
7. Protect Your Privacy When Publishing and Sharing Photos Online

Sharing photos is a wonderful way to communicate with friends and family. When you publish photos online, you typically want to make sure only the right people see them. Shown here is a sample Facebook album displayed on an iPad.
In this chapter, you’ll learn some of the popular ways you can share individual photos, photo albums, or galleries online, and discover how to avoid security and privacy pitfalls that could allow strangers to view and use the images you publish online. Topics include:
![]() Popular and secure options for storing, organizing, and sharing photos online
Popular and secure options for storing, organizing, and sharing photos online
![]() How and when to safely and appropriately use tagging, geotagging, and metadata
How and when to safely and appropriately use tagging, geotagging, and metadata
![]() How to keep photos that are stored online private
How to keep photos that are stored online private
![]() How to share photos with the general public without compromising your personal security or privacy
How to share photos with the general public without compromising your personal security or privacy
Every smartphone has between one and three built-in, high-resolution digital cameras, and all around the world, people use those cameras to shoot billions of images every day. Some of these photos are stored on the smartphone and never viewed again, while others are edited, archived, or digitally shared. Sharing photos is one of the most popular uses of social media services, and it’s a great way to share experiences and memories with friends and family.
The Internet offers a variety of services that allow people to store, organize, archive, and share their digital image collections online. The trick is choosing the best option, based on your objectives.
Some of these services (including Facebook and Instagram) are public forums where people can, if they choose, share their photos with everyone on the Internet, including total strangers. Other services let you “lock down” your images with privacy settings and then invite only specific people to view them.
By “locking down” images that are stored online, you’re able to use an online service’s permissions and privacy tools to prevent specific people from accessing and viewing your images. In some instances, you’re able to grant specific people permission to view your photos, but prevent them from downloading, editing, printing, or sharing them. By default, images you upload and publish on Facebook, for example, are public, but the Facebook service offers a handful of tools that allow you to make photos private or adjust the permissions associated with them. Some services, however, might not have privacy or adjustable permissions options.

Other services are designed for creating online albums or galleries that you can then invite specific people to view online, and in some cases, order prints and photo products featuring your images with a few mouse clicks or screen taps.

The Photos app that comes bundled with Windows 10 on PCs lets you create as many separate albums as you want and transform stagnant albums into slideshows.

Some cloud-based services are useful for organizing and archiving, or backing up, your digital photo library, and then keeping it private and secure so nobody but you can access your images.
Organizing Your Digital Image Library Can Take Time
Over time, you can build up your personal image library to include thousands of images, which you can organize into separate albums, galleries, or folders.
The Camera and Photos mobile apps bundled with your smartphone or tablet operating system, as well as the digital photography software that comes bundled with the Windows and MacOS operating systems for your computer, add metadata to your image files and include tools for automatically keeping your images well organized and easier to find and view later. For example, the software will organize images by the dates or location they were shot.
Anytime metadata is added or used to organize your images, make sure that when you share those images, only the appropriate metadata that you’re comfortable sharing is displayed. For example, your computer and mobile device will sort images by the time and date they were taken, where they were taken, and who appears within the images. You might not want to share a specific location or the names of people who appear in your photos. For example, if a photo of your grandchild is taken within their home, the Camera app stores that location as metadata. If you tag your grandchild’s name in that photo, their name also gets stored, which becomes part of the image’s digital file. If you publish that photo online in a public forum, and you do not remove the metadata information, you will inadvertently share your grandchild’s name, photo, and address online. Plus, the photo will become searchable online using your grandchild’s name.
You can use online services and social media services to create remote backups and online galleries or albums to showcase and share your images. It will take time and effort to ensure all your images are backed up properly, and that only the specific images or galleries you want to share are ultimately made available to other people.
You do this by tweaking the image-related metadata automatically generated by your camera—including the time, date, and location where the photo was taken. You’ll want to block certain metadata from being used in certain situations. For example, when you choose to display or share images online in a public forum, you might want to remove or lock metadata related to who appears in your images (often referred to as tagging), as well as the location where the image was shot (referred to as geotagging).
When you use multiple software packages and mobile apps and one or more online services to back up and share images, you need to keep track of where your photos are stored, where they’re backed up, and where they can be viewed by others.
You’re also responsible for deciding whether an image, or groups of images stored as an online album or gallery, will be accessible to the general public, to only a select group of people who you invite to see the images, or to just you.

After you invite specific people to view specific online galleries, you must adjust their permissions, which determines whether they can view, download, print, and share the images. Which service you use determines what permissions options are available to you. For example, you can’t set download or print permissions in Facebook. It’s possible to adjust or revoke these permissions at any time, but this, too, is something you must do manually.
Review Permissions
You should periodically review all your online albums to determine who is able to view them and what permissions have been granted to each person. Watch out for human error. Make sure the right people have access to only the intended albums and that each album contains only the images you intended to showcase.
Storing, Editing, Organizing, and Sharing Your Digital Images via the Cloud
The Photos software that comes bundled with your Windows 10 PC lets you view, edit, organize, archive, print, and share digital images. A similar application, also called Photos, comes bundled with the MacOS operating system. Although they share a common name and their functionality overlaps somewhat, these apps are different.
To take photos with your smartphone or tablet, you use an app called Camera. However, to view, edit, organize, archive, print, and share those images while using your mobile device, you use the Photos app that comes with your mobile device’s operating system. On some Android-based mobile devices, the Photos app is called Gallery.
If the features and functionality built in to the Photos software or mobile app on the equipment you’re using don’t offer everything you want or need, you have many third-party options.
Lock and Hide Photos Stored on Your Mobile Device
Apps are available from the App Store (iOS) and Google Play Store (Android) that let you hide images stored on your smartphone or tablet, plus add additional password protection to certain images, albums, or folders. Other free or low-cost apps that offer this functionality include Lock Pictures & Safe Photos, Private Photo Vault, Secret Photo Vault, and Secret Photo Album: Calculator Vault – Hide Photos.
These apps hide or lock down images stored on your mobile device only. They have no impact on images stored or synced with a cloud-based service.
Using Platform-Related Cloud Photo Storage and Sharing Options
Many options are available for online-based, digital photography–related services. If you’re a Windows PC user, Microsoft encourages you to use the Microsoft OneDrive cloud-based service (https://onedrive.live.com/about/en-us) to store your entire digital image library online and then sync it between your computer(s) and mobile device(s).
Mac, iPhone, and iPad users are encouraged to use Apple’s iCloud service (www.apple.com/icloud), whereas Google wants Android users to use the Photos/Galleries app that integrates seamlessly with the Google Photos online service (https://photos.google.com).
All these services handle the same basic tasks and offer the same types of tools for managing and syncing all aspects of your digital photo library. One benefit to syncing your images with a cloud-based service is that the service automatically maintains a remote backup of your images, so if your computer or mobile device gets lost, stolen, or damaged, or if you upgrade your device, all your digital images remain safely stored online.
Another benefit is that after your photo collection is stored in the cloud, you can set up your account and each of your computers and mobile devices to sync your photos simultaneously—as long as each computer and mobile device is linked with the same cloud-based account and connected to the Internet. If you snap a photo on your smartphone while you’re out and about, by the time you get home, a copy of that image will be available on your computer.
Security in the Cloud
All cloud-based services allow you to create a unique username (or use your email address), as well as a password for your account. However, some services offer added security protection, such as two-factor authentication and automatically encrypting all your digital image files. Choose a service that offers the level of security and protection you want, based on the types of photos you’ll be storing. For example, you may want to add a separate password to each album you plan to share, so only those with the correct password can access it.
What if you use a Windows PC, but also have an iPhone? By adding optional software to your devices, such as Apple iCloud, Google Photos, or Microsoft OneDrive, you can securely sync your entire digital photo library among all your computers and mobile devices as long as they’re synced to the same cloud-based account. After you choose which online service you want to use, you need only one account for all your computers and mobile devices.
When using a cloud-based service to store your photos, make sure you understand how that service’s sharing features work so you’re able to share specific images or albums with specific people, but keep the rest of your digital photo library private and secure. The cloud-based service you opt to use offers its own collection of sharing, permissions, and privacy tools that you’ll want to familiarize yourself with before you begin sharing files.
Using Third-Party Cloud Photo Storage and Sharing Options
In addition to Apple iCloud, Google Photos, and Microsoft OneDrive, many third-party (independent) online services are designed for managing your digital image library online. Some of the more feature-packed and popular options include:
Amazon Prime Photos: www.amazon.com/photos
Flickr: www.flickr.com
Photobucket: www.photobucket.com
Shutterfly: www.shutterfly.com
Smugmug: www.smugmug.com
Snapfish: www.snapfish.com

Use Shutterfly’s Share Sites Feature
All the online-based photo sharing services, as well as the social media services, offer their own collection of tools for sharing photos and albums. Each offers you a different level of control over the images. Shutterfly.com is just one popular photo-sharing service that offers this functionality.

This image is part of an album being stored and shared via shutterly.com. The person viewing this picture clicked the Share icon and can now share the image. Sharing options include via email, a unique link on Shutterfly, transfer to another site, or Facebook.
One free feature that Shutterfly offers is the ability to make a special Share Site. This is a way to create albums of photos and share the album with specific people, but have greater control over the Permissions for the people viewing each album.

With the Share Sites feature, you can customize the appearance of your Share Site, which is basically your own unique webpage. After uploading your photos and formatting the online gallery webpage on which your images will be seen, click the gear-shaped Settings icon to access the Settings menu.

Click the Edit Site Permissions option to access the Site Permissions menu. From here, you’re able to personalize the online gallery’s settings and control who can see your images and what viewers can do while viewing your album.

Cloud-Based File Sharing Services Work, Too
In Chapter 8, “Safely Store Data, Documents, and Files in the Cloud,” you’ll learn about general-purpose, cloud-based, file sharing services, including Box (www.box.com), Dropbox (www.dropbox.com), and SugarSync (www.sugarsync.com).
These services can also be used to back up, sync, and share your digital photo library, but they lack the tools for creating online albums or galleries and don’t have an online-based photo lab. On these services, your images are stored in folders, each of which you can custom name and password protect.
Choosing a Cloud-Based Photo Storage and Sharing Service
Most all the cloud-based services designed to back up, sync, and share digital images start off being free. When you set up an account, you are allotted a predetermined amount of online storage space, which is typically enough to securely store thousands of digital images.
However, as your personal digital image library expands, so will your online storage needs. When you reach the capacity of the free storage space, you’ll need to pay a monthly or annual fee for additional space.
Consider Your Needs First
Make sure the service you choose offers adjustable privacy settings that allow you to lock down and make certain photos totally private, while allowing you to share specific images or albums with individuals you select.
Other considerations when choosing a cloud-based service for your digital photography storage, syncing, and sharing needs include:
Storage resolution: If you’re using a cloud-based service to maintain a backup of your images, make sure that the service you choose does not automatically reduce the resolution or file sizes of your images to conserve storage space. You want to maintain the same resolution your digital images were originally shot in.
Ease of use: Ideally, you want the cloud-based service to be easy to use and intuitive, but also handle all the tasks you require, including helping you organize, manage, showcase, and share your digital images.
Functionality: Although all the popular cloud-based services for digital photography allow you to back up and sync your images across your computers and mobile devices, pay attention to the tools offered that let you edit individual images, create separate albums or galleries, and share albums or galleries with other people in a private and secure way.
Photo sharing functionality: You want maximum control over who will be able to see your images and what those people will be able to do after they access your images. Some services include tools for quickly creating visually stunning and highly personalized albums, galleries, or animated slideshows. You want the ability to create an unlimited number of separate albums or galleries, and then to choose who can view them. For example, for your grandson’s birthday photos, you might want to share those with just your relatives, but for the gallery that showcases images from your last cruise vacation, you might want to share those with friends and family members, plus a few members of your book club. At the same time, you want security tools to lock down images you don’t want to share.
Printing capabilities: For convenience, it’s great to work with a cloud-based service that’s linked with an online-based photo lab so you or the people invited to view your images can easily order prints, enlargements, or custom photo products. That being said, most of the cloud-based services that don’t have their own online-based photo lab offer seamless integration with an independent photo lab. However, pricing varies a lot, so choose a service that offers competitive pricing but that creates prints using the best quality inks and photo papers.
Security: All cloud-based services allow you to create a unique username (or use your email address), as well as a password for your account. However, some services offer added security protection, such as two-factor authentication and automatically encrypting all your digital image files. Choose a service that offers the level of security and protection you want, based on the types of photos you’ll be storing. For example, you may want to add a separate password to each album you plan to share, so only those with the correct password can access it.
Sharing Photos via Social Media
If you want to share images online with people who are active on social media, you have a variety of options, including Facebook, Instagram, Twitter, and Pinterest.
Of all the social media services, Facebook (www.facebook.com) offers the most robust toolset for creating and sharing an unlimited number of separate and highly personalized online albums. You can then manage who is able to view each album and control the security and permissions-related features.
Instagram (www.instagram.com) and Twitter (www.twitter.com) are better suited for sharing one or just a few images at a time, but these are considered public forums, so when you publish a photo as part of your Instagram or Twitter feed or as part of an online “story,” anyone can potentially find and view those images.
One reason people like using Instagram to share photos from their mobile device is because you can quickly take a photo, edit it using powerful but easy-to-use tools, and then share it, all from a single app. Another popular social media service for sharing groups of similarly themed photos is Pinterest (www.pinterest.com).
When sharing photos on a social media service from a mobile device, you’ll want to use the official app for the service. The official Facebook, Instagram, Pinterest, and Twitter mobile apps offer easy access and offer a collection of tools for viewing, editing, managing, and sharing individual photos or albums/galleries online.
Before you begin sharing any content on a social media service, be sure to adjust the privacy settings for your account to a level you’re comfortable with. As of early-2019, Facebook offered the most elaborate collection of security and privacy features associated with sharing photos and content online. Be sure to visit www.facebook.com/privacy after you set up your Facebook account, and then adjust the options associated with each menu and submenu option.
If you are an Instagram user, adjust your account privacy and security settings at www.instagram.com/accounts/privacy_and_security. For Twitter, adjust your account-related settings by visiting https://twitter.com/settings/personalization.
Why Not Just Use Email?
You may be thinking that if you want to share photos only with one or two other people, why not just email those images as an attachment to the email message?
The answer for this is simple. An email message has a maximum file size that you can send. Your digital images were probably shot at a high resolution and have a large file size, but a typical email message can hold only a few high-resolution images before reaching capacity.
If you have one or two images to share, sending them via email will work great. But if you want to share a collection of photos, you’ll need to store them online and then invite people to view them.
Uploading a Photo to Your Instagram Account
Instagram is very much like Twitter, in that each posting is short. Instagram is designed to showcase just one image or video clip (or up to 10 photos or video clips) per post, in conjunction with a text-based caption and related photo meta-data (including where the photo was taken and who appears within the image).
Create an Instagram Post
Instagram was designed to be used primarily from a mobile device with the official Instagram mobile app. Using this app, follow these steps to create a post that includes one photo. This example shows an iPhone, although the Android version of the app is very similar.
![]() Launch the Instagram mobile app (not shown).
Launch the Instagram mobile app (not shown).
![]() Tap the “+” icon that’s displayed at the bottom-center of the screen to compose a new post.
Tap the “+” icon that’s displayed at the bottom-center of the screen to compose a new post.

![]() At the top-center of the screen, tap the All Photos option to select images from a specific album within the Photos app. Otherwise, from the bottom-half of the screen, scroll down and tap the image you want to post that’s currently stored within the All Photos album.
At the top-center of the screen, tap the All Photos option to select images from a specific album within the Photos app. Otherwise, from the bottom-half of the screen, scroll down and tap the image you want to post that’s currently stored within the All Photos album.

![]() Tap the Zoom icon in the bottom-left corner of the image preview area to switch between a default square-shaped image and a rectangular image, and then use a pinch or reverse-pinch finger gesture directly on the image preview to zoom in or out. After doing this, place one finger on the image to drag it around and reframe it, if necessary.
Tap the Zoom icon in the bottom-left corner of the image preview area to switch between a default square-shaped image and a rectangular image, and then use a pinch or reverse-pinch finger gesture directly on the image preview to zoom in or out. After doing this, place one finger on the image to drag it around and reframe it, if necessary.
![]() Tap the Next option to continue. However, if you want to include up to 10 images or video clips within a single post, tap the multiple image icon that’s displayed in the bottom-right corner of the selected image that’s displayed on the top-half of the screen; then one at a time, tap up to 10 image thumbnails to select them. Tap the Next option to continue.
Tap the Next option to continue. However, if you want to include up to 10 images or video clips within a single post, tap the multiple image icon that’s displayed in the bottom-right corner of the selected image that’s displayed on the top-half of the screen; then one at a time, tap up to 10 image thumbnails to select them. Tap the Next option to continue.

![]() To add a special effect filter to the image, scroll along the filter thumbnails displayed near the bottom portion of the screen and tap the one you want to apply to the entire image. There are more than 20 filters to choose from. The default option is Normal, which means no filter will be applied to the image. You can only choose one filter per image. Tap the Next option to share the image, or tap the Edit option to continue editing it using other tools.
To add a special effect filter to the image, scroll along the filter thumbnails displayed near the bottom portion of the screen and tap the one you want to apply to the entire image. There are more than 20 filters to choose from. The default option is Normal, which means no filter will be applied to the image. You can only choose one filter per image. Tap the Next option to share the image, or tap the Edit option to continue editing it using other tools.
![]() To edit the image using the Instagram mobile app’s powerful, yet easy-to-use image editing tools, tap the Edit option.
To edit the image using the Instagram mobile app’s powerful, yet easy-to-use image editing tools, tap the Edit option.

![]() Choose the editing tool you want to use by swiping horizontally across the menu to scroll through the options, and then tap on one option.
Choose the editing tool you want to use by swiping horizontally across the menu to scroll through the options, and then tap on one option.

![]() One at a time, use as many different editing tools as you want. For example, you can use the Saturation tool (shown) to enhance the colors within an image to make them appear more vivid, and then use the Vignette tool to darken the outer edges of the image that draws more focus onto your subject. As you apply each editing tool, you’ll see its impact on the selected image that’s displayed at the top of the screen. After using each tool, tap the Done option to save your changes, or tap the Cancel option to erase the last edit and return to the edit menu.
One at a time, use as many different editing tools as you want. For example, you can use the Saturation tool (shown) to enhance the colors within an image to make them appear more vivid, and then use the Vignette tool to darken the outer edges of the image that draws more focus onto your subject. As you apply each editing tool, you’ll see its impact on the selected image that’s displayed at the top of the screen. After using each tool, tap the Done option to save your changes, or tap the Cancel option to erase the last edit and return to the edit menu.

![]() Tap the Next option displayed in the top-right corner when you’re done using the editing tools. (Not shown.)
Tap the Next option displayed in the top-right corner when you’re done using the editing tools. (Not shown.)
![]() From the New Post window, add a text-based caption. Tap the Write a Caption area of the screen and use the mobile device’s virtual keyboard to type your caption.
From the New Post window, add a text-based caption. Tap the Write a Caption area of the screen and use the mobile device’s virtual keyboard to type your caption.
![]() Tap the Tag People option to add the names of the people who appear within your image. When you do this, each person’s name will be displayed, and the information will become searchable.
Tap the Tag People option to add the names of the people who appear within your image. When you do this, each person’s name will be displayed, and the information will become searchable.
![]() Tap the Add Location option to include a geotag with the post. This will display where the image was taken.
Tap the Add Location option to include a geotag with the post. This will display where the image was taken.
![]() If you also have a Facebook, Twitter, and/or Tumblr account, you can simultaneously post your photos on these services, at the same time they’re posted on Instagram. Turn on the virtual switch associated with each service to do this.
If you also have a Facebook, Twitter, and/or Tumblr account, you can simultaneously post your photos on these services, at the same time they’re posted on Instagram. Turn on the virtual switch associated with each service to do this.
![]() When you’re ready to publish the Instagram post you just created, tap the Share option. Your images will be uploaded, and the new post will be added to your Instagram feed and visible to your online friends and followers—as well as potential strangers, unless you make your account private.
When you’re ready to publish the Instagram post you just created, tap the Share option. Your images will be uploaded, and the new post will be added to your Instagram feed and visible to your online friends and followers—as well as potential strangers, unless you make your account private.

Create a Personalized Online Album on Facebook
One of the fastest, easiest, and most secure ways to showcase groups of photos is to create online galleries or albums. If you’re already active on Facebook, sharing personalized online-based albums is one of the most popular uses of this social media service.

This sample Facebook album includes a selected group of images that only certain other Facebook users have access to. The album is unavailable to everyone else.
After you set up a free Facebook account, you’re able to create an unlimited number of separate online albums, choose specifically which images you want to showcase in each album, personalize the information about the album and each image, and then determine exactly who will be able to view the album and what additional options will be available to the invited viewers.
Here’s how to create and share a Facebook album using a web browser on your Internet-connected computer. Keep in mind that you can also create albums using the official Facebook mobile app.
![]() On your Internet-connected computer, launch a web browser, access Facebook (www.facebook.com), and sign in to your account.
On your Internet-connected computer, launch a web browser, access Facebook (www.facebook.com), and sign in to your account.
![]() Click the Photo/Video Album option that appears above the What’s On Your Mind? box.
Click the Photo/Video Album option that appears above the What’s On Your Mind? box.

![]() In the Open window, highlight and select the images stored on your computer or connected media that you want to upload and share on Facebook as part of a newly created album. To select multiple photos at once when using a Windows PC, hold down the Ctrl key when highlighting and selecting photos or photo listings to be uploaded to Facebook. On a Mac, hold down the Shift key.
In the Open window, highlight and select the images stored on your computer or connected media that you want to upload and share on Facebook as part of a newly created album. To select multiple photos at once when using a Windows PC, hold down the Ctrl key when highlighting and selecting photos or photo listings to be uploaded to Facebook. On a Mac, hold down the Shift key.

![]() After the image files are highlighted, click Open. The images upload to Facebook.
After the image files are highlighted, click Open. The images upload to Facebook.

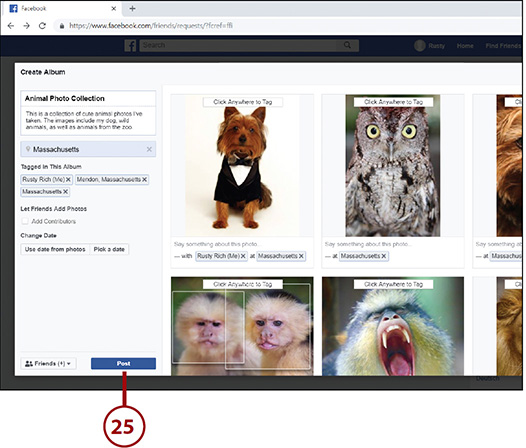
![]() The left column of the Create Album window shows fields for typing in information you want displayed and made public. Type in the Album name, which should be a descriptive title for the entire album.
The left column of the Create Album window shows fields for typing in information you want displayed and made public. Type in the Album name, which should be a descriptive title for the entire album.
![]() Click the Description field, and type a text-based description of the album. This can be a sentence or two that describes the images being featured in the album.
Click the Description field, and type a text-based description of the album. This can be a sentence or two that describes the images being featured in the album.
![]() The Location (geotag) information that is already linked to the digital images is imported to Facebook at the same time your images are uploaded. If you want to display this location information, leave the location field as is.
The Location (geotag) information that is already linked to the digital images is imported to Facebook at the same time your images are uploaded. If you want to display this location information, leave the location field as is.

![]() When you add a geotag to the entire album or an individual photo, that information is displayed below the image. To remove the location information, click the X icon to the right of the location tag.
When you add a geotag to the entire album or an individual photo, that information is displayed below the image. To remove the location information, click the X icon to the right of the location tag.

![]() If you want the online friends you invite to see your album to be able to upload their own photos to your album, click the Add Contributors option, and then type the names of your Facebook friends who should be allowed to contribute photos to the album. (Remove the check mark from this option to prevent others from being able to add images.)
If you want the online friends you invite to see your album to be able to upload their own photos to your album, click the Add Contributors option, and then type the names of your Facebook friends who should be allowed to contribute photos to the album. (Remove the check mark from this option to prevent others from being able to add images.)
![]() Below the Change Date heading, decide whether you want to import the date/time each photo was taken (the metadata from each image), or if you want to override this information with new information. To use metadata from the images, click the Use Date from Photos button. To add your own date for the album, click the Pick a Date button.
Below the Change Date heading, decide whether you want to import the date/time each photo was taken (the metadata from each image), or if you want to override this information with new information. To use metadata from the images, click the Use Date from Photos button. To add your own date for the album, click the Pick a Date button.
![]() Click the Friends button in the lower-left corner of the Create Album window.
Click the Friends button in the lower-left corner of the Create Album window.

![]() From the Who Should See This? drop-down menu, choose the audience you want to be able to access your album. Options include Public, Friends, Friends Except, Only Me, or Specific Friends. You can always change this option later.
From the Who Should See This? drop-down menu, choose the audience you want to be able to access your album. Options include Public, Friends, Friends Except, Only Me, or Specific Friends. You can always change this option later.

![]() Don’t click the Post button just yet! Instead, move your attention to the right side of the Create Album window, and one at a time, add or edit the tag-related metadata associated with each image. (Not shown.)
Don’t click the Post button just yet! Instead, move your attention to the right side of the Create Album window, and one at a time, add or edit the tag-related metadata associated with each image. (Not shown.)
![]() Click a photo to tag people in that photo. This means you associate names with the faces.
Click a photo to tag people in that photo. This means you associate names with the faces.
![]() In the Start Typing a Name field, type the name of the person featured in the photo if you want their name to be associated with the image and become searchable. Whether or not you tag people in your photos is a personal decision, based on the level of privacy you want for yourself and the people in your photos.
In the Start Typing a Name field, type the name of the person featured in the photo if you want their name to be associated with the image and become searchable. Whether or not you tag people in your photos is a personal decision, based on the level of privacy you want for yourself and the people in your photos.

![]() When you tag photos with one or more names, that information appears below the image. Click the X icon for a name tag to remove it.
When you tag photos with one or more names, that information appears below the image. Click the X icon for a name tag to remove it.
![]() Click the Say Something About This Photo field, and type a text-based caption for that specific image that you want people to see and that will become searchable. This is separate from the album title and description you created in steps 5 and 6.
Click the Say Something About This Photo field, and type a text-based caption for that specific image that you want people to see and that will become searchable. This is separate from the album title and description you created in steps 5 and 6.
Metadata Will Be Imported Automatically
If you’ve already used photo editing software on your computer or mobile device to add metadata information, such as a tag or caption, to the image, this metadata will be imported automatically into Facebook when you upload your images. If this is the case, you can edit this information before clicking the Post button.
![]() Click the gear-shaped Settings icon displayed near the lower-right corner of each image to access its Settings menu.
Click the gear-shaped Settings icon displayed near the lower-right corner of each image to access its Settings menu.

![]() Click the Edit Location option to add, edit, or delete the location that will be associated with the individual image—if it’s different from the rest of the album. Click the Change Date option to add, edit, or delete the date associated with the individual photo.
Click the Edit Location option to add, edit, or delete the location that will be associated with the individual image—if it’s different from the rest of the album. Click the Change Date option to add, edit, or delete the date associated with the individual photo.
![]() When you create a new album, you can use one photo as that album’s cover image. Choose one image from the album, and from that image’s Settings menu, click the Make Album Cover option to make the selected image the Album Cover Image.
When you create a new album, you can use one photo as that album’s cover image. Choose one image from the album, and from that image’s Settings menu, click the Make Album Cover option to make the selected image the Album Cover Image.

![]() Repeat steps 12 through 19 for each image you plan to add to the album. (Not shown.)
Repeat steps 12 through 19 for each image you plan to add to the album. (Not shown.)
![]() To add more images to the album, in the Create Album window, scroll down and click the + Add Photos/Video box, or click the + Add Photos/Videos button near the upper-right corner of the window.
To add more images to the album, in the Create Album window, scroll down and click the + Add Photos/Video box, or click the + Add Photos/Videos button near the upper-right corner of the window.
![]() To automatically rearrange the image order based on the date/time each image was taken, click the Order by Date Taken button. Click the button again to toggle between ascending and descending order.
To automatically rearrange the image order based on the date/time each image was taken, click the Order by Date Taken button. Click the button again to toggle between ascending and descending order.

![]() To manually change the order of the images, press and hold the left mouse button, drag the image to the desired location, and then release the mouse button. Keep doing this with various images until they appear in the order you want them to be seen. (Not shown.)
To manually change the order of the images, press and hold the left mouse button, drag the image to the desired location, and then release the mouse button. Keep doing this with various images until they appear in the order you want them to be seen. (Not shown.)
![]() When all the information related to the album, and each image has been added or edited, and you’re happy with the order the images will appear, click the Post button.
When all the information related to the album, and each image has been added or edited, and you’re happy with the order the images will appear, click the Post button.
![]() Depending on the image file sizes, your new album will become part of your Facebook account and available to the audience you selected within a few seconds to several minutes. Confirm that you’ve uploaded the correct photos and adjusted the sharing and permissions-related options correctly. (Not shown.)
Depending on the image file sizes, your new album will become part of your Facebook account and available to the audience you selected within a few seconds to several minutes. Confirm that you’ve uploaded the correct photos and adjusted the sharing and permissions-related options correctly. (Not shown.)
![]() After the album is published, it is stored online as part of your Facebook account’s Photos collection. You can access it anytime to view your images or to edit settings or information related to the album. This is what an album looks like after it’s published online.
After the album is published, it is stored online as part of your Facebook account’s Photos collection. You can access it anytime to view your images or to edit settings or information related to the album. This is what an album looks like after it’s published online.

![]() You or anyone viewing your album can click any image to see an enlarged version of it, along with all its metadata. At this point, if you invited specific people to view your album, they will receive an invitation from Facebook. While viewing an image, people can “Like” the image, add a comment to it, or share the image with their online friends.
You or anyone viewing your album can click any image to see an enlarged version of it, along with all its metadata. At this point, if you invited specific people to view your album, they will receive an invitation from Facebook. While viewing an image, people can “Like” the image, add a comment to it, or share the image with their online friends.

![]() In Album view, viewers can scroll down to the end of the page to “Like” or add a comment to the album instead of individual images.
In Album view, viewers can scroll down to the end of the page to “Like” or add a comment to the album instead of individual images.

Another Facebook Option
In addition to sharing photos and online albums using your regular Facebook account, if you regularly want to share photos and interact with groups of people (which gives them the opportunity to share photos and interact with you, as well), create an invitation-only Facebook Group just for those people and lock it down so only the people you invite to participate can access the content that’s shared.
Start by creating your personal Facebook account, and then follow the directions described here: www.facebook.com/help/167970719931213. Be sure you adjust the Privacy Settings correctly to make your Facebook Group private. Information on how to do this can be found at www.facebook.com/help/220336891328465.