
8. Safely Store Data, Documents, and Files in the Cloud

Cloud-based file sharing services, such as Dropbox (shown here), let you back up your important files, and in some cases, share specific files with others. To protect your security and privacy, you’ll need to take a few simple steps.
In this chapter, you’ll learn how you can use cloud-based file sharing services, including Microsoft OneDrive, Apple iCloud, Box, and Dropbox, to safely and securely back up and share your data, documents, and files. Topics include:
![]() Choosing a secure cloud-based file sharing service
Choosing a secure cloud-based file sharing service
![]() Organizing and managing your files
Organizing and managing your files
![]() Uncovering security concerns related to cloud-based file sharing services
Uncovering security concerns related to cloud-based file sharing services
![]() Learning tips for safely using cloud-based file sharing services
Learning tips for safely using cloud-based file sharing services
Your computer, whether it’s a Windows PC or Mac, has an internal hard drive in which your data, documents, files, photos, and other content are stored. You may also use an external hard drive or flash drive connected to your computer (via its USB port, for example) for additional storage space or for creating and maintaining a backup of your data. This is referred to as local storage, and does not require the Internet.
Your smartphone or tablet also has internal storage, where all your mobile apps, as well as your data, documents, files, and photos are stored.
Local storage is secure as long as nobody gains direct access to your computer, external hard drive, flash drive, or mobile device.
Local Versus Remote Storage
Local storage refers to your computer’s internal hard drive or your mobile device’s internal storage, as well as any external hard drives or flash drives that are physically connected to your computer or linked via a Bluetooth wireless connection. Your content is stored locally and does not require the Internet to access it.
When something is stored remotely in the cloud, it’s stored online, on a server potentially located away from your computer. Accessing remotely stored content requires an Internet connection.
Benefits of Using Cloud Storage
Until a few years ago, a common way to transfer data, documents, photos, or files from one computer to another or between your computer and your own mobile device involved physically connecting the equipment together via a USB cable, and then manually copying the data from one place to another.
When cloud-based computing started to become mainstream, storing content remotely became much more commonplace and convenient. Today, the operating system that runs on your computer and mobile device is seamlessly integrated with a cloud-based service, allowing for data to easily and securely be backed up, synced, stored, and shared via the Internet.
Think of the cloud-based service that your computer or mobile device connects with as an external hard drive that’s located somewhere in cyberspace. If the equipment you’re using has Internet access, data can be quickly uploaded or downloaded as needed via your cloud-based account. So, instead of (or in addition to) storing all your data locally in your computer’s hard drive or your mobile device’s internal storage, data is stored on remote servers located somewhere in cyberspace.
Using a cloud-based service to store and share data is referred to as “cloud computing,” and it offers some potential benefits, especially because the operating systems that run your computer and mobile devices are now seamlessly integrated with one or more of these services. This integration allows much of the cloud-based computing functionality to happen automatically in the background after initial setup.
Computer operating system developers such as Apple, Google, and Microsoft have devised cutting-edge and convenient ways to easily and securely use cloud-based services to handle everyday tasks, such as the following:
Maintaining a remote backup of your computer or mobile device’s contents.
Being able to sync software or app-specific data, documents, and files among all your computers and mobile devices in real time.
Protecting your important data that’s stored online using password protection and encryption, so if something happens to your computer or mobile device, you know your remote backup is safely stored on the Internet.
Sharing large amounts of content between yourself and other people, regardless of what type of equipment each person is using. This includes large documents and files, as well as all sorts of multimedia content (including digital music, video, and photo files).
Collaborating in real time with other people on the creation or editing of a document or file.
Many software applications, such as all those that are part of Microsoft Office (Word, Excel, PowerPoint, and so on) and Apple’s iWork apps (Pages, Numbers, and Keynote), allow for real-time collaboration using a compatible cloud-based service (OneDrive and iCloud, respectively). Dropbox also offers its own online-based collaboration tool, called Paper. This real-time collaboration is possible because the content you’re working with is securely synced and shared via a cloud-based service.
The trick to secure online collaborations is to make sure you’re working with the right people at any given time, and that the person who initiates the collaboration maintains control over the file-related permissions for the work being collaborated on.
Understanding Important Cloud Computing Concepts
Before you begin using any cloud-based service effectively, you need to understand a few core concepts:
Using any cloud-based service requires an Internet connection. If no Internet is available, you won’t be able to send, receive, or sync data in real time.
Regardless of what computer or mobile device equipment you’re using, you need only one cloud-based account. You then need to link each of your own computers and mobile devices to that single account so data can be exchanged (synced) freely.
When you begin using a cloud-based service, each of your computers and mobile devices need to be set up separately to use the selected service, although you’ll use the same account username and password. If all the settings are not set up the same way on each of your computers and mobile devices, your data won’t sync properly.
Using a cloud-based service is optional. If you prefer, you can continue to store all content locally and use older methods for transferring content between your computers or mobile devices that don’t necessarily require the Internet. However, many people find that much less convenient.
If an unauthorized person acquires your cloud service username and password, that person will gain access to all your content that’s stored online. Protect your username and password, and change your password periodically.
When you share content that’s stored in the cloud with other people, confirm and reconfirm you’ve selected to share the correct files (filenames can appear similar) and that you’ve entered the correct name and email address for the people you intend to share content with.
Two-Factor Authentication
Turn on two-factor authentication for cloud-based accounts. Most cloud-based services also work with USB security keys, like those available from Yubico (www.yubico.com) and Google (https://store.google.com/us/product/titan_security_key_kit). To turn on the two-factor authentication feature, access the Settings menu for the account, and then select the Security (or equivalent) option.
All cloud-based file sharing services can be used as the equivalent of a remote hard drive for storing content. However, the operating system for your computer or mobile device, as well as specific software or mobile apps you use, can be set up to use the same cloud-based service to handle a wide range of specialized tasks automatically. The goal is to make all your important data readily available to you, when and where you want it, in a secure and convenient way.
Suppose you start composing a Microsoft Word document on your Windows PC. If you have an Office 365 account with Microsoft and use the OneDrive cloud-based service, you can stop working on that document at any time and immediately pick up exactly where you left off on your smartphone, tablet, or any other computer (including a Mac) that’s linked to the same Office 365 and OneDrive accounts. There’s no need to manually copy, sync, or transfer the file. The cloud service and the software or mobile app you’re using does everything automatically after you do the one-time setup.
This seamless computing capability also applies to a wide range of other applications, including your web surfing. You can begin surfing the web on one computer or mobile device, and pick up exactly where you left off on another. All your web browser bookmarks, for example, will sync between your own computers and mobile devices.
Meanwhile, if you happen to take a photo on your smartphone, add contact information to the Contacts app for someone you just met, or create a new event using the Calendar app, that information will automatically and almost immediately sync among all your computers and mobile devices, so you’re always accessing the most up-to-date information and content.
Configuring Cloud-Based Services
Chapter 7 introduced using the cloud computing capabilities of the major operating system platforms and their respective mobile devices and computers to share photos.
In recent years, all the popular, company-specific cloud-based services have become cross-platform compatible, but you’ll need to install free software or a mobile app to add this functionality. For example, to integrate Microsoft OneDrive functionality to your Mac, you’ll need to install the Microsoft OneDrive software. Likewise, to use Apple iCloud functionality with your Windows PC, you’ll need to install the iCloud for Windows software.
Choose One Cloud-Based Service
To avoid a lot of confusion, choose one cloud-based service, and then connect all your computers and mobile devices to that one service, using the same account username and password.
If you want to use a cloud-based service that was designed from the ground up to work with all the popular computer and mobile device operating systems, two of the most popular options for consumers are Dropbox (www.dropbox.com) and Box (www.box.com).
These services offer computer software and a mobile app that let you use the service from any type of equipment, and freely transfer, sync, and back up data between Windows PCs, Macs, and all popular mobile devices. However, for added convenience, these services can also be managed from any computer or mobile device web browser by visiting the service’s website and signing in to your account.
Set Up OneDrive Functionality on Your Windows PCs
Microsoft OneDrive was designed to work with Windows PCs and handle a wide range of tasks controlled by the operating system, Microsoft applications (including all Microsoft Office applications), and third-party applications that support OneDrive. However, you need to initially turn on and set up OneDrive functionality on each of your computers. To do this, follow these steps:
![]() Turn on your Windows PC and click the Windows icon in the lower-left corner of the screen.
Turn on your Windows PC and click the Windows icon in the lower-left corner of the screen.
![]() Scroll down the alphabetical Applications listing and click the OneDrive option.
Scroll down the alphabetical Applications listing and click the OneDrive option.

![]() Follow the onscreen prompts to create a new Microsoft OneDrive account (if you don’t yet have one) or sign in to your existing OneDrive account. If you already have a OneDrive account but can’t remember which email address was used to set up the account, or you don’t remember your password, use Microsoft’s tools for retrieving this information instead of setting up new account. (Not shown.)
Follow the onscreen prompts to create a new Microsoft OneDrive account (if you don’t yet have one) or sign in to your existing OneDrive account. If you already have a OneDrive account but can’t remember which email address was used to set up the account, or you don’t remember your password, use Microsoft’s tools for retrieving this information instead of setting up new account. (Not shown.)
![]() As soon as OneDrive is set up to work on a Windows PC, a separate OneDrive folder is created and becomes accessible. Anything you place in this folder will be stored in the cloud and become accessible from all your other computers and mobile devices that are linked to the same OneDrive account. In this master OneDrive folder, you can create an unlimited number of subfolders to organize your files and content. In some cases, this will be done for you automatically by the applications you use that are OneDrive compatible. By default, a Documents, Email Attachments, Music, Pictures, and Public folder are set up for you.
As soon as OneDrive is set up to work on a Windows PC, a separate OneDrive folder is created and becomes accessible. Anything you place in this folder will be stored in the cloud and become accessible from all your other computers and mobile devices that are linked to the same OneDrive account. In this master OneDrive folder, you can create an unlimited number of subfolders to organize your files and content. In some cases, this will be done for you automatically by the applications you use that are OneDrive compatible. By default, a Documents, Email Attachments, Music, Pictures, and Public folder are set up for you.

![]() One way to access the OneDrive folder anytime moving forward is to open the Windows File Explorer.
One way to access the OneDrive folder anytime moving forward is to open the Windows File Explorer.
![]() Click the OneDrive listing on the left side of the File Explorer window.
Click the OneDrive listing on the left side of the File Explorer window.
![]() Click the subfolder you want to open; in this case, Pictures.
Click the subfolder you want to open; in this case, Pictures.

![]() In the Pictures subfolder, the icon under each filename indicates the status of that file (Online Only, Available On This Device, or Important).
In the Pictures subfolder, the icon under each filename indicates the status of that file (Online Only, Available On This Device, or Important).

You can access and treat files stored in your OneDrive account just like any other file. For example, you can drag (or copy and paste) them to other locations, rename them, open them, and/or share them with others.
Set Up iCloud Functionality on Your Macs
All Apple computer or iPhone/iPad users need to create an Apple ID account when they first set up their equipment. Each person needs just one Apple ID for all their Apple equipment. Your Apple ID username (the email address used to set up the account) and password are used to access the free iCloud account that Apple has automatically set up for you.
To set up and manage iCloud from the Mac you’re using, follow these steps:
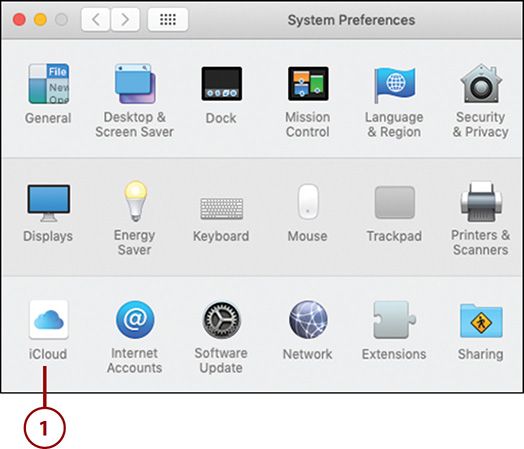
![]() Turn on your Mac, launch System Preferences, and click the iCloud icon.
Turn on your Mac, launch System Preferences, and click the iCloud icon.
![]() If you haven’t already done so, sign in to your iCloud account by entering the email address used to set up your Apple ID account, and then provide your Apple ID password. For help recovering your Apple ID account details, visit https://appleid.apple.com.
If you haven’t already done so, sign in to your iCloud account by entering the email address used to set up your Apple ID account, and then provide your Apple ID password. For help recovering your Apple ID account details, visit https://appleid.apple.com.
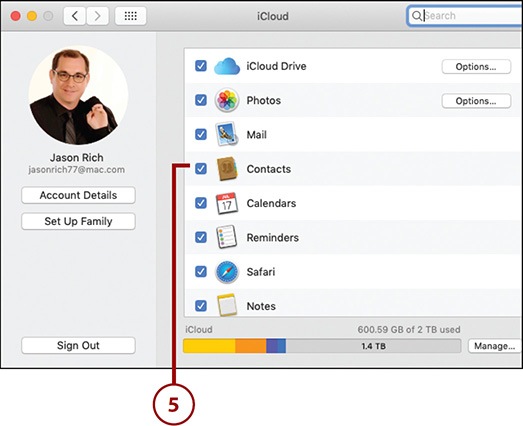
![]() On the right side of the iCloud Control Panel are a handful of listings for iCloud functions. Select each option you want to activate.
On the right side of the iCloud Control Panel are a handful of listings for iCloud functions. Select each option you want to activate.

![]() For iCloud to function properly, you must access the iCloud Control Panel on each of your own Macs and mobile devices and adjust the iCloud Control Panel settings the same way. (Not shown.)
For iCloud to function properly, you must access the iCloud Control Panel on each of your own Macs and mobile devices and adjust the iCloud Control Panel settings the same way. (Not shown.)
![]() If you want data from the Contacts app to sync with iCloud and all your Macs, as well as your iPhone and iPad, select the Contacts option listed in the iCloud Control Panel on each of your computers, and click the Contacts virtual switch to enable it on your iPhone (shown here) and/or iPad that are linked to the same iCloud account.
If you want data from the Contacts app to sync with iCloud and all your Macs, as well as your iPhone and iPad, select the Contacts option listed in the iCloud Control Panel on each of your computers, and click the Contacts virtual switch to enable it on your iPhone (shown here) and/or iPad that are linked to the same iCloud account.
![]() After you turn on iCloud functionality for each of the MacOS-related apps and functions, app-specific data for that app will automatically sync with iCloud. This happens in the background. (Not shown.)
After you turn on iCloud functionality for each of the MacOS-related apps and functions, app-specific data for that app will automatically sync with iCloud. This happens in the background. (Not shown.)

Sharing Content with Others from iCloud Drive
iCloud Drive provides a virtual hard drive storage area in which you can store any type of content (documents, files, photos, and so on). After content is stored in iCloud Drive, it becomes readily accessible from all your own computers and mobile devices linked with your iCloud account. Plus, you can select specific files or folders stored in iCloud Drive and use the Share menu options to share the content with specific people securely.
Using iCloud with Other MacOS Apps
The MacOS operating system comes with a collection of apps that work seamlessly with iCloud. One added feature available to iCloud users is the iCloud website (www.icloud.com).
When you sign in to this service using your Apple ID username and password, you have full access to online-based versions of core apps that come bundled on your Mac, iPhone, and/or iPad.
By turning on iCloud functionality for each of these apps, the app-specific data also becomes accessible to you from iCloud.com. Thus, if you forget your iPhone at home, but need to access your Contacts or Calendar, for example, you can do it from any Internet-connected computer or mobile device by visiting www.icloud.com, signing in to your iCloud account, and selecting which app you want to run online.

A wide range of applications that come bundled with your Mac, iPhone, and iPad also have an online counterpart that you can run from any Internet-connected computer or mobile device via a web browser. Just visit www.icloud.com, sign in, and click the application you want to use.
From the iCloud Control Panel on your Mac (or your mobile device), you must turn on each feature.
To access the iCloud Control Panel on your iPhone or iPad, launch Settings, and tap your username located near the top of the screen. Click your Apple ID username.

iCloud features include the following:
iCloud Drive: This is a virtual hard drive used for storing any type of files manually. When you copy a file to iCloud Drive (or any subfolder in iCloud Drive) it becomes available from all your computers and mobile devices that are linked to your iCloud account. From the iCloud Control Panel, click the Options button to further customize this feature. You’ll ultimately manage the contents of iCloud Drive using the MacOS Finder.

The MacOS Finder icon is displayed in the bottomleft corner of the desktop screen, on the extreme left of the Dock.


Photos: The MacOS and iOS operating systems use the Photos app to handle almost all aspects related to managing for iCloud; your entire digital photo library will be set up to back up and sync to your iCloud account. Click the Options button to customize this feature, which also allows you to share specific albums stored online with specific people in a secure way (via a feature called iCloud Shared Albums).
Mail: Your Apple ID (iCloud) account comes with a free email address from Apple. The email address is likely [YourAppleIDUserName]@icloud.com. You can use the Mail option to sync data related just to this email account with all your computers and mobile devices, and access this email account from www.iCloud.com. Sign in to the website and click the Mail icon to launch the online-based Mail app.
The Online Mail App
Apple’s online-based Mail app only allows you to manage your iCloud-related email account. The Mail app that runs on your Mac, iPhone, or iPad, however, can be used to manage multiple email accounts simultaneously, including your iCloud-related email account.
Contacts: The Contacts app is a full-featured contacts management application that comes bundled with all Macs, iPhones, and iPads. Use it to keep track of names, addresses, phone numbers, email addresses, birthdays, and other details related to the people you know.
Calendars: The Calendar app is a full-featured scheduling and time management app that comes bundled with all Macs, iPhones, and iPads. Use it to manage your schedule. When you turn on iCloud functionality, your appointments and events are synced automatically and in real-time between all your computers and mobile devices.
Reminders: This is a to-do list manager that comes bundled with all Macs, iPhones, and iPads.
Safari: This is Apple’s web browser. When you turn on iCloud functionality, all your bookmarks, open browser windows, Reading List content, and other Safari user preferences, for example, automatically sync between all your computers and mobile devices. You can start surfing the web on one device, and pick up exactly where you left off on another. The same browser windows can be opened on whichever other computer or mobile device you switch to, as long as it’s linked with the same iCloud account.
Notes: This is a virtual notebook app that comes bundled with all Macs, iPhones, and iPads. It offers less functionality than a word processor, but allows you to keep notes that are stored in custom-named virtual notebooks. When iCloud functionality is turned on for the app, all your notes automatically sync up between all your computers and mobile devices.
Siri: Sync all your Siri voice assistant customizations between all your Macs and Apple mobile devices when you turn on iCloud functionality.
Keychain: This is the feature of Safari that stores and remembers all your online account-related usernames and passwords, as well as credit/debit card details you use for making online payments or purchases. By turning on iCloud functionality, this information remains synced between all your computers and mobile devices that are linked with the same iCloud account.
Find My: The Find My feature is available on all Macs, iPhones, and iPads. It allows you to use the official Find My mobile app. To use it, visit www.icloud.com, sign into your iCloud account, and then click on the Find iPhone icon to pinpoint the exact location of a lost Mac, iPhone, iPad, and some other types of Apple equipment. For this to work, the lost device must be turned on and have access to the Internet. On the lost device, the Find My feature must also have been turned on, in advance, from the iCloud Control Panel. If it’s not already turned on, be sure to turn on this feature now. To learn more about this feature, visit www.apple.com/icloud/find-my-iphone.
News: The News app allows you to create and view a fully personalized news feed on your Mac, iPhone, or iPad. After you turn on iCloud functionality with this app, after you set up the News app, your custom newsfeed will become available on all your Macs and Apple mobile devices.
Stocks: The Stocks app enables you to view a personalized investment portfolio on your Mac, iPhone, or iPad. Turning on iCloud functionality allows you to sync your personal portfolio data in real-time.
Home: The Home app is used to control the “smart” devices in your home (such as the lights, thermostat, or appliances). Turning on the iCloud feature for this app allows you to sync your personal settings across all your Macs and mobile devices, so you can control your smart appliances from anywhere.
Many additional applications now work seamlessly with iCloud. Turning on or off this functionality and customizing it is done directly from the Settings menu of each respective application.
Using a Cross-Platform Cloud-Based Service
Dropbox and Box are independent, cloud-based, file sharing services designed for both consumer and business users. These services are cross-platform compatible across all computer and mobile device platforms. Initially setting up a Dropbox or Box account is free. Both services come with a pre-determined amount of online storage space.
Without installing any software onto your computer or an app onto your mobile device, you can set up and manage a Dropbox or Box account exclusively using online tools accessible from your web browser. However, to truly benefit from what’s possible using cloud computing, you’ll definitely want to install the free Windows PC or Mac software for either of these services onto your computer, as well as the mobile app for the service you choose onto your smartphone and/or tablet.
For example, Dropbox becomes accessible from File Explorer in Windows or Finder on the Mac, so you can copy and paste or drag files between your computer’s internal storage and the cloud-based service quickly and easily by treating the cloud service as external storage.
Whichever cloud service you choose, a master Dropbox or Box folder is set up. That folder can contain an unlimited number of subfolders, so you can easily manage your content. An ever-growing number of third-party software applications and mobile apps are compatible with Dropbox and Box, so automatic data backups and file syncing can easily be set up.
One of the biggest benefits to Dropbox, Box, or a similar service that uses a website, software, or mobile app is the ability to securely share large files or the contents of entire folders with specific people while keeping the rest of your content locked up (password protected), encrypted, and secure.
Introduction to Box and Dropbox
Box (www.box.com) offers a free Individual plan that includes 10GB of online storage, but it has a 250MB file upload limit. A Personal Pro subscription includes 100GB of online storage and has a 5GB file upload limit. However, a Starter subscription plan costs $5.00 per month, per user and includes 100GB of online storage space with no file upload limit. The Business Plan for $15.00 per user, per month includes unlimited online storage with no file upload limit.
Dropbox (www.dropbox.com) offers a Basic plan for free. It includes 2GB of online storage space, along with a collection of useful features. However, to unlock more of the features related to offline data access and receive more online storage space, you’ll need to upgrade to the Plus subscription plan for $9.99 per month. This includes 1TB of online storage space. The Professional plan, priced at $19.99 per month, includes 2TB of online storage space, a 120-day version history, and shared link controls.
Sharing Large Files Using Dropbox
After you have files or subfolders containing data and files stored in your Dropbox account, the easiest way to select and share specific content is to launch your favorite web browser, visit www.dropbox.com, log in to your Dropbox account, and then click the My Files option.

Double-Check the Files You Select
Don’t forget to double-check that you’ve selected the correct folder(s), subfolder(s), and/or files to share. Folder and filenames are not always descriptive, and some can look similar to others. Selecting the wrong content compromises its security, because you’ll potentially wind up sharing it with the wrong people.

Always Confirm Names and Email Addresses
If your computer or web browser is set up to auto-suggest or auto-complete names and/or email addresses, make sure you enter the correct information into the To field. Only the people added to the To field will be able to access and work with the content you’ve selected to share.

When adjusting permissions in Dropbox, if you select the Can Edit option, the person or people you’re sharing the content with can edit, delete, comment, and add additional files to the shared Dropbox folder. You’re giving selected people full access to the folder, subfolder, or files you’ve selected.
With the Can View option, the person or people you’re sharing with will have access to the selected file(s), but they won’t be able to edit these files or folders.

Use the Create a Link Option
If you use Dropbox’s Create a Link option, a special website URL is created for the content you’ve chosen to share. Anyone with whom you share the special website URL will have full access to that content. Plus, if anyone you share the content with distributes the website URL, those people will also have access to the content. This feature is useful for sharing content that’s not confidential or personal in nature, and when maintaining full control over the content is not essential.
After you’ve opted to share folders, subfolders, or files with other people, you can always revoke their permission to access the content in the future. However, if they’ve already downloaded the content to their computer or mobile device, they will already have access to it on an ongoing basis, and you won’t be able to control what they do with the content.


Perform a Dropbox Security Checkup
Dropbox offers an automated Security Checkup feature to help ensure whatever content you’re storing online remains secure and that you’re sharing only the desired content with the specific people you’ve chosen. Other cloud-based services offer a similar feature or the ability to manually adjust the account’s security settings.
To access the Dropbox Security Checkup feature (if you’re an active Dropbox user), follow these steps:
![]() Go to www.dropbox.com and sign in to your account.
Go to www.dropbox.com and sign in to your account.
![]() Click your Username/Profile image in the upper-right corner of the browser window, and then select the Settings option.
Click your Username/Profile image in the upper-right corner of the browser window, and then select the Settings option.

![]() Click the Security tab.
Click the Security tab.
![]() Click the Start Checkup button for the Security Checkup feature.
Click the Start Checkup button for the Security Checkup feature.

![]() Confirm the email address for your Dropbox account.
Confirm the email address for your Dropbox account.

![]() A list of computers, mobile devices, and web browsers that have been used to access your Dropbox account appears, as well as the approximate geographic locations your account has been accessed from. Confirm that only your own equipment has been used to access your account, and that you recognize all the locations from which the account has been accessed. Click Next.
A list of computers, mobile devices, and web browsers that have been used to access your Dropbox account appears, as well as the approximate geographic locations your account has been accessed from. Confirm that only your own equipment has been used to access your account, and that you recognize all the locations from which the account has been accessed. Click Next.

![]() Confirm the third-party software applications and mobile apps you have set up to work seamlessly with Dropbox. Delete any listings for applications you no longer use, or never used. Click Next. (Not shown.)
Confirm the third-party software applications and mobile apps you have set up to work seamlessly with Dropbox. Delete any listings for applications you no longer use, or never used. Click Next. (Not shown.)
![]() Review your Dropbox account password to determine how secure it is. You’ll be given the opportunity to create a more secure password. (Not shown.)
Review your Dropbox account password to determine how secure it is. You’ll be given the opportunity to create a more secure password. (Not shown.)
Using Cloud-Based File Sharing Services Safely
When using many of the cloud-based services, you can take some easy steps to secure your account. The security features you enable for the account are in addition to the encryption and other features incorporated into the service on the servers where your content is being stored.
When connecting to the Internet to access a cloud-based service using your computer or mobile device, take advantage of a virtual private network (VPN) and/or a firewall to secure the Internet connection on your end.
Create a secure password for your cloud-based account. Keep the password private and periodically change it. Do not share your primary account password with the people you’re sharing content with. A secure password makes it more difficult for someone else, such as a hacker, to figure out. An example of a popular and highly unsecure password is the word “password” or “ABCDEFG.” A more secure password should be at least six characters, include upper- and lowercase letters, and incorporate at least one number.
Turn on two-factor authentication for the cloud-based account. Most cloud-based services also work with USB security keys, like those available from Yubico (www.yubico.com) and Google (https://store.google.com/us/product/titan_security_key_kit). To turn on two-factor authentication, access the Settings menu for the account and select the Security (or similar) option.

Monitor the account activity. Many of the cloud-based services allow you to see a summary of who signed in to the account, where they signed in from, and what equipment they were using. From the Security page of your Dropbox account, you can link all your own computers and mobile devices to your account, and then easily determine whether someone accessed your account using other equipment.
Watch out for phishing schemes where you receive emails stating there’s a problem with your cloud-based account. In the message, you’ll be instructed to click a link that’s embedded in the email message, and then enter your account username and password. Never click one of these links or respond directly to the email message. If there’s a problem with your cloud-based account, you will be notified when you attempt to sign in to the legitimate account directly using the service’s software or mobile app, or when you access the service’s website by manually entering its website URL into your web browser (that is, www.dropbox.com or www.icloud.com).
Whenever you sign in to a cloud-based service using your computer or mobile device’s web browser, always sign out when you’re finished.

Many third-party software applications and mobile apps are designed to work seamlessly with Dropbox, Box, and other cloud-based services. However, you are responsible for initially setting up compatible software and mobile apps to work with your selected cloud-based service, and then periodically ensuring that you’ve set up permissions only for software and mobile apps you currently use. Delete permissions for applications you no longer use.
If you’re planning to use the backup and automatic sync feature of a cloud-based service on all your computers and mobile devices, you need to set up just one cloud-based account, but then link it with the software on each of your computers and mobile devices. The software or mobile app will then automatically save or sync app-specific data and files with your cloud-based account, which will give all of your computers and mobile devices real-time access to the most current version of the data and files.
When organizing your files in the cloud, set up distinct folder and subfolder names, and when possible, use descriptive names for individual files. This helps prevent human error when selecting files or folders to share with others.
Always double-check the names and email addresses of the people with whom you want to share files or folders, and make sure you adjust the permissions for each person accordingly. Also confirm that you’re sharing only the intended files or folders. Moving forward, when someone no longer needs access to your cloud account, revoke the permission.
When choosing a cloud-based service, make sure it has a feature for version history. This will automatically save older versions of files as updates are made, and store those for a pre-determined time period, allowing you to revert to an older version of the file if necessary. Dropbox, for example, offers a version history feature that retains older versions of files for between 30 and 120 days, depending on your subscription plan. When version history is provided by the cloud-based service, it’s automatically active, requires no setup, and does not use any of your allocated online storage space.
Depending on how you set up file syncing with your cloud-based account, if you edit or delete a file that’s stored in the cloud, those changes will update immediately on all the computers and mobile devices linked to the same account. Be cautious before deleting files, and choose a cloud-based service that allows deleted files to be recovered.
Some cloud-based services allow you to set up a separate password specifically for the content you plan to share with other people. When someone is invited to access your shared content, they will need the password you create, in addition to the invitation email they receive from the cloud-based service. When you create a password for shared content, always use a password that’s different from your master cloud account password, and create a unique password each time you share content.