
9. Customize the Security Settings on Your Smartphone or Tablet

Learn how to adjust the security settings for your smartphone or tablet to keep your data more secure. Shown here is the iOS 12 Privacy menu (found in Settings) on an iPad.
In this chapter, you’ll learn how to use the security and privacy features built in to your smartphone or tablet. Topics include:
![]() An overview of the privacy and security settings built in to the operating system of your mobile device
An overview of the privacy and security settings built in to the operating system of your mobile device
![]() Which privacy settings to manually adjust and why it is important
Which privacy settings to manually adjust and why it is important
![]() How to set up the passcode, fingerprint, or face identification sensors built in to your smartphone or tablet that can keep unauthorized people from accessing your device
How to set up the passcode, fingerprint, or face identification sensors built in to your smartphone or tablet that can keep unauthorized people from accessing your device
![]() How to manage and block unwanted calls to your smartphone
How to manage and block unwanted calls to your smartphone
With your iPhone, iPad, or Android-based mobile device, you can handle a wide range of commonly used tasks—from accessing your email, to checking the weather forecast, to handling online banking. Plus, thanks to its built-in GPS (Location Services) feature, your smartphone or tablet always keeps tabs on where you are. This information is used in many ways. For example, your current location details are used with GPS apps (whether Google Maps, Maps, or third-party apps) to provide you with real-time navigation information or to pinpoint your location each time you snap a photo using the device’s built-in camera.
Your smartphone or tablet often shares this information between apps, cloud-based services, and online services (including social media services)—sometimes without your knowledge.
If you’re like most people and store personal and private information in your mobile device, you’ll definitely want to take steps to protect it and keep unauthorized people from using your smartphone or tablet or from intercepting content that the mobile device sends or receives via the Internet.
Preventing Unauthorized People from Using Your Mobile Device
Almost all smartphones and tablets have multiple levels of security that allow you to lock the device, and then allow only an authorized user to unlock and access it. When all these security features are turned off, anyone can pick up, turn on, and start using your mobile device and potentially access any information stored in it. Those same people could launch the mobile device’s web browser and sign in to websites as you, if you have your website/online service usernames and passwords stored by the web browser.
To prevent random people from picking up your smartphone or tablet and having full access to everything stored in it, at the very least, turn on the Passcode (iOS)/PIN (Android) feature. For added convenience and more security, consider turning on the Touch ID (fingerprint scanner) or Face ID (face scanner).
The Touch ID sensor is built in to the Home button of older iPhone and iPad models. The newest iPhones and iPads have a face recognition camera built in, and no Home button.

When the Touch ID feature is active, the iPhone or iPad’s Lock screen (shown here) will instruct you to press the Home button to scan your fingerprint and unlock the device.
If you know other people will be using your smartphone or tablet (with permission), but you want to limit what apps, features, functions, and data those other people can access, turn on the device’s Content & Privacy Restrictions-related features.

Setting Up the Passcode Feature
The Passcode/PIN feature displays your mobile device’s Lock screen each time your device is turned on or awakened from sleep mode. The person who turned on the device will need to enter a four- or six-digit passcode (that is, an alphanumeric password) to unlock the smartphone or tablet and begin using it.
On an iPhone, iPad, or Android-based mobile device, the Passcode/PIN feature needs to be turned on and set only once. You can later change the passcode.
Turn on Passcode Security Right from the Start
When you turn on your new iPhone or iPad for the first time, you’ll be instructed to turn on and set up the Passcode and/or Touch ID/Face ID feature. If you skip these steps during the setup process, you can set the features later.
Set the Passcode (iPhone or iPad)
To turn on and use the Passcode feature on your smartphone or tablet (running iOS 12 or later), follow these steps:
![]() Turn on the iPhone or iPad, and from the Home screen, tap Settings (shown here).
Turn on the iPhone or iPad, and from the Home screen, tap Settings (shown here).

![]() Scroll down and tap the Touch ID/Face ID & Passcode option.
Scroll down and tap the Touch ID/Face ID & Passcode option.
![]() Tap the Turn Passcode On option. (To change your passcode, tap the Change Passcode option.)
Tap the Turn Passcode On option. (To change your passcode, tap the Change Passcode option.)

![]() Type in a six-digit numeric passcode when the Set Passcode window appears.
Type in a six-digit numeric passcode when the Set Passcode window appears.

![]() Confirm the passcode. (Not shown.)
Confirm the passcode. (Not shown.)
![]() After you exit Settings, when you turn on the mobile device or awaken it from sleep mode, the Lock screen will appear and you’ll be prompted to enter the correct code to unlock the device.
After you exit Settings, when you turn on the mobile device or awaken it from sleep mode, the Lock screen will appear and you’ll be prompted to enter the correct code to unlock the device.

![]() From the Touch ID/Face ID & Passcode submenu in Settings, you can adjust a handful of options that determine what can be viewed or done from the Lock screen without first unlocking the device.
From the Touch ID/Face ID & Passcode submenu in Settings, you can adjust a handful of options that determine what can be viewed or done from the Lock screen without first unlocking the device.
![]() If you turn on the Erase Data option, if someone attempts to unlock your iPhone or iPad using an incorrect passcode ten times in a row, the device will automatically erase itself (to protect your data). As the mobile device’s owner, you can later restore your content from an iCloud backup.
If you turn on the Erase Data option, if someone attempts to unlock your iPhone or iPad using an incorrect passcode ten times in a row, the device will automatically erase itself (to protect your data). As the mobile device’s owner, you can later restore your content from an iCloud backup.

Set the PIN (Android)
To turn on and use the PIN feature on your Android-based smartphone or tablet, follow these steps:
![]() Turn on the smartphone or tablet. (Not shown.)
Turn on the smartphone or tablet. (Not shown.)
![]() From the Home screen, tap the Settings icon.
From the Home screen, tap the Settings icon.

![]() From the Settings menu, tap the Device tab.
From the Settings menu, tap the Device tab.
![]() Tap the Lock Screen option.
Tap the Lock Screen option.

![]() Under the Screen Security heading, tap the Screen Lock option.
Under the Screen Security heading, tap the Screen Lock option.

![]() Tap the PIN option.
Tap the PIN option.

![]() Enter at least a four-digit numeric code, and then tap Done.
Enter at least a four-digit numeric code, and then tap Done.

![]() Confirm the numeric code by typing it in a second time, and then tap Done. (Not shown.)
Confirm the numeric code by typing it in a second time, and then tap Done. (Not shown.)
![]() After you exit Settings, when you turn on the mobile device or awaken it from sleep mode, the Lock screen will appear and you’ll be prompted to enter the correct code to unlock the device. (Not shown.)
After you exit Settings, when you turn on the mobile device or awaken it from sleep mode, the Lock screen will appear and you’ll be prompted to enter the correct code to unlock the device. (Not shown.)
Turning On the Touch ID (iOS) or Finger Scanner (Android)
Some mobile devices also have a fingerprint scanner built into the Home button. After users scan their fingerprint once, they can later unlock their smartphone or tablet by placing their finger on the Home button. (On some Android devices, you need to swipe your finger over the Home button.)
Scanning your fingerprint to unlock your device is often quicker than typing in a passcode. When setting up this feature, you’ll need to scan each finger that you want the smartphone or tablet to recognize. Consider scanning your thumbs and pointer fingers separately, so no matter how you’re holding the device, it’s always convenient to scan a fingerprint.
When you first set up a smartphone or tablet that has a Home button built in, you’ll be guided to set up the Touch ID (iOS) or Fingerprint Scan (Android) feature. This can also be done later.
Activating Touch ID (iPhone or iPad)
To turn on or off the Touch ID feature on an iPhone or iPad that has a Home button, launch Settings, tap the Touch ID & Passcode option, and then turn on or off the Passcode option (which controls the Passcode and Touch ID feature). To add more fingerprint scans to the device, tap the Add a Fingerprint option, and follow the onscreen prompts.
Activating Fingerprint Scan (Android)
To turn on/off the Fingerprint Scan feature on an Android-based mobile device, launch Settings, tap the Device tab, tap the Lock Screen option, and then tap the Screen Lock option. From the Select Screen Lock menu, choose the Fingerprint option to activate the fingerprint scan option, or choose the None or Swipe option to turn off this security feature altogether.
Depending on the make and model of your Android-based smartphone or tablet, other options for unlocking the device, including Password or Face Recognition, may be available.
Taking Advantage of Face ID (iOS)
Newer iPhone and iPad models that do not have a Home button have a camera located on the front of the device that is able to scan your face and identify you when you simply look at the screen.
The Face ID feature can be turned on during the device’s initial setup process or later; just tap Settings, and tap the Face ID & Passcode feature.

Set Up Face ID to Recognize Multiple Faces
If you want your iPhone or iPad to be able to identify additional people, from the Face ID & Passcode submenu in Settings, tap the Set Up An Alternate Appearance option. Follow the onscreen prompts to scan and store the additional faces. Alternatively, you can share your device’s passcode with other people to give them access to your mobile device, but do this only if you completely trust that other person.
Restricting Access to Apps and Content
Also referred to as “Parental Controls,” the Content & Privacy Restrictions feature built in to the iPhone or iPad allows you to permit other people to use your smartphone or tablet, but access only specific apps or content that you pre-determine. This feature is ideal if you plan to allow children to use your mobile device, but want them to be able to use only specific apps, enjoy specific types of content, or access only certain websites.
To manage the Content & Privacy Restrictions on an iPhone or iPad (running iOS 12 or later), follow these steps:
Launch Settings
Tap the Screen Time option.
Tap the Content & Privacy Restrictions option.
Tap the Content & Privacy Restrictions option at the top of the screen to turn it on, and then tap each menu option to manage access to specific apps and content.
Taking Advantage of Parental Controls
Built in to the operating systems of smartphones, tablets, smart TVs, video game systems, cable TV boxes, computers, and computer modems/routers are optional parental controls.
Depending on the device, you can use parental controls to control how much time is spent using a device or to block certain types of inappropriate content. Parental controls can be used to set a daily or weekly time limit for using that technology or to monitor a child’s activities.
Regardless of what equipment you’re setting up parental controls on, you typically do it by accessing the Settings or Setup menu when using the device. You’ll be prompted to set up a Parental Controls password or PIN that’ll allow you to set, lock down, or unlock the device.
When setting this parental controls password, do not use the same password you use elsewhere, which the young people in your life may already know. And make sure you don’t choose a password or PIN that your child will easily be able to figure out.
The parental controls offered by each device vary. It’s important to invest the time to review each related menu and submenu to develop an understanding of what’s offered. You can then adjust the options that you deem important.
Some games installed or played on the various gaming systems might also have their own game-specific parental controls built in to the game. These controls might allow the game to be played, but prevent a child from playing the multiplayer version of the game or from being matched up with strangers.
Android Users: Add Parental Controls Using a Mobile App
If you’re using an Android-based mobile device, you can download an optional app from the Google Play Store that adds parental controls to your smartphone or tablet. Some of these apps include Kids Place Parental Control, Kids Zone Parental Controls, MMGuardian Parental Control, Norton Family Parental Control, and Screen Time Parental Control.
Adjusting the App-Specific Privacy Settings on Your Mobile Device
When you launch Settings on your iPhone or iPad, one of the submenu options is called Privacy. Tap it to determine which apps can use specific mobile device features or share data with other apps.
For example, the Contacts app can share data related to names, addresses, email addresses, phone numbers, and birthdays for people in your Contacts database with other apps like Maps, Mail, Messages, and Calendar.

iOS 12 Privacy submenu (in Settings) is shown here on an iPhone.
When you tap the Location Services option, you’re able to turn on or off the GPS capabilities built in to your smartphone or tablet.
In general, you’ll want to leave the master switch for the Location Services feature turned on, but from the Location Services submenu in Settings, determine which apps are able to access your location and when. You might want to turn on the Location Service feature for the Camera app, so that the location where each photo you take is captured and saved, and also turn on this feature for the Maps app, so your iPhone or iPad can provide detailed navigation information.
However, you might want to turn off Location Services for the Messages app or various other apps, including social media apps, so they can’t track your location, and potentially share it with other apps, online services, or people.
Many Apps Rely on Knowing Your Location
Many apps need to know your location to function properly. The Location Services submenu, which is part of Settings, allows you to determine which apps can access your location, and determine how that information can be used (or shared).
In addition to Location Services, the Privacy submenu in Settings allows you to determine how information in the Contacts, Calendars, Reminders, Photos, Camera, Home, and Music apps are able to share information with other apps. (Within Settings, the Home app that comes preinstalled with iOS 12 is referred to as HomeKit.)
More importantly, from this menu, you can control iPhone or iPad functions, such as Bluetooth Sharing, the built-in microphone, the speech recognition technology, and the built-in fitness and motion capabilities.
Be sure to access the Privacy submenu, and then tap each option to personalize each setting to a level you’re personally comfortable with.
Keeping Your Mobile Device’s Operating System and Apps Up to Date
The iOS and Android operating systems, as well as the apps you’re running on your mobile device, are updated regularly to add features, fix bugs, and improve privacy or security. You should ensure you’re running the most up-to-date version of those on your devices.
Updating Your iPhone or iPad’s Operating System and Apps
To check whether an iOS update is available, connect your mobile device to the Internet, and follow these steps:
Launch Settings.
Tap the General option.
Tap the Software Update option.
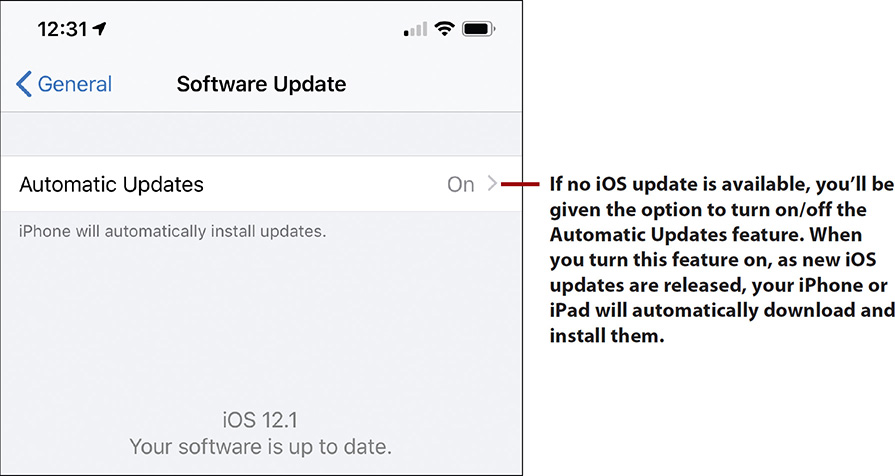

To download and install the latest versions of apps, launch the App Store app. Tap the Updates icon (displayed at the bottom of the screen), place your finger near the center of the screen and swipe down to refresh the listing, and then tap the Update All option (displayed near the upper-right corner of the screen).

The latest version of the apps that have an Update button displayed to the right of the app name will be downloaded and reinstalled onto your iPhone or iPad, but all your app-specific data and personalization will remain intact. Get in the habit of checking for app updates at least once per week.
Updating Your Android Mobile Device Operating System and Apps
To check whether an Android operating system update is available, follow these steps:
Launch Settings.
Tap the General tab.
Tap the About Device option.
Tap the Check for Updates or Software Updates option.

To download and install the latest versions of apps on your Android device, connect your device to an Internet connection, launch the Google Play Store, tap the Menu icon (which looks like three horizontal lines to the left of the Google Play Search field), tap the My Apps & Games option, and then tap the Updates tab.

Managing Your Mobile Device’s Wireless Connections
All smartphones and some tablets can connect to the Internet using a cellular (4G/LTE/5G) data connection through your service provider (for example, AT&T Wireless, T-Mobile, or Verizon Wireless).
A cellular data plan either comes with a pre-determined monthly wireless data allocation (such as 5GB per month) or offers unlimited data while you’re in your cellular service provider’s network. If you travel abroad, your smartphone or tablet (with cellular data capabilities) will roam to another service provider’s network, and you will be charged high international roaming fees to make and receive calls, as well as to access the Internet using a cellular data connection. Most newer smartphones have a generic SIM card that automatically roams when abroad.
All smartphones and tablets can connect to the Internet using a Wi-Fi Internet connection whenever the device is within the signal radius of a Wi-Fi hotspot or your home wireless network. Connecting to a Wi-Fi Internet connection is free and unlimited, unless an access fee is charged by the Wi-Fi hotspot provider (in a hotel or Internet café, for example).
Just like when using a computer, you’re able to enhance the security of your mobile device’s Internet connection by installing and using a virtual private network (VPN) mobile app. A VPN can be turned on and used with either a cellular data connection or Wi-Fi connection. A VPN offers added protection when you’re away. When you install and activate a VPN on your mobile device, each time you access the Internet, everything you send or receive from your mobile device is automatically encrypted. This encryption helps to ensure secure transmission of your data—wirelessly from your mobile device to the Wi-Fi you’re connected to—without the threat of an unauthorized person (such as a cybercriminal) eavesdropping on your activity as your data is transmitted. Again, the security risk from hackers is significantly greater when using public Wi-Fi without a VPN.
Turning On Bluetooth Settings
In addition to communicating with the Internet, your mobile device can wirelessly link up with optional equipment and “smart” devices to remotely control them. This wireless connection is often achieved using Bluetooth, which is built in to your mobile device.
The actual wireless Bluetooth connection between your mobile device and the equipment it’s paired with is secure, but it works only within a signal radius of about 32 feet.
The equipment you link to and control from your mobile device may have security vulnerabilities that you can take simple steps to protect against. For example, there are many types of medical and fitness devises, from heart rate, blood pressure, and blood glucose monitors, to digital scales, smart pill boxes, and digital hearing aids that can exchange information with your smartphone. If you’re using one of these devices, make sure your personal medical data stays private, unless you opt to share it with your medical practitioner. Special privacy settings are typically offered within the specialized app that’s used to control the smart device.
Bluetooth Devices Must Be Paired
An optional device that links with your smartphone or tablet via Bluetooth must first be “paired” with the mobile device for the wireless link to be initially established. This pairing process needs to be done only once. The steps will vary based on the device you’re using, so follow the pairing directions provided with that device.
Bluetooth is what typically enables connectivity between wireless headphones, external wireless speakers, a smart watch, or a wireless connection set up between your vehicle and smartphone.
If you don’t use Bluetooth devices, turn off your smartphone or tablet’s Bluetooth feature by launching Settings, tapping the Bluetooth option, and then tapping the Bluetooth feature.
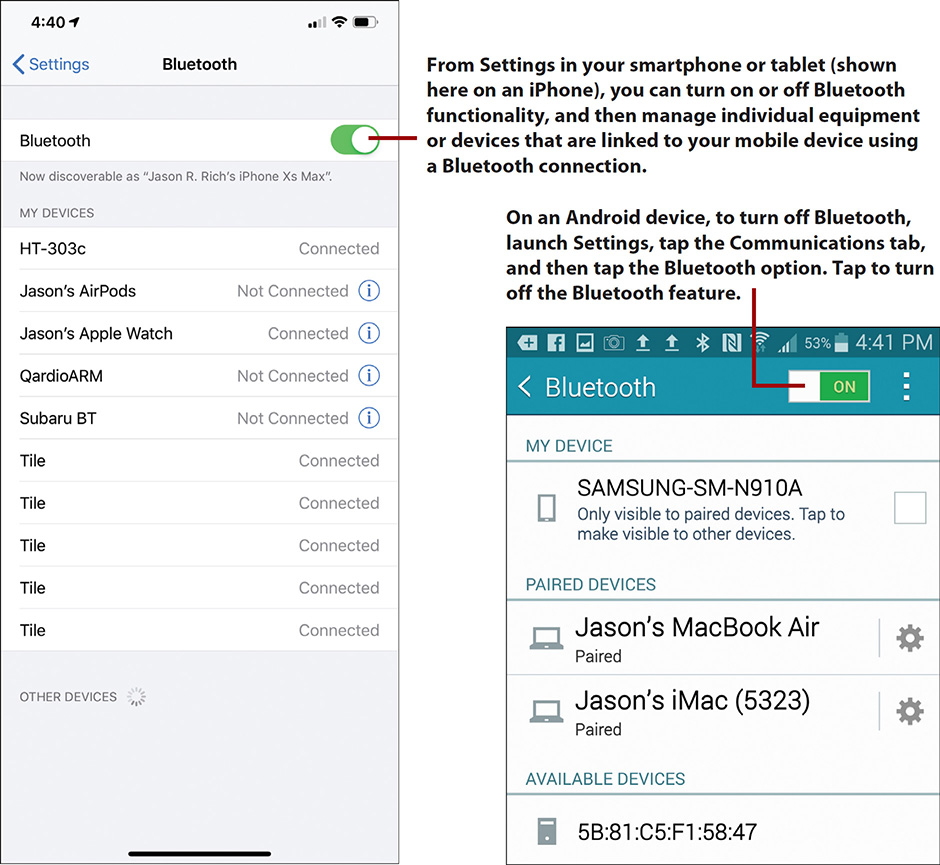
However, to wirelessly link many types of equipment to your mobile device, the master Bluetooth option must be turned on and left on. You can control individual devices that are linked (or paired) with your device via the Bluetooth menu in Settings.
In-home appliances, security tools, and electronic devices can access the Internet to gather information and be remotely controlled or managed using a compatible computer, smartphone, smart watch, or tablet running a special app.
It’s important to set up this equipment—and your home Internet service—properly to protect against potential security vulnerabilities. If you maintain a secure Internet connection in your home, most smart home equipment is easy to use and offers minimal privacy and security risks. Some precautions include:
Installing a firewall to your home Internet service.
Using a virtual private network when connecting to the Internet using your computer, smartphone, and/or tablet, and not connecting your smart equipment to a public Wi-Fi.
Creating strong account passwords and keeping the passwords secure.
Setting up your smart equipment correctly and securely.
Using AirDrop (iPhone/iPad)
Another wireless tool that’s built in to the iOS and MacOS operating systems is called AirDrop. It’s used for transferring certain types of app-specific data between your smartphone, tablet, or Mac and someone else’s iPhone, iPad, or Mac that is in close proximity. This might include photos or an entry from your Contacts database.
To turn on or off the AirDrop feature on an iPhone or iPad, launch Settings, tap the General option, and then tap the AirDrop option. On a Mac, launch System Preferences, click the Extensions option, click the Share Menu option, and then use the AirDrop checkbox to turn the feature on or off.
For maximum security, keep the AirDrop featured turned off. To do this on an iPhone or iPad, select the Receiving Off option from the AirDrop menu in Settings.
If you choose to turn on this feature, you can opt to connect with any other iPhone, iPad, or Mac that belongs to someone whose contact information is stored in your Contacts database. To do this, choose the Contacts Only option from the AirDrop submenu.
This is a more secure option than allowing anyone near you with a compatible iPhone, iPad, or Mac (including strangers when you’re in a public and crowded location) to send you photos, video clips, or other content to the Apple equipment you’re using.
Send App-Specific Content Using AirDrop
When you want to share app-specific content via AirDrop, follow these steps:
![]() Launch a compatible app, such as Photos, that supports AirDrop. (Shown here on an iPhone.)
Launch a compatible app, such as Photos, that supports AirDrop. (Shown here on an iPhone.)

![]() Select the content you want to share (such as a photo).
Select the content you want to share (such as a photo).
![]() Tap the Share menu icon.
Tap the Share menu icon.

![]() From the Share menu, choose the AirDrop option. A list of nearby compatible mobile devices and Macs that have AirDrop turned on and that are accessible from the equipment you’re using will appear. Tap the user’s name or photo that you want to send the selected content to.
From the Share menu, choose the AirDrop option. A list of nearby compatible mobile devices and Macs that have AirDrop turned on and that are accessible from the equipment you’re using will appear. Tap the user’s name or photo that you want to send the selected content to.

![]() A wireless connection between your equipment and the receiver’s equipment will be established, and the selected content will be transmitted between the two devices within a few seconds. (Not shown.)
A wireless connection between your equipment and the receiver’s equipment will be established, and the selected content will be transmitted between the two devices within a few seconds. (Not shown.)
Blocking and Managing Unwanted Calls to Your Smartphone
Your cell phone may already tell you if it suspects an incoming call is spam. You can also use an app—such as AT&T Call Protect, Robo Call Blocker – Roblock, Robokiller, and Truecaller—that intercepts all incoming calls and informs you if the caller is a telemarketer, bill collector, or fundraiser, or if the call is originating from a known robo-dialer.

You can adjust the settings of these apps to automatically block unwanted calls from a specific phone number so your phone does not even ring when you receive one of these calls.
Some Unwanted Calls May Still Get Through
Unfortunately, these apps probably won’t block a spoofed phone number from a robocaller or con artist. Spoofing uses technology to modify what phone number shows on caller ID, such as a number with the same area code as your phone number. Or the number looks like it’s coming from a local business or person you’ve previously talked to. It can also display a phone number similar to your own to increase the chances you will answer the call.
You can avoid answering the call, however, if the Caller ID phone number that’s displayed is unfamiliar—even if it appears to be local. If it’s important, the caller will leave a message.
By not speaking with telemarketers, you’re more apt to avoid becoming a victim of a scam, identity theft, or fraud. One common scam is when a telemarketer calls you and says he’s from Microsoft or Apple, and that there’s a problem with your computer. The caller convinces you to give him remote access to your computer to fix the problem, when actually he’s either planning to upload a virus or malware to your computer, or access your personal data that’s stored on your computer (including things like your online banking password).
If you receive one of these calls, hang up! Don’t provide any personal information whatsoever, and never grant a stranger remote access to your computer unless you’ve initiated contact with a technical support representative that you know is legitimate.
Block Specific Incoming Calls on Your iPhone
The Phone app on your iPhone has tools for manually blocking calls from specific phone numbers. When you receive a call from a telemarketer, follow these steps to block calls from that number in the future:
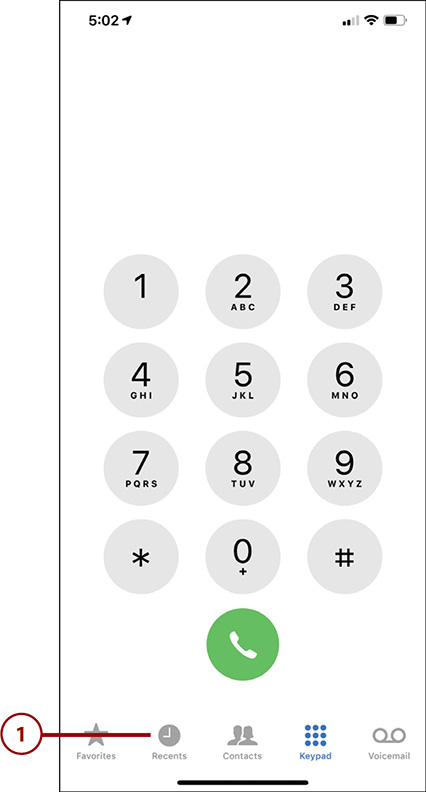
![]() Launch the Phone app and tap the Recents icon.
Launch the Phone app and tap the Recents icon.
![]() Look for the listing for the incoming call, and tap the (i) icon next to that call.
Look for the listing for the incoming call, and tap the (i) icon next to that call.

![]() From the Call Information screen, tap the Block This Caller option. In the future, any calls from that phone number will be prevented from reaching you.
From the Call Information screen, tap the Block This Caller option. In the future, any calls from that phone number will be prevented from reaching you.

Manage Blocked Calls on an iPhone
To edit the master list of blocked phone numbers of your iPhone, launch Settings, tap the Phone option, tap the Call Blocking & Identification option, and then tap the Edit option for the blocked phone number list. This allows you to add names and numbers to the blocked list, or remove listings from this list (to allow incoming calls from the previously blocked numbers).
Block Specific Incoming Calls on an Android Smartphone
The Phone app on your Android-based smartphone has tools for blocking calls from specific phone numbers. When you receive a call from a telemarketer, follow these steps to block future calls from that number:
![]() Launch the Phone app. (Not shown.)
Launch the Phone app. (Not shown.)
![]() Tap the Logs option.
Tap the Logs option.

![]() Locate the incoming call that originated from the phone number you want to block in the future, and tap its listing.
Locate the incoming call that originated from the phone number you want to block in the future, and tap its listing.

![]() From the Call Information screen, tap the menu icon (the three vertical dots in the upper-right corner of the screen).
From the Call Information screen, tap the menu icon (the three vertical dots in the upper-right corner of the screen).
![]() Tap the Add to Auto Reject List. In the future, any calls from that phone number will be prevented from reaching you.
Tap the Add to Auto Reject List. In the future, any calls from that phone number will be prevented from reaching you.

Edit Blocked Calls on an Android Smartphone
To manage the master list of blocked phone numbers on your Android-based smartphone, launch the Phone app, tap the menu icon (which looks like three vertical dots), tap the Settings option, tap the Call option, and then tap the Call Rejection option. To edit the list, tap the Auto Reject List, or to manage this feature, tap the Auto Reject Mode option.
If you want to provide a message to the caller whose call you’ve rejected, tap the Set Up Call Rejection Messages option, and then follow the onscreen prompts to create a message that will be sent.