1. Creating Your LinkedIn Account

In this chapter, you learn how to sign up for a LinkedIn account, navigate LinkedIn, choose the right LinkedIn account for your goals, and get familiar with the LinkedIn site. Topics in this chapter include:
![]() Exploring the LinkedIn home page
Exploring the LinkedIn home page
![]() Upgrading to a LinkedIn premium account
Upgrading to a LinkedIn premium account
Creating an account on LinkedIn, the world’s most popular professional networking site, is easy. Best of all, its basic features are all free.
Create a LinkedIn Account
You can quickly create a basic site on LinkedIn (www.linkedin.com).
1. Enter your first name, last name, email address, and a password.
2. Click the Join Now button.

Create a Strong Password
A password that contains a combination of uppercase and lowercase letters, numbers, and symbols provides the most protection.
Choose the Right Email Address
LinkedIn offers privacy controls to protect your business email address. Entering the email address that most of your business contacts use to communicate with you yields the best results when others try to connect with you by email on LinkedIn.
3. Select your country.
4. Enter your ZIP Code or postal code, depending on your choice of country.

5. Select your employment status from the options available: Employed, Job Seeker, or Student.
Your Employment Status Controls Other Fields
The selection you make in employment status field affects which additional fields display on this page. This task displays fields for someone who is employed.
6. Enter your job title.
7. Enter your company. If LinkedIn doesn’t find an existing match for the company you enter, the Industry field appears.

Let LinkedIn Find Your Company
As you start typing, LinkedIn locates potential company matches from existing profiles. Choosing from an existing entry helps ensure that you and your colleagues are correctly linked by company.
8. Select the industry that best describes your professional expertise from a list of more than 100 options.
Industry Options
Options in the Industry field range from popular professions (fields include Accounting, Banking, Computer Software, Internet, Real Estate, and Marketing and Advertising) to the more obscure (fields include Dairy, Gambling & Casinos, Fishery, and Think Tanks).
9. Click the Create My Profile button.

10. Click Skip This Step to bypass growing your network for now.

Complete Your Profile Before Connecting
At this stage, LinkedIn prompts you to search for and connect with people you know. However, I recommend you create your profile before completing this step. Why? Because when your contacts receive your connection request, you want them to view a complete profile, not an empty one.
11. Confirm your email address. What displays on this page varies based on the email provider you use. Complete the verification process based on the prompts LinkedIn provides you.

Understand the Email Verification Process
As a security measure, LinkedIn needs to verify the email address you entered when you signed up for an account. This ensures that the person who actually owns an email account, and not an impostor, signed up for LinkedIn.
12. Click Skip This Step to bypass notifying your social media contacts now.

Complete Your Profile Before Sharing
LinkedIn prompts you to let your Facebook friends and Twitter followers know that you just joined LinkedIn. Again, it’s best to skip this step and inform your social media contacts after you create your profile.
13. Click the Basic Account button to start with a free LinkedIn account.
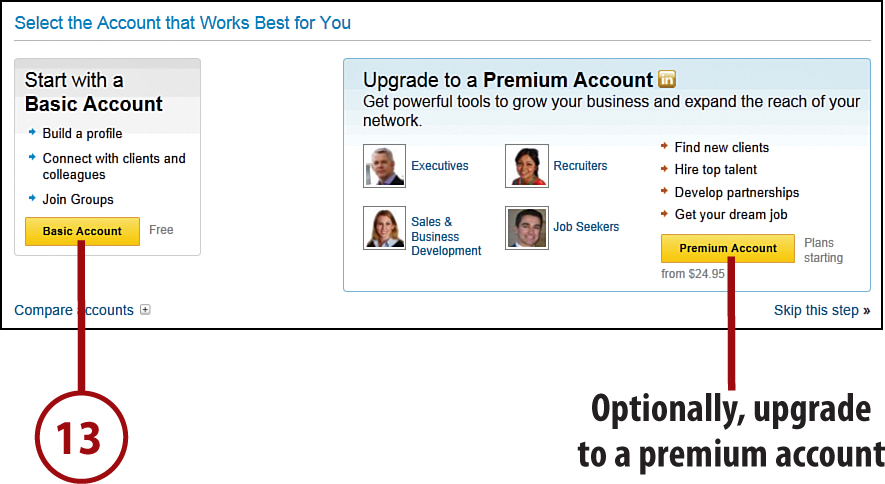
Start with a Free Account
Optionally, you can upgrade to a premium account immediately. Unless you’re certain that you need the features offered with a premium account, however, it’s a good idea to start with the free account.
14. LinkedIn displays your blank profile. You can enter data now or finish it later. See Chapter 2, “Creating Your LinkedIn Profile,” for more information about creating a quality profile that gets results.

Finding Your Way Around LinkedIn
LinkedIn includes millions of pages of data, so knowing how to find your way around can help save you lots of time. Fortunately, after you understand the LinkedIn navigation structure and the best ways to use your home page (command central on LinkedIn), you should be able to quickly find what you’re looking for.
Explore the LinkedIn Home Page
When you first create a LinkedIn account, your home page displays minimal content, which is understandable considering that you don’t have any contacts yet. A welcome box greets you, encouraging you to expand your network and start following people and companies. I recommend, however, that you create your profile before networking and following.

It’s important to remember the content on your home page is dynamic and is unique to your LinkedIn actions, network, and account settings. Your home page changes, however, as you start participating on LinkedIn. As an active LinkedIn user, the left column of your home page includes the following content:

• Your current status and a text box for updating your status. See Chapter 5, “Managing and Updating Your Profile,” for more information about updates.

• LinkedIn Pulse headlines, displaying relevant news articles as well as posts by LinkedIn influencers. See Chapter 9, “Viewing News on LinkedIn,” for more information about LinkedIn Pulse and influencer posts.

• The latest updates from your network. By default, this section displays all updates, but you can narrow this to display only updates from your connections, articles people have shared, updates from group members, profile updates, and so forth. You can also search updates by keyword and specify which updates display on your home page. See Chapter 4, “Customizing Your LinkedIn Settings,” for more information about customization options.
The right column of your home page displays the following:
• A list of three people you might know based on your existing connections. You can click the Connect link below a name to send an invitation to connect. If you haven’t added any connections yet on LinkedIn, this option doesn’t appear.
• A box with advertisements.

• The Who’s Viewed Your Profile box, which tells you how many people have viewed your profile recently. To access details about who has viewed your profile, you must either allow others to view your name and headline when you visit their profiles or upgrade to a premium account. If you haven’t created a profile yet or no one has viewed your profile, this option doesn’t appear.
• The Your LinkedIn Network box lists your number of connections, the total size of your network, and the number of new people in your network.

• Boxes for jobs, groups, and companies relevant to your background. LinkedIn uses the information from your profile to determine relevant content to display. For example, if you select Marketing as your industry, the content displayed should be useful to a marketing professional.
Navigate LinkedIn
Navigating LinkedIn is a straightforward process after you understand its navigational structure. LinkedIn pages display two navigation tools: a navigation bar at the top of the screen with two rows and a bottom menu of additional options.
The navigation bar includes links to the most popular LinkedIn destinations, with drop-down menus offering additional options.

Links on the top navigation menu include the following:
• Home—Return to the LinkedIn home page.
• Profile—Edit or view your profile and recommendations.
• Network—View contacts, add connections, and find alumni.
• Jobs—Perform an advanced job search or manage job postings.
• Groups—View your groups, view a group directory, or create a group.
• Interests—View and add companies, participate in groups, and follow influencers.
• Business Services—Post a job, access LinkedIn Talent Solutions (for recruiters), or create an ad.
• Upgrade—Purchase a premium account.

The bottom of the LinkedIn screen provides links to additional menu options, including LinkedIn company information, LinkedIn tools, and premium features.
Sign In to LinkedIn
After creating a LinkedIn account, you can sign in at any time at www.linkedin.com.
1. Enter your email address.
2. Enter your password.
3. Click the Sign In button.

Need a New Password?
If you forget your password, you can click the Forgot Your Password link to reset it.
Sign Out of LinkedIn
If you’re using LinkedIn on a public computer or a computer that other people have access to, you should sign out of your account when you’re finished. Otherwise, you might stay signed in.
1. Pause your mouse over your photo.
2. Click the Sign Out link.

View the LinkedIn Blog
The LinkedIn blog offers useful advice on making the most of LinkedIn and also alerts you to changes and new features.

1. Click the Blog link on the bottom navigation menu.

2. View the LinkedIn blog.
Get Help
If you need help with doing something on LinkedIn, particularly a new feature not covered in this book, you can access online help.
1. Pause your mouse over your photo.
2. Click the Get Help link.

3. Enter the help topic you want to see.
4. Click the Search button.

Choosing the Right LinkedIn Account Type
When you first sign up for LinkedIn, you receive a free basic account by default. This account offers so many powerful features that it should suit the needs of most users. Unless you specifically need a premium feature, try out the free account before making the decision to upgrade. With a free basic account, you can request a maximum of five introductions at one time, view 100 results per search, and save a maximum of three searches with weekly email alerts.
If you need more powerful networking features, you can upgrade to a paid premium account.
The LinkedIn Premium page offers four tabs with premium account options:
• LinkedIn Premium
• For Recruiters
• For Sales Professionals
Within each type, LinkedIn offers three levels with increasing features and pricing. If you aren’t a recruiter, job seeker, or sales professional, LinkedIn Premium offers a general selection of premium features.
Upgrade to a LinkedIn Premium Account
If you decide to upgrade to a paid account, you can do so in a few quick steps.
1. Click the Upgrade link.

2. Click the tab for the type of premium account you want. LinkedIn Premium is the default, but you can also choose For Recruiters, For Job Seekers, or For Sales Professionals.

3. Click the Annual option to pay upfront for a full year.
4. Click the Monthly link to be billed for your premium account each month.
Get a Discount by Signing Up for an Annual Plan
If you sign up for an annual plan, you receive a substantial discount—up to 25% per year. Before choosing this option, however, it’s a good idea to test a premium account for a month to verify it’s the right option for you.
5. Review what’s included in each plan in the Compare Plans section. For example, the higher priced plans include more InMail messages, introductions, searches, and so forth.

Do I Have to Sign Up for the Basic Plan?
The first column of the Compare Plans section displays the options available with the LinkedIn Basic plan. This is the default plan you receive when you sign up for LinkedIn. To keep this plan, you don’t need to do anything.
6. Click the Start Now button below your preferred plan.

7. Enter your payment information including credit card details and your address.
8. Click the Review Order button to review your information and confirm your purchase.
