
Chapter 5
Azure Container Instances
Overview
Azure Container Instances (ACIs) enable organizations to deploy containers in the cloud on-demand, without having to build and manage the back-end VM infrastructure. A serverless Azure environment completely managed by Microsoft, ACIs allow organizations to use containers without requiring the implementation of a container-orchestration solution such as Kubernetes. This makes it easy for organizations to get up and running with container instances extremely quickly. ACI supports both Windows and Linux container deployments using the Azure Portal, Azure PowerShell, the Azure CLI, and ARM templates.
Some common use cases for ACI include the following:
Event-driven applications and task automation
Batch processing jobs
Applications that require occasional and unpredictable bursts of high capacity
Key features
Some key features of ACIs are as follows:
Support for Docker images ACI supports the use of Docker images from a container registry, such as Docker Hub or Azure Container Registry. Docker Hub and Azure Container Registry are cloud-based container repositories to build, test, store, and share containers.
Public internet access ACIs enable developers to expose a container group directly to the internet with a fully qualified domain name (FQDN) and a public IP address. It also enables developers to set up a custom DNS name label for their application to make it accessible using the azureregion.azurecontainer.io DNS suffix.
Secure communication ACI requires all secure communications between servers and applications to use TLS 1.2 only. Older protocols such as TLS 1.0 and TLS 1.1 are no longer available for use.
Interactive shell support ACI provides an interactive shell that enables developers to run commands while a container is actively running. This helps when troubleshooting issues on running containers.
Security on the hypervisor level ACI ensures that applications running in containers hosted in a multi-tenant environment like Azure using shared infrastructure remain completely isolated and function as they would in a dedicated virtual machine (VM).
Support for resource customization Containers are generally used to run a single application, API service, or batch job. Different applications, API services, and batch jobs require different resource levels. Assigning the same level of resources to all containers would be an extremely expensive option. Fortunately, ACI enables users to specify the memory and the number of vCPU based on the actual needs of the container. This helps reduce the resources allocated and thereby better control and manage expenses incurred.
Azure Files for persistent data storage Users can mount Azure Files shares on ACI instances to provide persistent storage that allows containers to retrieve state data post reset.
Benefits of container services
There are a few key benefits to using ACIs. First, ACIs support both Windows- and Linux-based container groups. However, at present, there are a few features that are available only for Linux container groups, including the following:
Support for mounting Azure Files shares Users can mount a server message block (SMB) file share stored on Azure Storage to the container for file sharing.
Support for mounting a Git repo volume Users can mount a directory to the container and place a copy of the Git repository into it when the container starts.
Support for mounting a secret volume Users can mount a secret volume that provides sensitive information to a container that is required during runtime.
Support for mounting an emptyDir volume Users can mount an empty directory for all containers in a container group to facilitate data sharing between them.
Support for deployment on an Azure virtual network This allows for secure communications with other resources located in the virtual network and on interconnected on-premises networks.
Support for multiple containers in a container group ACIs support multiple containers in a single container group, thereby allowing other interconnected containers that are useful for monitoring, logging, and configuration activities to load alongside the application container.
Support for Azure Monitor resource usage metrics You can use Azure Monitor to monitor ACI instance resource usage metrics to reveal detailed patterns around resource consumption to enable planning and optimization.
Additionally, both Windows and Linux containers generally start much faster than containers hosted on VMs. Because Azure manages the underlying VM infrastructure, ACI can bring containers online within seconds. Note, however, that Linux containers load much faster than Windows containers due to the size of the OS.
Finally, containers can be grouped together to share the same resources, local network, storage volumes, and lifecycle policies. For example, you might have a container that contains an application, back-end services, logging operations, and so on. You can then schedule the container group to run, so all the containers inside the group run together. (This is currently supported only for Linux containers.)
Deployment considerations
There are a number of features to consider when planning the deployment of ACIs. Let’s dive deeper into each of these.
Container groups
As mentioned in the preceding section, a container group is a group of containers that share the same resources, local network, storage volumes, and lifecycle policies. A container group is scheduled on the same underlying host machine.
For example, a container group could consist of the following:
An application container and a logging container, so the application container can store all the logging information in the logging container.
An application container and a monitoring container, so the monitoring container can continuously monitor the health status of the application container. This can help in raising alerts and carrying out automated remediation actions.
An application front-end container and an application back-end container, where the front-end services client requests and the back-end retrieves client data.
A single functional task divided into a number of container images for independent management by different teams.
Deployment
A container group can be deployed using one of the following:
Azure Resource Manager (ARM) template ARM templates allow the implementation of infrastructure as code. An ARM template can deploy containers along with other Azure services, such as an Azure Files share. This makes it the ideal method of deployment when multiple Azure services are to be deployed along with the container instances.
YAML file A YAML file is a structured configuration file that provides the ACI service with details of the container instances to deploy. It is the recommended method of deployment when only container instances are being deployed.
Resource grouping
ACI combines all the resources required by the different container instances in a container group before allocating the underlying infrastructure. It is important to define the resource requirements of each container instance based on the workload running therein to allow for optimal allocation.
Service limits
ACI has a few service limits that you must account for as part of the deployment-planning exercise. Some key limits include the following:
100 standard SKU container groups per region per subscription A standard SKU provides the shared underlying infrastructure to run the container instances.
Zero dedicated SKU container groups per region per subscription A dedicated SKU provides dedicated hardware on which to run the container instances.
60 containers per container group A container group can support a maximum of 60 containers. You should avoid setting up containers that are not interdependent or interconnected in the same container group if there is a possibility of hitting this limit.
20 volumes per container group A maximum of 20 volumes are supported per container group. In case you are reaching the limit, see if any volumes overlap based on their purpose or contents.
Container instance resources
You can set up every container instance to request the minimum and maximum resources required. This enables each instance to initially request a certain amount of resources, and to scale up if required based on the maximum resource allocation on the instance level and the available resources on the container group level. To identify the ideal resource allocations and limits on the container group level, you must understand the minimum, average, and peak resource requirements across all containers.
Networking
One of the key features of ACIs is the ability to publish container instances publicly using a FQDN and a public IP address. This makes it possible to access container instances on particular ports externally using the FQDN/IP address. Individual container instances can be exposed on different ports to make the required services available externally. At the same time, all container instances can communicate with each other internally, without requiring additional port configuration between the container instances.
Container instances with private network access can communicate with other internal resources hosted on an Azure virtual network or another private network connected to the Azure virtual network via VPN/ExpressRoute. You can achieve this by deploying the container groups in an Azure virtual network. This gives all the container instances in that group the ability to communicate with other private resources/services in a secure manner.
Storage
Storage in container instances is non-persistent. However, you can make persistent storage available to container instances using different storage services available in Azure and hosted outside of Azure. These include the following:
Azure Files share You can create a volume on an Azure Files share using the Azure Storage service and make it available to container instances using the SMB protocol to store, read, and write persistent data. This can also help instances share data among each other.
Secret volume A secret volume provides read-only storage to store sensitive information required by a container instance during startup or runtime. Sensitive information could include SSH keys, database credentials, and so on, which should be accessible only by the container instances. These can be stored as files on the secret volume, and the volume mapped to all container instances in a container group.
Empty directory An empty directory can be mapped to provide writeable storage to container instances in a container group. This can be a shared directory for data sharing or used for other purposes, such as storing checkpoint files, logs, or other data required by the other container instances, or as a scratch volume. The maximum size for an empty directory is currently 50 GB.
Git repo volume A Git repo volume is a clone of an existing Git repository copied and mounted to a container instance at startup.
Each of these can be mapped to specific paths within the individual containers in a group.
Walkthrough
Let’s walk through the process of creating a basic container instance using the Quickstart images provided by Microsoft in Azure. You will build these using the Azure Portal, Azure PowerShell, and the Azure CLI.
Using Azure Portal
To create a container instance using the Quickstart image with the Azure Portal, follow these steps:
In the Azure Portal, type container instances in the search box to locate the service and select it from the list that appears.
Click Create or Create Container Instances to start the Create Container Instance wizard. (See Figure 5-1.)

FIGURE 5-1 Create container instance.
In the Basics tab of the Create Container Instance wizard, enter the following information (see Figure 5-2), and click Next:
Subscription Select the subscription that will host the container instance.
Resource Group Select the resource group you want to use to host the container group. Alternatively, to create a new resource group, click the Create New link, and follow the prompts.
Container Name Type a name for the container. If the name you type is already in use, the wizard will prompt you to select another name.
Region Select the Azure region in which you want to host the container instance.
Image Source Select the Quickstart Images option button. This enables you to select from pre-built images provided by Microsoft to quickly obtain the container instance with a test or temporary image.
Image Click the drop-down list and select the mcr.microsoft.com/azuredocs/aci-helloworld:latest (Linux) image.
Size Choose to keep the instance size at the default setting. Alternatively, click the Change Size link and follow the prompts to customize the resources required. (See Figure 5-3.)

FIGURE 5-2 The Basics tab of the Create Container Instance wizard.

FIGURE 5-3 Customize the container instance size.
Enter the following information on the Networking tab (see Figure 5-4) and click Next:
Networking Type Select the Public option button to make the container instance available publicly.
DNS Name Label Type a DNS name label. This label must be unique across all publicly accessible container instances. If the name you type is already in use, the portal will display an error and prompt you to enter a different label.
Ports Leave the default setting as is. This port will be opened on the container instance for access.
Ports Protocol Leave the default setting as is.
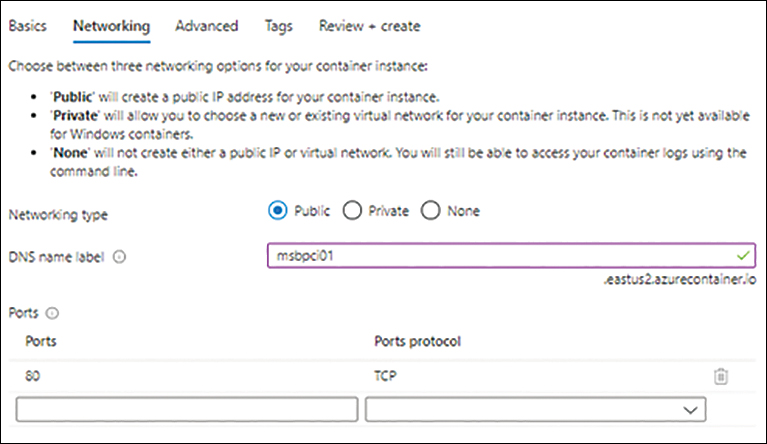
FIGURE 5-4 The Networking tab of the Create Container Instance wizard.
On the Advanced tab (see Figure 5-5), enter the following information and click Next:
Restart Policy Select the policy you want to apply for instance restarts on exit. In this case, leave the default setting, On Failure, as is.
Environment Variables Enter the desired settings here—in this case, the default settings.
Command Override Enter the desired setting here—in this case, the default setting.

FIGURE 5-5 The Advanced tab of the Create Container Instance wizard.
In the Tags tab, enter any tags required for the container instance, and click Next.
On the Review + Create tab, review your settings and click Create. (See Figure 5-6.)
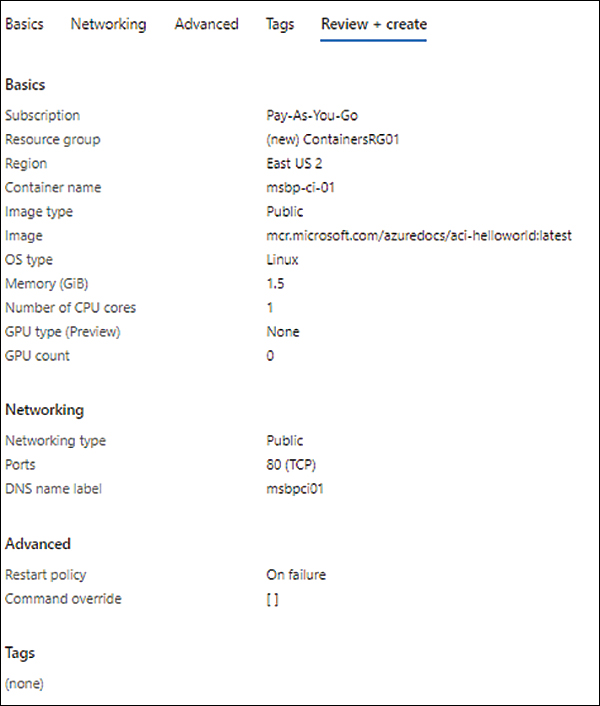
FIGURE 5-6 Review and create your container instance.
Select the instance in the Azure Portal. You’ll see the FQDN for the instance in the Overview section. (See Figure 5-7; the FQDN entry is on the far right.)

FIGURE 5-7 Container instance overview.
Browse to the FQDN location in a web browser to verify that the container instance is online. (See Figure 5-8.)

FIGURE 5-8 The container instance FQDN in a web browser.
Using Azure PowerShell
You can use the New-AzContainerGroup Azure PowerShell command to create a container group with a container instance, as shown in the following code snippet. Use this snippet to create the same container as you did in the Azure Portal. Be sure to either delete the previous instance or give this new instance a different name:
# Create a resource group to host the container instance. In case of using an existing
resource group skip this command and enter the required existing resource group in the
next section.
New-AzResourceGroup -Name ContainersRG01 -Location EastUS2
#Create Container group using the Hello World Quickstart Linux image
New-AzContainerGroup -ResourceGroupName ContainerRG01
-Name msbpcr01 -Image mcr.microsoft.com/azuredocs/aci-helloworld:latest
-OsType Linux -DnsNameLabel msbpcr01 -Ports 80
Using Azure CLI
You can use the az container create Azure CLI command to create a container group with a container instance, as shown in the following code snippet. Use this snippet to create the same container as you did in the Azure PowerShell. Be sure to either delete the previous instance or give this new instance a different name:
# Create a resource group to host the container instance. In case of using an existing
resource group skip this command and enter the required existing resource group in the
next section.
az group create --name ContainerRG01 --location eastus2
#Create Container group using the Hello World Quickstart Linux image
az container create --resource-group ContainerRG01 --name msbpcr01
--image mcr.microsoft.com/azuredocs/aci-helloworld --dns-name-label msbpcr01 --ports 80
Container orchestration
Container orchestration comes into the picture when environments have a number of containers that need to be deployed and managed in an automated fashion. Although you can combine container instances in container groups, as the number of container instances goes up, managing each individual instance adds significant overhead.
Using container-orchestration tools such as Azure Kubernetes Service (AKS), you can automate container scaling and upgrade coordination and management, while ACI handles basic container-scheduling activities. This helps large environments with hundreds or even thousands of containers efficiently scale and manage them.
Container registry
A container registry provides a single storage to build, store, scan, and manage container images and associated artifacts. There are three types of container registries that can be used with ACI:
Azure Container Registry Azure Container Registry is a fully managed and geo-replicated container registry service provided in Azure. There are a few benefits to using this service compared to other container registry services, as detailed here:
Faster deployment to ACI compared to private registry services.
Faster deployment of new containers using existing container images.
Geo-replication of the registry, providing a redundant environment that is available across Azure regions.
Private container registry A private container registry is an independently managed and hosted registry service maintained outside of Azure. This allows organizations to use their existing private container registry to deploy containers in ACI. An organization might do this for any of the following reasons:
Security requirements for self/managed hosting outside of Azure.
Existing investments in a container registry service.
Faster deployment using an existing service versus migrating to Azure Container Registry.
Other public container registry services These include services such as those provided by Docker, AWS, Google, and OpenShift. Not all of these are supported for use with ACIs; therefore, it is important to verify the available support during deployment planning. Use these only if you need to continue to use an existing container registry service instead of moving to Azure Container Registry.
Best practices
There are a few best practices for deployment to consider, depending on your specific environment needs. Following is a small list of these best practices, along with guidance to assist you during deployment planning:
Keep container image sizes small Although ACIs currently support a maximum container image size of 15 GB, you should try to minimize container sizes to avoid slow startup times.
Use Azure Container Registry for production deployment Although you can use other container registries for development and testing phases, to reduce the load times of production workloads, it is highly advisable to host your container images in Azure Container Registry. To simplify architecture and management, it is best to migrate completely to Azure Container Registry, but if that is not possible for all environments, you should at least manage production deployments there.
Use approved container images and registries Use only approved container images for production deployments, and have tools and processes in place to detect and prevent the use of unapproved container images. You can achieve this by using Azure Container Registry to allow only images that have been signed by their trusted publishers. Or go one step beyond and permit the use of approved image registries only. This will limit the ability to introduce unknown images into the environment.
Use version tags It is a recommended practice to have a defined and structured mechanism to tag container images. Use image version tags to identify the required image rather than specifying the latest tag, which can result in the accidental deployment of untested code.
Use GitHub actions for automation You can use GitHub actions to automate the deployment of containers directly to ACIs. If GitHub is the deployment source being used for an environment, use this feature to automate deployment actions.
Allocate minimum and maximum resources Have a minimum allocation of 1 vCPU and 1 GB of memory for any container group. (Individual container instances hosted in the group can be set up with less than 1 vCPU and 1 GB of memory.) Set the maximum resource allocation based on the combined resource requirements of the container instances and their minimum, average, and maximum requirements, with an additional buffer for the ACI service.
Encrypt deployment data using customer-managed keys The ACI service stores certain data related to the containers it runs, such as deployment metadata, environment variables, sensitive keys required during runtime, and persistent logs. This data is automatically encrypted by the Azure service using Microsoft-managed keys with 256-bit AES encryption. This should suffice for most organizations. However, to accommodate compliance or security needs, customer-managed keys can be used in place of Microsoft-managed keys for this encryption. Make sure key management and rotation processes and guidelines are in place.
Use Azure Logic Apps for automation ACIs support a connector to Azure Logic Apps, which you can use to set up workflows and automated tasks for container group deployment and management—for example, monitoring for Azure Logic Apps triggers to initiate the creation or deletion of container groups.
Export container group configuration After you configure a container group, you can export the configuration to a YAML file using the Azure CLI or Azure PowerShell. This makes it possible to restore or perform new builds of container groups in the event of any disaster or recovery scenario. It’s a good practice to version-control the exports to make it easy to identify them and to set up automation to regularly perform this task in environments where the configuration changes on a regular basis.
Security best practices
Along with the deployment best practices covered in the preceding section, there are several security-related best practices to consider. A number of these relate to compliance and security guidelines and needs of an organization. Several common ones are listed here:
Enforce the principle of least privilege You can reduce the attack surface in the event of a security breach by running containers only with the level of access needed to manage their specific jobs rather than with root or extended access—a concept called the principle of least privilege. This limits the access an attacker has to the overall environment.
Scan container images Use Azure Security Center to scan container images stored inside Azure Container Registry for potential vulnerabilities. Alternatively, you can use third-party scanning tools from Twistlock, Trend Micro, and others to scan images stored in Azure Container Registry or any private registry.
Secure access to the container registry It’s best to use a private registry service like Azure Container Registry or Docker Trusted Registry, as these enable you to granularly define access and to prevent the introduction of unwanted images. Azure Container Registry uses Azure role-based access control (RBAC), making it easier to define access based on specific admin role activities.
Protect access to production containers Limit access to production containers to privileged users who require access. Use Azure RBAC to restrict access to such users.
Use Azure Key Vault to secure credentials Azure Key Vault is a managed service provided in Azure to store sensitive information, such as certificates, passwords, and connection strings. This information is encrypted by Microsoft, and the keys are under Microsoft’s management. You can use this service to store sensitive information rather than storing it within the application code or files on the container instances. Azure Key Vault encrypts data at rest and in transit when the data is shared with other Azure services.
Use dedicated hosts for maximum isolation ACI provides a dedicated SKU, which you can use to access dedicated physical server hardware in the selected Azure region to run the containers. This provides the maximum level of isolation possible for the container images. This can be a great option for organizations requiring adherence to certain compliance and regulatory guidelines for their container workloads.
Use Azure Firewall for better traffic management and control Instead of making a container instance accessible directly over the public internet, use Azure Firewall to route ingress traffic to the container instances. This adds a layer of security for the workloads and makes it easier to define complex access rules. It also allows you to route all outbound traffic from the container instances via Azure Firewall, making it easier to monitor and manage this traffic, too.
Use a vulnerability-management solution Use a vulnerability-management solution to detect, identify, and manage threats on container images and on running containers. Having a solution in place that is integrated into the DevOps lifecycle can help mitigate known issues during the development phase itself.
Enable logging for administrative access Logging all administrative access to containers can help in audits and in retracing actions performed before any incident or breach. Integrated solutions like Azure Monitor can be used for this purpose.
Use Azure Monitor Azure Monitor can be integrated with ACI to monitor resource usage, network usage, and file access by container instances. This provides insights into resource consumption and access, and helps when troubleshooting issues, planning capacity, and managing access.
Use network segmentation In environments that require a high level of security and network controls, you can perform network segmentation between container instances to protect instances from a breach in another instance’s subnet. You can either do this manually during the deployment planning phase or automatically using third-party tools that monitor and manage the nano-segmentation required during runtime.
Approve required files and executables for use during runtime Providing a safe list of files and executables to be allowed access for use during runtime can significantly reduce the attack surface on a container instance. Incorporating this from the development cycle stage provides a baseline for the container and makes it easier to troubleshoot in the event of anomalies and unexpected behaviors during runtime.
Remove unnecessary services and processes This reduces the attack surface and the number of potential vulnerabilities that need to be monitored and managed for.