
Chapter 4
Azure Virtual Desktop
Overview
Azure Virtual Desktop (AVD) is a desktop-as-a-service that is built to run at scale in Microsoft Azure. It is a virtualization service for both desktops and applications that combines and leverages different Azure services for compute, storage, networking, security, and monitoring, to deliver a complete solution.
Key features
Features of AVD include the following:
You can publish virtual desktops and apps on the Windows Server OS and the Windows 10 Desktop OS, giving users a familiar experience to their on-premises environment.
AVD allows integration across Azure services for load balancing, high availability, security, identity and access controls, monitoring, and diagnostics.
You can use existing on-premises custom OS images to deploy session hosts if the ones provided in the Azure Gallery and Marketplace do not meet your compliance and regulatory needs.
You can deploy multiple pools for user or app segregation to address a variety of workload requirements.
You can assign users to multiple app groups, thereby reducing the complexity of permissions and of the access control model.
Support for a simplified deployment and management experience using the Azure Portal, Azure Virtual Desktop PowerShell, the Azure CLI, and REST APIs enables administrators to quickly get up to speed with AVD.
You can give users access to full desktops, to individual apps, or to a combination of the two.
A new Reverse Connect protocol allows secure access using reverse connections to the AVD service. No inbound ports need be exposed on the back-end VMs hosting virtual desktops or apps.
Benefits of AVD are as follows:
AVD makes it possible to quickly deploy secure multi-user/multi-session Windows 10 virtual desktops and scale them depending on changing organizational requirements. This makes it a compelling service for organizations looking to provide secure remote work capabilities for their employees across various devices using the familiar Windows 10 interface.
AVD enables users to employ company-provided or personal devices like laptops, tablets, and smartphones, whether they are Android or iOS, and experience a secure Windows 10 experience.
You can virtualize Microsoft 365 apps for enterprise and optimize them to work with AVD and the Windows 10 multi-session OS.
Along with Windows 10, you can use Windows 7 as the client OS for single-user virtual desktops. Microsoft will provide free extended security updates for the OS. (Expect this to change in the future, however, as Windows 7 is officially at end-of-life except for in certain use cases.)
You can easily migrate existing on-premises Remote Desktop Services (RDS) desktops and apps to AVD, making it easier for organizations to get rid of legacy hardware and to benefit from the scalability, availability, and security of the cloud.
AVD reduces security and management overhead, as Microsoft manages the back-end infrastructure and provides gateway, broker, and web access functionalities. You manage only the image and session host VMs.
Using the Windows 10 multi-session desktop OS supported only in AVD can help reduce costs by pooling compute, storage, and networking resources while maintaining the resources provisioned for users.
You can use Azure Automation for cost-management purposes, while still delivering the required capacity and availability in the environment.
Although Microsoft has had desktop and app virtualization solutions that leverage RDS and Hyper-V for many years, there was no full-fledged service in the Azure cloud that could provide all the different security and scalability features that AVD does. This has resulted in AVD quickly becoming one of the most widely used cloud-based desktop solutions.
Now that you have an overview of AVD, let’s dive deeper into how AVD uses different Azure services to deliver a complete enterprise-ready solution.
Core concepts
This section covers some core AVD concepts so you can better understand how to use this service in small and large environments to address various requirements.
Use cases
It is easy to set up a test environment to validate how AVD performs for any given organization based on the user and app requirements of that environment. It is, nonetheless, important to understand the best use cases for AVDs to obtain the maximum benefit from the service:
Remote work scenarios in which organizations want to enable employees to work from home in a secure manner.
Mergers and acquisitions scenarios that require the quick integration of new employees into existing work processes.
Scenarios in which elastic demand is needed to address the needs of short-term employees or contractors.
Scenarios in which regulatory compliance requirements mean the organization must secure desktops but reduce administrative overhead and minimize user impact in the process.
Scenarios in which security and data-privacy requirements mean the organization must secure end-user desktops gracefully yet swiftly.
Scenarios in which a test and development environment is needed for app and policy compatibility testing.
To host legacy or custom apps for engineering or design, which require specialized environments for use in a managed environment.
To migrate to supported Windows OS releases with minimal end-user disruption.
To provide employees with BYOD options and with the flexibility to work from different locations and using different devices in a unified and secure manner.
Although this is an extensive list, there might be other use cases specific to your environment based on cost, IT administrative needs, or other requirements. You must take these into account and validate that the ADE environment will provide a solid basis for long-term success.
Architecture
ADE consists of numerous components that must come together to provide a fully scalable and secure desktop in the cloud. Although many of these components are deployed and managed by Microsoft, many of them are deployed, managed, and secured by the customer. Figure 4-1 shows a standard AVD architecture that includes all the available components.

FIGURE 4-1 Azure Virtual Desktop components overview.
The design shown in Figure 4-1 includes the following components:
The AVD control plane This consists of Web Access, Gateway, Connection Broker, Diagnostics, and Extensibility Components services. The AVD control plane is built and managed by Microsoft as a shared service.
Virtual networks, subnets, AVD VMs/host pools, and back-end storage (using either Azure files or Azure NetApp files) The end-customer builds and manages these.
The ExpressRoute or VPN connection This helps connect the on-premises environment with the AVD infrastructure in the cloud.
Customer-managed on-premises AD Domain Services server(s) and the Azure AD Connect server These integrate with Azure Active Directory, web, application, and database server(s), which you can use as is for app publishing.
Azure Active Directory This manages the identity and authentication layer.
AVD control plane
The AVD control plane is a set of Microsoft-managed back-end service components that are completely managed and scaled per load across the entire AVD infrastructure. As mentioned, components of the AVD control plane include the following services:
Web Access The Web Access service enables users to access the AVD environment using an HTML5-compatible web browser from a variety of operating systems. It provides a user-friendly experience in BYOD and remote work scenarios.
Gateway The Gateway service allows any AVD client to securely connect to a virtual desktop and to apps hosted on the virtual desktop over the internet. It serves as an intermediary layer that coordinates connections between the client and the AVD VMs.
Connection Broker The Connection Broker service manages the load-balancing and session distribution of connections to virtual desktops and apps. It also manages the reconnection of existing sessions to the original virtual desktop (if possible) to ensure session continuity.
Diagnostics The Diagnostics service is an event aggregator that marks actions carried out by administrators or users in the AVD environment as successful or failed. These events can then be queried to identify components that are failing or have failed to initiate corrective action.
Extensibility Components You can manage AVD using the Azure Portal, the Azure PowerShell, or REST APIs. This extensibility also allows you to integrate third-party tools to extend and enhance the capabilities of the AVD environment.
Session connectivity
AVD uses the Remote Desktop Protocol (RDP) for session display and user input over network connections. Although RDP was released several years ago, with Windows NT 4.0 Terminal Server Edition, it has been constantly updated and improved with every subsequent Windows release. It is an extremely reliable protocol used extensively across most environments for remote session management. It requires ports to be opened on the firewall to access the underlying desktops or apps.
Reverse Connect
Reverse Connect is a new transport protocol built for AVD to establish remote sessions. It uses outbound HTTPS connections to the AVD infrastructure for a secure client connection. This is unlike the traditional on-premises RDS environment where a TCP listener is used for incoming RDP connections.
The most important aspect of this protocol is that it does not require any session host VMs to be directly exposed to the internet or any incoming ports to be opened. All communication between the host pool(s) and the back-end AVD control plane components occurs using HTTPS (port 443) only. This allows you to further secure connections using conditional access policies, such as source IP addresses, time of day, client OS, and so on.
Design considerations
Azure Virtual Desktop is made up of a number of different components and Azure services that work in concert. It is important to understand these components before designing the AVD solution to ensure that you incorporate them in the right manner.
Service locations
In an AVD environment, multiple resources are created, including the host pool, session hosts, app groups, and workspaces. There are some general best practices to keep in mind when deciding where to host these resources, such as the following:
Service metadata is geographically hosted based on the location of the host pool.
It is best to locate session hosts and app groups in the same location to avoid data transfer between locations.
Workspaces are app groups that should be set up in the same location so that updates to each go hand in hand.
If possible, it is best to host an app group and the related host pool in the same location.
Data storage location
Different components in the AVD environment store user data, VM data, and metadata. It is important to understand where and how this data can be stored to plan and select the hosting location.
You can use any available Azure region to host VM disks and user data using Azure Files, file servers, or other storage services. Companies are not currently required to host this data in specific regions; they can host this data in different regions based on user proximity, cost, security, data compliance, and administration needs.
Metadata contains information like AVD workspace names, host pool names, app group names, and user principal names in a datacenter. Whenever a service object is created, you must specify a location for it; this determines where metadata for the object will be stored. You are currently limited to storing metadata only in certain regions. So, it is best to select the Azure region that is closest to the primary access location, depending on what regions are available.
Because Microsoft manages storage, you should be aware that metadata is encrypted at rest and is synchronized to another region within a specific geography for redundancy and failover.
This is not the case for VM and user data, such as system OS, app settings, and user files. These reside in the region selected by the admin, and redundancy must be built and managed by the customer. In other words, Microsoft’s scope of services does not include the setup, maintenance, and recovery of these services or data sources.
Service limitations
Correctly designing your solution in the design phase helps alleviate issues during the growth/scaling phase. Although AVD is highly scalable, you should consider some Azure platform and AVD control plane limitations during the design phase to avoid issues later on:
Microsoft has a recommended limit of 5,000 VMs per Azure subscription per region. This applies to all supported Windows 10 Enterprise releases (single or multi-user sessions). To accommodate more user sessions, it is best to scale the hosts up with higher resources rather than scale out beyond the 5,000 VMs.
Automated scaling is limited to around 1,200 VMs per Azure subscription per region. As shown earlier in the “Architecture” section, you can use a hub-and-spoke model to deploy VMs across multiple subscriptions to bypass scaling limits.
There are API throttling limits of 600 VM reboots per hour for Resource Manager subscriptions. Although this will rarely cause issues for most enterprises, it is important to be aware of requirements for frequent VM reboots to remove app locks or perform frequent patching or updates. In such instances, performing the reboots on the OS level using either Microsoft or third-party management tools can help bypass this limitation.
The session host VM name prefixes, which are provided when the VM is deployed, cannot exceed 11 characters because instance names are auto-assigned using the remaining four characters. (NetBIOS has a limitation of 15 characters for every Windows computer account, and all session hosts in Azure must adhere to this.)
Although not impactful in most environments, a single resource group can contain no more than 800 instances of resources. To bypass this limitation, create more resource groups.
When deploying using ARM templates, there is a limit of 200 VMs per availability set. Without availability sets, this limit changes to 399 VMs. So, you can always increase the limit by switching off availability sets either in Azure Portal host pool enrollment or in the ARM template code.
Host pools
A host pool is a grouping of multiple session host VMs for user consumption. Ideally, all VMs are set up using the same image or template and would be grouped together as part of a host pool. This ensures consistency in experience for all users associated with that host pool. All apps, configurations, and updates should be the same across the entire set of session host VMs in a host pool. Users assigned to an app group are associated with each host pool for the publishing of specific apps or remote desktops.
Types of host pools
Two types of host pools can be deployed in an AVD environment: personal host pools and pooled host pools.
A personal host pool is one in which each session host VM is assigned to individual users. The assignment can be managed automatically or manually (directly). Automatic assignment takes place when a user connects to a host pool for the first time. Any available session host is automatically assigned to that user; the user then is connected to that host each time they sign in. This is also referred to as a persistent desktop experience because when a VM is assigned to a user, it allows the user to store data locally and retrieve it at any time. So, users can customize their desktop experience—including the apps that are installed—based on their own needs, without affecting the experience of other users.
A pooled host pool is one in which multiple session host VMs are pooled together for use by multiple users. In this scenario, all the VMs in the pool should have the same sizing, apps, and configurations to allow for efficient load-balancing. The operating system of the underlying VMs can be either a supported Windows Server OS or Windows 10 Enterprise multi-session OS. This is also called a non-persistent desktop experience because users are load-balanced across numerous session hosts, depending on host availability and on the load-balancing algorithm assigned to that host pool. Because it’s not guaranteed that users will sign back into the same host each time, their ability to customize their desktop experience is limited, because they do not have administrative rights on the host. Users should not store data locally to avoid data loss due to session host switchover. Instead, they should use file shares, sync desktop documents using OneDrive, and employ other similar technologies to access their data.
Load-balancing methods for pooled host pools
AVD provides two types of load-balancing algorithms for pooled host pools. Each algorithm has a different way of determining which session host will be assigned to a user when they connect to the host pool:
Breadth-first load balancing This type of load-balancing algorithm distributes all user sessions evenly across all session hosts in the host pool. The host-selection process is randomized. Rather than automatically selecting the host with the lowest number of sessions, the system identifies the five hosts with the fewest session and randomly assigns one of those hosts to a new user session. This type of load balancing provides an optimal user experience because the session load is shared evenly across hosts.
Depth-first load balancing This type of load-balancing algorithm first saturates an entire session host with the maximum user sessions allowed for a host in the host pool. When a session host reaches its limit, the load balancer diverts all new user connections to the next available session host in the host pool, until that session host reaches its limit. When selecting a host for a new session, the system chooses the session host with the most sessions that hasn’t reached its limit. If multiple hosts match these criteria, then the first host to respond to the query is selected. This type of load-balancing is ideal for enterprises that want more control over the number of VMs allocated to a host pool for cost-control purposes.
There are a few caveats to note:
Each host pool can use only one load-balancing method at any given time. However, you can change this method any time you want to.
In case a user has disconnected and is trying to reconnect to the host pool before the earlier session has been logged off, they will be reconnected to the same session as before. This happens with both load-balancing methods.
If any session host is set to prevent new connections, that host will be ignored by the load-balancing algorithm during host selection. This happens regardless of the host’s current utilization and active status.
Host pools walkthrough
The following sections step you through the process of creating host pools for your deployment using the Azure Portal, Azure PowerShell, and the Azure CLI.
Using the Azure Portal
You can use the Azure Portal to set up personal host pools and pooled host pools. To set up a personal host pool, follow these steps:
Log in to the Azure Portal and type Azure Virtual Desktop in the search bar.
Under Services, click Azure Virtual Desktop. (See Figure 4-2.)

FIGURE 4-2 Searching for the Azure Virtual Desktop service.
In the left pane, under Manage, click Host Pools.
Click the Create button to start the Host Pool Creation wizard. (See Figure 4-3.)

FIGURE 4-3 Host Pool creation.
In the Basics tab, enter the following information (see Figure 4-4):
Subscription Select the subscription that will host the AVD infrastructure.
Resource Group Select an existing resource group or create a new one to host the AVD environment.
Host Pool Name Enter a name for the host pool.
Location Select the Azure region you want to host the host pool metadata.
Validation Environment Specify whether this host pool will work as a validation environment. Set this to No for now.

FIGURE 4-4 Setting the host pool basic config.
Open the Host Pool Type drop-down list and choose Personal.
The Assignment Type drop-down appears. Open this drop-down list and choose Automatic. (See Figure 4-5.) Then click Next.

FIGURE 4-5 Choosing personal pool type and the pool’s assignment type.
In the Virtual Machines tab, next to Add Virtual Machines, click the No option button, as shown in Figure 4-6. (You will add VMs later.) Then click Next.

FIGURE 4-6 Adding VMs (or not).
In the Workspace tab, next to Register Desktop App Group, click the No option button, as shown in Figure 4-7. (You will do this later, too.) Then click Next.
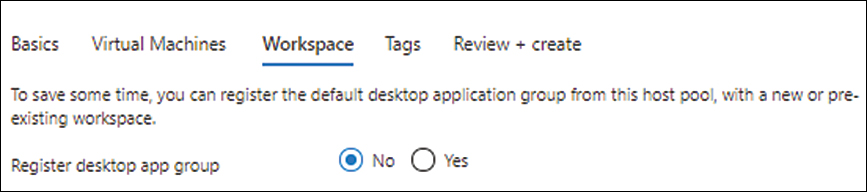
FIGURE 4-7 Registering the desktop app group (or not).
In the Tags tab, enter the following tags to assign them to this host pool and its associated resources (see Figure 4-8). Then click Next.
Name WVD-Environment-Type.
Value Personal.
Resource Leave this set to the default.

FIGURE 4-8 Setting up tags.
In the Review + Create tab, review your settings and click Create. (See Figure 4-9.) The new host pool will appear in the list of personal host pools in the Azure Portal. (See Figure 4-10.)

FIGURE 4-9 Reviewing and creating a personal host pool.

FIGURE 4-10 Confirming the creation of the personal host pool.
Setting up a pooled host pool is similar to setting up a personal host pool. Follow these steps:
Repeat steps 1 through 5. Be sure you choose a unique host pool name.
Open the Host Pool Type drop-down list and choose Pooled. (See Figure 4-11.)
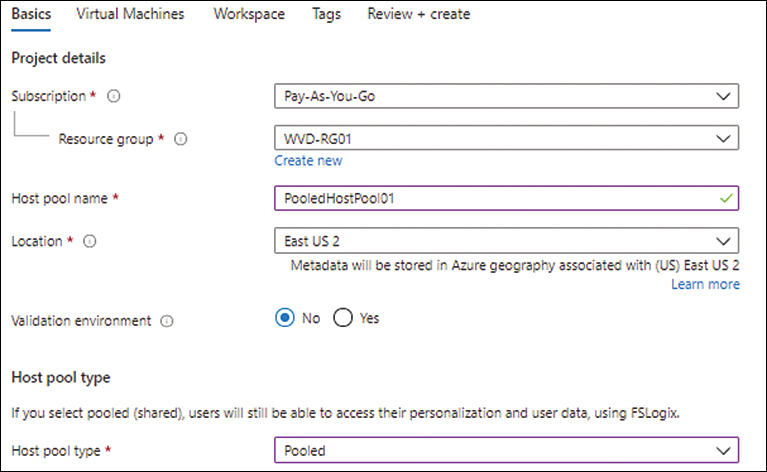
FIGURE 4-11 Creating a pooled host pool.
The Load Balancing Algorithm and Max Session Limit settings appear. Open the Load Balancing Algorithm drop-down list and choose the correct algorithm for your environment. In this case, I’ve chosen Breadth-First.
In the Max Session Limit box, enter the number of sessions you want the session host to support. This will be based on the size of the session host and on your individual session requirements. In this case, I’ve entered 20. (See Figure 4-12.)
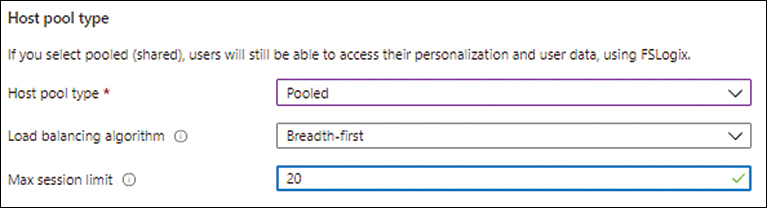
FIGURE 4-12 Setting the maximum session limit.
Repeat steps 8 through 11. The new host pool will appear in the list of pooled host pools in the Azure Portal. (See Figure 4-13.)

FIGURE 4-13 Confirming the creation of the pooled host pool.
Using Azure PowerShell
You can create a host pool with Azure PowerShell using the New-AzWvdHostPool command with various switches to set its parameters.
For example, to create a personal host pool as shown in the steps earlier, you could use the following code. Be sure to either delete the previous host pool setup or give this a different name. Replace all the variables as per your environment:
New-AzWvdHostPool -ResourceGroupName WVD-RG01 `
            -Name PersonalHostPool `
            -Location 'eastus2' `
            -HostPoolType 'Personal' `
            -PersonalDesktopAssignmentType Automatic `
            -LoadBalancerType Persistent `
            -RegistrationTokenOperation 'Update' `
            -ExpirationTime $((get-date).ToUniversalTime().AddDays(1).ToString('yyyy-MM-ddTHH:mm:ss.fffffffZ')) `
            -Description 'Description' `
            -FriendlyName 'Friendly Name' `
            -VMTemplate $null `
            -ValidationEnvironment:$false `
            -PreferredAppGroup Desktop
Here’s the code to create a pooled host pool:
New-AzWvdHostPool -ResourceGroupName WVD-RG01 `
            -Name PooledHostPool01 `
            -Location 'eastus2' `
            -HostPoolType 'Pooled' `
            -LoadBalancerType 'BreadthFirst' `
            -RegistrationTokenOperation 'Update' `
            -ExpirationTime $((get-date).ToUniversalTime().AddDays(1).ToString('yyyy-MM-ddTHH:mm:ss.fffffffZ')) `
            -Description 'Description' `
            -FriendlyName 'Friendly Name' `
            -MaxSessionLimit 20 `
            -VMTemplate $null `
            -ValidationEnvironment:$false `
            -PreferredAppGroup Desktop
Using The Azure CLI
You can create a host pool with the Azure CLI by using the az desktopvirtualization hostpool create command with various switches to set its parameters. The following Bash script shows you how. Be sure to either delete the previous host pool setup or give this a different name. Replace all the variables as per your environment.
To create a personal host pool, you could use the following code:
az desktopvirtualization hostpool create --host-pool-type Personal --load-balancer-type
Persistent --location eastus2 --name personalhosts2 --resource-group WVD-RG01
--description 'Test Pool' --friendly-name 'Personal Host Pool'
--personal-desktop-assignment-type Automatic"
Here’s the code to create a pooled host pool:
az desktopvirtualization hostpool create --host-pool-type Pooled --load-balancer-type
BreadthFirst --location eastus2 --name pooledhostpool01 --resource-group WVD-RG01
--description 'Test Pool' --friendly-name 'Pooled Host Pool' --max-session-limit 20
--personal-desktop-assignment-type Automatic
Validation pool
A validation pool is a special type of host pool for which Azure will apply back-end service updates before rolling them out to your other host pools. Having a validation pool enables you to ensure that service updates will not negatively affect the functionality of your apps, resulting in downtime.
You can set a host pool as a validation pool when you create the host pool or at some later point in time. You should build the validation pool using the same image or template as the production pool. This enables you to test your apps after service updates with complete confidence in the outcomes.
It is important to have a documented process in place for using validation pools after service updates. After a service update is applied to the validation pool, have a set of users sign in to the validation environment and perform all manner of checks to ensure the environment is working as expected.
Validation pool walkthrough
The following sections step you through the process of setting up a validation pool.
Using the Azure Portal
To set up a validation pool using the Azure Portal during host-pool creation, follow these steps:
Follow the steps outlined in the preceding walkthrough to launch the Create a Host Pool wizard.
Next to Validation Environment, select the Yes option button, as shown in Figure 4-14. Then complete the wizard as described previously to create the validation pool.

FIGURE 4-14 Creating a validation pool during host-pool creation.
To set up a validation pool using the Azure Portal for an existing host pool, follow these steps:
Open the existing host pool’s page in the Azure Portal.
In the left pane, click Properties.
Under Configuration, next to Validation Environment, click the Yes option button. (See Figure 4-15.)

FIGURE 4-15 Creating a validation pool after host-pool creation.
Using Azure PowerShell
You can create a validation pool with the same PowerShell script you used to create a host pool, but with the addition of the –ValidationEnvironment switch set to $true. The following code shows you how:
New-AzWvdHostPool -ResourceGroupName WVD-RG01 `
            -Name PooledHostPool01 `
            -Location 'eastus2' `
            -HostPoolType 'Pooled' `
            -LoadBalancerType 'BreadthFirst' `
            -RegistrationTokenOperation 'Update' `
            -ExpirationTime $((get-date).ToUniversalTime().AddDays(1).ToString('yyyy-MM-ddTHH:mm:ss.fffffffZ')) `
            -Description 'Description' `
            -FriendlyName 'Friendly Name' `
            -MaxSessionLimit 20 `
            -VMTemplate $null `
            -ValidationEnvironment:$false `
            -PreferredAppGroup Desktop `
            -ValidationEnvironment:$true
Using The Azure CLI
You can create a validation host with the same Azure CLI Bash script you used to create a host pool, but with the addition of the --validationenvironment switch set to true. The following code shows you how:
az desktopvirtualization hostpool create --host-pool-type Pooled --load-balancer-type
BreadthFirst --location eastus2 --name pooledhostpool01 --resource-group WVD-RG01
--description 'Test Pool' --friendly-name 'Pooled Host Pool' --max-session-limit 20
--personal-desktop-assignment-type Automatic --validation-environment true
App groups
An app group is a collection of applications, installed on a session host in a host pool, which can be made available to users. There are two types of app groups in the AVD environment:
Desktop app groups These give users access to the full desktop experience.
RemoteApp app groups These give users access to only the RemoteApps that are individually published.
Whenever a host pool is created, by default, a desktop app group (named Desktop Application Group) is automatically created to provide access to the full desktop experience. (You can delete this group if it is not required.) A RemoteApp app group is not created by default. If you want to publish RemoteApps, however, you must create one.
In environments in which different apps must be published for different groups of workers, you can create multiple RemoteApp app groups to facilitate this. A RemoteApp app can be part of both multiple RemoteApp app groups and the worker profiles that use that app group. For example, a specialized engineering app might only be part of a RemoteApp app group used by the engineering team, whereas an Office app might be part of multiple RemoteApp app groups, including the one used by the engineering team.
Users access AVD resources like RemoteApps or the full virtual desktop only after they have been assigned to the appropriate app groups. When deciding on an assignment strategy, keep these caveats in mind:
Although users can be part of both a desktop and a RemoteApp app group, they can launch only one type of app group in a given session.
When a user is assigned to multiple app groups in the same host pool, they will see all the resources in all those app groups.
Each Azure Active Directory tenant can support only 200 app groups.
App groups must be in the same location as the workspaces. (You’ll learn more about workspaces shortly.)
All app groups related to a host pool must be registered to the same workspace.
App groups walkthrough
The following sections step you through the process of creating an app group using the Azure Portal, Azure PowerShell, and the Azure CLI.
Using the Azure Portal
To create an app group using the Azure Portal, follow these steps:
In the Azure Virtual Desktop page, under Manage, click Application Groups.
A list of app groups appears. As shown in Figure 4-16, two app groups are created already—one for each of the host pools you created earlier.

FIGURE 4-16 List of app groups.
Click the Create button to start the Create an Application Group wizard.
In the Basics tab, enter the following information (see Figure 4-17) and click Next twice to skip the Applications tab and progress to the Assignments tab. (You’ll add applications later.)
Subscription Select the same subscription as the host pools.
Resource Group Select the same resource group as the one used by the host pool you want to associate with the app group.
Host Pool Select the host pool to associate with the app group. Be sure to select a pooled host pool. If you select a personal host pool, you will get an error asking you to select another host pool, as shown in Figure 4-17.
Location This is set automatically and is grayed out.
Application Group Type RemoteApp is automatically selected, and Desktop is grayed out because a desktop group has already been created by default.
Application Group Name Type a name for the app group.
In the Assignments tab, click Add Azure AD Users or User Groups (see Figure 4-18).
Select an AD user group that contains all the users to whom you want to give access to the apps in the app group and click Add.
Click Next twice to advance to the Tags tab. (You’ll register the app group to a workspace in the next section.)
In the Tags tab, enter any tags that you would like to apply (see Figure 4-19) and click Next.

FIGURE 4-17 The Basics tab of the App Groups Creation wizard.

FIGURE 4-18 Adding assignments.

FIGURE 4-19 Adding tags.
In the Review + Create tab, review your settings and click Create to create the app group. (See Figure 4-20.)

FIGURE 4-20 Reviewing the app group settings.
Using Azure PowerShell
You can create an app group with Azure PowerShell using the New-AzWvdApplicationGroup command with various switches to set the app group’s parameters. The following code shows you how:
New-AzWvdApplicationGroup -Name WindowsApps -ResourceGroupName WVD-RG01
-ApplicationGroupType "RemoteApp" -HostPoolArmPath '/subscriptions/7719ec11-92dd-457c-b393-
5adc481214c79/resourceGroups/WVD-RG01/providers/Microsoft.DesktopVirtualization/hostPools/
PooledHostPool01'-Location "East US 2"
Using The Azure CLI
You can create an app group with the Azure CLI az desktopvirtualization applicationgroup create command with various switches to set the app group’s parameters. The following Bash script shows you how:
az desktopvirtualization applicationgroup create --location "eastus2" --description
"WVD Application Group for Pooled Desktops" --application-group-type "RemoteApp"
--friendly-name "WindowsApps" --host-pool-arm-path "/subscriptions/7719ec11-92dd-457c-
b393-5adc12a3e4c79/resourceGroups/WVD-RG01/providers/Microsoft.DesktopVirtualization/
hostPools/PooledHostPool01" --name "WindowsApps" --resource-group "WVD-RG01"
Workspaces
A workspace is a collection of app groups. In each AVD tenant, each app group must be associated with a workspace. This enables users to see and use the desktops and remote apps assigned to each app group.
Workspaces walkthrough
The following sections step you through the process of creating a workspace using the Azure Portal, Azure PowerShell, and the Azure CLI.
Using the Azure Portal
To create a workspace using the Azure Portal, follow these steps:
In the Azure Virtual Desktop page, under Manage, click Workspaces.
Click the Create button to start the Create a Workspace wizard. (See Figure 4-21.)
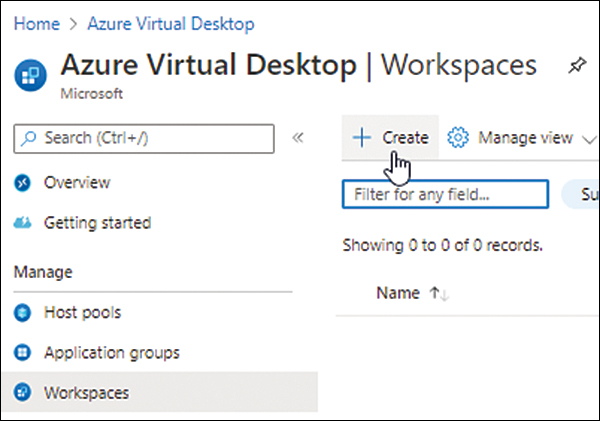
FIGURE 4-21 Creating a workspace.
In the Basics tab, enter the following information (see Figure 4-22) and click Next:
Subscription Select the same subscription as the host pools.
Resource Group Select the same resource group as the one used by the app group you want to associate with the workspace.
Workspace Name Enter a unique name for the workspace.
Friendly Name Enter a friendly name for the workspace.
Description Optionally, enter a description for the workspace.
Location Select the location where you want to create—ideally, the same region as the Azure host pools and app groups.
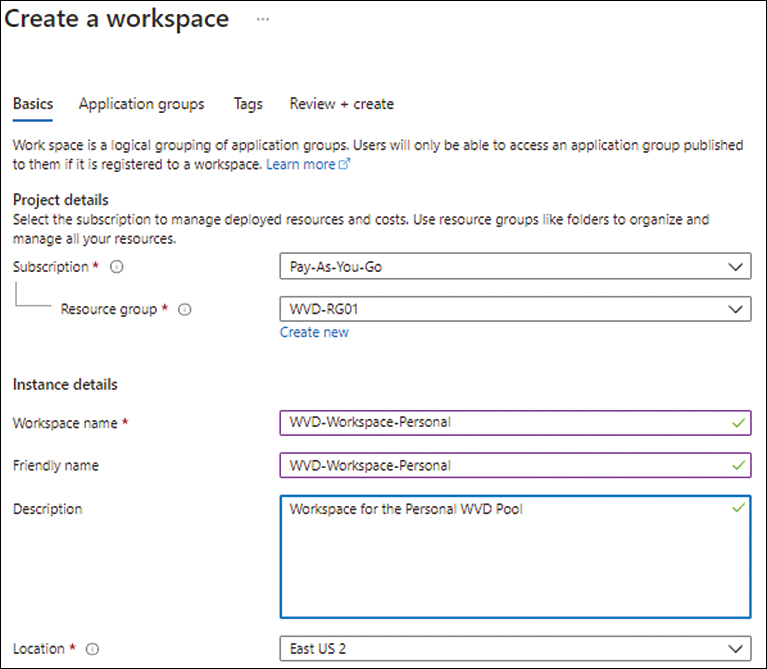
FIGURE 4-22 The Basics tab of the Create a Workspace wizard.
In the Application Groups tab, next to Register Application Groups, select the Yes option button.
Click the Register Application Groups link. (See Figure 4-23.)

FIGURE 4-23 Registering app groups.
Click the WindowsApps app group you created earlier and click OK. (See Figure 4-24.)
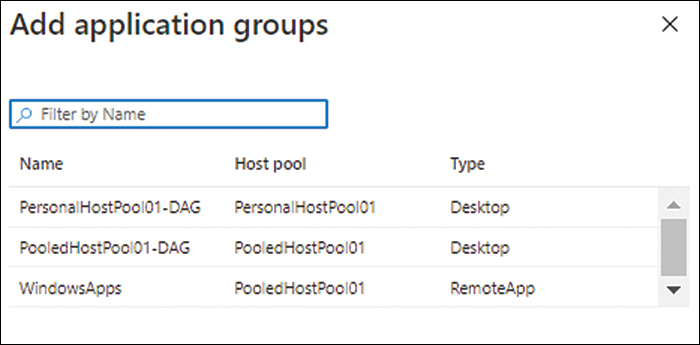
FIGURE 4-24 App group selection.
Verify the app group appears in the Application Groups tab (see Figure 4-25) and click Next.

FIGURE 4-25 App group setup.
In the Tags tab, enter any tags you want to apply to identify this workspace, and click Next. In this case, I’ve entered these tags (see Figure 4-26):
Name WVD-Environment-Type
Value Personal
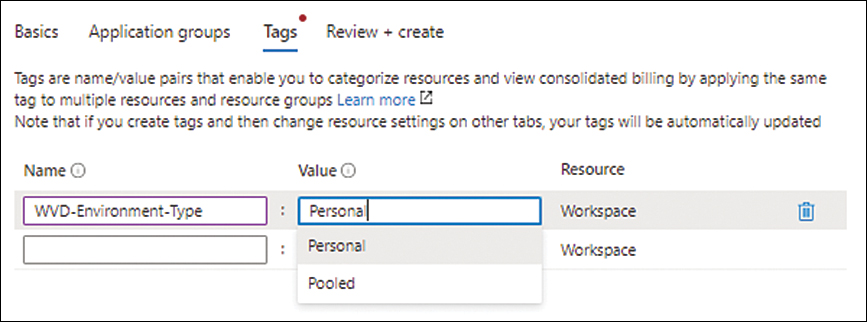
FIGURE 4-26 Adding tags to the workspace.
In the Review + Create tab, review your settings and click Create to create the workspace. (See Figure 4-27.)

FIGURE 4-27 Reviewing the workspace settings.
Using Azure PowerShell
You can create a workspace using the Azure PowerShell New-AzWvdWorkspace command with various switches to set the workspace’s parameters. The following code shows you how:
New-AzWvdWorkspace -ResourceGroupName WVD-RG01 -Name WVD-Workspace-Pooled -Location
'eastus2' -FriendlyName 'WVD-Workspace-Pooled'-ApplicationGroupReference $null
-Description 'Workspace for Pooled Desktops'
Using The Azure CLI
You can create a workspace using the Azure CLI az desktopvirtualization workspace create command with various switches to set the workspace’s parameters. The following Bash script shows you how:
az desktopvirtualization workspace create --resource-group "WVD-RG01" --location
"eastus2" --description "Workspace for Pooled Desktops" --friendly-name "WVD-Workspace-
Pooled" --tags WVD-Environment-Type="Pooled" --name "WVD-Workspace-Pooled2"
Session hosts
Session hosts are the underlying VM instances that host session-based desktops and apps accessed by AVD end-users. When a user connects to the AVD environment, the connection traverses through the Web Access, Gateway, and Broker services to land on a session host, which loads the user’s profile data along with the apps provisioned for the user.
In smaller deployments, you can provision session hosts individually as part of the AVD tenant and host pool. In larger deployments, it’s best to use golden images that contain all the required apps and configuration. This facilitates the automated provisioning of large numbers of session hosts on an ongoing basis.
There are numerous factors to consider when deciding on the operating system, VM size, and licensing model for session hosts. These are covered in the following sections.
Operating systems supported
AVDs session hosts support different Windows operating systems in line with Microsoft’s OS lifecycle policies. Only 64-bit operating systems are supported. Currently, this support extends to the following OS images. However, this might change based on the time of your deployment. Check the latest guidance to choose the best OS image for your needs:
Windows Server 2019
Windows Server 2016
Windows Server 2012 R2
Windows 10 Enterprise multi-session
Windows 10 Enterprise
Windows 7 Enterprise
Table 4-1 shows the OS deployment and automation options.
TABLE 4-1 OS deployment and automation options
Windows OS | Azure Gallery Images | Manual host deployment | ARM templates | Azure Marketplace provisioning |
|---|---|---|---|---|
Windows Server 2019 | Yes | Yes | No | No |
Windows Server 2016 | Yes | Yes | Yes | Yes |
Windows Server 2012 R2 | Yes | Yes | No | No |
Windows 10 Enterprise multi-session, version 1909 and later | Yes | Yes | Yes | Yes |
Windows 10 Enterprise, version 1909 and later | Yes | Yes | Yes | Yes |
Windows 7 Enterprise | Yes | Yes | No | No |
As you can see, Windows Server 2016 and Windows 10 single-user and multi-session currently provide maximum flexibility and support. Regardless, you want to select the OS that is most suitable to meet your environment’s automation requirements. If you have OS support restrictions based on app compatibility limitations, consider these when designing the automation for the environment.
Windows 10 Enterprise multi-session
Windows 10 Enterprise multi-session is a new Remote Desktop Session Host (RDSH) that allows multiple concurrent interactive sessions. (Previously, this was possible only using Windows Server OS.) This gives users the Windows 10 experience they are used to on their PCs but allows IT to take advantage of the cost benefits of per-user Windows licensing (rather than the Remote Desktop Services (RDS) client access license required by the RDS on Windows Server OS).
Windows 10 Enterprise multi-session is a virtual edition of Windows 10 Enterprise. Its ProductType property has a value of 3, the same as Windows Server OS. This keeps the Windows 10 Enterprise multi-session OS compatible with existing RDSH multi-session–aware apps, existing RDSH management tools, and low-level system performance optimizations built and tested for RDSH environments.
Application installers that are designed to work only when the ProductType property is set to Client will prevent app installation on Windows 10 multi-session OS. To avoid this, either confirm with the app vendor or test on a standalone Windows 10 Enterprise multi-session VM to be sure app installation works as expected.
Windows 10 Enterprise multi-session is optimized for AVD. It can’t be run in an on-premises production environment or activated using Key Management Service (KMS) on-premises. Microsoft’s licensing agreement deems it a violation if Windows 10 Enterprise multi-session is set up to run outside of Azure for production purposes.
VM sizing
It is important to size session host VMs correctly to ensure an optimal experience for users of the AVD environment. Although you can change the VM sizing and scaling to address performance bottlenecks, you should plan and test the initial size with the following considerations in mind:
App performance requirements Consult with the app developer(s) to obtain their sizing recommendations. If dealing with multiple custom apps, combine the recommendations for each app to calculate the overall resource requirements.
Number of users (average) anticipated Estimate how many users, on average, are expected to use the AVD environment to calculate minimum resource requirements for the VM hosts.
Number of users (peak load) anticipated Estimate how many users during peak loads are expected or what their overall resource requirements will be to calculate the maximum resource requirements for the VM hosts.
Windows OS core recommendations For Windows 10 multi-session OS, the recommended minimum number of vCPU cores is four. This takes into account the fact that UI components use two parallel threads for heavy rendering activities. The recommended maximum number of vCPU cores is 24. This is because the system’s synchronization overhead increases as the number of cores increases. If the number of vCPU cores exceeds 16, the overhead reduces the benefits of the additional cores. It is therefore better to use two 16-core VMs rather than a single 32-core VM.
Take these factors into consideration when calculating the minimum and maximum anticipated loads to determine how many VM session host instances you need to provision.
Licensing
The OS licensing for session host VMs is part of the Microsoft 365 or Windows E3 licensing or of the traditional Remote Desktop Client Access License (CAL). Table 4-2 shows the different licenses supported for the different operating systems.
TABLE 4-2 Licensing requirements
OS | Required license |
|---|---|
Windows 10 Enterprise multi-session or Windows 10 Enterprise | Microsoft 365 E3, E5, A3, A5, F3, Business Premium Windows E3, E5, A3, A5 |
Windows 7 Enterprise | Microsoft 365 E3, E5, A3, A5, F3, Business Premium Windows E3, E5, A3, A5 |
Windows Server 2012 R2, 2016, 2019 | RDS Client Access License (CAL) with Software Assurance |
When you have the correct licensing to run Azure AVD workloads in place, you can run the session host VMs using Azure Hybrid Benefit, negating the need to pay for another Windows license. Since this is limited to the session host VMs, this licensing benefit does not apply to other VMs running as domain controllers, file shares, and other related services.
Scaling
Because session host VMs are VMs in the Azure back end, you can automate scaling to shut down and deallocate unused session hosts during off-peak hours, the same way you can regular VMs. You can then turn them back on during peak hours, ensuring user sessions are handled efficiently and that end-users don’t experience any performance impact. Microsoft provides a low-cost scaling-automation tool that you can set up quite easily to achieve this. Refer to the complete, up-to-date guidance provided by Microsoft online to put this in place.
High availability
While designing your AVD solution, you should consider the high-availability requirements for various components to meet your organization’s redundancy needs. Although the components managed by Microsoft are designed and built with high availability in mind, and are not managed by the customer, the redundancy of components like session host VMs, associated VM disks, and user profile storage are managed by the customer. The following sections discuss how to achieve high availability for these components.
Use availability sets
One of the easiest ways to achieve high availability for session hosts is to deploy them in an availability set. As discussed in Chapter 2, “Azure virtual machine scale sets,” putting a VM (including a session host VM) in an availability set spreads them over multiple physical computer racks, servers, storage devices, and network devices within the same Azure datacenter, and puts them in different fault and update domains to protect them from failures or outages related to service updates. So, in the event of any hardware or software outage, only a subset of the session host VMs would go offline, and user sessions would fail over to the remaining VMs that are online and accessible. This is a great way to ensure redundancy on the local datacenter level within an Azure region.
Use availability zones
To achieve high availability in the event of a local datacenter failure within an Azure region, you can use availability zones. An availability zone is a physical datacenter location within an Azure region. Each availability zone is composed of one or more datacenters, equipped with its own independent power, cooling, and networking. Most Azure regions have three availability zones to provide utmost resiliency within the region.
Like availability sets, availability zones use fault and update domains. If three or more VMs are created across three availability zones in a particular Azure region, those VMs are spread across three fault and update domains—one in each availability zone. This ensures resiliency even if one of the zones or datacenters is completely offline.
You should use availability zones in only scenarios in which uptime requirements are high, because hosting resources in availability zones has cost implications. Considering that you can easily deploy session host VMs using the golden image, it might be more cost-effective to use automation to quickly deploy new hosts in case of a zone outage. What you choose to do will depend on your availability requirements, the impact of an outage on business revenues, and app-latency requirements. You should discuss this with all stakeholders before deciding whether to use availability zones for the AVD environment.
Reserved instances
You can use reserved instances (RIs) to reduce the cost of session host VMs. With RIs, you reserve and pre-pay for the compute resources required to run your session host VMs in advance.
You can set up all session host VMs as RIs. However, if there is a set of VMs that will be brought online only for brief scheduled periods of time to handle peak loads, it is best to calculate the cost savings achieved by the scaling automation versus those achieved by using RIs before choosing which approach to take.
It might be possible to use the two options in combination to achieve maximum cost benefits—setting up RIs for one subset of session host VMs and setting up shutdown-startup automation for another.
WVD agent
Every session host VM requires the installation of a WVD agent and agent bootloader. The WVD agent allows for connectivity between the AVD service and the VMs. Because the agent is the intermediary between the service and the VM, if there are any with this agent, the session host VMs won’t connect to the service and will be unavailable to accept client connections—even if the VM is online and available.
In the event of failed agent installations or upgrades, the agent will stop communicating with the AVD service. This would require an uninstall and re-install of the agent installer. If the agent is installed correctly but not loading on boot, the issue might be related to the agent bootloader and would require more analysis or reinstallation.
Agent registration
Once a VM is registered to a host pool, the VM agent regularly updates the VM’s token whenever the VM is active. The certificate is thereafter valid for a period of 90 days. It is therefore recommended that all the session host VMs are brought online for 20 minutes every 90 days so that these tokens can be updated along with any other stack component and agent updates that must be applied. If any session host VM is not turned on during a 90-day period, it will result in the token expiring and the VM being unavailable for use in the host pool. It will require manual intervention to refresh this token by reinstalling the VM agent on the affected host.
Agent updates
Updates of WVD agents are performed automatically by the existing WVD agent in coordination with the AVD service as new updates are released. These updates might contain new functionality or security or bug fixes. It is important that the WVD agent be kept up to date to ensure that security and bug fixes are applied consistently across the environment.
The WVD agent queries the AVD service on a regular basis for any component updates that might be available. If updates are found, the agent is automatically updated within two to three minutes, with no impact on the VM. The older version of the agent is retained as a backup, so if there are any issues after update, it can be rolled back to the earlier version.
Microsoft performs agent updates at different intervals over a period of five days across all Azure subscriptions. However, updates are performed over a period of 24 hours for a single broker region. All VMs in a host pool are updated at different intervals during that period.
Deploying apps to session hosts
You can deploy apps to AVD session host VMs using one of the following methods:
Installing apps in the golden image.
Leveraging centralized management tools like SCCM or Intune.
Dynamic app provisioning using AppV, VMWare AppVolumes, or Citrix AppLayering.
Building custom scripts using Microsoft tools or third-party tools.
Using MSIX App Attach to containerize and attach the required apps (apps are not installed on the OS but are instead mounted on virtual disks dynamically as needed).
MSIX App Attach is the latest app-packaging format built by Microsoft. It provides the following benefits:
The OS, user, and app data are separated through the containerization of the app data.
Apps need not be repacked when delivered dynamically.
It reduces session host resource requirements, which helps reduce costs.
It speeds up user logins.
Because it uses a 64k block, MSIX App Attach reduces the network impact.
It is specifically designed to support cloud solutions.
Duplicate files across Windows and apps are removed, and app files are shared, which reduces disk utilization by session hosts.
All apps run independently of each other and do not affect any other app during app updates—even if there are shared files involved.
MSIX App Attach APIs support Windows 10 Enterprise and Windows 10 Enterprise multi-session, version 2004 or later, making it ideal for all supported versions of the Windows client OS.
There are no limits on how many apps you can deploy using MSIX App Attach.
There are, however, a few limitations to using MSIX App Attach of which you should be aware:
MSIX images are deployed on a per-machine basis, not on a per-user basis. As a result, the number of users who can use an MSIX image handle depends on the size of the VM’s file system disk and network throughput. Azure Files has a limit of 2,000 open handles per file.
Support for Azure AD Domain Services is currently not available.
Application layering is not supported by all apps. This limits the apps from being repackaged into an MSIX file. Some types of apps that face this limitation include antivirus and anti-Malware software, Active-X and Silverlight, VPN client software, and software drivers.
Windows OS servicing
It is important to keep your AVD instances up to date on a monthly basis to ensure compliance and security. There are several options for updating session host VM instances. These include the following:
Microsoft Endpoint Configuration Manager (MECM) You can use MECM to update server and desktop operating systems on a regular basis with automation to schedule and validate successful deployments.
Windows Updates for Business (WUB) You can use WUB to update desktop operating systems like Windows 10 Enterprise multi-session in an automated manner with the latest patches released by Microsoft.
Azure Update Management Service (AUMS) You can use AUMS to update server operating systems like Windows Server 2019, 2016, and 2012 R2. You can then use Azure Log Analytics service to check for compliance to ensure the updates have deployed successfully.
Deploy a new image You can use a new (custom) image to deploy session hosts every month with the latest Windows and app updates pre-installed and tested. This enables you to test the host image in a validation pool before deployment in production.
Session host walkthrough
The following section steps you through the process of creating a session host using the Azure Portal.
Using the Azure Portal
To create a session host using the Azure Portal, follow these steps:
In the Azure Virtual Desktop page, under Manage, click Host Pools.
In the Host Pools page, click on the personal or pooled host pool that you want to use as a session host. For this example, I have selected PersonalHostPool01.
In the left pane of the host pool’s page, under Manage, click Session Hosts.
Click Add to start the Create a Session Host wizard. (See Figure 4-28.)

FIGURE 4-28 Adding a session host.
The values in the Basics tab should already be populated and grayed out. (See Figure 4-29.) Click Next to continue.

FIGURE 4-29 The Basic tab of the Create a Session Host wizard.
On the Virtual Machines tab, enter the following information (see Figure 4-30):
Resource Group This should be the same resource group as the host pool.
Name Prefix Enter a unique name prefix for the session host.
Virtual Machine Location Indicate where you want to create the session host.
Availability Options Specify whether the session host should be part of an availability zone. For this example, select Availability Zone.

FIGURE 4-30 The Virtual Machines tab of the Create a Session Host wizard.
Still in Virtual Machines tab, enter the following information (see Figure 4-31):
Availability Zone Select the availability zone you want to assign to the session host, based on your AVD environment design. In this example, select 1.
Security Type Leave as Standard.
Image Type Choose Gallery. (The other option, Storage Blob, is not available because you do not have a disk blob available for VM creation.)
Image Select the required Windows 10 Enterprise image from the group of marketplace images made available by Microsoft—in this case, Windows 10 Enterprise, Version 20H2.

FIGURE 4-31 Session host image selection.
Still in Virtual Machines tab, enter the following information (see Figure 4-32):
Virtual Machine Size You can leave this set to the default (as I’ve done here) or customize it based on the requirements of your environment.
Number of VMs A session host pool can have more than one VM. Set this value based on your design requirements. In this example, set it to 2.
OS Disk Type Choose the disk type based on your app requirements. In this case, choose Standard SSD.
Boot Diagnostics Leave this set to the default value (Enable with Managed Storage Account) or select a custom storage account if required.

FIGURE 4-32 Setting VM values.
Still in Virtual Machines tab, under Network and Security, enter the following information (see Figure 4-33):
Virtual Network Select the virtual network to create the session hosts.
Subnet Select the subnet you want to use.
Network Security Group Choose Basic.
Public Inbound Ports Select No.

FIGURE 4-33 Setting the VM network configuration.
Still in Virtual Machines tab, under Domain, open the Select Which Directory You Would Like to Join drop-down list and choose Azure Active Directory.
Next to Enroll VM with Intune, click the No option button. (See Figure 4-35.) Then click Next.

FIGURE 4-35 Domain settings.
In the Tags tab, enter any tags that you would like to apply (see Figure 4-36) and click Next.

FIGURE 4-36 Setting tags for the session host.
On the Review + Create tab, review your settings and click Create to create the session host VMs.
The creation process takes some time to complete. The Deployment Is in Progress will indicate what phase of the process is currently underway. (See Figure 4-37.) For more information about a particular phase, you can click the Operation Details link. You can also click the Operation Details link if the creation process fails to understand why. (Click the link next to the failed step.)

FIGURE 4-37 Monitoring deployment progress.
When the session host VMs have been created successfully, they will be visible in the host pool page in the Session Hosts pane. (See Figure 4-38.)

FIGURE 4-38 Confirming the session host VMs were created.
Store user profile data
You can store user profile data in Azure Storage using Azure Files. Azure Files secures this stored data by using encryption at rest and in transit and by integrating various identity options like on-premises Active Directory and Azure Active Directory. This makes it easy to manage user access permissions. Azure Files also supports numerous redundancy options, like Azure backups, snapshots, and so on, which enables you to maintain backup copies for easy restoration.
Data redundancy and high availability
You can set up Azure Files with different redundancy options based on your organization’s resiliency requirements. These options are as follows:
Locally redundant storage (LRS) Using LRS ensures that each file is replicated and stored three times within the Azure storage cluster spread across a single Azure datacenter. Any hardware failure on the storage layer due to power-supply issues, hard-disk issues, or other issues contained within the storage unit would not result in data loss or hamper data access. LRS is the most cost-effective redundancy option. However, other redundancy options offer better protection against datacenter-wide outages—for example, due to a fire or some other disaster.
Zone redundant storage (ZRS) Using ZRS ensures that each file is replicated and stored three times within three distinct and physically isolated storage clusters. Because a zone is spread across three Azure datacenters, this provides multi-datacenter redundancy. All write operations are replicated across the three availability zones and accepted only after they have been committed to all three zones. ZRS is more expensive than LRS, but it provides a significantly higher level of protection. However, a zone-wide outage would still result in data loss.
Geo-redundant storage (GRS) Using GRS ensures that files are replicated and stored six times between two Azure storage clusters—three times in an Azure storage cluster in the primary region, and three more times in an Azure storage cluster in a secondary region. In the event of a disaster, Microsoft manages the failover to the secondary site (although you can perform this failover manually if required). GRS provides the highest level of redundancy, but at a higher cost.
Backups
Although the preceding redundancy options do provide a certain level of resiliency and recoverability in case of outages, there are scenarios in which data corruption can take place. For such scenarios, you must make regular backups with Azure Backup for easy restoration when needed. Although AVD supports third-party backup solutions, Azure Backup provides a built-in, easy, and cost-effective solution that is suitable for most organizations.
AVD can leverage Azure Backup to back up the various components in AVD. These include the following:
Session hosts You can back up all AVD session hosts using Azure Backup’s VM backup capabilities. This is a stable, proven technology in the Azure IaaS stack that can easily scale up to provide backups for as many hosts as needed and retain those backups for as long as is required based on your organization’s compliance policies.
Storage Regardless of what technology is in use for user data or profile storage—Azure blob storage or Azure Files—you can leverage Azure Backup to create regular backups. This technology has been available for numerous years and is extremely stable for regular and long-term retention of user or profile data.
Service metadata Azure manages the backing up of service metadata. Backup and redundancy for this type of data fall outside the customer’s scope.
Web Access, Gateway, and Broker services Azure manages the backing up of these components, which are part of the AVD control plane. Backup and redundancy for these services fall outside the customer’s scope.
There are numerous benefits to using Azure Backup for AVD backups, including the following:
No infrastructure required Azure Backup does not require the deployment of any infrastructure to support the backing up of AVD session hosts or storage.
Customized retention You can set backup-retention policies according to your organization’s policies to meet daily, weekly, monthly, and yearly retention requirements.
Built-in management All configuration for scheduling and managing backups and restores is built into the service and does not require the use of additional services or components.
Fast restores Snapshots are used for file share backups, which allow for fast restoration of required data. VM restores are also performed very quickly compared to other third-party solutions that might not use Azure as their data store.
Alerting and reporting You can use the management interface to set up alerts for backup and restore failures for timely intervention. The reporting module provides deeper insights on the backups performed.
Disaster recovery
Most mid- to large-scale enterprises see virtual desktops as critical to their environment. The impact of extended downtimes can be exorbitant, so organizations look to disaster-recovery solutions to address such scenarios.
For AVD, one of the best ways to ensure recovery in the event of a disaster is to implement disaster-recovery solutions for each of the various components that are managed by the end-customer. Components managed by Microsoft are designed with disaster recovery in mind, and failover of these components is managed by Microsoft as part of their service contracts and guarantees.
When a disaster occurs in an Azure region, back-end service infrastructure components automatically fail over to the designated secondary location and continue servicing clients normally. So, users will be able to sign into the AVD service. However, unless the other customer-managed components are available, they won’t be able to perform any work functions.
The various components in the end-customer scope include the following:
Session host VMs, including storage used for VM disks
User profile data
Dependent network shares
Virtual networks connecting all these components
Network components connecting the on-premises environment to the AVD environment
For users to access these components during a region-wide outage, each of them must be replicated to a different location. You can automate the failover between these sites or manage it manually. The following sections cover some of the recommended ways in which you can replicate each of these components or make them available in the secondary region.
VM redundancy
The first components to target are the session host VMs. There are two suggested methods to build redundancy for these VMs:
Replicating them using Azure Site Recovery You can replicate all pooled and personal desktop VMs to a secondary region using Azure Site Recovery. Azure Site Recovery is a service that is built into Azure to provide disaster-recovery services for VMs, storage, and other Azure services using replication solutions and automation tools and scripts. You can configure all your VMs in both pooled and personal host pools to use Azure Site Recovery. You can then bring the VMs back online using recovery plans. This approach works for both pooled and personal desktops.
Setting up multiple regions with the required VMs in advance You can set up multiple host pools across multiple Azure regions with the required session host capacity but keep the VMs in the secondary site offline. You can set up all the required AVD configurations, including app groups and workspaces, in the hosts in the secondary site. You can use Azure Site Recovery to power on the VMs using recovery plans in the event of a disaster. This approach is viable for pooled desktop VMs, as these VMs should not have any user data stored locally.
If you use Azure Site Recovery, the AVD agent in the secondary site VMs will automatically connect to the AVD service instance nearest to them using the latest service tokens. This eliminates the need to register these VMs in the secondary site manually. This also automatically adds them to the host pool in the secondary site and makes them available for end-users once they are re-logged.
vNETs
The next critical component to consider is the virtual network infrastructure used by the AVD environment to connect end-users to on-premises resources and business apps. If all components will be failed over to a secondary site, you should set up virtual networks in that secondary site to match the setup in the primary. This makes it easier to duplicate and maintain changes in the primary site to the secondary one. If users need to access any on-premises resources using the VPN, ExpressRoute, or other virtual WAN solutions, then those must be re-established after failover in the secondary site.
User identities
The domain controller, hosted on-premises or (preferably) in the Azure environment, manages user identities. You must make these available from the secondary site, too. You can achieve this in one of the following ways:
If using an on-premises domain controller, make sure the secondary site is connected to it.
Set up a domain controller in the secondary site.
Use Azure Site Recovery to replicate the AD domain controller.
The recommended approach is to set up a domain controller in the secondary site to provide extremely low latency between the session hosts and the DCs in Azure. However, if that is not possible or acceptable for security or compliance reasons, then ensure there is good connectivity between the on-premises domain controller and the secondary region environment.
User profile data
You can replicate user profile data stored in FSLogix profiles to the secondary site, depending on the solution used to store the profiles:
Azure Files Use native replication for replication to the secondary site.
Azure NetApp Files Use native replication for replication to the secondary site.
Shared network drives stored on file shares Use Azure Site Recovery for the VM(s) or third-party solutions for replication.
Cloud Cache for profile storage Cloud Cache inherently allows for the replication of profile data to the secondary site.
Network shares (optional)
If users need access to company or departmental data in the AVD environment, you can create network shares to make this data available in the secondary site, depending on how the shares are set up in the primary site. Some of these options are similar to the ones available for FSLogix profile storage:
Azure Files Use native replication for replication to the secondary site.
Azure NetApp Files Use native replication for replication to the secondary site.
Shared network drives stored on file shares Use Azure Site Recovery for the VM(s) or third-party solutions for replication.
Applications
Be sure to consider all the business apps employed by users in the AVD environment. To identify the ideal replication solutions, consider the apps and their data-storage options, and discuss this with the app vendor or refer to its documentation. Replication might involve the use of a single replication solution like Azure Site Recovery, a similar third-party replication solution, or a combination of solutions, depending on the app and database in use.
Best practices
After you set up all the various components for recovery to the secondary site, there are a few recommended practices to follow:
Carry out testing of the disaster-recovery site.
Document all recovery procedures (automated and manual).
Allocate the responsibility of the various disaster-recovery activation and testing procedures to clearly defined roles or identified personnel.
Regularly test the disaster-recovery plans and process to validate that all the required components come up as needed and that data is available.
Document any changes to the primary site and incorporate them into the secondary-site configuration and recovery plan (in advance, if possible).
There are also a few suggestions on how to test the recovery plan:
Perform recovery tests during a maintenance window to avoid user disruption.
Communicate the recovery test plan to end-users well in advance, with frequent reminders as the test dates approach to ensure users can flag possible obstacles or planned business events to avoid business disruption.
If necessary, turn off access to the primary site session host VMs so users do not accidentally access and make changes to those VMs during the test window.
Test and validate all business-critical apps with relevant stakeholders and document the outcomes.
Identify and carry out any corrective actions, if needed, before the next testing window, and document the changes for future validation.
Authentication
Some AVD components require you to set up authentication for users to be able to access and use the AVD service. These include authentication to the AVD service itself, the session hosts, and the AVD control plane for management access. Each of these is explained here in more detail.
AVD service
The following support authentication to the AVD service:
On-premises users synced to Azure AD (also known as hybrid identities)
On-premises users synced to Azure AD and federated using Active Directory Federation Services (ADFS)
Cloud-only Azure AD users in session hosts using only Azure AD-joined VMs
Session-host access
AVD supports NTLM and Kerberos authentication for access to session host VMs. The following three approaches are the most commonly used:
Deploy a domain controller in the same VNet as the session hosts.
Set up a VPN to access an on-premises domain controller.
Set up Azure AD DS integrated with Azure AD.
Consider this when planning the design of the underlying network architecture.
Use built-in roles to provision access
Azure uses Role-Based Access Controls (RBAC) for rights assignment to users and admins for resources across the environment. AVD leverages the same RBAC model with a set of custom built-in roles specific to the AVD infrastructure management.
Let’s briefly review the different built-in roles and their purpose to get a better understanding of how they can be used for simplified access management in the AVD environment:
Desktop Virtualization Contributor Allows the assigned administrator to manage all aspects of the AVD deployment except compute resources.
Desktop Virtualization Reader A view-only administrator role that allows the assigned administrator to review all aspects of the deployment but not to make changes. You might assign this role to auditors or external consultants who are tasked with reviewing your environment design and configuration for reporting purposes.
Host Pool Contributor Allows the assigned administrator to manage all aspects of the host pools deployed in the environment and gives access to all resources. It does not allow the administrator to create session host VMs or create host pools, but rather gives them the ability to manage them.
Host Pool Reader A view-only administrator role that allows the assigned administrator to review everything related to host pools in the AVD environment but not to make changes.
Application Group Contributor Allows the assigned administrator to manage all aspects of app groups except publishing app groups to users or user groups.
Application Group Reader A view-only administrator role that allows the assigned administrator to review everything related to app groups in the AVD environment but not to make changes.
Workspace Contributor Allows the assigned administrator to manage all aspects of the workspaces set up in the AVD environment. It is best to use this role in conjunction with the Application Group Reader role so the assigned admin gets read access to all the app information for the app groups associated with the workspaces.
Workspace Reader A view-only administrator role that allows the assigned administrator to review everything related to workspaces in the AVD environment but not to make changes.
User Session Operator Allows the assigned administrator to manage user session activities like sending messages, disconnecting, and logging out sessions. This role does not grant access to session host management activities like adding or removing session hosts, setting host maintenance or drain mode configuration, or other similar activities.
Session Host Operator Allows the assigned administrator to view and manage session hosts, including performing activities like removing session hosts and maintaining the host using drain mode. Admins assigned this role do not have the ability to add session hosts using the Azure Portal because write permissions for host pool objects are not assigned as part of this role. However, if a valid registration token and compute permissions are provisioned through another role, the admin can add session hosts to the host pool.
Network considerations
Following are two network-related recommendations for ensuring that the AVD environment performs optimally:
The round-trip latency for traffic from the user network to the session hosts in the chosen Azure region should be less than 150 ms. Be sure to check this from the various known networks from which the virtual desktops would be accessed before selecting the region to host the session hosts and host pools.
Although the regions that support the storage of virtual desktop metadata are currently limited, if possible (based on latency testing and other factors), it is best to host the session hosts in the same Azure region as the metadata service, as this improves network performance.
On the subject of networking, it is increasingly common for organizations to track and control user traffic on their workstations within the office networks and, in some cases, even on their home networks when using company devices. In the AVD environment, you can achieve this by using a proxy server to manage all communication, including DNS and internet traffic. Be aware, however, that if the proxy server’s connection to the Azure environment has high latency, there will be a related impact on the AVD cluster, which can hamper the user experience. It is therefore important to choose proxy servers that exhibit low latency. It’s best to test the proxy server to validate its performance when connected to the various regions where session hosts are located. Perform this validation on a regular basis to confirm that the latency has not gone up dramatically over time and identify backup proxy options to switch to before affecting the user experience.
Security
Security in the AVD environment is applicable on different levels. Some security recommendations apply to the overall AVD environment and are useful to protect the access and management layers within the environment. Other recommendations apply on the session-host level to protect and secure VM instances accessed by the users.
Security for the overall WVD environment
Let’s start by covering security recommendations that apply to the overall AVD environment. These focus on protecting the identity, access, and management layers, and provide guidance on areas to monitor to identify possible surface areas of attack:
Use Conditional Access Conditional Access enables you to control which users can access resources in Azure, from which locations, at what times of day, and using which devices. This enables organizations to control access on various levels based on their compliance and security needs. You can customize Conditional Access to use some or all of these capabilities. It is a good practice to use Conditional Access to control access to the AVD environment, as its granular controls can prevent malicious actors from accessing the environment, even if they breach the password for one of the users.
Delegate access Delegating access restricts users in the AVD environment to accessing only those resources that are necessary to perform their official work activities. This access level might be different for different user groups or the same across the organization. Identify the various user groups in your organization, their role requirements, their associated permission requirements on the virtual desktop, and plan permission assignments accordingly. AVD uses the Azure RBAC model for access delegation. This makes it easy to assign access to different users or user groups by either using existing built-in roles or creating custom roles that contain the specific permission sets required by the users. You can apply the permissions thereafter on the host pool, app groups, or workspace level, providing granular control on every level.
Use Azure Security Center Azure Security Center helps manage vulnerabilities; maintain access compliance in accordance with standard frameworks like PCI, HIPAA, and so on; and strengthen the overall security posture of the AVD environment. For these reasons, it is a good practice to enable Azure Security Center for all subscriptions, session hosts, and other VMs and storage accounts associated with the AVD environment.
Use Secure Score Secure Score is a free service provided by Microsoft that scans the environment to identify configuration settings that deviate from Microsoft’s recommendations and best practice guidelines. Secure Score provides a list of recommendations, ranked by priority or criticality, as well as guidance to help you quickly address the recommendation. Microsoft regularly updates Secure Score as new best practices, services, and field recommendations are compiled. It is best to review them monthly or quarterly and implement any new recommendations that are relevant for your environment.
Use multi-factor authentication This service is provided in Azure as part of most Azure AVD licensing SKUs. Multi-factor authentication is an easy way to protect every environment—even if user passwords are breached using brute-force attacks. It is highly recommended that you enable multi-factor authentication for all administrators and users in the environment.
Collect audit logs The AVD environment generates numerous audit logs, and viewing and managing these logs on an individual basis can be quite cumbersome. Fortunately, Microsoft provides the audit log collection service to consolidate and analyze these logs. Some key audit logs to collect are as follows:
AVD diagnostic log
Session hosts log
Azure Active Directory log
Azure activity log
Azure Active Directory Activity log
Use RemoteApps You can enable AVD access by providing access either to the entire virtual desktop environment or to individual required apps only by using RemoteApps. Using RemoteApps exposes only a small subset of the session host VM to users when they access an app. This reduces the attack surface and limits users’ access to the session host VM. The app experience is still seamless, as users can work with the app without needing to log in to the entire desktop.
Use Azure Monitor Azure Monitor can help you monitor AVD service usage and session host health and availability. Use Azure Monitor to build and consume dashboards to monitor the health of various AVD components and set up service health alerts to be notified promptly of critical user-impacting events.
Security for session hosts
Session host VMs are the main component employed by users when they log into the AVD environment. Securing these VMs is critical to ensuring the security of the overall AVD environment. Following are some best practices to keep session host VMs secure:
Delegate permissions to shadow users In environments in which user support is delegated, helpdesk admins need not have full admin rights on session host VMs. Instead, you can delegate specific permissions to shadow users in the AVD environment. This enables helpdesk admins to provide support to the users without assigning extended permissions, thereby reducing the attack surface in the event their credentials are breached. You must assign these permissions on the session host VM level by targeting the Windows management namespace. To ensure they are applied consistently across the environment, you should assign them either on the golden image used to build the session host VMs or as a computer startup script applied to the session host VMs.
Apply endpoint protection for hosts Securing session host VMs starts with deploying an endpoint protection solution to detect known malicious code. Depending on your organization’s preferences, you can use Windows Defender Antivirus or deploy a third-party antivirus solution. Be sure to set any exclusions for storage, app executables, or database files on a global level so they are applied across all session hosts.
Use an endpoint detection and response (EDR) solution For advanced detection and response to known and unknown malicious software on session host VMs, use an EDR solution such as Defender ATP, which is provided within Azure, or a third-party solution. It is a good practice to have an EDR solution in place to protect the environment from advanced attack vectors.
Manage threats and vulnerabilities Azure Security Center is a great service built into Azure to analyze and identify vulnerabilities in server operating systems deployed across the AVD environment. Azure Security Center can integrate with Defender ATP to manage threats and vulnerabilities on the operating systems. Or you can integrate and leverage various third-party threat and vulnerability management solutions found in the Azure Marketplace.
Patch software vulnerabilities Patching software vulnerabilities on the operating system and application layers is critical to ensuring that the environment is as secure as possible. Malicious actors regularly attack known vulnerabilities; simply patching these vulnerabilities on a monthly or bi-weekly patching cycle can mitigate numerous security risks. It is also a good practice to update golden images with the latest deployed patches to keep them up to date so that new VMs deployed using these images are up to date as soon as they are online.
Enact idle time and disconnection policies Identify a suitable threshold for idle time and disconnection policies to obtain the right mix of resource savings and prevent data loss and user interruption. If there are apps in the environment that have long-running processes, such as rendering and simulation software, consider larger timeout windows to avoid data loss.
Lock out the screen for idle sessions Set the Windows screen to lock and require reauthentication during idle times so that malicious actors do not exploit unattended workstations to gain access to the AVD environment.
Establish tiered admin access Users should always be given access only to the resources they need to perform their work functions efficiently. If certain users require extended access for app deployment or configuration, it is best to identify the use times for such access and provide the additional rights only for that period. If this is not possible, then use app-deployment tools such as Microsoft SCCM or Intune to publish apps or configurations to limit the need for extended access.
Control user access to internal and external resources Control user access to internal and external network resources like file shares, internal and external websites, and web services using services like Azure Firewall, network appliances, proxy servers, and so on. Restrict access to only those services or websites the user needs to carry out their work activities. Be sure to test this from different network segments to ensure that access to the AVD environment and the required internal and external resources is working correctly.
Deploy security for Office apps In most environments, Office apps are deployed on session hosts in default mode, with little to no security applied. It is important to keep these apps up to date and to identify policies specific to your environment that can help restrict access to functionality that is not needed—for example, using group policies or applying restrictions on the golden image for new session host deployments. Make sure the policies you deploy do not hamper user productivity by testing with users across company segments with different work profiles.
Redirect devices Use device-redirection policies to prevent the redirection of drives, USB devices, and printers from the user’s local device to the remote desktop sessions to which they are connected. This can prevent data leaks that occur inadvertently or maliciously if a user’s account is hacked. It is a good practice to set these restrictions unless redirection is required for operational reasons.
Set up permission controls on file systems Use NTFS and share permissions on local and remote file shares to allow user access to only required levels. This can help prevent the spread of malicious code or unauthorized data access.
Prevent access to Windows Explorer Without proper permission controls, users can employ Windows Explorer to gain entry to local and network drives to which they do not need access. It is a good practice to prevent access to Windows Explorer completely or hide all sensitive drives using group policy to prevent misuse.
Use just-in-time access controls Use just-in-time access controls to provide direct RDP access to session hosts and other critical VMs in the environment. This can help you keep track of access sessions and limit the attack surface in case of a breach.
Prevent unwanted software deployment Use technologies like App Locker to allow access only to required apps on session host VMs. This can help limit the attack surface and prevent malicious apps from running without being allow-listed.
Integration with Azure DevTest Labs
Azure DevTest Labs enables developers to efficiently self-manage VMs and PaaS resources without waiting for approvals. Essentially, DevTest Labs creates tools consisting of preconfigured solutions or Azure Resource Manager (ARM) templates. These have all the necessary tools and software needed to create environments in minutes rather than hours or days.
Azure DevTest Labs provides a mini Azure control plane that empowers teams to create and manage environments in a self-service manner. The biggest benefits are the cost, security, and compliance controls it provides for building a compliant desktop solution, and the agility it gives end-users by being a self-service solution. This, of course, comes at a cost, as organizations still must engineer their desktop solution. The good news is that DevTest Labs and Azure provide all the pieces needed for this solution.
Benefits of Azure DevTest Labs include the following:
Fast VM creation
The ability to customize and approve a set of VM images for use
Custom VMs containing all the required software and tools for quick consumption
Custom package builds that are a combination of custom images and the latest software builds that are installed automatically on VM creation
Extension installs on VMs after provisioning
Auto-startup and auto-shutdown schedules for VMs
The ability to limit the number of VMs users can create
Cost monitoring and alerting for optimization
There are two main reasons to combine these services:
AVDs can front-end the connectivity for DevTest Labs workloads, providing a secure model for connectivity when used by developers to manage individual developer desktops.
Azure DevTest Labs provides the ability to build single session hosts and give self-service capabilities to end-users while maintaining central control.
Other best practices
Following is a list of some other commonly used practices across large AVD deployments to help you better manage and monitor the environment:
Set up email discovery One way end-users connect to their published virtual desktops is to use feed URLs. However, it is always a challenge for IT to provide these complex feed URLs, and for users to retrieve it each time they require it without making mistakes. To make it easier for end-users to connect to their published virtual desktops, you can use DNS configuration to set up email discovery. This enables users to discover their feed using their email address. Be sure to set this up in all environments unless there is a special security need to hide feed URLs.
Use language packs In situations in which users will employ the AVD environment in different geographical areas or using different languages, it’s important for users to be able to customize their Windows 10 language. You can achieve this building dedicated host pools with the various languages and publishing them to the required users. Alternatively, you can make all users part of the same host pool but give them access to hosts with different language images, allowing them to select the one they prefer. This method is a lot more efficient to manage and maintain.
Integrate with Azure Advisor Azure Advisor is a service that analyzes the configuration and telemetry of associated Azure resources to identify recommendations that can help address general problems. It is a good practice to integrate the AVD environment with Azure Advisor to benefit from this functionality. This can help you reduce user complaints about common issues, thereby saving time, effort, and money.
Use Microsoft Endpoint Manager or Microsoft Intune It is a good practice to use either Microsoft Endpoint Manager, a unified platform that includes Microsoft Endpoint Configuration Manager and Microsoft Intune, or Microsoft Intune alone. This can help ease management overhead by:
Managing automated app deployments and upgrades on session hosts
Keeping Windows 10 session hosts up to date
Monitoring compliance on session hosts for antivirus and firewall configurations
Managing group policy related settings deployed on session hosts
Publish apps
Once all the session hosts are deployed, the next step is to publish the required apps for users to access. You do this if users will not be given access to the entire virtual desktop, but only to the remote apps.
There are three types of apps that are generally published, as follows:
Built-in apps These are the default apps installed on the base Windows image. Examples include Calculator, Notepad, File Explorer, and so on.
Third-party installed apps These are the third-party apps installed on the session host images and VMs. Examples include Microsoft Office Suite, Adobe Reader, Microsoft Teams, and so on.
Custom apps These are customer-specific apps installed on the session host images and VMs. These are installed in custom paths and require guidance from the app developer for ideal installation and use.
App publishing walkthrough
The following section steps you through the process of publishing a built-in app and a third-party app using the Azure Portal.
Using the Azure Portal
To publish a built-in app and a third-party app using the Azure Portal, follow these steps:
In the Azure Virtual Desktop page, under Manage, click Application Groups.
In the Application Groups page, click the app group that you would like to use to publish apps—in this case, WindowsApps. (See Figure 4-39.)
In the left pane of the WindowsApps group page, under Manage, click Applications. (See Figure 4-40.)
Click Add.
In the Add Application dialog box, open the Application Source drop-down list and choose Start Menu. (See Figure 4-41.)

FIGURE 4-39 Selecting an app group.

FIGURE 4-40 Adding applications to an app group.

FIGURE 4-41 Selecting the application source.
Open the Application drop-down list and choose Notepad.
As shown in Figure 4-42, the remaining settings are populated automatically.

FIGURE 4-42 Adding the Notepad app.
Click Add.
Repeat these steps to add a third-party app—in this case, Acrobat Reader DC. (See Figure 4-43.)

FIGURE 4-43 Adding a third-party application.
After you publish the apps, users who connect to the AVD service will be able to view them and launch them for use. (See Figure 4-44.)

FIGURE 4-44 List of published apps.