
Chapter 2
Azure virtual machine scale sets
Overview
As the use of Azure has increased, environments have become more complex and interconnected. This has led to a growing need to easily deploy, manage, and scale virtual machines (VMs) that can be integrated with Azure load balancing and auto-scaling without too much overhead. The introduction of the Azure VM scale sets (VMSS) addressed exactly this need.
A VMSS consists of multiple VMs that are configured to be exactly the same and can be managed as a group rather than individually. This involves much less overhead while also enabling you to take advantage of the scaling and elasticity offered by the cloud. VMSS are available across all Azure regions. Moreover, Microsoft does not charge you to use them beyond the regular compute charges you pay for any other resources. This makes VMSS a very high-value proposition for many environments.
As environments transition to cloud-scale application architectures, the true power, flexibility, and benefits of VMSS become apparent. Consider a cloud-scale application architecture, in which unique and non-unique components of applications are built separately and made to run individually. Using VMSS makes it possible to keep the unique components, such as management nodes, running as individual nodes based on their specific resource requirements, while deploying the non-unique components of the workload as VMs in a scale set. As a result, capacity in terms of the number of VMs in the set becomes more important than the individual characteristics of the workload, making scale easier to achieve.
How Azure VMSS work
To build complex scalable infrastructure designs in the cloud, you must always achieve a balance between the level of control you have over the individual infrastructure resources and the complexity and placement of those resources. Platform as a service (PaaS) solutions tend to facilitate this by providing fixed architectures that you must conform to and that the application must be built around. This helps you achieve the right balance.
In many cases, using a PaaS solution is not possible, and you need to deploy a custom application architecture specific to the needs of your environment. VMSS address this by allowing a higher level of control over infrastructure than a PaaS solution, while reducing the overhead of building and scaling different resources like networking, storage, and compute, and balancing nodes across fault and update domains. In short, VMSS provide the control capabilities of infrastructure as a service (IaaS) combined with the ease of scale provided by PaaS. (See Figure 2-1.)
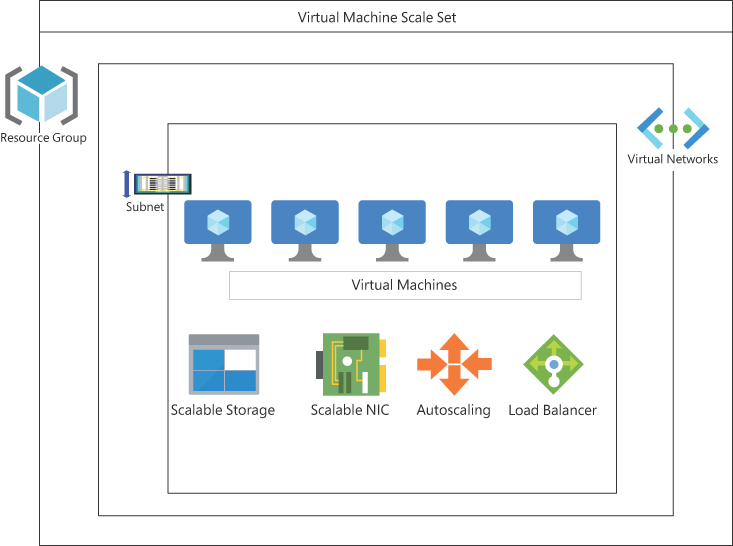
FIGURE 2-1 An Azure VM scale set built of different Azure components, including resource groups, VMs, network interface cards (NICs), storage, and extensions.
A VMSS allows for the definition of an individual compute resource, which has storage, network, and required extension properties associated with it. This saves you a lot of configuration work. Moreover, when it’s time to deploy the resource, only a single call is sent to the underlying Azure fabric. This enables the Azure compute resource provider to automatically optimize both reliability and performance.
Why use a VMSS?
To provide better performance and high availability and redundancy, applications are generally distributed across multiple instances running the same application code. The application might then be accessed via a load balancer that distributes requests to one of the application instances.
To perform maintenance or update an application instance/code base, you must divert traffic to another functional application instance. Azure VMSS can help you facilitate this. On a related note, if there is an increase in demand for the application, you might a need to increase the number of application instances running the application. Azure VMSS provide the management capabilities to build and run an application across many VMs while automatically scaling resources and load-balancing traffic as needed.
VMSS features
Important features of VMSS include the following:
Easy creation You can use the Azure Portal to easily create Windows and Linux VMSS. (You will walk through this process later in the chapter.) When the scale set is created, load balancers with NAT rules to allow SSH or RDP connections are automatically implemented. These load balancers handle basic layer-4 traffic distribution as well as more advanced layer-7 traffic distribution and TLS termination.
Easy management All VM instances in a scale set are created from the same base OS image and configuration. This enables you to easily manage tens or even hundreds of VMs without having to perform additional configuration or network-management tasks. Moreover, you can change the number of VMs running in a scale set simply by issuing an API call or command (for example, through REST, the SDK, or the command line).
High availability The number of VMs in a scale set can vary between 0 and 100. VMSS with large numbers of VMs allow for high availability. Another contributor to high availability is availability zones. These allow for the automatic distribution of VM instances in a scale set within a single datacenter or across multiple datacenter.
High resiliency Every scale set contains multiple instances of an application. So, if one instance of a VM hosting the application experiences an issue or requires maintenance, users will be able to access other instances with minimal (if any) interruption or impact.
Built-in autoscaling Demand to access an application can fluctuate during the course of the day, week, or month. VMSS can automatically increase the number of VM instances available as demand rises and reduce the number of VM instances as demand goes down. This helps minimize costs without sacrificing availability. You can easily define autoscaling rules based on your environment. For example, you can set a minimum, maximum, and default number of VMs in a scale set, as well as action triggers based on resource consumption.
Large compute pools You can create multiple VMSS in the same VNET or subscription. You can then combine these VMSS to build large compute pools for high-volume data processing or other services.
Integration with Azure Resource Manager (ARM) With a large deployment, automating the deployment of most or all functionality, including software and VM extensions, is essential. VMSS supports this automation, including ARM template deployments that include details on the required extensions and software compatible with ARM deployments.
Support for Visual Studio When a VMSS is part of an ARM project, you can deploy standard Linux and Windows templates for Visual Studio provided in the Azure SDK. This allows for the automation of workload deployment as part of the project buildout.
Integration with Azure load balancers Azure load balancers and the Azure Application Gateway can seamlessly integrate with VMSS. As mentioned, load balancer NAT rules are automatically created when a new VM is added to a scale set. This helps ensure that the VMs always have a connection path.
Improved security Built-in control over inbound connectivity makes VMs in a scale set inherently more secure than standalone VMs with an IP address, which require the configuration of a network security group (NSG) to lock down unwanted ports and protocols.
Support for different tools You can manage VMSS using the Azure CLI, Azure PowerShell, the latest versions of the Azure-managed SDKs, and REST APIs.
Manual rollout of OS image updates without interruption You can update a scale set master or model—that is, its definition and properties—and then perform a manual rollout for all or selected VMs. This enables you to update VMSS without shutting down the entire scale set, which reduces downtime during update and maintenance activities.
Scale sets versus VMs
As mentioned, a VMSS set consists of multiple VMs with an identical configuration built in a highly available design with interconnected components. But although a VMSS is composed of VMs, there are some features that only VMs have, and other features that are available only with VMSS. It is important to understand which technologies offer which features so you can make an informed decision about which one to use.
Here are some key advantages of VMSS:
Easy scaling It is easier to scale a VMSS than it is to scale individual VMs. Scaling VMs individually involves using complex scripting and triggers, whereas you can employ the Azure autoscale service to automatically scale a VMSS.
Easy re-imaging It is generally recommended to build scale sets with images. This allows for the easy addition and deletion or removal of VMs from the scale set without data loss or service interruption. It is easier to re-image scale sets than VMs.
Easy upgrades You can roll out scale set upgrades very easily by using upgrade policies. There are no such scale policies for individual VMs.
Overprovisioning Overprovisioning of scale sets helps increase reliability and reduce deployment times, especially during peak loads. Achieving the same outcome using individual VMs would require the use of complex code.
On the other hand, VMs have a few unique features that must be taken into consideration:
Image capture You can capture an image of an individual VM but not of a VM that is part of a scale set.
Native to managed disk migration Migrating from native to managed disks is possible when using individual VMs, but not when a VM is part of a scale set.
Use of IPv6 You can assign IPv6 to individual NIC cards on a VM, but this cannot be done for a VM in a scale set. In that case, you must assign IPv6 to the load balancer in front of the scale set.
VMSS creation walkthrough
The following sections step you through the process of creating a VMSS using the Azure Portal, Azure PowerShell, and the Azure CLI. If you are following along, be sure to select resources and resource names based on your environment, including unique VMSS, vNET, and subnet names for each of your deployments. Also, be sure to delete any unwanted resources after you have completed testing to avoid charges levied by Microsoft for these resources.
Using the Azure Portal
To create a virtual machine scale set using the Azure Portal, follow these steps:
Log in to the Azure Portal, type virtual machine scale sets in the search box to locate the service, and select it from the list that appears. (See Figure 2-2.)

FIGURE 2-2 Search for the virtual machine scale set service.
Click the Create Virtual Machine Scale Set button to start the Create Virtual Machine Scale Set wizard. (See Figure 2-3.)

FIGURE 2-3 Initiate the creation of a virtual machine scale set.
In the Basics tab of the Create Virtual Machine Scale Set wizard, enter the following information (see Figure 2-4), and click Next:
Subscription Select the subscription that will host the virtual machine scale set.
Resource Group Select the resource group you want to use to host the virtual machine scale set. Alternatively, to create a new resource group, click the Create New link and follow the prompts.
Name Type a name for the virtual machine scale set.
Region Select the region you want to use to host the virtual machine scale set.
Availability Zone Leave this set to None (the default).
Orchestration Mode Leave this set to Uniform (the default).
Security Type Leave this set to Standard (the default).
Image Select the OS image that should be deployed on the VMSS instance.
Azure Spot Instance Leave this unchecked (the default).
Size Select the desired size for the VMSS instance.
Username Enter the local administrator username to be set up on the instance.
Password and Confirm Password Enter the password for the local admin user.
Licensing Leave this unchecked (the default).

FIGURE 2-4 The Basics tab of the Create Virtual Machine Scale Set wizard.
In the Disks tab, enter the following information (see Figure 2-5) and click Next:
OS Disk Type Select the disk type to set up for the VM instances.
Encryption Type Leave this set to (Default) Encryption-at-Rest with a Platform-Managed Key.
Enable Ultra Disk Compatibility Leave this unchecked (the default).
Data Disks Leave this blank.
Use Managed Disks Leave this checked (the default).

FIGURE 2-5 The Disks tab of the Create Virtual Machine Scale Set wizard.
In the Networking tab (see Figure 2-6), enter the following information and click Next:
Virtual Network Select the vNET to host the VMSS. Alternatively, to create a new virtual network, click Create Virtual Network and follow the prompts.
Network Interface Leave this set to the default. Optionally, click Edit to modify the selected network interface.
Use a Load Balancer Leave this unchecked (the default).

FIGURE 2-6 The Networking tab of the Create Virtual Machine Scale Set wizard.
In the Scaling tab (see Figure 2-7), enter the following information and click Next:
Initial Instance Count Specify a value equal to or higher than 2.
Scaling Policy Leave this set to Manual (the default).
Scale-in Policy Leave this set to Default - Balance Across Availability Zones and Fault Domains….

FIGURE 2-7 The Scaling tab of the Create Virtual Machine Scale Set wizard.
In the Management tab, leave the default settings as is (see Figure 2-8) and click Next.

FIGURE 2-8 The Management tab of the Create Virtual Machine Scale Set wizard.
In the Health tab, leave the default settings as is (see Figure 2-9) and click Next.

FIGURE 2-9 The Health tab of the Create Virtual Machine Scale Set wizard.
In the Advanced tab, leave the default settings as is (see Figure 2-10) and click Next.

FIGURE 2-10 The Advanced tab of the Create Virtual Machine Scale Set wizard.
In the Tags tab (see Figure 2-11), enter any tags you want to associate with the VMSS and click Next.

FIGURE 2-11 The Tags tab of the Create Virtual Machine Scale Set wizard.
In the Review + Create tab (see Figure 2-12), verify that your settings are correct and click Create.

FIGURE 2-12 The Review + Create tab of the Create Virtual Machine Scale Set wizard.
Using Azure PowerShell
You can create a VMSS with Azure PowerShell using the New-AzPrivateDNSZone command with various switches to set parameters. For example, to create the same scale set as you did in the preceding section, you use the following code snippet:
#Define variables
$RG = "VMSS-RG01"
$location = "EastUS2"
$vmssname = "VMSS01"
$vnet = "VMSS01-Vnet"
$subnet = "VMSS01-Subnet"
$vmsslb = "VMSS01-LB"
$vmsspip = "VMSS01-PIP"
#Create VMSS
New-AzVmss -ResourceGroupName $RG `
  -Location $location `
  -VMScaleSetName $vmssname `
  -VirtualNetworkName $vnet `
  -SubnetName $subnet `
  -PublicIpAddressName $vmsspip `
  -LoadBalancerName $vmsslb `
  -UpgradePolicyMode "Automatic"
Using the Azure CLI
You can create a VMSS with the Azure CLI using the az network private-dns zone create command with various switches to set parameters. The following script shows you how to set up the same scale set you created in the preceding sections with the Azure CLI:
#Define variables
location="eastus2"
rg="VMSS-RG01"
vmssname="VMSS01"
vmssadminuser="vmssadmin"
#Create VMSS
az vmss create
  --resource-group $rg
  --name $vmssname
  --image UbuntuLTS
  --upgrade-policy-mode automatic
  --admin-username $vmssadminuser
  --generate-ssh-keys
Large VMSS
A VMSS containing between 100 and 1,000 VMs is considered to be a large scale set. In specific scenarios, like centralized compute grids that require simplified management of worker nodes or big data deployments with large data sets, it is easier to have a single large VMSS than multiple smaller scale sets. In such scenarios, by combining the VMSS with data disks, a highly scalable environment consisting of thousands of VMs and petabytes of storage can be used to run singular operations.
A scale set can scale up to include a large number of VMs not because it allows such a large number within its scope, but because it allows for multiple placement groups to be contained within a single scale set. A placement group is similar to an availability set. It has its own upgrade and fault domains. A single placement group can contain as many as 100 VMs. By default, a scale set consists of only one placement group. However, if you set the singlePlacementGroup parameter to false, the scale set can contain multiple placement groups, with a combined limit of 1,000 VMs.
Although large scale sets might be a great option for large deployments, it might not be what’s best for your environment. To determine whether large scale sets are right for you, consider the following points:
The VM image and number of VMs required to run the application If the application requires a custom OS image to be deployed, the scaling is limited to 600 VMs instead of 1,000 VMs. If, however, an Azure Marketplace image can be used, then the full limit or quota of 1,000 VMs can be used.
The disks that can be used by the application Large scale sets only use Azure managed disks. This is because user-managed disks use storage accounts, which can contain only 20 disks/VMs at a time. There is a risk of running into subscription limits for storage accounts, which can result in catastrophic outcomes if not accounted for. To limit this risk and to reduce the management overhead for the storage admin charged with managing the large number of storage accounts, large VM scale sets have been designed to work only with managed disks.
The application’s load-balancing requirements Layer-4 load-balancing requirements for a large VMSS are different. It requires the use of the standard SKU, as that has the ability to load-balance traffic between multiple scale sets and multiple placement groups. If, however, the application in question requires the use of a basic load balancer, then the scale set cannot use multiple placement groups. It needs to use only a single placement group and would therefore be limited to 100 VMs. On the other hand, layer-7 load balancing, which uses the Azure Application Gateway, is supported for VMSS of all sizes.
The application’s networking requirements Large VMSS do not support InfiniBand networking. If that is a requirement for an application, then a large VMSS would not be the right option for that environment. In addition, every scale set is set up inside a single subnet. Depending on the total number of VMs intended to be part of the scale set, and accounting for future growth requirements, the subnet for the scale set must have enough address space available for all the VMs that will eventually be hosted within it. Because scale sets overprovision VMs to improve deployment reliability and performance, you must also consider this when deciding on address space size. As a rule of thumb, after you calculate the final intended size of the scale set, add 20% to accommodate overprovisioning.
The application’s availability requirements Using a large VMSS does not change the overall availability of a scale set. VMs in different placement groups can end up on the same hardware, even though the scale of a large VMSS should minimize the impact of such a distribution logic.
Large VMSS creation walkthrough
The following sections step you through the process of creating a large VMSS using the Azure Portal, Azure PowerShell, and the Azure CLI. If you are following along, be sure to select resources and resource names based on your environment, including unique VMSS, vNET, and subnet names for each of your deployments. Also, be sure to delete any unwanted resources after you have completed testing to avoid charges levied by Microsoft for these resources.
Using the Azure Portal
To enable support of large scale sets using the Azure Portal during VMSS creation, follow these steps:
Follow the steps in the “VMSS creation walkthrough” section to start the Create a Virtual Machine Scale Set wizard and create a VMSS.
In the Scaling tab, in the Instance section, change the value in the Initial Instance Count box to a number higher than 100. (See Figure 2-13.) This will automatically set the allocation policy to support more than 100 instances and create multiple placement groups in the back end to support a large VMSS.
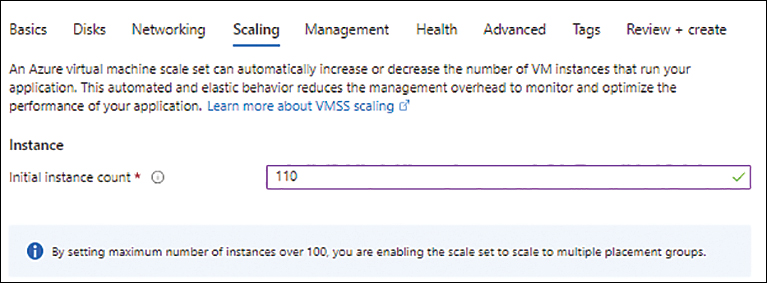
FIGURE 2-13 Setting the Initial Instance Count value to a number higher than 100 to enable large VM scale sets.
In the Advanced tab, under Allocation Policy, select the Enable Scaling Beyond 100 Instances check box. (See Figure 2-14.)

FIGURE 2-14 Setting up support for large scale sets.
Finish using the VM Scale Set Creation wizard to create the large VMSS, as described in the section “VMSS creation walkthrough.”
Using Azure PowerShell
Using Azure PowerShell to create a large VMSS involves adding the –InstanceCount parameter with a value higher than 100. This configures the scale set to support multiple placement groups. The following code shows a PowerShell script to create a large VM scale set:
#Define variables
$RG = "VMSS-ResourceGroup"
$Location = "EastUS2"
$VMSSName = "LargeVMScaleSet01"
$VNET = "VMSS-Vnet"
$Subnet = "VMSS-Subnet"
$vmsslb = "VMSS01-LB"
$vmsspip = "VMSS01-PIP"
#Create Large VMSS
New-AzVmss `
  -ResourceGroupName ""$RG `
  -Location ""$location `
  -VMScaleSetName $VMSSName""`
  -VirtualNetworkName ""$vNET `
  -SubnetName ""$Subnet `
  -PublicIpAddressName $vmsspip `
  -LoadBalancerName $vmsslb `
  -UpgradePolicyMode "Automatic"
   -InstanceCount 150
Using the Azure CLI
When using the Azure CLI to create a large VMSS, you add an --Instance-Count parameter with a value higher than 100. This configures the scale set to support multiple placement groups. The following code shows a Bash script used to create a large VMSS:
#Define variables
location="eastus2"
rg="VMSS-RG01"
vmssname="LargeVMScaleSet01"
vmssadminuser="azureadmin"
#Create Large VMSS
az vmss create
  --resource-group $rg
  --name $vmssname
  --image UbuntuLTS
  --upgrade-policy-mode automatic
  --admin-username $vmssadmiuser
  --generate-ssh-keys --instance-count 150
Ensure high availability with VMSS
VMSS support several features to enable high availability. These include the following:
Overprovisioning
Availability zones
Fault domains
Autoscaling
Vertical scaling
Load balancing
Overprovisioning
Overprovisioning is the default behavior for a scale set. Overprovisioning results in the scale set provisioning more VMs than required or requested. The additional VMs are deleted when the required number of VMs have been successfully provisioned and are active. There is no charge for the additional VMs, and quota limits are not affected. The benefit of this feature is it improves the success rates for VM deployments and reduces wait times for new VM deployments to come online.
The application hosted within the scale set must be capable of handling this behavior. Having VMs appear and disappear can cause certain applications to behave in a confusing manner, as their code is not designed to deal with this. In such cases, you can turn off overprovisioning within the scale set templates by specifying the parameter "overprovision": "false".
Overprovisioning walkthrough
The following sections step you through the process of enabling provisioning using the Azure Portal, Azure PowerShell, and the Azure CLI. If you are following along, be sure to select resources and resource names based on your environment, including unique VMSS, vNET, and subnet names for each of your deployments. Also, be sure to delete any unwanted resources after you have completed testing to avoid charges levied by Microsoft for these resources.
Using the Azure Portal
To enable overprovisioning using the Azure Portal during VMSS creation, follow these steps:
Follow the steps in the “VMSS creation walkthrough” section to start the Create a Virtual Machine Scale Set wizard and create a VMSS.
In the Management tab, under Overprovisioning, select the Enable Overprovisioning check box. (See Figure 2-15.)
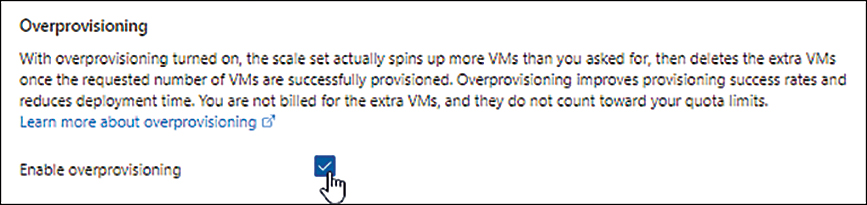
FIGURE 2-15 Enabling overprovisioning.
Finish using the VM Scale Set Creation wizard to create the VMSS, as described in the section “VMSS creation walkthrough.”
Using Azure PowerShell
When using Azure PowerShell to create a VMSS, you add the –Overprovision parameter and set the value to $true to enable overprovisioning and $false to disable it. By default, overprovisioning is enabled, so setting this value to $true is typically not necessary. The following code shows how to use a PowerShell script to create a VMSS with overprovisioning turned off:
#Define variables
$location = "EastUS2"
$RG = "VMSS-RG01"
$vmssname = "VMSS01"
# Create VMSS with overprovisioning turned off (it's enabled by default)
$vmssConfig = New-AzVmssConfig -Location $location `
    -SkuCapacity 2 `
    -SkuName "Standard_DS2" `
    -OverProvision $False
New-AzVmss -ResourceGroupName $rg -Name $vmssname -VirtualMachineScaleSet $vmssConfig
Using the Azure CLI
When using the Azure CLI to create a VMSS, you add the --disable-overprovision parameter to disable overprovisioning. Overprovisioning is enabled by default. The following code shows how to use this parameter in a Bash script to create a VMSS with overprovisioning disabled:
#Define variables
vmssname="vmss01"
location="eastus2"
rg="vmss-rg01"
#Create VMSS with overprovisioning turned off (it's enabled by default)
az vmss create -g $rg -n $vmssname –-l $location --image ubuntults --disable-overprovision
Availability zones
To protect a VMSS from datacenter–level failures, you can create a scale set across availability zones. Azure regions that support availability zones have a minimum of three separate zones, each with their own independent power source, network, and cooling. You can select an availability zone when you create the VMSS.
Considerations
When you deploy a regional scale set into one or more zones, you have three availability options:
Static fixed
spreading(platformFaultDomainCount=5) The scale set spreads the VMs across exactly five fault domains per zone. If the scale set cannot identify five distinct fault domains per zone, the request fails.Max spreading (
platformFaultDomainCount=1) The scale set spreads the VMs across as many fault domains as possible within each zone. This might be across more than five fault domains per zone, or fewer, depending on how many are available. With max spreading, regardless of how many fault domains the VMs are spread across, only one fault domain is visible in the VMSS instance view and in the instance metadata.Spreading aligned with storage disk fault domains (
platformFaultDomainCount=2or3) The scale set spreads the VMs across the same fault domains as the underlying managed disks attached to the individual VMs. The number of managed disk fault domains varies between two to three per Azure region.
Unless there is a need to spread replicas across distinct hardware isolation units, max spreading would work for most deployments. It provides the best spreading and redundancy. However, if there is a need to spread replicas across distinct hardware isolation units, the recommendation would be to use spreading across availability zones and use max spreading within each zone.
Placement groups
As mentioned, a placement group is similar to an availability set, and has its own update and fault domains. A single placement group can contain a maximum of 100 VMs.
When you deploy a scale set, you can choose to deploy it within a single placement group or multiple placement groups within an availability zone. Although the scale set is regional and not zonal, you can choose to have a single placement group or multiple placement groups within the region.
By default, with new scale sets, multiple placement groups are set up for single-zone and cross-zone scale sets. However, only single placement groups are used for regional (non-zonal) scale sets.
Single-zone and zone-redundant scale sets
You can deploy scale sets within a single availability zone or across multiple availability zones. Deploying a scale set to a single availability zone would require all VMs created for that scale set to exist within that same zone—meaning that a zone outage would cause a service interruption. In contrast, with multiple zone scale sets, VMs are spread across multiple zones, thereby providing more redundancy and resiliency from zone outages. In addition, with single-zone scale sets, autoscaling works only in that zone, whereas with multi-zone or zone-redundant scale sets, autoscaling evenly balances VMs across the zones (depending on the zone-balancing policies in place).
Although using zone-redundant scale sets would seem like the ideal solution due to the added redundancy, doing so can affect the design, costs, and management overhead associated with your application design. Hence, it is important to take all the related factors into consideration, including the application redundancy and uptime requirements, before deciding which option to choose. You should also confirm that the regions most suited for your workload support availability zones to avoid issues during deployment.
Zone balancing
Zone balancing is used when scale sets are deployed across multiple zones. In such instances, it is possible to select between two types of zone-balancing algorithms:
Strict zone balance With strict zone balance, the scale set is managed such that it is considered balanced only if all zones have the same number of VMs, plus or minus one VM. For example, if a scale set is spread across three zones, and zone A has three VMs, zone B has three VMs, but zone C has two VMs, then the scale set is considered balanced because the difference is only one VM. On the other hand, if in the same scenario, zone C had only one VM, then the scale set would be considered unbalanced. On subsequent scale-out or scale-in attempts, the scale set would work toward balancing itself. Note that VM extensions are not taken into consideration when checking for this balance. This implies that VMs with failed extensions will be considered active during the balancing check.
Best-effort zone balance Best-effort zone balance has more flexibility than strict zone balance. It attempts to maintain balance, but if it is not able to do so—for example, due to an outage in a specific zone—it will temporarily operate in an unbalanced manner. It will then work toward correcting the balance in subsequent scale-in or scale-out attempts based on region availability. This distinction is important, because strict zone balance will fail scale-out or scale-in attempts if there is a possibility of an imbalance taking place, which might cause problems in the event of regional outages or if the size of the scale set must scale in specific regions due to lack of vCPU availability.
Availability zones walkthrough
The following sections step you through the process of setting up availability zones for a VMSS using the Azure Portal, Azure PowerShell, and the Azure CLI. If you are following along, be sure to select resources and resource names based on your environment, including unique VMSS, vNET, and subnet names for each of your deployments. Also, be sure to delete any unwanted resources after you have completed testing to avoid charges levied by Microsoft for these resources.
Using the Azure Portal
To set up availability zones using the Azure Portal during VMSS creation, follow these steps:
Follow the steps in the “VMSS creation walkthrough” section to start the Create a Virtual Machine Scale Set wizard and create a VMSS.
In the Basics tab, open the Availability Zone drop-down list and do one of the following:
Select a single availability zone (zone 1, zone 2, or zone 3) to spread the scale set across a single zone. (See Figure 2-16.)

FIGURE 2-16 Single zone scale set setup.
Select multiple zones to create a zone-redundant scale set. (See Figure 2-17.)

FIGURE 2-17 Different availability group options.
Finish using the VM Scale Set Creation wizard to create the VMSS, as described in the section “VMSS creation walkthrough.”
Using Azure PowerShell
When using Azure PowerShell to create a scale set, you add the -Zone parameter to enable the availability zones for that scale set. For example, the following code shows how to use this parameter in a PowerShell script for VMSS creation. Add the number of zones based on your scale-set design needs:
#Define variables
$RG = "VMSSResourceGroup"
$location = "EastUS2"
$VMSSname = "VMScaleSet01"
$vnet = "VMSS-Vnet"
$subnet = "VMSS-Subnet"
$publicIP = "VMSSPublicIPAddress"
# Create VMSS in availability zone
New-AzVmss `
  -ResourceGroupName $RG""`
  -Location ""$location `
  -VMScaleSetName ""$VMSSname `
  -VirtualNetworkName ""$vnet `
  -SubnetName ""$subnet `
  -PublicIpAddressName ""$publicip `
  -LoadBalancerName "VMSSLoadBalancer" `
  -UpgradePolicy "Automatic" `
  -Zone "1", "2", "3"
Using the Azure CLI
When using the Azure CLI to create a scale set, you add the --zones parameter to enable the availability zones for that scale set. For example, the following code shows how to use this parameter in a Bash script or prompt for VMSS creation. Add the number of zones based on your scale-set design needs:
#Define variables
rg="VMSS-RG01"
name="VMSS-Set01"
adminusername="vmssadminuser"
# Create vmss in availability zones
az vmss create --resource-group $rg
    --name $name
    --image UbuntuLTS
    --upgrade-policy-mode automatic
    --admin-username $adminusername
    --generate-ssh-keys
    --zones 1 2 3
Fault domains
In Azure regions with no availability zones, VMSS are created with five fault domains by default. For Azure regions that do support zonal deployments, the fault domain count is one. This implies that the VM instances will be split across as many racks as possible. You must set the number of fault domains when creating a scale set, so you’ll want to think about this beforehand to build for maximum resiliency.
Fault domain walkthrough
The following sections step you through the process of setting up fault domains for a VMSS using the Azure Portal, Azure PowerShell, and the Azure CLI. If you are following along, be sure to select resources and resource names based on your environment, including unique VMSS, vNET, and subnet names for each of your deployments. Also, be sure to delete any unwanted resources after you have completed testing to avoid charges levied by Microsoft for these resources.
Using the Azure Portal
To enable fault domains using the Azure Portal during VMSS creation, follow these steps:
Follow the steps in the “VMSS creation walkthrough” section to start the Create a Virtual Machine Scale Set wizard and create a VMSS.
In the Advanced tab, next to Spreading Algorithm, select one of the following options:
Max Spreading VMs are spread across as many fault domains as possible in each zone.
Fixed Spreading VMs are always spread across exactly five fault domains. Remember, if fewer than five fault domains are available, the scale set will fail to deploy.
If you chose Fixed Spreading in step 2, enter the number of fault domains you want to use in the Fault Domain Count drop-down list. (See Figure 2-18.)

FIGURE 2-18 Set the fault domain count.
Finish using the VM Scale Set Creation wizard to create the VMSS, as described in the section “VMSS creation walkthrough.”
Using Azure PowerShell
When using Azure PowerShell to create a scale set, you add the -PlatformFaultDomainCount parameter to set the number of fault domains to be used for the scale set. For example, the following code shows how to use this in a PowerShell script for VMSS creation. Add the number of fault domains to be used based on your scale-set redundancy needs, selecting between the currently supported values of 1, 2, 3, and 5.
#Define variables
$RG = "VMSS-RG01"
$location = "EastUS2"
$VMSSname = "VMScaleSet01"
$vnet = "VMSS-Vnet01"
$subnet = "VMSS-Subnet01"
$publicip = "VMSSPublicIPAddress"
#Create VMSS with fault domain config
New-AzVmss `
  -ResourceGroupName ""$RG `
  -Location ""$location`
  -VMScaleSetName ""$VMSSname `
  -VirtualNetworkName ""$vnet `
  -SubnetName ""$subnet `
  -PublicIpAddressName ""$publicip `
  -LoadBalancerName "VMSSLoadBalancer" `
  -UpgradePolicy "Automatic" `
  -Zone "1", "2", "3"
  -PlatformFaultDomainCount 3
Using the Azure CLI
When using the Azure CLI to create a scale set, you add the --platform-fault-domain-count parameter to set the number of fault domains for the scale set. For example, the following code shows how to use this in a Bash script for VMSS creation. Add the number of fault domains to be used based on your scale-set redundancy needs, selecting between the currently supported values of 1, 2, 3, and 5:
#Define variables
rg="VMSS-RG01"
$location = "EastUS2"
$VMSSname = "VMScaleSet01"
$vnet = "VMSS-Vnet01"
#Create VMSS with fault domain config
az vmss create
  --resource-group $rg
  --name myScaleSet
  --image UbuntuLTS
  --upgrade-policy-mode automatic
  --admin-username azureuser
  --platform-fault-domain-count 3
  --generate-ssh-keys
Autoscaling
Now that we’ve covered availability and resiliency options, and highlighted a number of occasions on how autoscaling relates to scale set availability and resiliency, let’s examine how autoscaling works. In this context, autoscaling describes the ability of an Azure VMSS to automatically manage VM requirements based on various rules and resource-utilization patterns. In other words, the scale set can increase or decrease the number of VM instances running the application based on the rules defined in the scale set. As VM instances are added to a scale set, they are automatically added to the load balancer, too, so traffic can be distributed to them.
Autoscaling significantly reduces the overhead associated with managing application workload capacity requirements. Indeed, it completely eliminates the need to constantly check VM utilization and decide to scale in or out. This not only reduces management overhead, but it also makes the entire process more accurate than if it were manually managed.
You define a scale set’s autoscaling rules manually. First, though, you must establish what you consider to be acceptable performance, based on application requirements and customer experience testing. After you identify these thresholds, you can put in place autoscaling rules to adjust the scale set’s resource capacity accordingly.
A good approach is to base rules on the percentage of VM CPU utilization within a specific period of time. For example, suppose you know from user experience testing that when CPU utilization hits 85%, performance starts to suffer. In that case, you might set an autoscaling rule to increase the number of VM instances if CPU utilization reaches 80% for a period of 15 minutes to avoid performance degradation. Conversely, you might set an autoscaling rule to decrease the number of VM instances if CPU utilization drops below 30% to avoid paying for VM instances you aren’t using.
You might also create autoscaling rules based on scheduled or known triggers or activities that would require a much higher or lower capacity requirement. For example:
If business activity typically starts at 9 a.m. Monday through Friday, a burst of users will likely log in to the system at that time. In that case, it would be a good idea to create an autoscaling rule to add VM instances just before that time so they are available before users begin to log in. On the other hand, if business activity tends to drop sharply after 7 p.m. and on weekends, you can create an autoscaling rule to reduce the number of VM instances available during that time.
If your business employs an enterprise resource planning (ERP) application, it likely sees increased usage at the end of the month or quarter. Knowing this, you could set an autoscaling rule to automatically increase the number of VM instances to accommodate this increased demand.
If you are planning a marketing promotion, an event, or a large sale, you could schedule a one-time autoscaling rule before the activity or anticipated demand.
Host-based metrics
The easiest metrics to use for autoscaling rules are the built-in host metrics for the various VM instances. These provide details on CPU utilization, memory demand, and disk access for each VM instance. Visibility into these metrics does not require the use of additional agents or configuration. You can configure scaling-in or scaling-out actions based on these metrics when you create a scale set or add them later using the Azure Portal, Azure PowerShell, the Azure CLI, and ARM templates.
Azure Diagnostics Extension for VMs
To obtain more detailed performance metrics, you must deploy an agent on each VM instance. One such agent is the Azure Diagnostic Extension for VMs. Once deployed, this agent provides more in-depth performance metrics, which allow for more-informed decisions regarding autoscaling rules. For example, you can consider more granular metrics like PercentageIdleTime for CPU or AverageReadTime for disks instead of the basic CPU and disk utilization metrics available using host metrics. This can help in defining more accurate scaling policies that yield higher levels of performance and cost benefits.
Azure Application Insights
You can use Azure Application Insights to monitor app-level performance metrics. To use Application Insights, you must install an instrumentation package within the application to monitor the app and send telemetry data to Azure. Once this is in place, you can access advanced application metrics such as session details, application response times, page loading performance, and so on, which you can use to define autoscaling rules. This level of granularity allows for more insightful and more efficient autoscaling actions, based on actual customer experience rather than baseline parameters.
Advanced autoscaling
In addition to setting autoscaling rules based on performance metric thresholds, a specific schedule, or a combination of the two, you can set up advanced autoscaling rules using email and webhook notifications. This approach requires the creation of multiple scaling profiles that contain a combination of triggers and scaling actions. Based on the email and webhook notifications, different profiles and their associated actions could be triggered.
Best practices and general tips for autoscaling
Following are some best practices and general tips that relate to autoscaling:
Set maximum and minimum values appropriately If the scaling logic is set such that the minimum = 4, the maximum = 4, and the current instance count is 4, no scaling action can occur. Therefore, an appropriate margin is required between the maximum and minimum instance counts, which are inclusive. Autoscale will scale between these two limits.
Autoscale resets any manual scaling actions Manual scaling is temporary unless the autoscaling rules are set or modified in line with the manual scaling actions. If you manually set an instance count value above or below the maximum, the autoscale engine will automatically bring the scale set to the minimum or maximum threshold based on the deviation on its next run. For example, if the range is set to be between 2 and 7, and there is only one instance running, autoscale would automatically scale to two instances the next time it runs. Similarly, if the instance count is manually set to scale to nine instances, on the next autoscale run, it will scale it back to seven instances.
Modify autoscaling rules You can easily modify autoscaling rules over time. So, for example, you might start with utilization rules and then gather performance metrics before deciding on scheduled rules unless you have historical data available.
Combine scaling-in and scaling-out rules While it is possible to create autoscaling rules to take only a single action (scale in or scale out), based on specific performance thresholds in a profile, it is not ideal. The more optimal approach would be to combine rules such that scaling out takes place automatically when usage is high and scaling in occurs automatically when the usage is low.
Diagnostics metrics for scaling rules There are different metrics for scaling, which include total, minimum, maximum, and average. Based on the environment in use, the most appropriate metric would differ. If you’re not sure which metric is the right one, it’s a good idea to start with the average metric; you can adjust it over time if needed.
Threshold management When setting metric thresholds, account for the environment in which the scale set is running and expect to perform some amount of fine-tuning and adjusting over time based on that environment. Also ensure that metrics do not overlap, clash, or conflict, as this will result in confusion and potentially inaction. Be sure to test a scaling-in and scaling-out operation by performing stress testing on the scale set if possible. This will help validate that the rules work, and that you will only need to adjust thresholds over time based on actual performance.
Using multiple profiles You can set different types of scaling rules for a scale set. This can result in a single scale set having multiple profiles with different types of policies, which are triggered based on performance, schedules, or specific date/time ranges. It is important to know the order in which autoscale processes these profiles. At present, autoscale processes them in the following order:
Profiles with a fixed date and time
Profiles with recurring schedules
The default profile
Currently, only a single profile is processed at a time. This means that when a profile condition is met, autoscale applies the rules covered in that profile and ignores the rest of the profiles in the queue thereafter. Therefore, it might be best to add any rules that are required but are ignored (due to the ordering) to the profile that is getting processed last.
Scaling out versus scaling in For rules that manage scaling-out operations, a match with any rule will trigger the operation. However, for rules that manage scaling-in operations, all the rules must match. Be sure to test against this scenario to ensure your rules will work as expected when needed.
Identifying the default instance count The default instance count is the number of VMs running when autoscaling rules are not in effect at the start of the scale set setup. This can be due to insufficient metric information for the thresholds defined in the configuration. Make sure the minimum required number of VMs is set up correctly based on the anticipated load at that time to ensure the application performance does not suffer. Over time, this will be managed more efficiently by the system as it gathers performance metrics from the VM instances.
Autoscale notifications Autoscale records numerous actions and conditions in the activity log, such as scaling operations initiating, completing, and failing; issues with gathering metrics; and so on. You can use the Azure monitor or log monitor to set up notifications to inform administrators when such events take place. This can prompt a deeper analysis to identify whether there are incorrectly sized VM instances or other performance issues. (Incorrectly sized VM instances would require vertical scaling, which is discussed in the next section.)
Autoscaling walkthrough
The following sections step you through the process of setting up autoscaling policies using the Azure Portal, Azure PowerShell, and the Azure CLI. If you are following along, be sure to select resources and resource names based on your environment, including unique VMSS, vNET, and subnet names for each of your deployments. Also, be sure to delete any unwanted resources after you have completed testing to avoid charges levied by Microsoft for these resources.
Using the Azure Portal
To set up autoscaling using the Azure Portal during VMSS creation, follow these steps:
Follow the steps in the “VMSS creation walkthrough” section to start the Create a Virtual Machine Scale Set wizard and create a VMSS.
In the Scaling tab, in the Instance section, change the value in the Initial Instance Count box to reflect minimum number of VM instances for the new scale set. (See Figure 2-19.)

FIGURE 2-19 Entering the minimum number of VM instances for the scale set.
In the Scaling section, next to Scaling Policy, select one of the following (see Figure 2-20):
Manual If you select this option, all scaling-management activities will need to be performed manually.
Custom When you select this option, you can set up the system to manage scaling activities.

FIGURE 2-20 Select the Custom scaling policy and define your autoscale thresholds.
As shown in Figure 2-20, when you select the Custom option button, you’ll see several additional options:
Minimum number of instances Defines the minimum number of instances required for stable application functionality with the base application load.
Maximum number of instances Defines the maximum number of instances required for stable application functionality with the maximum anticipated application load. If you aren’t sure what this number should be, increase it over time while monitoring the usage of the scale set.
Scale Out: CPU threshold (%) Defines the CPU threshold to monitor to trigger scale-out policies. Set this based on the threshold point at which application performance may suffer and the amount of time it takes for a new instance to be brought online to handle new sessions.
Scale Out: Duration in minutes Defines the amount of time to monitor CPU utilization to trigger scale-out policies. Set this based on expected spikes in application load that stabilize quickly thereafter and the amount of time it takes for new instances to be brought online.
Scale Out: Number of instances to increase by Defines the number of instances to add when threshold parameters are met. This could be a single instance or multiple instances, based on anticipated application loads derived from historical data or on scheduled or planned events.
Scale In: CPU threshold (%) Defines the CPU threshold to monitor to trigger scale-in policies. Set this based on the threshold point at which application performance may continue to work efficiently and the amount of time it takes for a new instance to be brought online to handle new sessions in case there is a spike.
Scale In: Number of instances to decrease by Defines the number of instances to remove each time scale-in threshold parameters are met. This could be a single instance or multiple instances, based on anticipated application loads derived from historical data or on scheduled or planned events.
Under Scale-In Policy, open the Scale-In Policy drop-down list and choose the policy you want to apply. (See Figure 2-21.) Your choices are as follows:

FIGURE 2-21 Scale-in policy options.
Default – Balance across availability zones and fault domains, then delete VM with highest instance ID This policy configuration results in the scale set being spread across multiple availability zones and fault domains to achieve maximum redundancy. For zonal deployments, VMs are balanced across availability zones. On a best-effort basis, VMs are balanced across fault domains. The VM with the highest instance ID is deleted when the balancing algorithm performs its scaling in operations.
Newest VM – Balance across availability zones, then delete the newest created VM For zonal deployments, this scale-in policy configuration results in the scale set being spread across multiple availability zones. Scale-in operations will delete the newest VMs.
Oldest VM – Balance across availability zones, then delete the oldest created VM For zonal deployments, this scale-in policy configuration results in the scale set being spread across multiple availability zones. Scale-in operations will delete the oldest VMs.
Finish using the VM Scale Set Creation wizard to create the VMSS, as described in the section “VMSS creation walkthrough.”
If autoscaling is not set up at the time of the scale set creation or if it needs to be modified at any stage, you can easily address this. You can change scaling policies as needed and even define advanced scaling configurations such as multiple scaling conditions or multiple scaling rules. Follow these steps:
In the Azure Portal, select the VMSS whose scaling policies you want to set or change.
Click the Scaling option in the Settings pane.
In the Configure tab, select one of the following options:
Manual Scale Select this to set up a manual instance count that will be a fixed count maintained for autoscaling. (See Figure 2-22.)

FIGURE 2-22 Set up or modify autoscaling policies for an existing VMSS.
Custom Autoscale Select this to set up more complex autoscaling rules. For example, you can set scaling logic based on CPU usage, as shown in Figure 2-23.

FIGURE 2-23 Custom scale set rules and thresholds to trigger scaling policy.
Optionally, set up an advanced scaling configuration by creating multiple scaling rules for different thresholds or parameters to achieve more fine-tuned autoscaling. (See Figure 2-24.)

FIGURE 2-24 Create multiple custom scaling rules to monitor multiple scale set utilization conditions.
Optionally, define multiple profiles with different scaling rules to achieve the desired autoscaling configuration. (See Figure 2-25.) Be sure to test this to ensure that the rules do not clash or conflict.

FIGURE 2-25 Configure multiple custom scaling rules.
You can set up autoscaling notifications to email administrators or specific engineers within the organization when autoscaling operations are triggered. Notifications to webhooks can also be set up using this feature. Follow these steps:
In the Azure Portal, select the scale set for which you want to set up autoscaling notifications.
Click the Scaling option in the Settings pane.
In the Notify tab, specify whether you want to email administrators or co-administrators (or both).
Optionally, add more administrator emails or webhooks. (See Figure 2-26.)

FIGURE 2-26 Setting up autoscaling notifications.
Using Azure PowerShell
When using Azure PowerShell, you can use the New-AzureRmAutoscaleRule command to create an autoscaling rule and the Update-AzureRMAutoscaleRule command to modify an autoscaling rule. For example, the following code creates an autoscaling rule to check for the CPU percentage utilization for 15 minutes, and to increase the VM instance count by 2 if the average is greater than 80%.
#Define variables
$subscriptionID = "12232-12148-329201-199101"
$rg = "VMSS-RG01"
$vmssname = "VMSS-01"
$location = "EastUS2"
$vnet = "VMSS01-vNET"
$subnet = "VMSS01-Subnet"
$loadbalancer = "VMSS01-LB"
#Setup autoscaling rule
New-AzureRmAutoscaleRule `
  -MetricName "Percentage CPU" `
  -MetricResourceId /subscriptions/$SubscriptionId/resourceGroups/$RG/providers/
Microsoft.Compute/virtualMachineScaleSets/$vmssname `
  -TimeGrain 00:05:00 `
  -MetricStatistic "Average" `
  -TimeWindow 00:15:00 `
  -Operator "GreaterThan" `
  -Threshold 90 `
  -ScaleActionDirection "Increase" `
  -ScaleActionScaleType "ChangeCount" `
  -ScaleActionValue 2 `
  -ScaleActionCooldown 00:15:00
The following code defines the scale-in policy as NewestVM at the time of scale set creation:
#Define variables
$subscriptionID = "12232-12148-329201-199101"
$rg = "VMSS-RG01"
$vmssname = "VMSS-01"
$location = "EastUS2"
$vnet = "VMSS01-vNET"
$subnet = "VMSS01-Subnet"
$loadbalancer = "VMSS01-LB"
#Create VMSS with scale-in policy
New-AzVmss -ResourceGroupName $RG `
  -Location $location `
  -VMScaleSetName $vmssname `
  -ScaleInPolicy "NewestVM"
Using the Azure CLI
When using the Azure CLI to create a scale set, you can add the az monitor autoscale create parameter to enable autoscaling for that scale set. For example, the following code creates an autoscaling rule to set the minimum instance and maximum instance count for the scale set and to increase the instances by two each time an autoscale action is triggered:
#Define variables
rg="VMSS-RG01"
vmssname="VMSS01"

#Create autoscale rule
az monitor autoscale create --resource-group $rg
  --resource $vmssname
  --resource-type Microsoft.Compute/virtualMachineScaleSets
  --name autoscalerule01
  --min-count 4
  --max-count 40
  --count 2
The following code sets the scale-in policy to OldestVM at the time of the scale set creation:
#Define variables
rg="VMSS-RG01"
vmssname="VMSS01"
adminuser="vmssadminuser"
#Create VMSS with scale-in policy
az vmss create
  --resource-group $rg
  --name $vmssname
  --image UbuntuLTS
  --admin-username $adminuser
  --generate-ssh-keys
  --scale-in-policy OldestVM
Vertical scaling
So far, we’ve covered how autoscaling can scale in and scale out—in other words, scale horizontally. However, there might be instances when you need to scale up or scale down—that is, scale vertically. With vertical scaling, the size of the VM instances, rather than the number of instances, is increased or decreased, depending on performance needs. You might need to scale vertically if, for example:
Horizontal scaling takes place too often, and the autoscale service cannot keep up with demand.
The application is not performing as expected because the VM instances are undersized.
Autoscaling does not occur much at all because the VM instances are oversized, and additional instances are rarely required.
You can scale vertically in one of two ways:
By reprovisioning the VMs in the scale set—that is, removing VMs and adding new ones of the required size.
By changing the size of every VM currently running to retain the data already hosted on these VMs.
Vertical scaling can reduce service costs by replacing oversized VM instances with smaller ones and then reducing the number of smaller VMs that run during off-peak hours. Vertical scaling can also improve application performance because it takes less time to provision smaller VM instances than larger ones.
You can set up vertical scaling to be triggered using webhooks based on alerts generated by monitored metrics. Whenever an alert is generated, the webhook can trigger a set of pre-defined automated actions, which would carry out the scale-up or scale-down operation.
Load balancing
Load balancers distribute traffic to all the VM instances in a scale set. Basic layer-4 traffic distribution to all VM instances can be handled by a load balancer. You can set up the Azure load balancer to monitor VM instances and distribute incoming traffic only to healthy VM instances. Although Microsoft does not charge you extra to set up or use scale sets, it does charge you for the use of underlying compute resources, such as the load balancer.
Load balancing walkthrough
The following sections step you through the process of setting up a load balancer for a VMSS using the Azure Portal, Azure PowerShell, and the Azure CLI. If you are following along, be sure to select resources and resource names based on your environment, including unique VMSS, vNET, and subnet names for each of your deployments. Also, be sure to delete any unwanted resources after you have completed testing to avoid charges levied by Microsoft for these resources.
Using the Azure Portal
To set up a load balancer using the Azure Portal during VMSS creation, follow these steps:
Follow the steps in the “VMSS creation walkthrough” section to start the Create a Virtual Machine Scale Set wizard and create a VMSS.
In the Networking tab, under Load Balancing, select the Use a Load Balancer check box. (See Figure 2-27.)

FIGURE 2-27 Set up load balancing.
Still in the Load Balancing section, enter the following information (see Figure 2-28):
Load Balancing Options Leave this set to Azure Load Balancer (the default).
Select a Load Balancer Choose the load balancer you want to use. Alternatively, click the Create New link and follow the prompts to create a new load balancer with traffic-routing rules that you define. I opted to create a new load balancer named VMSS01-lb.
Select a Backend Pool Leave this set to the default. The load balancer will automatically add new VM instances to the pool for load balancing. Alternatively, click the Create New link to set up a new back-end pool name.

FIGURE 2-28 Set up load balancing configuration options.
Finish using the VM Scale Set Creation wizard to create the VMSS, as described in the section “VMSS creation walkthrough.”
Using Azure PowerShell
When using Azure PowerShell to create a scale set, you can use the –LoadBalancerName option to specify the name of the load balancer to be used or created as part of the scale set creation process. For example, the following code shows how to use this in a PowerShell script for VM scale set creation:
#Define variables
$rg = "VMSS-RG01"
$vmssname = "VMSS-01"
$location = "EastUS2"
$vnet = "VMSS01-vNET"
$subnet = "VMSS01-Subnet"
$loadbalancer = "VMSS01-LB"
#Create VMSS with load balancer
New-AzVmss `
  -ResourceGroupName $rg `
  -Location $location `
  -VMScaleSetName $vmssname `
  -VirtualNetworkName $vnet `
  -SubnetName $subnet `
  -PublicIpAddressName "VMSS01-PublicIPAddress" `
  -LoadBalancerName $loadbalancer `
Using the Azure CLI
When using the Azure CLI to create a scale set, you can use the --Load-Balancer option to specify the name of the load balancer to be used or created as part of the scale set creation process. For example, the following code shows how to use this in a Bash script for VM scale set creation:
#Define variables
rg="VMSS-RG01"
vmssname="VMSS-01"
adminusername="vmssadmin"
loadbalancer="VMSS01-LB"
vnet="VMSS01-vNet"
subnet="VMSS01-Subnet"
#Create the VM scale set with a load balancer
az vmss create
  --resource-group $rg
  --name $vmssname
  --image UbuntuLTS
  --upgrade-policy-mode automatic
  --admin-username $adminusername
  --generate-ssh-keys
--public-ip-address vmss-publicipaddress-01
--load-balancer $loadbalancer
--vnet-name $vnet
--subnet $subnet
Maintain Azure VMSS
Maintaining an Azure VMSS involves the following tasks and tools:
Upgrading the scale set model
Performing automatic OS upgrades
Updating golden OS images
Deploying the Application Health extension and automated instance repairs
Using Instance Protection
Using proximity placement groups
Checking and increasing vCPU quotas
Enabling termination notifications
Upgrade the scale set model
A VMSS has an upgrade policy that is used to decide how VM instances within that scale set will be kept up to date with the latest scale set model. There are three upgrade modes:
Automatic Existing VM instances will upgrade as soon as new OS images/upgrades are available. The upgrade will be carried out in random order.
Manual Existing VM instances will not be upgraded automatically. Instead, they will be upgraded manually by an administrator. (Note that choosing this option limits the use of the automatic OS rollback feature by using the previous OS disk.)
Rolling Upgrades are rolled out automatically in batches, enabling administrators to pause the upgrades if needed—for instance, if there are reported issues post-upgrade.
Upgrade the scale set model walkthrough
The following sections step you through the process of setting model upgrade options using the Azure Portal, Azure PowerShell, and the Azure CLI.
Using the Azure Portal
To set up automatic OS upgrades using the Azure Portal during VMSS creation, follow these steps:
Follow the steps in the “VMSS creation walkthrough” section to start the Create a Virtual Machine Scale Set wizard and create a VMSS.
In the Management tab, under Upgrade Policy, open the Upgrade Mode drop-down list and choose Manual…, Automatic…, or Rolling…. (See Figure 2-29.)

FIGURE 2-29 Set the upgrade policy.
If you select the Automatic option, no further configuration is needed. (See Figure 2-30.)
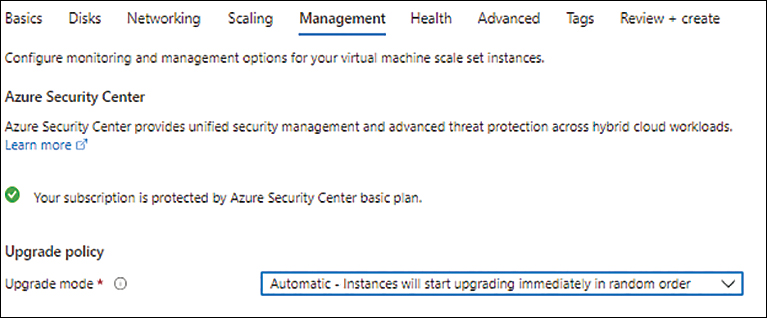
FIGURE 2-30 The Automatic upgrade mode requires no further configuration.
If you select the Rolling option, you’ll see additional options to define the rolling upgrade batch size (as a percentage), the pause time between batches, the maximum unhealthy instances (as a percentage), and the maximum unhealthy instances upgraded (as a percentage). (See Figure 2-31.)

FIGURE 2-31 Set the Rolling upgrade policy.
Finish using the VM Scale Set Creation wizard to create the VMSS, as described in the section “VMSS creation walkthrough.”
Using Azure PowerShell
When using Azure PowerShell to update a VMSS, you can add the –UpgradePolicyMode parameter and set the value to Automatic, Rolling, or Manual to define this configuration. For example, the following code shows how to use this in a PowerShell script for VMSS updates:
#Define variables
$rg = "VMSS-RG01"
$vmssname = "VMSS-01"
$location = "EastUS2"
$vnet = "VMSS01-vNET"
$subnet = "VMSS01-Subnet"
$loadbalancer = "VMSS01-LB"
#Update scale set config
New-AzVmss `
  -ResourceGroupName $rg `
  -Location $location `
  -VMScaleSetName $vmssname `
  -VirtualNetworkName $vnet `
  -SubnetName $subnet `
  -PublicIpAddressName "VMSS01-PublicIPAddress" `
  -LoadBalancerName $loadbalancer `
   -UpgradePolicyMode "Automatic"
Using the Azure CLI
When using the Azure CLI to create a scale set, you can set the --upgrade-policy-mode parameter to Automatic, Rolling, or Manual. For example, the following code shows how to use this in a Bash script for VMSS creation:
#Define variables
rg="VMSS-RG01"
vmssname="VMSS-01"
adminusername="vmssadmin"
#Update scale set config
az vmss create --resource-group $rg
  --name $vmssname
  --image UbuntuLTS
  --upgrade-policy-mode automatic
  --admin-username $adminusername
  --generate-ssh-keys
Perform automatic OS upgrades
You can perform automatic OS upgrades to safely update the OS disk for all VM instances in a scale set. This process is easy to manage and highly efficient. Here are a few points to keep in mind about automatic OS upgrades:
The latest OS images can be automatically applied after they are distributed by the image publishers, without user intervention.
VM Instances are upgraded in rolling batches, ensuring minimal disruption and service interruption.
Automatic OS upgrades are integrated with the Application Health extension and application health probes to allow for better monitoring and management.
Automatic OS upgrades work for all VM sizes, and for both Windows and the latest Ubuntu and CentOS Linux images.
Automatic OS upgrades allow for the entire process to be made manual, if needed.
As part of the upgrade process, a new OS disk is created with the latest OS image, and the current OS disk of a VM is replaced at the time of the upgrade. All extensions and custom data scripts are thereafter run to bring the VM to the same state as the original VM. Persistent data disks are not affected and continue to be retained by the VM.
Automatic OS upgrades can be enabled on a scale set of any size, which means they can be leveraged for scale sets ranging from a few VMs to thousands of VMs.
To minimize application downtime, upgrades take place in batches, with no more than 20% of the scale set upgrading at any time.
Automatic OS image upgrades walkthrough
The following sections step you through the process of enabling automatic OS image upgrades using the Azure Portal, Azure PowerShell, and the Azure CLI.
Using the Azure Portal
To enable Automatic OS upgrades using the Azure Portal during VMSS creation, follow these steps:
Follow the steps in the “VMSS creation walkthrough” section to start the Create a Virtual Machine Scale Set wizard and create a VMSS.
In the Management tab, under Automatic OS Upgrades, select the Enable Automatic Upgrades check box. (See Figure 2-32.)

FIGURE 2-32 Set up automatic OS upgrades.
Finish using the VM Scale Set Creation wizard to create the VMSS, as described in the section “VMSS creation walkthrough.”
Using Azure PowerShell
When using Azure PowerShell to update a VMSS, you can add the –AutomaticOSUpgrade parameter and set it to $true to enable automatic OS upgrades. For example, the following code shows how to use this parameter in a PowerShell script:
#Define variables
$rg = "VMSS-RG01"
$vmssname = "VMSS-01"
#Update scale set config
Update-AzVmss -ResourceGroupName $RG -VMScaleSetName $vmssname -AutomaticOSUpgrade $true
Using the Azure CLI
When using the Azure CLI to update a VMSS, you can add the --set UpgradePolicy.AutomaticOSUpgradePolicy.EnableAutomaticOSUpgrade parameter and set it to true to enable automatic OS upgrades. For example, the following code shows how to use this parameter in a Bash script for VMSS updates:
#Define variables
rg="VMSS-RG01"
vmssname="VMSS-01"
#Update scale set config
az vmss update --name $vmssname
--resource-group $rg
--set UpgradePolicy.AutomaticOSUpgradePolicy.EnableAutomaticOSUpgrade=true
Update golden OS images
To perform OS updates on VM instances in a scale set, you can update the golden image. Alternatively, you build a new golden image with the required updates and deploy it to the scale set. This would result in each VM instance being upgraded to the latest image in a rolling manner.
This is generally a non-disruptive activity, as the scale set design should help ensure minimal to no user interruption. However, if the application deployed on the scale set has compatibility issues between different OS versions and requires a subsequent update, it might be prudent to take maintenance downtime to perform these upgrade activities. This prevents you from having multiple versions of the app running at the same time.
Deploy the Application Health extension and automated instance repairs
Azure VM extensions are critical to performing automated post-deployment configuration activities. In addition, extensions can be deployed for monitoring, securing, backing up, and performing other activities on the VM.
One example of an extension is the Application Health extension. You can use the Application Health extension to monitor the health of the application and automatically perform repairs when needed.
You can integrate Application Health extensions with the automated instance repairs (AIR) service to achieve high availability for the application running in a scale set. If the Application Health extension engine detects an unhealthy scale set, the AIR service can automatically delete it and deploy a new one in its place. This reduces the management overhead required to monitor and act on such failures.
AIR is currently supported for scale sets with no more than 200 VM instances. However, it is possible that this limit will change in the future to match the maximum instance limit for scale sets.
Application Health extension walkthrough
The following section steps you through the process of enabling the Application Health extension using the Azure Portal.
Using the Azure Portal
To enable the Application Health extension using the Azure Portal during VMSS creation, follow these steps:
Follow the steps in the “VMSS creation walkthrough” section to start the Create a Virtual Machine Scale Set wizard and create a VMSS.
In the Health tab, under Enable Application Health Monitoring (see Figure 2-33), select the Enabled option.

FIGURE 2-33 Enable application health monitoring.
Enabling application health monitoring reveals several additional parameters (see Figure 2-34):
Application Health Monitor Set the extension to use to monitor the health of the application (in this case, the Application Health extension).
Protocol Select the protocol supported by the application for monitoring its health.
Port Number Enter the port number that will be used to monitor application health. For highly secure environments, you may end up using a port that is not publicly exposed.
Path Enter the path that corresponds with the page, application, or file that will be monitored to confirm application health status.

FIGURE 2-34 Application health monitoring options.
Choose the desired settings. Then finish using the VM Scale Set Creation wizard to create the VMSS, as described in the section “VMSS creation walkthrough.”
Automatic instance repair walkthrough
The following sections step you through the process of enabling automatic instance repairs using the Azure Portal, Azure PowerShell, and the Azure CLI.
Using the Azure Portal
To enable automatic instance repairs using the Azure Portal during VMSS creation, follow these steps:
Follow the steps in the “VMSS creation walkthrough” section to start the Create a Virtual Machine Scale Set wizard and create a VMSS.
In the Health tab, under Automatic Repair Policy (see Figure 2-35), select the Enable Automatic Repairs check box, and enter a value in the Grace Period box.

FIGURE 2-35 Enable automatic instance repair.
Finish using the VM Scale Set Creation wizard to create the VMSS, as described in the section “VMSS creation walkthrough.”
Using Azure PowerShell
When using Azure PowerShell to create a VMSS, you can enable automatic instance repairs by adding the –EnableAutomaticRepair and -AutomaticRepairGracePeriod parameters and set the values to $true and PT30M, respectively. (PT30M specifies a grace period of 30 minutes.) For example, the following code shows how to use these parameters in a PowerShell script for VMSS creation:
#Define variables
$location = "East US2"
$RG = "VMSS-RG01"
$VMSSName = "VMSS01"
#Update instance repair config
$vmssconfig = New-AzVmssConfig `
 -Location $location `
 -SkuCapacity 2 `
 -SkuName "Standard_DS2" `
 -UpgradePolicyMode "Automatic" `
 -EnableAutomaticRepair $true `
 -AutomaticRepairGracePeriod "PT30M"
#Create VMSS
New-AzVmss -ResourceGroupName $RG -Name $VMSSName -VirtualMachineScaleSet $VMSSconfig
Using the Azure CLI
When using the Azure CLI to create a scale set, you can use the --automatic-repairs-grace-period parameter with a value for the number of minutes for the grace period. This enables the configuration of automatic instance repair and sets the grace period defined in the command. For example, the following code shows how to use this parameter in a Bash script for VMSS creation:
#Define variables
location="EastUS2"
rg="VMSS-RG01"
adminuser="vmssadmin"
loadbalancer="VMSS01-LB"
vmssname="VMSS-01"
vmsshealthprobe="VMSS-LB01-HP01"
#Setup VMSS with automatic instance repair config
az vmss create
  --resource-group $rg
  --name $vmssname
  --image UbuntuLTS
  --admin-username $adminuser
  --generate-ssh-keys
  --load-balancer $loadbalancer
  --health-probe $vmsshealthprobe
  --automatic-repairs-grace-period 30
Use Instance Protection
Instance Protection enables you to set specific VM instances in a VMSS as special VMs. This results in them being treated differently from other VMs in the scale set. The difference in treatment depends on the protection properties defined for the instance. You might use this feature when you want to avoid autoscaling specific instances in a scale set or if upgrading or reimaging those instances might result in the disruption of specific activities running just on those VMs.
Azure VMSS provide two types of Instance Protection, as follows:
Scale-in protection This prevents automatic scale-in operations from taking place on the specified instance. It does not prevent user-initiated operations like deletions, nor does it prevent scale set–level operations like OS upgrades, instance deallocations, and so on.
Scale set–level protection This prevents scale set–level operations from taking place. This includes scale-in protection features in addition to preventing scale set–level operations like OS upgrades, instance deallocations, and so on. It does not protect against user-initiated actions like deletions, nor does it prevent the deletion of the entire scale set itself.
You can set up Instance Protection only after the scale set instances have been created. There are many ways of doing this, including using the Azure Portal, Azure PowerShell, the Azure CLI, or the REST API. If you need to use Instance Protection, it is important to remember to set it up after the VM instances are created.
Instance Protection walkthrough
The following sections step you through the process of enabling instance protection using the Azure Portal, Azure PowerShell, and the Azure CLI.
Using the Azure Portal
To set up Instance Protection using the Azure Portal, follow these steps:
In the Azure Portal, navigate to the VMSS for which you want to configure Instance Protection, and select it.
Click the Protection Policy button. (See Figure 2-36.)
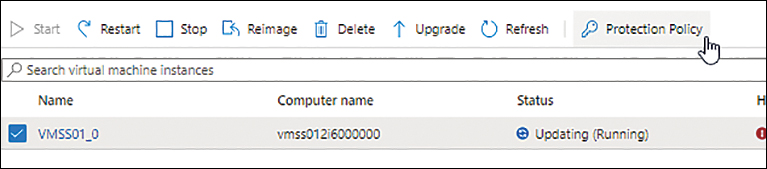
FIGURE 2-36 Set up Instance Protection.
In the Protection Policy pane, select the type of Instance Protection you want to apply and click Save. (See Figure 2-37.)

FIGURE 2-37 Change the protection policy configuration.
Using Azure PowerShell
When using Azure PowerShell to update a VMSS to use Instance Protection, you add the –ProtectFromScaleIn parameter and set the value to $true. For example, the following code shows how to use this parameter in a PowerShell script for a VMSS:
#Define variables
$RG = "VMSS-RG01"
$VMSSName = "VMSS-01"
#Update Instance protection config
Update-AzVmssVM `
  -ResourceGroupName $RG `
  -VMScaleSetName $VMSSName `
  -InstanceId 0 `
  -ProtectFromScaleIn $true
Using the Azure CLI
When using the Azure CLI to create a scale set, you can use the --protect-from-scale-in parameter with a value of true or false to turn Instance Protection on or off. For example, the following code shows how to use this parameter in a Bash script for a VMSS:
#Define variables
rg="VMSS-RG01"
vmssname="VMSS-01"

#Update Instance protection config
az vmss update
  --resource-group $rg
  --name $vmssname
  --instance-id 0
  --protect-from-scale-in true
Use proximity placement groups
All VMs in a single scale set are generally placed in a single Azure region. In theory, this reduces the physical distance between the instances. Using availability zones can help achieve a similar outcome. However, a single availability zone can be spread across multiple physical datacenters, which can result in much higher network latency than the application deployed on the scale set might support. To address this, you can use proximity placement groups. Proximity placement groups ensure that the VMs you use are located as close together as possible to achieve the lowest possible latency and avoid application performance issues.
Proximity placement groups can be used for VM instances in an availability set, VM instances in a single scale set or multiple scale sets, and standalone VMs. This enables multi-tiered applications to have all their interdependent workloads hosted close to each other to reduce latency across the stack.
Proximity placement groups walkthrough
The following sections step you through the process of defining proximity placement groups using the Azure Portal, Azure PowerShell, and the Azure CLI. If you are following along, be sure to select resources and resource names based on your environment, including unique VMSS, vNET, and subnet names for each of your deployments. Also, be sure to delete any unwanted resources after you have completed testing to avoid charges levied by Microsoft for these resources.
Using the Azure Portal
To define a proximity placement group using the Azure Portal at VMSS creation, follow these steps:
Follow the steps in the “VMSS creation walkthrough” section to start the Create a Virtual Machine Scale Set wizard and create a VMSS.
In the Advanced tab, under Proximity Placement Group, open the Proximity Placement Group drop-down list and choose the group you want to use. (See Figure 2-38.)
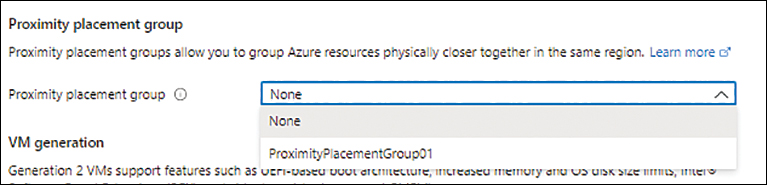
FIGURE 2-38 Set up a proximity placement group.
Finish using the VM Scale Set Creation wizard to create the VMSS, as described in the section “VMSS creation walkthrough.”
Using Azure PowerShell
When using Azure PowerShell, you can assign a VMSS to a proximity placement group during the creation process by defining the –ProximityPlacementGroupId parameter with the resource ID of the proximity placement group. To move an existing VMSS to a proximity placement group, use the following code snippet:
#Define variables
$RG = "RG01"
$location = "EastUS2"
$ppgroupName = "PPG-VMSS-01"
$vmscaleset = "VMSS-ScaleSet"

#Create Proximity Placement group
$ppgroup = New-AzProximityPlacementGroup -Location $location `
   -Name $ppgroupName `
   -ResourceGroupName $RG `
   -ProximityPlacementGroupType Standard
#Move an existing scale set into the proximity group
""
#Stop vm scale set

Stop-AzVmss -VMScaleSetName $vmscaleset.Name -ResourceGroupName $RG
#update scale set config
Update-AzVmss -VMScaleSetName $vmscaleset.Name -ResourceGroupName $RG -ProximityPlacementGroupId $ppgroup.Id
Start-AzVmss -VMScaleSetName $vmscaleset.Name -ResourceGroupName $RG
Using the Azure CLI
When using the Azure CLI, you can set up a proximity placement group for VMSS during the creation process by defining the --ppg parameter with the resource ID of the proximity placement group. To do so, you must have created the proximity placement group before creating the scale set, as shown in the following sample code snippet:
#define variables
ppg="VMSS-PPG"
rg="RG01"
location="eastus"
vmssname="VMSS01"
#create proximity placement group
az ppg create
   -n $ppg
   -g $rg
   -l $location
   -t standard
#create scale set with the proximity placement group
az vmss create -n $vmssname -g $rg --instance-count 5 --image Win2019Datacenter --os-disk-size-gb 40 --ppg $ppg
Check and increase vCPU quotas
There are two types of vCPU quotas currently available in Azure: one on the regional level and one on the VM family level. Any new VM deployment must meet the CPU limits available for both these quotas. If there are not enough vCPUs available for either of these two quotas, then the VM deployment will fail. In addition, there is a limit on the number of VMs that can be provisioned in a specific region.
It is important to be aware of these limits so scaling operations are not affected. You can check current consumption on the Subscription page in the Azure Portal in the Usage + Quotas section or by using Azure PowerShell. If consumption is too high for either the regional or VM family quota, it is recommended that you request an increase by logging a ticket with Microsoft support or by deleting unwanted or unused VMs from the subscription.
Enable termination notifications
During scale-in operations on VM instances in a scale set, the sudden loss of an instance can result in user data loss if the application is not set up to handle such activities efficiently. If termination notifications have been enabled for the scale set, the system sends a notification via the Azure Instance Metadata Service to record any termination activities. You can also set up a termination delay, which enables the transfer of load or traffic from the soon-to-be-terminated instance to other active instances in the scale set.
Termination notification walkthrough
The following sections step you through the process of setting up termination notifications using the Azure Portal, Azure PowerShell, and the Azure CLI. If you are following along, be sure to select resources and resource names based on your environment, including unique VMSS, vNET, and subnet names for each of your deployments. Also, be sure to delete any unwanted resources after you have completed testing to avoid charges levied by Microsoft for these resources.
Using the Azure Portal
To set up termination notifications using the Azure Portal during VMSS creation, follow these steps:
Follow the steps in the “VMSS creation walkthrough” section to start the Create a Virtual Machine Scale Set wizard and create a VMSS.
In the Management tab, under Instance Termination, select the Enable Instance Termination Notification check box.
Drag the Termination Delay (Minutes) slider to the number of minutes you want the system to wait before sending the termination notification. (See Figure 2-39.)

FIGURE 2-39 Set up instance termination notification.
Finish using the VM Scale Set Creation wizard to create the VMSS, as described in the section “VMSS creation walkthrough.”
Using Azure PowerShell
You can set up termination notifications using Azure PowerShell with the –TerminateScheduledEvents and –TerminateScheduedEventNotBeforeTimeoutInMinutes parameters. The –TerminateScheduledEvents parameter can be set to either $true or $false. The –TerminateScheduedEventNotBeforeTimeoutInMinutes value needs to be defined with the minutes after which the termination timeout must take place. For example, the following code shows how to do this in a PowerShell script for a VMSS:
#Define variables
$location="EastUS2"
#Setup VMSS with termination notification configuration
New-AzVmssConfig `
  -Location $location `
  -SkuCapacity 2 `
  -SkuName "Standard_DS3v4" `
  -UpgradePolicyMode "Automatic" `
  -TerminateScheduledEvents $true `
  -TerminateScheduledEventNotBeforeTimeoutInMinutes 10
Using the Azure CLI
You can set up termination notifications using the Azure CLI with the --terminate-notification-time parameter with a timeout value in integer form based on the minutes for the timeout to be set. For example, the following code shows how to use this parameter in a Bash script for a VMSS:
#Define variables
rg="VMSS-RG01"
vmssname="VMSS-01"
adminusername="vmssadmin"
#Create VMSS with termination notification config
az vmss create --resource-group $rg
  --name $vmssname
  --image UbuntuLTS
  --admin-username $adminusername
  --generate-ssh-keys
  --terminate-notification-time 20
Azure maintenance best practices
To enhance the stability, reliability, security, responsiveness, and performance of the underlying host infrastructure on which VMs are hosted, Microsoft Azure must perform updates on a periodic basis. These updates can be on the software or hardware level in the form of OS updates or upgrades or hardware replacement.
Microsoft performs these updates such that there are no anticipated outages on the underlying infrastructure that might affect any VM workloads running on them. However, on occasion, Microsoft may require maintenance on the underlying host, which will cause your VMs to be paused during the reboot window.
In such cases, Microsoft will convey this to the admins assigned to your Azure subscription well in advance and will await a response. If you do not respond to Microsoft, Azure’s back-end service automatically performs the maintenance. If you do respond, Microsoft will expect you to carry out the required maintenance on your underlying host on your own within 35 days and provide you with the necessary steps to do so. If you fail to perform this maintenance, Azure will automatically initiate the upgrade.
For highly available infrastructure like scale sets, it is advantageous to have a pre-defined process to manage these updates on an ongoing basis. This helps ensure that when any notifications are received from Microsoft Azure regarding required maintenance, a clearly defined set of steps is carried out in an efficient manner.
Some best practices for planned maintenance are as follows:
Multiple admins get alerts Set up numerous parties to receive alerts. Alerts are typically sent to the subscription owner and co-owners, but more recipients can be added by targeting activity log events.
Communication planning Notify all affected parties of the upcoming maintenance requirements well in advance and after the maintenance is complete.
Detailed process documentation Have a clearly documented process in place for activities to be carried out before and after the maintenance.
Validate the environment Do this after the maintenance to ensure everything is working as expected.
Internal cross-org coordination Ensure no other maintenance or upgrade activities are taking place around the same time.
Design with high availability in mind Any unplanned downtime should not affect the overall environment.
Networking considerations and best practices
When you deploy an Azure VMSS using the Azure Portal, certain network properties are set by default—for example, a default Azure load balancer with inbound NAT rules is assigned. Depending on requirements—especially security requirements—you might need to change the default configuration. Before making such changes, be sure to discuss this with your security team to ensure you are in alignment with the appropriate policies.
Commonly used features that can be modified from the default configuration include the following:
Accelerated Networking Accelerated Networking improves the network performance of a NIC by enabling single root I/O virtualization (SR-IOV) for a VM. If your environment calls for the use of this functionality, you should set the
"enableAcceleratedNetworking"parameter totruein the scale set’s"networkInterfaceConfigurations"settings or template during scale set creation.DNS settings By default, scale sets take on the specific DNS settings of the VNET and subnet in which they were created. You can, however, configure the DNS settings for a scale set directly as part of the template code. This can help ensure that the scale set is aligned with your organization’s DNS-related network requirements.
Public IPv4 per VM In general, individual VMs in a scale set do not require their own public IP addresses. For most scenarios, it is more secure and economical to have a single public IP associated with the load balancer or with a jumpbox in that scale set. The jumpbox helps route, control, and monitor incoming connections to the scale set. There are exceptions to this, however, such as in scenarios where workloads require direct public connectivity using unique IP addresses. In such cases, you might consider adding individual public IPs per VM.
Network security groups (NSGs) NSGs allow the filtering and control of traffic to and from resources in an Azure network or an Azure VM. They also allow for the creation of security rules that detail the source, scope, protocol, and port parameters to control said traffic. You can apply an existing or pre-defined NSG to a scale set during the creation process on the Networking tab of the VM Scale Set Creation wizard, in the Network Interface section.
Multiple IPs per VM network interface Every NIC attached to each individual VM in a scale set can have one or more IP configurations associated with it. Each configuration is assigned one private IP address by default based on the subnet for the scale set. In addition, each configuration can have one public IP address associated with it.
Multiple NICs per VM Larger VMs can have multiple NICs. The maximum number at this time is eight NICs per VM, but it differs between VM SKUs. If multiple NICs are required per VM, you can easily achieve this if the IP address space on the virtual network and subnet(s) have been sized appropriately. It is important to note that all NICs connected to a VM in a scale set must connect to the same virtual network. The NICs can connect to different subnets, but all subnets must be part of the same virtual network.
Application security groups (ASGs) ASGs help manage VM security by grouping VMs according to the applications that run on them. This allows for the use of NSGs in an application-centric manner. You can configure an existing or pre-defined ASG during the VMSS creation process in the Networking tab of the VM Scale Set Creation wizard, in the Network Interface section.
Now that we have covered all the networking features that can benefit a scale set, let’s dive deeper into various high availability, redundancy, and management options.
VMSS deployment best practices
To streamline the deployment of VM Instances in a VMSS, consider the following points when formulating your deployment strategy.
Use a custom golden image
To use an application on VM instances in a scale set, there are two approaches you can take. The recommended approach is to use the application installer to create a custom VM OS image. This “golden” image should be built to auto-trigger any pre-install or post-install configuration steps using scripts so that no admin or user intervention is required during scaling operations.
The other option is to use the default OS images, called platform images in Azure, to create VM instances. In this scenario, the required application install should be automated using scripting, third-party application deployment solutions, or in the case of Windows Servers, group policy. Note that, with this approach, the time required to get the new VM instance in “usable” mode, ready to accept user connections, increases. Depending on the number of changes that need to be performed, there can be application access or performance issues. In addition, you may need to monitor or validate the functioning of the application after each scale-out operation to confirm that all required changes have taken place correctly. This can result in more complexity in your deployment and day-to-day maintenance and management. That is why it is best to adopt the golden image–based deployment option in your environment if you can, as it will help streamline the deployment and application upgrade process.
Use the Custom Script Extension for app configuration
Custom Script Extension (CSE) allows you to automate the install of applications on Azure VMs. Although you can use this approach for application installs after an instance deployment, it is recommended to instead use it only for any post-deployment configuration that must be performed on each new VM instance that you cannot incorporate in the golden image.
The CSE engine requires scripts to be provided in the Azure Portal when the extension is configured or to host them in GitHub or an Azure blob storage and reference them during configuration. The engine then uses the script directly if provided or downloads it for use at execution.
Use Windows PowerShell Desired State Configuration
Windows PowerShell Desired State Configuration (DSC) is an essential component for setup, configuration, and management of Windows Servers. In large environments that make extensive use of scale sets, it gets difficult over time to monitor and maintain the known good state of every VM instance. Windows PowerShell DSC provides a free option to help monitor and maintain this configuration state, removing the need for you to procure and deploy other complex third-party solutions.
PowerShell DSC is a configuration as code (CaC) technology that uses GitHub to enable you to configure Windows OS and deployed applications using a configuration file and Windows PowerShell.
Every VM instance has a built-in engine, which performs the required actions that you have pushed out. Using this approach, you can completely automate the ongoing monitoring and management configuration of VM instances, reducing management overhead.
Use cloud-init for Linux VMs
Similar to Windows PowerShell DSC, you can use cloud-init to perform the same set of tasks for a Linux VM. You can also use cloud-init to configure the users and security settings inside the Linux OS.
Cloud-init is compatible with most Linux distributions, and automatically uses the native tool on each distribution for command execution. This standardization makes it easy to deploy applications without customizing the install commands for each distribution type.
OS and data disks for scale sets
You can use different disk types on VM scale sets, depending on the availability, redundancy, reliability, and cost considerations for your environment. The following sections review each of these disk options in more detail to allow you to make a more informed choice for your workloads.
Disk types
VMSS currently support different disk types for use with either the OS or data disks on VM instances. These disk types are as follows:
Premium SSD Currently the fastest disk types available for scale sets. These disks provide the maximum input/output operations per second (IOPS) and higher performance than other supported disk types. They are, however, the most expensive disk options, so you must consider actual application requirements and associated budgets before choosing this disk type. Premium SSD disks are supported by specific VM series like DSv2-Series, FS, and GS-series VMs. VM instances must use one of these VM series to be able to use Premium SSD disks.
Standard SSD A great option for workloads that require a consistent level of performance that is higher in IOPS than Standard HDD disks but not as high as Premium SSD disks. Standard SSD disks deliver much higher redundancy, consistency, and latency than HDD disks. They are suitable for applications that need low IOPS, like web servers, small lightly used applications, and some dev/test workloads. Standard SSDs provide low–single digit millisecond latency. However, at times, actual IOPS and throughput may vary.
Standard HDD Provide a significantly lower amount of IOPS than SSD disks. Standard HDD disks are, however, the cheapest disk option. They are suitable for applications where the IOPS requirements can be met using HDD disks and for dev and test workloads.
Disk types walkthrough
The following section steps you through the process of assigning a disk type to a VMSS using the Azure Portal.
Using the Azure Portal
To assign a disk type to a VMSS using Azure Portal during VMSS creation, follow these steps:
Follow the steps in the “VMSS creation walkthrough” section to start the Create a Virtual Machine Scale Set wizard and create a VMSS.
In the Disks tab, under Disk Options, open the OS Disk Type drop-down list and choose Premium SSD, Standard SSD, or Standard HDD. (See Figure 2-40.)

FIGURE 2-40 Set up disk options.
Finish using the VM Scale Set Creation wizard to create the VMSS, as described in the section “VMSS creation walkthrough.”
Managed disks
Due to the high-availability requirements of scale sets, it is critical to use managed disks in conjunction with scale sets. These provide a very high level of resiliency by isolating disks for the different VM instances to reduce single points of failure in the architecture. When you integrate managed disks and scale sets, the loss of individual VM instances will not affect other VM instances or cause a major outage.
Managed disks walkthrough
Managed disks are enabled by default when you select the OS disk type. This section steps you through the process of confirming they are set up during scale set creation using the Azure Portal.
Using the Azure Portal
To confirm that managed disks are enabled for a scale set using the Azure Portal during VMSS creation, follow these steps:
Follow the steps in the “VMSS creation walkthrough” section to start the Create a Virtual Machine Scale Set wizard and create a VMSS.
Select the OS disk type. (See the “Disk types walkthrough” section for more information.)
Scroll to the Advanced section and ensure the Use Managed Disks check box is selected. (See Figure 2-41.)

FIGURE 2-41 Confirm managed disks are set up for the scale set.
Finish using the VM Scale Set Creation wizard to create the VMSS, as described in the section “VMSS creation walkthrough.”
User-managed storage
If managed disks are not preferable for use with a particular scale set, your other option is to employ a user-managed storage account to store the VM disks for all the VMs in the scale set. At present, you are limited to using 20 VMs per storage account. However, achieving higher IO throughput in the storage layer might result in a lower number of VMs being provisioned per account.
User-managed storage walkthrough
The following section steps you through the process of setting up user-managed storage using the Azure Portal.
Using the Azure Portal
To configure the VM OS disk to be user-managed using the Azure Portal during VMSS creation, follow these steps:
Follow the steps in the “VMSS creation walkthrough” section to start the Create a Virtual Machine Scale Set wizard and create a VMSS.
Select the OS disk type. (See the “Disk types walkthrough” section for more information.)
Scroll to the Advanced section and deselect the Use Managed Disks check box. (See Figure 2-42.)

FIGURE 2-42 Set up user-managed storage.
Finish using the VM Scale Set Creation wizard to create the VMSS, as described in the section “VMSS creation walkthrough.”
Data disks
Azure VMSS supports the use of data disks for VM instances when the scale set is created or at a later stage if the need arises. Note that simply adding the disk does not make it usable. The disk must also be mounted and formatted within the OS. Using the Custom Script Extension discussed earlier to perform these activities is advisable to reduce management overhead for subsequent operations.
Data disks can be empty (the default). Alternatively, you can duplicate an existing data disk and attach it to all VM instances in a scale set. If you are using a custom golden image, you can include the data disk containing the required data in the image. Then, when the scale set is provisioned using the custom image, it will have all the required data.
Adding unmanaged data disks is currently not supported at the time of VM creation. You can add them after the VM is created, however. Data disks are supported by and can be added and managed using the Azure Portal, Azure PowerShell, the Azure CLI, Azure templates, SDKs, and the REST API.
Data disks walkthrough
The following sections step you through the process of setting up data disks Using the Azure Portal. If you are following along, be sure to select resources and resource names based on your environment, including unique VMSS, vNET, and subnet names for each of your deployments. Also, be sure to delete any unwanted resources after you have completed testing to avoid charges levied by Microsoft for these resources.
Using the Azure Portal
To set up data disks using the Azure Portal during VMSS creation, follow these steps:
Follow the steps in the “VMSS creation walkthrough” section to start the Create a Virtual Machine Scale Set wizard and create a VMSS.
In the Disks tab, click the Create and Attach a New Disk link. (See Figure 2-43.)
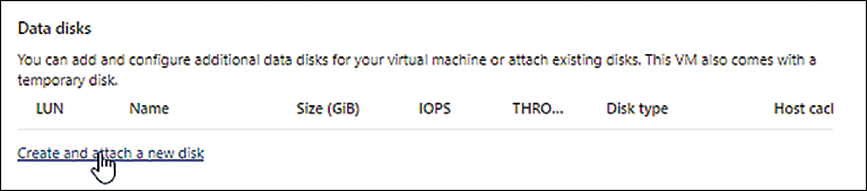
FIGURE 2-43 Set up data disks.
The Create a New Disk dialog box opens. (See Figure 2-44.) Type a name for the new disk in the Name box. Then do any of the following before clicking OK:
Set a source type by opening the Source Type drop-down list and choosing from the available options.
Change the size of the disk by clicking the Size link. Then, in the Disk Size dialog box, choose an account type, select a disk size, and click OK.
Choose an encryption type by opening the Encryption Type drop-down list and choosing from the available options. (The default type is encryption at rest with a platform-managed key.)

FIGURE 2-44 Create a New Disk dialog box.
The disk you created appears in the Data Disks area of the Disks tab. (See Figure 2-45.)

FIGURE 2-45 Data disks on LUN 0.
Finish using the VM Scale Set Creation wizard to create the VMSS, as described in the section “VMSS creation walkthrough.”
Strategies for cost optimization
Microsoft provides various options to help you manage costs associated with the VM instances in a VMSS. Depending on your application design, cost-control requirements, and application capabilities, you will likely be able to benefit from some, if not most, of these options.
Spot instances
Like individual VMs, VM instances in a VMSS can be set up as Azure spot instances. This offers significant cost savings when performing scale-out operations.
Spot instances depend on the capacity available in the specific region based on the VM size, time of day, and other factors, so they do affect a scale set’s availability. Therefore, specific use cases like dev/test environments, batch jobs, and similar workloads, and web applications with no user affinity requirements are great candidates for spot instances.
When you use spot instances, there is a risk of Azure evicting VMs if it needs the capacity back. However, you can establish eviction policies to dictate when and how this occurs, and what happens next.
Eviction policies are similar to the deallocation and delete options discussed in Chapter 1 of this book. If a scale set’s VM instances are built from custom images and a new one can be easily brought up without manual intervention or long processing times, it might be best to set the policy to delete instead of deallocate because removing the underlying VM disk results in additional cost savings. Additionally, if you deallocate rather than delete the VMs, those VMs would count against the scale set’s capacity. Moreover, being spot instances, if they can’t be brought online, it would limit the number of instances that could be made available in other zonal regions to achieve capacity requirements. Setting the eviction policy to delete would alleviate this problem.
At the time of eviction, there is a 30-second window to complete any outstanding jobs before shutdown is performed. Hence, it is advisable to stress-test this in different workload scenarios to make sure there are no application errors, data loss, or locked jobs or transactions.
Spot instances walkthrough
The following sections step you through the process of setting up spot instances using the Azure Portal, Azure PowerShell, and the Azure CLI.
Using the Azure Portal
To set up spot instances using the Azure Portal during VMSS creation, follow these steps:
Follow the steps in the “VMSS creation walkthrough” section to start the Create a Virtual Machine Scale Set wizard and create a VMSS.
In the Basics tab, in the Instance Details section, select the Azure Spot Instance check box.
In the Eviction Type options that appear, select one of the following options (see Figure 2-46):
Capacity Only… Choose this eviction model if you want to evict VM spot instances if Azure needs capacity for pay-as-you-go workloads.
Price or Capacity… Choose this eviction model to specify a maximum price that you are willing to pay to run the spot instance every hour. If the cost of the instance goes beyond your maximum price, Azure will evict your VM if it needs capacity for pay-as-you-go workloads.

FIGURE 2-46 Eviction type options for spot instances.
Open the Size drop-down list and choose a size for the spot instance.
Type a maximum price in the Maximum Price You Want to Pay Per Hour box. (See Figure 2-47.)

FIGURE 2-47 Choose a size for your spot instance and specify your maximum price per hour.
In the Eviction Policy section, choose one of the following options (see Figure 2-48):
Stop/Deallocate Choose this option if you want Azure to stop and deallocate an evicted spot instance so it can quickly be brought back online at a later stage. When you check this option, Azure retains the underlying disk(s), as well as any data contained within the spot instance.
Delete Choose this option if you want Azure to remove the evicted spot instance and its underlying disks. If the VMSS does not store data locally on the disks of the VMs, then this would be the best option, as it will save considerable costs.

FIGURE 2-48 Set up the eviction policy for spot instances.
Finish using the VM Scale Set Creation wizard to create the VMSS, as described in the section “VMSS creation walkthrough.”
Using Azure PowerShell
You can use Azure PowerShell to set up spot instances when creating a VMSS by adding the parameters '-Priority "Spot"' and '-max-price xx' (where xx is the maximum price for the spot instance) to the code or script. If you do not want spot instances to be evicted for price reasons, set -max-price to -1. (If -max-price is not specified, it will be set to -1 by default.) For example, the following code shows how to create a VMSS in the East US 2 region with spot instances that use a delete eviction policy and have a maximum price per hour of 0.01538:
#Define variables
$location = "East US 2"
$RG = "VMSS-RG01"
$vmssname = "VMSS01"
#Create vmss config for Spot instances
$vmssConfig = New-AzVmssConfig `
    -Location $location `
    -SkuCapacity 2 `
    -SkuName "Standard_DS2" `
    -UpgradePolicyMode Automatic `
    -SinglePlacementGroup False `
    -Priority "Spot" `
    -max-price 0.01538 `
    -EvictionPolicy Delete
#Create scale set with above config
New-AzVmss -ResourceGroupName $RG -Name $vmssname -VirtualMachineScaleSet $vmssConfig
Using the Azure CLI
You can use the Azure CLI to set up spot instances when creating a VMSS by adding the parameters '--Priority Spot' and '--max-price xx' (where xx is the maximum price for the spot instance) to the code. If you do not want spot instances to be evicted for price reasons, set the --max-price to -1. (If --max-price is not specified, it will be set to -1 by default.) For example, the following code shows how to create a VMSS (UbuntuScaleSet01) with the UbuntuLTS image and spot instances that use a delete eviction policy with a maximum price of 0.01538:
#Define variables
location="East US 2"
rg="VMSS-RG01"
vmssname="VMSS01"
adminusername="vmssadmin"
#Create vmss config for Spot instances
az vmss create --resource-group $rg
    --location $location
    --vm-sku Standard_DS2
    --name $vmssname
    --image UbuntuLTS
    --single-placement-group false
    --admin-username $adminusername
    --generate-ssh-keys
    --priority Spot
    --max-price 0.01538
    --eviction-policy Delete
Reserved instances
Like individual VMs, VMSS can benefit from reserved instances (RIs). To recap, RIs are VMs that are reserved on the Azure platform for a specific period of time, which can vary from one to three years. When a VM is set up as a reserved instance, the underlying hardware resources for that VM are reserved, ensuring that the VM will have access to them regardless of whether it is placed offline during the reservation period, no matter how long.
For scale sets, because the number of VMs constantly changes based on fluctuations in the utilization of resources and on your scaling policies, it might be best to start by reserving the minimum number of instances that can run at any given time in the scale set. Then, monitor the peak utilization window and VM instance requirements for the application at peak capacity. If you determine that setting up RIs for your VMSS results in cost savings, you can set them up for more of your VM instances.
Dedicated hosts
You can use dedicated hosts to host a VMSS, the same way you can individual VMs. During scale set creation, you simply specify a host group containing the dedicated hosts you want to use.
For this to work correctly, there are a few prerequisites and best practices:
Be sure the availability settings on the VMSS and host group match. This ensures that their availability configurations are aligned. The fault domain count for the VMSS and host group should also match to ensure that VMs are spread correctly.
You should provision dedicated hosts in advance with sufficient capacity to host the scale set VM instances. Otherwise, VM creation during VMSS creation will fail.
The placement of VMs in the host group should be set to automatic. Manual management causes issues with new VM provisioning on scale-out operations.
Finalize the VM SKUs required for the VM instances so that the SKU of the dedicated host can be set up to match. This will ensure that VM instances for that SKU are supported for provisioning on the dedicated host(s).
Do not use proximity placement groups.
Avoid provisioning VMs. Alternatively, make sure that the capacity of your dedicated host is enough to handle overprovisioned VMs. That way, there are no failures during deployment or scaling operations.
Dedicated hosts walkthrough
The following sections step you through the process of setting up a dedicated host configuration for a VMSS during VMSS creation using the Azure Portal, Azure PowerShell, and the Azure CLI. If you are following along, be sure to select resources and resource names based on your environment, including unique VMSS, vNET, and subnet names for each of your deployments. Also, be sure to delete any unwanted resources after you have completed testing to avoid charges levied by Microsoft for these resources.
Using the Azure Portal
To set up dedicated hosts configuration using the Azure Portal during VMSS creation, follow these steps:
Create a dedicated host by following the steps covered in Chapter 1.
Follow the steps in the “VMSS creation walkthrough” section to start the Create a Virtual Machine Scale Set wizard and create a VMSS.
In the Advanced tab, under Host, open the Host Group drop-down list and select the host group you want to use. (See Figure 2-49.)

FIGURE 2-49 Set up a dedicated host.
Finish using the VM Scale Set Creation wizard to create the VMSS, as described in the section “VMSS creation walkthrough.”
Using Azure PowerShell
You can use Azure PowerShell to create a Windows Server–based VMSS with a dedicated host using the New-AzHostGroup and New-AzHost parameters. If you want to manually choose which host to deploy the scale set to, add the --host parameter with the name of the host. For example, the following code shows how to use these parameters in a PowerShell script for VMSS creation based on the setup done earlier using the Azure Portal:
#Define variables
$RG = "VMSS-RG01"
$location = "East US 2"
$hostgroup = "VMSS-HostGroup01"
$hostname = "VMSS-Host01"
$vmssname = "VMSS01"
$vnet = "VMSS01-vNET"
$subnet = "VMSS01-Subnet"
$vmsspip = "VMSS01-PIP"
$vmsslb = "VMSS01-Loadbalancer"
New-AzResourceGroup -Location $location -Name $rgName
$hostGroup = New-AzHostGroup `
   -Location $location `
   -Name $hostgroup `
   -PlatformFaultDomain 2 `
   -ResourceGroupName $RG `
   -Zone 1

#Create the Dedicated Host
$dHost = New-AzHost `
   -HostGroupName $hostGroup.Name `
   -Location $location -Name $hostname `
   -ResourceGroupName $RG `
   -Sku DSv3-Type1 `
   -AutoReplaceOnFailure 1 `
   -PlatformFaultDomain 1

#Create a new scale set in the host group
New-AzVmss `
  -ResourceGroupName $RG `
  -Location $location `
  -VMScaleSetName $vmssname `
  -VirtualNetworkName $vnet `
  -SubnetName $subnet `
  -PublicIpAddressName $vmsspip `
  -LoadBalancerName $vmsslb `
  -UpgradePolicyMode "Automatic"'
  -HostGroupId $hostGroup.Id
Using the Azure CLI
You can use the Azure CLI to create a Windows Server–based VMSS with a dedicated host using the az vm host group create and az vm host create commands and their related parameters. For example, the following code shows how to use this in a Bash script for VMSS creation based on the setup done earlier using the Azure Portal:
#Define variables
rg="VMSS-RG01"
location="EastUS2"
hostgroup="VMSS-HostGroup01"
hostname="VMSS-Host01"
adminusername="vmssadmin"
vmssname="VMSS01"
#Create a host group for the VMSS
az vm host group create
   --name $hostgroup
   -g $rg
   -z 1
   --platform-fault-domain-count 2
   --automatic-placement true
#Create a Dedicated Host
az vm host create
   --host-group $hostgroup
   --name $hostname
   --sku ESv3-Type1
   --platform-fault-domain 1
   -g $rg

#Create a VMSS
az vmss create
  --resource-group $rg
  --name $vmssname
  --image UbuntuLTS
  --upgrade-policy-mode automatic
  --admin-username $adminusername
  --host-group $hostgroup
  --generate-ssh-keys
  --size Standard_D2s_v3
  --zone 1
Azure Hybrid Benefit
You can apply the Azure Hybrid Benefit to VM instances in a scale set. Azure Hybrid Benefit is a licensing benefit that enables you to use your own on-premises Windows Server license to license servers in Azure. To do this, you must have Software Assurance or a Windows Server subscription. Using Azure Hybrid Benefit can help you significantly reduce the costs of running your workloads because you pay only for compute costs. Azure Hybrid Benefit works with both Windows and Linux VMSS.
Azure Hybrid Benefit for Windows VMSS walkthrough
The following sections step you through the process of setting up Azure Hybrid Benefit for a VMSS in Windows using the Azure Portal, Azure PowerShell, the Azure CLI, and an ARM template.
Using the Azure Portal
To set up Azure Hybrid Benefit using the Azure Portal during VMSS creation, follow these steps:
Follow the steps in the “VMSS creation walkthrough” section to start the Create a Virtual Machine Scale Set wizard and create a VMSS.
In the Basics tab, under Licensing, select the Would You Like to Use an Existing Windows Server License check box.
A check box appears to prompt you to confirm that you have an eligible Windows Server license with Software Assurance or a Windows Server subscription. Select the check box to confirm. (See Figure 2-50.)

FIGURE 2-50 Set up Azure Hybrid Benefit in Windows and confirm licensing eligibility.
Finish using the VM Scale Set Creation wizard to create the VMSS, as described in the section “VMSS creation walkthrough.”
Using Azure PowerShell
You can use Azure PowerShell to enable Azure Hybrid Benefit and create a Windows Server–based VMSS by adding the –LicenseType "Windows_Server" parameter. For example, the following code shows how to use this parameter in a PowerShell script for VMSS creation:
#Define variables
$RG = "VMSS-RG01"
$vmssname = "VMSS01"
$location = "EastUS2"
#create VMSS with Azure Hybrid Benefit
New-AzVmss `
    -ResourceGroupName $RG `
    -Name $vmssname `
    -Location $location `
    -ImageName "Win2019Datacenter" `
    -LicenseType "Windows_Server"
Using the Azure CLI
You can use the Azure CLI to enable Azure Hybrid Benefit and create a Windows Server–based VMSS by adding the --License-Type Windows_Server parameter. For example, the following code shows how to use this parameter in a Bash script for VMSS creation:
#Define variables
rg="VMSS-RG01"
vmssname="VMSS01"
location="EastUS2"
#create VMSS with Azure Hybrid Benefit
az vm create
    --resource-group $rg
    --name $vmssname
    --location $location
    --license-type Windows_Server
    }
Azure Hybrid Benefit for Linux VMSS walkthrough
The following sections step you through the process of setting up Azure Hybrid Benefit for a VMSS for RHEL and SLES using the Azure Portal, Azure PowerShell, and the Azure CLI.
Using the Azure Portal
With Linux, you can apply Azure Hybrid Benefit during VMSS creation and after. To set up Azure Hybrid Benefit during VMSS creation, follow these steps:
Follow the steps in the “VMSS creation walkthrough” section to start the Create a Virtual Machine Scale Set wizard and create a VMSS.
In the Basics tab, under Licensing, select the Would You Like to Use an Existing Red Hat Enterprise Linux Subscription check box.
A check box appears to prompt you to confirm that you have an eligible Red Hat Enterprise Linux subscription. Select the check box to confirm. (See Figure 2-51.)
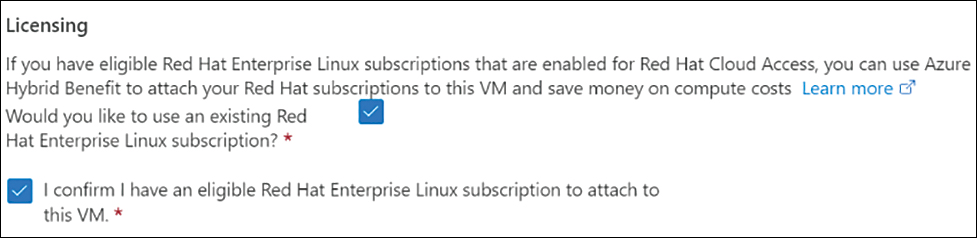
FIGURE 2-51 Set up Azure Hybrid Benefit in Linux during VMSS creation and confirm licensing eligibility.
Finish using the VM Scale Set Creation wizard to create the VMSS, as described in the section “VMSS creation walkthrough.”
Using Azure PowerShell
You can use Azure PowerShell to enable Azure Hybrid Benefit when creating a Red-Hat Linux Server–based or SUSE Linux Server–based VMSS by adding the –LicenseType "RHEL_BYOS" or –LicenseType "SLES_BYOS" parameter. For example, the following code shows how to use these parameters in a PowerShell script for VMSS creation:
#Define variables
$RG = "VMSS-RG01"
$vmssname = "VMSS01"
$location = "EastUS2"
#create VMSS with Azure Hybrid Benefit
New-AzVmSS `
    -ResourceGroupName $RG `
    -Name $vmssname `
    -Location $location `
    -ImageName "RHEL" `
    -LicenseType "RHEL_BYOS"
Using the Azure CLI
You can use the Azure CLI to enable Azure Hybrid Benefit and create a Red Hat Linux Server–based VMSS by adding the --License-Type RHEL_BYOS parameter. For example, the following code shows how to use this parameter in a Bash script or prompt for RHEL VMSS creation:
#Define variables
rg="VMSS-RG01"
vmssname="VMSS01"
location="EastUS2"
#create VMSS with Azure Hybrid Benefit
az vmss create
--resource-group $rg
--name $vmssname
--location $location
--license-type RHEL_BYOS
Best practices
Nowadays, every public-facing environment is under constant attack from malicious actors. For some of these malicious actors, the goal is to break into the network to steal vital or confidential information. For others, it’s to spread ransomware to bring down the network and force the organization to pay a ransom.
This section covers some general and security recommendations and best practices for VMSS. Although the recommendations and best practices that follow do not comprise an exhaustive list, they are a great starting point for most environments. Keeping these recommendations and best practices in mind can help you secure your VMSS environment post-deployment.
A general recommendation is to always review which best practices will apply to your environment, test them to validate the impact, monitor them constantly, and adjust them as needed. Do this before you finalize their implementation to avoid unexpected outages.
Use application gateways to manage web application traffic With application gateways, you can use the back-end pool to host the VMSS, while front-end public-facing interfaces and HTTPS/SSL connections terminate on the application gateway. As a result, only specific resources are exposed on configurable listeners and ports, drastically limiting the attack surface for that application.
Use virtual networks and separate internal and public-facing workloads It is best to host Azure resources like VMs and VMSS inside existing or new virtual networks with a subnet configuration to separate internal and public-facing workloads. This segregation can be based on public and internal-facing workloads, workload criticality, workload interdependence, or current network schema.
Use NSGs It is highly advisable to use NSGs on the VM NIC or vNET level to control traffic to hosted applications or workloads on only specific trusted source IPs and application ports. Note that this applies on the individual VM or vNET level. You should validate this configuration on a regular basis to ensure that only the required source IPs and ports are still set up, as this tends to change over time with more additions than deletions or reviews taking place.
Use Azure Firewall for public endpoint protection NSGs are great for protecting individual VMs or resources within a vNET. However, it is difficult to monitor traffic across the entire environment. This is where Azure Firewall comes in handy. With Azure Firewall, you can enact source IP, application port, and protocol restrictions for the entire environment. Because Azure Firewall is service-based, charges are levied based on usage, making it a very cost-effective yet secure solution.
Set up network traffic logging Azure Security Center can log network traffic to identify and monitor network policies and suggestions to secure the VM instances in a VMSS. In addition, NSG flow logs can be configured to store historical data in a storage account for auditing of suspicious activity.
Monitor Azure activity logs You should monitor the Azure activity log for changes to the VMSS configuration to identify unwanted or unplanned configuration modifications. For best results, set up alerts to inform admins or security experts within the organization of such changes.
Use Azure Policy for configuration remediation Azure Policy is a great service to assign policy definitions for Azure resources for good governance of the Azure environment. You can use Azure Policy to monitor and remediate non-compliance due to deviations in configuration for resources, including network resources used by scale sets.
Standardize security configuration You can use Azure Blueprints to combine Azure objects such as ARM templates, Azure policies, roles, and role assignments to create a single simplified security blueprint. This helps you streamline large-scale Azure VM deployments such as VMSS. Use these whenever possible, as it will help in simplifying the deployment and management of large and complex VMSS.
Set time synchronization for VM instances Microsoft maintains time sources for all Azure resources. However, if your organization requires the use of custom time sources, you can set them up with group policy or local policy settings. Note that you must apply these settings to all VM instances in a scale set to ensure they are localized correctly to avoid differing log time entries.
Manage security logs centrally Azure records write operations on resources to activity logs, which are stored in each resource’s blade in Azure. Recording these logs in a central database like Azure Sentinel or a third-party SIEM tool can help you easily track, monitor, and audit these logs for security events. You can also use Log Analytics Workspace for long-term event log data retention from Azure VM instances in a scale set. You can automate the integration and ingestion of this data to streamline the entire security log monitoring process.
Audit logging You can install diagnostic extensions on VM instances in a scale set to capture guest OS diagnostic information. This can be in the form of Windows event logs, application logs, custom logs, and Windows performance counters. In addition, you can use Application Insights to capture more advanced counters, which provide more visibility into the performance of the application hosted in the VMSS. Finally, you can use Azure Monitor to monitor performance and logs on the VM level. Working in conjunction with Application Insights, which performs the same task on the application layer, Azure Monitor makes it possible for you to better understand application performance issues and address them on the VM or application layer as indicated in the logs.
Centralize antimalware logging Enable Microsoft’s Antimalware for Cloud Services and Virtual Machines tool for Windows VM instances in a scale set to capture and log events in an Azure blob storage account for review. You can set up alerts for events that require follow-up. (Linux VMs require the use of a third-party tool for antimalware monitoring.)
Use domain authentication/Azure AD authentication to manage VM instances This simplifies the security model and allows for easier scaling, monitoring, tracking, and reviewing of access permissions for admins and end-users.
Use Privileged Access Workstations (PAWs) If feasible, use PAWs with MFA to reduce the organization’s attack surface. PAWs are dedicated environments with limited access to and from Internet services, which reduces the threat vectors that the workstations are exposed to. This makes them ideal for highly sensitive activities.
Allow access from known IP ranges only You can use conditional access policies and named locations to allow access only via known good IP ranges and/or countries to your Azure Portal for VMSS management. Requests from unknown IPs or countries are automatically dropped. This can prevent brute-force attack attempts.