
Chapter 1
Azure virtual machines
Overview
Azure virtual machines are the basic building blocks in most Azure architectures and implementations. They are one of the most used services in the Microsoft Azure Cloud. Most organizations migrating from on-premises environments to the Microsoft Azure Cloud leverage Azure virtual machines (along with Azure Storage, Azure Networking, and related services). This chapter introduces the features of Azure virtual machines so you can use these services better.
What is an Azure VM?
A virtual machine (VM) is an image file that acts as an actual computer. Put another way, a VM is a computer hosted inside another computer.
A VM is generally sandboxed from the rest of the host (hypervisor) system and the other VMs (guests) running on that host. This enables you to build an isolated environment to run different workloads while optimizing hardware resources like compute (CPUs, memory), networking interfaces, and storage available on that host. You can separate or connect each VM with other VMs depending on your needs. This has the added benefit of ensuring that the effects of malware (such as viruses) and cyber-attacks can be restricted to specific exposed or interconnected VMs.
With Azure VMs, the same virtualization principle is extended to physical servers hosted in different Azure regions across the world. In a traditional virtualization environment, the organization hosting the VMs would also manage the physical host infrastructure, including all related infrastructure workloads like firewalls, routers, switches, and so on. In an Azure-hosted VM, Microsoft is largely responsible for ensuring that the back-end hardware services are up and running for customer consumption as and when needed. This removes the overhead of maintaining, upgrading, and managing the physical infrastructure layer from in-house IT teams.
Organizations use Azure VMs in a few different ways. Five common examples are as follows:
To run test and dev workloads Organizations that are heavily invested in on-premises infrastructure generally find it easier to deploy test and dev workloads in Azure VMs. This enables their IT teams to become familiar with the cloud while also testing and verifying their on-premises applications to better plan for future migrations to the cloud. Organizations might also initiate new application builds or transformation projects by hosting the initial test and dev workloads in the cloud, so the application code will be built with cloud-native features for maximum benefits.
To run applications requiring scalability and flexibility VMs are often used to accommodate applications that require the ability to scale quickly or in short bursts for temporary or infrequent loads.
To provide redundancy for the datacenter Some organizations use Azure VMs to host their disaster-recovery environment and/or redundant infrastructure.
To reduce on-premises hardware footprint Some organizations move to Azure VMs when refreshing or upgrading hardware to reduce the hardware footprint in the on-premises or co-located datacenters. This also helps reduce related datacenter costs, such as for power, cooling, security, and compliance audits.
To reduce on-premises management overhead Some organizations use Azure VMs to reduce the management overhead of underlying hardware, hypervisors and upgrades, and other interconnected components, such as networking, security solutions, and so on.
Operating system support
Microsoft Azure supports both Windows- and Linux-based VMs. However, make sure to check that your version of Windows or Linux is supported, as these change over time. (See Table 1-1.) Also, although versions older than Windows Server 2008 R2 are supported, clients must bring their own images and have an active support agreement with Microsoft for operating systems that have reached their end-of-life.
TABLE 1-1 OS support for Azure VMs
Distribution | Version |
|---|---|
Windows Server | 2008 R2, 2012, 2012 R2, 2016, 2019 |
CentOS | CentOS 6.x, 7.x, 8.x |
Debian by Credativ | 8.x, 9.x, 10.x |
Flatcar Container Linux by Kinvolk | Pro, Stable, Beta |
Oracle Linux by Oracle | 6.x, 7.x, 8.x |
Red Hat Enterprise Linux by Red Hat | 6.x, 7.x, 8.x |
SUSE Linux Enterprise by SUSE | SLES/SLES for SAP 11.x, 12.x, 15.x |
openSUSE by SUSE | openSUSE Leap 15.x |
Ubuntu by Canonical | Ubuntu Server and Pro 16.x, 18.x, 20.x |
VM series
Microsoft provides various specialized Azure VM series. It’s critical that you understand these series, as well as your application requirements, so you can decide which VM series to run your workloads on. As of early 2022, some of these series are as follows:
A-series VMs These are basic, entry-level VMs with CPU performance and memory configurations best suited for workloads used for test and development. A-series VMs might also be good for low-traffic web servers, small to medium databases, servers for proof of concepts, and code repositories. They provide a low-cost option to get started with Azure.
Bs-series VMs These are a great option for workloads that typically require low to moderate baseline CPU utilization, but occasionally require significantly higher CPU utilization for brief periods when demand rises. Web servers handling low traffic volumes are an ideal workload to host on such servers. Bs-series VMs are an economical option to use even for dev and test workloads, where CPU utilization levels are not that high for most of the development cycle. Other use cases include small databases, micro services, servers used for proof of concepts, and low-intensity workloads, such as AD domain controllers, print servers, Windows Update servers, and similar workloads in most environments.
D-series VMs D-series VMs are the most versatile Azure VM series. There are multiple VM subseries available under the D-series: Ds, Dds, and Das-series, each with different VM types. Each VM type uses different processor types and can achieve different levels of CPU performance, providing multiple options based on the application requirements. The CPU and memory combinations available in the D-series address the needs of most production environments. In addition to the use cases mentioned in the preceding bullets, D-series VMs work well for analytics workloads and workloads requiring in-memory caching.
DC-series VMs DC-series VMs use the latest generation of Intel XEON E-2288G processor with SGX technology. They include Software Guard Extensions (SGX), which are a set of instructions that increases the security of the in-memory application code and data to protect it from tampering. This makes them ideal for workloads that require confidential data processing and storage. Some use cases for DC-series VMs include blockchain, intelligence analysis, fraud detection, confidential machine learning, and so on.
E-series VMs E-series VMs are optimized for memory-intensive workloads; they have a higher memory-to-core ratio. Ideal use cases include SQL, Oracle, or SAP HANA databases (which require more in-memory capacity), business intelligence and in-memory analytics workloads, and so on.
F-series VMs F-series VMs are built to support more CPU-intensive workloads; they have a higher core-to-memory ratio. They are ideal for workloads that run compute-intensive applications, such as batch, gaming, and web servers.
H-series VMs Also called high-performance computing VMs, H-series VMs are optimized to support large computing and modeling application requirements, such as financial modeling, weather-pattern analysis, computational chemistry, and similar applications. These VMs have a very high resource capacity and are optimized for intensive computing.
N-series VMs N-series VMs are GPU-enabled VMs that are ideal for graphics-intensive workloads, such as gaming, deep learning, graphics rendering, and so on. There are different VM offerings within this series that are aimed for different computing scenarios. Some of these VM offerings support InfiniBand connections, which provide extremely high networking throughput and performance.
Azure regions
Azure VMs are available in datacenters spread globally across 54 regions, with new regions added on a near-constant basis to address area needs. Each region consists of a set of datacenters located within very low latency perimeters. Regions are connected together with dedicated high-speed networks.
The location of the users who will employ your VMs will be a key factor in deciding which region to choose for your workloads. For example, if most of your users are based on the east coast of the U.S., you will most likely choose to use VMs in that location. This will improve the likelihood that your users will have the best possible experience when accessing these resources. If, on the other hand, your users are split among multiple geographies, you will have to choose by possibly hosting test and dev workloads to determine which region might be best-suited for your needs.
Depending on your application design, you might opt to use VMs across multiple regions to host your workloads, thereby providing an optimal experience to users in different geographic areas. Be sure you have a clear understanding of application functionality and hosting requirements before making your decision about which region(s) to choose.
If the primary users of your application(s) are external-facing customers, where you choose to host certain workloads might depend on where those users are based. For example, the location of external-facing application workloads could reflect where your customers are, while the location of internal-facing workloads, for employees, might depend on where those employees are.
You should review the list of Azure regions available to select the region based on your needs, accounting for the factors that will affect the usage and growth of your workloads. When determining which region should host your workloads, latency is a particularly critical factor. Fortunately, there are online tools to enable you to gauge the average latency between your location (or other locations or ISPs used within your organization) and various Azure datacenters around the world. For example, Figure 1-1 shows the average latency from my workstation to the different datacenters in the U.S. Datacenters in the West US region have the lowest latency, but the West US 2 region has acceptable latency, too. So, in my case, I would specify the West US region as my primary datacenter candidate (meaning I would use the VMs in datacenters in this region by default) and the West US 2 region as my secondary datacenter candidate (meaning I would use VMs in datacenters in this region if there were not adequate VMs in the US West region).

FIGURE 1-1 Latency to different Azure regions.
Compute sizing and pricing
In addition to selecting the appropriate VM series and region, you need to choose the right compute size for your workloads. Your choice will depend on your performance needs as well as your budgetary constraints.
As shown in Figure 1-2, the compute resources with different VM types have various prices. These are based on a number of factors, including the processor, memory, and network resources available on the underlying hardware level. Prices will vary depending on when you run the comparison, so it is imperative to look at VM prices near or on the date of workload creation rather than relying on earlier cost comparisons, especially if those comparisons are weeks or months old.

FIGURE 1-2 Monthly VM pricing comparison in the West US 2 region (January 2022).
Naturally, price is important. But when comparing prices for VMs, you must ensure that the VMs you are choosing from meet your technical needs. A VM that does not support your application’s technical requirements will generally cause more harm than good in terms of cost savings. On a similar note, if a particular datacenter is the only one capable of meeting your needs with regard to latency, then there’s no need to compare VM costs across regions.
Azure VM creation walkthrough
The following sections step you through the process of creating an Azure VM using the Azure Portal, Azure PowerShell, and Azure CLI.
Using The Azure Portal
To create a VM using the Azure Portal, follow these steps:
Log in to the Azure Portal and type virtual machines in the search bar.
Under Services, click Virtual Machines.
On the Virtual Machines page, click Create and choose Virtual Machine to start the Create a Virtual Machine wizard.
In the Basics tab of the Create a Virtual Machine wizard, enter the following information (see Figure 1-3):
Subscription Select the subscription to create the VM.
Resource Group Select an existing resource group or create a new one to host the VM.
Virtual Machine Name Enter a name for the VM. It should not be longer than 15 characters to avoid having DNS/NetBIOS issues later on.
Region Select the Azure region you want to host the VM.
Availability options Leave this at the default value (No Infrastructure Redundancy Required) for now. You will explore availability options later in this chapter.
Image Select the OS image to use for the VM—in this case, Windows Server 2019 Datacenter – Gen 1.
Azure Spot Instance Leave this unchecked for now.
Size Select a size. Because this is a test VM, choose a smaller size to save on costs.

FIGURE 1-3 The Basics tab of the Create a Virtual Machine wizard.
Still in the Basics tab, under Administrator Account, enter the following information. Then click Next. (See Figure 1-4.)
Username Enter a username for the default local administrator account for the VM.
Password Set a strong password based on organizational password requirements.
Confirm Password Re-enter the same password.
Public Inbound Ports Leave this at the default value of Allow Selected Ports.
Select Inbound Ports Leave this at the default value of RDP (3389).
Licensing Leave this unchecked.
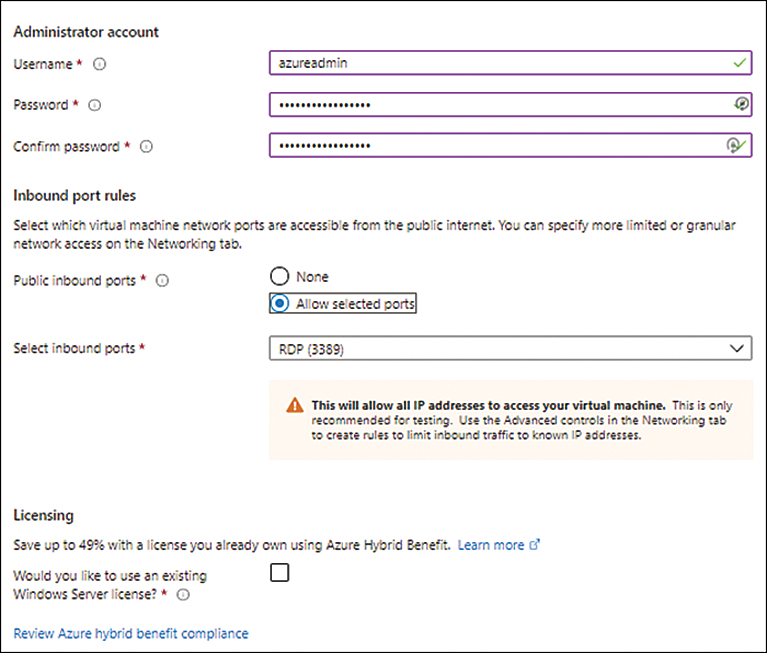
FIGURE 1-4 Setting up the Administrator Account, Networking Rules, and Licensing.
In the Disks tab, leave all the default settings as is (see Figure 1-5), and click Next.

FIGURE 1-5 The Disks tab of the Create a Virtual Machine wizard.
In the Networking tab, enter the requested information in the following boxes. (See Figure 1-6.) Then click Next.
Virtual Network Select an existing virtual network or let the wizard create a new one.
Subnet Select an existing subnet or let the wizard create a new one.
Public IP Select an existing unused public IP or let the wizard create a new one.
NIC Network Security Group Set this to Basic to allow the wizard to create a network security group with the default configuration.
Public Inbound Ports Leave this at the default setting, Allow Selected Ports.
Select Inbound Ports Leave this at the default setting, RDP (3389), to allow the use of RDP to log in to the VM after you create it.
Accelerated Networking Depending on the VM size, you might be able to set up accelerated networking. Leave this at the default setting (unchecked).
Load Balancing Leave this at the default setting (unchecked).

FIGURE 1-6 The Networking tab of the Create a Virtual Machine wizard.
In the Management tab, leave the default settings as is (see Figure 1-7) and click Next to continue.

FIGURE 1-7 The Management tab of the Create a Virtual Machine wizard.
In the Advanced tab, leave the default settings as is (see Figure 1-8) and click Next to continue.
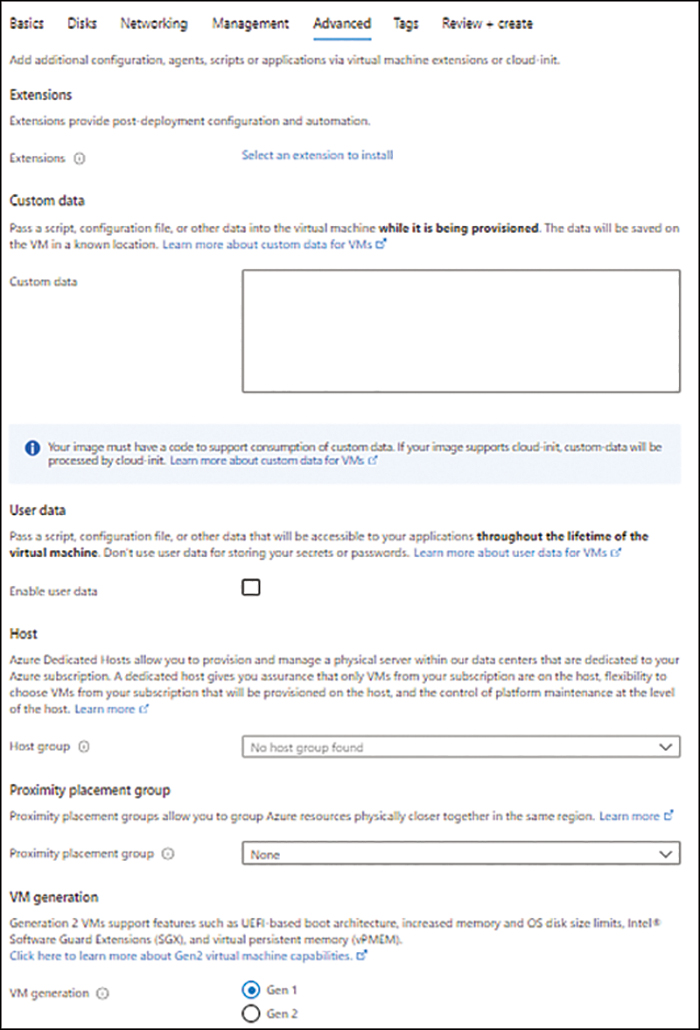
FIGURE 1-8 The Advanced tab of the Create a Virtual Machine wizard.
In the Tags tab, enter any tags that you would like to apply to the VM or leave the default settings as is (see Figure 1-9) and click Next to continue.

FIGURE 1-9 The Tags tab of the Create a Virtual Machine wizard.
In the Review + Create tab, review your settings and click Create to create the VM.
Using Azure PowerShell
You can create VMs using the Azure PowerShell New-AzVM command with various switches to specify the VM’s parameters. For example, the following code shows how to create the same VM as before using Azure PowerShell:
#Define required variables
$rg = "RG01"
$vmname = "VM01"
$location = "EastUS"
$vnet = "vNET01"
$subnet = "Subnet01"
$nsg = "NSG01"
$publicip = "publicIP01"
#Create resource group for VM
New-AzResourceGroup -Name $rg -Location $location
#Create VM
New-AzVm `
    -ResourceGroupName $rg `
    -Name $vmname `
    -Location $location `
    -VirtualNetworkName $vnet `
    -SubnetName $subnet `
    -Image Win2019Datacenter `
    -SecurityGroupName $nsg `
    -PublicIpAddressName $publicip `
    -OpenPorts 3389
Using the Azure CLI
You can use the Azure CLI to create VMs by using the az vm create command with various switches to specify the VM’s parameters. For example, the following Bash script shows how to create the same VM as before using the Azure CLI:
#Define required variables
rg = "RG01"
location = "EastUS"
vmname = "VM01"
nsg = "NSG-01"
publicip = "publicIP-01"
#Create resource group for VM
az group create --name $rg --location $location
#Create VM and open RDP
az vm create
    --resource-group $rg
    --name $vmname
    --image Win2019Datacenter
    --nsg $nsg
    --public-ip-address $publicip
    --public-ip-sku Standard
    --nsg-rule RDP
    --admin-username azureuser

az vm open-port -g $rg -n $vmname --port 3389 --priority 100
High-availability considerations
Different types of VM workloads require different levels of redundancy and high availability. Certain mission-critical applications and database servers might require 100% availability (or close). In other instances, you might require that latency between servers be kept at a minimum. It is therefore important to understand and consider the various high-availability options provided by Microsoft in Azure. These include the following:
Availability sets
Availability zones
Proximity placement groups
Availability sets
An availability set is a group of two or more VMs hosted in the same Azure datacenter but on different hardware. This ensures that if the datacenter experiences a physical hardware failure, one or more VMs will remain online. The VMs in an availability set are generally of the same configuration and host the same application or service, so there is redundancy if one VM goes offline. Microsoft offers a 99.95% SLA for availability sets.
For configurations in which multiple web servers or application front-ends are located in the same Azure region and are hosting the same workload across multiple servers for redundancy and scalability, adding VMs to an availability set would be highly recommended. Database servers set up with DB replication would also benefit from using availability sets.
Each availability set is assigned three fault domains and 20 update domains, and each VM in an availability set is assigned to one fault domain and one update domain. If the number of VMs exceeds three, the fourth VM will share the same fault domain as the first VM. (See Figure 1-10.)
A fault domain is a set of VMs that are using the same storage, power source, and networking resources. Any sudden hardware or physical infrastructure failure in an Azure datacenter that pertains to hard disks, power, or networking in a physical rack can result in unplanned downtimes. In such unplanned maintenance events, Azure automatically fails over any VMs hosted on the affected fault domain to another fault domain, assuming those VMs are part of an availability set.
An update domain is a set of VMs that receive Microsoft updates at the same time. As you know, Microsoft patches any security vulnerabilities on a periodic basis. This helps to improve security, reliability, and performance. Generally, when these updates are performed, it does not affect the hosted VMs. However, on occasion, patched VMs require a reboot for the updates to take effect. In a large cloud environment, such a complex operation is planned well in advance to minimize the business impact on affected clients. This is where update domains come in. Update domains enable Azure to reboot VMs in groups rather than all at once. When the VMs in one update domain are finished updating, Azure can move onto the next one.

FIGURE 1-10 Fault domains for VMs.
Availability set walkthrough
The following sections step you through the process of creating an availability set using the Azure Portal, Azure PowerShell, and Azure CLI.
Using the Azure Portal
To create an availability set using the Azure Portal during VM creation, follow these steps:
Follow the steps in the “Azure VM creation walkthrough” section to start the Create a Virtual Machine wizard and create a VM.
In the Basics tab, locate the Instance Details section. Then, under the Availability Set drop-down list, click the Create New link. (See Figure 1-11.)

FIGURE 1-11 Creating a new availability set.
In the Create Availability Set dialog box, set the following parameters (see Figure 1-12), type a name for the availability set in the Name box, use the Fault Domain slider to specify how many fault domains to use, and use the Update Domains slider to choose how many update domains to use.
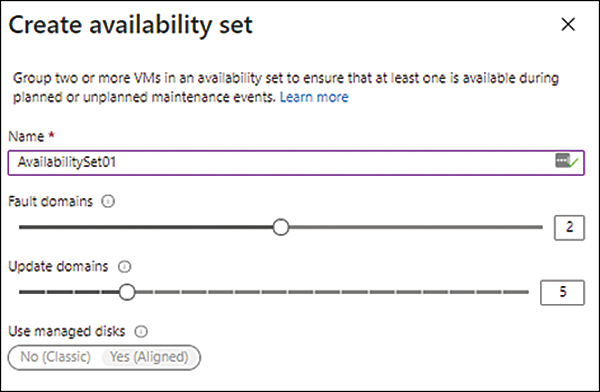
FIGURE 1-12 Setting up the fault and update domains.
Click Create to return to the Create a Virtual Machine wizard and continue creating the VM as described in the section, “Azure VM creation walkthrough.”
Using Azure Powershell
You can create an availability set using Azure PowerShell by using the New-AzAvailabilitySet command. You can then add VM(s) to the availability set by using the -AvailabilitySetName parameter of the New-AzureVMConfig cmdlet, as shown here:
#Define variables
$rg = "RG01"
$location = "EastUS"
$avs = "AVSet-01"
$vm = "vm-01"
$vNet = "vNET-01"
$subnet = "Subnet01"
$nsg = "NSG-01"
$publicip = "PublicIP-01"
#Create an availability set
New-AzAvailabilitySet `
   -Location $location `
   -Name $avs `
   -ResourceGroupName $rg `
   -Sku aligned `
   -PlatformFaultDomainCount 2 `
   -PlatformUpdateDomainCount 5
#Create a VM in the availability set
New-AzVm `
        -ResourceGroupName $rg `
        -Name $vm `
        -Location $location `
        -VirtualNetworkName $vNet `
        -SubnetName $Subnet `
        -SecurityGroupName $nsg `
        -PublicIpAddressName $publicip `
        -AvailabilitySetName $avs
Using Azure CLI
You can create an availability set using the Azure CLI by using the az vm availability-set create command. You can then add VM(s) to the availability set by using the --availability-set parameter of the az vm create cmdlet, as shown here:
#Define variables
rg="RG02"
avs="AVSet-01"
vm="VM-02"
vnet="vNET-01"
subnet="Subnet-01"
avs="AVSet-01"
publicip="publicip-01"
#Create availability set
az vm availability-set create
    --resource-group $rg
    --name $avs
    --platform-fault-domain-count 2
    --platform-update-domain-count 5
# Create VM inside the availability set
az vm create
     --resource-group $rg
     --name $vm
     --availability-set $avs
     --vnet-name $vnet
     --subnet $subnet
     --public-ip-sku Standard
     --public-ip $publicip
     --image Win2019Datacenter
     --admin-username azureuser
Availability zones
Each Azure region is made up of three availability zones. (See Figure 1-13.) An availability zone consists of one or more datacenters equipped with their own power, cooling, and networking. If one datacenter in the availability zone experiences an outage, VMs in another datacenter in the availability zone will still be available. For this reason, availability zones provide a higher level of redundancy than availability sets. Microsoft offers 99.99% SLA for availability zones.
The concepts of fault domains and update domains also apply to availability zones. Azure automatically ensures that VMs are split between fault domains and update domains, even between availability zones.
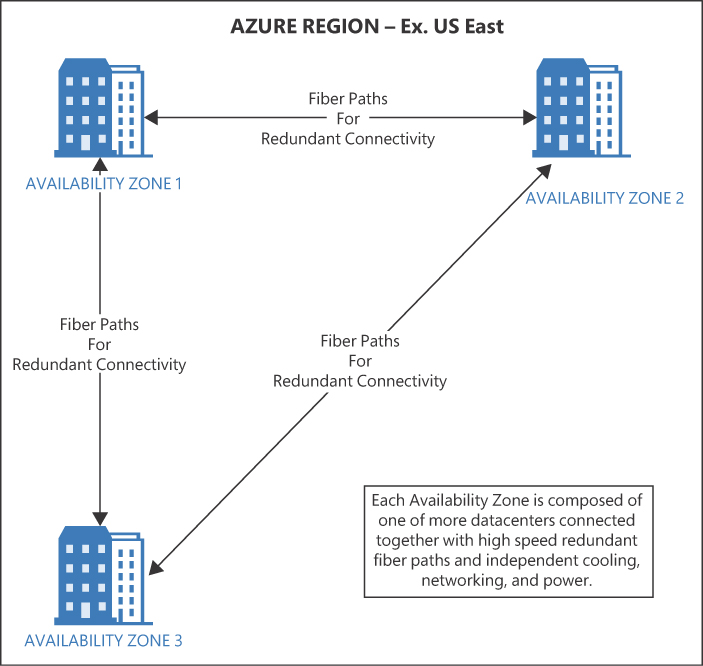
FIGURE 1-13 Availability zones in an Azure region.
Availability zones walkthrough
The following sections step you through the process of assigning a VM to an availability zone using the Azure Portal, Azure PowerShell, and Azure CLI.
Using the Azure Portal
To assign a VM to an availability zone using the Azure Portal during VM creation, follow these steps:
Follow the steps in the “Azure VM creation walkthrough” section to start the Create a Virtual Machine wizard and create a VM.
In the Basics tab, locate the Instance Details section. Then, open the Availability Options drop-down list and choose Availability Zone. (See Figure 1-14.)

FIGURE 1-14 Setting up an availability zone during VM creation.
Open the Availability Zone drop-down list and choose the availability zone to which you want to assign the VM. (See Figure 1-15.) Then, continue creating the VM as described in the section, “Azure VM creation walkthrough.”

FIGURE 1-15 Selecting the availability zone.
Using Azure PowerShell
You can assign a VM to an availability zone using Azure PowerShell by using the -zone parameter when creating the VM using the New-AzVM command, as shown here:
#Define variables
$rg = "RG01"
$location = "EastUS2"
$vm = "vm01"
$vNet = "vNET-01"
$subnet = "Subnet01"
$nsg = "NSG-01"
$publicip = "PublicIP-01"
#Create a VM in the availability zone
New-AzVm `
        -ResourceGroupName $rg `
        -Name $vm `
        -Location $location `
        -VirtualNetworkName $vNet `
        -SubnetName $Subnet `
        -SecurityGroupName $nsg `
        -PublicIpAddressName $publicip `
                   -Zone 2
Using the Azure CLI
You can assign a VM to an availability zone using the Azure CLI by using the –zone parameter when creating the VM with the az vm create command, as shown here:
#Define variables
rg="RG01"
location="EastUS2"
vm="vm01"
# Create VM
az vm create --resource-group $rg --name $vm --location $location
--image Win2019Datacenter --zone 2
Proximity placement groups
As your use of VMs grows, those VMs might be placed in different datacenters across an Azure region. This can result in higher than acceptable network latency between VMs. Placing your VMs in proximity placement groups ensures that the VMs are located as close to each other as possible. This enables you to achieve the lowest possible latency and avoid performance issues. This might be important for interconnected workloads, such as applications and databases.
Proximity placement groups walkthrough
The following sections step you through the process of creating a proximity placement group as assigning a VM to it during VM creation using the Azure Portal, Azure PowerShell, and Azure CLI.
Using the Azure Portal
To create a proximity placement group and assign a VM to it during VM creation using the Azure Portal, follow these steps:
In the Azure Portal, type proximity placement group in the search bar and click the Proximity Placement Groups entry under Services. (See Figure 1-16.)

FIGURE 1-16 Search for the proximity placement groups service.
Click the Create Proximity Placement Group button (see Figure 1-17) to start the Create Proximity Placement Group wizard.
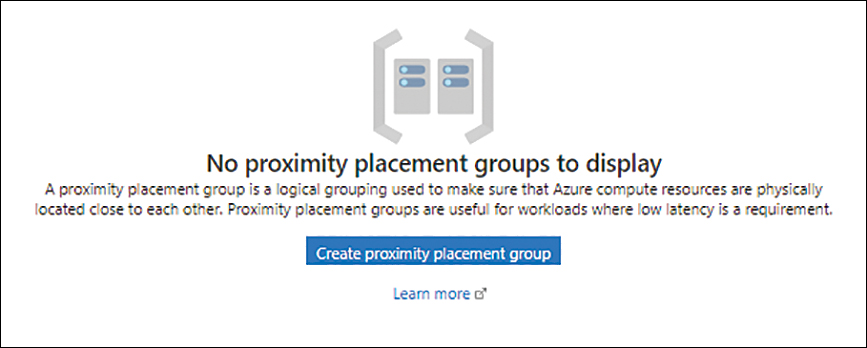
FIGURE 1-17 Create a proximity placement group.
In the Basics tab of the Create Proximity Placement Group wizard, enter the following information (see Figure 1-18) and click Next to continue:
Subscription Select the subscription to create the proximity placement group.
Resource Group Select an existing resource group or create a new one to host the proximity placement group.
Region Select the Azure region you want to host the proximity placement group. Make sure it is the same region as your VMs that will be a part of this group.
Proximity Placement Group Name Enter a unique name for the proximity placement group.

FIGURE 1-18 The Basics tab of the Create Proximity Placement Group wizard.
In the Tags tab, enter any tags that you would like to apply to the proximity placement group or leave the default settings as is (see Figure 1-19) and click Next to continue.

FIGURE 1-19 The Tags tab of the Create Proximity Placement Group wizard.
In the Review + Create tab (see Figure 1-20), review your settings and click Create to create the proximity placement group.

FIGURE 1-20 The Review + Create tab of the Create Proximity Placement Group wizard.
After you create the proximity placement group, you can add VMs to it during the VM-creation process.
In the Advanced tab of the Create a Virtual Machine wizard, locate the Proximity Placement Group section. Then, open the Proximity Placement Group drop-down list and choose the placement proximity group you created. (See Figure 1-21.) Then continue creating the VM as described in the section, “Azure VM creation walkthrough.”

FIGURE 1-21 Selecting the proximity placement group.
Using the Azure PowerShell
You can create a proximity placement group using Azure PowerShell by using the New-AzProximityPlacementGroup command. You then reference it using the -ProximityPlacementGroup parameter when creating a new VM with the New-AzVM shell command, as shown here:
#Define the required variables
$resourceGroup = "RG01"
$location = "East US 2"
$ppgName = "PPG-01"
$vmName = "VM01"
# create the proximity placement group
$ppg = New-AzProximityPlacementGroup `
   -Location $location `
   -Name $ppgName `
   -ResourceGroupName $resourceGroup `
   -ProximityPlacementGroupType Standard
#create a VM in the Proximity Placement Group
New-AzVm `
  -ResourceGroupName $resourceGroup `
  -Name $vmName `
  -Location $location `
  -ProximityPlacementGroup $ppg.Id
Using the Azure CLI
You can create a proximity placement group using the Azure CLI by using the az ppg create command. You then reference it using the --ppg parameter when creating a new VM with the az vm create Bash command, as shown here:
#Define the required variables
resourcegroup = "RG01"
location = "East US 2"
ppgname = "PPG-01"
vmname = "VM01"
#Create a Proximity placement group
az ppg create -n $ppgname
   -g $resourcegroup
   -l $location
   -t standard
#Create a VM in the Proximity Placement Group
az vm create
   -n $vmname
   -g $resourcegroup
   --image Win2019Datacenter
   --ppg $ppgname
   --size Standard_D3_v4
   -l $location
Storage disks for VMs
VMs can use two types of disks for storage: managed disks and unmanaged disks. Generally speaking, managed disks are recommended because they provide a much higher level of redundancy, resiliency, and reliability than unmanaged disks. However, in certain situations, it might be necessary to use unmanaged disks. This section explores each disk type in detail to enable you to choose the disk type that is right for you.
Managed disks
Managed disks do not require an Azure storage account in the back end to host the disk. This removes all applicable limitations on the storage account. Managed disks can scale independently and have much higher levels of availability and durability.
Some key features of managed disks are as follows:
Secure by default Managed disks support disk encryption by default using both Azure-managed and customer-managed encryption keys. Encryption can be performed on the OS level, too, providing an additional layer of protection.
Built-in high availability Designed for 99.999% availability, managed disks are extremely durable and highly available by default. In addition, managed disks always maintain three replicas of data, making them highly tolerant against failures.
Zone resilient Managed disks offer support for availability zones, making them resilient to zone failures.
Scalable Managed disks can support up to 50,000 VM disks per region, making them highly scalable—especially when compared to unmanaged disks.
Easier to manage Managed disks offer support for role-based access controls (RBAC), allowing for granular access control.
Higher performance Compared to unmanaged disks, managed disks provide predictable and high IOPS for all disk types.
Backup support Azure Backup can be used to back up and restore managed disks.
Unmanaged disks
Unmanaged disks require you to create an Azure storage account to hold the VM disk files. So, they are subject to all the limitations that apply to the storage account level, such as IOPS throttling, the number of disks supported per storage account, and so on.
Some key characteristics of unmanaged disks are as follows:
Performance limitations IOPS limitations on the Azure storage account level apply to all standard unmanaged disks sharing a storage account. Premium disks provide predictable performance levels.
Scalability limitations It is recommended to have a maximum of 40 disks per standard storage account.
Customer-managed encryption Encryption is performed on the storage-account level and must be enabled manually.
Geo-redundancy options You can set up geo-redundancy for unmanaged disks using either the GRS or RA-GRS options during disk creation.
Support for migration to managed disks Unmanaged disks can be easily migrated to managed disks, which provide higher resiliency and security and offer more features.
Disk roles
Azure VMs support three main disk roles (see Figure 1-22):
OS disk An OS disk is a default disk that is attached to every VM and contains the operating system running on the VM. In addition to hosting the OS, this disk can be used to host small applications or web services that do not have high IOPS or storage needs.
Data disk A data disk is an additional disk that can be attached to a VM to store applications, databases, or other data required for the VM to perform its functions. Multiple data disks can be attached to a VM (depending on the VM SKU limitations). Each disk is provided a custom drive letter and can be scaled to up to 32 TB in size.
Temporary disk The Azure platform provides a temporary disk on most VMs. The size of the disk depends on the VM SKU. This disk is to be used only for paging or swap files, as the data on this disk is not persistent; a forced VM restart or platform-level maintenance can result in data loss. It is not recommended to store any application, database, or other critical files on this disk.

FIGURE 1-22 The different types of disk roles used within a VM.
Disk SKUs
Azure currently provides four disk SKUs. Each of these can be selected in different scenarios based on OS, app, or database requirements:
Standard HDD This SKU provides low-cost reliable HDD disks to Azure VMs. The performance of Standard HDDs is highly variable and unpredictable, making them ideal for low-intensity or low-criticality workloads, such as for dev/test VMs, AD domain controllers, low-traffic web servers, and so on.
Standard SSD This SKU provides cost-effective SSD disks that are optimized for workloads that require lower IOPS at a consistent level. It is a good entry-level SSD disk experience and, considering the cost, is ideal for workloads that do not work well on Standard HDD disks but do not require the high levels of performance provided by Premium and Ultra SSD disks. Standard SSD disks are more reliable and provide lower latency than Standard HDD disks, making them ideal for most web servers and lightly used application servers.
Premium SSD This SKU provides a high-level of IOPS and low latency. It is suitable for workloads requiring high-performing disks. Premium SSD disks are an ideal choice for most mission-critical workloads, including SAP HANA, Microsoft SQL databases, and Enterprise ERP applications.
Ultra disk This SKU provides the highest levels of throughput and IOPS coupled with low levels of latency compared to the other disk types available in Azure. Ultra disks support dynamic disk performance optimization without affecting the workload running on top. This makes them ideal for data-intensive workloads, such as with relational databases, enterprise applications such as SAP HANA, and other transaction-intensive workloads.
Networking for VMs
Every VM must be configured with different networking components to ensure connectivity with other resources, as well as user connectivity while ensuring required security is in place. These components include the following:
Network interfaces
IP addresses (private and public)
Network security groups
Network interfaces
Network interfaces connections (NICs) allow VMs to be connected within an Azure virtual network so they can communicate with other resources or accept traffic from users. Every VM requires a minimum of one NIC; some VM SKUs support multiple network NICs. Each NIC connects a VM to a specific subnet.
IP addresses
Every VM NIC must be assigned a private IP address, but it can also be assigned a public IP address depending on the VM’s access and connectivity requirements and the network design.
The private IP address is used primarily for internal communications within a VNET, which is an interconnected on-premises network. Internet communications are possible using network address translation (NAT) via a web application firewall (WAF) or Azure Firewall, which must be defined for every VM. The public IP address is used when VMs require direct internet connectivity for inbound and outbound communications or when communicating with other Azure services not connected to a VNET. Assigning a public IP address is optional and should be done with caution, as exposing every VM to the public internet is not recommended.
Public IP addresses can be defined on a VM level. However, the recommended approach is to use external load balancers or WAFs to manage internet-based ingress traffic and routes to the VMs’ private IPs. This protects VMs from being attacked directly from the internet.
Network security groups
To protect a VM’s inbound and outbound communication, you can set up a network security group (NSG) on the VM NIC or on the subnet where the VM is hosted. An NSG allows you to define rules to restrict or allow network traffic from other Azure resources, IP addresses, or IP ranges. It is recommended that you define NSGs for critical workloads or publicly exposed VMs either on the VM NIC or on the subnet level to only allow the required traffic to and from the VM. This will reduce the VM’s attack surface.
Cost-optimization options
Azure provides various cost-optimization strategies to reduce the cost of your VM workloads.
Reserved instances
Reserved instances (RIs) are VMs that are reserved on the Azure platform for a specific period of time, which can vary from one to three years. When a VM is set up as a reserved instance, the underlying hardware resources for that VM are reserved, ensuring that the VM will have access to them regardless of whether it is placed offline during the reservation period, no matter how long. There is no performance difference between a regular VM and a reserved VM of the same model and size. However, the reservation unlocks value in terms of large cost savings for your organization, as Microsoft provides discounts ranging from 20% to 60% on VM compute costs.
Understanding RI cost savings
Before you commit to using RIs, it is recommended that you run your VM workloads without RIs and gather consumption data. This data will help you understand your actual server usage, which will enable you to make a more informed decision about the VM size to reserve.
Microsoft offers different levels of savings for RIs. These depend on the number and size of the RIs you need to cover your projected workload and the term for which you want to reserve. Because RIs require upfront payment, you should review the pricing guidelines before you buy. Figure 1-23 shows the savings at the time of this writing for a D16a v14 VM hosted in the West US 2 datacenter. As you can see, the cost changes dramatically for the same instance when moving from a one-year RI to a three-year RI.

FIGURE 1-23 Savings under RIs (courtesy of https://azure.microsoft.com/en-us/pricing/calculator, as of January 2022).
Therefore, you should consider the instance sizing requirements, based on either monitored use (Azure/on-premises) or specifications from the application developer, and the minimum timeframe for the load and subsequent usage that the application will experience to make a final decision.
Reservations walkthrough
The following section steps you through the process of creating a reservation using the Azure Portal.
Using the Azure Portal
To create a reservation using the Azure Portal, follow these steps:
In the Azure Portal, type reservations in the search bar. Then, under Services, click Reservations. (See Figure 1-24.)

FIGURE 1-24 Search for the reservations service.
Click Purchase Now to start the Purchase Reservations wizard. (See Figure 1-25.)

FIGURE 1-25 Start the Purchase Reservations wizard.
In the Products tab of the Purchase Reservations wizard, click Virtual Machine. (See Figure 1-26.)
The Select the Product You Want to Purchase page opens, with recommended reservations based on your usage history. (See Figure 1-27.) Click one of the recommended reservations to select it. Alternatively, click All Products and select a different VM SKU. Then click the Add to Cart button.

FIGURE 1-26 The Products tab of the Purchase Reservations wizard.
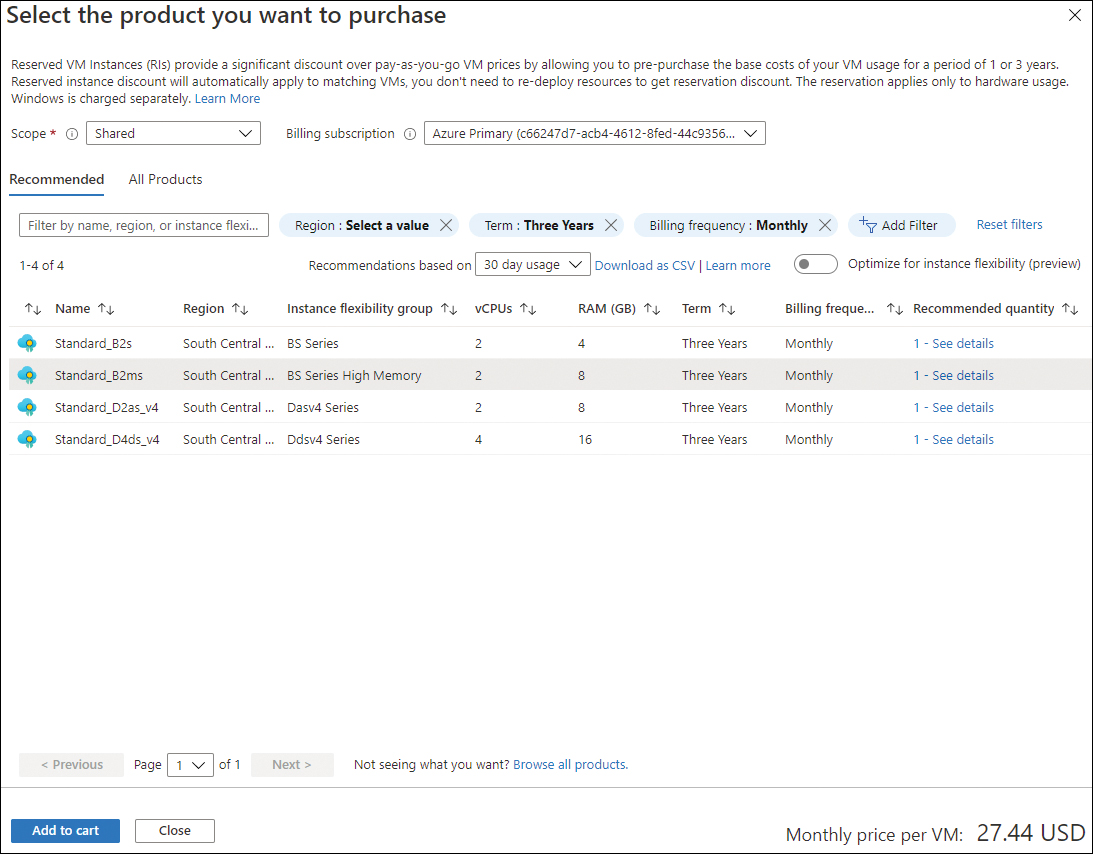
FIGURE 1-27 Select the VM SKU to purchase.
In the Products tab, enter the following information (see Figure 1-28), and click Review + Buy:
Reservation Name Enter a unique name for the reservation.
Billing Frequency Choose Upfront or Monthly to specify how you want to be billed.
Quantity Enter how many VMs you want to reserve.
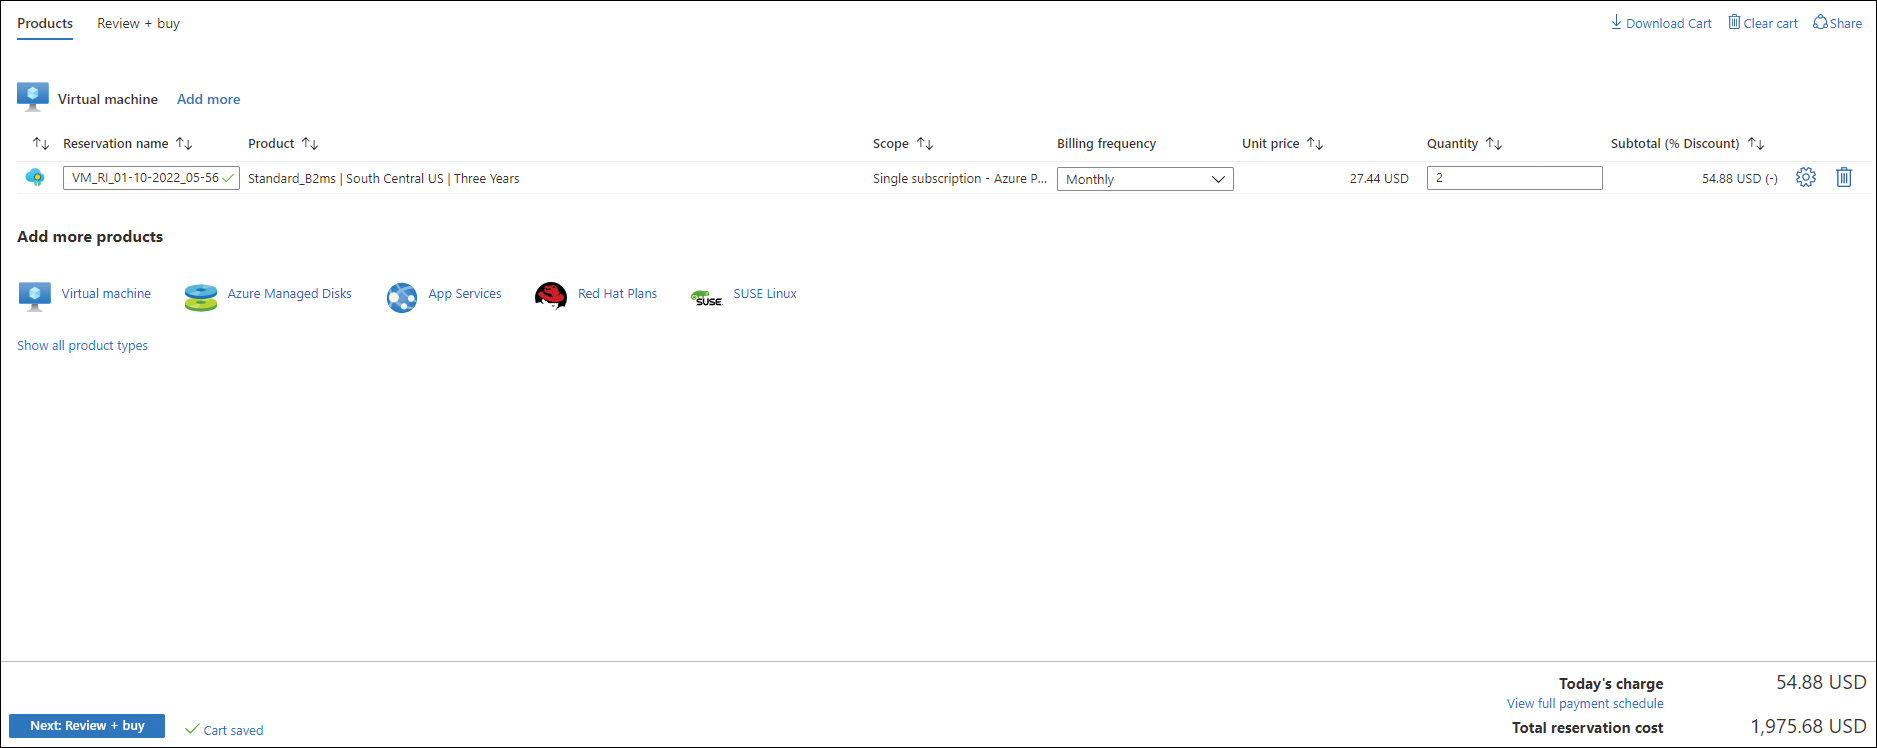
FIGURE 1-28 Set up procurement options.
On the Review + Buy tab, verify your settings and click the Buy Now button. (See Figure 1-29.)

FIGURE 1-29 The Review + Buy tab of the Purchase Reservations wizard.
Azure initiates the procurement of the reservation. This can take a few hours, during which the reservation status will show as Pending. (See Figure 1-30.)

FIGURE 1-30 The reservation is pending.
Monitor the status of the reservation to ensure that it is procured. (See Figure 1-31.)

FIGURE 1-31 Successful reservation procurement.
Select the reservation. You will see the following options (see Figure 1-32):
Refund Click this to initiate a refund if you no longer require this reservation.
Exchange Click this to exchange this reservation for a higher VM SKU.
Rename Click this to rename the reservation.
Change Directory Click this to move the reservation to a different Azure subscription.

FIGURE 1-32 Reservation options.
Azure Hybrid Benefit
Another great way to reduce costs is to leverage Azure Hybrid Benefit for Windows, SQL Server, RedHat, and SUSE Linux workloads. Azure Hybrid Benefit is a licensing configuration that can help you significantly reduce the expenses associated with running your workloads in the cloud. It works by allowing you to use your on-premises Software Assurance–empowered Windows Server and SQL Server licenses on Azure. Presently, this advantage applies to RedHat and SUSE Linux workloads too.
By using this benefit, you can reduce your licensing costs while running your workloads in Azure by 20 to 80% (or more), depending on your licensing contracts. To better understand how to leverage this benefit, consult your licensing partner(s), who helped you procure your license.
Azure Hybrid Benefit walkthrough
The following sections step you through the process of setting up Hybrid Use Benefit for a Windows VM workload using the Azure Portal, Azure PowerShell, and the Azure CLI.
Using the Azure Portal
To set up Azure Hybrid Benefit using the Azure Portal while creating a Windows VM, follow these steps:
Follow the steps in the “Azure VM creation walkthrough” section to start the Create a Virtual Machine wizard and create a VM.
In the Basics tab, locate the Licensing section. Then select the Would You Like to Use an Existing Windows Server License check box. (See Figure 1-33.)

FIGURE 1-33 Setting up OS licensing for a VM.
A second check box appears under the one you just selected.
Select the I Confirm I Have an Eligible Windows Server License… check box. (See Figure 1-34.) Then click Next and continue creating the VM as described in the section, “Azure VM creation walkthrough.”

FIGURE 1-34 Confirming license eligibility.
Using Azure PowerShell
You can enable Azure Hybrid Benefit using Azure PowerShell by using the -LicenseType parameter and setting its value to “Windows_Server” or “Windows_Client” (Windows) or "RHEL_BYOS" or "SLES_BYOS" (Linux, depending on your OS distribution), as shown here:
#Define variables
$rg = "RG01"
$vm = "VM01"
$location = "East US"
#Create VM
New-AzVm `
    -ResourceGroupName $rg `
    -Name $vm `
    -Location $location `
    -ImageName "Win2019Datacenter" `
    -LicenseType "Windows_Server"
Azure CLI
You can enable Azure Hybrid Benefit using the Azure CLI by adding the --licensetype parameter and setting its value to Windows_Server or Windows_Client (Windows) or "RHEL_BYOS" or "SLES_BYOS" (Linux, depending on your OS distribution), as shown here:
#Define variables
rg = "RG01"
vm = "VM01"
location = "East US"
#Create VM
az vm create
    --resource-group $rg
    --name $vm
    --location $location
    --image win2019datacenter
    --license-type Windows_Server
Spot instances
Azure spot instances offer significant cost savings when performing scale-out operations. Spot instances enable you to run your workloads at a discount when there is unused capacity in the region where your VMs are hosted. Using spot instances is ideal for organizations running different types of workloads, such as the following:
Test/dev workloads (including continuous delivery and integration workloads)
Batch-processing jobs, large compute workloads, or graphics rendering applications or jobs
Analytics and big data workloads
If the Azure platform determines that it needs the capacity back to handle a workload request from a pay-as-you-go client in the same region (who is charged a higher rate), it will terminate, or evict, the spot instance. Azure supports two eviction models:
Capacity only With this eviction model, the VM instance is evicted only if Azure needs the capacity for a pay-as-you-go instance request in that region.
Price or capacity With this eviction model, you set a maximum price (per hour) that you are willing to pay to run the spot instance. So, if Azure needs to free up capacity to handle a pay-as-you-go request, it will perform a price comparison. If the maximum price you set is more than the pay-as-you-go price, Azure will continue handling your spot instance. If not, your spot instance will be evicted.
The eviction process is managed by an eviction policy, which you set up when you create a spot instance. The eviction policy also enables you to specify whether a VM should be deallocated or deleted when a spot instance is de-provisioned:
When a VM is deallocated, the compute capacity is removed, and any charges associated with this capacity no longer apply. However, the underlying disks remain in place—meaning, those charges do still apply.
When a VM is deleted, the underlying disks are also deleted. This reduces the costs associated with the workload, which can be significant depending on your disk size, disk top, the number of spot instances you put in place, and so on. However, when you are ready to reinstate the workload, you will need to retrieve the source data from its original location, which can take time.
Deallocating rather than deleting the VM enables you to quickly spin your workload back up when you need it or when capacity becomes available. The option you choose will depend on your application design and requirements.
Azure spot instance walkthrough
The following sections step you through the process of setting up spot instances for VM workloads using the Azure Portal, Azure PowerShell, and the Azure CLI.
Using the Azure Portal
To set up spot instances using the Azure Portal, follow these steps:
Follow the steps in the “Azure VM creation walkthrough” section to start the Create a Virtual Machine wizard and create a VM.
In the Basics tab, locate the Instances section. Then select the Enable Spot Instance check box. (See Figure 1-35.)

FIGURE 1-35 Setting up an Azure spot instance.
Two Eviction Type options become available:
Capacity Only You choose this to base the eviction policy on capacity only.
Price or Capacity You choose this to base the eviction policy on both capacity and maximum price.
Select the Price or Capacity option button. (See Figure 1-36.)

FIGURE 1-36 Setting the eviction type.
Open the Size drop-down list and choose a size for this spot instance workload. Then enter your maximum price in the Maximum Price You Want to Pay Per Hour box, based on your budget available. (See Figure 1-37.)

FIGURE 1-37 Setting the spot instance size and max price.
Click Next and continue creating the VM as described in the section, “Azure VM creation walkthrough.”
Using Azure PowerShell
You can set up a spot instance with Azure PowerShell by using the New-AzVMConfig command with the -Priority Spot and -MaxPrice parameters. The output of this command is passed through to the New-AzVM command to create a VM as a spot instance. Here’s an example:
#Define variables
$rg = "RG01"
$vm = "VM01"
$location = "East US"
#Create Spot Instance with vmconfig
$vmConfig = New-AzVMConfig -VMName $vm -VMSize Standard_D1 -Priority "Spot" -MaxPrice -1 -EvictionPolicy Deallocate | `
New-AzVM -ResourceGroupName $rg -Location $location -VM $vmConfig
Using the Azure CLI
You can set up a spot instance with the Azure CLI by using the az vm create command with the --priority Spot and --max-price parameters, as follows:
#Define variables
rg = "RG01"
vm = "VM01"
location = "East US"
#Create Spot Instance with vmconfig
az vm create
    --resource-group $rg
    --name $vm
    --location $location
    --image WindowsServer2019Datacenter
    --admin-username adminuser
    --priority Spot
    --max-price -1
    --eviction-policy Deallocate
Dedicated hosts
In a regular Azure VM setup, the underlying host can be shared across multiple clients, which can create compliance, security, and/or regulatory issues. Using a dedicated host helps address these issues.
Azure dedicated hosts provide physical servers to host Azure VMs. The physical server and its workload capacity is used exclusively by a single organization. It is not shared with other Microsoft Azure customers. Once a dedicated host is provisioned, the organization has control over its infrastructure and can define host-level maintenance policies.
Benefits of dedicated hosts
Using dedicated hosts offers a few benefits. These are discussed here.
VM SKU consolidation
You can set up VMs of different sizes on the same dedicated host. However, the VMs must be of the same series. For example, suppose you need to host VMs of different sizes within the Exds series—E2ds, E4ds, E8ds, and E16ds. In this case, you could select an Edsv4-Type 1 dedicated host to host all these VM SKUs.
Depending on the size of the dedicated host you select, you can set up different VMs, taking into account the total compute capacity available. Figure 1-38 shows how you can use 31 E2ds v4 VMs, 15 E4ds v4 VMs, or 7 E8ds v4 VMs on an Edsv4-Type1 host. Alternatively, as shown in Figure 1-39, you can use a combination of different types of VMs. (Note that this is not an exhaustive list of combinations, but rather an indicative sample set.)

FIGURE 1-38 Dedicated host SKUs.

FIGURE 1-39 Dedicated host types.
Maintenance activity management
Every host in the Microsoft Azure environment must undergo regular updates to improve the reliability, availability, performance, and security of the platform’s back-end infrastructure. In all shared-customer scenarios, Microsoft manages this to ensure minimal disruption and downtime in the back end. However, in some environments, applications are sensitive to such maintenance activities. Fortunately, with dedicated hosts, the organization, rather than Microsoft, can control the deployment of these updates. For example, you can control the order in which hosts are updated. You can also delay the update by as many as 35 days.
If your organization is running mission-critical or legacy applications or cannot afford any changes or updates to the underlying host layer without a planned maintenance and downtime window, dedicated hosts are a great option. Just be sure to set internal controls and processes to manage these updates on an ongoing basis to avoid unplanned outages.
Bring your own licensing (BYOL)
Dedicated hosts enable you to leverage your Windows and SQL Server licensing, provided the licensing adheres to Microsoft’s terms of use. Microsoft deducts the licensing costs from your ongoing VM costs, allowing for significant cost savings. In fact, cost benefits can be upwards of 30%, depending on your licensing SKUs.
Support for Windows and Linux
Dedicated hosts support both Windows (with or without SQL Server) and Linux VMs on the same physical host. Be sure to take this into consideration in your planning, as it can help you maximize the use of the physical host environment by reducing the overall number of hosts required. This, in turn, can affect cost.
Co-location with other non-dedicated host-based VMs
You can use dedicated hosts alongside shared VMs. This enables you to host sensitive workloads on dedicated hosts, while running less-sensitive or non-critical workloads in a shared server environment. This combination can give you the best of both worlds, providing security, compliance, and performance for sensitive and critical workloads and cost benefits for non-critical workloads. Remember this when designing your environment; it is a key consideration.
High availability
When you use a dedicated host, all VMs on that host may go down if the dedicated host experiences a problem. This can have a detrimental impact—especially if redundant servers for the same application are placed on the same dedicated host. It is therefore important to consider high availability when designing the environment. There are different ways to address this. Regardless of which way you choose, you will need to deploy multiple copies of each VM component across multiple hosts.
One way to address this issue is to create host groups. A host group is a collection of dedicated hosts in a single availability zone. To achieve high availability across zones, you can create multiple host groups (one per zone) and spread them accordingly.
You can set up VMs in different fault domains within a host group. This results in them being hosted on different physical racks in the datacenter. When you create a host group, you must specify how many fault domains the host group will be spread over. You then assign a specific fault domain to each host in the host group. The underlying managed disk services for VMs deployed to hosts with different fault domains will be set up on multiple storage stamps to increase fault-isolation protection.
You can use availability zones and fault domains together to achieve a higher level of fault isolation. It is important that you specify the availability zone, fault domain count, and fault domain configuration for the host groups, hosts, and VMs at the time of creation for maximum benefits.
Dedicated host walkthrough
The following sections step you through the process of setting up a dedicated host and adding a VM to it using the Azure Portal, Azure PowerShell, and Azure CLI.
Using the Azure Portal
To create a dedicated host and add a VM to it using the Azure Portal, follow these steps:
In the Azure Portal, type dedicated hosts in the search bar. Then, under Marketplace, click Dedicated Hosts. (See Figure 1-40.)

FIGURE 1-40 Searching for the dedicated hosts service.
In the Create Dedicated Host wizard, enter the following information (see Figure 1-41):
Subscription Select the subscription to create the dedicated host.
Resource Group Select an existing resource group or create a new one for the dedicated host.
Name Enter a unique name for the dedicated host.
Location Select the Azure region you want for the dedicated host.

FIGURE 1-41 Creating a dedicated host.
Under Hardware Profile, you can choose an existing host group or create a new one. For this exercise, click Create New Host Group. (See Figure 1-42.)

FIGURE 1-42 Creating a new host group.
In the Create a Host Group dialog box, enter the following information (see Figure 1-43):
Host Group Name Enter a unique name for the host group.
Availability Zone Choose the availability zone you want to use.
Fault Domain Count Specify how many fault domains the host group will support.

FIGURE 1-43 Setting up the host group.
Open the Size Family drop-down list and choose the family type for the VMs that will be hosted on the dedicated host. Then open the Fault Domain drop-down list and assign the dedicated host to a specific fault domain. (See Figure 1-44.)

FIGURE 1-44 Setting up the hardware profile.
Under Save Money, use the option buttons to specify whether you currently have Windows Server or SQL Server licenses. (See Figure 1-45.) Then click Next to continue.

FIGURE 1-45 Configuring the Azure Hybrid Benefit.
In the Tags tab, enter any tags that you would like to apply to the dedicated host or leave the default settings as is (see Figure 1-46) and click Next to continue.

FIGURE 1-46 Setting up dedicated host tags.
In the Review +Create tab, review your settings and click Create to create the dedicated host.
After Azure creates the dedicated host, navigate to its configuration blade. Then, under Settings, click Instances. (See Figure 1-47.)
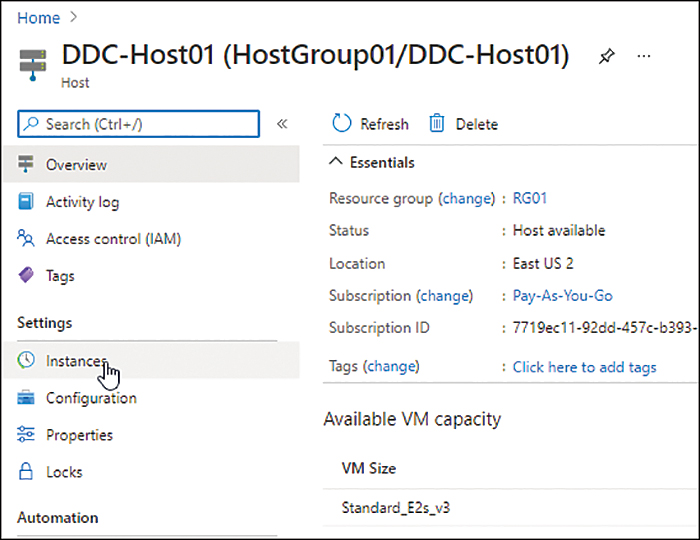
FIGURE 1-47 Setting up a VM instance.
Click Add VM. (See Figure 1-48.)

FIGURE 1-48 Adding a new VM to the dedicated host.
You’ll create the VM as described in the section, “Azure VM creation walkthrough,” entering the settings indicated in the following steps.
In the Basic tab, open the Availability Options drop-down list and choose Select Availability Zone. Then open the Availability Zone drop-down list and choose the same zone you selected for the dedicated host. (See Figure 1-49.)
In the Advanced tab, open the Host Group drop-down list and choose the host group you created for the dedicated host. Then open the Host drop-down list and choose the dedicated host you created earlier in this walkthrough. (See Figure 1-50.)

FIGURE 1-49 Set VM availability options for the dedicated host.

FIGURE 1-50 Choosing the dedicated host.
Click Next and continue creating the VM as described in the section, “Azure VM creation walkthrough.”
Using Azure PowerShell
You can create a dedicated host and assign a VM to it with Azure PowerShell by using the New-AzHostGroup and New-AzHost commands, as follows:
#Define variables
$rg = "RG01"
$location = "East US"
$vnet = "vNet-01"
$HostGrpName = "HostGroup"
$Dhostname = "DHost-01"
$vm = "VM01"
#Create Host Group
New-AzHostGroup `
   -Location $location `
   -Name $HostGrpName `
   -PlatformFaultDomain 2 `
   -ResourceGroupName $rg `
   -Zone 1
#Create Dedicated Host
New-AzHost `
   -HostGroupName $hostGrpName `
   -Location $location `
    -Name $Dhostname `
   -ResourceGroupName $rg `
   -Sku ESv3-Type1 `
   -AutoReplaceOnFailure 1 `
   -PlatformFaultDomain 1
#Define Credentials
$cred = Get-Credential
#Create VM in Dedicated Host
New-AzVM `
   -Credential $cred `
   -ResourceGroupName $rg `
   -Location $location `
   -Name $vm `
   -HostId $dhost.Id `
   -Size Standard_E2s_v3 `
   -Image Win2019Datacenter `
   -Zone 1
Using the Azure CLI
You can create a dedicated host and assign a VM to it with the Azure CLI using the Az vm host group create and az vm host create commands, as follows:
#Define variables
rg="RG01"
location="EastUS2"
vnet="vNet-01"
hostgrpname="HostGroup"
dhostname="DHost-01"
vm="VM01"
#Create Host Group
az vm host group create
   --name $hostgrpname
   --resource-group $rg
   --location $location
   --zone 1
   --automatic-placement true
   --platform-fault-domain-count 1
#Create Dedicated Host
az vm host create
   --host-group $hostgrpname
   --name $dhostname
   --sku ESv3-Type1
   --location $location
   -g $rg
#Create VM in Dedicated Host
az vm create
   -n $vm
   --image Win2019Datacenter
   --host-group $hostgrpname
   --size Standard_E2s_v3
   --location $location
   -g $rg
   --zone 1
Backups and disaster recovery
It is highly recommended that you put a backup and disaster-recovery solution in place for your Azure environment workloads. These can be native solutions like Azure Backup and Azure Site Recovery or third-party solutions. Having a working and tested solution in place is especially critical in scenarios in which data corruption, malicious encryption, or data loss occurs.
For most organizations, having a backup solution in place is standard practice, and has been for some time. However, because of the exorbitant costs historically associated with disaster-recovery solutions, few organizations could afford one. Azure Site Recovery drastically reduces the costs associated with building and maintaining a disaster-recovery solution, making it feasible for most organizations.
Backup
It is highly recommended that you have a backup solution in place for every production VM—either Azure Backup or a third-party solution that supports integration with Azure. Regardless of what tool you use, a detailed backup strategy is critical to recovery in the event of data corruption or a malicious attack. This strategy should include monitoring backups on a regular basis and immediately fixing any backup issues. You should also test the restoration of VM backups in isolated networks to validate that the data restores correctly and adheres to the compliance requirements of the organization.
If you are using Azure Backup, you can store VM backups redundantly across multiple geographies. This is highly recommended, as it allows you to restore data in an alternate region in case of regional failure—especially important if you have no disaster-recovery solution.
Although backing up production VMs is strongly recommended, for dev/test VMs, it might be optional, depending on the data stored on the VMs and DevOps processes in place. If cost is not a restricting factor, then consider keeping backups for the dev/test environment, but with a lower retention level than for production VMs.
Azure uses Recovery Services vaults to create, store, and manage backups. Each vault can contain backup policies and configuration for thousands of VMs and other Azure workloads that are supported for backup. You can create a vault on your own. Alternatively, enabling Azure Backup for a VM will set one up for you automatically.
Backup walkthrough
The following section steps you through the process of setting up Azure Backup for a VM during VM creation using the Azure Portal.
Using the Azure Portal
To set up Azure Backup during VM creation using the Azure Portal, follow these steps:
Follow the steps in the “Azure VM creation walkthrough” section to start the Create a Virtual Machine wizard and create a VM.
In the Management tab, locate the Backup section. Then select the Enable Backup check box.
Enter the following information (see Figure 1-51):
Recovery Services Vault This will be updated automatically to show any existing Recovery Services vaults in the same region as your VM. Alternatively, a (new) tag will appear before the name of the fault; this indicates that the wizard will create one automatically. To change to a different existing vault, select it from the drop-down list. Alternatively, to create a custom vault, click the Create New link and follow the prompts.
Backup Policy Click the Create New link. This opens the Create Policy wizard, which you can use to set up the backup policy that will define when and how often backups will take place and the retention configuration.

FIGURE 1-51 The VM backup configuration.
In the Create Policy wizard, enter the following information (see Figure 1-52) and click Create:
Policy Name Enter a name for the backup policy.
Backup Schedule Use the Frequency, Time, and Timezone drop-down lists to set the backup schedule.
Instant Restore Specify the number of instant restore snapshots to take and retain. (Having more snapshots enables you to recover your VM more quickly, without having to access the backup vault.)
Retention Range Use these settings to specify how long daily, weekly, monthly, and yearly backups should be retained.

FIGURE 1-52 Setting up the backup policy.
Continue creating the VM as described in the section, “Azure VM creation walkthrough.”
Disaster recovery
A regional failure will result in all Azure VMs being unavailable until Microsoft recovers the region and brings all the workloads back online. If such an outage is not acceptable for your organization, you need to develop a disaster-recovery strategy for all production VMs (and optionally for dev/test VMs).
Azure Site Recovery natively integrates with Azure VMs to implement disaster recovery in a secondary Azure region of your choice. The service seamlessly manages replication, usually resulting in a very low recovery time objective (RTO). Azure Site Recovery also supports the creation of a recovery plan that can help automate the entire disaster-recovery process.
If Azure Site Recovery is not ideal for your environment, you can use a third-party solution that supports Azure VMs instead. Regardless of which solution you use, be sure you document the entire disaster-recovery process and test it on a regular basis to ensure your environment comes online in the secondary site per your recovery point objective (RPO) requirements.
Site recovery walkthrough
The following section steps you through the process of setting up Azure Site Recovery during VM creation using the Azure Portal.
Using the Azure Portal
To set up Azure Site Recovery during VM creation using the Azure Portal, follow these steps:
Follow the steps in the “Azure VM creation walkthrough” section to start the Create a Virtual Machine wizard and create a VM.
In the Management tab, in the Site Recovery section, select the Enable Disaster Recovery check box. Then enter the following information (see Figure 1-53):
Secondary Region Choose a region to host the disaster recovery copy of the VM.
Secondary Subscription Select the subscription to set up Azure Site Recovery.
Recovery Services Vault A Recovery Service vault is automatically created. Click Create New if you require any customizations.
Site Recovery Policy A site recovery policy is automatically created. Click Create New if you require any customizations.
Availability Options Select any infrastructure redundancy options, if required.
Update Settings Specify whether Azure Site Recovery (ASR) should manage updates for the servers.
Automation Account Select an automation account or let the wizard create one to be used to automate activation.

FIGURE 1-53 Set up Site Recovery options.
Verify that the configuration is correct and continue creating the VM as described in the section, “Azure VM creation walkthrough.”
Best practices
Now that we have covered all the different aspects of setting up a VM workload in Azure, including ensuring it is highly available and cost-optimized, let’s review some of the general best practices to improve the security, monitoring, and management of these workloads. These guidelines are based on real-world deployments; your use of them in your own environment should be judicious and based on your own internal reviews:
Limit VM-level access Restrict administrative access to VMs to administrators who are required to carry out administrative activities. Set up access using groups so you can easily provision and de-provision access as needed. Use built-in or custom roles in Azure to restrict access on the Azure level and adopt a similar approach to limit access on the OS level. Define access permissions for different administrative roles and use RBAC to define granular permissions for those roles. This will help limit the attack surface in case of breach of credentials.
Limit/restrict use of generic admin accounts Use named administrative accounts instead of generic admin accounts shared by multiple administrators. This will help identify the actors for actions that have been carried out.
Control network access using network security groups Ensure only the required ports are opened on NSGs assigned on the VM or subnet level. For critical protocols such as RDP, SSH, and FTP, where the set of users accessing that protocol is limited, also define trusted network ranges to limit access.
Use Azure Policy to assess compliance You can use Azure Policy to define rules to standardize the Azure environment and monitor and assess the compliance of the environment with these rules. Use Azure Policy to define VM parameters such as allowed locations, VM SKUs, backup, disk encryption, and so on, to ensure that any new VM workloads automatically adhere to best practices identified for the environment.
High availability and DR for critical applications Use the high-availability options available for VMs to protect critical application workloads. For example, for a critical application or database, having multiple servers running the same application can help with load-balancing and reduce impact in case of a security breach on one of the two VMs by allowing failover to the second VM. Similarly, your disaster-recovery plan should consider security breaches that might cause access to the primary site to go offline, including scenarios such as malicious data encryption. This way, you can bring the disaster-recovery site online with data from before the malicious attack.
Leverage Azure Security Center Cyberattacks are now more prevalent than ever. Constant monitoring of an environment is the only way to identify, act on, and limit the impact of a security breach. Azure Security Center provides these capabilities. If possible, you should use it to detect threats and take automated actions for remediation. If Azure Security Center does not meet your needs, you can use any number of third-party solutions instead.
Enforce disk encryption Protecting data at rest in cloud environments is a key requirement for most organizations. Use Azure Disk Encryption to encrypt boot and data volumes for both Windows and Linux VMs. Organizations that require a high level of security can use customer-managed encryption keys for the encryption for complete control over the data.
Limit public access Attackers constantly scan public networks for exposed IPs that can be subjected to brute-force attacks. VMs that require exposure to the public internet should be behind a WAF, Azure Firewall, or a similar service to limit exposure. If VMs require direct connectivity, it is important to limit access to only the protocols, ports, and IP ranges that need to be accessed.
Use just-in-time access if possible Just-in-time access helps lock down management access to VMs. It can help control access to VMs by provisioning access when required for defined and monitored periods of time.
Define a patch-management strategy and monitor compliance Unpatched environments are one of the leading causes of security breaches. It is important to have a clearly defined patch-management strategy that includes reporting and monitoring guidelines to ensure that this critical activity regularly occurs for every OEM software in the environment.
Deploy an antivirus and antimalware solution Install a centralized antivirus and antimalware solution to protect against known viruses, malicious files, and zero-day attacks. Microsoft Malware is available for use with Windows VMs. Various Azure-supported third-party solutions are also available to provide this security layer.
Limit installed software and services Review the software and services installed on all VMs, especially public-facing ones, and remove any unwanted software or services to limit the attack surface due to unmonitored or unpatched code.
Monitor VM health and performance Monitoring critical processes and the overall health and performance of VMs can help you identify any breaches causing unexpected performance spikes. Identifying these in the early stages can help limit any service disruption and possibly the level of impact on the environment.
Back up VMs regularly In some malicious data-encryption scenarios, the only method of recovery is to restore data from backups. It is, therefore, important that backups are in place to assist in such recoveries.