
Now that you’ve captured the video and created a quick movie using AutoMovie, as discussed in Chapter 7, it’s time to spread your wings and fly! I would venture to guess that making that first movie really whetted your appetite for more, and now you’re ready to add your own personal touches. The editing is where the fun begins; this is where you show off your artistic talent and your eye for moviemaking. Editing is more than just a fun way to show off or to spend a Sunday afternoon; after all, good movies aren’t simply filmed, they are made. Only through good editing can your story really come to life.

Editing is what transforms a mediocre piece of footage into a movie people will enjoy and want to watch again and again. In this chapter, you’ll learn many of the basic (and some not-so-basic) editing techniques, including how to rearrange clips to show events out of sequence; how to add effects and split, combine, trim, or delete clips to make the movie just the right length; how to remove unwanted parts of the raw footage; how to add transition effects; and how to add title and credit pages. If you’re serious about telling your story and you really want to create something meaningful (or enjoyable, or funny, or dramatic, or thought-provoking), this is the place to be. In this chapter, you won’t just learn how to edit; you’ll learn how to create a movie!
Before you begin your new career as a movie editor, you need to become a little more familiar with the setting in which you’ll be wielding your movie magic. We’ve already looked at Windows Movie Maker 2’s basic interface in Chapter 7, but now we’ll look at where and how you’ll be working with the audio and visuals. To perfect your movie project, you’ll add and edit clips, add music and narration, insert still pictures, modify the timing of clips, adjust audio levels, and more. You’ll perform those tasks using either the Storyboard or the Timeline.
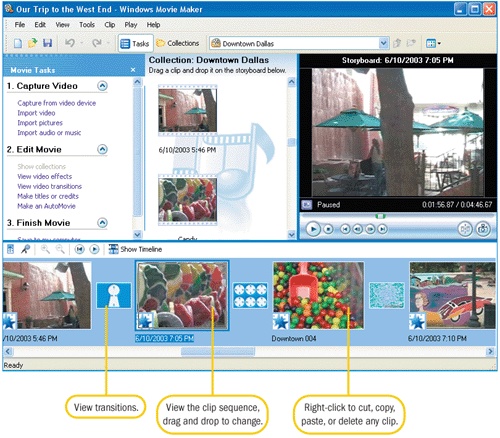
The Storyboard, shown in Figure 8-1, is the more graphical view and is the default view in Movie Maker 2. It’s a good choice when you want to view the overall sequence of events, rearrange clips, and see the video transitions that you’ve added.
The Timeline, shown in Figure 8-2, is the less graphical view, but the better choice (and sometimes the only choice) when you want to view and modify audio clips, narrate the video, or trim unwanted portions of a clip.
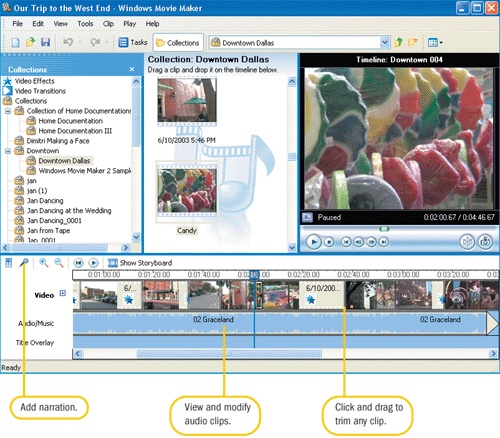
Figure 8-2. The Timeline view is the best option when modifying a clip’s length, adding narration, or adding music.
Table 8-1 details which tasks are best achieved in each view. Some tasks, like adding narration, can only be performed in certain views. Very simply, the Storyboard shows the sequence of the clips and offers the whole story, while the Timeline displays the timing and visual representation of the audio. Choosing which one to use will depend on what task is at hand, and as you work with the video, you’ll probably find you’ll toggle between the two quite often.
Table 8-1. Storyboard or Timeline?
WHAT DO YOU WANT TO DO? | WHICH IS BETTER? |
|---|---|
View the sequence of the video or rearrange clips | Storyboard |
View or add video effects and transitions | Storyboard |
Preview all of the clips in the project | Storyboard |
View or add audio clips | Timeline |
Change the length of the movie by trimming clips | Timeline |
Zoom in or out on a clip | Timeline |
Record narration and adjust audio levels | Timeline |
View video, transitions, audio, and music tracks together | Timeline |
Split or combine clips | Storyboard |
Copy, delete, move, paste, or nudge a clip | Storyboard or Timeline |
Now that you know a little about when to use the Storyboard and Timeline and what can be achieved with both, it’s time for you to step into the editing room and step up to the plate!
For a quick review and to get you up to speed before we start, remember that to create any kind of movie you need some raw footage. Getting good raw footage requires some thought, and you’ll want to film it with a story, theme, or purpose in mind. In addition to filming interesting stuff, you’ll want to make sure it’s good quality. If you have the time and money, consider purchasing a tripod, high-quality tapes, and a spotlight or other lighting source. If you’re really into it, you might even consider taking a filmmaking class.
Whatever quality raw footage you have, once it’s captured in Movie Maker 2, the footage is transformed into clips. Clips are what you’ll work with when creating your masterpiece, so you’ll need to understand how to work with them to turn your film into a real movie and to share your story. So, let’s first take a look at how clips are used and how they can be manipulated. Fire up Movie Maker, open an existing project or capture video for a new one, put on your creativity cap, and let’s get started.
You might recall from Chapter 7 that you place clips from a collection onto the Storyboard by dragging them there or by clicking the Clip menu, and then clicking Add To Storyboard. You can also select multiple clips and transfer several clips at a time. Because you can choose the clips to add, and you don’t have to add all of the clips you’ve captured, it’s much easier to fine-tune your movie because you have the ability to exclude any clips you don’t need or want.
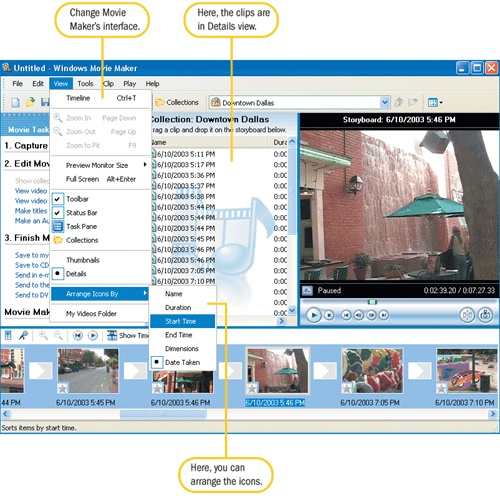
Once the clips are added to the Storyboard or Timeline, you can switch views by clicking Show Timeline or Show Storyboard. You can also change views from the View menu, as well as view the icons by name, duration, start time, end time, dimensions, and date taken. And although you’ll probably want to view the clips in the Contents pane in Thumbnail view, you can switch to Details view easily. Figure 8-3 shows the View menu and its available options. If you look closely at the Contents pane and the View menu selections, you’ll see that the Contents pane is showing the clips in Details view.
While creating and editing a project, you’ll also want to preview the clips and the project often. Previewing a clip is watching the clip play in the Monitor pane. Previewing allows you to see what changes have been made to the film and how they’ll look once a movie has been completed. Remember, a good editing job is what transforms a piece of footage into a masterpiece, so take your time and work slowly.
Like viewing the interface and clips, you can preview your clips in several ways:
In the Contents pane, right-click any clip and choose Play Clip to play a single clip. By playing a single clip, you can view the transitions, effects, and observe how the audio and the video interact. (You’ll do this often.)
In the Storyboard or Timeline, right-click any clip and choose Play Storyboard or Play Timeline to preview your work on the project so far. Viewing the entire project often really gives you a feel for how your editing is going and how the story is coming along.
Right-click a clip in the Contents pane and click Add To Storyboard (Timeline) to add it to the movie in progress. You can open another collection and add clips from there too. Add clips from old home movies, Web cams, and snapshots.
Pick a clip from the Contents pane, click the View menu, and click Full Screen. The clip will play in full screen mode. Press the Esc key to return to normal mode. Full screen mode is like being at the movies!
Pick a clip from the Storyboard or Timeline pane, click the View menu, and click Full Screen. The entire film will play in full screen mode. Press the Esc key to return to normal mode.
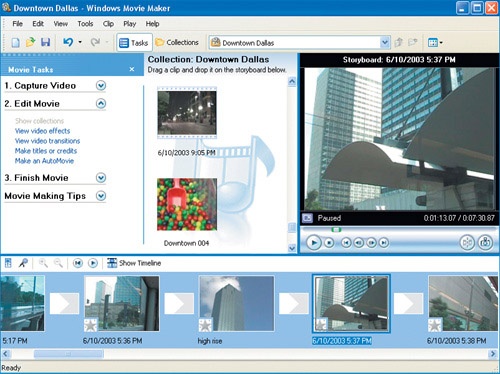
Position the mouse pointer between the panes, specifically the blue line that separates the Storyboard or Timeline from the rest of the interface. When the arrow becomes a double-headed arrow, drag to change the size. This can also be used to increase or decrease the size of the Monitor pane. Figure 8-4 shows a good balance between the size of the Monitor pane and the Storyboard pane.
Once clips have been added, they can be moved around the Storyboard or Timeline by dragging them to a new location. Dragging clips to a new location in the film can be useful when you want to remove a clip from a particular section but don’t want to delete it entirely. Moving clips is a fun way to throw off the sequence of the movie too, or to splice two movies together. You can also move a clip by right-clicking the clip and then clicking Cut from the resulting menu choices. After cutting the clip, position the mouse in the Storyboard or Timeline where you want to add it back in, right-click, and click Paste.
For instance, suppose you filmed a 90-minute wedding and it took three DV tapes. You can capture all of the video to the computer, but at some point you’ll have to rearrange the clips so that they are in order and form one project. Dragging clips to the proper place in the film is the easiest way to do that. In this example, consider making a short version of the wedding video by moving or deleting clips—perhaps a 10-minute overview—that could be shared and shown quickly.
You can also include the same clip several times in a video for emphasis or to enhance an ongoing theme. Positioning the same clip several times throughout a movie can add effect, or the same frame can be used to separate portions of the video. When making an anniversary video, for instance, you might place a still picture in between the sections of the video to break up the video and show the couple when they were younger. You can also move funny parts of a film to places where humor is needed, perhaps in the middle if the film starts to drag.
The clip you decide to use can be a regular video clip, a title or separator page, or a still picture. You can create intermissions too; just insert a blank clip that plays for 5 minutes, thus giving your audience a chance to refresh. Copy and paste this blank clip wherever you deem necessary. Remember, you’re trying to tell a story, create a funny video, or re-create an important life event, and to make the movie work, you’ll have to remember who your audience is and what they might want to see.
To rename, copy, and paste a clip, follow these steps:
From the Storyboard or Timeline, right-click a clip, and choose Copy.
Right-click anywhere in the Storyboard or Timeline and select Paste to add the clip again.
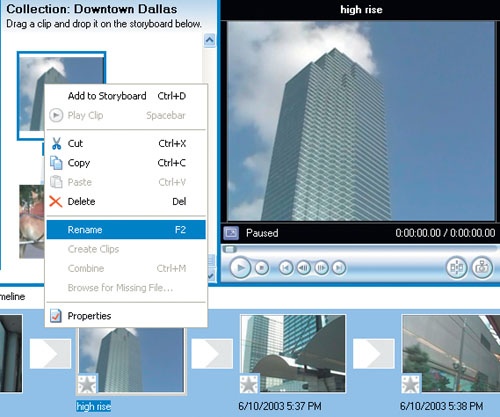
To rename any clip, select the clip in the Contents pane, click Edit, and click Rename. You can also right-click and select Rename from the resulting shortcut menu. You’ll probably want to rename your clips before you add them because the Storyboard isn’t updated effectively, and renaming clips can cause headaches when Movie Maker 2 looks for files it thinks should have specific names. If you must, rename the clips in the collection, and then add them to the Storyboard, as shown in Figure 8-5.
Tip
If you look closely at Figure 8-5, you’ll see the Take Picture icon. One way to create a clip to copy multiple times in the video is to play the project up to your favorite part, pause it, click the Take Picture icon in the Monitor pane, name the picture, and then add the picture as desired in the project.
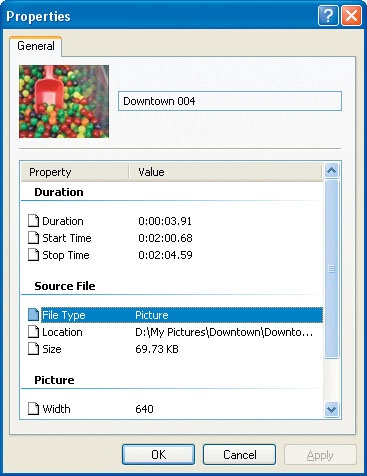
In case you are wondering just how long a clip is or how big it is, you can view a clip’s properties by right-clicking the clip and choosing Properties. You can do this in the Storyboard, Timeline, or Collections pane. You’ll be able to see the clip’s duration, start time, end time, source file information, video size and bit rate, frame rate, and audio properties. In addition to viewing the properties for a single clip, you can see an entire project’s properties by clicking Properties on the File menu.
In Figure 8-6 you can see the properties for a clip in the video I’m creating. You can see it’s a picture that’s been imported, not a video file. Because the clip is only 69.73 KB, it can be e-mailed. Having the ability to view the size of the file can come in quite handy. Compare this to Figure 8-7, which shows a much larger video/audio clip.

To be a good storyteller, you have to know a little about the art of storytelling. For instance, you must know when to pause, when to continue, when to give the audience a break, and when to end the story. You also have to be willing to cut the story short if it isn’t working, if it feels too repetitive, or if it’s running out of steam. Creating a good movie is like telling a good story. As with a story, you have to know what to include, what to cut out, what clips can be combined, what clips should be split, and how long the movie should be. In this section you’ll learn a little about this art. In the following sections you’ll learn how and when to split or combine clips, and when and why to trim, or change the length, of others.
Note
If at any time you feel the clips in the Storyboard or Timeline just aren’t working, you can start over by clearing away all of the clips and returning to a blank canvas. To do so, click Edit and click Clear Storyboard or Clear Timeline.
If you selected Create Clips When Wizard Finishes when capturing your video, Movie Maker 2 created clips automatically. If you didn’t select that option, you’ll have one large clip to work with. Either way, there will probably come a time when you want to split one clip into two. Splitting a large clip into two clips allows you to add video transitions in the middle of what once was a single clip, and thus have more control over that particular part of the film and the story. Video transitions you can add include options to fade the clips in or out; increase or decrease the brightness; mirror, rotate, or turn the clip upside down; texturize; or apply a watercolor effect to the clip (just to name a few).
In addition to video transitions, you can also add static title pages, pictures, or other items in between the newly split clips.
Tip
When splitting clips and adding transitions, choose a point where there are significant frame changes (that is, different background, people, and so on). Sometimes the transition is hard to detect if the frames are too similar.
You can split a video clip in the Contents pane, the Storyboard, or the Timeline, but you can only split audio clips in the Contents pane or the Timeline, and not in the Storyboard. Here’s the lowdown:
In the appropriate pane, click the clip you want to split. You can’t go wrong with the Contents pane.
On the Play menu, click Play Clip. Click Pause Clip on the Play menu to pause the video where you want to split the clip. (You can also locate the position of the clip using the seek bar in the Monitor pane and pause it there as well.)
With the clip set to the location where you want to split it, on the Clip menu click Split, or click the Split The Clip icon in the Monitor pane.
The opposite of splitting a single clip into two clips is combining two clips into a single clip. Combining two smaller clips that are contiguous in the Storyboard or Timeline allows for easier management of the story line and also offers an efficient way to add effects and audio to the project. You might also combine clips to make the flow of clips smoother and lessen the interruption of a clip change. Try to combine clips that are similar, or the new, larger clip might appear disjointed or choppy.
You can combine two consecutive video clips in the Contents pane, the Storyboard, or the Timeline, but you can only combine audio clips in the Contents pane or the Timeline, and not in the Storyboard. Here’s how to combine clips:
Trimming a clip is, very simply put, changing its length. By changing the length of one or more clips, you can edit the length of a project to make it meet the length requirement of a CD-R, e-mail specification, or Web site limitation. You can also make sure the film isn’t too long for its intended viewers. By changing the point at which a single clip starts and stops, you can also control which parts of the video will and won’t be shown to the audience. (Show the clip of your family setting up the tent, but trim it so that the audience doesn’t see the tent blowing away because Junior didn’t hook his side up to the stakes properly!)
Trimming clips is also a good technique to use when you want the music and video to end together (or fade out together) in a movie. In that case, just trim the audio clip or the last clip of the video so they both end at the same time. Consider trimming clips that repeat an action, clips that are lacking in action or are not necessary to enhance the story, clips you think are boring, or any clip that does not add value to the film. You can believe me when I say that if you think a clip isn’t needed, your audience will probably agree.
Trimming clips can only be achieved using the Timeline. You can’t trim clips in the Storyboard or the Contents pane. To trim a clip, follow these steps:
On the View menu, click Timeline.
In the Timeline, select the clip you want to trim.
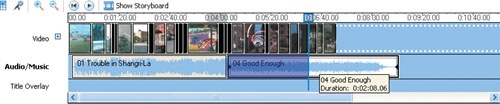
Click the playback indicator on the Timeline and drag it to the point where you want to trim the clip. In Figure 8-8, I’m trimming the audio clip so that it ends where I want the film to end. (Next, I’ll go back and trim the last few clips of the project, and I’ll probably delete those last clips altogether.)
Note
You can also use the Play and Clip menus to perform these tasks, although that’s a little more complex. I find it easier to work with the Timeline when trimming clips.
ZOOMING IN ON YOUR TARGET

I’m starting to worry a little that you’ve been squinting at the Timeline trying to perform some tiny, little edit on a clip located there. Have you? Oh goodness, I hope you haven’t worked up a headache. Perhaps you tried to perform an edit but just gave up and switched over to Storyboard view, or just settled for the "best you could do." Well here’s an amazing feature you’ve got to try—the Zoom commands!
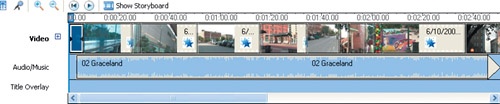
Take a look at this image of a Timeline and tell me what’s wrong with this picture. As you can probably tell, you can’t effectively trim these clips (especially the last four or five) because they are just too small to see. Now look at the next image. Wow, what a difference! As you can see, it is going to be much easier to work with clips with the second configuration.


You can change the look of your Timeline by zooming in it. To zoom in (or out), click View, and then click Zoom In (or Zoom Out) as needed. You should also try Zoom To Fit; sometimes this is the perfection option. Either way, once you are zoomed in, it is easy to determine where you’d like the film to end, where the music should end, and how clips are configured on the Timeline.
Now that you’ve filmed your story, captured the footage to your computer, and had a go at a little editing, it’s time to move forward. By now, you’ve figured out what length the movie should be, and you’ve moved, deleted, renamed, combined, and split a few clips to make sure the story is coming together as planned. With the visuals in place and with the clips trimmed, you can now move on to the details that will really make your movie stand out.
In the next sections, you’ll learn how to add transitions to smooth out the story, you’ll add effects to add emphasis to specific parts of the story, and you’ll add music or narration (or both). Of course, you’ll want to take credit for your work too, so title pages, static pages, and end credit pages will certainly be necessary.
A movie without audio is like a film without color—there’s just something incredibly obvious missing. Because Movie Maker 2 makes it easy to add audio, you should at the very least consider adding some background music. In addition to background music (or in place of it), you can narrate your movie with your own words and voice. Audio can add so much—a personal touch, a description of a location, or a message. Music does the same; add classical music behind a wedding proposal video, rock music behind a skateboard or parachuting video, or jazz behind an art film video.
Adding background music for an entire movie is easy, but you’ll need to have a video captured and clips created so you can tell Movie Maker 2 where you’d like the music to begin and end. You’ll also need to have some music on your hard disk or available from a similar source. In a movie I created, I took video of Elvis’s mansion and added the background music "Graceland" by Paul Simon. It added the perfect touch.
To add background music to an existing movie, follow these steps:
In the Movie Tasks pane, expand Capture Video, and click Import Audio Or Music.
In the Import File dialog box, browse to locate the music file to use for a background. Click Import.
Scroll up in the Contents pane to locate the clip. It will have a musical note on it instead of video.
In the Storyboard, click Show Timeline. You can also show the Timeline by clicking Timeline on the View menu. Figure 8-9 shows the Timeline and the music clip.
Drag the music clip to the Timeline and place it at the beginning of the Timeline. If you want the music to start at a different frame in the Timeline, drag it to a particular frame. You can add different songs for different clips if you want.
Use the Timeline’s scroll bar to locate the end of the song. Notice that you can click and drag the audio clip in the Timeline to shorten it, or to make it match up with the length of the video.
Play the Timeline to verify the music you’ve added works as planned.
If your video has its own sounds, like birds chirping, rain falling, people saying their vows, or people conversing, and you’d like to hear those sounds over the music you’ve just added, you’ll have to set the audio levels. If you have video of rain falling, consider putting a light classical piece behind it; or if you have video of a train ride, add some traveling music.
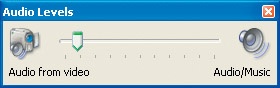
The first icon in the Storyboard or Timeline is Set Audio Levels. Click this to set how the audio recorded in the video and the audio added from the background music should relate. Figure 8-10 shows the Audio Levels dialog box where I’ve adjusted the audio levels to put more emphasis on the audio from the video and less on the background music. This way, I can hear the conversation in the video over the background music.
Narrating a video is another way to add audio. Using narration, you can add, in your own words, what and who is being filmed, where and when the filming is being done, and how it feels to be there. Sometimes there’s no better way to tell a story than to actually tell it. Another upside to narrating a video after your film has been captured is that you can make mistakes and rerecord on the fly. You can also write scripts for the video to plan your words in advance, bring in actors to do voice-overs, or employ groups of people to add a laugh track.
You’ll need a microphone or a headset and some speakers to narrate the video. You’ll also want to decide where you’d like to narrate the video and where you don’t. You might simply want to read off the video title and be done with it, or you might want to narrate the entire video. With that in mind, follow me:
Configure Movie Maker 2 so that a collection is open and is showing in the Timeline.
Drag the playback indicator (the horizontal line) to a position on the Timeline where there is no audio. The Audio/Music track must be empty wherever you want to add narration.
Click Narrate Timeline. It’s the second icon in the Timeline pane and is shown in Figure 8-11. Here, I’m creating a movie about the possessions in my home, and I’ll narrate all I know about each item as it’s filmed; I’ll send this video to my insurance representative when I’m finished. You might want to consider this project as well.
Speak into the microphone or headset to see the audio levels. Position the microphone or headset so that the level is toward the upper part of the meter without entering the red area. You can also use the Input Level slider to configure the levels. Set it too low, and you won’t be able to hear the narration; too high, and it’ll be distorted.
Click Show More Options, which gives you the following choices:
If you have existing audio on the Audio/Music track of the Timeline that you do not want to replace with narration, select Limit Narration To Available Free Space On Audio/Music Track.
If you want to mute the speakers and all audio out lines, select Mute Speakers. Audio playback can be distracting when narrating.
To change the audio device or the audio input source, select the appropriate device from one of the drop-down lists.
To see fewer options, click Show Fewer Options.
After deciding what to say and dragging the playback indicator to the area of the Timeline you’d like to narrate, click Start Narration. Click Stop Narration when you are finished.
In the Save Windows Media File dialog box, name the new WMA file that will be saved and accessed when this video is played. Click Save. The narration will appear in the Audio/Music track of the Timeline.
As with adding music, you can set audio levels by clicking the Set Audio Levels icon.

Once the narration is finished, you can listen to it by moving the playback indicator to the appropriate clip and clicking Play. If the narration isn’t exactly what you want, right-click the Audio/Music clip and click Delete, and then rerecord.
You already know you can set audio levels, rerecord narration clips, and configure how background music relates to the sounds already in the video; but wait, there’s more! You can adjust the volume of a single audio clip and add audio effects too.
Let’s say you’re narrating a clip, and you get a little close to the microphone, or during narration, something loud happens in the video. Your narration can be too loud or too soft for a single clip for any number of reasons. To remedy this, you have the power to adjust the volume of a single clip. It’s easy; just right-click the Audio/Music clip and click Volume. In the Audio Clip Volume dialog box, move the slider to increase or decrease the volume. You’ll be able to see the change graphically in the Timeline.
Tip
If your video has sound that does not appear on the Audio/Music track of the Timeline, you can still adjust the audio levels. Although you won’t be able to right-click and choose Volume, you can access the audio levels from the Storyboard or Timeline and from the Tools menu. The setting will affect the entire movie.
You can add some basic effects to your movie project—you can mute audio or fade it in or out. Fading in the audio gradually increases the audio volume until it reaches its final playback level; fading out gradually decreases it until it can no longer be heard. You can mute the audio if you don’t want the audio to be heard at all (your teenager’s conversation with his best friend while on a camping trip when he didn’t know you were filming him, for instance).
To add an audio effect, follow these steps:
On the Audio/Music track of the Timeline, select an audio clip to add an effect to.
On the Clip menu, point to Audio, and select either Fade In or Fade Out. Select Mute to mute the clip. Select Volume to set the clip’s volume.
I like to fade out music tracks as the video ends because the song is usually longer than the video I’m creating. When the video is longer than a single song, add a second track and fade both in and out. You can clear effects from the Clip menu too; just select the clip, and then on the Clip menu, point to Audio, and clear the selected effect.
As you are well aware, you can spice up your project with music, but aside from simply adding music tracks (like entire songs or parts of them), you can also add musical effects. There are lots of musical effects you can apply to a video; you can add effects that sound like birds chirping, like pool balls breaking, or like people clapping, laughing, or yelling. These effects, placed in the proper place in a video, can really liven things up and enhance your story.
Although you can download all kinds of musical effects from the Internet, the easiest way to obtain a collection of these sounds is to download the Movie Maker 2 Creativity Fun Pack. You can get it at www.microsoft.com/windowsxp/moviemaker/downloads/create.asp. Just click the link, click Save, and follow the directions for installing. If you need help or additional instructions, refer to the Introduction at the beginning of this book.
Once the Creativity Fun Pack is installed, you’ll have access to sounds that you can use for a variety of movie types, including films of ceremonies, processions, parades, and formal events, as well as films of vacations, films for class reunions, and more.
LISTEN UP

If you downloaded and installed the Movie Maker 2 Creativity Fun Pack, you’ve got a lot of new media files on your computer. Although the title names are indicative of the files’ actual sound effects, it’s a pain to have to listen to each file before importing it, and even more of a pain to import it only to discover it isn’t the sound you want!
Because there are so many sounds to choose from, it’s advantageous to listen to all of them at least once before trying to work with them in Movie Maker 2. It’s easy to listen to them in Windows Media Player 9. While you listen, jot down ideas for other ways to use the sounds in existing projects, and think of ideas for new ones. After I heard the Ref Whistle sound effect, I immediately opened that old video of my daughter getting fouled (which wasn’t called!) and added the whistle myself. I used the Audio Levels to make it really loud.
There’s a simple way to hear all of the sounds in the Creativity Fun Pack, and, it’s just plain fun to listen to them. Grab a soda, get comfy, and follow these steps:
Open Windows Media Player 9.
On the Tools menu, click Search For Media Files.
Browse to the root drive where the Creativity Fun Pack was installed and click Search.
In the Add To Media Library By Searching Computer dialog box, click Close once the search is complete.
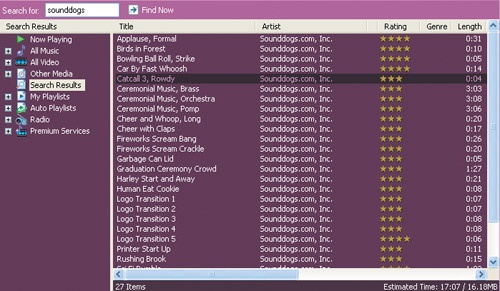
Click Media Library, and in the Search For box, type Sounddogs. (Sounddogs is the maker of all of the wonderful files in the Creativity Fun Pack.)
Scroll up to the top and double-click the first file. The files in the Search Results pane will play one at a time.
Consider using sounds for these unique sets of circumstances:
After filming your son’s graduation ceremony, you find out that the camera picked up the conversation of the people sitting next to you, but not the ceremony’s sounds. Use graduation sounds to repair the video, incorporating Graduation Ceremony Crowd, Ceremonial Music, Cheer With Claps, and Applause, Formal.
After filming a nature video on your latest camping trip, you find that the background sounds are not as audible as you’d hoped, and increasing the sound in Movie Maker 2 doesn’t help much. Add Birds In Forest, Sparrows In Forest, Breeze, and Rushing Brook in specific places or throughout the video.
The video of the car show was wonderful, but the sounds at the show were so loud they distort when you play it. Add Car By Fast Whoosh, Cheer And Whoop Long, Harley Start And Away, and Sport Car Drive Away to repair it.
You might also consider using the Cheer And Hoot effect as the final clip of a movie. Doing so might encourage your audience to give you a round of applause!
Once you’ve decided on the sounds you want to include in an existing Movie Maker 2 project, you’ll have to import them and place them in the correct areas of the project. Here’s how:
Click Import Audio Or Music in the Capture Video pane in Movie Maker 2.
Browse to the file you want to add. If you accepted the defaults during installation, click the root drive, click My Documents, click My Videos, and click Creativity Fun Packs.
Select the Sound Effects or Music Tracks And Music Transitions folder, and click a folder or file to open. (If you want to hear the file before importing it, right-click the file name, and click Play. The file will play in Windows Media Player.)
Once the file has been imported, scroll to the top of the Collections pane to locate it, and drag it to the Timeline. Figure 8-12 shows a Timeline with three clips added.
Watch the clip and listen to the sound added by clicking the Play button in the Playback Controls area.

Now that you’ve gotten your clips configured and added some music and narration, you can add video effects, a title page, and transitions. Create a title page to introduce the film, and use a credits page to plaster your name all over it! Use the Fade In effect on the first clip and Fade Out on the last to bring the movie in and out gracefully and not too abruptly. Remember that you can use the trimming options to make the music or narration end with the movie, and you can apply the fade commands on the audio track. You can even add effects to still pictures that you’ve added to your project. There are literally thousands of simple ways to spice up your video and turn it into a movie!
Now that you’ve added some music effects, try your hand at video effects. It’s easy to add a simple video effect—just right-click the first clip, and click Fade In from the list. Next, right-click the last clip, and click Fade Out. You’ve just improved your movie by adding video effects! Fade In and Fade Out are great effects to add, and they work for almost any movie. You can apply multiple effects to a single clip as well—and sometimes both Fade In and Fade Out are needed on the same clip.
In addition to the Fade In and Fade Out effects, other effects can be applied by right-clicking the clip and choosing Video Effects. Figure 8-13 shows the Add Or Remove Video Effects dialog box, where you can add any effect from the list and click OK to apply it to the selected frame. As you add effects, stars will be placed in the Timeline or Storyboard. In Figure 8-14, the pictures of the gumballs and the subsequent clip have the Watercolor effect applied.
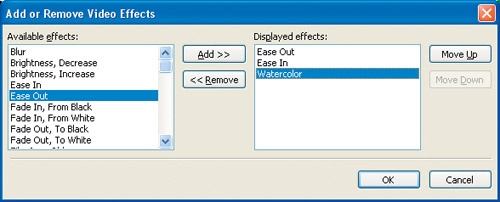
Figure 8-13. Adding video effects is easy; just right-click the clip and click either Fade In, Fade Out, or Video Effects. If you choose Video Effects, you can use this dialog box to select and apply the desired effects to the selected clip.
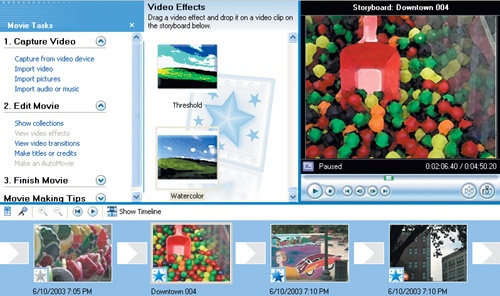
Figure 8-14. Applying the Watercolor effect changes the clip drastically. In this figure, you can see both the applied Watercolor effect and the Video Effects in the Contents pane.
If, after looking at the list of effects shown in Figure 8-13, you’re confused about what each of these effects do, click Tools, and then click Video Effects (or click View Video Effects in the Edit Movie section of the Movie Tasks pane). Examples of the available video effects will be shown in the Contents pane, as you can see in Figure 8-14.
Try these effects:
Use the Increase and Decrease Brightness effects when the film is too dark or light due to recording conditions.
Use the Fade In From White effect at the beginning of a movie.
Use the Film Old Age effects to make a new video look old.
Use the Mirror effects to turn a video upside down.
Use the Rotate effects to turn someone on their ear!
SPICE UP YOUR MOVIES WITH NEW CLIPS

Here’s another neat way to add some special effects to your movie. Have you ever seen the countdown at the beginning of old movies? What about those "The End" clips? Well now you can add these clips to your own movies, and they’re already created for you! The countdown video titles are a perfect fit for the "old" movies that you’ve created from 8 mm film, and because the countdown frame is a clip in its own right, you can make it look old using Video Effects. The countdown titles and "The End" clips can also give your movie a more professional look.
To add one of the new titles or end credits, follow these steps:
Open a project in Movie Maker 2.
Click File, click Import Into Collections, and navigate to the location on the hard disk where you installed the Windows XP Creativity Fun Pack. If you accepted the defaults during installation, click the root drive, click My Documents, click My Videos, and click Creativity Fun Packs.
Click Video Titles And End Credits, click the View icon, and click Thumbnails.
When importing video title slides, clear the Create Clips For Video Files option. This will ensure that the video files imported will remain in one piece.
To import more than one clip, hold down the Ctrl key while selecting. When finished, click Import.
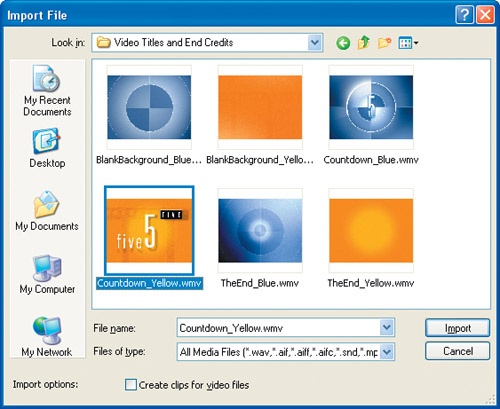
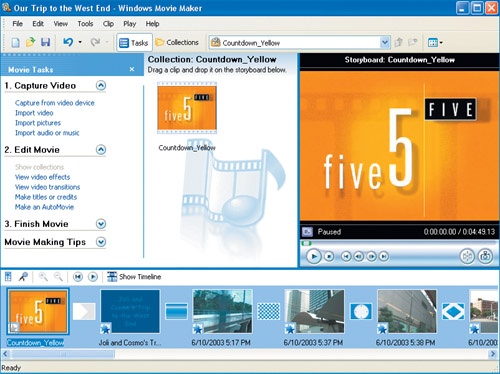
The last file imported will show in the Collections pane; the others will be in the Collections list. You can now drag that file to the Storyboard or Timeline. In this image, I’ve dragged the Countdown_Yellow clip to the beginning of my working project. The clip can be edited by right-clicking it, just like editing any other clip.
Like effects, transitions are applied to clips. To see the available transitions, click View Video Transitions in the Edit Movie section of the Movie Tasks pane. When you drag a video transition in between two clips, that transition is applied, as described here:
With a project open and in Storyboard view, click View Video Transitions.
Choose a transition to apply in between two clips.
Drag the transition from the Contents pane to the Storyboard. Figure 8-15 shows a Storyboard with both transitions and effects applied to all of the clips.

Add a new dimension to the clips in your movie with the new effects and transitions included with Microsoft Plus! Digital Media Edition. These effects and transitions are easy to use, and there are lots of them to choose from. With these new effects and transitions, there’s no limit to what you can create! Consider these uses:
Use the Plus! Desaturate effect to change a color clip to black and white, and add a Film Age effect to make it look old. Take an ordinary video of a small town and make the video look like it was taken years ago.
Use the Color Warp effects when you want to make the clip look futuristic or like a clip out of an old sci-fi movie. (Color Warp effects are great for music videos.)
Use the Exotic Green and Exotic Red effects to change the color of the clip. This creates a major change and distorts the clip so much it is often hard to make out what it is. These effects are ideal for special effects in films.
Use the Plus! Negative effect to make the clip show in its negative colors. This makes the clip look etched, or drawn in.
Use the Texture effects to give the video a three-dimensional look and feel. I’ve added textural effects to video of buildings downtown, and they look great.
Use the Plus! Drain, Erode, and Evaporate transitions to bring the next clip in by having it look like it "rains" or "falls" in. It’s perfect for clips of weather, and for separating clips of winter sports events like skiing or snowboarding.
Use the Plus! Star transitions to separate clips you’ve taken at a Dallas Cowboys football game (or whatever your favorite sports team is).
Here’s how to add another dimension to your clips:
Open Movie Maker 2 and an existing project. Show the project in Storyboard view so that you can easily see any existing transitions.
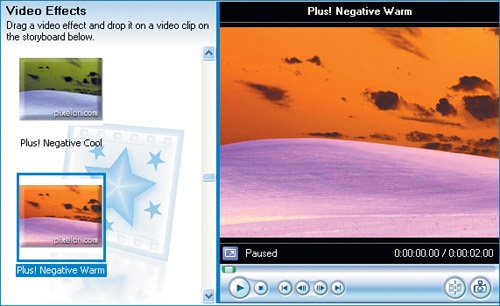
In the Movie Tasks pane, expand Edit Movie, and click View Video Effects.
In the Contents pane, scroll through the effects until you reach the Plus! effects, as shown in Figure 8-16. Click each to see a preview in the Monitor pane.
To add the effect, drag it to the Storyboard and drop in on the clip it should affect. The Plus! Negative Warm effect changes the color of the clip dramatically and gives the clip an eerie and futuristic look.
Back in the Movie Tasks pane, in the Edit Movie section, click View Video Transitions.
Scroll through the transitions until you reach the Plus! transitions. Click each to preview it in the Monitor pane. You’ll have to click the Play button in the Monitor pane to actually see the effect in progress.
To add a transition, drag it to the Storyboard in between the two clips it will separate.
You absolutely must take credit for your work, and a title page is always nice too. Title and credits pages mark for all eternity that you created this movie! It’s simple to create both, as described here:
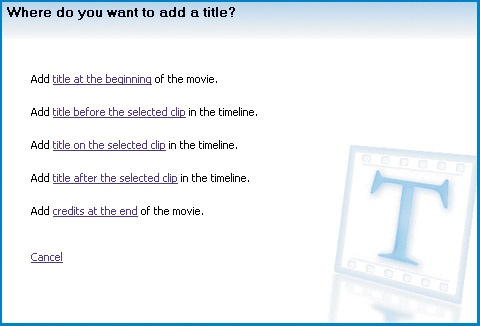
In the Movie Tasks pane, expand Edit Movie, and click Make Titles or Credits.
In the Where Do You Want to Add a Title? page, shown in Figure 8-17, make the appropriate selection. Title pages are generally added at the beginning of the movie, but you can create a page to separate the movie at various clips too. I’ll choose Add Title at the Beginning of the Movie.
Under More Options, click Change The Title Animation or Change The Text Font And Color to make changes to the title page, separation pages, or credits. Animation can fade in, fade out, fly in or out, flash, spin, zoom, and more. The text and font color, position of the text, and other formatting can also be changed. You’ll be able to preview these effects as you create them.
Note
Sometimes, due to a glitch in the interface, you might not be able to see More Options, and there won’t be a scroll bar. If this happens, position the mouse over the blue separator bar that is between the Text For Title page and the Storyboard or Timeline, and drag it up and then down again. The scroll bars will appear, and you’ll be able to access the additional options.
When you’ve edited the text, click Done, Add Title To Movie.
The title page will appear for 5 seconds, but this can be changed using the Timeline.
To add other pages to the movie, repeat these steps, selecting a different option in step 1, as needed. Create and add a title page to separate the movie into acts, to create an intermission, or to disconnect completely different parts of a movie (like a wedding ceremony and a wedding reception, or a plane ride from the actual vacation).
PERSONALIZE YOUR TITLE PAGES

The Static Titles available from the Creativity Fun Pack are awesome. These are JPEG files that can be placed anywhere in an existing project, just like any picture that you’ve taken can be. There are video titles for graduation videos, for Father’s Day videos, Mother’s Day videos, sports films, and more. You import them the same way you import the video titles and end credits, and once imported, you work with them in an open project just like any other clip.

Check out these great projects:
Use the Baseball Memories or Play Ball pictures to separate innings of a baseball game.
Use the Bee–Daisy picture or the Blue Sky–Flower to transition between clips taken of your garden.
Use the Batter clip when a new batter is introduced in a baseball video.
Use the Cap–Diploma, Graduation, and Grad Congrats pictures to introduce or transition between parts of a graduation video.
Use the Memories picture for the first clip in a video created from old films.
PERSONALIZE THE STATIC TITLE FILES
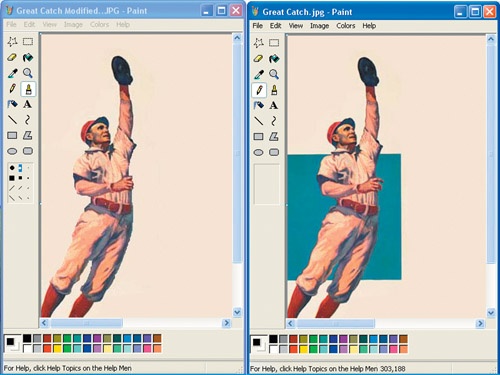
You can use Microsoft Paint (or almost any other graphics program) to edit, personalize, and resave the Static Title files that come with the Creativity Fun Pack. In doing so, you can add words, change the background color, and even erase parts of the image you don’t want. To edit a static video file in Microsoft Paint, follow these steps:
In Paint, click File, and click Open.
Browse to My Documents, click My Videos, and click Creativity Fun Packs.
Click Static Titles, and select a file from the list.
With the file open in Paint, you can now edit it, resave it, and use it in another program or open the edited version in Movie Maker 2. Use the Text tool to add text, use the Brush tool to paint, or use the Airbrush tool to add graffiti or create a border. Use the Eyedropper tool to match a color, and then use the Brush tool to erase parts of the image by painting with that color. This image shows how the Brush tool can be used to remove the blue box behind the baseball player (and if you look closely, even a couple of fingers).
When you are finished editing, click File, click Save As, and choose a new name for the file.
- audio clips
Clips that contain only audio data. Audio clips and video clips are combined in Movie Maker 2 to create completed clips. Audio clips can be adjusted for volume, and they can be muted.
- dimensions
The display size of a clip in Movie Maker 2. The dimensions of the captured video are given in pixels, with the first number representing the width and the second representing the height.
- frame rate
Frames per second in a Movie Maker film. The higher the frame rate, the smoother the video. A common frame rate is 30 frames per second.
- video effect
An effect that can be added to clips in a movie to lighten, darken, or otherwise change the appearance of the original clip. Video effects can fade in or out, or can make a clip look old, among many other options.