
Welcome to Microsoft Windows XP: Do Amazing Things. This book is guaranteed to spark your imagination and change the way you look at everything from digital photography to movie making to how you listen to music. Throw a little instant messaging and some surfing the Net in there, and you’re ready to rock and roll. With Windows XP, you can, indeed, do amazing things!
While reading this book, let your imagination run wild. Although I’ll introduce the basics, including how to make a movie, how to burn a CD, how to add images, music, and video to an e-mail, and how to create a digital photo library, there are also hundreds of additional jumping-off points. There’s a lot more to explore than just becoming proficient in the newest technologies—there’s more to it than simply purchasing and using a digital camera or a portable MP3 player, or communicating using a computer. Today, you can use these technologies to enhance and improve your life.

This book is divided into four parts: "Part I," "Part II," "Part III," and "Part IV." Within the parts are chapters that contain all of the information you need in order to work with digital photographs, music, movies, and more.
In Part I, you’ll learn all about digital cameras and scanners, and how to use them to go digital and liberate your photos. In Part II, you’ll learn how to download and acquire music and videos for your digital music library, organize your music files, and take your music with you wherever you go. In Part III, you’ll learn how to make movies using almost any type of movie camera, and how to turn that footage into something special that not only tells a story, but preserves the memories for future generations. Finally, in Part IV, you’ll learn how to communicate in real-time online using Windows Messenger, and how to get the most out of Internet Explorer.
As you work through the book, you’ll run across the following special elements that will help you get the most out of Windows XP:
Tips and Notes. Offer sound advice for getting better performance and better output, and offer suggestions and guidance for performing additional tasks and projects.
Sidebars. Stand-alone sections within the main body of each chapter. The sidebars are related to the chapter’s topic, but are completely independent of the chapter discussion. They offer ways to take your experiences even further. For instance, in Chapter 1, a sidebar details how to take your child’s artwork off the refrigerator, scan it, and use it to create a virtual gallery of artwork that you can use as a screen saver or desktop background, or view as a slideshow. The sidebars offer new and exiting ways to expand how you use your computer with Windows XP. They’re my favorite part of the book, and I’m guessing they’ll be your favorite too!
Glossaries. Lists of terms (and their definitions) related to a chapter’s subject, which are located at the end of each chapter. The terms are printed in blue throughout the chapter, so if you see a blue word and it’s unfamiliar to you, turn to the glossary for further information.
Before you get started, you might want to get your computer ready for the amazing things it’s about to do. If you have Windows XP installed on your computer already, you’re nearly there. At the time this book went to press, there were a couple of free upgrades available for the media components of Windows XP—one for Media Player and one for Movie Maker. Throughout the book, I’ll be discussing and showing screen shots of the upgraded versions. To get the most out of this book and Windows XP, you should take the time to upgrade both before you start reading. (If you have one of the newer OEM versions of Windows XP, you might already have Movie Maker 2.)
I’ll also be talking about additional programs you can use to complete activities described in this book. Many of these programs are free, like the Image Resizer PowerToy or the Wallpaper Changer PowerToy, and some are parts of software programs that you buy, like Microsoft Plus!.
In this section, you’ll learn where to find the upgrades for the media programs in Windows XP and how to download and install them. You’ll also find out what additional programs are available, and how to find them. The next section, "How to Download and Install Virtually Anything," will show you how to download or purchase and how to install them. You can either download or acquire the programs you think you’ll use before starting the book, or, you can simply refer back to this section when you need to. Either way, these additional programs are well worth the time it takes to obtain and learn to use them.
Tip
Many of these additional programs described in the special project sidebars are available on the DVD that ships with this book. Check out the section "What’s on the DVD" to find out what you already have!
Let’s start with upgrading Windows Media Player and Movie Maker. Because tasks you’ll be performing in these programs are system-intensive, verify that your computer meets or exceeds the minimum requirements needed before downloading and installing any components. If your system meets or exceeds the system requirements listed on page xxv you should have no trouble installing these components.
Windows Media Player 9 offers over 120 new features and is quite a step up from the Media Player that came with your original installation of Windows XP. For starters, you’ll get the new mini-player, fast streaming for broadband users for no-interruption streaming, new audio effects including crossfading and volume leveling, auto playlists, and high-performance CD burning. You’ll definitely want this upgrade.
There are several ways to obtain Windows Media Player 9. If you like using Windows Update and you want to get the update that way, go to the "Using Windows Update" section in this Introduction. Using Windows Update is a pretty easy route to take, but there are other ways too. You can upgrade from inside Media Player by clicking Help and then clicking Check For Player Updates (you might have to open Internet Explorer first if the Web site doesn’t come up automatically). Finally, you can get version 9 from http://windowsmedia.com/9series/download/download.asp.
If you want to download Windows Media Player 9 manually, follow these steps:
Open Internet Explorer and point the browser to http://windowsmedia.com/9series/download/download.asp.
Read Microsoft’s Privacy Statement and click Download Now.
Click Save in the File Download dialog box, and browse to a location to save the file. I have a folder named Downloads On Sony Vaio that I save all of mine to. You might want to do the same. Figure I-1 shows a sample folder; notice I’ve renamed the file Media Player 9.
Wait while the download continues, making sure that Close This Dialog Box When Download Completes is not selected. When it’s finished, click Open Folder.
Double-click the application’s icon and follow the installation instructions.

Windows Movie Maker 2 offers a lot more features than the player that came with your original installation of Windows XP. For starters, there’s a new and improved interface, new wizards, transitions, effects, titles, and the option to create a movie automatically using AutoMovie. It’s a must-have upgrade.
Like Media Player, you can upgrade using Windows Update (see "Using Windows Update"). You can also upgrade from inside Movie Maker by clicking Help and then clicking Windows Movie Maker On The Web (you might have to open Internet Explorer first if the Web site doesn’t come up automatically). Finally, you can get version 9 from http://www.microsoft.com/windowsxp/moviemaker/downloads/moviemaker2.asp.
If you want to download Movie Maker 2 manually, follow these steps:
Open Internet Explorer and point the browser to http://www.microsoft.com/windowsxp/moviemaker/downloads/moviemaker2.asp.
Read the information on the page, and click Go. On the next page, click Download.
Click Save in the File Download dialog box and browse to a location to save the file.
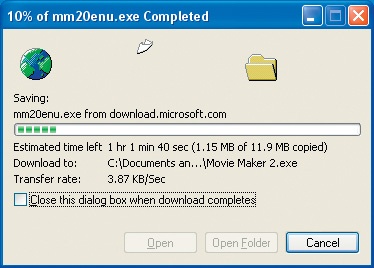
Wait while the download continues, making sure that Close This Dialog Box When Download Completes is not selected, as shown in Figure I-2. When it’s finished, click Open Folder.
Double-click the application’s icon and follow the installation instructions.
Let’s find out where you can get all of those extra software packages that can add a whole new dimension to your computing experiences with Windows XP. Although some of the titles are self-explanatory, such as the Wallpaper Changer (which changes the wallpaper on your computer automatically), others have more generic names and contain several items. For instance, the Windows Media Player Fun Pack contains plug-ins and visualizations for Media Player 9 as well as music tracks, sound effects, titles, and credits for Movie Maker 2. Because we’ll be talking about these items throughout the book, it would be redundant to detail what is in each pack here. So, let’s just concentrate on finding them.
When looking for a software package, first check the DVD that came with this book. Many of the screen savers and PowerToys are available there. If you don’t find it on the DVD, or if you want to download it manually (to guarantee you have the latest and greatest versions), check out the Internet URLs listed below.
Fun packs, creativity packs, bonus packs, and more:
Windows Media Player 9 Series Fun Pack
http://www.microsoft.com/windowsxp/windowsmediaplayer/downloads/create.asp
Windows Movie Maker 2 Creativity Fun Pack
http://www.microsoft.com/windowsxp/moviemaker/downloads/create.asp
Windows Media Bonus Pack for Windows XP
http://www.microsoft.com/windows/windowsmedia/download/bonuspack.aspx
Digital Photography Fun Pack
http://www.microsoft.com/windowsxp/experiences/downloads/create_photo_ie.asp
Windows Media Encoder 9
http://www.microsoft.com/windows/windowsmedia/9series/encoder/default.aspx
PowerToys from http://www.Microsoft.com:
CD Slide Show Generator, Image Resizer, Tweak UI, HTML Slideshow Wizard, and Webcam Timershot
http://www.microsoft.com/windowsxp/pro/downloads/powertoys.asp
Wallpaper Changer and Windows XP Video Screen Saver
http://www.microsoft.com/windowsxp/experiences/downloads/create_powertoy.asp
From http://www.wmplugins.com:
Ratings Migration PowerToy
Creativity Fun Pack for Windows Media Player 9
Tweak MP PowerToy
Windows Media Player 9 Viz for Windows XP
Windows Media Bonus Pack for Windows XP
If you want to take your Windows XP experience even further, consider purchasing Microsoft Plus! and Microsoft Plus! Digital Media Edition. Both contain awesome tools for enhancing how you work and play with Windows XP. You can get both at most computer stores, at bookstores, and even online. To purchase them online, visit http://www.microsoft.com/windows/plus/plushome.asp.
Microsoft Plus! includes the following tools:
Plus! Voice Command for Windows Media Player
Plus! MP3 Audio Converter
Plus! CD Label Maker
Plus! Speaker Enhancement
Plus! Personal DJ
Plus! 3D Visualizations
Additional Microsoft Windows Media Player skins
Microsoft Plus! Digital Media Edition includes these tools:
Plus! Alarm Clock
Plus! Analog Recorder
Plus! Audio Converter
Plus! CD Label Maker
Plus! Dancer
Plus! Party Mode for Windows Media Player
Plus! Photo Story
Plus! Portable Audio Devices
Plus! Sync and Go
Note
You can now get an update to Microsoft Plus! Digital Media Edition at http://www.microsoft.com/windows/plus/dme_more/moreupdates.asp.
In addition to having access to the previously listed tools and programs (most of which I discuss in this book), if you purchase Plus! or Plus! Digital Media Edition, you’ll also be able to download and install some extras. Listed here are the extras we discuss in this book, and where to locate them for download:
Get more Plus! Dancers (for Plus! Digital Media Edition only)
http://www.microsoft.com/windows/plus/dme_more/moredancers.asp
Get more Party Mode skins (for Plus! Digital Media Edition only)
http://www.microsoft.com/windows/plus/dme_more/moreskins.asp
Get more CD label templates
http://www.microsoft.com/windows/plus/dme_more/moretemplates.asp
Get Photo Story profiles
http://www.microsoft.com/windows/plus/dme_more/moreprofiles.asp
Obtaining, purchasing, downloading, and installing additional software, including PowerToys, fun packs, bonus packs, and creativity packs (and just about anything else) is virtually the same process no matter which you choose. If you’re downloading from the Internet, you must find the software first, download it to your hard disk, click the installation icon after the download has finished, and follow the installation instructions. If the program you want is on the DVD, turn to the "What’s on the DVD" section. To download and install bonus packs, creativity packs, and fun packs, follow these steps:
Open Internet Explorer and type the address that contains the location of the item to download and install. (Addresses are listed in an earlier section.)
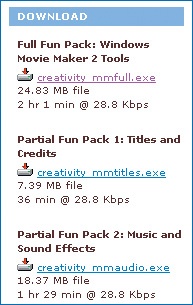
At the Web site, read the information carefully, and then locate Download, Download Now, Install, the title of the fun pack, or a similar option for the software you want to obtain. Figure I-3 shows some options, including downloading a "full fun pack" versus a "partial" one. Here, you’d have to click the fun pack’s name.
If you’re taken to another page, repeat step 2.
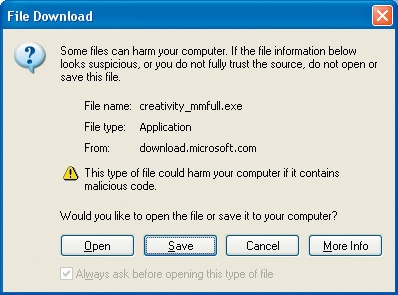
In the File Download dialog box, click Save. This dialog box is shown in Figure I-4.
Browse to a location on the hard disk where you want to save the file, and click Save. Take note of the file name.
You might be prompted (now or later) to read and agree to some terms; if so, do that before continuing.
Wait while the download continues, making sure that Close This Dialog Box When Download Completes is not selected. When it’s finished, click Open Folder.
Double-click the application’s icon and follow the installation instructions.
If you’re a big fan of Windows Update (I know I am), you can get just about any upgrade this way (including Media Player 9 and Movie Maker 2):
Click Start, click All Programs, and click Windows Update.
Click Scan For Updates, and when the scan completes, click Review And Install Updates.
Look through the updates listed under Critical Updates And Service Packs, Windows XP, and Driver Updates. Choose which updates to install and click Add. You’ll be prompted if items you select need to be downloaded and installed separately. If this happens, choose only one, as prompted.
Click Add, then Review And Install Updates, and then Install Now. You’ll have to accept the terms of agreement to continue.
The update will be automatically installed to your computer. You should use Windows Update often; you never know what might be out there.
The DVD is chockfull of useful and fun extras. As I mentioned earlier, some of the projects in this book require you to obtain and install additional programs and tools. For instance, if you want to create a slide show of your pictures and burn it to a CD so that anyone using virtually any computer can watch it automatically, you’ll need the CD Slideshow Generator PowerToy. Luckily for you, many of these programs are on the DVD. The DVD also contains demo videos, how-tos, additional information, and links. It’s a great resource for users of all levels.
Here are the programs and tools you’ll find on the DVD:
Screensavers
Windows XP 3D Screensaver
Windows XP Bliss Screensaver
AWE Screensaver
Photo PowerToys
CD Slideshow Generator
Webcam Timershot
HTML Slideshow Wizard
Image Resizer
Windows Media Player PowerToys
WMP 9 Series Visualization
Ratings Migration
Picture Visualization 2
Tweak MP
Other PowerToys
Virtual Desktop Manager
Taskbar Magnifier
Alt-Tab Replacement
Open Command Window Here
Tweak UI
Power Calculator
Creativity Kit for WMM2
Installing from the DVD is as simple as popping in the disc and following the prompts. It will start automatically, and it looks and acts just like a DVD movie!
The following are the minimum requirements:
Windows XP,* Windows 2000, Windows Me, Windows 98 Second Edition, or Windows Server 2003
266 MHz processor
32 MB RAM or higher
8 MB video card
Sound card and speakers
DVD-ROM Drive
*Windows XP required for bonus software
The following are the recommended requirements:
Windows XP
750 MHz processor (2.4 GHz Intel Pentium 4 for Hi-Definition video playback)
128 MB RAM or higher
32 MB video card
Sound card and speakers
Every effort has been made to ensure the accuracy of this book. Microsoft Press provides corrections for books at the following address: http://mspress.microsoft.com/support/.
If you have comments, questions, or ideas regarding this book, please send them to Microsoft Press via e-mail to [email protected] or via postal mail to:
Microsoft PressAttn: Windows XP: Do Amazing Things EditorOne Microsoft WayRedmond, WA 98052-6399
Please note that product support is not offered through the above addresses. For support for Windows XP, you can connect to Microsoft Technical Support on the Web at http://support.microsoft.com/.