
Capture Video with Your DV Camera or Web Cam
Shoot Videos that Launch Your Garage Band into TRL Territory
Import Still Pictures and Video Clips
Get Your Clips Ready for Their Close-ups
Create a Video Family Tree
Make a Movie Right Now
Do a Madden with Your Child’s Soccer Game Footage
Microsoft Windows Movie Maker 2 is intended for recreational moviemakers and is an excellent tool for aspiring filmmakers. Although home movies have traditionally been the focus of new moviemakers (and new parents), there are thousands of other ways to be creative with your DV camera. It’s now possible for anyone to create quality, professional videos that people will actually want to see. Thanks to the newest advances in digital technology, cameras and computers have finally caught up with our imaginations and made the magic of moviemaking attainable for everyone. Now it’s up to you to explore the possibilities and ignite your creative energy!

With Movie Maker 2, you can write, create, star in, and produce your own movie; capture birthday parties, baptisms, and bar mitzvahs; and create a presentation for your boss or supervisor. Film your band, create short films for your personal Web site, and create instructional videos for your kid’s hockey team. You can even make money on the side by filming weddings and similar events. You might also want to create a video of what is in your home in case of fire or theft. If you have a camera and Movie Maker 2, all you need is a little imagination.
In this chapter I’ll help you get started. Getting started requires that you shoot some video with your DV camera, so if you haven’t done that yet, you need to get going! Once that’s achieved, I’ll show you where and how to download the newest version of Movie Maker so that you can take advantage of the latest features. Then I’ll show you how to connect your DV camera, VCR, Web cam, or other recording device to your computer and capture video from it. For the most part, you’ll click Capture Video and work through the wizard. It’s that easy!
If you don’t believe you can make a movie, just wait until the end of this chapter. We’ll take a look at Movie Maker’s AutoMovie feature, which offers a quick and simple way to make a movie without having to know anything about moviemaking!
Before we get started with the actual "making of the movie" part, let’s talk a little about the filmmaking process and what some of the more common moviemaking terms mean in Movie Maker. Having an understanding of what’s going to happen before it actually happens will be quite enlightening.
First you’ll shoot some video, hopefully with your brand new DV camera, then you’ll capture the video to your computer. Capturing is the term used for moving or copying the video that’s in the camera (raw data) to the hard disk of your computer. Once it’s saved on your computer, the data can be edited, and a real movie can be produced using Movie Maker 2.
Movie Maker transforms the video automatically into clips, which are smaller segments created from the larger video file. You can tell Movie Maker to create only one large clip, but generally, smaller clips are easier to work with. Clips are saved automatically as a collection. You can think of the collection as a container for your data because it’s where Movie Maker stores the original source files.
Once clips are saved in a collection, they can be edited for content and length and manipulated using a wide assortment of effects that allow you to change the appearance of the images. They can also be configured to move from one clip to another by using any of several transitions that visually link the clips together. To complete the moviemaking experience, you can add narration and music to a clip or a series of clips. Any work you do on your collection is saved as a project, which contains the clips, transitions, audio, narration, all of your edits, and any pictures you’ve added. Saving a project lets you start where you left off the next time you open the file.
In Movie Maker, a movie is the final product that is created from a saved project. You can watch movies you’ve created in Media Player or a Web browser, and record your movies to tape so that you can share them with friends on almost any computer.
Now that you understand the big picture, you are ready to start making movies. Let’s get started by obtaining the latest version of Movie Maker.
Your copy of Windows XP came with Movie Maker, and if you’ve installed Service Pack 1, you’ve upgraded a little already. However, there’s a later version of Windows Movie Maker available at http://www.microsoft.com/windowsxp/moviemaker/downloads/moviemaker2.asp. Movie Maker 2 is available as a free download and extends the capabilities of the version of Windows Movie Maker you currently have. It has a different interface and expanded toolbars, is more colorful, and is generally more user friendly. Before continuing, log on to the site and download Movie Maker 2.
Rather than talking about how to get the best lighting, sound, and composition for your movies during the filming process, in this chapter I want to show you how to use Movie Maker 2. You’ll learn about the art of moviemaking as you go along, and you’ll develop an eye for what makes a good topic and what doesn’t. With experience, you’ll gain insight about theme and subject matter, and you might find that writing scripts or an outline can make for a better end product. And, if you become really serious about filmmaking, I’m sure you’ll read some of the many books on the subject. For now, let’s just shoot some video, take a look at the Movie Maker 2 interface, connect your camera, and capture the video to your computer. We’ll worry about the finer points later.
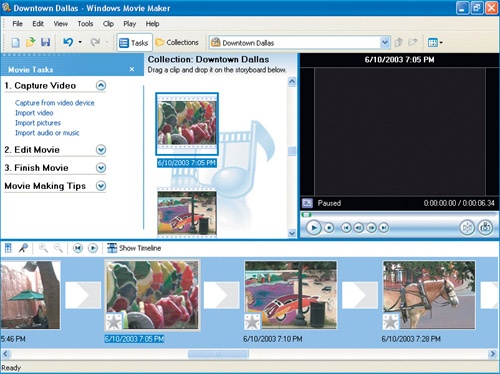
Before you can make a movie from footage of your child’s first steps or his high school graduation, you’ll need to familiarize yourself with the Movie Maker 2 interface. As you can see from Figure 7-1, the Movie Maker 2 interface is separated into several parts and includes a menu bar, the Standard toolbar, the Movie Tasks pane, and the Monitor. You’ll use these areas to create your masterpieces.
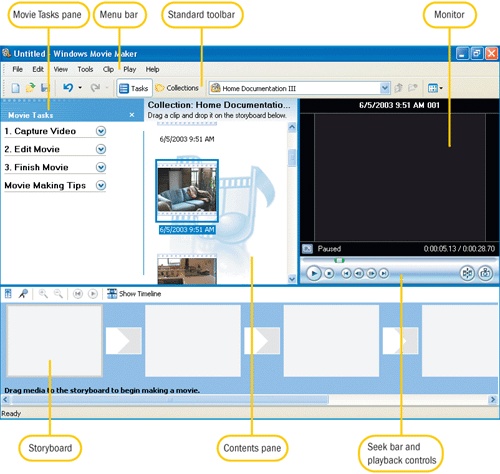
If you look closely, you’ll see that the interface really isn’t much different from any other Windows program. There’s a menu bar with the usual commands, as well as the Standard toolbar with icons for performing tasks. The Movie Tasks pane is where you’ll spend most of your time, though, and each section (Capture Video, Edit Movie, Finish Movie, and Movie Making Tips) is integral to the entire moviemaking process. So let’s get that camera connected and see what we can create!
Once you shoot some footage, you need to get your video camera connected so that you can capture the video from it. You should follow the manufacturer’s instructions for connecting your device to your computer. Here are the more common ways to connect a camera to a computer:
For a DV camera, you’ll need a FireWire port and an IEEE 1394 cable. This is by far the fastest way to transfer video.
For an analog camcorder, you’ll need an analog video capture card and the appropriate cables to connect the camera to it.
For a Web cam, you’ll most likely need a USB port and a USB cable, although older Web cams might connect using a different type of port.
For a VCR or similar analog device, you’ll need an analog video capture card and the appropriate cables.
Once you are connected, verify that the camera is installed and recognized by Windows XP, and then you’ll be ready to transfer video. If your camera isn’t recognized, visit the camera manufacturer’s Web site for issues regarding compatibility.
Transferring video, editing video, and creating movies are system-intensive work. It takes a pretty powerful computer to get good, fast, solid performance, and it can’t hurt to take a little time before transferring the video to the computer to get the computer in good working order. Make sure your computer is in tip-top shape by running Disk Cleanup and Disk Defragmenter. Once the computer is running well, you can enhance the transfer process by closing unused programs and turning off preview in the Capture Wizard when capturing from a DV camera. You might also consider saving your videos to a separate partition. You’ll see better performance in the long run than you would by simply storing those videos on your C: drive. For more information about fine-tuning your computer, see the "THINKING OUTSIDE THE BOX" section in Chapter 5.
There are a couple of ways to begin capturing video to Movie Maker 2 and your computer. One way is to connect the camera to the computer, turn it on, set it to its playback setting, and wait to be given options. Once the DV camera has been detected, you can choose to record the video you’ve taken using Movie Maker 2 or another program. Figure 7-2 shows the choices available to you. If you see this prompt, select Record Video Using Windows Movie Maker and click OK.
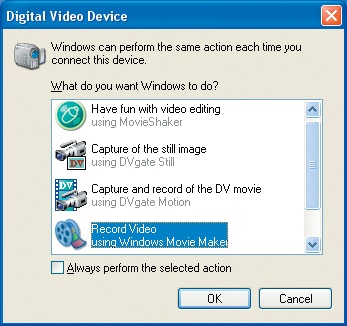
Figure 7-2. When you connect the camera, you’ll be prompted to choose what you’d like to do with the video.
If you are not prompted in this manner, or if you are already working in Movie Maker 2, you can capture the video from inside the program. In the Movie Tasks pane, expand Capture Video, and click Capture From Video Device. The result will be the same as choosing from the prompt in Figure 7-2. Figure 7-3 shows the Capture Video options.

After telling Movie Maker 2 that you want to capture video, the Video Capture Wizard will open. Follow these steps:
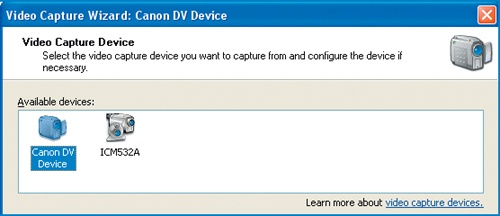
On the first page, select the device from the list of available devices and click Next. Figure 7-4 shows two available devices. The Canon DV Device is a video camera, and the ICM532A is a Web cam. Select the DV camera and click Next.
Type a file name for the captured video and a location to save the file. After typing a name, click the Browse button to select a location to save the file or choose the My Videos folder, which is the default.
Select a video setting choice. The settings you choose will determine the quality and the size of the file, as well as the format. Like music files, increasing the bit rate gives you a higher quality file, but also a larger one. If you are saving for playback on your computer or to burn to a CD, file size might not be much of an issue. If you are saving a file to send to someone via e-mail, size certainly matters. Select one of the following options and then click Next:
Best Quality For Playback On My Computer (Recommended). This is a high-quality setting. Video is captured at the optimal settings for the computer, camera, processor, and output device. This setting is generally the best option, especially if you plan to edit the video in Movie Maker 2 and output it to a CD-R, attach it to an e-mail, or post it to a Web site. The file is saved as a Windows Media Video file that can be viewed in Windows Media Player, has a variable bit rate, records at 30 frames per second, and has a display size of 640×480.
Digital Device Format (DV-AVI). Choose this setting if you want to record your final movie back to the camera’s tape. The file is saved as an Audio-Video Interleaved (AVI) file and can be either PAL or NTSC Video Format. The format you choose depends on the format used by your DV camera, which varies by country and region. If you aren’t sure which one to choose, opt for the one that is offered as the default. The default is determined by the Regional and Language Option set in Control Panel.
Other Settings. Select this option if you want to record video for storage on a Pocket PC, for a local area network, or for a dial-up, ISDN, or broadband connection or similar media. Settings for bit rate, frames per second, and other items depend on the choice made for playback.
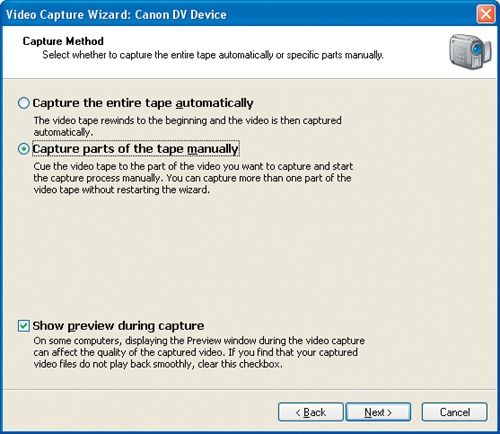
Click Capture Parts Of The Tape Manually, as shown in Figure 7-5, to manually choose which parts of the tape to capture. You can also capture the entire tape if desired; however, selecting parts of the tape manually offers more control over what’s captured.
Use the controls in the Video Capture Wizard to rewind the tape and locate the part of the tape you want to record. If you chose to record the entire tape, it will automatically rewind to the beginning and start the process without intervention. I’ll assume you chose to capture the video manually in this example.
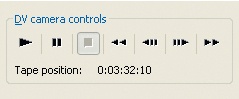
On the Capture Video page of the Video Capture Wizard shown in Figure 7-6, locate the DV Camera Controls and use the Rewind, Fast Forward, Previous Frame, Next Frame, Play, Stop, and Pause buttons to locate the part of the tape where you’d like to begin recording. Most of the time, it’s as easy as rewinding to the beginning of the tape.
Figure 7-6. Locate where you want to begin recording with the camera controls on the Capture Video page of the wizard.
TRL AND CARSON DALY, HERE WE COME!
Are you in a garage band that’s on the brink of being discovered? Are you a professional musician or a songwriter who writes and sells songs or jingles? If you are (and even if you aren’t!), you can make a real splash and stand out from the crowd by creating a music video CD that you could send to your local cable station, agents, or producers. Demo tapes are ok if you’re stuck in the ’90s, but this is a new century. It’s time to step up to the mike!
Let’s say you’re a member of a struggling band that has had several successful local gigs. Someone’s got a DV camera and a sister who knows how to use it. You search the Internet to locate clubs outside your area and pull their e-mail addresses. Instead of sending just a letter, a picture of the band, and a tape to the club owner, you send a video CD created from footage taken at your last gig. Who wouldn’t be impressed with your ingenuity? The club owner slips the video CD into his computer and gets the next best thing to seeing your band perform live. He gets a sense of your band’s onstage presence, sound system, and even the crowd’s reaction to your music.
With a CD like this, there’s no audio or music track because the music is part of the video. Transitions, title bars, and effects can be added to spice up the video too. Today you’re playing at Al’s Tiki Lounge; tomorrow you’re on TRL!
Make sure Create Clips When Wizard Finishes is selected, and select Mute Speakers or Capture Time Limit, if desired. Click Start Capture to begin recording.
Click Stop Capture after you have finished recording. Click Finish.

However long it took to film your movie, that’s about how long it’ll take to get it on your computer. Once that’s been taken care of, the file will have to be created so Movie Maker 2 can be used to edit it. All of this can take quite a bit of time, and you’ll probably hear your computer working at it for a while. Once the recording is complete and the video has been captured, clips will be created, and the wizard will close.
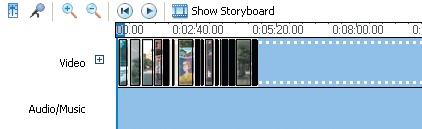
If you followed the instructions in the last section, you’ve captured the video and you have some clips created. Now you need to add the new clips to the Storyboard. An empty Storyboard is shown in Figure 7-1 and Figure 7-3, and in Figure 7-7, you can see a Storyboard that contains clips. Once the clips are added, you can import pictures, audio, and narration to the video.
Tip
Take a look at Figure 7-7 and make sure your Movie Maker 2 interface is set up like this one. If it isn’t, click View, and click the items you’re missing. You’ll want to choose Storyboard, Toolbar, Status Bar, Task Pane, and Thumbnails.
To add the clips to the Storyboard, follow these steps:
Choose the collection you want to work with from the Collections drop-down list if it isn’t already selected.
Click the first clip in the Contents pane. Click Edit, and then click Select All. All of the clips will be selected.
Click Clip, and then click Add To Storyboard. All of the clips will be added.
Use the scrollbar and the controls in the Storyboard to play, rewind, pause, and to drag and drop clips to change the order of the clips as desired.
The need and the desire to take (or work with) digital photos don’t disappear just because you have a DV camera. In fact, I probably use my digital still camera more than I use my DV camera. You might discover you do the same. I know you’ll still want to e-mail digital pictures, work with scanned images, print pictures, and carry around a picture of Junior in your wallet. Working with still pictures, digital pictures, and scanned images is certainly still necessary and can be quite rewarding when combined with existing video.
If you can’t tell from the title of this section, you can add (import) still pictures from your hard disk, from a camera, from an external drive, and from many other sources to a movie using Movie Maker 2. I’ll bet you have tons of really neat pictures on your computer that would be just perfect to add to a movie! You can use still pictures as a way to separate sections in a film, to show changes over time, or to add an effect to an existing movie by supplying fodder for an ongoing theme.
Tip
Import isn’t really the right term for adding still pictures to your movie projects because the file isn’t actually imported and resaved to a Movie Maker folder. Instead, the file remains in its original location and is accessed as needed. Make sure not to rename, remove, or delete the original source file after you’ve imported a picture to a movie.
To import a still picture, save it to your hard disk first, and then follow these steps:
Expand the Capture Video section under Movie Tasks. If you don’t see the Movie Tasks pane, click View and click Task Pane.
Click Import Pictures.
Browse to locate the picture to import, click it, and then click Import. The Import File dialog box is shown in Figure 7-8.

The picture you import will appear in the collection of clips in the center pane of the Movie Maker 2 interface. You can then drag the picture anywhere on the Storyboard you’d like. By default, the imported picture will play for 5 seconds, but you can change that by using the Timeline and dragging from the clip’s edge. You’ll learn more about working with the Timeline in Chapter 8.
FINALLY, A GOOD PASSPORT PICTURE

Are you inherently unphotogenic? Do you have a hard time getting a decent-looking passport picture? You’re looking the solution right in the face! All you have to do is take a few minutes of video of yourself looking into the camera, capture and play the video using Movie Maker 2, and then play it slowly, frame by frame, until you get the perfect pose. Then, just use the Take A Picture icon in the Monitor area to take a picture of that particular frame. Save that frame and you’ve got yourself the perfect passport picture that you won’t mind sharing with the world! These pictures are perfect for the Web, for e-mailing, and for creating smaller prints like passport photos, but since they are small JPEG files, they aren’t really suited for larger prints.
To take a picture from a video clip, follow these steps:
In the Contents pane or on the Storyboard or Timeline, select the clip you want to take a picture from.
Locate the frame of the video you want to capture. You can use the playback controls on the seek bar or you can use the Play Storyboard or Play Timeline commands on the Play menu. I find the slider on the seek bar to be most helpful, as well as the Previous Frame and Next Frame buttons.
Once the frame has been selected, click Tools, and click Take Picture From Preview. You can also click the Take A Picture icon in the Monitor. If you take the picture from the Contents pane, the resolution of the picture matches (up to 600 × 800) the resolution of the video; if you take the picture from the Storyboard or the Timeline, the resolution is 320 × 240. Remember, better resolution means better pictures.
Enter a file name and click Save.

Once a frame of a video has been saved as a picture, you can do any one of the following with it:
Create pictures of people in the original video, and e-mail a copy to them for their own use and enjoyment. To e-mail a picture, browse to it, right-click it, point to Send To, and click Mail Recipient.
Drag the picture from the Contents pane to the Timeline or Storyboard to add it to a project.
Save pictures taken from videos and edit them with another program. Browse to the picture after it has been saved, right-click, point to Open With, and click a program in the list. Open the picture in Microsoft Paint and draw a moustache, open in an image-editing program like Microsoft Office Picture Manager to lighten, darken, resize, and perform other edits, or open in a third-party utility like Photoshop to add text, create effects, or to cut out the subject and add it to another file.
Open the pictures in Windows Picture and Fax Viewer to print, view as part of a slide show, create a photo story, save, rotate, and more.

Besides importing still pictures, you can also import other videos and create movies inside of movies and even merge specific clips from one movie into a second, existing project. Importing a video into a video (merging clips from two or more movies into a single movie) is somewhat advanced editing, but it bears introducing here. In addition to combining clips from existing digital videos, you can also capture and import video from VCR tapes. If you were capturing video footage before the move to DV cameras, chances are good you have some old VCR tapes you’d like to incorporate as well.
To import another video into an existing one, open an existing collection, and use the Import Video command in the Capture Video section of the Movie Tasks pane to import a second (or third) collection. Once imported, select the clips you want to add to the existing project and drag the video clips from the Contents window to the existing project collection. These newly imported clips can be manipulated the same way other clips are, and can be dragged to other areas of the movie. You can also add narration and audio effects.
Here are a few ideas for importing video from multiple sources:
Import clips from multiple videos to create a making-of, time-lapse video, such as video of your house being built, of a business project from design to inception, or the creation of a personal project, such as a boat or funny car.
Import clips from multiple videos when an event took longer than one tape to capture or if multiple people were shooting the event, such as a wedding, a concert, a convention, or county fair. You’ll get the best results if all of these tapes were recorded using the same video resolution, but that’s not a specific requirement for merging video files.
Use clips from multiple videos to capture pieces of your life in a single film; add a clip from childhood, followed by a clip from your teenage years, to clips of the present. Consider making similar videos for honorees of retirement parties, birthday parties, or graduations.
CREATE A DIGITAL FAMILY TREE

If you’re the designated genealogist of the family, or if you just enjoy unearthing and diagramming the family tree, have I got a project for you! It’s a digital family tree—a movie that contains collections of audio tapes, 8 mm film, still pictures, VHS videos, and digital pictures.
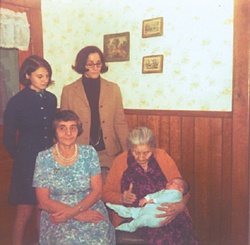
The movie should be chronological, starting with a title page that details the purpose and layout of the movie, followed by a diagram of the family tree as you know it. (You can do the diagram in Microsoft PowerPoint and import it.) The first picture shown in the movie should be a still picture that’s been scanned, and it should be the oldest picture available of a member of the family tree. You can include narration, or the picture could be preceded or followed by another title page that details the person’s name. Subsequent pictures can be of children or a spouse, and other relatives as they are uncovered. Continue to add still pictures until a time and date when audio or video is available. Capture film from 8 mm film, old audio reel-to-reel tapes, VHS tapes, and finally, digital pictures until you’ve created a digital library of the family tree.
If you save the collection as a project as well as creating a movie, you can add to it as pictures, video, or audio become available, and it can be an ongoing activity. I guarantee that when your relatives see this video, you’re going to be inundated with new material. What a treat for your distant relatives and immediate family!
Capturing video from a VCR or analog device is the same as capturing video from a DV camera. However, you have to make sure the device you want to record from is properly connected and configured to its playback setting. Once connected, choose Capture Video on the File menu. As with capturing video with a camera, you select the device from the Available Devices page, select the input and output devices, enter a file name, and continue working through the wizard. After the video has been captured to the computer, clips are created that can be modified, edited, and manipulated just like any other video.
Tip
Capturing video the analog way can be problematic. If you have issues capturing analog video after making a successful connection, visit Microsoft’s Web site at www.microsoft.com/windowsxp/expertzone/default.asp or www.papajohn.org for help.
Capturing live video directly to your computer is the only way to bypass the two-step process of first recording the video with a camera and then transferring it to the computer. When you capture live video, the recorded data is immediately transferred to a collection. The downside is that you have to be standing really close to your computer or have extremely long connection cables!
Here are a few really cool ideas for incorporating even more video into your life:
Connect your DV camera or Web cam to your computer to capture live video of what’s going on outside your office window and send instant pictures to e-mail recipients, friends, colleagues, and acquaintances. (I’ve been known to record hailstorms and then e-mail them to friends across the country!)
Record live TV and send a funny commercial to a friend via e-mail, or record someone you know who is on television.
Connect a Web cam to your laptop to record a sales conference, a business presentation, or a speech so you can share it with absentees later.
Transfer video from analog camera tapes to your computer for digital preservation. No more worrying about those tapes going bad.
To record live video using a DV camera, connect it as you would normally, but instead of setting the camera to playback mode, set it to record mode. On my camera, record mode is the Camera setting.
Once connected, the camera should be automatically detected by Windows XP and opened in Movie Maker 2, and the Video Capture Wizard will start. Select the DV device (shown in Figure 7-4), and work through the wizard as detailed earlier. Click Start Capture to begin recording, and click Stop Capture when you are finished. The video will automatically be transferred to the computer and will be available instantly for viewing and editing. As with any video, it can be edited, and music and narration can be added later.
Web cams offer an inexpensive alternative for capturing live video. With a Web cam, you don’t need an analog converter, a TV tuner card, or any special equipment. In fact, my Web cam plugs right into the USB port in the front of the computer. In addition, after the manufacturer’s rebate, my camera was actually free! Some of the high-end models connect via an IEEE 1394 connection and produce fairly high-quality videos. You get what you pay for, so do your homework before purchasing one.
To use a Web cam to import live video, follow these steps:
Connect the Web cam and verify it has been installed and is recognized by Windows XP.
Open Movie Maker 2, click File, and click Capture Video.
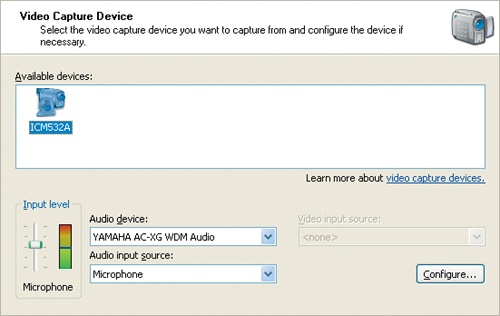
On the Available Devices Wizard page, select the Web cam. Depending on the type of Web camera you purchased, you might have the options shown in Figure 7-9. These can include options for the input levels of the microphone or headset, and a Configure button.
If you have these additional options, speak into the microphone and configure the input levels; you’ll want the levels to be at the top of the color bar when you speak, but you don’t want it in the red all of the time. You can also select the audio device and audio input source if you have several.
Click Configure, if available. In the Configure Video Capture Device dialog box, click Camera Settings to configure the color, brightness, contrast, and similar camera settings. Click Video Settings to configure the size and compression settings for the video you capture using the Web cam. Web cams differ, so you’ll have to read the documentation that came with yours for configuration explanations. Click Close in this dialog box when finished, and click Next in the wizard.
Continue working through the wizard, naming the file, configuring quality settings, and so on. Then capture the video using the Start Capture and Stop Capture buttons as detailed earlier.
Once the video has been captured and imported, you can save the clip, e-mail it, edit it, add music to it, and more.
Using an analog camera to capture live video is like using a DV camera to capture live video, except the connection uses an analog capture card and RCA cable instead of an IEEE 1394 port and cable. It’s slower, and the quality won’t be as good, but the concept is still the same. Simply connect your device, turn it to its Camera or Record setting, open Movie Maker 2, and choose Capture Video. You’ll have options to configure the camera, and the wizard will walk you through the process.
You can record live video and audio from a TV set, but you’ll need a couple of things. First, a TV tuner must be installed and the appropriate software configured. Then you can record video from TV and change the settings for the TV tuner from inside Movie Maker 2.
As with other hardware, the TV will be shown on the Video Capture Device page under Available Devices. And like most Web cams and analog cameras, you’ll have a Configure button. You can use the options to configure how you’d like to record from the TV, including quality settings, brightness, contrast, and more.
Note
If you subscribe to satellite or cable TV, you’ll also need the appropriate receiver box connected to the analog capture device and a TV tuner. The ATV tuner will usually need to be set to Channel 3, and you’ll use the receiver box to change the channels. No TV tuner device can decode encrypted satellite or cable channels.
Now that you have the raw data captured to your computer, you’re ready to make a movie. As you’ve learned, raw data can be obtained from analog cameras, from old VHS videos, from a TV, or from your new DV camera, among other sources. How you got the footage doesn’t matter anymore; what matters now is that you’re ready to turn that data into a real movie!
If you want to edit the data manually, create your own transitions, add sound and narration, and edit each clip of your movie separately for brightness, contrast, and effect, and you plan to make moviemaking your new hobby, skip this part and head on over to Chapter 8 and Chapter 9. There you’ll learn about all of the things you can do with Movie Maker 2 and all of the neat features for creating awesome movies manually. If you simply want to skip all of that and let Movie Maker 2 do the work for you, or if you really only need a quick and simple movie of yesterday’s piano recital, a quick instructional video for your staff on how to use a new technology, or a weekend camping trip, read on. AutoMovie is for you!
To create an AutoMovie, the film will have to meet a few specific requirements. A collection must be selected, and the selection must contain video or pictures that last at least 30 seconds. You’ll have to select an editing style, which will be used by AutoMovie to create your movie for you. There are styles to make the movie look old, to enhance sports films, to make a music video, and more. You can also add text for the title or background music or both.
To use AutoMovie, follow these steps:
Select a collection in the Collections pane, or select only the clips from a specific collection in the Contents pane.
In the Movie Tasks pane, under Edit Movie, click Make An AutoMovie. You can also click Tools, and then click AutoMovie if you prefer using the menu bar.
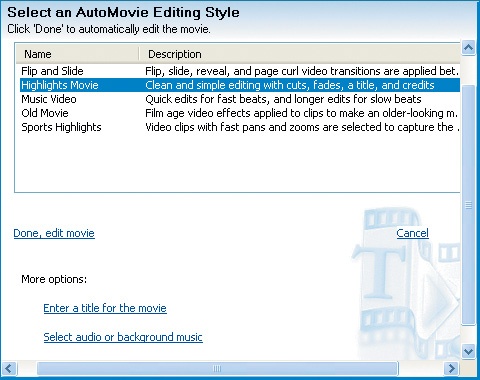
On the Select An AutoMovie Editing Style page, select a style. There are several, and a description of each is listed, as shown in Figure 7-10. Highlights Movie creates a clean and simple movie with cuts, fades, a title, and credits, and is a good option if you aren’t sure which one to select.
JOHN MADDEN, LOOK OUT!
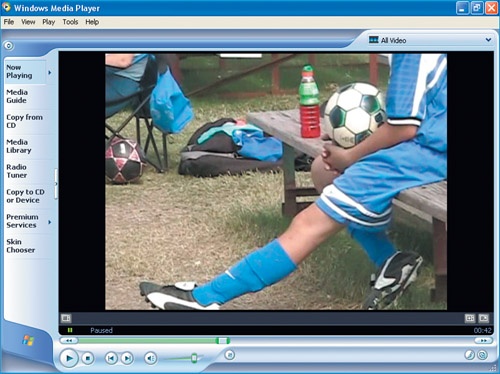
Mike coaches a soccer team for 16- to 18-year-olds who are all serious about their soccer careers. It’s an all-star team; the kids had to try out to get on it, and everybody on the team is hoping for a soccer scholarship to college. Mike has a DV camera and a laptop computer with a FireWire port. He considers himself a pretty high-tech guy. While Mike coaches the team, one of his assistant coaches records the game with his DV camera. After the game, Mike captures the video to his laptop while the kids are changing their shoes, packing up their gear, and heading to the pizza joint for a recap. On the way to the restaurant, Mike creates a quick movie of the game. Using Movie Maker 2, it’s pretty easy to shorten or delete long clips that aren’t needed and save just the highlights. At the restaurant, he replays the tape on his laptop for the team. Not only is the game now saved for posterity, but the players get immediate feedback, and the post-game meeting stays focused. Mike’s able to illustrate ways to improve their game and commend those who played well. For really great plays, he records the clip and e-mails it to the players. This approach to coaching has made Mike a pretty successful leader, and his team always goes to the playoffs. Now if he can only perfect those Madden "Bam"s!
Under More Options (if you don’t see More Options, use the scroll bar or make the Storyboard or Timeline smaller), click Enter A Title For The Movie and type a title on the Enter Text For Title page. You can edit the text later if you’d like.
Under More Options, click Select Audio Or Background Music to browse to an audio file and set audio levels.
Click Done, Edit Movie.


It will take Movie Maker 2 a few minutes to create the movie, but it’ll be worth it! More content takes longer, so if you find yourself waiting a while, don’t worry. When the movie is complete, you can either save it as is or manually tweak it using the techniques detailed in Chapter 8. If you’re creating a simple movie to show the kids after a soccer game, though, this is probably all you need.
Once you start gathering videos and transferring video to your computer from other sources, you’ll find that you’re soon inundated with files. Take my word for it—the disorganization gets worse once you start creating collections, projects, and movies. Without proper planning, all of this data can become unruly and turn your hard disk into a sloppy, fragmented mess. To stay on top of things, you’ll want to plan early how you will store these files.
Besides simple organization, it won’t take long to realize how valuable these collections are to you, your family, and future generations. Do you really need to keep all collections? How can you organize and archive them? For starters, let’s talk about what can and cannot be deleted, how to back up the collections we want to keep, and how to organize the collections into groups.
To delete or not to delete, that is the question. If you’ve made a complete movie from a collection of clips, and you don’t need to use that collection of clips for any other movie, you can go ahead and delete the collection. However (and this is a big however), the final movie should be stored on a hard disk and on a CD-R disc, and an extra CD copy of the movie should be stored somewhere else. Remember, these finalized movies are as valuable as reel-to-reel tapes, VCR tapes of your first soccer game or band concert, or DV tapes of your wedding.
If you aren’t sure you’ll need the clips again, or if you have not created and saved a completed movie, you’ll want to keep the collection. If you are in the middle of a project using the clips from a collection, don’t delete them. The collections hold the raw footage and you must have that. In addition, for some films you might need to "borrow" a couple of clips to complete a project.
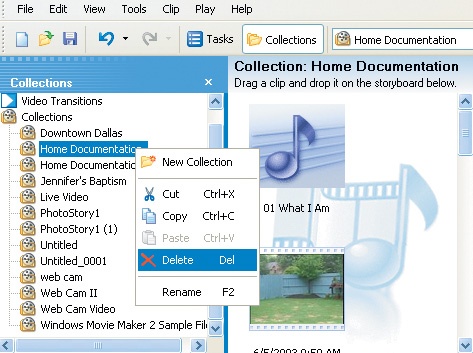
When you’re ready to delete a collection, click File and click New Project. Click View, click Collections, and in the Collections pane click the collection to delete. Then, on the Edit menu, click Delete. (You can also right-click the collection and choose Delete.) Figure 7-11 shows this process.
Renaming a collection is as simple as selecting the collection, right-clicking, and choosing Rename. Or you can click File and click New Project. Click View, click Collections (if you aren’t already in Collections view), and in the Collections pane click the collection to rename. Type the new name for the collection and press Enter. You can also click Edit, click Rename, type the new name, and press Enter.
Organizing the collections you create doesn’t have to be a time-consuming task. If I had to guess, I’d say that so far you have only four or five collections anyway—maybe a live video of yourself using a Web cam, perhaps a few videos imported from a DV camera, maybe a couple of videos from an old 8 mm camera, and perhaps a photo story. To see what you have, open Movie Maker 2, click the Collections button on the Standard toolbar, and take a look at what’s listed.
Now, before you collect more videos, think about how your collections can be categorized and grouped. You might group your collections using titles like Sports, Live Video, The City, Vacations, and The Family. Once you’ve decided on a couple of group names, follow these steps:
Open Movie Maker 2, click the Collections button on the Standard toolbar, and take a look at what’s listed.
Right-click Collections in the Collections pane (shown in Figure 7-12), then click New Collection.
Name the collection with a group name and press Enter; you’ll move other collections into this new folder for organizing.
Drag any other collection to this new one to store it there.

Continue in this manner until you’ve created enough new collection folders to organize your files. Beside each collection that contains other collections is a plus sign. You can click the plus sign to see the collections inside. Figure 7-13 shows an example of both.

Your movies are precious and should be treated with the same respect you show your old slides, reel-to-reel tapes, and photographs. Whether you’ve converted your old memories to digital format, or used a digital camera to transfer and create movies of your newest adventures, you should back up your collections in case of accidental deletion, corruption, or a failed hard disk.
Although there is no backup command in Movie Maker 2, you can back up the collection folder using Windows Explorer. (This technique can also be used to back up any other folder on your hard disk.) To back up your collections, follow these steps:
Right-click the Start button and click Explore All Users.
Locate the following folder: Documents and SettingsUserAccountNameLocal SettingsApplication DataMicrosoftMovie Maker.
Select the Mediatab.dat file.
On the Edit menu, click Copy.
Browse to a recordable CD drive, shared network location, additional or external hard drive, or compressed media drive.
On the Edit menu, click Paste.
If for some reason your hard disk ever fails, you have to reinstall Windows XP, or a collection file becomes corrupt, you can restore the files easily as long as the source files are still available and are in the same location with the same name. Here’s how:
Close Movie Maker 2.
Right-click the Start button and click Explore All Users.
Browse to the location of the backup files and select the Mediatab.dat file.
On the Edit menu, click Copy.
Open the folder Documents and SettingsUserAccountNameLocal SettingsApplication DataMicrosoftMovie Maker.
On the Edit menu, click Paste.
The moral of the story is this: Make sure you back up your collections, projects, and movies, and that you take as good care of your digital files as you do of your old tapes and pictures. These files are just as priceless and cannot be replaced if the files are lost as a result of a computer mishap. As you move into the future, make sure you’re preserving the past.
- analog video capture card
An expansion card that is installed inside the computer case that allows you to connect analog devices. Common analog devices include older analog camcorders, VCRs, and reel-to-reel tapes.
- Audio-Video Interleaved (AVI) file
A file saved in the format used when creating audio and video files. AVI files can include narration, video, music, and more, and can be played with Windows Media Player and Movie Maker 2.
- frames
Extremely small pieces of video. Frames are sequential images that create the video. Frames are shown at a frames-per-second rate, and are quite small. A higher frames-per-second rate will make the video appear smoother and of better quality.
- raw data
Data or footage from a digital or analog camera or other imaging device. Raw data is generally edited for length, effect, brightness, contrast, and other properties before presentation and before a movie is made.
- Storyboard
In Movie Maker 2, a way to view clips in a video while editing. The Storyboard is best used when clips need to be edited, deleted, moved, or if still pictures of title pages need to be added.
- Timeline
In Movie Maker 2, a way to view clips in a video while editing. The Timeline is best used when clips need to be shortened or if music and narration are to be added.
- transitions
In Movie Maker 2, effects used to move from one clip in a video to the next. Transitions are generally effects like fade in or fade out, but can be more elaborate and include slides, static or snow effects, or diagonals.
- Web cam
A small, discreet, and generally inexpensive camera used for e-mailing small videos, video conferencing, or security. Web cams can be used with Movie Maker 2 as imaging devices, and live video can be captured if desired.