Chapter at a Glance

In this chapter, you will learn how to
Many people keep one or more task lists going at all times, listing things to do, things to buy, people to call, and so on. You might cross off tasks as you complete them, transfer unfinished tasks to other lists, create multiple lists for multiple purposes, or follow a specialized system designed by an efficiency expert. You probably write these task lists on pieces of paper, even though you've undoubtedly experienced the pitfalls of that age-old system. Paper crumples, tears, and frequently ends up in the lint tray of the clothes dryer (even when you are sure you checked all the pockets before you put your pants in the laundry).
If you use Microsoft Outlook 2010 on a daily basis, you might find it far easier to use its built-in task list, called the To-Do List. You can add tasks, assign due dates, receive reminders, and mark tasks as complete when you finish them. You can even assign tasks to other people, and if those people use Outlook, you can view their progress on assigned tasks as they track progress milestones.
You can view the task list associated with your default e-mail account in several locations within Outlook, including the Tasks module, the To-Do Bar Task List, the Daily Task List that appears in selected calendar views, and the Outlook Today page. You can view other Outlook task lists in the Tasks module.
In this chapter, you'll create tasks from scratch and learn how to delegate tasks to other people and manage task assignments. You'll also review different ways of arranging, organizing, and locating tasks, and you'll remove tasks from your list by marking them as complete or deleting them.
Note
Practice Files The exercises in this chapter use Outlook items you created in exercises in previous chapters. If an exercise requires an item that you don't have, you can complete the exercise in which you create the item before beginning the exercise, or you can substitute a similar item of your own. A complete list of practice files is provided in Using the Practice Files at the beginning of this book.
Note
See Also For information about the Daily Task List, see Displaying Different Views of a Calendar in Chapter 5. For information about the To-Do Bar and the To-Do Bar Task List, see Displaying Different Views of Tasks later in this chapter.
If you use your Outlook task list to its fullest potential, you'll frequently add tasks to it. You can create one-time or recurring tasks from scratch in different ways, or you can add an existing Outlook item (such as a message) to your task list. Regardless of how or where you create a task, all tasks are available in the Tasks module and in the To-Do Bar Task List. Only individual tasks are available in the Tasks List.
Tip
Another way to add a task to your list is by accepting an assigned task. For more information, see Managing Task Assignments later in this chapter.
You can attach files to task items, and you can include text, tables, charts, illustrations, hyperlinks, and other content in the task window content pane by using the same commands you use in other Outlook item windows and in other Microsoft Office 2010 programs, such as Microsoft Word. You can also set standard Outlook item options such as recurrence, color categories, reminders, and privacy.
Tip
You can maintain multiple task lists by creating folders to contain task items. For information about creating task folders, see the sidebar Finding and Organizing Tasks later in this chapter.
You can create a task item from scratch by using one of several methods.
In the Tasks module:
Click the New Task button on the Home tab, enter the task details in the task window that opens, and then save and close the task.
When you display your To-Do List, enter the task description in the Type A New Task box at the top of the list, and then press Enter to create a task with the default settings.
When you display your Tasks List, enter the task description in the Click Here To Add A New Task box, press Tab to move to subsequent fields, fill in other information, and then press Enter.
Tip
The fields available in the Tasks List vary based on the list view you're displaying. For information about the available views, see Displaying Different Views of Tasks later in this chapter.
In any module:
From any view of the task list, you can assign the task to a category, change the due date, add a reminder, mark the task as complete, or delete the task entirely. To access these commands, right-click the task name, category, or flag, and then click the option you want.
Tip
By default, Outlook doesn't automatically set a reminder for tasks as it does for calendar items. You can turn on reminders from the Outlook Options dialog box. For more information, see Personalizing Your Office and Outlook Settings in Chapter 13.
When you create a task item, the only information you must include is the subject. As with many other types of Outlook items, you can set several options for tasks to make it easier to organize and identify tasks.
Start date and due date You can display tasks on the various Outlook task lists on either the start date or the due date. The color of the task flag indicates the due date.
Status You can track the status of a task to remind yourself of your progress. Specific status options include Not Started, In Progress, Completed, Waiting On Someone, or Deferred. You also have the option of indicating what percentage of the task is complete. Setting the percentage complete to 25%, 50%, or 75% sets the task status to In Progress. Setting it to 100% sets the task status to Complete.
Priority Unless you indicate otherwise, a task is created with a Normal priority level. You can set the priority to add a visual indicator of a task's importance. Low priority displays a blue downward pointing arrow and High priority displays a red exclamation point. You can sort and filter tasks based on their priority.
Recurrence You can set a task to recur on a regular basis; for example, you might create a Payroll task that recurs every month. Only the current instance of a recurring task appears in your task list. When you mark the current task as complete, Outlook creates the next instance of the task.
Category Tasks use the same category list as other Outlook items. You can assign a task to a category to associate it with related items such as messages and appointments.
Reminder You can set a reminder for a task in the same way you do for an appointment. The reminder appears until you dismiss it or mark the task as complete.
Privacy Marking a task as private ensures that other Outlook users to whom you delegate account access can't see the task details.
None of the options are required, but they can be helpful to you when sorting, filtering, and prioritizing your tasks.
You frequently need to take action based on information you receive in Outlook—for example, information in a message or in a meeting request. You might want to add information from another Outlook item to your task list, to ensure that you complete any necessary follow-up work.
Depending on the method you use, you can either create a new task from an existing item or simply transfer the existing item to your task list by flagging it.
To create a new task from a message, contact, or note:
Drag the message to the Tasks button at the bottom of the Navigation Pane, pause until the Navigation Pane changes to display the Tasks module content, and then release the mouse button.
This method opens a task window that already has information filled in from the original item. You can change settings, add information and attachments, assign the task to other people, and so on.
To transfer an existing e-mail message to your task list without creating an individual task:
Click the flag icon to the right of a message in the Mail pane. This method, referred to as flagging a message for follow-up, adds the message to your task lists with the default due date specified in the Quick Click settings, and adds an information bar to the message. However, it does not create a separate task item, so to retain the task, you must retain the message—you can move the message between mail folders, but deleting the message deletes the task as well.
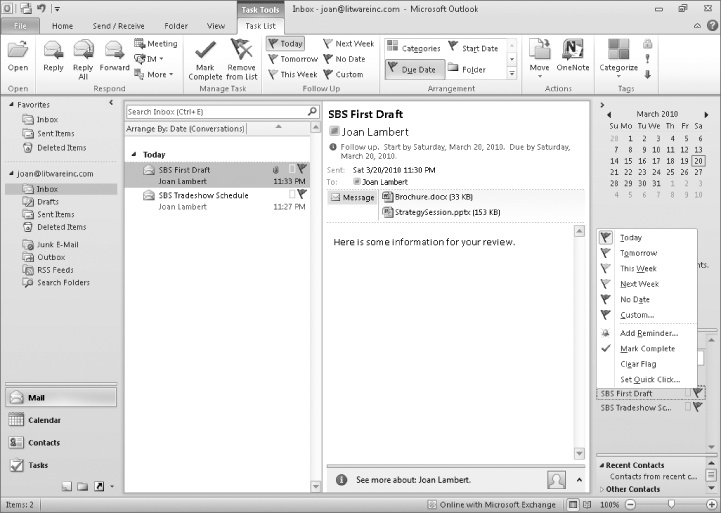
Right-click the flag icon to the right of a message in the Mail pane, and then specify a due date: Today, Tomorrow, This Week, Next Week, No Date, or Custom (which allows you to set specific start and end dates).
Tip
Flagged messages appear on your task list under the default due date header. You can change the default due date either by setting the Quick Click flag in the Outlook Options dialog box or by right-clicking the flag and then clicking Set Quick Click. In the Set Quick Click dialog box, click the due date you want to appear by default, and then click OK.
Drag the message to the To-Do Bar Task List and drop it under the heading for the due date you want to assign it to. (If the desired due date doesn't already have a heading in the To-Do Bar Task List, you need to drop the message under another heading and then assign the due date you want.) This method also adds the message to your task list but doesn't create a separate task item.
You can flag a contact record for follow-up by clicking the contact record in the Contacts pane and then clicking the Follow-Up button in the Tags group on the Home tab.
If you frequently want to create message-based tasks with special settings, such as a task with the original message attached to it, with specific follow-up settings or categories, and with specific assignments, you can create a Quick Step to accomplish all of these steps with one click.
Note
See Also For information about using standard Quick Steps, see "Managing Messages by Using Quick Steps" in Chapter 7. For information about creating custom Quick Steps, see Creating and Managing Quick Steps in Chapter 13.
In this exercise, you'll flag a message for follow-up and create tasks from the To-Do Bar Task List and from the Tasks pane.
Note
SET UP This exercise uses the SBS Tradeshow Schedule and SBS First Draft messages you created in Chapter 3. If you didn't create those messages, you can do so now, or you can substitute any messages in your Inbox. Display your Inbox, and expand the To-Do Bar if it is minimized. Locate the SBS Tradeshow Schedule message, and then follow the steps.
 In the message list, to the right of the
SBS Tradeshow Schedule message,
click the transparent Quick Click
flag.
In the message list, to the right of the
SBS Tradeshow Schedule message,
click the transparent Quick Click
flag.The Quick Click flag changes from transparent to red, and a task named SBS Tradeshow Schedule appears in the Today category on your To-Do Bar Task List.
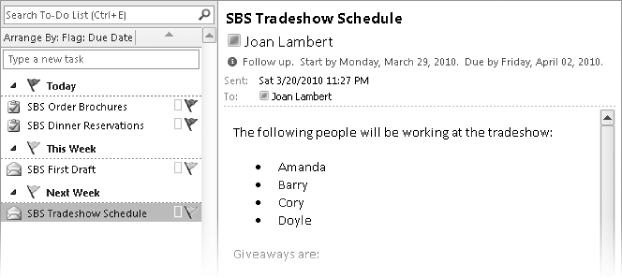
In the To-Do Bar Task List, point to the SBS Tradeshow Schedule task.
A ScreenTip appears displaying the start date, reminder time, due date, the folder in which the message appears, and any categories assigned to the message.
Note
Troubleshooting The appearance of buttons and groups on the ribbon changes depending on the width of the program window or item window. For information about changing the appearance of the ribbon to match our screen images, see Modifying the Display of the Ribbon at the beginning of this book.
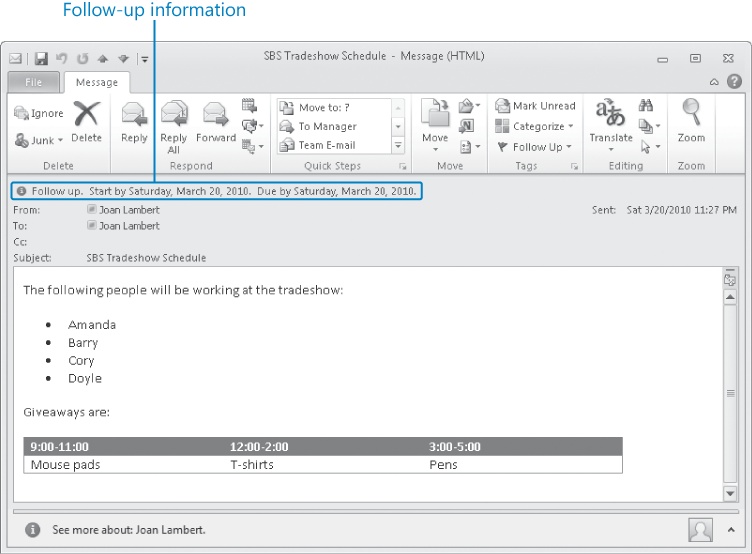
In the To-Do Bar Task List, double-click the SBS Tradeshow Schedule task.
The flagged message opens in a message window. The message header indicates that you need to follow up on this message. The start and due dates given are today's date.
Close the message window.
In the message list, locate the SBS First Draft message. Drag the message from the message list to the To-Do Bar Task List, and drop it under the Today heading.
In the message list, the Quick Click flag in the right margin of the SBS First Draft message changes from transparent to red.
In the To-Do Bar Task List, right-click (don't click) the red flag to the right of the SBS First Draft message.
Note
Troubleshooting Clicking an active flag marks the item as complete in the Inbox, and removes it from the To-Do Bar Task List. For more information, see Removing Tasks and Items from Task Lists later in this chapter.
A list of due date options appears and, because a task has been activated, the Task List contextual tab appears on the ribbon.
Tip
Flagging a task for completion This Week or Next Week sets the start date to the first working day of the specified week and the due date to the last working day of the week. The default work week is Monday through Friday but the start and due dates reflect your own work week configuration. For information about changing the days and times of your work week, see Defining Your Available Time in Chapter 8.
A new This Week due date heading appears in the To-Do Bar Task List with the message under the heading. In the message list and in the To-Do Bar Task List, the Quick Click flag to the right of the SBS First Draft message changes from red to light pink.
At the top of the To-Do Bar Task List, click Type a new task, enter SBS Order Brochures, and then press Enter.
Tip
The tasks you create while working through the exercises in this book begin with SBS so that you can differentiate them from any real tasks you create.
The new task appears in the Today section of the To-Do Bar Task List.
 In the Navigation
Pane, click the Tasks
button.
In the Navigation
Pane, click the Tasks
button.The Tasks module opens, displaying your active tasks in the To-Do List. The icon preceding each item in the list indicates whether it is a standard task, a flagged e-mail message, and so on. Message icons match those shown in the Inbox, indicating whether the message is read or unread and whether you've replied to or forwarded the message.
In the To-Do List, click the SBS Tradeshow Schedule message.
The Reading Pane displays the flagged message contents.
In the To-Do List, click SBS Order Brochures.
The Reading Pane displays the task item contents. You can't edit the task settings directly in the Reading Pane.
At the top of the To-Do List, click Type a new task, enter SBS Dinner Reservations, and then press Enter.
The task appears in the Today section of both the To-Do List and the To-Do Bar Task List.
 In the To-Do
List, click the SBS Dinner
Reservations task. Then on the Home tab, in the Follow Up group, click Next Week.
In the To-Do
List, click the SBS Dinner
Reservations task. Then on the Home tab, in the Follow Up group, click Next Week.In both task lists, the task appears under the Next Week heading. In the Reading Pane, the due date changes to Friday of the next week.
Double-click the SBS Dinner Reservations task to open it in a task window.
In the notes pane, enter the following sentence:
Confirm that the restaurant has a private dining room available for the Board Meeting.
As with other Outlook items, you can add many types of content to the notes pane and format the text in the notes pane.
 On the Task tab, in the Actions group, click the Save & Close button.
The task window closes.
 On the Home tab, in the New group, click the New Task button.
An untitled task window opens.
In the Subject box, enter the following sentence:
SBS Send Dinner Invitations.
A calendar appears.
On the calendar, click the Tuesday of the next week (not of the current week).
Select the Reminder check box, click the Reminder arrow, and then in the calendar, click the Monday of the next week.
In the notes pane, enter the following sentence:
Invite all Board members and their spouses.
In the Actions group, click the Save & Close button.
Outlook adds the task to your task list, and it appears in the Next Week group in both the To-Do Bar Task List and the To-Do List.


Tasks generally appear on the Outlook task lists by start date or due date. You can change the details or dates of a task, or track the progress you've made on it.
To update the status of a task:
Open the task window.
In the % Complete list, type or select (by clicking the arrows) the percentage of the project you estimate as complete.
Outlook changes the status to reflect your selection. Tasks that are 0% complete are Not Started, tasks that are 1% to 99% complete are In Progress, and tasks that are 100% complete are Completed.
If you want to manually change the task status—for example, to Waiting on someone else or Deferred—click that option in the Status list.
Save and close the task.
Outlook updates the task both in your own task list and in the task originator's task list.
You can't track the status of a flagged message.
In this exercise, you'll update the status and due date of a task on your task list.
Note
SET UP You need the SBS Dinner Reservations task you created earlier in this chapter to complete this exercise. If you didn't create that task, you can do so now, or you can substitute any task in your default task list. Display your To-Do List in the Tasks module, and then follow the steps.
In the Tasks pane, double-click the SBS Dinner Reservations task.
For the purposes of this exercise, assume that you are waiting for the banquet manager to confirm whether a private dining room is available. You want to update the task to reflect your progress, change the task due date, and also remind yourself to call again if you don't hear from her by the end of the day.
Click the Start date arrow, and then on the calendar, click Today.
Click the Status arrow, and then in the list, click Waiting on someone else.
In the % Complete box, type or select (by clicking the arrows) 25%.
In the notes pane, on a new line, type the following sentence:
Left message for banquet manager—will call back tomorrow.
Click the Due date arrow, and then on the calendar, click the next day.
The information bar at the top of the task header changes to reflect the new due date.
Select the Reminder check box. Click the first Reminder arrow, and then on the calendar, click the due date.
Click the second Reminder arrow, and then in the list, click 3:00 PM.
Outlook is set to display a reminder on the afternoon of the new due date.
On the Task tab, in the Actions group, click the Save & Close button.
In the To-Do List, the SBS Dinner Reservations task moves under the Tomorrow heading.


When you complete a task or follow up on a flagged item, you have three options for managing its presence on your task list: marking the task or flagged item as complete, removing the flag from a flagged item, or deleting the task or flagged item entirely.
Marking a task or flagged item as complete retains a record of the item on your task list. Completed tasks are visible only in certain task list views.
To mark a task as complete:
In the Tasks module, click the task to make it active, and then on the Home tab, in the Manage Task group, click the Mark Complete button.
In views that include a check box preceding the task subject (most list views), select the check box to delete the task.
In views that include a colored flag, click the flag once.
In any view, right-click the task, and then click Mark Complete.
In the task window, change the Status to Completed or the % Complete setting to 100%.
Whichever method you use, in your task list, the completed task is crossed through, the Complete check box is selected, and the flag changes to a check mark. In the task window for the completed task, Status is set to Completed and % Complete is set to 100%. (In other words, doing any one thing accomplishes all the others.)

After you mark an instance of a recurring task as complete, Outlook generates a new instance of the task at whatever interval you specified when creating the task.
Removing the flag from a flagged item such as a message or contact record retains the item in its original location but removes it from your task list entirely.
To remove the flag from an item:
Display the Tasks module, click the flagged item to select it, and then click the Remove From List button in the Manage Tasks group on the Home tab.
Click the flagged item in the To-Do Bar Task List and then click the Remove From List button in the Manage Tasks group on the Task List contextual tab.
Right-click the flagged item, click Follow-up, and then click Clear Flag.
Deleting a task or flagged item moves the task or the original item to the Deleted Items folder; it is permanently deleted when you empty that folder. No record of it remains on your task list or in its original location (such as your Inbox).
To delete a task or flagged item:
In the Tasks module, click the task to make it active and then on the Home tab, in the Delete group, click the Delete button.
In any view, right-click the task, and then click Delete.
You can assign tasks from your Outlook task list to other people within your organization and outside of your organization (and other people can assign tasks to you). Outlook indicates assigned tasks in your task list by adding blue arrow pointing to a person on the task icon, similar to that of a shared folder in Windows Explorer.
You can assign tasks to people on your Microsoft Exchange Server network, to people on other Exchange Server networks, and to people running e-mail programs other than Outlook.
When you assign a task to a person on your Exchange Server network, Outlook sends a task request, similar to a meeting request, to the person you designated. The assignee can accept or decline the task assignment by clicking the corres-ponding button in the Reading Pane or in the task window header. Outlook indicates the status of the task in your task list as Assigned.
When you assign a task to a person who is on another Exchange Server network or is using an e-mail program other than Outlook, Outlook sends a message that the assignee can respond to manually. Until you change the task status, it is Waiting For Response From Recipient, rather than Assigned.
When you assign a task, you can choose whether to keep a copy of the task on your own task list or transfer it entirely to the assignee's task list. Either way, the task remains on your own task list until accepted, so you won't lose track of it. (If the recipient declines the task, you can return it to your task list or reassign it.)
Tip
You can assign only actual task items; you can't assign flagged messages that appear in your task list.
After you assign a task to someone else, ownership of the task transfers to that person, and you can no longer update the information in the task window. (The assignee becomes the task owner and you become the task originator.) If you keep a copy of the task on your task list, you can follow the progress as the assignee updates the task status and details, and you can communicate information about the task to the owner by sending status reports. Unless you choose otherwise, Outlook automatically sends you a status report on an assigned task when the assignee marks the task as complete.
To delegate a task to another Outlook user:
In the task window, on the Task tab, in the Manage Task group, click the Assign Task button.
In the To box that appears in the task header, enter the e-mail address of the person you want to assign the task to.
In the task header, click the Send button. If a message box notifies you that the task reminder has been turned off, click OK.
Outlook sends the task request, and notifies you when the assignee accepts or declines the task.
You can view the status of tasks you have assigned to other people by displaying your task list in Assignment view.
Note
See Also For information about task list views, see Displaying Different Views of Tasks later in this chapter.
If you assign a task and the assignee declines the assignment, the task doesn't automatically return to your task list; you need to either reclaim it (return it to your own task list) or reassign it.
To reclaim or reassign a declined task:
Open the declined task assignment (indicated in your Inbox by a task icon with a red X).
The Manage Task group on the Task tab of the ribbon includes commands specific to managing the declined task.
In the Manage Task group, click the Return To Task List button to reclaim the task, or the Assign Task button to reassign it.

When another person assigns a task to you, you receive a task assignment request.
To accept, decline, respond to, or reassign a task assignment request:
Open the task assignment request (indicated in your Inbox by a task icon with an outstretched hand).
The Task tab of the ribbon includes commands specific to managing the task assignment request.
Take one of the following actions:
In the Respond group, click the Accept button to accept the task or the Decline button to decline the task, and send the associated response to the task owner.
In the Respond group, click Reply to send a message to the task owner without accepting or declining the task, or the Forward button to forward the task content to another person without reassigning the task.
In the Manage Task group, click the Assign Task button, and follow the process described earlier in this topic to assign the task to another person.

You can update the details of a task assigned to you by someone else in the same way that you do tasks that you create.
To send a status report about a task assigned to you by someone else:
In this exercise, you'll assign a task to another person.
Note
SET UP You need the SBS Send Dinner Invitations task you created earlier in this chapter to complete this exercise. If you didn't create that task, you can do so now, or you can substitute any task in your default task list. Choose a co-worker or other e-mail contact to practice assigning tasks to, and let him or her know to expect a task assignment. Then display your To-Do List in the Tasks module, and follow the steps.
In the Tasks pane, double-click the SBS Send Dinner Invitations task.
The task opens in a task window.
 In the Manage
Task group, click the Assign
Task button.
In the Manage
Task group, click the Assign
Task button.A To box and Send button appear in the task header, and the Manage Task group changes to display only the Cancel Assignment button.
In the To box, enter the e-mail address of the person to whom you want to assign the task.
Note that the Keep An Updated Copy Of This Task On My Task List and Send Me A Status Report When This Task Is Complete check boxes are selected by default.
 In the task header, click the Send button.
A message box notifies you that the task reminder previously set for this task will be turned off when you assign it to another person.
In the Microsoft Outlook message box, click OK.
Outlook sends the task request. Your co-worker or contact receives a task assignment request.
Ask your co-worker or contact to accept the task.
Outlook notifies you when the assignee accepts or declines the task.


Outlook 2010 makes it simple to keep your task list at your fingertips. You can view tasks in several different locations, including the following:
In the Tasks module, you can display either the To-Do List, which includes both tasks and flagged messages, or the Tasks List, which includes only tasks. There are many options for viewing and arranging each list.
In any module, the expanded To-Do Bar displays the To-Do Bar Task List, where tasks are grouped and sorted under due date headings. (You can also sort this list by category, start date, folder, type, or importance, or you can create a custom arrangement.) You can scroll through the list to display all your tasks or collapse the groups you don't want to view. To increase the space available for your task list, you can close the Date Navigator or show fewer or no appointments.
The minimized To-Do Bar displays only your next appointment (if you choose to display appointments) and the number of incomplete tasks due today (if you choose to display tasks). You switch between views of the To-Do Bar by clicking the Minimize or Expand button on its header.
Note
See Also For information about the To-Do Bar, including changing the type and amount of content displayed, see Personalizing the Outlook Program Window in Chapter 13.
In the Calendar module, the Daily Task List appears at the bottom of the Calendar pane in Day, Work Week, or Week view. When expanded, the Daily Task List at displays the tasks due, including the category and task type, during the displayed time period. In Day view, the start date, due date, and reminder time also appear.
Tip
If you don't see the Daily Task List in Day, Work Week, or Week view, click the Daily Task List button in the Layout group on the View tab, and then click Normal.
Like the Navigation Pane and the To-Do Bar, you can minimize the Daily Task List so that it displays only the number of active and completed tasks and provides more space for you to work. You can switch between views of the Daily Task List by clicking the Minimize or Expand button on its header.
You can schedule a specific block of time to complete a task by dragging it from the Daily Task List to your calendar. When you mark the task complete, Outlook removes it from your calendar.
On the Outlook Today page, the tasks due today are listed in the Tasks area. (This page was previously the "home page" of Outlook. You display the Outlook Today page by clicking your top-level account in the Navigation Pane.)

So far in this chapter, we've been working in your To-Do List, which is the default Tasks module view and displays both tasks and flagged messages. You can display more comprehensive information about the tasks on a task list by clicking the Tasks entry for that account in the Tasks module Navigation Pane. As you can with your calendar, you can display different views of your Tasks List and within each view, different arrangements of the tasks.
You can change the view from the Change View gallery in the Current View group on the Home tab, or from the Change View gallery in the Current View group on the View tab. Tasks List views include:
Active
Assigned
Completed
Detailed
Next 7 Days
Overdue
Prioritized
Server Tasks
Simple List
Today
To-Do List
The default view for the Tasks List is Simple List view, with tasks arranged by due date. Not surprisingly, the default view for the To-Do List is To-Do List.
From the Arrangements gallery in the Arrangement group on the View tab, you can select from the following standard arrangements of items within the To-Do List or a Tasks List view:
Assignment
Categories
Due Date
Folder (Available in the To-Do List only, this view separates tasks and flagged messages that are stored in different folders.)
Note
See Also For information about organizing tasks in custom folders, see the sidebar Finding and Organizing Tasks later in this chapter.
Importance
Modified Date
Start Date
Type
You can reorder the tasks in any list view by clicking the heading of the field you want to sort on. You can add and remove fields from the list view by using the Field Chooser, in the same way that you would from the list view of contact records.
Note
See Also For information about adding and removing fields in a list view, see Displaying Different Views of Contact Records in Chapter 4.
Completed tasks remain in the Tasks List until you actually delete them, so they are available there if you want to view them.
Tip
The Tasks List views don't by default display the Reading Pane. If you want, you can display it at the bottom of the Tasks pane so that you don't lose horizontal screen space and obscure task details. Click the Reading Pane button in the Layout group on the View tab, and then click Bottom.
In this exercise, you'll look at different views of tasks and flagged messages within the Tasks module.
Note
SET UP This exercise uses the SBS Order Brochures, SBS Dinner Reservations, and SBS Send Dinner Invitations tasks, and the SBS First Draft and SBS Tradeshow Schedule flagged messages you created and assigned earlier in this chapter. If you didn't create those tasks and messages, you can do so now, or you can substitute any tasks and flagged messages in your task list. Display the To-Do List in the Tasks module, in the default To-Do List view, and then follow the steps.
 With the To-Do
List displayed in the Tasks pane, click the Change View button in the Current
View group on the Home
tab.
With the To-Do
List displayed in the Tasks pane, click the Change View button in the Current
View group on the Home
tab.The Change View gallery expands. The To-Do List button is selected to indicate the current view.
In the Change View gallery, click Detailed.
The To-Do List changes to a list view displaying many different task fields. The Reading Pane, which by default is open to the right of the Tasks pane in To-Do List view, closes.
In this view, the To-Do List resembles the Tasks List.
In the Navigation Pane, click Tasks.
The Tasks List appears in the Tasks pane. Only the tasks appear in the list; the flagged messages are absent.
The Tasks List displays its default Simple List view rather than the Detailed view you chose for the To-Do List. The arrow in the Due Date header indicates the current arrangement.
 On the View
tab, in the Arrangement gallery,
click the More button.
On the View
tab, in the Arrangement gallery,
click the More button.The gallery expands to display additional arrangements.
In the Arrangement gallery, click Assignment.
The order of the tasks changes slightly, although it's not entirely obvious how or why.
In the Arrangement gallery, click Show in Groups.
The list changes to clearly distinguish tasks that you've assigned to other people from tasks that you own. If you have assigned tasks to multiple people, each assignee has a group.
In the Current View group, in the Change View gallery, click Assigned.
The list changes to display only the task that you assigned in a previous exercise. Although only one task is visible in the Tasks List, the To-Do Bar Task List still displays all the tasks and flagged messages, so you can feel confident that you're looking at a filtered view and haven't accidentally deleted the other tasks.
In the Change View gallery, click To-Do List.
The Tasks pane displays all the active tasks in the same format as the default To-Do List. The arrangement changes to Due Date.
Note, however, that this is not the real To-Do List—it doesn't include the flagged messages.
In the Navigation Pane, click To-Do List.
The flagged messages reappear in the Tasks pane.


Note
CLEAN UP Return to the Tasks List, and change the view back to the default Simple List view. Retain the SBS Order Brochures, SBS Dinner Reservations, and SBS Send Dinner Invitations tasks, and the flagged SBS Tradeshow Schedule and SBS First Draft messages, for use in later exercises.
Finding and Organizing Tasks
You can use the Outlook 2010 Search feature to quickly locate tasks by searching on any text in the task or in a file attached to the task. Type the word or other information you want to find in the Search box at the top of the Tasks pane header, in any view. Outlook filters the tasks as you type, displaying only those containing the search criteria you enter, and highlighting the matching criteria in the tasks.

To help you organize your tasks, you can assign them to color categories in the same way that you do any other Outlook item.
Note
See Also For more information about Instant Search, see Quickly Locating Messages in Chapter 7. For more information about Color Categories, see Organizing Outlook Items by Using Color Categories in the same chapter.
If your task list gets too big, or if you want to maintain separate task lists for different purposes, you can organize tasks into separate folders. To create a task folder:
On the Folder tab, in the New group, click the New Folder button.
In the Create New Folder dialog box, enter the name and select the location of the folder.
In the Folder Contains list, click Task Items, and then click OK.
You can then drag existing tasks into the folder.
You can create tasks for yourself and assign tasks to other people.
Outlook displays tasks in the Tasks pane, in the Daily Task List in the Calendar pane, and on the To-Do Bar, which is available from any Outlook pane.
You can organize tasks by grouping them in additional task folders or by categorizing them.
When you assign tasks, Outlook sends a task request to the designated person, who can accept or decline the task. If you keep a copy of the assigned task, it is automatically updated when the person you assigned the task to updates the original.
You can update tasks assigned to you and send status reports to the person who assigned the task.
A task can have a status of Not Started, Deferred, Waiting, Complete, or the percentage completed.
You can create one-time or recurring tasks. Outlook creates a new occurrence of a recurring task every time you complete the current occurrence.
You can set a reminder to display a message at a designated time before a task is due.
When you complete a task you can mark it as complete, remove it from your task list, or delete it.