
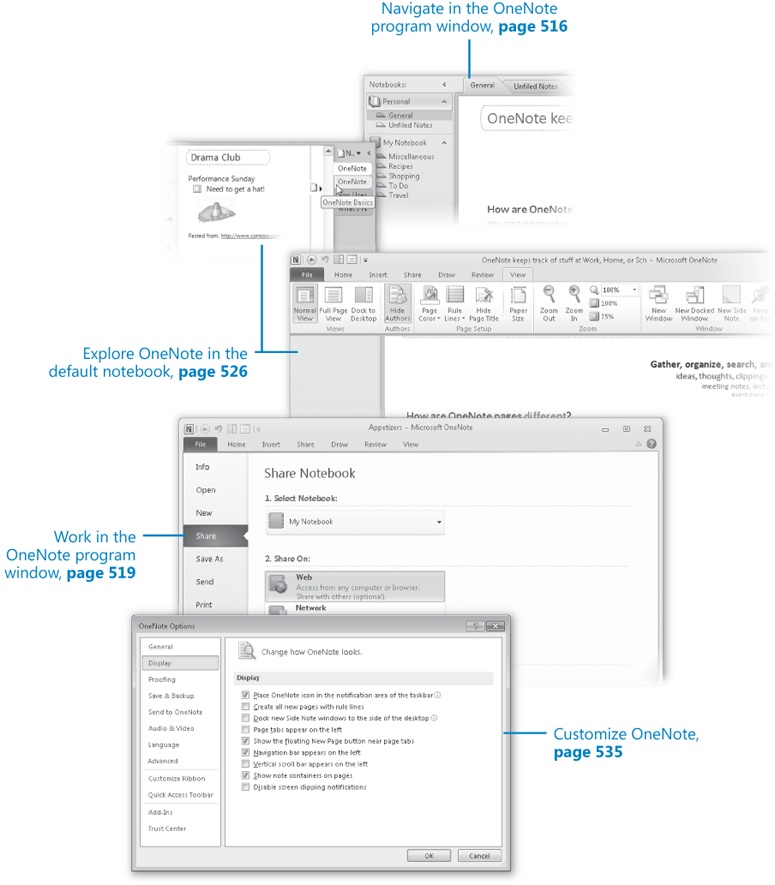
Chapter at a Glance
Microsoft OneNote 2010 is a handy program that makes it possible to electronically collect and store pieces of information. You can use OneNote to:
Collect, save, and safeguard information in one place.
Take notes in a class or meeting.
Organize information in a way that is logical to you.
Search for information when you need it.
After you spend a short time using OneNote, you will undoubtedly find many uses for it. OneNote 2010 is available in all editions of Microsoft Office 2010, and is equally useful for business and personal purposes.
As with all organizational systems, OneNote is most effective if you use it on a regular basis. By developing consistent data collection and storage practices, you will be able to most efficiently locate stored information whenever you need it. Eventually, you might even wonder how you ever survived without it.
In this chapter, you’ll explore the OneNote working environment and storage structure, learn how to move around and work in OneNote, and look at the options for customizing OneNote to better fit the way you work.
Note
Practice Files You don’t need any practice files to complete the exercises in this chapter. For more information about practice file requirements, see Using the Practice Files at the beginning of this book.
In the same way that the Windows operating system information storage structure reflects that of a physical office, (with a desktop, folders, and files), the OneNote storage structure reflects that of a tabbed notebook. You might have a notebook for each project you work on, or one notebook in which you track business information and another in which you track personal information. Each notebook is divided into sections, and each section is divided into pages. If you want to extend the analogy, you can even format the background of a notebook page to resemble various types of ruled paper.
Note
See Also For information about changing the background of a notebook page, see Creating Sections and Pages, in Chapter 19, .
In Windows Explorer, each notebook is represented by a folder in your DocumentsOneNote Notebooks folder. Each section of a notebook is stored as an .one file within the notebook folder. (Although you would usually move sections within OneNote itself, it is possible to move or copy a section to a different notebook in Windows Explorer by moving or copying the section file to a different notebook’s folder.

When you start OneNote 2010 for the first time, the program opens a sample notebook named Personal. Thereafter when you start OneNote, the notebook you worked with in the previous OneNote session opens.
Information about the content of open OneNote notebooks is shown in four areas of the OneNote program window.
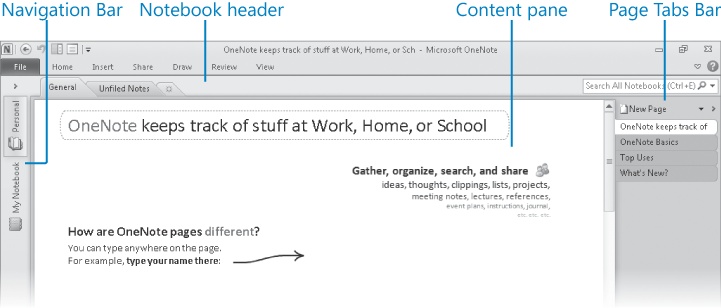
The Navigation Bar on the left side of the program window displays information about the notebooks that are stored in the default notebook location. When collapsed, as it is by default, the Navigation Bar displays a button for each notebook. When expanded, the Navigation Bar displays the hierarchical structure of each notebook. You expand and collapse the Navigation Bar by clicking the button in its upper-right corner.
The content pane in the center of the program window displays the active notebook page. On pages that you create, the page title appears at the top of the page, along with the date and time the page was most recently modified.
The notebook header above the content pane displays section tabs that you can click to move between sections of the active notebook.
The Page Tabs Bar to the right of the content pane displays page tabs you can click to move between pages of the active section. By default, the Page Tabs Bar displays a tab for each page in the current section. You can filter the display of tabs to make it easier to locate specific content.
You can collapse and expand the Page Tabs Bar by clicking the button in its upper-right corner.
Note
Keyboard Shortcuts Press Alt+Page Up to display the first page in the currently visible set of page tabs; press Alt+Page Down to display the last page in the currently visible set. Press Ctrl+Shift+[ to increase the width of the Page Tabs Bar; press Ctrl+Shift+] to decrease the width of the Page Tabs Bar.

As you do in other Office programs, you work with OneNote notebook content by using the commands on the ribbon and Quick Access Toolbar, and with the OneNote program, and OneNote notebook files in the Backstage view.
Unlike in other Office 2010 programs, the ribbon in OneNote is collapsed by default to provide more space for the notebook page.
The OneNote ribbon includes the File tab and six other tabs:
Home This tab includes buttons that represent commands for formatting notebook content, inserting and locating content tags, and coordinating notebook content with Microsoft Outlook 2010.
Note
See Also For information about content tags, see the sidebar Tagging Content in Chapter 20.
Note
Troubleshooting The appearance of buttons and groups on the ribbon changes depending on the width of the program window. For information about changing the appearance of the ribbon to match our screen images, see Modifying the Display of the Ribbon at the beginning of this book.
Note
See Also For information about interactions between OneNote and Outlook, see Creating Sections and Pages in Chapter 19.
Insert This tab includes commands for inserting, linking to, and attaching images, files, audio and video recordings, time stamps, and special symbols.
Note
See Also For information about inserting various types of content, see Chapter 20.
Share This tab includes commands for sharing a notebook with other OneNote users and for managing a multiuser notebook.
Note
See Also For information about multiuser notebooks, see Creating a Notebook for Use by Multiple People in Chapter 19.
Draw This tab includes commands for inserting and manipulating handwritten content.
Note
See Also For information about writing in a notebook, see Entering Content Directly onto a Page in Chapter 20.
Review This tab includes commands for working with the of text stored on notebook pages, including checking spelling and grammar; researching word choices; and translating content either by using the Office translation tools or through an online service.
Note
See Also For information about reviewing content, see Correcting Spelling and Grammatical Errors in Chapter 3.
View This tab includes commands for changing the appearance of the OneNote window and of notebook pages, for magnifying your view of notebook content, and for working with multiple program windows.


In OneNote, the default Quick Access Toolbar displays the Back, Undo, Dock To Desktop, and Full Page View buttons. As with other Office 2010 programs, you can change the location of the Quick Access Toolbar and customize it to include any commands to which you want to have one-click access.
From the Customize Quick Access Toolbar menu, you can add the Forward, Redo, Print, Print Preview, Favorite Pens, and Favorite Highlighter buttons. You can add other buttons from the Quick Access Toolbar page of the OneNote Options window or by right-clicking a command on the ribbon and then clicking Add To Quick Access Toolbar.
Note
See Also For information about creating handwritten content with pens and highlighters, see Entering Content Directly onto a Page in Chapter 20.
Tip
If you prefer to work with the ribbon collapsed to maximize the available notebook page space, add all the commands you use frequently to the Quick Access Toolbar and display it below the ribbon, directly above the workspace. For information, see Customizing the Quick Access Toolbar in Chapter 1.
As with other Office 2010 programs, clicking the File tab at the left end of the OneNote ribbon displays the Backstage view. Commands related to managing OneNote and OneNote files (rather than notebook content) are organized on the following pages of the Backstage view:
Info From this page, you can share, close, or view the properties of a notebook, view the synchronization status of your local copy of a shared notebook (the copy that is on your computer) with the original notebook (the copy that is in the central storage location), and open backup copies of notebooks.
Open From this page, you can open an existing notebook either by browsing to and selecting the notebook’s Table Of Contents file or by selecting a recently closed notebook from a list on the page.
New From this page, you can create a new notebook on your local computer, on a computer that you access on your local network, on a SharePoint site, or on a Web site.
Note
See Also For information about new notebooks, see Creating a Notebook for Use by One Person and Creating a Notebook for Use by Multiple People in Chapter 19.
Share From this page, you can share a notebook with other OneNote users by storing it on a computer that you access on your local network, on a SharePoint site, or on a Web site.
Note
See Also For information about sharing notebooks, see Creating a Notebook for Use by Multiple People in Chapter 19.
Save As From this page, you can save the current page or section in one of several file formats, or save the current notebook as a OneNote Package (a distributable OneNote file), a PDF file, or an XPS file.
Send From this page, you can send the current page content to Outlook or to Microsoft Word. If you want to send information from the current page to someone, you can embed the page content in the body of an e-mail message or attach the page to a message as a OneNote (.one) file, a Web (.mht) file, or a Portable Document Format (.pdf) file. You can copy the page content into a Word document, or if you use Word as your blog editor, you can copy the page content to a blog post form.
Print From this page, you can preview and print a notebook page, a group of pages, or an entire section of a notebook.
You can click Print and choose settings in the Print dialog box, or click Print Preview and choose settings in the Print Preview And Settings dialog box.
Help From this page, you can access information about your Office installation, manage product activation and product keys, and access support resources, program options, and program updates.


The default installation of OneNote 2010 includes one notebook, named Personal, which has one section, named General. This section has four pages of information about OneNote and examples of the types of information you can collect in OneNote and ways that you can work with it.
In this exercise, you’ll take a quick tour of the Personal notebook while moving among sections and pages, and displaying different views of a page.
On the Start menu, point to All Programs, click Microsoft Office, and then click Microsoft OneNote 2010.
OneNote starts. If this is the first time you’ve used OneNote, the first page of the General section of the Personal notebook is displayed.
If the Personal notebook isn’t open, do one of the following to open it:
If the Personal notebook is shown on the Navigation Bar, click its button.
If the Personal notebook is not shown on the Navigation Bar, display the Open page of the Backstage view, and click the Open Notebook button. In the Open Notebook dialog box, browse to your DocumentsOneNote Notebooks folder, double-click the Personal folder, and then double-click Open Notebook.
Note
Troubleshooting If your school or organization has a specialized OneNote environment, the Personal notebook might not be available. You can follow along with this exercise by substituting any available notebook.
With the default settings, the ribbon is collapsed at the top of the program window, the Navigation Bar is collapsed on the left side of the program window, and the Page Tabs Bar is open on the right side of the program window.
Note
Troubleshooting If the program window doesn’t appear as described, don’t worry; we’ll show you how to adjust the settings in this exercise.
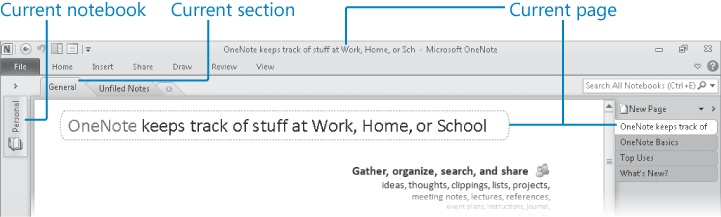
The current notebook is indicated by the active (boxed) notebook button on the Navigation Bar. The current section is indicated by the active (top) tab in the notebook header. The current page is indicated in the window title bar, in the dotted box at the top of the page, and on the active page tab.
 At the top of the Navigation
Bar,
click the Expand Navigation Bar button.
At the top of the Navigation
Bar,
click the Expand Navigation Bar button.The expanded Navigation Bar displays the notebook and the two sections within it, which correspond to the tabs in the notebook header.
On the Navigation Bar, in the Personal notebook, click Unfiled Notes.
OneNote displays the Unfiled Notes section. This is a holding area for content that you send to OneNote from other programs. You can also create content directly in this section if you haven’t decided on an organizational structure for the content.
Note
See Also For information about sending content to OneNote from other Office 2010 programs, see Creating Sections and Pages in Chapter 19, and Sending Content to OneNote in Chapter 20.
The Unfiled Notes section is part of the OneNote program rather than part of a specific notebook; you have only one Unfiled Notes section, and it is shared by all your notebooks.
 On the Navigation
Bar, on the right side of the Personal notebook button, click the Collapse button.
On the Navigation
Bar, on the right side of the Personal notebook button, click the Collapse button.The sections of the Personal notebook disappear from the Navigation Bar.
In the notebook header, point to the General tab.
A ScreenTip displays the complete path to the storage location of the section file (the .one file). Notice that the file name matches the section name.
Click the General tab to redisplay the General section of the Personal notebook. Then scroll down the page to view its content.
Tip
An image of a video thumbnail is embedded near the bottom of the page. Clicking the Click Here link to the right of the thumbnail displays a Web page from which you can play the video “How to organize stuff in OneNote 2010.” This is a short video, without narrative, that provides a very basic overview of notebooks, sections, and pages.
 At the top of the Page Tabs
Bar, click the Collapse Page Tabs button.
At the top of the Page Tabs
Bar, click the Collapse Page Tabs button.The Page Tabs Bar shrinks to about half its former width. When truncated, the same name is displayed for the first and second pages.
In the Page Tabs Bar, point to the second page tab.
A ScreenTip displays the entire page title, OneNote Basics.
Note
See Also For information about the New Page icon that appears to the left of the page tabs when you point to them, see Creating Sections and Pages in Chapter 19.
Click the OneNote Basics page tab. Then scroll down the page to view its content.
At the top of the page are images of several types of content you can create in a notebook by using the tools that are built into OneNote.
Note
See Also For information about inserting and creating content on notebook pages, see Chapter 20.
View the content of the Top Uses and What’s New pages. Then display the Info page of the Backstage view, and click the Settings button for the Personal notebook.
A menu of actions you can take with the notebook expands.
On the Settings menu, click Close.
The Personal notebook closes. Only the Unfiled Notes section remains open in the OneNote program window.
Display the Open page of the Backstage view.
The Open page includes a list of notebooks you’ve recently closed.
In the Recently Closed Notebooks list, click Personal.
The Personal notebook reopens.
At the top of the program window, click the collapsed View tab of the ribbon.
 In the Views group,
click the Dock to Desktop button.
In the Views group,
click the Dock to Desktop button.The ribbon collapses. The OneNote program window becomes a vertical pane on the right side of the screen.
Experiment with the docked OneNote window.
You can’t move the docked window by dragging its title bar. You can change the width of the window by dragging its left edge. When the window width is at its narrowest, the Quick Access Toolbar and ribbon tabs are not visible.
Tip
Other open windows on the screen might resize when you change the width of the docked OneNote window. Maximizing another window while OneNote is docked resizes that window to fill the entire screen other than the vertical space taken by the docked OneNote window. The docked window space is not available to other windows.
In the docked OneNote window, click the collapsed View tab.
Only a subset of the commands previously available from this tab is available in the docked window.
 In the Views group,
click the Normal View button.
In the Views group,
click the Normal View button.The program window returns to its normal size.
 On the Quick Access Toolbar, click the Full Page View button.
The Navigation Bar and Page Tabs Bar close entirely, and the content pane fills the width of the program window. The Pages tab appears on the ribbon.
Double-click the Pages tab to permanently expand it.
The tab contains commands for moving among pages, locating content, and creating, deleting, or moving notebook pages.
 In the Navigate
group, click the Next Page button two times.
In the Navigate
group, click the Next Page button two times.On the Quick Access Toolbar, click the active Full Page View button.
OneNote returns to Normal view, and the Pages tab disappears from the ribbon.


In this book, we discuss the default behavior of OneNote—the way the program works if you don’t change any of its settings. As with all Office programs, there are a number of adjustments—major and minor—that you can make to modify the program to suit your needs. The majority of these are available from the OneNote Options dialog box, which you open by clicking Options in the Backstage view.
Like the Options dialog box in other Office 2010 programs, the OneNote Options dialog box presents a wide variety of settings divided into category-specific pages. Many of the settings you can control in OneNote are the same as those available in other Office programs. The OneNote Options dialog box includes the following pages:
General On this page, you can set options that are common to the Office 2010 programs, including user interface options, the default font, and the user name and initials that identify changes you make to notebook content.
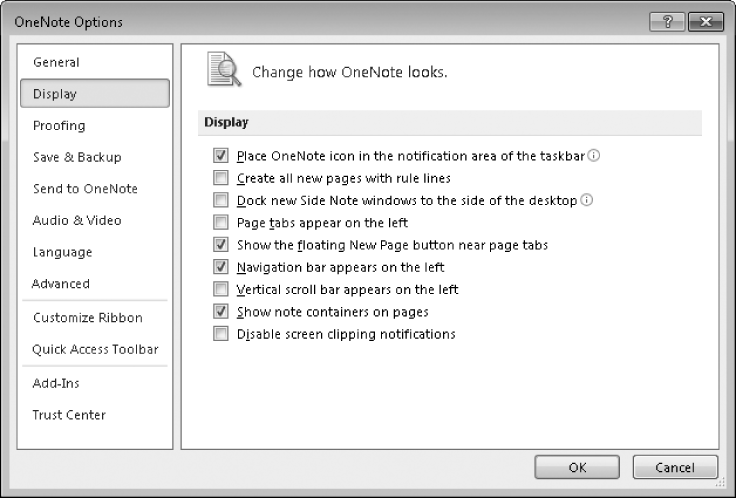
Display On this page, you can change the location and appearance of OneNote features and tools.
Proofing On this page, you can set the AutoCorrect options and spelling options for use in OneNote, as well as the spelling options that are common to the Office 2010 programs.
Save & Backup On this page, you can specify the default locations in which OneNote saves files, configure automatic backup options or start a backup procedure, and configure file optimization options.
Send to OneNote On this page, you can specify where OneNote stores content that you send from Outlook, send from a Web page, and print from a program to OneNote.
Audio & Video On this page, you can specify audio and video recording settings and enable OneNote to search for spoken words within audio and video recordings.
Language On this page, you can specify the languages used by the dictionary and spelling checker, the language priority order for buttons, tabs, and Help content, and the ScreenTip display language.
Advanced On this page, you can set a variety of options including those for linking notes that you take from a docked OneNote window to other programs, optimizing OneNote operations when the computer is running on battery power, and working with tags and passwords.
Investigate this dialog box at your own convenience.
OneNote simplifies the process of collecting and storing electronic information.
OneNote 2010 supports multiple notebooks, computers, and users, and has many useful new features.
OneNote 2010 stores information in the DocumentsOneNote Notebooks folder. Each “notebook” consists of a folder containing a .one file corresponding to each section within the notebook.
The default OneNote 2010 installation includes a notebook containing examples and ideas for using OneNote in your home, school, or business environment.
You can customize many aspects of the appearance and behavior of OneNote to fit your needs.