14 Deploying microservice APIs with Kubernetes
- Creating a cluster with AWS’s Elastic Kubernetes Service (EKS)
- Exposing services using the AWS Load Balancer Controller
- Deploying services to a Kubernetes cluster
- Managing secrets securely in Kubernetes
- Deploying an Aurora Serverless database
Kubernetes is an open source container orchestration framework, and it’s fast becoming a standard way for deploying and managing applications across platforms. You can deploy Kubernetes yourself to your own servers, or you can use a managed Kubernetes service. In either case, you’ll get a consistent interface to your services, which means moving across cloud providers becomes less disruptive for your operations. You can also deploy a Kubernetes cluster in your machine and run your tests locally in much the same way you’d do in the cloud.
Run kubernetes locally with minikube You can run a Kubernetes cluster locally using minikube. Although we won’t cover it in this chapter, minikube is a great tool to get more familiar with Kubernetes. Check out the official documentation for minikube (https://minikube.sigs.k8s.io/docs/start/).
Deploying Kubernetes yourself is a good exercise to get more familiar with the technology, but in practice most companies use a managed service. In this chapter, we’ll use a Kubernetes managed service to deploy our cluster. Plenty of vendors offer Kubernetes managed services. The major players are Google Cloud’s Google Kubernetes Engine (GKE), Azure’s Kubernetes Service (AKS), and AWS’s Elastic Kubernetes Service (EKS). All three services are very robust and offer similar features.1 In this chapter, we’ll use EKS, which is currently the most popular managed Kubernetes service.2
To illustrate how to deploy applications to a Kubernetes cluster, we’ll use the example of the orders service. We’ll also create an Aurora Serverless database, and we’ll see how to securely feed the database connection credentials to the service using Kubernetes secrets.
The chapter doesn’t assume previous knowledge of AWS or Kubernetes. I’ve made an effort to explain every Kubernetes and AWS concept in detail so that you can follow along with the examples, even if you have no previous experience with either technology. Entire books have been written on these topics, so this chapter is just an overview, and I provide references to other resources you can use to dive deeper into these matters.
Before proceeding, please bear in mind that EKS and other AWS services used in this chapter are for-fee services, so this is the only chapter in the book that will cost you some money if you follow along with the examples. The base cost of a Kubernetes cluster in AWS EKS is $0.10 per hour, which amounts to $2.40 per day and roughly $72 per month. If budget is an issue, my recommendation is to read the chapter first to get an understanding of what we’re doing and then try out the EKS examples afterward. If this is your first time working with EKS and Kubernetes, it may take you one or two days to work through the examples, so try to schedule this time to work on the examples. Section 14.9 describes how to delete the EKS cluster, and all the other resources created in this chapter, to make sure you don’t incur additional costs.
Without further ado, let’s get started! We’ll begin by setting up the environment.
14.1 Setting up the environment for this chapter
In this section, we set up the environment so that you can follow along with the examples in the rest of the chapter. Even if you’re not planning to try out the examples, I recommend you take at least a quick look at this section to learn about the tools we’re going to use. This chapter is heavy in tooling, so here we install the most important dependencies, and in the coming sections you’ll find additional instructions for other tools.
First, copy over the code from chapter 13 into a new folder called ch14 by running the following command:
cd into ch14, install the dependencies, and activate the virtual environment by running the following commands:
Since we’ll deploy to AWS, we need to be able to access AWS services programmatically. In chapter 13, we installed and configured the AWS CLI. If you haven’t done so, please go back to section 13.1 and follow the steps to install and configure the AWS CLI.
You’re going to learn how to deploy services to Kubernetes, so you also need to install the Kubernetes CLI, known as kubectl. There’re different ways to install kubectl depending on the platform that you’re using, so please refer to the official documentation to see which option works best for you (https://kubernetes.io/docs/tasks/tools/).
Finally, in this chapter we will make heavy use of jq—a CLI tool that helps us parse and query JSON documents. jq is not strictly necessary to follow along with the examples in this chapter, but it does make everything easier, and if you haven’t used the tool before, I highly encourage you to learn about it. We’ll use jq mostly for filtering JSON payloads and retrieving specific properties from them. As with Kubernetes, there are different installation options depending on your platform, so please refer to the official documentation to find out which strategy is best for you (https://stedolan.github.io/jq/download/).
Now that our environment is ready, it’s deployment time! Before we create the cluster, the next section explains some of the main concepts related to Kubernetes to make sure you can follow the upcoming sections. If you have previous experience with Kubernetes, you can skip section 14.2.
14.2 How Kubernetes works: The “CliffsNotes” version
So, what is Kubernetes? If you don’t have previous experience with Kubernetes or are still confused about how it works, this section offers a hyper-compressed introduction to its main components.
Kubernetes is an open source container orchestration tool. Container orchestration is the process of running containerized applications. In addition to container orchestration, Kubernetes also helps us automate deployments, and it handles graceful rollouts and rollbacks, scaling applications, and more.
Figure 14.1 offers a high-level overview of the main components of a Kubernetes cluster. The core of a Kubernetes cluster is the control plane, a process that runs the Kubernetes API for our cluster, controls its state, and manages the available resources, among many other tasks. It’s also possible to install add-ons on the control plane, including specific DNS servers such as CoreDNS.

Figure 14.1 High-level architecture of a Kubernetes cluster showing how all components of a cluster come together.
DEFINITION The Kubernetes control plane is a process that runs the Kubernetes API and controls the state of the cluster and manages the available resources, scheduling, and many other tasks. For more information about the control plane, see chapters 11 (http://mng.bz/yayE) and 12 (http://mng.bz/M0dm) from Core Kubernetes by Jay Vyas and Chris Love (Manning, 2022).
The smallest unit of computing in Kubernetes is the pod: a wrapper around containers that can include one or more containers. The most common practice is to run one container per pod, and in this chapter, we deploy the orders service as a single container per pod.
To deploy pods into the cluster, we use workloads. Kubernetes has four types of workloads: Deployment, StatefulSet, DaemonSet, and Job/CronJob. Deployment is the most common type of Kubernetes workload and is useful for running stateless distributed applications. StatefulSet is used for running distributed applications whose state needs to be synchronized. You use DaemonSet to define processes that should run on all or most of the nodes in the cluster, such as log collectors. Job and CronJob help us to define one-off processes or applications that need to be run on a schedule, such as once a day or once a week.
To deploy a microservice, we use either a Deployment or a StatefulSet. Since our services are all stateless, in this chapter we deploy the orders service as a Deployment. To manage the number of pods, deployments use the concept of a ReplicaSet, a process that maintains the desired number of pods in the cluster.
Workloads are normally scoped within namespaces. In Kubernetes, namespaces are logical groupings of resources that allow us to isolate and scope our deployments. For example, we can create a namespace for each service in our platform. Namespaces make it easier to manage our deployments and to avoid name conflicts: the names of our resources must be unique within a namespace but don’t have to be across namespaces.
To run our applications as web services, Kubernetes offers the concept of services—processes that manage the interfaces of our pods and enable communication between them. To expose our services through the internet, we use a load balancer, which sits in front of the Kubernetes cluster, and forwards traffic to the services based on ingress rules.
The final piece of the Kubernetes system is the node, which represents the actual computing resources in which our services run. We define nodes as computing resources since they can be anything from physical servers to virtual machines. For example, when running a Kubernetes cluster in AWS, our nodes will be represented by EC2 machines.
Now that we understand what the main parts of Kubernetes are, let’s create a cluster!
14.3 Creating a Kubernetes cluster with EKS
In this section, you’ll learn how to create a Kubernetes cluster using the AWS EKS. We launch the Kubernetes cluster using eksctl, which is the recommended tool for managing Kubernetes in AWS.
eksctl is an open source tool created and maintained by Weaveworks. It uses CloudFormation behind the scenes to create and manage changes to our Kubernetes clusters. This is excellent news, because it means we can reuse the CloudFormation templates to replicate the same infrastructure across different environments. It also makes all our changes to the cluster visible through CloudFormation.
Definition CloudFormation is AWS’s infrastructure-as-code service. With CloudFormation, we can declare our resources in YAML or JSON files called templates. When we submit the templates to CloudFormation, AWS creates a CloudFormation stack, the collection of resources defined in the templates. CloudFormation templates shouldn’t contain sensitive information and can be committed in our code repositories, which makes changes to our infrastructure very visible and replicable across different environments.
There are various ways to install eksctl depending on the platform you’re using, so please refer to the official documentation to find out which strategy works best for you (https://github.com/weaveworks/eksctl).
To run the containers in the Kubernetes cluster, we use AWS Fargate. As you can see in figure 14.2, Fargate is AWS’s serverless container service that allows us to run containers in the cloud without having to provision servers. With AWS Fargate, you don’t need to worry about scaling your servers up or down, since Fargate takes care of that.
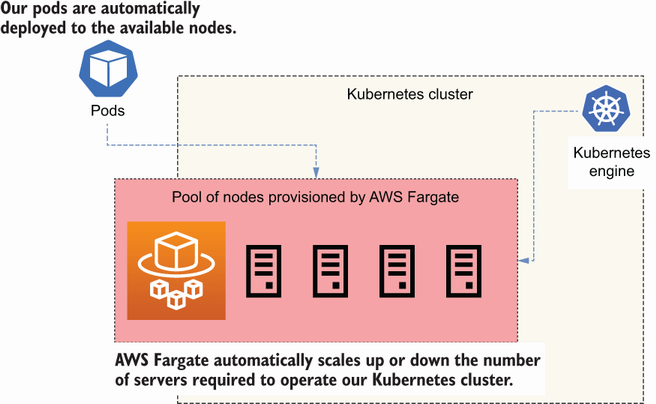
Figure 14.2 AWS Fargate automatically provisions the servers required to operate our Kubernetes cluster.
To create a Kubernetes cluster using eksctl, run the following command:
The creation process takes approximately 30 minutes to complete. Let’s look at each flag in this command:
-
--name—The name of the cluster. We’re calling the clustercoffeemesh. -
--region—The AWS region where you want to deploy the cluster. This region should be the same you used to create the ECR repository in section 13.4. -
--fargate—Creates a Fargate profile to schedule pods in thedefaultand thekube-systemnamespaces. Fargate profiles are policies that determine which pods must be launched by Fargate. -
--alb-ingress-access—Enables access to the cluster through an Application Load Balancer.
Figure 14.3 illustrates the architecture of the stack created by eksctl when launching the Kubernetes cluster. By default, eksctl creates a dedicated Virtual Private Cloud (VPC) for the cluster.

Figure 14.3 eksctl creates a VPC with three public networks, three private networks, two CIDR reservations, and two VPC security groups. It also deploys the Kubernetes cluster within the VPC.
Kubernetes networking To make advanced use of Kubernetes, you need to understand how networking works in Kubernetes. To learn more about Kubernetes networking, check out Networking and Kubernetes: A Layered Approach by James Strong and Vallery Lancey (O’Reilly, 2021).
It’s also possible to launch the cluster within an existing VPC by specifying the subnets in which you want to run the deployment. If launching within an existing VPC, you must make sure the VPC and the provided subnets are correctly configured for operating the Kubernetes cluster. See the eksctl documentation to learn about the networking requirements of a Kubernetes cluster (https://eksctl.io/usage/vpc-networking/) and the official AWS documentation on the VPC networking requirements for a Kubernetes cluster (http://mng.bz/aPRY).
As you can see in figure 14.3, eksctl creates six subnets by default: three public and three private, with their corresponding NAT gateways and routing tables. A subnet is a subset of the IP addresses available in a VPC. Public subnets are accessible through the internet, while private subnets are not. eksctl also creates two subnet CIDR reservations for internal use by Kubernetes, as well as two security groups; one of them allows communication between all nodes in the cluster, and the other allows communication between the control plane and the nodes.
Definition CIDR stands for Classless Inter-Domain Routing, and it’s a notation used for representing ranges of IP addresses. CIDR notation includes an IP address followed by a slash and a decimal number, where the decimal number represents the range of addresses. For example, 255.255.255.255/32 represents a range for one address. To learn more about CIDR notation, see Wikipedia’s article: https://en.wikipedia.org/wiki/Classless_Inter-Domain_Routing.
Once we’ve created the cluster, we can configure kubectl to point to it, which will allow us to manage the cluster with the command line. Use the following command to point kubectl to the cluster:
Now that we’re connected to the cluster, we can inspect its properties. For example, we can get a list of running nodes with the following command:
$ kubectl get nodes
# output truncated:
NAME                                       STATUS  ROLES  AGE    VERSION
fargate-ip-192-168-157-75.<aws_region>...  Ready  <none>  4d16h  v1.20.7...
fargate-ip-192-168-170-234.<aws_region>... Ready  <none>  4d16h  v1.20.7...
fargate-ip-192-168-173-63.<aws_region>...  Ready  <none>  4d16h  v1.20.7...
To get the list of pods running in the cluster, run the following command:
$ kubectl get pods -A
NAMESPACE    NAME                      READY  STATUS   RESTARTS  AGE
kube-system  coredns-647df9f975-2ns5m  1/1    Running  0         2d15h
kube-system  coredns-647df9f975-hcgjq  1/1    Running  0         2d15h
There are many more useful commands you can run to learn more about your cluster. Check out the official documentation about the Kubernetes CLI for additional commands and options (https://kubernetes.io/docs/reference/kubectl/). A good starting point is the kubectl cheat sheet (https://kubernetes.io/docs/reference/kubectl/cheatsheet/). Now that our cluster is up and running, in the next section, we’ll create an IAM role for our Kubernetes service accounts.
14.4 Using IAM roles for Kubernetes service accounts
Every process that runs in your Kubernetes cluster has an identity, and that identity is given by a service account. Service accounts determine the access privileges of a process within the cluster. Sometimes, our services need to interact with AWS resources using the AWS API. To give access to the AWS API, we need to create IAM roles—entities that give applications access to the AWS API—for our services. As you can see in figure 14.4, to link a Kubernetes service account to an IAM role, we use OpenID Connect (OIDC). By using OIDC, our pods can obtain temporary credentials to access the AWS API.

Figure 14.4 Pods can authenticate with an OIDC provider to assume an IAM role, which gives them access to the AWS API, and therefore gives them access to AWS services.
To check if your cluster has an OIDC provider, run the following command, replacing <cluster_name> with the name of your cluster:
You’ll get an output like the following:
In this case, the ID of the cluster’s OIDC provider is BE4E5EE7DCDF9FB198D06FC9883FF1BE. Grab the OIDC provider’s ID and run the following command:
This command lists all the OIDC providers in your AWS account, and it uses grep to filter by the ID of your cluster’s OIDC provider. If you get a result, it means you already have an OIDC provider for your cluster. If you don’t get any output, it means you don’t have an OIDC provider, so let’s create one! To create an OIDC provider for your cluster, run the following command, replacing <cluster_name> with the name of your cluster:
That’s all it takes. Now we can link IAM roles to our service accounts! In the next section, we deploy a Kubernetes load balancer to enable external traffic to the cluster.
14.5 Deploying a Kubernetes load balancer
Right now, our cluster is not accessible from outside of the VPC. If we deploy our applications, they’ll only get internal IPs and therefore won’t be accessible to the external world. To enable external access to the cluster, we need an ingress controller. As you can see in figure 14.5, an ingress controller accepts traffic from outside of the Kubernetes cluster and load balances it among our pods. To redirect traffic to specific pods, we create ingress resources for each service. The ingress controller takes care of managing ingress resources.
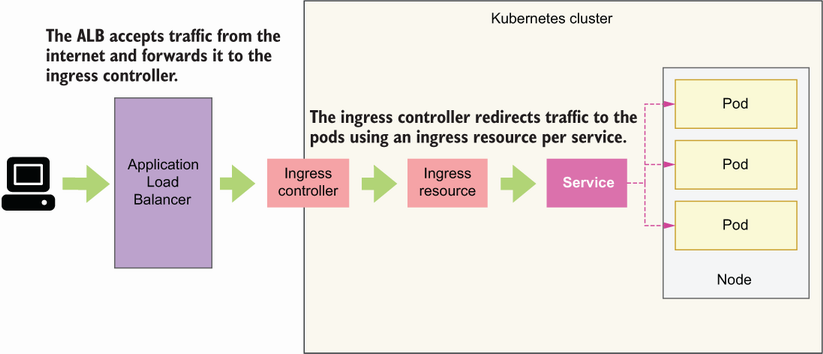
Figure 14.5 An ingress controller accepts traffic from outside of the Kubernetes cluster and forwards it to the pods according to rules defined by ingress resources.
In this section, we’ll deploy a Kubernetes ingress controller as an AWS Load Balancer Controller.3 As you can see in figure 14.5, the AWS Load Balancer Controller deploys an AWS Application Load Balancer (ALB), which sits in front of our cluster, captures incoming traffic, and forwards it to our services. To forward traffic to our services, the ALB uses the concept of target groups—a rule for how traffic should be forwarded from the ALB to a specific resource. For example, we can have target groups based on IPs, services IDs, and other factors. The load balancer monitors the health of its registered targets and makes sure traffic is only redirected to healthy targets.
To install the AWS Load Balancer Controller, we need to have an OIDC provider in the cluster, so make sure you’ve gone through section 14.4 before proceeding. The first step to deploying an AWS Load Balancer Controller is to create an IAM policy that gives the controller access to the relevant AWS APIs. The open source community that maintains the AWS Load Balancer Controller project provides a sample of the policy that we need, so we simply need to fetch it:
$ curl -o alb_controller_policy.json
https://raw.githubusercontent.com/kubernetes-sigs/aws-load-balancer-
➥ controller/main/docs/install/iam_policy.json
After running this command, you’ll see a file called alb_controller_policy.json in your directory. Now we can create the IAM policy using this file:
$ aws iam create-policy
--policy-name ALBControllerPolicy
--policy-document file://alb_controller_policy.json
The next step is to create an IAM role associated to a Kubernetes service account for the load balancer with the following command:
$ eksctl create iamserviceaccount
  --cluster=coffeemesh
  --namespace=kube-system
  --name=alb-controller
  --attach-policy-arn=arn:aws:iam::<aws_account_id>:policy/ALBControllerPolicy
  --override-existing-serviceaccounts
  --approve
This command creates a CloudFormation stack, which includes an IAM role associated with the policy we created earlier, as well as a service account named alb-controller within the kube-system namespace reserved for system components of the Kubernetes cluster.
Now we can install the Load Balancer Controller. We’ll use Helm to install the controller, a package manager for Kubernetes. If you don’t have Helm available in your machine, you need to install it. There are different strategies for installing Helm depending on your platform, so make sure you check out the documentation to see which option works best for you (https://helm.sh/docs/intro/install/).
Once Helm is available on your machine, you need to update it by adding the EKS charts repository to your local helm (in Helm, packages are called charts). To add the EKS charts, run the following command:
Now let’s update helm to make sure we pick up the most recent updates to the charts:
Now that helm is up to date, we can install the AWS Load Balancer Controller. To install the controller, we need to get hold of the ID of the VPC eksctl created when we launched the cluster. To find the VPC ID, run the following command:
$ eksctl get cluster --name coffeemesh -o json |
jq '.[0].ResourcesVpcConfig.VpcId'
# output: "vpc-07d35ccc982a082c9"
To run the previous command successfully, you need to have jq installed. Please refer to section 14.1 to learn how to install it. Now we can install the controller by running the following command:
$ helm install aws-load-balancer-controller eks/aws-load-balancer-
➥ controller
  -n kube-system
  --set clusterName=coffeemesh
  --set serviceAccount.create=false
  --set serviceAccount.name=alb-controller
  --set vpcId=<vpc_id>
Since the controller is an internal Kubernetes component, we install it within the kube-system namespace. We make sure that the controller is installed for the coffeemesh cluster. We also instruct Helm not to create a new service account for the controller, and instead use the alb-controller service account we created earlier.
It’ll take a few minutes until all the resources are created. To verify that the deployment went well, run the following command:
$ kubectl get deployment -n kube-system aws-load-balancer-controller
NAME              READY    UP-TO-DATE    AVAILABLE    AGE
alb-controller    2/2      2             2            84s
You’ll know that the controller is up and running when the READY column shows 2/2, which means the desired number of resources are up. Our cluster is now ready, so it’s time to deploy the orders service!
14.6 Deploying microservices to the Kubernetes cluster
Now that our Kubernetes cluster is ready, it’s time to start deploying our services! In this section, we walk through the steps required to deploy the orders service. You can follow the same steps to deploy other services of the CoffeeMesh platform.

Figure 14.6 To deploy a microservice, we create a new namespace, and within this namespace we deploy all the components needed to operate the microservice, such as a Deployment object and a Service object.
As you can see in figure 14.6, we deploy the orders service to a new namespace called orders-service. This allows us to logically group and isolate all the resources required to operate the orders service. To create a new namespace, we run the following command:
Since we’ll run the orders service in the new namespace, we also need to create a new Fargate profile configured to schedule jobs within the orders-service namespace. To create the new Fargate profile, run the following command:
$ eksctl create fargateprofile --namespace orders-service --cluster
coffeemesh --region <aws_region>
With the orders-service namespace and the Fargate profile ready, we can deploy the orders service. To make the deployment, we take the following steps:
The following sections explain in detail how to proceed in each step.
14.6.1 Creating a deployment object
Let’s begin by creating a deployment for the orders service using a service manifest file. As you can see in figure 14.7, deployments are Kubernetes objects that operate our pods and provision them with everything they need to run, including a Docker image and port configuration. Create a file named orders-service-deployment.yaml and copy the contents of listing 14.1 into it.

Figure 14.7 A Deployment object provides necessary configuration for the pods, such as their Docker image and port configuration, and ensures we have the desired number of pods running.
We use Kubernetes’ API version apps/v1 and declare this object a Deployment. In metadata, we name the deployment orders-service, we specify its namespace, and we add the label app: orders-service. Labels are custom identifiers for Kubernetes objects, and they can be used for monitoring, tracing, or scheduling tasks, among other uses.4
In the spec section, we define a selector rule that matches pods with the label app: orders-service, which means this deployment will only operate pods with this label. We also declare that we’d like to run only one replica of the pod.
Within the spec.template section, we define the pod operated by this deployment. We label the pod with the app: orders-service key-value pair in agreement with the deployment’s selector rule. Within the pod’s spec section, we declare the containers that belong in the pod. In this case, we want to run just one container, which is the orders service application. Within the definition of the orders service container, we specify the image that must be used to run the application with the port on which the application runs.
Listing 14.1 Declaring a deployment manifest
# file: orders-service-deployment.yaml

apiVersion: apps/v1                   ①
kind: Deployment                      ②
metadata:
  name: orders-service                ③
  namespace: orders-service           ④
  labels:                             ⑤
    app: orders-service
spec:                                 ⑥
  replicas: 1                         ⑦
  selector:
    matchLabels:
      app: orders-service             ⑧
  template:                           ⑨
    metadata:
      labels:
        app: orders-service           ⑩
    spec:                             ⑪
      containers:
      - name: orders-service
        image: <aws_account_id>.dkr.ecr.<aws_region>.amazonaws.com/coffeemesh-orders:1.0            ⑫
        ports:
          - containerPort: 8000       ⑬
        imagePullPolicy: Always
① Version of the Kubernetes API used in this manifest
② This manifest defines a Deployment object.
④ The namespace within which the deployment must be located
⑥ The deployment’s specification
⑦ How many pods must be deployed
⑬ The port on which the API runs
To create the deployment, we run the following command:
This command creates the deployment and launches the pods we defined in the manifest file. It’ll take a few seconds for the pods to become available. You can check their state with the following command:
The initial state of the pods will be Pending, and once they’re up and running their state will change to Running.
14.6.2 Creating a service object
Now that our deployment is ready, we will create a service object for the orders service. As we learned in section 14.2, services are Kubernetes objects that allow us to expose our pods as networking services. As you can see in figure 14.8, a service object exposes our applications as web services and redirects traffic from the cluster to our pods on the specified ports. Create a file named orders-service.yaml, and copy into it the contents of listing 14.2, which shows how to configure a simple service manifest.

Figure 14.8 A service object redirects traffic from the cluster to the pods on the specified ports. In this example, incoming traffic to the cluster on port 80 is redirected to port 8000 in the pods.
We use version v1 of the Kubernetes API to declare our service. In metadata, we specify that the service’s name is orders-service and that it’s to be launched within the orders-service namespace. We also add a label: app: orders-service. In the service’s spec section, we configure a ClusterIP type, which means the pod will only be accessible from within the cluster. There are other types of services in Kubernetes, such as NodePort and LoadBalancer. (To learn more about the types of services and when to use each type, see the sidebar, “Which type of Kubernetes service should I use?”)
We also create a forwarding rule to redirect traffic from port 80 to port 8000, which is the port on which our containers run. Finally, we specify a selector for the app: orders-service label, which means this service will only operate pods with that label.
Listing 14.2 Declaring a service manifest
# file: orders-service.yaml

apiVersion: v1
kind: Service                  ①
metadata:
  name: orders-service
  namespace: orders-service
  labels:
    app: orders-service
spec:
  selector:
    app: orders-service
  type: ClusterIP              ②
  ports:
    - protocol: http           ③
      port: 80                 ④
      targetPort: 8000         ⑤
① This manifest defines a Service object.
② This is a ClusterIP type of Service.
③ The service communicates over HTTP.
④ The service must be mapped to port 80.
⑤ The service runs internally on port 8000.
To deploy this service, run the following command:
14.6.3 Exposing services with ingress objects
The final step is to expose the service through the internet. To expose the service, we need to create an ingress resource that routes traffic to the service. As you can see in figure 14.9, an ingress resource is a service that redirects HTTP traffic to the pods running in our Kubernetes cluster on the specified ports and URL paths. Create a file named orders-service-ingress.yaml and copy the content of listing 14.3 to it.

Figure 14.9 An ingress object allows us to redirect HTTP traffic on a specific port and URL path to a service object.
In the ingress manifest, we use version networking.k8s.io/v1 of the Kubernetes API, and we declare the object as an Ingress type. In metadata, we name the ingress object orders-service-ingress, and we specify that it should be deployed within the orders-service namespace. We use annotations to bind the ingress object to the AWS Load Balancer we deployed in section 14.5. Within the spec section, we define the forwarding rules of the ingress resource. We declare an HTTP rule that forwards all traffic under the /orders path to the orders service and additional rules to access the service’s API documentation.
Listing 14.3 Declaring an ingress manifest
# file: orders-service-ingress.yaml

apiVersion: networking.k8s.io/v1
kind: Ingress                                              ①
metadata:
  name: orders-service-ingress
  namespace: orders-service
  annotations:                                             ②
    kubernetes.io/ingress.class: alb                       ③
    alb.ingress.kubernetes.io/target-type: ip              ④
    alb.ingress.kubernetes.io/scheme: internet-facing      ⑤
spec:
  rules:                                                   ⑥
  - http:
      paths:
      - path: /orders                                      ⑦
        pathType: Prefix                                   ⑧
        backend:                                           ⑨
          service:
            name: orders-service                           ⑩
            port:
              number: 80                                   ⑪
      - path: /docs/orders
        pathType: Prefix
        backend:
          service:
            name: orders-service
            port:
              number: 80
      - path: /openapi/orders.json
        pathType: Prefix
        backend:
          service:
            name: orders-service
            port:
              number: 80
① The manifest defines an Ingress object.
② AWS configuration for the Ingress
③ The Ingress exposes an Application Load Balancer.
④ Traffic is routed to the pods based on IP.
⑤ The Ingress is available to external connections.
⑦ A rule for the /orders URL path
⑧ The rule applies to requests starting with the /orders prefix.
⑨ The backend service that handles this traffic
⑩ Traffic must be routed to the orders-service Service.
⑪ The orders-service Service is available on port 80.
To create this ingress resource, we run the following command:
The orders API is now accessible. To call the API, we first need to find out the endpoint for the ingress rule we just created. Run the following command to get the details of the ingress resource:
$ kubectl get ingress/orders-service-ingress -n orders-service
# output truncated:
NAME                     CLASS    HOSTS   ADDRESS...
orders-service-ingress   <none>   *       k8s-ordersse-ordersse-3c391193...
The value under the ADDRESS field is the URL of the load balancer. You can also get hold of this value by running the following command:
$ kubectl get ingress/orders-service-ingress -n orders-service -o json |
jq '.status.loadBalancer.ingress[0].hostname'
"k8s-ordersse-ordersse-3c39119336-236890178.<aws_region>.elb.amazonaws.com"
We can use this URL to call the orders service API. Since the database isn’t yet ready, the API itself won’t work, but we can access the API documentation:
$ curl http://k8s-ordersse-ordersse-3c39119336-
➥ 236890178.<aws_region>.elb.amazonaws.com/openapi/orders.json
It may take some time for the load balancer to become available, and in the meantime curl won’t be able to resolve the host. If that happens, wait a few minutes and try again. To be able to interact with the API, we must set up a database, which will be the goal of our next section!
14.7 Setting up a serverless database with AWS Aurora
The orders service is almost ready: the application is up and running, and we can access it through the internet. Only one component is missing: the database. We have multiple choices for setting up the database. We can set up the database as a deployment within our Kubernetes cluster with a mounted volume, or we can choose one of the many managed database services that cloud providers offer.
To keep it simple and cost-effective, in this section, we’ll set up an Aurora Serverless database in AWS—a powerful database engine that is cost-effective since you only pay for what you use and is very convenient since you don’t have to worry about managing or scaling the database.
14.7.1 Creating an Aurora Serverless database
We’ll launch our Aurora database within the Kubernetes cluster’s VPC. To be able to launch a database within an existing VPC, we need to create a database subnet group: a collection of subnets within the VPC. As we learned in section 14.3, eksctl divides the Kubernetes cluster’s VPC into six subnets: three public and three private. The six subnets are distributed across three availability zones (data centers within an AWS region), with one public and one private subnet per availability zone.
When choosing the subnets for our database subnet group, we need to consider the following constraints:
-
Aurora Serverless only supports one subnet per availability zone.
-
When creating a database subnet group, the subnets must all be either private or public.5
For security, it’s best practice to use private subnets in database subnet groups as it ensures that the database server is not accessible from outside of the VPC, which means external and unauthorized users are unable to connect to it directly. To find the list of private subnets in the VPC, we first need to obtain the ID of the Kubernetes cluster’s VPC with the following command:
Then use the following command to get the IDs of the private subnets in the VPC:
$ aws ec2 describe-subnets --filters Name=vpc-id,Values=<vpc_id>
--output json | jq '.Subnets[] | select(.MapPublicIpOnLaunch == false) |
.SubnetId'
The previous command lists all the subnets in the Kubernetes cluster’s VPC, and it uses jq to filter the public subnets. Armed with all this information, we can now create the database subnet group using the following command:
$ aws rds create-db-subnet-group --db-subnet-group-name
coffeemesh-db-subnet-group --db-subnet-group-description "Private subnets"
--subnet-ids "<subnet_id>" "<subnet_id>" "<subnet_id>"
As you can see in figure 14.10, this command creates a database subnet group named coffeemesh-db-subnet-group. When running the command, make sure you replace the <subnet_id> placeholders with the IDs of your private subnets. We’ll deploy our Aurora database within this database subnet group.

Figure 14.10 We deploy an Aurora database within a database subnet group named coffeemesh-db-subnet-group. The database subnet group is created on top of the three private subnets of our VPC to prevent unauthorized access.
Next, we need to create a VPC security group—a set of rules that define what incoming and outgoing traffic is allowed from the VPC—that allows traffic to the database so that our applications can connect to it. The following command creates a security group called db-access:
$ aws ec2 create-security-group --group-name db-access --vpc-id <vpc-id>
--description "Security group for db access"
# output:
{
    "GroupId": "sg-00b47703a4299924d"
}
In the previous command, replace <vpc-id> with the ID of your Kubernetes cluster’s VPC. The output from the previous command is the ID of the security group we just created. We’ll allow traffic from all IP addresses on PostgreSQL’s default port, which is 5432. Since we’re going to deploy the database into private subnets, it’s okay to listen on all IPs, but for additional security, you may want to restrict the range of addresses to those of your pods. We use the following command to create an inbound traffic rule for our database access security group:
$ aws ec2 authorize-security-group-ingress --group-id
<db-security-group-id> --ip-permissions
'FromPort=5432,IpProtocol=TCP,IpRanges=0.0.0.0/0'
In this command, replace <db-security-group-id> with the ID of your database access security group.
Now that we have a database subnet group and a security group that allows our pods to connect to it, we can use the subnet group to launch an Aurora Serverless cluster within our VPC! Run the following command to launch an Aurora Serverless cluster:
$ aws rds create-db-cluster --db-cluster-identifier coffeemesh-orders-db
--engine aurora-postgresql --engine-version 10.14
--engine-mode serverless
--scaling-configuration MinCapacity=8,MaxCapacity=64,
➥ SecondsUntilAutoPause=1000,AutoPause=true
--master-username <username>
--master-user-password <password>
--vpc-security-group-ids <security_group_id>
--db-subnet-group <db_subnet_group_name>
Let’s take a close look at the command’s parameters:
-
--db-cluster-identifier—The name of the database cluster. We’re naming the clustercoffeemesh-orders-db. -
--engine—The database engine you want to use. We’re using a PostgreSQL-compatible engine, but you can also choose a MySQL-compatible engine if you prefer. -
--engine-version—The version of the Aurora engine you want to use. We’re choosing version 10.14, which is the only version available for Aurora PostgreSQL serverless right now. See the AWS documentation to keep up to date with new versions (http://mng.bz/gRyn). -
--engine-mode—The database engine mode. We’re choosing serverless to keep the example simple and cost-effective. -
--scaling-configuration—The autoscaling configuration for the Aurora cluster. We configure the cluster with minimum Aurora capacity units (ACU) of 8 and a maximum of 64. Each ACU provides approximately 2 GB of memory. We also configure the cluster to scale down to 0 ACUs automatically after 1,000 seconds without activity.6 -
--master-user-password—The password of the database master user. -
--vpc-security-group-ids—The ID of the database access security group we created in the previous step. -
--db-subnet-group—The name of the database security group we created earlier.
After running this command, you’ll get a large JSON payload with details about the database. To connect to the database, we need the value of the DBCluster.Endpoint property of the payload, which represents the database’s hostname. We’ll use this value in the next sections to connect to the database.
14.7.2 Managing secrets in Kubernetes
To connect our services to the database, we need a secure way to pass the connection credentials. The native way to manage sensitive information in Kubernetes is using Kubernetes secrets. This way, we avoid having to expose sensitive information through the code or through our image builds. In this section, you’ll learn how to manage Kubernetes secrets securely.
AWS EKS offers two secure ways to manage Kubernetes secrets: we can use the AWS Secrets & Configuration Provider for Kubernetes,7 or we can use AWS Key Management Service (KMS) to secure our secrets with envelope encryption. In this section, we’ll use envelope encryption to protect our secrets.8
As you can see in figure 14.11, envelope encryption is the practice of encrypting your data with a data encryption key (DEK) and encrypting the DEK with a key encryption key (KEK).9 It sounds complicated, but it’s simple to use since AWS does the heavy lifting for us.

Figure 14.11 Envelope encryption is the practice of encrypting data with a data encryption key (DEK) and encrypting the DEK with a key encryption key.
To use envelope encryption, first we need to generate an AWS KMS key. You can use the following command to create the key:
The output of this command is a payload with metadata about the newly created key. From this payload, we want to use the KeyMetadata.Arn property, which represents the key’s ARN, or Amazon Resource Name. The next step is to enable secrets encryption in our Kubernetes cluster using eksctl:
$ eksctl utils enable-secrets-encryption --cluster coffeemesh
--key-arn=<key_arn> --region <aws_region>
Make sure you replace <key_arn> with the ARN of your KMS key and <aws_region> with the region where you deployed the Kubernetes cluster. The operation triggered by the previous command can take up to 45 minutes to complete. The command runs until the cluster is created, so just wait until it finishes. Once it’s done, we can create Kubernetes secrets. Let’s create a secret that represents the database connection string. A database connection string has the following structure:
Let’s look at each component of the connection string:
-
username—The username we chose earlier when creating the database. -
password—The password we chose earlier when creating the database. -
hostname—The database’s hostname, which we obtained in the previous section from theDBCluster.Endpointproperty of the payload returned by theawsrdscreate-db-clustercommand. -
port—The port on which the database is running. Each database has its own default port, such as 5432 for PostgreSQL and 3306 for MySQL. -
database_name—The name of the database we’re connecting to. In PostgreSQL, the default database is calledpostgres.
For example, for a PostgreSQL database, a typical connection string looks like this:
To store the database connection string as a Kubernetes secret, we run the following command:
$ kubectl create secret generic -n orders-service db-credentials
--from-literal=DB_URL=<connection_string>
The previous command creates a secret object named db-credentials within the orders-service namespace. To get the details of this secret object, you can run the following command:
$ kubectl get secret db-credentials -n orders-service -o json
# output:
{
    "apiVersion": "v1",
    "data": {
        "DB_URL": "cG9zdGdyZXNxbDovL3VzZXJuYW1lOnBhc3N3b3JkQGNvZmZlZW1lc2gtZGIuY2x1c3Rlci1jYn
➥ Y0YWhnc2JjZWcuZXUtd2VzdC0xLnJkcy5hbWF6b25hd3MuY29tOjU0MzIvcG9zdGdyZXM="
    },
    "kind": "Secret",
    "metadata": {
        "creationTimestamp": "2021-11-19T15:21:42Z",
        "name": "db-credentials",
        "namespace": "orders-service",
        "resourceVersion": "599258",
        "uid": "d2c210e7-c61c-46b7-9f43-9407766e147c"
    },
    "type": "Opaque"
}
The secrets are listed under the data property of the payload, and they’re Base64 encoded. To obtain their values, you can run the following command:
where <DB_URL> is the Base64 encoded value of the DB_URL key.
To make the secret available to the orders service, we need to update the order service deployment to consume the secret and expose it as an environment variable.
Listing 14.4 Consuming secrets as environment variables in a deployment
# file: orders-service-deployment.yaml

apiVersion: apps/v1
kind: Deployment
metadata:
  name: orders-service
  namespace: orders-service
  labels:
    app: orders-service
spec:
  replicas: 1
  selector:
    matchLabels:
      app: orders-service
  template:
    metadata:
      labels:
        app: orders-service
    spec:
      containers:
      - name: orders-service
        image:
➥ <aws_account_id>.dkr.ecr.<aws_region>.amazonaws.com/coffeemesh-orders:1.0
        ports:
          - containerPort: 8000
        imagePullPolicy: Always
        envFrom:                       ①
          - secretRef:                 ②
              name: db-credentials     ③
① Environment configuration for the pods
② Configuration for identifying the secret
③ Environment must be loaded from the secret named db-credentials.
Let’s apply the changes by running the following command:
Our service can now connect to the database! We’re almost done. The final step is to apply the database migrations, which we’ll accomplish in the next section.
14.7.3 Running the database migrations and connecting our service to the database
Our database is up and running, and now we can connect the orders service with it. However, before we can create records and run queries, we must ensure the database has the expected schemas. As we saw in chapter 7, the process of creating the database schemas is called migration. Our application’s migrations are available under the migrations folder. In this section, we’ll run the migrations against the Aurora Serverless database.
In the previous section, we deployed the Aurora database to our private subnets, which means we can’t access our database directly to run the migrations. We have two main options to connect to the database: connect through a bastion server or create a Kubernetes Job that applies the migrations. Since we’re working with Kubernetes and our cluster is already up and running, using a Kubernetes Job is a suitable option for us.
Definition A bastion server is a server that allows you to establish a secure connection with a private network. By connecting to the bastion server, you are able to access other servers within the private network.
To create the Kubernetes job, we first need to create a Docker image for running the database migrations. Create a file named migrations.dockerfile, and copy the contents of listing 14.5 into it. This Dockerfile installs both the production and the development dependencies and copies over the migrations and the Alembic configuration into the container. As we saw in chapter 7, we use Alembic to manage our database migrations. The command for this container is a one-off alembic upgrade.
Listing 14.5 Dockerfile for the database migrations job
# file: migrations.dockerfile

FROM python:3.9-slim

RUN mkdir -p /orders/orders

WORKDIR /orders

RUN pip install -U pip && pip install pipenv

COPY Pipfile Pipfile.lock /orders/

RUN pipenv install --dev --system --deploy

COPY orders/repository /orders/orders/repository/
COPY migrations /orders/migrations
COPY alembic.ini /orders/alembic.ini

ENV PYTHONPATH=/orders                 ①

CMD ["alembic", "upgrade", "heads"]
① We set the PYTHONPATH environment variable.
To build the Docker image, run the following command:
$ docker build -t
➥ <aws_account_number>.dkr.ecr.<aws_region>.amazonaws.com/coffeemesh-
➥ orders-migrations:1.0 -f migrations.dockerfile .
We’re naming the image coffeemesh-orders-migrations and tagging it with version 1.0. Make sure you replace <aws_account_id> with your AWS account ID and <aws_region> with the region where you want to store your Docker builds. Before we push the image to the container registry, we need to create a repository:
Now let’s push the image to the container registry:
$ docker push
➥ <aws_account_id>.dkr.ecr.<aws_region>.amazonaws.com/coffeemesh-orders-
➥ migrations:1.0
If your ECR credentials have expired, you can refresh them by running the following command again:
$ aws ecr get-login-password --region <aws_region> | docker login
--username AWS --password-stdin
<aws_account_id>.dkr.ecr.<aws_region>.amazonaws.com
Now that our image is ready, we need to create a Kubernetes Job object. We use a manifest file to create the Job. Create a file named orders-migrations-job.yaml and copy the contents of listing 14.6 into it. Listing 14.6 defines a Kubernetes object of type Job using the batch/v1 API. Just as we did in the previous section for the orders service, we expose the database connection string in the environment by loading the db-credentials secret using the envFrom property of the container’s definition. We also set the ttlSecondsAfterFinished parameter to 30 seconds, which controls how long the pod will last in the orders-service namespace once it’s finished the job.
Listing 14.6 Creating a database migrations job
# file: orders-migrations-job.yaml

apiVersion: batch/v1
kind: Job
metadata:
  name: orders-service-migrations
  namespace: orders-service
  labels:
    app: orders-service
spec:
  ttlSecondsAfterFinished: 30      ①
  template:
    spec:
      containers:
      - name: orders-service-migrations
        image:
➥ <aws_account_id>.dkr.ecr.<aws_region>.amazonaws.com/coffeemesh-orders-
➥ migrations:1.0
        imagePullPolicy: Always
        envFrom:
          - secretRef:
              name: db-credentials
      restartPolicy: Never
① The pod must be deleted 30 seconds after completing.
Let’s create the Job by running the following command:
It’ll take a few seconds until the job’s pod is up and running. You can check its status by running the following command:
Once the pod’s status is Running or Completed, you can check the job’s logs by running the following command:
Watching the pod’s logs in this way is useful to check how the process is going and to spot any issues raised in its execution. Since the migration job is ephemeral and will be deleted after completion, make sure you check the logs while the process is running. Once the migrations job has completed, the database is finally ready to be used! We can finally interact with the orders service—the moment we’ve been waiting for! Our service is now ready for use. The next section explains one more change we need to make to finalize the deployment.
14.8 Updating the OpenAPI specification with the ALB’s hostname
Now that our service is ready and the database is deployed and configured, it’s time to play around with the application! In chapters 2 and 6, we learned to interact with our APIs using a Swagger UI. To use the Swagger UI in our deployment, we need to update the API specification with the hostname of our Kubernetes cluster’s ALB. In this section, we update the order’s API specification, make a new deployment, and test it.
Listing 14.7 Adding the ALB’s hostname as a server
# file: oas.yaml

openapi: 3.0.0

info:
  title: Orders API
  description: API that allows you to manage orders for CoffeeMesh
  version: 1.0.0

servers:
  - url: <alb-hostname>
    description: ALB's hostname
  - url: https://coffeemesh.com
    description: main production server
  - url: https://coffeemesh-staging.com
    description: staging server for testing purposes only
  - url: http://localhost:8000
    description: URL for local testing

...
In listing 14.8, replace <alb-hostname> with the hostname of your own ALB. As we learned in section 14.6, you obtain the ALB’s hostname by running the following command:
$ kubectl get ingress/orders-service-ingress -n orders-service -o json |
jq '.status.loadBalancer.ingress[0].hostname'
# output:
# "k8s-ordersse-ordersse-8cf837ce7a-1036161040.<aws_region>.elb.amazonaws.com"
Now we need to rebuild our Docker image:
$ docker build -t
<aws_account_number>.dkr.ecr.<aws_region>.amazonaws.com/coffeemesh-
➥ orders:1.1 .
Then, we publish the new build to AWS ECR:
Next, we need to update the orders service deployment manifest.
Listing 14.8 Declaring a deployment manifest
# file: orders-service-deployment.yaml

apiVersion: apps/v1
kind: Deployment
metadata:
  name: orders-service
  namespace: orders-service
  labels:
    app: orders-service
spec:
  replicas: 1
  selector:
    matchLabels:
      app: orders-service
  template:
    metadata:
      labels:
        app: orders-service
    spec:
      containers:
      - name: orders-service
        image:
➥ <aws_account_id>.dkr.ecr.<aws_region>.amazonaws.com/coffeemesh-orders:1.1
        ports:
          - containerPort: 8000
        imagePullPolicy: Always
Finally, we apply the new deployment configuration by running the following command:
Monitor the rollout by running the following command:
Once the old pod is terminated and the new one is up and running, load the order’s service Swagger UI by pasting the ALB’s hostname in a browser and visiting the /docs/orders page. You can play around with the API using the same approach you learned in chapters 2 and 6: creating orders, modifying them, and fetching their details from the server.
And the journey is finally complete! If you’ve been able to follow up to this point and managed to get your Kubernetes cluster up and running, please accept my most sincere congratulations! You’ve made it! Figure 14.12 shows a high-level overview of the architecture you’ve deployed in this chapter.

The overview of Kubernetes in this chapter is a brief one, but it’s enough to get an understanding of how Kubernetes works, and it’s sufficient to get a cluster up and running in your production environment. If you work or intend to work with Kubernetes, I strongly encourage you to continue reading about this technology. You can check all the references I’ve cited in this chapter, to which I’d like to add Marko Lukša’s fundamental Kubernetes in Action (2nd ed., Manning, expected 2023).
In the next section, we’ll delete all the resources we created during this chapter. Don’t miss it if you don’t want to be charged more than needed!
14.9 Deleting the Kubernetes cluster
This section explains how to delete all the resources we created in this chapter. This step is crucial to make sure you don’t get billed for the Kubernetes cluster once you’ve finished working through the examples. As you can see in figure 14.13, we have dependency relationships among some of our resources. To successfully delete all resources, we must delete them in reverse order of their dependencies. For example, the database cluster depends on the database subnet group, which depends on the VPC subnets, which depend on the VPC. In this case, we’ll start by deleting the database cluster, and in the last step we’ll delete the VPC.

Figure 14.13 The resources in our stack have relationships of dependency. The direction of dependency is indicated by the direction of the arrows. To delete the resources, we start by deleting those that have no arrows pointing to them.
Let’s delete the database cluster with the following command:
The --skip-final-snapshot flag instructs the command not to create a snapshot of the database before deletion. It takes a few minutes for the database to be deleted. Once it’s deleted, we can delete the database subnet group with the following command:
Next, let’s delete the AWS Load Balancer Controller. Deleting the AWS Load Balancer Controller is a two-step process: first we uninstall the controller using helm, and then we delete the ALB that was created when we installed the controller. To delete the ALB we need its URL, so let’s fetch that value first (make sure you run this step before uninstalling with helm):
$ kubectl get ingress/orders-service-ingress -n orders-service -o json |
jq '.status.loadBalancer.ingress[0].hostname'
# output: "k8s-ordersse-ordersse-8cf837ce7a-
➥ 1036161040.<aws_region>.elb.amazonaws.com"
Now let’s uninstall the controller with the following command:
After running this command, we need to delete the ALB. To delete the ALB, we need to find its ARN. We’ll use the AWS CLI to list the load balancers in our account and filter them out by their DNS name. The following command fetches the ARN of the load balancer whose DNS name matches the ALB’s URL, which we obtained earlier:
$ aws elbv2 describe-load-balancers | jq '.LoadBalancers[] |
select(.DNSName == "<load_balancer_url>") | .LoadBalancerArn'
# output: "arn:aws:elasticloadbalancing:<aws_region>:<aws_account_id>:
➥ loadbalancer/app/k8s-ordersse-ordersse-8cf837ce7a/cf708f97c2485719"
Make sure you replace <load_balancer_url> with your load balancer’s URL, which we obtained in an earlier step. This command gives us the load balancer’s ARN, which we can use to delete it:
Now we can delete the Kubernetes cluster with following command:
Finally, let’s delete the KMS key we created earlier to encrypt our Kubernetes secrets. To delete the key, we run the following command:
where <key_id> is the ID of the key we created earlier.
Summary
-
Kubernetes is a container orchestration tool that’s becoming a standard for deploying microservices at scale. Using Kubernetes helps us to move across cloud providers while keeping a consistent interface to our services.
-
The three major managed Kubernetes services are Google’s Kubernetes Engine (GKE), Azure’s Kubernetes Service (AKS), and AWS’s Elastic Kubernetes Service (EKS). In this chapter, we learned to deploy a Kubernetes cluster with EKS, which is the most widely adopted Kubernetes managed service.
-
We can deploy a Kubernetes cluster in AWS using the console, CloudFormation, or the eksctl command-line tool. In this chapter, we used the eksctl CLI since it’s the AWS recommended way to manage a Kubernetes cluster.
-
To make our Kubernetes cluster reachable from the internet, we use an ingress controller such as the AWS Load Balancer Controller.
-
To deploy a microservice to a Kubernetes cluster, we create the following resources:
-
Aurora Serverless is a powerful database engine and a convenient choice for microservices. With Aurora Serverless, you only pay for what you use, and you don’t need to worry about scaling the database, thereby reducing your costs and the time you spend managing it.
-
To securely feed sensitive configuration details to your applications in Kubernetes, we use Kubernetes secrets. With EKS, we have two strategies for managing Kubernetes secrets securely:
1 For a quick comparison between GKE, AKS, and EKS, see Alexander Postasnick, “AWS vs EKS vs GKE: Managed Kubernetes Services Compared,” June 9, 2021, https://acloudguru.com/blog/engineering/aks-vs-eks-vs-gke-managed-kubernetes-services-compared.
2 Flexera, “2022 State of the Cloud Report” (pp. 52–53), https://info.flexera.com/CM-REPORT-State-of-the-Cloud.
3 The AWS Load Balancer Controller is an open source project hosted on GitHub (https://github.com/kubernetes-sigs/aws-load-balancer-controller/). The project was originally created by Ticketmaster and CoreOS.
4 To learn more about labels and how to use them, see the official documentation, https://kubernetes.io/docs/concepts/overview/working-with-objects/labels/, and Zane Hitchcox’s “matchLabels, Labels, and Selectors Explained in Detail, for Beginners,” Medium (July 15, 2018), https://medium.com/@zwhitchcox/matchlabels-labels-and-selectors-explained-in-detail-for-beginners-d421bdd05362.
5 For more information on this point, see the official AWS documentation: https://docs.aws.amazon.com/AmazonRDS/latest/UserGuide/USER_VPC.WorkingWithRDSInstanceinaVPC.html.
6 See the official documentation for more information on how Aurora Serverless works and the autoscaling configuration parameters: https://docs.aws.amazon.com/AmazonRDS/latest/AuroraUserGuide/aurora-serverless-v2.html.
7 You can learn more about this option through Tracy Pierce’s article “How to use AWS Secrets & Configuration Provider with Your Kubernetes Secrets Store CSI driver,” https://aws.amazon.com/blogs/security/how-to-use-aws-secrets-configuration-provider-with-kubernetes-secrets-store-csi-driver/.
8 Managing Kubernetes securely is a big and important topic, and to learn more about, it you can check out Alex Soto Bueno and Andrew Block’s Securing Kubernetes Secrets (Manning, 2022), https://livebook.manning.com/book/securing-kubernetes-secrets/chapter-4/v-3/point-13495-119-134-1.