
4 Principles of REST API design
- The design principles of REST APIs
- How the Richardson maturity model helps us understand the advantages of REST best design principles
- The concept of resource and the design of endpoints for REST APIs
- Using HTTP verbs and HTTP status codes to create highly expressive REST APIs
- Designing high-quality payloads and URL query parameters for REST APIs
Representational state transfer (REST) describes an architectural style for applications that communicate over a network. Originally, the concept of REST included a list of constraints for the design of distributed and scalable web applications. Over time, detailed protocols and specifications have emerged that give us well-defined guidelines for designing REST APIs. Today, REST is by far the most popular choice for building web APIs.1 In this chapter, we study the design principles of REST and learn to apply them by designing the orders API of the CoffeeMesh platform, the on-demand coffee delivery application we introduced in chapter 1.
We explain the concept of a resource, and what it means for the design of REST APIs. You’ll also learn to leverage features of the HTTP protocol, such as HTTP verbs and status codes, to create highly expressive APIs. The final part of this chapter covers best practices for designing API payloads and URL query parameters.
4.1 What is REST?
REST, a term coined by Roy Fielding in his doctoral dissertation “Architectural Styles and the Design of Network-based Software Architectures” (PhD diss., University of California, Irvine, 2000, p. 109), describes an architectural style for loosely coupled and highly scalable applications that communicate over a network. It refers to the ability to transfer the representation of a resource’s state. The concept of resource is fundamental in REST applications.
DEFINITION REST is an architectural style for building loosely coupled and highly scalable APIs. REST APIs are structured around resources, entities that can be manipulated through the API.
A resource is an entity that can be referenced by a unique hypertext reference (i.e., URL). There are two types of resources: collections and singletons. A singleton represents a single entity, while collections represent lists of entities.2 What does this mean in practice? It means that we use different URL paths for each type of resource. For example, CoffeeMesh’s orders service manages orders, and through its API we can access a specific order through the /orders/{order_id} URL path, while a collection of orders is available under the /orders URL path. Therefore, /orders/{order_id} is a singleton endpoint, while /orders is a collections endpoint.
Some resources can be nested within another resource, such as a payload for an order with several items listed in a nested array.
Listing 4.1 Example of payload with nested resources
{
    "id": "924721eb-a1a1-4f13-b384-37e89c0e0875",
    "status": "progress",
    "created": "2023-09-01",
    "order": [
        {
            "product": "cappuccino",
            "size": "small",
            "quantity": 1
        },
        {
            "product": "croissant",
            "size": "medium",
            "quantity": 2
        }
    ]
}
We can create nested endpoints to represent nested resources. Nested endpoints allow us to access specific details of a resource. For example, we can expose a GET /orders/{order_id}/status endpoint that allows us to get an order’s status without all the other details about the order. Using nested endpoints is a common optimization strategy when resources are represented by large payloads since they help us avoid costly data transfers when we are only interested in one property.
The resource-oriented nature of REST APIs may sometimes appear limiting. A common concern is how to model actions through endpoints while keeping our APIs RESTful. For example, how do we represent the action of cancelling an order? A common heuristic is to represent actions as nested resources. For example, we can have a POST /orders/{order_id}/cancel endpoint to cancel orders. In this case, we model the order’s cancellation as creating a cancellation event.
Designing clean endpoints is the first step toward building REST APIs that are easy to maintain and to consume. The patterns you’ve learned in this section go a long way to achieving clean endpoints, and in the rest of this chapter, you’ll learn additional patterns and principles for clean API design. In the next section, you’ll learn about the six architectural constraints of REST API applications.
4.2 Architectural constraints of REST applications
In this section, we study the architectural constraints of REST applications. These constraints were enumerated by Fielding, and they specify how a server should process and respond to a client request. Before we delve into the details, let’s first provide a brief overview of each constraint:
-
Client -server architecture—The user interface (UI) must be decoupled from the backend.
-
Statelessness—The server must not manage states between requests.
-
Cacheability—Requests that always return the same response must be cacheable.
-
Layered system—The API may be architected in layers, but such complexity must be hidden from the user.
-
Code on demand—The server can inject code into the user interface on demand.
-
Uniform interface—The API must provide a consistent interface for accessing and manipulating resources.
Let’s discuss each of these constraints in more detail.
4.2.1 Separation of concerns: The client-server architecture principle
REST relies on the principle of separation of concerns, and consequently it requires that user interfaces are decoupled from data storage and server logic. This allows server-side components to evolve independently from UI elements. As you can see in figure 4.1, a common implementation of the client-server architectural pattern is building the UI as a standalone application, for example, as a single-page application (SPA).

Figure 4.1 REST’s client-server architecture principle states that the server implementation must be decoupled from the client.
4.2.2 Make it scalable: The statelessness principle
In REST, every request to the server must contain all the information necessary to process it. In particular, the server must not keep state from one request to the next. As you can see in figure 4.2, removing state management from server components makes it easier to scale the backend horizontally. This allows us to deploy multiple instances of the server, and because none of those instances manages the API client’s state, the client can communicate with any of them.

Figure 4.2 REST’s statelessness principle states that the server must not manage the state of the client. This allows us to deploy multiple instances of the API server and respond to the API client with any of them.
4.2.3 Optimize for performance: The cacheability principle
When applicable, server responses must be cached. Caching improves the performance of APIs because it means we don’t have to perform all the calculations required to serve a response again and again. GET requests are suitable for caching, since they return data already saved in the server. As you can see in figure 4.3, by caching a GET request, we avoid having to fetch data from the source every time a user requests the same information. The longer it takes to assemble the response for a GET request, the greater the benefits of caching it.

Figure 4.3 REST’s cacheability principle states that cacheable responses must be cached, which helps to boost the API server performance. In this example, we cache the order’s status for a short period of time to avoid multiple requests to the kitchen service.
Figure 4.3 illustrates the benefits of caching. As we learned in chapter 3, customers can track the progress on their orders once they’ve been submitted to the kitchen. The orders service interfaces with the kitchen service to obtain information on the order’s progress. To save time the next time the customer checks the order’s status, we cache its value for a short period of time.
4.2.4 Make it simple for the client: The layered system principle
In a REST architecture, clients must have a unique point of entry to your API and must not be able to tell whether they are connected directly to the end server or to an intermediary layer such as a load balancer. You can deploy different components of a server-side application in different servers, or you can deploy the same component across different servers for redundancy and scalability. This complexity should be hidden from the user by exposing a single endpoint that encapsulates access to your services.
As you can see in figure 4.4, a common solution to this problem is the API gateway pattern, which is a component that serves as an entry point for all microservices. The API gateway knows the server addresses of each service, and it knows how to map each request to the relevant service.3

Figure 4.4 REST’s layered system principle states that the complexity of our backend must be hidden from the client. A common solution to this problem is the API gateway pattern, which serves as an entry point to all the services in the platform.
4.2.5 Extendable interfaces: The code-on-demand principle
Servers can extend the functionality of a client application by sending executable code directly from the backend, such as JavaScript files needed to run a UI. This constraint is optional and only applies to applications in which the backend serves the client interface.
4.2.6 Keep it consistent: The uniform interface principle
REST applications must expose a uniform and consistent interface to their consumers. The interface must be documented, and the API specification must be followed strictly by the server and the client. Individual resources are identified by a Uniform Resource Identifier (URI),4 and each URI must be unique and always return the same resource. For example, the URI /orders/8 represents an order with ID 8, and a GET request on this URI always returns the state of the order with ID 8. If the order is deleted from the system, the ID must not be reused to represent a different order.
Resources must be represented using a serialization method of choice, and that approach should be used consistently across the API. Nowadays, REST APIs typically use JSON as the serialization format, although other formats are also possible, such as XML.
The architectural constraints of REST give us solid ground for designing robust and scalable APIs. But as we’ll see in the following sections of this chapter, there are more factors we need to consider when designing an API. In the next section, you’ll learn to make your APIs discoverable by enriching a resource’s description with related hypermedia links.
4.3 Hypermedia as the engine of application state
Now that we understand the most important design constraints of REST APIs, let’s look at another important concept in REST: hypermedia as the engine of application state (HATEOAS). HATEOAS is a paradigm in the design of REST APIs that emphasizes the concept of discoverability. HATEOAS makes APIs easier to use by enriching responses with all the information users need to interact with a resource. In this section, we explain how HATEOAS works, and we discuss the benefits and disadvantages of this approach.
What exactly is HATEOAS? In an article written in 2008 with the title “REST APIs Must Be Hypertext-Driven” (http://mng.bz/p6y5), Fielding suggested that REST APIs must include related links in their responses to allow clients to navigate the API by following those links.
DEFINITION Hypermedia as the engine of application state (HATEOAS) is a design paradigm of REST that emphasizes the idea of discoverability. Whenever a client requests a resource from the server, the response must contain a list of related links to the resource. For example, if a client requests the details of an order, the response must include the links to cancel and pay for the order.
For example, as you can see in figure 4.5, when a client requests the details of an order, the API includes a collection of links related to the order. With those links, we can cancel the order, or we can pay for it.

Figure 4.5 In the HATEOAS paradigm, the API sends a representation of the requested resource with other links related to the resource.
Listing 4.2 Representation of an order including hypermedia links
{
    "id": 8,
    "status": "progress",
    "created": "2023-09-01",
    "order": [
        {
            "product": "cappuccino",
            "size": "small",
            "quantity": 1
        },
        {
            "product": "croissant",
            "size": "medium",
            "quantity": 2
        }
    ],
    "links": [
        {
            "href": "/orders/8/cancel",
            "description": "Cancels the order",
            "type": "POST"

        },
        {
            "href": "/orders/8/pay",
            "description": "Pays for the order",
            "type": "POST"
        }
    ]
}
Providing relational links makes APIs navigational and easier to use, since every resource comes with all the URLs we need to work with it. However, in practice, many APIs are not implemented that way for several reasons:
-
The information supplied by hyperlinks is already available in the API documentation. In fact, the information contained in an OpenAPI specification is far richer and more structured than what you can provide in a list of related links for specific resources.
-
It’s not always clear exactly what links should be returned. Different users have different levels of permissions and roles, which allow them to perform different actions and access different resources. For example, external users can use the POST
/ordersendpoint in the CoffeeMesh API to place an order, and they are also able to use the GET/orders/{order_id}endpoint to retrieve the details of an order. However, they cannot use the DELETE/orders/{order_id}endpoint to delete an order, since this endpoint is restricted to internal users of the CoffeeMesh platform. If the point of HATEOAS is to make the API navigational from a single point of entry, it wouldn’t make sense to return the DELETE/orders/{order_id}endpoint to external users since they are not able to use it. Therefore, it’s necessary to return different lists of related links to different users according to their permissions. However, this level of flexibility introduces additional complexity in our API designs and implementations and couples the authorization layer with the API layer. -
Depending on the state of the resource, certain actions and resources may not be available. For example, you can call the POST
/orders/1234/cancelendpoint on an active order but not on a cancelled order. This level of ambiguity makes it hard to define and implement robust interfaces that follow the HATEOAS principles. -
Finally, in some APIs, the list of related links may be large and therefore make the response payload too big, hence compromising the performance of the API and the reliability of the connection for small devices with low network connectivity.
When working on your own APIs, you can decide whether to follow the HATEOAS principles. There’s a certain level of benefit in providing lists of related resources in some cases. For example, in a wiki application, the linked resources section of a payload can be used to list content related to a specific article, links to the same article in other languages, and links to actions that can be performed on the article. Overall, you may want to strike a balance between what your API documentation already provides to the client in a more clear and detailed way, and what you can offer in your responses to facilitate the interaction between the client and the API. If you’re building a public-facing API, your clients will benefit from relational links. However, if it’s a small internal API, it’s probably unnecessary to include relational links.
Now that we know how we make our APIs discoverable and when it’s worth doing so, let’s study the Richardson maturity model, which will help you understand to what extent your APIs comply with the design principles of REST.
4.4 Analyzing the maturity of an API with the Richardson maturity model
This section discusses the Richardson maturity model, a mental model developed by Leonard Richardson to help us think about the degree to which an API complies with the principles of REST.5 The Richardson maturity model distinguishes four levels (from level 0 to level 3) of “maturity” in an API. Each level introduces additional elements of good REST API design (figure 4.6). Let’s discuss each level in detail.

Figure 4.6 The Richardson maturity model distinguishes four levels of API maturity, where the highest level represents an API design that abides by the best practices and standards of REST, while the lowest level represents a type of API that doesn’t apply any of the principles of REST.
4.4.1 Level 0: Web APIs à la RPC
At level 0, HTTP is essentially used as a transport system to carry interactions with the server. The notion of API in this case is closer to the idea of a remote procedure call (RPC; see appendix A). All the requests to the server are made on the same endpoint and with the same HTTP method, usually GET or POST. The details of the client’s request are carried in an HTTP payload. For example, to place an order through the CoffeeMesh website, the client might send a POST request on a generic /api endpoint with the following payload:
The server invariably responds with 200 status codes and an accompanying payload letting us know the outcome of processing the request. Similarly, to get the details of an order, a client might make the following POST request on the generic /api endpoint (assuming the ID of the order is 8):
4.4.2 Level 1: Introducing the concept of resource
Level 1 introduces the concept of resource URLs. Instead of a generic /api endpoint, the server exposes URLs that represent resources. For example, the /orders URL represents a collection of orders, while the /orders/{order_id} URL represents a single order. To place an order, the client sends a POST request on the /orders endpoint with a similar payload as in level 0:
This time when requesting the details of the last order, the client will make a POST request on the URI representing that order: /orders/8. At this level, the API doesn’t distinguish between HTTP methods to represent different actions.
4.4.3 Level 2: Using HTTP methods and status codes
Level 2 introduces the concept of HTTP verbs and status codes. At this level, HTTP verbs are used to represent specific actions. For example, to place an order, a client sends a POST request on the /orders endpoint with the following payload:
In this case, the HTTP method POST indicates the operation we want to perform, and the payload only includes the details of the order we want to place. Similarly, to get the details of an order, we send a GET request on the order’s URI: /orders/ {order_id}. In this case, we use the HTTP verb GET to tell the server that we want to retrieve details of the resource specified in the URI.
While previous levels include the same status code (usually 200) in all responses, level 2 introduces the semantic use of HTTP status codes to report the outcome of processing the client’s request. For example, when we create a resource using a POST request, we get a 201 response status code, and a request for a nonexistent resource gets a 404 response status code. For more information on HTTP status codes and best practices using them, see section 4.6.
4.4.4 Level 3: API discoverability
Level 3 introduces the concept of discoverability by applying the principles of HATEOAS and by enriching responses with links that represent the actions we can perform on a resource. For example, a GET request on the /orders/{order_id} endpoint returns a representation of an order, and it includes a list of related links.
Listing 4.3 Representation of an order, including hypermedia links
{
    "id": 8
    "status": "progress",
    "created": "2023-09-01",
    "order": [
        {
            "product": "cappuccino",
            "size": "small",
            "quantity": 1
        },
        {
            "product": "croissant",
            "size": "medium",
            "quantity": 2
        }
    ],
    "links": [
        {
            "href": "/orders/8/cancel",
            "description": "Cancels the order",
            "type": "POST"

        },
        {
            "href": "/orders/8/pay",
            "description": "Pays for the order",
            "type": "GET"
        }
    ]
}
In the Richardson maturity model, level 3 represents the last step toward what he calls the “Glory of REST.”
What does the Richardson maturity model mean for the design of our APIs? The model gives us a framework to think about where our API designs stand within the overall principles of REST. This model isn’t meant to measure the degree to which an API “complies” with the principles of REST, or to otherwise assess the quality of an API design; instead, it gives us a framework to think about how well we leverage the HTTP protocol to create expressive APIs that are easy to understand and to consume.
Now that we understand the main design principles of REST APIs, it’s time to start designing the orders API! In the next section, we’ll begin by designing the API endpoints by learning to use HTTP methods.
4.5 Structured resource URLs with HTTP methods
As we learned in section 4.4, using HTTP methods and status codes is associated with a mature API design in the Richardson maturity model. In this section, we learn to use HTTP methods correctly by applying them to the design of the CoffeeMesh application’s orders API.
HTTP methods are special keywords used in HTTP requests to indicate the type of action we want to perform in the server. Proper use of HTTP methods makes our APIs more structured and elegant, and since they’re part of the HTTP protocol, they also make the API more understandable and easier to use.
DEFINITION HTTP request methods are keywords used in HTTP requests to indicate the type of action we wish to perform. For example, the GET method retrieves the details of a resource, while the POST method creates a new resource. The most important HTTP methods for REST APIs are GET, POST, PUT, PATCH, and DELETE. HTTP methods are also known as verbs.
In my experience, there’s often confusion around the proper use of HTTP methods. Let’s clear up that confusion by learning the semantics of each method. The most relevant HTTP methods in REST APIs are GET, POST, PUT, PATCH, and DELETE:
HTTP methods allow us to model the basic operations we can perform on a resource: create (POST), read (GET), update (PUT and PATCH), and delete (DELETE). We refer to these operations with the acronym CRUD, which comes from the field of databases,6 but is very popular in the world of APIs. You’ll often hear about CRUD APIs, which are APIs designed to perform these operations on resources.
How do we use HTTP methods to define the endpoints of CoffeeMesh’s orders API? We use HTTP methods in combination with URLs, so let’s first define the resource URLs. In section 4.1, we learned to distinguish between two types of resource URLs in REST: singletons, which represent a single resource, and collections, which represent a list of resources. In the orders API, we have these two resource URLs:
-
/orders/{orders_id}—Represents a single order. The curly braces around{order_id}indicates that this is a URL path parameter and must be replaced by the ID of an order.
As you can see in figure 4.7, we use the singleton URL /orders/{order_id} to perform actions on an order, such as updating it, and the collections URL /orders to place and to list past orders. HTTP methods help us model these operations:
-
POST
/ordersto place orders since we use POST to create new resources. -
GET
/ordersto retrieve a list of orders since we use GET to obtain information. -
GET
/orders/{order_id}to retrieve the details of a particular order. -
PUT
/orders/{order_id}to update an order since we use PUT to update a resource. -
DELETE
/orders/{order_id}to delete an order since we use DELETE for deletes. -
POST
/orders/{order_id}/cancelto cancel an order. We use POST to create a cancellation. -
POST
/orders/{order_id}/payto pay for an order. We use POST to create a payment.

Figure 4.7 We combine HTTP methods with URL paths to design our API endpoints. We leverage the semantics of HTTP methods to convey the intention of each endpoint. For example, we use the POST method to create new resources, so we use it in the POST /orders endpoint to place orders.
Now that we know how to design API endpoints by combining URL paths with HTTP methods, let’s see how to leverage the semantics of HTTP status codes to return expressive responses.
4.6 Using HTTP status codes to create expressive HTTP responses
This section explains how we use HTTP status codes in the responses of a REST API. We begin by clarifying what HTTP status codes are and how we classify them into groups, and then we explain how to use them to model our API responses.
4.6.1 What are HTTP status codes?
We use status codes to signal the result of processing a request in the server. When properly used, HTTP status codes help us deliver expressive responses to our APIs’ consumers. Status codes fall into the following five groups:
-
3xx group—Signals that a resource has been moved to a new location
-
5xx group—Signals that there was an error while processing the request
NOTE HTTP response status codes are used to indicate the outcome of processing an HTTP request. For example, the 200 status code indicates that the request was successfully processed, while the 500 status code indicates that an internal server error was raised while processing the request. HTTP status codes are associated with a reasoned phrase that explains the intent of the code. For example, the reasoned phrase for the 404 status code is “Not Found.” You can check out the full list of status codes and learn more about them at http://mng.bz/z5lw.
The full list of HTTP status codes is long, and enumerating them one by one wouldn’t do much to help us understand how we use them. Instead, let’s look at the most commonly used codes and see how we apply them in our API designs.
When thinking about HTTP status codes, it’s useful to distinguish between successful and unsuccessful responses. A successful response means the request was successfully processed, while an unsuccessful response means that something went wrong while processing the request. For each of the endpoints that we defined in section 4.5, we use the following successful HTTP status codes:
-
POST
/orders: 201 (Created)—Signals that a resource has been created. -
GET
/orders: 200 (OK)—Signals that the request was successfully processed. -
GET
/orders/{order_id}: 200 (OK)—Signals that the request was successfully processed. -
PUT
/orders/{order_id}: 200 (OK)—Signals that the resource was successfully updated. -
DELETE
/orders/{order_id}: 204 (No Content)—Signals that the request was successfully processed but no content is delivered in the response. Contrary to all other methods, a DELETE request doesn’t require a response with payload, since, after all, we are instructing the server to delete the resource. Therefore, a 204 (No Content) code is a good choice for this type of HTTP request. -
POST
/orders/{order_id}/cancel: 200 (OK)—Although this is a POST endpoint, we use the 200 (OK) status code since we’re not really creating a resource, and all the client wants to know is that the cancellation was successfully processed. -
POST
/orders/{order_id}/pay: 200 (OK)—Although this is a POST endpoint, we use the 200 (OK) status code since we’re not really creating a resource, and all the client wants to know is that the payment was successfully processed.
That’s all good for successful responses, but what about error responses? What kinds of errors can we encounter in the server while processing requests, and what kinds of HTTP status codes are appropriate for them? We distinguish two groups of errors:
-
Errors made by the user when sending the request, for example, due to a malformed payload, or due to the request being sent to a nonexistent endpoint. We address this type of error with an HTTP status code in the 4xx group.
-
Errors unexpectedly raised in the server while processing the request, typically due to a bug in our code. We address this type of error with an HTTP status code in the 5xx group.
Let’s talk about each of these error types in more detail.
4.6.2 Using HTTP status codes to report client errors in the request
An API client can make different types of errors when sending a request to an API. The most common type of error in this category is sending a malformed payload to the server. We distinguish two types of malformed payloads: payloads with invalid syntax and unprocessable entities.
Payloads with invalid syntax are payloads that the server can neither parse nor understand. A typical example of a payload with invalid syntax is malformed JSON. As you can see in figure 4.8, we address this type of error with a 400 (Bad Request) status code.

Figure 4.8 When a client sends a malformed payload, we respond with a 400 (Bad Request) status code.
Unprocessable entities are syntactically valid payloads that miss a required parameter, contain invalid parameters, or assign the wrong value or type to a parameter. For example, let’s say that, to place an order, our API expects a POST request on the /orders URL path with a payload like this:
That is, we expect the user to send us a list of elements, where each element represents an item of the order. Each item is described by the following properties:
-
size—Identifies the size that applies to the ordered product -
quantity—Tells us how many items of the same product and size the user wishes to order
As you can see in figure 4.9, an API client can send a payload missing one of the required properties, such as product. We address this type of error with the 422 (Unprocessable Entity) status code, which signals that something was wrong with the request and it couldn’t be processed.
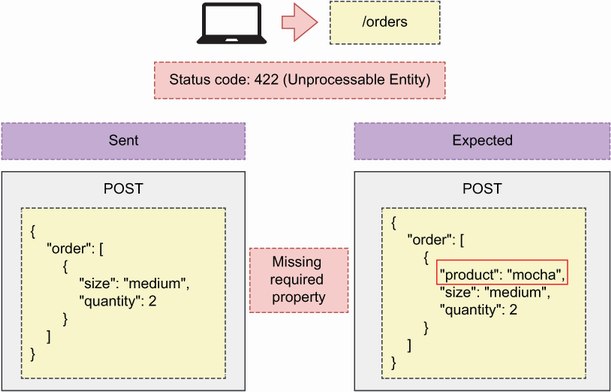
Figure 4.9 When an API client sends a malformed payload, the server responds back with a 400 (Bad Request) status code.
Another common error happens when an API client requests a resource that doesn’t exist. For example, we know that the GET /orders/{order_id} endpoint serves the details of an order. If a client uses that endpoint with a nonexistent order ID, we should respond with an HTTP status code signaling that the order doesn’t exist. As you can see in figure 4.10, we address this error with the 404 (Not Found) status code, which signals that the requested resource is not available or couldn’t be found.

Figure 4.10 When an API client requests a resource that doesn’t exist, the server responds with status code 404 (Not Found).
Another common error happens when API clients send a request using an HTTP method that is not supported. For example, if a user sent a PUT request on the /orders endpoint, we must tell them that the PUT method is not supported on that URL path. There are two HTTP status codes we can use to address this situation. As you can see in figure 4.11, we can return a 501 (Not Implemented) if the method hasn’t been implemented but will be available in the future (i.e., we have a plan to implement it).

Figure 4.11 When an API client sends a request to a URL path with an HTTP method that will be exposed in the future but hasn’t been implemented, the server responds with a 501 (Not Implemented) status code.
If the requested HTTP method is not available and we don’t have a plan to implement it, we respond with the 405 (Method Not Allowed) status code, as illustrated in figure 4.12.

Figure 4.12 When an API client makes a request on a URL path with an HTTP method that is not supported and will not be supported, the server responds with a 405 (Method Not Allowed) status code.
Two common errors in API requests have to do with authentication and authorization. The first happens when a client sends an unauthenticated request to a protected endpoint. In that case, we must tell them that they should first authenticate. As you can see in figure 4.13, we address this situation with the 401 (Unauthorized) status code, which signals that the user hasn’t been authenticated.

Figure 4.13 When an API client sends an unauthenticated request to an endpoint that requires authentication, the server responds with a 401 (Unauthorized) status code.
The second error happens when a user is correctly authenticated and tries to use an endpoint or a resource they are not authorized to access. An example is a user trying to access the details of an order that doesn’t belong to them. As you can see in figure 4.14, we address this scenario with the 403 (Forbidden) status code, which signals that the user doesn’t have permissions to access the requested resource or to perform the requested operation.
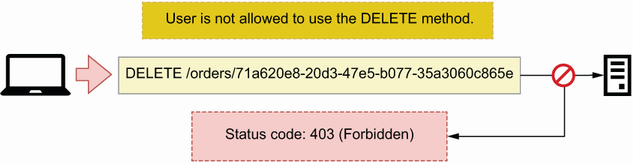
Figure 4.14 When an authenticated user makes a request using an HTTP method they’re not allowed to use, the server responds with a 403 (Forbidden) status code.
Now that we know how to use HTTP status codes to report user errors, let’s turn our attention to status codes for server errors.
4.6.3 Using HTTP status codes to report errors in the server
The second group of errors are those raised in the server due to a bug in our code or to a limitation in our infrastructure. The most common type of error within this category is when our application crashes unexpectedly due to a bug. In those situations, we respond with a 500 (Internal Server Error) status code, as you can see in figure 4.15.

Figure 4.15 When the server raises an error due to a bug in our code, we respond with a 500 (Internal Server Error) status code.
A related type of error happens when our application becomes unable to service requests. We usually handle this situation with the help of a proxy server or an API gateway (see section 4.2.4). Our API can become unresponsive when the server is overloaded or down for maintenance, and we must let the user know about this by sending an informative status code. We distinguish two scenarios:
-
As you can see in figure 4.16, when the server is unable to take on new connections, we must respond with a 503 (Service Unavailable) status code, which signals that the server is overloaded or down for maintenance and therefore cannot service additional requests.

Figure 4.16 When the API server is overloaded and can’t serve additional requests, we respond to the client with a 503 (Service Unavailable) status code.
-
When the server takes too long to respond to the request, we respond with a 504 (Gateway Timeout) status code, as shown in figure 4.17.

Figure 4.17 When the API server is very slow responding to the request, a proxy server responds to the client with a 504 (Gateway Timeout) status code.
This completes our overview of the HTTP status codes most commonly used in the design of web APIs. The correct use of status codes goes a long way toward delivering a good developer experience for your API clients, but there’s one more thing we need to design well: API payloads. In the next section, we turn our attention to this important topic.
4.7 Designing API payloads
This section explains best practices for designing user-friendly HTTP request and response payloads. Payloads represent the data exchanged between a client and a server through an HTTP request. We send payloads to the server when we want to create or update a resource, and the server sends us payloads when we request data. The usability of an API is very much dependent on good payload design. Poorly designed payloads make APIs difficult to use and result in bad user experiences. It’s therefore important to spend some effort designing high-quality payloads, and in this section you’ll learn some patterns and best practices to help you in that task.7
4.7.1 What are HTTP payloads, and when do we use them?
An HTTP request is a message an application client sends to a web server, and an HTTP response is the server’s reply to the request. An HTTP request includes a URL, an HTTP method, a set of headers, and, optionally, a body or payload. HTTP headers include metadata about the request’s contents, such as the encoding format. Similarly, an HTTP response includes a status code, a set of headers, and, optionally, a payload. We can represent payloads with different data serialization methods, such as XML and JSON. In REST APIs, data is typically represented as a JSON document.
DEFINITION An HTTP message body or payload is a message that contains the data exchanged in an HTTP request. Both HTTP requests and responses can contain a message body. The message body is encoded in one of the media types supported by HTTP, such as XML or JSON. The Content-Type header of the HTTP request tells us the encoding type of the message. In REST APIs, the message body is typically encoded as JSON.
HTTP requests include a payload when we need to send data to the server. For example, a POST request typically sends data to create a resource. The HTTP specification allows us to include payloads in all HTTP methods, but it discourages their use in GET (http://mng.bz/O69K) and DELETE (http://mng.bz/YKeo) requests.
The wording of the HTTP specification is intentionally vague on whether DELETE and GET requests can include a payload. It doesn’t forbid the use of payloads, but it states that they don’t have any defined semantics. This allows some APIs to include payloads in GET requests. A famous example is Elasticsearch, which allows clients to send query documents in the body of a GET request (http://mng.bz/G14M).
What about HTTP responses? Responses may contain a payload depending on the status code. According to the HTTP specification, responses with a 1xx status code, as well as the 204 (No Content) and 304 (Not Modified) status codes, must not include a payload. All other responses do. In the context of REST APIs, the most important payloads are those in the 4xx and 5xx error responses, as well as 2xx success responses with the exception of the 204 status code. In the next section, you’ll learn to design high-quality payloads for all those responses.
4.7.2 HTTP payload design patterns
Now that we know when we use payloads, let’s learn best practices for designing them. We’ll focus on the design of response payloads, since they present more variety. As we learned in section 4.6.1, we distinguish between error and success responses. Error responses’ payloads should include an "error" keyword detailing why the client is getting an error. For example, a 404 response, which is generated when the requested resource cannot be found in the server, can include the following error message:
"error" is a commonly used keyword for error messages, but you can also use other keywords such as "detail" and "message". Most web development frameworks handle HTTP errors and have default templates for error responses. For example, FastAPI uses "detail", so we’ll use that keyword in the orders API specification.
Among success responses, we distinguish three scenarios: when we create a resource, when we update a resource, and when we get the details of a resource. Let’s see how we design responses for each of these scenarios.
Response payloads for POST requests
We use POST requests to create resources. In CoffeeMesh’s orders API, we place orders through the POST /orders endpoint. To place an order, we send the list of items we want to buy to the server, which takes responsibility for assigning a unique ID to the order, and therefore the order’s ID must be returned in the response payload. The server also sets the time when the order was taken and its initial status. We call the properties set by the server server-side or read-only properties, and we must include them in the response payload. As you can see in figure 4.18, it’s good practice to return a full representation of the resource in the response to a POST request. This payload serves to validate that the resource was correctly created.

Figure 4.18 When an API client sends a POST request to create a new resource, the server responds with a full representation of the resource just created with its ID and any other properties set by the server.
Response payloads for PUT and PATCH requests
To update a resource, we use a PUT or a PATCH request. As we saw in section 4.5, we make PUT/PATCH requests on a singleton resource URI, such as the PUT /orders/ {order_id} endpoint of CoffeeMesh’s orders API. As you can see in figure 4.19, in this case it’s also good practice to return a full representation of the resource, which the client can use to validate that the update was correctly processed.
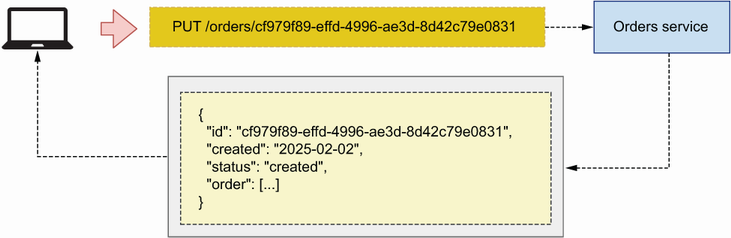
Figure 4.19 When an API client sends a PUT request to update a resource, the server responds with a full representation of the resource.
Response payloads for GET requests
We retrieve resources from the server using GET requests. As we established in section 4.5, CoffeeMesh’s orders API exposes two GET endpoints: the GET /orders and the GET /orders/{orders_id} endpoints. Let’s see what options we have when designing the response payloads of these endpoints.
The GET /orders returns a list of orders. To design the contents of the list, we have two strategies: include a full representation of each order or include a partial representation of each order. As you can see in figure 4.20, the first strategy gives the API client all the information they need in one request. However, this strategy may compromise the performance of the API when the items in the list are big, resulting in a large response payload.

Figure 4.20 When an API client sends a request to the GET /orders endpoint, the server responds with a list of orders, where each order object contains full details about the order.
The second strategy for the GET /orders endpoint’s payload is to include a partial representation of each order, as you can see in figure 4.21. For example, it’s common practice to include only the ID of each item in the response of a GET request on a collection endpoint, such as GET /orders. In this situation, the client must call the GET /orders/{order_id} endpoint to get a full representation of each order.

Figure 4.21 When the API client makes a GET request on the /orders URL path, the server responds with a list of order IDs. The client uses those IDs to request the details of each order on the GET /orders/{order_id} endpoint.
Which approach is better? It depends on the use case. It’s preferable to send a full representation of each resource, especially in public-facing APIs. However, if you’re working on an internal API and the full details of each item aren’t needed, you can shorten the payload by including only the properties the client needs. Smaller payloads are faster to process, which results in a better user experience. Finally, singleton endpoints, such as the GET /orders/{order_id}, must always return a full representation of the resource.
Now that we know how to design API payloads, let’s turn our attention to URL query parameters.
4.8 Designing URL query parameters
Now let’s talk about URL query parameters and how, why, and when you should use them. Some endpoints, such as the GET /orders endpoint of the orders API, return a list of resources. When an endpoint returns a list of resources, it’s best practice to allow users to filter and paginate the results. For example, when using the GET /orders endpoint, we may want to limit the results to only the five most recent orders or to list only cancelled orders. URL query parameters allow us to accomplish those goals and should always be optional, and, when appropriate, the server may assign default values for them.
Definition URL query parameters are key-value parameters in the URL. Query parameters come after a question mark (?), and they’re typically used to filter the results of an endpoint, such as the GET /orders endpoint of the orders API. We can combine multiple query parameters by separating them with ampersands (&).
URL query parameters are key-value pairs that form part of a URL but are separated from the URL path by a question mark. For example, if we want to call the GET /orders endpoint and filter the results by cancelled orders, we may write something like this:
We can chain multiple query parameters within the same URL by separating them with ampersands. Let’s add a query parameter named limit to the GET /orders endpoint to allow us to restrict the number of results. To filter the GET /orders endpoint by cancelled orders and restrict the number of results to 5, we make the following API request:
It’s also common practice to allow API clients to paginate results. Pagination consists of slicing the results into different sets and serving one set at a time. We can use several strategies to paginate results, but the most common approach is using a page and a per_page combination of parameters. page represents a set of the data, while per_page tells us how many items we want to include in each set. The server uses per_page’s value to determine how many sets of the data we’ll get. We combine both parameters in an API request as in the following example:
This concludes our journey through the best practices and design principles of REST APIs. You’re now equipped with the resources you need to design highly expressive and structured REST APIs that are easy to understand and consume. In the next chapter, you’ll learn to document your API designs using the OpenAPI standard.
Summary
-
Representational state transfer (REST) defines the design principles of well-architected REST APIs:
- Client-server architecture—Client and server code must be decoupled.
- Statelessness—The server must not keep state between requests.
- Cacheability—Cacheable requests must be cached.
- Layered system—The architectural complexity of the backend must not be exposed to end users.
- Code on demand (optional)—Client applications may be able to download executable code from the server.
- Uniform interface—The API must provide a uniform and consistent interface.
-
Hypermedia as the engine of application state (HATEOAS) is a paradigm that states that REST APIs must include referential links in their responses. HATEOAS makes APIs navigational and easier to use.
-
Good REST API design leverages features of the HTTP protocol, such as HTTP methods and status codes, to create well-structured and highly expressive APIs that are easy to consume.
-
We exchange data with an API server using payloads. A payload goes in the body of an HTTP request or response. Clients send request payloads using the POST, PUT, and PATCH HTTP methods. Server responses always include a payload, except when the status code is 204, 304, or one from the 1xx group.
-
URL query parameters are key-value pairs in the URL, and we use them for filtering, paginating, and sorting the results of a GET endpoint.
1 The 2022 “State of the API Report” by Postman found that the majority of participants in the survey (89%) use REST (https://www.postman.com/state-of-api/api-technologies/#api-technologies).
2 See Prakash Subramaniam’s excellent article “REST API Design—Resource Modeling” for an in-depth discussion of resources and resource modeling in REST APIs (https://www.thoughtworks.com/en-gb/insights/blog/rest-api-design-resource-modeling).
3 For more information on this pattern, see Chris Richardson, Microservices Patterns (Manning, 2019, pp. 259–291; https://livebook.manning.com/book/microservices-patterns/chapter-8/point-8620-53-297-0).
4 For the latest specification on URIs, see “RFC 7320: URI Design and Ownership” by M. Nottingham (July 2004, https://tools.ietf.org/html/rfc7320).
5 Leonard Richardson presented his maturity model in his talk “Justice Will Take Us Millions of Intricate Moves” at QCon San Francisco in 2008 (https://www.crummy.com/writing/speaking/2008-QCon/).
6 The CRUD acronym was reportedly introduced by James Martin in his influential book Managing the Data-Base Environment (Prentice-Hall, 1983, p. 381).
7 In addition to learning best practices, you’ll find it useful to read about anti-patterns. My article, “How Bad Models Ruin an API (or Why Design-First is the Way to Go),” contains an overview of common anti-patterns you should avoid (https://www.microapis.io/blog/how-bad-models-ruin-an-api).