Chapter 14: Generating Code from AST
In this chapter, we will learn how to use ASTs in Python to generate code for various applications. We will apply these abstract syntax trees to metaprogramming to implement automatic code generated in this chapter.
Automatic code generation is one way of making the life of a programmer easier. An abstract syntax tree is an excellent functionality that can help us generate code in a much simpler way.
The concept of AST is discussed with examples in Chapter 9 of this book. In this chapter, we will be tapping the advantages of ASTs to generate code automatically. Code generation can be implemented to enable no-code or limited coding while developing applications. In this chapter, we will continue to use the example of ABC Megamart to generate code from ASTs.
In this chapter, we will be looking at the following main topics:
- Generating a simple class with a template
- Generating multiple classes from a list
- Generating a class with attributes
- Generating a class with methods
- Defining a custom class factory
- Developing a code generator to generate a simple library
By the end of this chapter, you should be able to understand how to use the existing methods of the ast library in Python to enable your application to generate its own code, how to avoid repeating yourself, and how to generate code dynamically.
Technical requirements
The code examples shared in this chapter are available on GitHub under the code for this chapter here: https://github.com/PacktPublishing/Metaprogramming-with-Python/tree/main/Chapter14.
Generating a simple class with a template
In this section, we will be looking at how to generate code for a class without actually defining the class itself. We will be creating a string-based template with the structure of a class we want to develop but not the actual code that can be executed. To explain this further, let us look at an example where we will generate a class named VegCounter by parsing a series of strings using the ast module.
The sequence of steps to be followed to generate code for a class is represented in the following flow diagram:
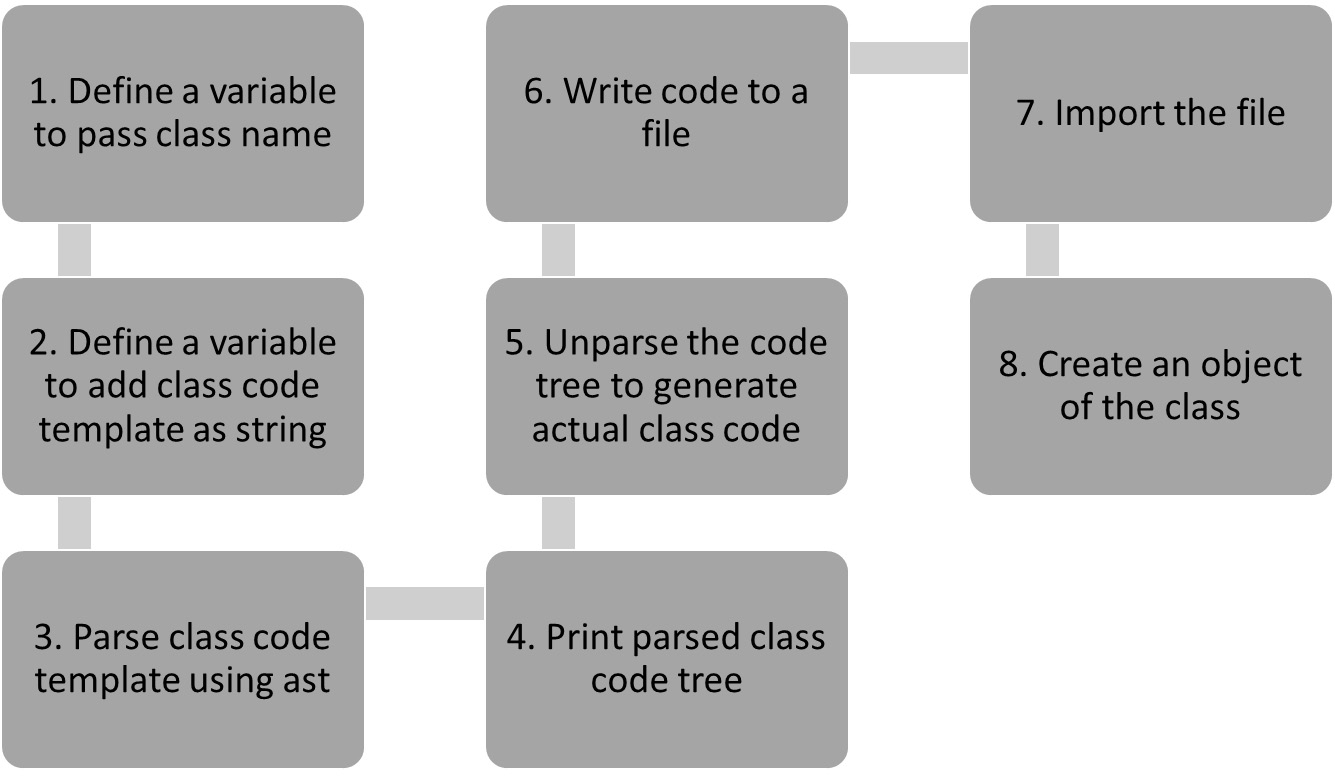
Figure 14.1 – A code generation sequence for a simple class
Let us look at the implementation of this example:
- We will start by importing the ast library:
import ast
- Let us now create a variable to pass the class name with which the code needs to be generated:
classname = "VegCounter"
- We will next define a variable that becomes the template for the class generated in this example:
classtemplate = """class """ +classname+ """():pass"""
- In the next step, we will parse the class template with the parse method in the ast module:
print(ast.dump(class_tree, indent = 4))
- The output of the preceding code displays the abstract syntax tree of the class template:
Module(
body=[
ClassDef(
name='VegCounter',
bases=[],
keywords=[],
body=[
Pass()],
decorator_list=[])],
type_ignores=[])
- The preceding tree can be compiled and executed as follows:
actualclass = compile(class_tree, 'vegctr_tree', 'exec')
actualclass
Thus, this leads to the following output:
<code object <module> at 0x0000028AAB0D2A80, file "vegctr_tree", line 1>
- In the next step, we will unparse the tree to generate the actual code for the class:
VegCounter.
print(ast.unparse(class_tree))
Executing the preceding code leads to the following output:
class VegCounter:
pass
- In the next step, let us write the preceding class code to a file named classtemplate.py:
code = open("classtemplate.py", "w")
script = code.write(ast.unparse(class_tree))
code.close()
- The classtemplate file looks as follows:
Figure 14.2 – The classtemplate.py file
- Let us now import the classtemplate and create an object:
import classtemplate as c
vegc = c.VegCounter()
vegc
The output is as follows:
<classtemplate.VegCounter at 0x28aab1d6a30>
In this section, we have generated a simple class code using the ast module. This example helps us in understanding the steps to be followed to generate code for a custom class since it is easier to start understanding code generation by starting simple. With this understanding, let us generate code for multiple classes.
Generating multiple classes from a list
In this section, we will look at generating code for multiple classes dynamically using the ast module and its unparse method.
Generating the code for more than one class dynamically gives us a direction for implementing code generation for multiple functionalities of an application. The classes need not be for the same functionality and the class code thus generated can later be modified to include additional methods or attributes as required by the application. The skeletal class code will be generated through this example.
To understand this further, we will follow the sequence described in the following flow diagram.

Figure 14.3 – A code generation sequence for multiple classes
Let us now look at how to implement this scenario:
- We will first define a variable that can be assigned a list of class names as values:
classnames = ["VegCounter", "ElectronicsCounter", "PasadenaBranch", "VegasBranch"]
- In the next step, let us look at generating class templates for each of the class names from the preceding list:
classgenerator = []
for classname in classnames:
classcode = """class """ +classname+ """():pass"""
classgenerator.append(classcode)
classgenerator
The class templates are added to another list named classgenerator, and the list is as follows:
['class VegCounter():pass',
'class ElectronicsCounter():pass',
'class PasadenaBranch():pass',
'class VegasBranch():pass']
- To parse the string templates from the preceding output and generate their abstract syntax trees, let us create another list named classtrees and store the trees:
classtrees = []
for i in classgenerator:
classtree = ast.parse(i)
classtrees.append(classtree)
classtrees
The parsed class trees that are assigned to the classtrees list variable are displayed as follows:
[<ast.Module at 0x1efa91fde20>,
<ast.Module at 0x1efa91e6d30>,
<ast.Module at 0x1efa91e6220>,
<ast.Module at 0x1efa91e6370>]
- In this step, we will review one of the trees to ensure that the abstract syntax tree is generated for the class as expected:
print(ast.dump(classtrees[0], indent = 4))
The output is generated as follows:
Module(
body=[
ClassDef(
name='VegCounter',
bases=[],
keywords=[],
body=[
Pass()],
decorator_list=[])],
type_ignores=[])
- We can further unparse the classtrees variable to generate the code for each class:
print(ast.unparse(classtrees[1]))
An example output looks as follows:
class ElectronicsCounter:
pass
- Let us further write all the generated classes into a file:
code = open("classtemplates.py", "w")
for i in classtrees:
code.write(ast.unparse(i))
code.write(" ")
code.write(" ")
code.close()
The generated classtemplates.py file looks as follows:

Figure 14.4 – The classtemplates.py file
- Let us import the file and call an instance of each class to check if it works:
import classtemplates as ct
print(ct.ElectronicsCounter())
print(ct.PasadenaBranch())
print(ct.VegasBranch())
print(ct.VegCounter())
The output of the preceding code is as follows:
<classtemplates.ElectronicsCounter object at 0x00000255C0760FA0>
<classtemplates.PasadenaBranch object at 0x00000255C0760F10>
<classtemplates.VegasBranch object at 0x00000255C0760FA0>
<classtemplates.VegCounter object at 0x00000255C0760F10>
In this section, we have generated code for multiple classes using the ast module. This example is the next step toward working on automatic code generation for multiple functionalities or modules of an application.
Generating a class with attributes
In this section, we will generate code for a class, along with a list of attributes, that will also be included dynamically in the class. Generating code for a class alone can give the initial skeletal structure for a module, whereas we need to add attributes if we want to make the class more specific. The following flow diagram represents the sequence of steps to be followed for this example:

Figure 14.5 – A code generation sequence for a class with multiple attributes
Let us look at the code for this example:
- We will first define a variable to provide classname as input, followed by a classtemplate to create the template of the class declaration:
classname = "VegCounter"
classtemplate = '''class ''' +classname+ ''':'''+' '
- In the next step, let us define another variable to provide attribute names as input:
attributename = ['items', 'countername', 'billamount']
- Let us further update classtemplate by providing each of the preceding attributes that are required to generate the class code:
for attr in attributename:
classtemplate = classtemplate + attr +''' =
None''' + ' '
- Let us now parse the classtemplate and review the abstract syntax tree:
class_tree = ast.parse(classtemplate)
print(ast.dump(class_tree, indent = 4))
- The syntax tree for the preceding class template looks as follows:
Module(
body=[
ClassDef(
name='VegCounter',
bases=[],
keywords=[],
body=[
Assign(
targets=[
Name(id='items',
ctx=Store())],
value=Constant(value=None)),
Assign(
targets=[
Name(id='countername',
ctx=Store())],
value=Constant(value=None)),
Assign(
targets=[
Name(id='billamount',
ctx=Store())],
value=Constant(value=None))],
decorator_list=[])],
type_ignores=[])
All three variables – items, countername, and billamount added into the class template – are now part of the syntax tree. If we review the tree in detail, we can look at these variables under body | assign | targets | name | id.
- We can further unparse the tree and look at the code of the class:
print(ast.unparse(class_tree))
The output looks as follows:
class VegCounter:
items = None
countername = None
billamount = None
Let us write the code to a file and import it:
code = open("classtemplateattr.py", "w")
script = code.write(ast.unparse(class_tree))
code.close()
The generated code looks as follows:

Figure 14.6 –The classtemplateattr.py file
We can import the classtemplateattr.py file and the class can be accessed as follows:
import classtemplateattr as c
c.VegCounter()
vegc = c.VegCounter()
vegc.items = ['onions','tomatoes','carrots','lettuce']
vegc.countername = 'Veg Counter'
vegc.billamount = 200
The output is displayed as follows, with all the attributes and their corresponding values assigned:
['onions', 'tomatoes', 'carrots', 'lettuce']
Veg Counter
200
In this section, we have generated a class with multiple attributes without writing the code for the class. Instead, we have defined a template that takes in a class name and a list of attributes as input. With this understanding, we can look at generating a class with methods.
Generating a class with methods
In this section, let us generate code for a class and its methods. Throughout this chapter, our goal is to generate code dynamically for building applications that can solve a specific purpose. Adding methods along with attributes makes the code generation for a class even more application-specific. We can look at two variations of this example:
- Generating a class with an init method
- Generating a class with a user-defined method
Let’s discuss each in detail.
Generating a class with an init method
In this example, let us generate code for a class and add an init method to the class and also initialize attributes. In this example, we will define a class for the vegetable counter of ABC Megamart. In the init method, let us initialize cart items from the vegetable counter of ABC Megamart in this class:
classname = "VegCounter"
classtemplate =  '''class ''' +classname+ ''':'''+'
' +''' def __init__(self,*items):
cartItems = []
for i in items:
cartItems.append(i)
self.items = cartItems'''
class_tree = ast.parse(classtemplate)
print(ast.unparse(class_tree))
The parsed class template generates the following code:
class VegCounter:
def __init__(self, *items):
cartItems = []
for i in items:
cartItems.append(i)
self.items = cartItems
The abstract syntax tree for this class is generated with the function definition, as represented in the following figure:

Figure 14.7 – The function definition of the init method
With this understanding, let us look at one more example of this same class by generating code for a user-defined method.
Generating a class with a user-defined method
In this section, let us look at a variation of the class by creating a template that generates a user-defined method for the class:
classname = "VegCounter"
methodname = "returnCart"
classtemplate =  '''class ''' +classname+ ''':'''+'
' +''' def '''+methodname+'''(self,*items):
cartItems = []
for i in items:
cartItems.append(i)
return cartItems'''
class_tree = ast.parse(classtemplate)
print(ast.unparse(class_tree))
The parsed classtemplate generates the following code:
class VegCounter:
def returnCart(self, *items):
cartItems = []
for i in items:
cartItems.append(i)
return cartItems
The abstract syntax tree for this class is generated with the function definition, as represented in the following figure:
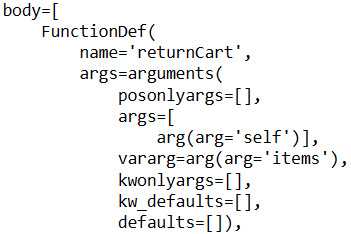
Figure 14.8 – The function definition of the user-defined method
We can either use the init method when we want to initialize the cart items at the class level or use the attributes later. By contrast, the user-defined method can be used if we want to keep the attributes specific to the method and perform actions based on the attributes within the method.
With this understanding, let us look at defining a custom class factory.
Defining a custom class factory
In this section, let us define a function named classgenerator that generates a custom class, attribute, and method using a class template as follows:
def classgenerator(classname, attribute, method):
classtemplate = '''class ''' +classname+
          ''':'''+'
    ' +attribute+''' =
          None
    def '''+method+'''(self,item,status):
if (status == 'Y'):
print('Test passed for', item)else:
print('Get another', item)'''
return classtemplate
In this section, we are making the code generation more dynamic by creating a function that can generate code with custom values for the class name, attribute name, and method name, respectively. This helps in creating custom code for multiple functionalities in an application.
Let us provide a custom class name, attribute name, and method name as input to the preceding function:
class_tree = ast.parse(classgenerator('ElectronicCounter', 'TestItem', 'verifyCart')actualclass = compile(class_tree, 'elec_tree', 'exec')
print(ast.unparse(class_tree))
The generated class code is as follows:
class ElectronicCounter:
TestItem = None
def verifyCart(self, item, status):
if status == 'Y':
print('Test passed for', item)else:
print('Get another', item)We can expand this example further by developing a code generator library in the following section.
Developing a code generator to generate a simple library
In this section, let us develop a simple code generator that generates code for a class with get, set, and delete properties for its custom attributes. The purpose of this section is to generate a complete library through automatic code generation. To fulfill this, let us write the following code:
- Let us define the code generator as follows:
class CodeGenerator:
def __init__(self, classname, attribute):
self.classname = classname
self.attribute = attribute
- Let us further define the method to define the class template in the code generator as follows:
def generatecode(self):
classtemplate = '''class ''' +self.classname+ ''':'''+''' def __init__(self):''' + ' '+''' self._'''+self.attribute+''' = None @property
def test'''+self.attribute+'''(self): return self.test'''+self.attribute+''' @test'''+self.attribute+'''.getter
def test'''+self.attribute+'''(self): print("get test'''+self.attribute+'''") return self._test'''+self.attribute+'''
@test'''+self.attribute+'''.setter
def test'''+self.attribute+'''(self, value):
print("set test'''+self.attribute+'''")
self._test'''+self.attribute+''' = value
@test'''+self.attribute+'''.deleter
def test'''+self.attribute+'''(self):
print("del test'''+self.attribute+'''")
del self._test'''+self.attribute+'''
'''
class_tree = ast.parse(classtemplate)
print(ast.unparse(class_tree))
print(' ')
- We will now save the preceding code into a file named codegenerator.py and import the file as a library:
from codegenerator import CodeGenerator as c
- Let us define a dictionary object and assign multiple class names and their corresponding attribute names as input:
classes = {'VegCounter' : 'items',
'ElectronicCounter' : 'goods',
'BranchManhattan' : 'Sales',
'BranchPasadena' : 'Products'
}
- Let us further define a function named generatelib and add classes as input parameters. This function takes in the class names and their attribute names as input and generates the code from the class templates of the codegenerator library:
def generatelib(classes):
for key, value in classes.items():
codegen = c(key, value)
codegen.generatecode()
- In this step, let us write the generated code into a file to generate a custom library that can be used further:
from contextlib import redirect_stdout
with open('abcmegamartlib.py', 'w') as code:
with redirect_stdout(code):
generatelib(classes)
code.close()
- The generated code is in the following format for each input class:
class VegCounter:
def __init__(self):
self._items = None
@property
def testitems(self):
return self.testitems
@testitems.getter
def testitems(self):
print('get testitems')
return self._testitems
@testitems.setter
def testitems(self, value):
print('set testitems')
self._testitems = value
@testitems.deleter
def testitems(self):
print('del testitems')
del self._testitems
- We can further import the generated library and define objects as follows:
import abcmegamartlib as abc
abc.BranchManhattan()
The preceding code returns the following output:
<abcmegamartlib.BranchManhattan at 0x21c4800c7f0>
These are various examples of code generation that can be implemented using Python’s metaprogramming ast module.
Summary
In this chapter, we have looked at various examples to generate code for a custom class and a class with custom attributes. We have also covered examples of generating code for a custom class with methods and attributes. Finally, we have developed a code generator that can be used to develop a custom library using the concept of abstract syntax trees in Python.
Overall, we have seen various scenarios that can help us utilize the abstract syntax tree within Python’s ast module and generate dynamic code using Python metaprogramming.
In the next chapter, we will be discussing a case study to which we can apply all the concepts of metaprogramming that we have covered so far in the book.