
Chapter 13: Applying GOF Design Patterns – Part 2
In this chapter, we will continue looking at the concept of design patterns in Python 3 and its various categories and their implementation while developing software using Python.
In the previous chapter, we learned how to apply behavioral design patterns with examples. In this chapter, we will continue looking at the remaining two categories – structural and creational design patterns. We will see how they can be applied in Python using our core example of ABC Megamart.
In this chapter, we will be looking at the following main topics:
- Understanding structural design patterns
- Understanding creational design patterns
By the end of this chapter, you should be able to understand some of the examples of important structural and creational design patterns and learn how they can be implemented in various applications.
Technical requirements
The code examples shared in this chapter are available on GitHub under the code for this chapter here: https://github.com/PacktPublishing/Metaprogramming-with-Python/tree/main/Chapter13.
Exploring structural design patterns
As the name suggests, structural design patterns are used to design the structure of classes and their implementation in such a way that the classes and objects can be extended or reused effectively. In this section, we will be covering three such structural design patterns — bridge, façade, and proxy patterns. We are considering these three design patterns because they are unique and they represent three different aspects of how structural design patterns can be used.
Understanding the bridge pattern
The bridge design pattern is applied to bridge multiple elements or operations of implementation using the concept of abstraction or the abstract method. To explain this further and to implement this design pattern, our code should have the following elements:
- Abstraction superclass: The base class with the abstract method to perform a specific action, along with methods to bridge any additional implementation
- Abstraction subclasses: One or more subclasses that implement the abstract method from the abstraction superclass to perform their respective action
- Implementation superclass: A base that adds an additional implementation or design over the abstraction
- Implementation subclasses: Subclasses that inherit the implementation superclass
Let’s look at the bridge pattern with an example. In this example, we will look at printing the business card for branch managers that belong to two different supermarkets – ABC Megamart and XYZ Megamart. Let’s see how:
- To illustrate the design pattern further, let’s create an abstraction superclass named PrintCard, and add three methods. The add_name method adds the name of the supermarket, and the add_manager method adds the formatting specific to a manager. The add_manager method gets the formatting input from the implementation subclass, which we will discuss later in this section. The third method is the printcard method, which is an abstract method and will be defined in the subclasses:
from abc import abstractmethod, ABC
class PrintCard(ABC):
def add_name(self, name):
self.name = name
def add_manager(self, branch):
self.branch = branch.FORMATTING
@abstractmethod
def printcard(self):
pass
- Let’s further create an abstraction subclass named CardABC. This class will initialize the logo, name from the super class, and manager from the super class. The printcard method will print the logo, the name of the supermarket, and the address of the branch:
class CardABC(PrintCard):
def __init__(self, logo, name, branch):
self.logo = logo
super().add_name(name)
super().add_manager(branch)
def printcard(self, *args):
print(self.logo + self.name)
for arg in args:
print(self.branch + str(arg))
- Next, create an abstraction subclass named CardXYZ. It will initialize the following variables – style, logo, name from super class, and manager from the superclass. The printcard method will print the logo, the style for the card, the name of the supermarket, and the address of the branch:
class CardXYZ(PrintCard):
def __init__(self, style, logo, name, branch):
self.style = style
self.logo = logo
super().add_name(name)
super().add_manager(branch)
def printcard(self, *args):
print(self.logo + self.style + self.name)
for arg in args:
print(self.branch + str(arg))
- Now, let’s create the implementation superclass named Manager with a method named formatting:
class Manager:
def formatting(self):
pass
- Next, create an implementation subclass named Manager_manhattan to add formatting to the business card, specifically for the branch manager from the Manhattan branch:
class Manager_manhattan(Manager):
def __init__(self):
self.formatting()
def formatting(self):
self.FORMATTING = '33[7m'
- Let’s now create an implementation subclass named Manager_albany to add formatting for the business card specifically for the branch manager from the Albany branch:
class Manager_albany(Manager):
def __init__(self):
self.formatting()
def formatting(self):
self.FORMATTING = '�33[94m'
- Next, instantiate CardABC, which is an abstraction subclass. The three input parameters for this class are the format of the logo, the name of the supermarket, and the branch from where the formatting will be added to the card:
manager_manhattan = CardABC(logo = '33[43m', name = 'ABC Megamart', branch = Manager_manhattan())
- And now we will print the card:
manager_manhattan.printcard('John M',
'40097 5th Main Street',
'Manhattan',
'New York City',
'New York',
11007)
The output is represented as follows, with the formatting as provided in the class instantiation:
ABC Megamart
John M
40097 5th Main Street
Manhattan
New York City
New York
11007
- Let’s now instantiate CardXYZ, which is an abstraction subclass. The four input parameters for this class are the style, the format of the logo, the name of the supermarket, and the branch from where the formatting will be added to the card:
manager_albany = CardXYZ(style = '33[43m',logo = '33[5m', name = 'XYZ Megamart', branch = Manager_albany())
- Now, let’s print the card.
manager_albany.printcard('Ron D','[email protected]','123 Main Street','Albany','New York', 12084)
The output is represented as follows, with the style and formatting as provided in the class instantiation:
XYZ Megamart
Ron D
123 Main Street
Albany
New York
12084
Let’s connect the elements of this design pattern with their corresponding objects in the example with the following graphical representation:

Figure 13.1 – Bridge pattern classes
So, the bridge pattern has been implemented by creating a bridge between the abstraction and the implementation classes. With this understanding, let’s look at the facade pattern.
Understanding the facade pattern
In this section, we will look at the facade pattern, where we will design a black box kind of implementation to hide the complexity of a system that handles multiple subsystems from the end user or client. To explain this further and to implement this design/core pattern, our code needs the following elements:
- Functionality: The core functionalities that need to be implemented for a system are defined in these functionality classes.
- Facade: This is the class that wraps the core functionalities and their implementation from the end users.
- End user: The function, method, or class using which the core functionalities of a system are accessed using the facade class.
To understand the facade pattern further, let’s create a set of functionalities that starts from adding items to the shopping cart, moving to the counter, scanning bar codes, billing, and finally, printing the invoice:
- The first functionality class in this series is Cart, where items will be added to the shopping cart in the return_cart method:
class Cart:
def __init__(self, items):
self.items = items
def return_cart(self):
cart_items = []
for i in self.items:
cart_items.append(i)
print("Running return_cart...")
return cart_items
- The second functionality class is the Counter class, where the name of the counter is returned in the goto_counter method:
class Counter:
def __init__(self, name):
self.name = name
def goto_counter(self):
countername = self.name
print("Running goto_counter...")
return countername
- The third functionality class is the BarCode class, where the scanned bar codes are returned in the scan_bar_code method:
class BarCode:
def __init__(self, scan):
self.scan = scan
def scan_bar_code(self):
codes = []
for i in self.scan:
codes.append(i)
print("Running scan_bar_code...")
return codes
- The fourth functionality is the Billing class, where the price is tagged to the bar codes and returned as a dictionary object in the add_billing method:
class Billing:
def __init__(self, codes, units ):
self.codes = codes
self.units = units
def add_billing(self):
codes = self.codes.scan_bar_code()
pricetag = []
for i in self.units:
pricetag.append(i)
bill = dict(zip(codes, pricetag))
print("Running add_billing...")
return bill
- The next functionality is the Tax class, where tax values are returned using the add_tax method in the class:
class Tax:
def __init__(self, tax):
self.tax = tax
def add_tax(self):
taxed = []
for i in self.tax:
taxed.append(i)
print("Running add_tax...")
return taxed
- The functionality after this is the FinalBill class, where we will be calculating the final bill using the calc_bill method:
class FinalBill:
def __init__(self, billing, cart, tax):
self.billing = billing
self.cart = cart
self.tax = tax
def calc_bill(self):
bill = self.billing.add_billing()
items = []
cart_items = self.cart.return_cart()
calc_bill = []
taxes = self.tax.add_tax()
for item,tax in zip(bill.items(),taxes):
items.append(item[1])
calc_bill.append(item[1] + item[1]*tax)
finalbill = dict(zip(cart_items, calc_bill))
print("Running calc_bill...")
return finalbill
- The final functionality class in the facade pattern is the Invoice class, where we will be creating a print_invoice method to print the final invoice:
class Invoice:
def __init__(self, finalbill, counter):
self.finalbill = finalbill
self.counter = counter
def print_invoice(self):
finalbill = self.finalbill.calc_bill()
final_total = sum(finalbill.values())
print("Running print_invoice...")
print('**************ABC
Megamart*****************')
print('***********------------------
**************')
print('Counter Name: ',
self.counter.goto_counter())
for item,price in finalbill.items():
print(item,": ", price)
print('Total:',final_total)
print('***********------------------
**************')
print('***************PAID********************
****')
- Now, let’s create the Facade class named Queue. It has two functions – the pipeline method to explicitly run some of the methods in the functionality classes, and the pipeline_implicit method to run the print_invoice method from the Invoice class, which will in turn call all other methods in the rest of the functionality classes:
class Queue:
def __init__(self, items, name, scan, units, tax):
self.cart = Cart(items)
self.counter = Counter(name)
self.barcode = BarCode(scan)
self.billing = Billing(self.barcode, units)
self.tax = Tax(tax)
self.finalbill = FinalBill(self.billing,
self.cart, self.tax)
self.invoice = Invoice(self.finalbill,
self.counter)
def pipeline(self):
self.cart.return_cart()
self.counter.goto_counter()
self.barcode.scan_bar_code()
self.tax.add_tax()
def pipeline_implicit(self):
self.invoice.print_invoice()
- Let’s create an end user function to run the methods in functionality classes using the Facade class by creating an instance for Queue and calling the pipeline method:
def run_facade():
queue = Queue(items = ['paperclips','blue
pens','stapler','pencils'],
name = ['Regular Counter'],
scan = [113323,3434332,2131243,2332783],
units = [10,15,12,14],
tax = [0.04,0.03,0.035,0.025],
)
queue.pipeline()
- Now, let’s call the run_facade method to test the design pattern:
run_facade()
The output for the preceding test is as follows:
Running return_cart...
Running goto_counter...
Running scan_bar_code...
Running add_tax...
- Finally, let’s create another end user function to run the methods in functionality classes using the Facade class by creating an instance for Queue and calling the pipeline_implicit method:
def run_facade_implicit():
queue = Queue(items = ['paperclips','blue
pens','stapler','pencils'],
name = ['Regular Counter'],
scan = [113323,3434332,2131243,2332783],
units = [10,15,12,14],
tax = [0.04,0.03,0.035,0.025],
)
queue.pipeline_implicit()
- Then, let’s call the run_facade_implicit method to test the design pattern:
run_facade_implicit()
The output for the preceding test is as follows:
Running scan_bar_code...
Running add_billing...
Running return_cart...
Running add_tax...
Running calc_bill...
Running print_invoice...
**************ABC Megamart*****************
***********------------------**************
Running goto_counter...
Counter Name: ['Regular Counter']
paperclips : 10.4
blue pens : 15.45
stapler : 12.42
pencils : 14.35
Total: 52.620000000000005
***********------------------**************
***************PAID************************
Let’s connect the elements of this design pattern with their corresponding objects in the example in the following graphical representation:

Figure 13.2 – Facade pattern classes
So, the facade pattern has been implemented by creating a black box that provides the end users with an interface to access the functions of a complex system without worrying about the implementation details. Now, let’s look at the proxy pattern.
Understanding the proxy pattern
In this section, we will look at the proxy design pattern. As the name implies, the proxy pattern is applied to create a proxy around the actual functionality so that the actual functionality is executed only when the proxy allows it based on certain preconditions. To explain this further and to implement this design pattern, our code needs the following elements:
- Functionality class: The base functionalities of the system are designed in this class as methods.
- Proxy class: This is a proxy around the functionality class and it provides restrictions as to when to execute the base functionalities from the functionality class.
In this example, let’s consider the NYC branch of ABC Megamart and create a class named NYC:
- The NYC class is initialized with four empty dictionary parameters named manager, branch, product, and sales. Let’s also add three methods named set_parameters (to set the four dictionary parameters), get_parameters (to return the parameters), and calc_tax_nyc (to calculate the tax and return the parameters along with selling price data):
class NYC:
def __init__(self):
self.manager = {}
self.branch = {}
self.product = {}
self.sales = {}
def set_parameters(self, manager, branch, product,
sales):
self.manager = manager
self.branch = branch
self.product = product
self.sales = sales
def get_parameters(self):
return self.manager, self.branch,
self.product, self.sales
def calc_tax_nyc(self):
branch = self.branch
manager = self.manager
product = self.product
sales = self.sales
pricebeforetax = sales['purchase_price'] +
sales['purchase_price'] *
sales['profit_margin']
finalselling_price = pricebeforetax +
(pricebeforetax * (sales['tax_rate'] +
sales['local_rate']))
sales['selling_price'] = finalselling_price
return branch, manager, product, sales
- The next step of the implementation is to create a proxy ReturnBook class to call the methods from the NYC class to set parameters, get parameters, and calculate tax:
class ReturnBook(NYC):
def __init__(self, nyc):
self.nyc = nyc
def add_book_details(self, state, manager, branch,
product, sales):
if state in ['NY', 'NYC', 'New York']:
self.nyc.set_parameters(manager, branch,
product, sales)
else:
print("There is no branch in the state:",
state)
def show_book_details(self, state):
if state in ['NY', 'NYC', 'New York']:
return self.nyc.get_parameters()
else:
print(state, "has no data")
def calc_tax(self, state):
if state in ['NY', 'NYC', 'New York']:
return self.nyc.calc_tax_nyc()
else:
print("The state", state, "is not
supported")
- Let’s now instantiate the proxy ReturnBook class and provide the NYC functionality class as the input parameter:
branch_manhattan = ReturnBook(NYC())
- To set the parameters from the NYC class, we will be calling the add_book_details method from the proxy class. The parameters will be set in the NYC class only if the conditions provided in add_book_details are successfully met by the input state parameter:
branch_manhattan.add_book_details(state = 'NY', manager = {'regional_manager': 'John M',
'branch_manager': 'Tom H',
'sub_branch_id': '2021-01'},
branch = {'branchID': 2021,
'branch_street': '40097 5th Main Street',
'branch_borough': 'Manhattan',
'branch_city': 'New York City',
'branch_state': 'New York',
'branch_zip': 11007},
product = {'productId': 100002,
'product_name': 'WashingMachine',
'product_brand': 'Whirlpool'},
sales = {'purchase_price': 450,
'profit_margin': 0.19,
'tax_rate': 0.4,
'local_rate': 0.055})
- Let’s further call the show_book_details method to get the parameters from the NYC class, provided that the state parameter in the input is NY, NYC, or New York:
branch_manhattan.show_book_details('NY')
The output of the preceding code is as follows:
({'regional_manager': 'John M',
'branch_manager': 'Tom H',
'sub_branch_id': '2021-01'},
{'branchID': 2021,
'branch_street': '40097 5th Main Street',
'branch_borough': 'Manhattan',
'branch_city': 'New York City',
'branch_state': 'New York',
'branch_zip': 11007},
{'productId': 100002,
'product_name': 'WashingMachine',
'product_brand': 'Whirlpool'},
{'purchase_price': 450,
'profit_margin': 0.19,
'tax_rate': 0.4,
'local_rate': 0.055})
- Let’s further call the calc_tax method from the proxy class to calculate the selling price, provided the state parameters are successful:
branch_manhattan.calc_tax('NY')
- Let’s test the restrictions in the proxy methods by providing incorrect input to the state parameter:
branch_manhattan.add_book_details(state = 'LA', manager = {'regional_manager': 'John M',
'branch_manager': 'Tom H',
'sub_branch_id': '2021-01'},
branch = {'branchID': 2021,
'branch_street': '40097 5th Main Street',
'branch_borough': 'Manhattan',
'branch_city': 'New York City',
'branch_state': 'New York',
'branch_zip': 11007},
product = {'productId': 100002,
'product_name': 'WashingMachine',
'product_brand': 'Whirlpool'},
sales = {'purchase_price': 450,
'profit_margin': 0.19,
'tax_rate': 0.4,
'local_rate': 0.055})
The output of the preceding code is as follows:
There is no branch in the state: LA
The output of the preceding code is as follows:
LA has no data
- Finally, let’s test the calc_tax method from the proxy:
branch_manhattan.calc_tax('LA')
The output is as follows:
The state LA is not supported
Let’s connect the elements of this design pattern with their corresponding objects in the example in the following graphical representation:
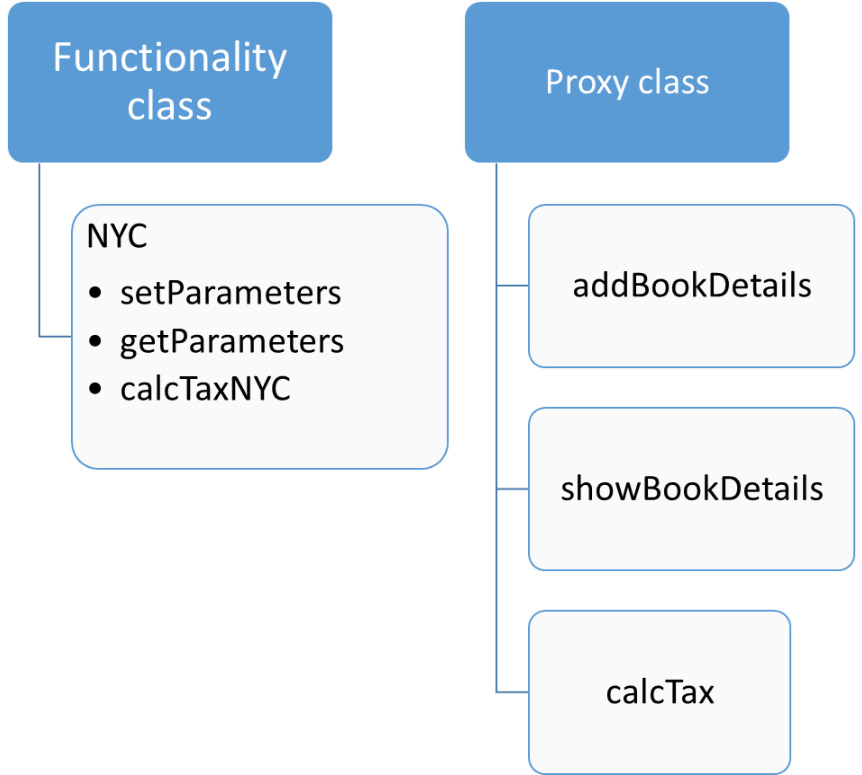
Figure 13.3 – Proxy design pattern classes
So, the proxy pattern has been implemented by creating a proxy class that adds the required conditions to execute the actual functionalities. Next, we’re moving on to exploring the creational design patterns.
Exploring creational design patterns
Creational design patterns are various methods to add abstraction in the process of object creation. In this section, we will be looking at three such design patterns, namely the factory method, prototype pattern, and singleton pattern.
Understanding the factory method
The factory design pattern is a method of abstraction where a factory class is created to create an object for the class from the factory class instead of directly instantiating the object. To explain this further and to implement this design pattern, our code needs the following elements:
- Abstract class: The abstract class with the abstract methods for functionalities to be defined in the subclasses.
- Abstraction subclasses: The subclasses are inherited from the abstract class and overwrite the abstract methods.
- Factory class: The class to create objects for the abstraction subclasses.
- End user method: The class or method to test or call the factory method.
For this example, let’s implement using another scenario from ABC Megamart:
- Let’s create an abstract class with two methods, buy_product and maintenance_cost:
from abc import abstractmethod
class Branch:
@abstractmethod
def buy_product(self):
pass
@abstractmethod
def maintenance_cost(self):
pass
- Now, let’s create a subclass for the Branch class named Brooklyn and implement the buy_product and maintenance_cost methods:
class Brooklyn(Branch):
def __init__(self,product,unit_price,quantity,
product_type):
self.product = product
self.unit_price = unit_price
self.quantity = quantity
self.product_type = product_type
def buy_product(self):
if (self.product_type == 'FMCG'):
self.statetax_rate = 0.035
self.promotiontype = 'Discount'
self.discount = 0.10
self.initialprice =
self.unit_price*self.quantity
self.salesprice = self.initialprice +
self.initialprice*self.statetax_rate
self.finalprice = self.salesprice *
(1-self.discount)
return self.salesprice,
self.product,self.promotiontype
else:
return "We don't stock this product"
def maintenance_cost(self):
self.coldstorageCost = 100
if (self.product_type == 'FMCG'):
self.maintenance_cost = self.quantity *
0.25 + self.coldstorageCost
return self.maintenance_cost
else:
return "We don't stock this product"
- Similarly, let’s create another subclass, named Manhattan, which inherits the Branch class, as follows:
class Manhattan(Branch):
def __init__(self,product,unit_price,quantity,
product_type):
self.product = product
self.unit_price = unit_price
self.quantity = quantity
self.product_type = product_type
- Let’s further define a method named buy_product to return the product price, product name, and promotion in cases where the product is electronic:
def buy_product(self):
if (self.product_type == 'Electronics'):
self.statetax_rate = 0.05
self.promotiontype = 'Buy 1 Get 1'
self.discount = 0.50
self.initialprice =
self.unit_price*self.quantity
self.salesprice = self.initialprice +
self.initialprice*self.statetax_rate
self.finalprice = self.salesprice *
(1-self.discount)
return self.finalprice,
self.product,self.promotiontype
else:
return "We don't stock this product"
- Let’s now define another method to calculate the maintenance cost:
def maintenance_cost(self):
if (self.product_type == 'Electronics'):
self.maintenance_cost = self.quantity * 0.05
return self.maintenance_cost
else:
return "We don't stock this product"
- In the next step, let’s create a factory class named BranchFactory, which creates the instance for the branch subclasses, Brooklyn or Manhattan:
Class BranchFactory:
def create_branch(self,branch,product,unit_price,
quantity,product_type):
if str.upper(branch) == 'BROOKLYN':
return Brooklyn(product,unit_price,
quantity,product_type)
elif str.upper(branch) == 'MANHATTAN':
return Manhattan(product,unit_price,
quantity,product_type)
- Now, let’s test the factory method by creating a function named test_factory:
def test_factory(branch,product,unit_price,quantity,product_type):
branchfactory = BranchFactory()
branchobject = branchfactory.create_branch(branch,
product,unit_price,quantity,product_type)
print(branchobject)
print(branchobject.buy_product())
print(branchobject.maintenance_cost())
- Let’s now call the test_factory function with inputs as Brooklyn, Milk, 10.5, and FMCG as follows:
test_factory('Brooklyn','Milk', 10,5,'FMCG')
The output for the preceding code is as follows:
<__main__.Brooklyn object at 0x000002101D4569A0>
(51.75, 'Milk', 'Discount')
101.25
- Now, call the test_factory function with inputs as manhattan, iPhone, 1000, 1, and Electronics as follows:
test_factory('manhattan','iPhone', 1000,1,'Electronics')
The output for the preceding code is as follows:
<__main__.Manhattan object at 0x000002101D456310>
(525.0, 'iPhone', 'Buy 1 Get 1')
0.05
Let’s connect the elements of this design pattern with their corresponding objects in the example with the following graphical representation:

Figure 13.4 – Factory pattern classes
So, the factory pattern has been implemented by creating a factory class that instantiates the Abstraction subclasses. With this implementation, we have learned about the creational design pattern with an example.
Understanding the prototype method
The prototype design pattern is also used to implement abstraction during the creation of a Python object. A prototype can be used by the end user to create a copy of an object of a class without the overhead of understanding the detailed implementation behind it. To explain this further and to implement this design pattern, our code needs the following elements:
- Prototype class: This class has a method to clone or copy another Python object that has the implementation.
- Implementation class: This class has the actual implementation of the functionalities as attributes and methods.
For this example, let’s implement using another scenario from ABC Megamart:
- Let’s create a class named Prototype and define a method named clone to copy the Python object provided as input to the method:
class Prototype:
def __init__(self):
self.cp = __import__('copy')
def clone(self, objname):
return self.cp.deepcopy(objname)
- Let’s now create an implementation class named FMCG and initialize a set of variables pertaining to the supplier details, and add a method to get the supplier details:
class FMCG:
def __init__(self,supplier_name,supplier_code,
supplier_address,supplier_contract_start_date,
supplier_contract_end_date,supplier_quality_code):
self.supplier_name = supplier_name
self.supplier_code = supplier_code
self.supplier_address = supplier_address
self.supplier_contract_start_date =
supplier_contract_start_date
self.supplier_contract_end_date =
supplier_contract_end_date
self.supplier_quality_code =
supplier_quality_code
def get_supplier_details(self):
supplierDetails = {
'Supplier_name': self.supplier_name,
'Supplier_code': self.supplier_code,
'Supplier_address': self.supplier_address,
'ContractStartDate':
self.supplier_contract_start_date,
'ContractEndDate':
self.supplier_contract_end_date,
'QualityCode': self.supplier_quality_code
}
return supplierDetails
- In the next step, let’s create an object named fmcg_supplier for the FMCG class:
fmcg_supplier = FMCG('Test Supplier','a0015','5093 9th Main Street, Pasadena,California, 91001', '05/04/2020', '05/04/2025',1)
- Let’s also create an object for the Prototype class, named proto:
proto = Prototype()
- Now, we can directly clone the fmcg_supplier object without passing all the attributes of the FMCG class as input. To do this, we will make use of the clone method from the Prototype class:
fmcg_supplier_reuse = proto.clone(fmcg_supplier)
- The fmcg_supplier_reuse object is a clone of the fmcg_supplier object and it is not the same object itself. This can be verified by looking at the ID of both of these objects:
id(fmcg_supplier)
The output is as follows:
2268233820528
- Similarly, we can also look at the ID of the cloned object:
id(fmcg_supplier_reuse)
The output is as follows:
2268233819616
- Let’s also verify that the cloned object can be modified without impacting the actual object:
fmcg_supplier_reuse.supplier_name = 'ABC Supplier'
fmcg_supplier_reuse.get_supplier_details()
The output is as follows:
{'Supplier_name': 'ABC Supplier',
'Supplier_code': 'a0015',
'Supplier_address': '5093 9th Main Street, Pasadena,California, 91001',
'ContractStartDate': '05/04/2020',
'ContractEndDate': '05/04/2025',
'QualityCode': 1}
- In the preceding output, we have modified the cloned object and this should not impact the original object. Let’s verify the original object:
fmcg_supplier.get_supplier_details()
The output is as follows:
{'Supplier_name': 'Test Supplier',
'Supplier_code': 'a0015',
'Supplier_address': '5093 9th Main Street, Pasadena,California, 91001',
'ContractStartDate': '05/04/2020',
'ContractEndDate': '05/04/2025',
'QualityCode': 1}
So, the prototype pattern has been implemented by creating a Prototype class that copies the object of the implementation class. Now that you’ve understood this, let’s look at the singleton design pattern.
Understanding the singleton pattern
As the name suggests, the singleton pattern is a design pattern where we can limit the number of class instances created for a class while initializing the class itself. To explain this further and implement this design pattern, we need to develop the elements of the singleton class in our code.
Unlike the other patterns, this pattern has only one element – the singleton class. A singleton class will have a constraint set within its init method to limit the number of instances to one.
For this example, let’s implement using another scenario from ABC Megamart:
- Let’s define a class named SingletonBilling. This class will have the attributes required to generate a bill for a product:
class SingletonBilling:
billing_instance = None
product_name = 'Dark Chocolate'
unit_price = 6
quantity = 4
tax = 0.054
- Let’s add a constraint in the init method of this class to limit the number of class instances to one:
def __init__(self):
if SingletonBilling.billing_instance == None:
SingletonBilling.billing_instance = self
else:
print("Billing can have only one
instance")
- In the next step, let’s also add a generate_bill method to perform the function of generating a bill for a product based on the class attributes:
def generate_bill(self):
total = self.unit_price * self.quantity
final_total = total + total*self.tax
print('***********------------------
**************')
print('Product:', self.product_name)
print('Total:',final_total)
print('***********------------------
**************')
- In the next step, we can instantiate the class object for the first time and call its generate_bill method:
invoice1 = SingletonBilling()
invoice1.generate_bill()
The output is displayed as follows:
***********------------------**************
Product: Dark Chocolate
Total: 25.296
***********------------------**************
- Let’s now test the singleton pattern by instantiating one more instance for the class:
invoice2 = SingletonBilling()
The second instance could not be created for the class due to its singleton property. The output is as expected:
Billing can have only one instance
So, the singleton pattern has been implemented by restricting the singleton class from creating more than one instance. With this example, we have covered three types of creational design patterns and their implementation.
Summary
In this chapter, we have learned about the concept of structural and creational design patterns by applying some of these design patterns in Python 3. We implemented the bridge design pattern and understood each of its elements. We understood the facade design pattern and its various elements. We also implemented the proxy design pattern with an example. We also covered creational design patterns such as the factory method, prototype, and singleton patterns with their corresponding examples.
Similar to other chapters covered in this book, this chapter, which explains the second part of design patterns, also focused on metaprogramming and its impact on Python code.
In the next chapter, we will continue the code generation with some examples.