Chapter 5: Understanding Introspection
In this chapter, we will look at introspection in Python 3 and understand how it is useful in metaprogramming. Introspection is a concept where we can learn about the properties or attributes of objects in Python during runtime using a suite of Python’s built-in methods.
Why introspection? Introspection is an information-gathering process for Python objects, and the information thus gathered can help in utilizing the objects to perform generic operations by manipulating them externally and, in turn, can help us in writing metaprograms.
Before we understand how to implement introspection, we will have a look at the built-in functions of Python that help in performing introspection. Throughout this chapter, we will look at each function that helps us introspect and understand the objects we use in our programs.
In this chapter, we will be taking a look at the following main topics:
- Introducing built-in functions
- Using the built-in id function
- Debugging unintentional assignments using id
- Finding out whether an object is callable
- Checking whether an object has an attribute
- Checking whether an object is an instance
- Checking whether an object is a subclass
- Understanding the usage of property
- Using property as a decorator
By the end of this chapter, you should be able to apply built-in functions to introspect Python objects, apply them to examples, and use them to debug code.
Technical requirements
The code examples shared in this chapter are available on GitHub under the code for this chapter here: https://github.com/PacktPublishing/Metaprogramming-with-Python/tree/main/Chapter05.
Introducing built-in functions
To understand introspection and the usage of Python’s built-in functions to perform introspection, we will continue making use of our core example of ABC Megamart throughout this chapter.
We will be covering the usage of the following built-in functions to introspect Python objects:
- id()
- eval()
- callable()
- hastattr()
- getattr()
- isinstance()
- issubclass()
- property()
Introspecting Python objects helps in understanding the properties of objects, which in turn, helps in metaprogramming these objects and using them to debug the objects, which we will be looking at in further chapters as well.
With this understanding, let’s look further into the concept of how to use these built-in functions and introspect objects.
Using the built-in id function
Understanding the characteristics of a Python object helps in writing metaprograms on the object. The memory address of an object is one of its characteristics or properties that can be manipulated using metaprogramming. The id function in Python 3 can be called to identify an object using the object’s memory address. Identifying an object through its memory address helps in analyzing objects to find out whether there are multiple assignments or copies of an object created unintentionally during the process of code development.
To understand this further, here is how we will work:
- We will be creating a class named Billing, which calculates and prints a simple bill for any product that is provided as input. Refer to the following code:
class Billing:
def __init__(self,product_name,unit_price,quantity,tax):
self.product_name = product_name
self.unit_price = unit_price
self.quantity = quantity
self.tax = tax
def generate_bill(self):
total = self.unit_price * self.quantity
final_total = total + total*self.tax
print('***********------------------
**************')
print('Product:', self.product_name)
print('Total:',final_total)
print('***********------------------
**************')
- Let’s now create an object for the Billing class:
billing = Billing('Delmonte Cheese',6,4,0.054)
- Let’s now call the generate_bill method to print the bill:
billing.generate_bill()
This code gives the following output:
***********------------------**************
Product: Delmonte Cheese
Total: 25.296
***********------------------**************
- In the next step, let’s create a separate generate_bill function that performs the same set of operations as the generate_bill method that was created inside the Billing class. The function will take in four parameters (product_name, unit_price, quantity, and tax):
def generate_bill(product_name,unit_price,quantity,tax):
total = unit_price * quantity
final_total = total + total*tax
print('***********------------------
**************')
print('Product:', product_name)
print('Total:',final_total)
print('***********------------------
**************')
- In the next step, we will be copying the Billing class into another variable named Invoicing:
Invoicing = Billing
So far, we have three objects:
- A class named Billing
- A function named generate_bill
- A variable that assigned the Billing class to a variable called Invoicing
- Now, let’s apply Python’s built-in id function to get the memory address of each of these objects:
id(Billing)
2015859835472
id(Invoicing)
2015859835472
id(generate_bill)
2015871203792
In the preceding output, we can notice that both Billing and Invoicing have the same memory address since Invoicing is a copy of the Billing class. The following figure is a simple representation of this example:

Figure 5.1 – The Billing class copied to Invoicing
With this understanding, we can further look into how we can use the id function in implementing metaprogramming.
Debugging unintentional assignments using id
In this section, we will be discussing what happens when we make unintentional references or assignments to an object while defining an attribute, a method, or a function, and how to resolve such incorrect assignments using the built-in id function. When a reference is made unintentionally, the memory address of the object is shared between the actual object and the reference object. In this example, we will be making use of id to debug the Python objects created in the preceding section and identify duplicate assignments or references of an object that might have been created unintentionally while developing an application. Here is how it works:
- To begin with, let’s create a dictionary item, class_id_count, to capture the number of occurrences of the memory address of each class:
class_id_count = {}
- In the next step, we will be creating the following four lists:
duplicates = []
ids = []
classes = []
classnames = []
Here, we capture duplicate memory addresses with duplicates, capture results of the id function with ids, capture the class details with classes, and capture the names of classes with classnames.
- In this step, we will be iterating over the directory of Python objects and checking whether the type of the object is type since the type of class is type in Python. This step helps in identifying all the objects that are classes and then updating the lists created with ids, classes, and classnames. Refer to the following code block:
for obj in dir():
if type(eval(obj)) == type:
ids.append(id(eval(obj)))
classes.append(eval(obj))
classnames.append(obj)
- We will now iterate over the ids list and check that the id is not in class_id_count, and then add it; if it is already in class_id_count, we will add it to the duplicates list:
for i in ids:
if i not in class_id_count:
class_id_count[i] = 1
elif (class_id_count[i] == 1):
duplicates.append(i)
class_id_count[i] += 1
- We will further iterate over the classes and classnames lists and check whether there are duplicates. Then, we will print the classes that have duplicates:
for cls,clsname in zip(classes,classnames):
for clsid in duplicates:
if (id(cls)==clsid):
print(clsname,cls)
The output of the preceding code is as follows:
Billing <class '__main__.Billing'>
Invoicing <class '__main__.Billing'>
- Executing the preceding code results in the following output:
class_id_count
{2196689735984: 2}
duplicates
[2196689735984]
ids
[2196689735984, 2196689735984]
classes
[__main__.Billing, __main__.Billing]
classnames
['Billing', 'Invoicing']
In the preceding output, we can see that both the Billing and Invoicing classes have the same memory address and they are duplicates. There can be scenarios where we might have intentionally referenced a class, and there can also be scenarios where multiple variable assignments to the same memory address might have happened by mistake. In such intentional scenarios, id can be used to check duplicate assignments to a memory address.
The following figure is a simple representation of this example:
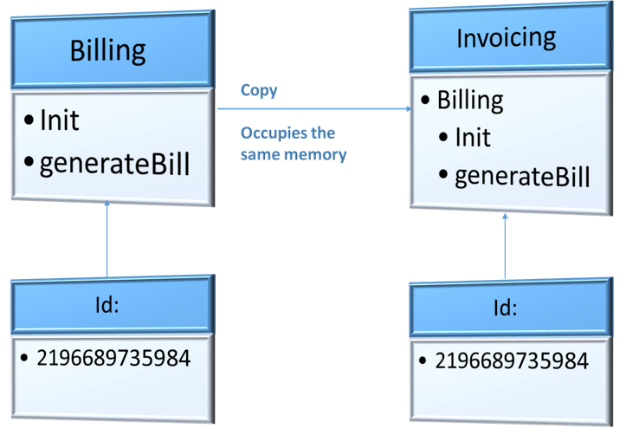
Figure 5.2 – Two classes with one memory address
With this understanding, we will look further into another built-in function, callable.
Finding out whether an object is callable
In this section, we will look at another built-in function named callable. As the name implies, this function helps in identifying whether a Python object can be called. Functions and methods can be called to enable various operations to be performed on the input parameters. Not all Python objects are callable. For example, a string variable or a numeric variable stores information but will not perform any action when executed. The callable function helps in verifying such objects that can be called and those that cannot be called in a function.
Why do we need to check whether an object is callable? Python is an object-oriented programming language where we can write libraries and write classes within the libraries that are encapsulated. The end user of classes or libraries need not always have access to the class definition or method definitions. While importing the Python libraries, we might sometimes want to know whether the imported object is just a variable that stores a value or whether it is a function that can be reused. The simplest way of checking this is to see whether the object is callable, as functions or methods are usually callable. This comes in handy, especially when the developer of a library did not provide any documentation for its methods and attributes.
Let’s make use of callable in the following example:
- Let’s create a new Python file and save it as product.py. Go to https://github.com/PacktPublishing/Metaprogramming-with-Python/blob/main/Chapter05/product.py and add the following code, which creates a class named Product. Add the following four attributes to it: Product ID, Product Name, Product Category, and Unit Price. We will now assign values to these four attributes, as follows:
class Product:
_product_id = 100902
_product_name = 'Iphone X'
_product_category = 'Electronics'
_unit_price = 700
- Now, let’s add a method named get_product within the Product class. This method would simply return the four attributes created in the preceding step:
def get_product(self):
return self._product_id, self._product_name,
self._product_category, self._unit_price
- In this step, we will import the Product class from product.py and create an object for it:
import product
prodobj = product.Product()
- Let’s now check whether the class is callable by using the built-in callable function. The class is callable and so the function returns True:
callable(product.Product)
True
- In this step, we can also check whether a class object is callable. The object is not callable since we did not overwrite the __call__ method of the class to make it callable, and so the function returns False:
callable(prodobj)
False
- We can now check whether a Python object is callable and then get its attributes:
if callable(prodobj.get_product):
print(prodobj.get_product())
else:
print("This object is not callable")
- Similarly, we can also check whether a Python object is callable and then print the details of the object if it returns True:
if callable(prodobj):
print(prodobj)
else:
print('This is not a method')
With this example, we can look further into the next function, hasattr.
Checking whether an object has an attribute
While using a method or a function object defined in a framework or library by importing the library into another program, we might not always know all the attributes of the object. In such cases, we have a built-in hasattr function that can be used to introspect if a Python object has a specific attribute.
This function checks whether a given object has attributes. To test this function, we will create a class for the inventory of ABC Megamart, add the required attributes for the products stored in the inventory, and also include the price of the products along with the tax component. The price will be calculated both before and after tax for the products stored in the inventory. The following are the steps for it:
- We will create a class called Inventory and initiate it with the variables required for an inventory, such as product_id, product_name, date (of purchase), unit_price, quantity, unit_discount, and tax, as shown in the following code:
class Inventory:
def __init__(self,product_id,product_name,date,unit_price,quantity,unit_discount,tax):
self.product_id = product_id
self.product_name = product_name
self.date = date
self.unit_price = unit_price
self.quantity = quantity
self.unit_discount = unit_discount
self.tax = tax
- In this step, we will add a method to Inventory to calculate the amount before tax and, in this method, we will have three input parameters: quantity, unit_price, and unit_discount. If these three variables are None, then this method will use the same variables initiated during the instantiation of the Inventory class to calculate the amount before tax:
def calc_amount_before_tax(self,quantity=None,unit_price=None, unit_discount=None):
if quantity is None:
self.quantity = self.quantity
else:
self.quantity = quantity
if unit_price is None:
self.unit_price = self.unit_price
else:
self.unit_price = unit_price
if unit_discount is None:
self.unit_discount = self.unit_discount
else:
self.unit_discount = unit_discount
amount_before_tax = self.quantity *
(self.unit_price - self.unit_discount)
return amount_before_tax
- We will also add another method to the Inventory class to calculate the amount after tax. This method is also defined in a similar pattern as calc_amount_before_tax:
def calc_amount_after_tax(self, quantity=None,unit_price=None,unit_discount=None,tax=None):
if quantity is None:
self.quantity = self.quantity
else:
self.quantity = quantity
if unit_price is None:
self.unit_price = self.unit_price
else:
self.unit_price = unit_price
if unit_discount is None:
self.unit_discount = self.unit_discount
else:
self.unit_discount = unit_discount
if tax is None:
self.tax = self.tax
else:
self.tax = tax
amount_after_tax =
self.calc_amount_before_tax(
self.quantity,self.unit_price,
self.unit_discount) + self.tax
return amount_after_tax
- We will now create the last method for this class, which returns the consolidated inventory details, creates a DataFrame, and returns the DataFrame:
def return_inventory(self):
import pandas as pd
inventory_schema = pd.DataFrame([
self.product_id,
self.product_name,
self.date,
self.unit_price,
self.quantity,
self.unit_discount,
self.tax,
self.calc_unt_before_tax(),
self.calc_amount_after_tax()]).transpose()
inventory_schema.columns = ["Product_id",
"Product_name","Date","Unit_price",
"Quantity","Unit_discount","Tax",
"Amount Before Tax", "Amount After Tax"]
return inventory_schema
- Then, create an object for the Inventory class and initialize its attributes:
inventory = Inventory(300021,
'Samsung-Refrigerator',
'08/04/2021',
200,
25,
10,
0.0522)
- Check whether the object returns the attributes:
inventory.product_id
300021
inventory.product_name
'Samsung-Refrigerator'
inventory.date
'08/04/2021'
inventory.unit_price
200
inventory.quantity
25
inventory.unit_discount
10
inventory.tax
0.0522
inventory.calc_amount_before_tax()
4750
inventory.calc_amount_after_tax()
4750.0522
inventory.return_inventory()
The output of the preceding code is as follows:

Figure 5.3 – The output – Inventory details
- Next, let’s make use of dir to list down all the names of arguments in the Inventory class:
dir(Inventory)
['__class__',
'__delattr__',
'__dict__',
‚__dir__',
‚__doc__',
‚__eq__',
‚__format__',
‚__ge__',
‚__getattribute__',
‚__gt__',
‚__hash__',
‚__init__',
‚__init_subclass__',
‚__le__',
‚__lt__',
‚__module__',
‚__ne__',
‚__new__',
‚__reduce__',
‚__reduce_ex__',
‚__repr__',
‚__setattr__',
‚__sizeof__',
‚__str__',
‚__subclasshook__',
‚__weakref__',
‚calc_amount_after_tax',
‚calc_amount_before_tax',
‚return_inventory']
- Now, let’s make use of hasattr to check whether the class has attributes. If the type of attribute is a method, then use getattr to get the attributes. Executing the following loop results in the list of all the attributes of Inventory:
for i in dir(Inventory):
if (hasattr(Inventory,i)):
if type(getattr(inventory, i)) is type(getattr(inventory, '__init__')):
print(getattr(Inventory,i))<class 'type'>
<function Inventory.__init__ at 0x000001C9BBB46CA0>
<function Inventory.calc_amount_after_tax at 0x000001C9BBB46DC0>
<function Inventory.calc_amount_before_tax at 0x000001C9BBB46D30>
<function Inventory.return_inventory at 0x000001C9BBB46E50>
With this understanding, we can further look into another built-in function, isinstance.
Checking whether an object is an instance
In this section, we will look at another function named isinstance, which can be used to check whether an object is an instance of a particular class. As we are covering introspection in this chapter, we are more focused on what functions are available to introspect an object rather than how these functions can be used further to manipulate or debug a piece of code. Chapter 6, will cover the usage of these functions on metaprogramming along with examples.
In the preceding section, we created a class named Inventory. In this section, we can continue using the same class and create another object for the class. This is shown as follows:
inventory_fmcg = Inventory(100011,
'Delmonte Ketchup',
'09/04/2021',
5,
0.25,
0.10,
0.0522)
inventory_fmcg.product_id
100011
inventory_fmcg.calc_amount_before_tax()
1.225
inventory_fmcg.calc_amount_after_tax()
1.2772000000000001
inventory_fmcg.return_inventory()
The output of the preceding code is as follows:

Figure 5.4 – The output – Inventory details of inventory_fmcg
Now, let’s check whether inventory_fmcg is an object of the Inventory class using isinstance:
isinstance(inventory_fmcg,Inventory)
True
Similarly, we can also check whether the previously created inventory object is still an instance of the Inventory class:
isinstance(inventory,Inventory)
True
Let’s consider a scenario where we have reallocated the object inventory to another value by mistake while writing the code, and we might still need to make use of the object and call its methods to return the inventory details. To test this scenario using isinstance, we can look at the following steps:
- Check whether an object is an instance of the Inventory class and call a method of the function. If the object is not an instance of the class, check the type of variable to which it has been reallocated:
if isinstance(inventory,Inventory):
display(inventory.return_inventory())
else:
print("Object reallocated to", type(inventory),
", please correct it")
- The preceding code results in the following output since inventory is still an object of the Inventory class:

Figure 5.5 – The output – Inventory details
- Now, let’s reallocate the inventory variable to some other string value and call the return_inventory method on it:
inventory = "test"
- Calling the return_inventory method for the inventory object will result in the following error:

Figure 5.6 – Error on calling the return_inventory method on a reallocated object
- To avoid the preceding error and to let the code handle this error gracefully and, at the same time, provide more information to the developer, we can modify the code as follows using the isinstance method:
if isinstance(inventory,Inventory):
print(inventory.return_inventory())
else:
print("Object reallocated to", type(inventory),
", please correct it")
The output of the preceding code is as follows:
Object reallocated to <class 'str'> , please correct it
With this understanding, we can look further into another in-built function, issubclass.
Checking whether an object is a subclass
In this section, we will look at the issubclass function. This function is used to check whether a given input class is actually a child class or a subclass of a specific parent class. To introspect a class using this function, let’s look at the following steps:
- Create an FMCG class by initializing variables for supplier information such as supplier_name, supplier_code, supplier_address, supplier_contract_start_date, supplier_contract_end_date, and supplier_quality_code, shown as follows:
class FMCG:
def __init__(self,supplier_name,supplier_code,
supplier_address,supplier_contract_start_date,
supplier_contract_end_date,supplier_quality_code):
self.supplier_name = supplier_name
self.supplier_code = supplier_code
self.supplier_address = supplier_address
self.supplier_contract_start_date =
supplier_contract_start_date
self.supplier_contract_end_date =
supplier_contract_end_date
self.supplier_quality_code =
supplier_quality_code
- Add a method in the class to simply get the supplier details initialized in the class and return it as a dictionary object with a key and a value:
def get_supplier_details(self):
supplier_details = {
'Supplier_name': self.supplier_name,
'Supplier_code': self.supplier_code,
'Supplier_address': self.supplier_address,
'ContractStartDate':
self.supplier_contract_start_date,
'ContractEndDate':
self.supplier_contract_end_date,
'QualityCode': self.supplier_quality_code
}
return supplier_details
- Create an object for the FMCG class and initialize the variables with supplier data and then display the supplier details by calling the preceding method:
fmcg = FMCG('Test Supplier','a0015','5093 9th Main Street, Pasadena,California, 91001', '05/04/2020', '05/04/2025',1)
fmcg.get_supplier_details()
{'Supplier_name': 'Test Supplier',
'Supplier_code': 'a0015',
'Supplier_address': '5093 9th Main Street,
Pasadena,California, 91001',
'ContractStartDate': '05/04/2020',
'ContractEndDate': '05/04/2025',
'QualityCode': 1}
- Here, we can then create another class for condiments that covers both inventory details and FMCG supplier details by inheriting this class from both the FMCG class and the Inventory class. This class will be initialized with all the product-level inventory variables and the supplier-level variables:
class Condiments(FMCG,Inventory):
def __init__(self,*inventory):
self.product_id = inventory[0]
self.product_name = inventory[1]
self.date = inventory[2]
self.unit_price = inventory[3]
self.quantity = inventory[4]
self.unit_discount = inventory[5]
self.tax = inventory[6]
self.supplier_name = inventory[7]
self.supplier_code = inventory[8]
self.supplier_address = inventory[9]
self.supplier_contract_start_date =
inventory[10]
self.supplier_contract_end_date =
inventory[11]
self.supplier_quality_code = inventory[12]
- Then, let’s add a method to simply return all the variables initialized in the Condiments class by storing them as a DataFrame or table:
def return_condiment_inventory(self):
import pandas as pd
inventory_schema = pd.DataFrame([
self.product_id,
self.date,
self.unit_price,
self.quantity,
self.unit_discount,
self.tax,
self.calc_amount_before_tax(),
self.calc_amount_after_tax(),
self.get_supplier_details()
]).transpose()
inventory_schema.columns = ["Product_id",
"Date","Unit_price","Quantity",
"Unit_discount","Tax","Amount Before Tax",
"Amount After Tax",'Supplier_details']
return inventory_schema
- We can now create an object for this class and call its method:
ketchup = Condiments(100011,'Delmonte Ketchup','09/04/2021',5,0.25,0.10,0.0522,'Test Supplier','a0015','5093 9th Main Street, Pasadena,California, 91001', '05/04/2020', '05/04/2025',1)
ketchup.return_condiment_inventory()
- Executing the preceding code results in the following output:

Figure 5.7 – The output – Condiment inventory details
- Now let’s check whether the FMCG class is a subclass of Inventory. It will return as False since FMCG is not a subclass of Inventory:
issubclass(FMCG,Inventory)
False
- In this step, we will check whether Condiments is a subclass of FMCG and also whether it is a subclass of Inventory. Both should return as True since Condiments is inherited from both of these classes:
issubclass(Condiments,FMCG)
True
issubclass(Condiments,Inventory)
True
- Next, we will be creating an object for a class by, first, checking whether a class is a subclass of a specific parent class, then creating an object accordingly, and then calling a method on the newly created object:
if issubclass(Condiments,FMCG):
fmcg = Condiments(100011,'Delmonte
Ketchup','09/04/2021',5,0.25,0.10,0.0522,
'Test Supplier','a0015','5093 9th Main Street,
Pasadena,California, 91001', '05/04/2020',
'05/04/2025',1)
else:
fmcg = FMCG('Test Supplier','a0015','5093 9th Main
Street, Pasadena,California, 91001',
'05/04/2020', '05/04/2025',1)
display(fmcg.get_supplier_details())
- Executing the preceding code results in the following output:
{'Supplier_name': 'Test Supplier',
'Supplier_code': 'a0015',
'Supplier_address': '5093 9th Main Street,
Pasadena,California, 91001',
'ContractStartDate': '05/04/2020',
'ContractEndDate': '05/04/2025',
'QualityCode': 1}
With this understanding, we can look further into the last topic of this chapter.
Understanding the usage of property
In this section, we will look at the last built-in function covered in this chapter, property. This function is used to initialize, set, get, or delete methods of attributes in Python. These values are called the properties of an object. Let’s first understand how property works on Python objects by creating an example.
We can create a property by simply calling the property function and storing it as a variable. Refer to the following code:
test_property = property()
test_property
<property at 0x1c9c9335950>
We still did not answer the question of how this function creates a property. The property function takes in four variables to get, set, delete, and document the properties of an attribute. To examine it further, let’s look at it in a little more detail. The steps are as follows:
- Create a class named TestPropertyClass.
- Initialize it with a test attribute and set it as None.
- We will then add three methods to perform the functions of getting, setting, and deleting the initialized test attribute.
- We will then create another variable within the class named test_attr and assign the property function to it with the get, set, and delete methods created in this class.
The code for this example is as follows:
class TestPropertyClass:
def __init__(self):
self._test_attr = None
def get_test_attr(self):
print("get test_attr")return self._test_attr
def set_test_attr(self, value):
print("set test_attr")self._test_attr = value
def del_test_attr(self):
print("del test_attr")del self._test_attr
test_attr = property(get_test_attr, set_test_attr,
del_test_attr, "test_attr is a property")
In the preceding code, get_test_attr simply returns the test attribute, set_test_attr sets a value to the test attribute, and del_test_attr deletes the test attribute.
Let’s now create an object for this class and check how property works on it:
test_property_object = TestPropertyClass()
test_property_object.test_attr
get test_attr
In the preceding code, calling the test attribute has, in turn, invoked the get_test_attr method since it is provided as the get method to the property function. Let’s confirm this understanding further by setting a value to test_attr:
test_property_object.test_attr = 1980
set test_attr
Assigning a value to the test_attr variable has now invoked the set_test_attr method since it is provided as a set method to the property function. Calling the test_attr attribute again returns the value set in the preceding step:
test_property_object.test_attr
get test_attr
1980
Similarly, deleting the attribute, in turn, invokes the del_test_attr method since it is provided as a delete method to the property function:
del test_property_object.test_attr
del test_attr
Once the attribute is deleted, the get method will still be invoked while calling the attribute, but it will not return the value previously assigned since it is deleted:
test_property_object.test_attr
The output of the preceding code would now look as follows:

Figure 5.8 – The get method invoked on a deleted attribute
By modifying the behavior of the getter, setter, or deleter methods, we can modify the properties of the attribute itself. We will look at this statement in detail in Chapter 6.
With this understanding of assigning the property function to a variable and then invoking its getter, setter, and deleter methods, we will further look into another variation of implementing property.
Using property as a decorator
In the preceding section, we looked at how to use property as a function to modify the properties of an attribute in a class. In this section, we will look at how to use property as a decorator. Let’s consider the same TestPropertyClass as in the preceding example and modify the class definition to use the @property decorator statement instead of the property() function statement. Refer to the following code:
class TestPropertyClass:
def __init__(self):
self._test_attr = None
@property
def test_attr(self):
return self.test_attr
@test_attr.getter
def test_attr(self):
print("get test_attr")return self._test_attr
@test_attr.setter
def test_attr(self, value):
print("set test_attr")self._test_attr = value
@test_attr.deleter
def test_attr(self):
print("del test_attr")del self._test_attr
In the preceding code, we have added @property as the decorator for test_attr, and we have also added @test_attr.setter for the set method, @test_attr.getter for the get method, and @test_attr.deleter for the delete method.
Let’s proceed with executing the code further to check whether getter, setter, and deleter are working as expected:
test_property_object = TestPropertyClass()
test_property_object.test_attr
get test_attr
In the preceding code, calling the attribute invoked the getter method. Similarly, setter and deleter also invoked the set and delete methods, respectively:
test_property_object.test_attr = 1982
set test_attr
test_property_object.test_attr
get test_attr
1982
del test_property_object.test_attr
del test_attr
These are some of the examples of how introspection can be applied to Python objects using Python’s built-in functions.
Summary
In this chapter, we have learned how to introspect Python objects using built-in functions.
We then saw how to use the id function, and how to debug code using id. We also looked at how to check whether an object is callable, how to check whether an object has an attribute, how to check whether an object is an instance, how to check whether an object is a subclass, and finally, we looked at how to get, set, and delete properties on attributes. From all of these concepts, we learned how to inspect Python objects such as classes, methods, and functions. From the examples covered under each topic, we also learned how to apply introspection in practical use cases.
In the next chapter, we will be extending the learning from introspection and applying it further to understand reflection on Python objects.