
Chapter 20
Understanding the Word Object Model and Key Objects
In this chapter, you'll become familiar with the Word object model and the architecture underlying Word. You'll see how to perform common tasks with the most frequently useful Word objects. These objects include the Documents collection and the Document object, the Selection object, Range objects, and the Options object.
Examining the Word Object Model
You don't need to understand how the entire Word object model fits together in order to work with VBA in Word, but most people find it helpful to have a general idea of how to research the components and structure of the object model. Some VBA programming involves managing objects, and for this the Help system's code examples are often invaluable. To see Word's online object model reference, follow these steps:
- Launch or activate Word, and then click the Developer tab and click Visual Basic to launch or activate the VBA Editor.
- Choose Help ➢ Microsoft Visual Basic For Applications Help F1. (Even though this says the shortcut is F1, it isn't. Pressing F1 currently takes you to an entirely different page.)
You should see a web page similar to the one shown in Figure 20.1 (this figure shows a part of the web page). If you don't see this web page, type this URL into your browser's address field:
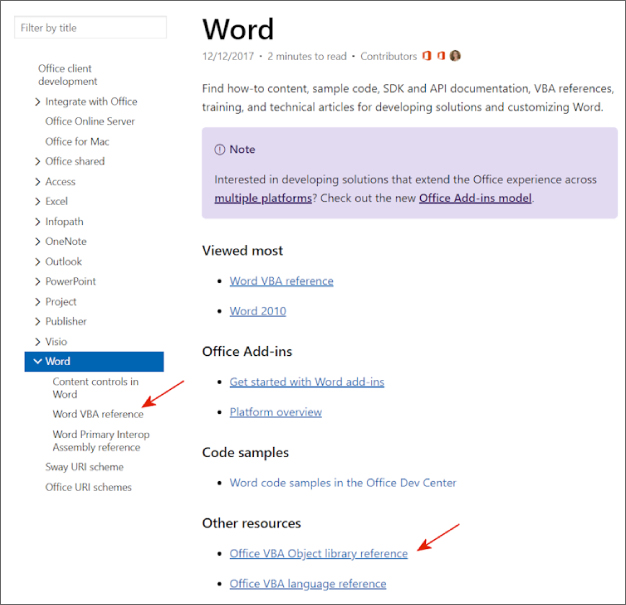
Figure 20.1 A Word Help website
https://docs.microsoft.com/en-us/office/client-developer/word/word-home - Click the Word VBA Reference link on the left side of the web page (see the arrow in Figure 20.1).
You now see the page shown in Figure 20.2.
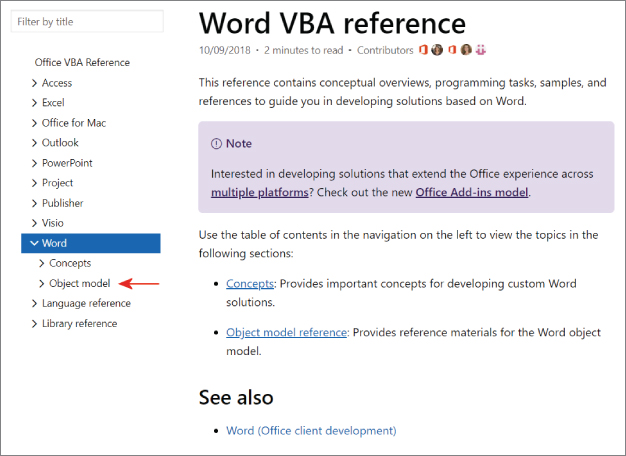
Figure 20.2 Drilling down in the Word Help site
- Now click the link named Object Model Reference, as shown in Figure 20.2.
You now see the Object Model Reference, shown partially in Figure 20.3.
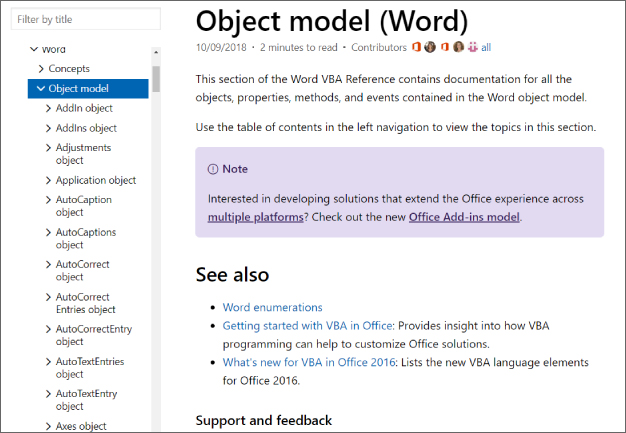
Figure 20.3 The entries in the Word Object Model Reference will help you write your own VBA code.
In the past, the Object Model Reference was specific to the various versions of Office. Now, however, it's become generic. So, you don't see Office 2019 mentioned in Figure 20.3. This page mentions Office 2016, though the latest revision of this information is October 2018. However, the Office objects generally remain stable, with few changes.
The following sections show you how to work with some of the most useful Word objects, starting with the Documents collection and the Document object. You'll see how to use the ActiveWindow object and the Windows collection in the next chapter.
Working with the Documents Collection and the Document Object
In many of your Word procedures, you'll likely work with documents: creating, saving, opening, closing, and printing them. To do so, you work with the Documents collection, which contains a Document object for each open document in Word.
Creating a Document
To create a new document, use the Add method of the Documents collection. The syntax is as follows:
expression.Add Template, NewTemplate, DocumentType, Visible
Here, expression is a required expression that returns a Documents collection. Typically, you'll want to use the Documents collection itself (Documents.Add).
Template is an optional Variant argument that specifies the template on which to base the new document. If you omit Template, Word uses the Normal template (this process is the same as if you'd clicked the File tab on the Ribbon and then clicked the New button to open a blank document). So, you need to specify a Template argument only when you want to base the new document on a template other than the default Normal.dotm.
NewTemplate is an optional Variant argument that you can set to True to create a template file (.dotx) rather than a document. NewTemplate is set to False by default, so you can safely omit this argument unless you're creating a template.
DocumentType is an optional Variant argument that you can use to specify the type of document to create: wdNewBlankDocument (the default), wdNewEmailMessage, wdNewFrameset (for a frameset), or wdNewWebPage.
Visible is an optional Variant argument that you can set to False to have the document created in a window that isn't visible. The default setting is True, making the document window visible.
There are two ways to create a document:
- Creating a document based on
Normal.dotmThe following statement creates a new document based on theNormal.dotmglobal template:
-
Documents.Add
- Creating a document based on a template The following statement creates a new document based on the template named
Company Report.dotmstored in the network folder designated\serverpublic emplates:
-
Documents.Add Template:= "\serverpublic emplatesCompany Report.dotm"
Creating a Template
The following statements declare a new object variable of the Document class named myTemplate, create a new template based on the template named Fancy.dotx, and assign it to myTemplate:
Dim myTemplate As DocumentSet myTemplate = Documents.Add(Template:="c:MyTemplatesfancy.dotx", _NewTemplate:=True, Visible:=True)
In this example, the file path (c:MyTemplatesand so on) to the template is specified because this template is not located in one of the default template folders. The result is a new .dotx file, based on the Fancy.dotx template.
Saving a Document
Just as when a user is saving a newly created document via the keyboard and mouse, when executing VBA code you must specify a filename and path the first time you save a new document. After that, you can save it under the same name (Save) or specify a different name or format (Save As).
Saving a File for the First Time or as a Different File
To save a file for the first time, or to save a file under a different name or in a different format, use the SaveAs2 method. The syntax is as follows:
expression.SaveAs2(FileName, FileFormat, LockComments, Password, AddToRecentFiles, WritePassword, ReadOnlyRecommended, EmbedTrueTypeFonts, SaveNativePictureFormat, SaveFormsData, SaveAsAOCELetter, Encoding, InsertLineBreaks, AllowSubstitutions, LineEnding, AddBiDiMarks, CompatibilityMode
With Word 2010, the traditional SaveAs command was replaced by the SaveAs2 command, which is identical except for the addition of a CompatibilityMode argument. Documents can be saved six different ways with respect to their compatibility with earlier versions of Word. Based on how you set the CompatibilityMode argument, Word saves your document in one of these ways:
0is the default if you don't specify any of the otherCompatibilityModeoptions in this list. The document will be saved using whatever compatibility mode is currently used by this document.wdCurrentis a compatibility mode equivalent to the latest version of Microsoft Word.wdWord2003is a mode that's compatible with Word 2003. Any features new in Word 2013 are disabled.wdWord2007is essentially the same as 2003 mode, but features compatible with the 2007 version of Word are enabled.wdWord2010is the mode where the Word 2010 features are enabled.WdWord2013enables all Word features.
The traditional SaveAs command, though deprecated, will still work, but the Editor has a tendency to automatically replace it with SaveAs2. Spooky, but no real harm done.
In the syntax, expression is an expression that returns a Document object. For example, you might use the ActiveDocument object or an object in the Documents collection.
FileName is an optional Variant argument that specifies the name for the document. If you omit FileName, VBA uses the current folder and the default filename of Docn.docx (or Docn.docm) or a document and Dotn.dotx (or .dotm) for a template, where n is the next available number (for example, Doc5.docx for a macro-free document or Dot2.dotm for a macro-enabled template).
FileFormat is an optional Variant argument that specifies the format in which to save the document. Table 20.1 lists the wdSaveFormat constants for specifying commonly used formats.
TABLE 20.1: WdSaveFormat constants
| CONSTANT | SAVES DOCUMENT AS |
wdFormatDocument |
A Word document |
wdFormatDocument97 |
The Word version 97 document format |
wdFormatDocumentDefault |
The Word document default (the docx file type) |
wdFormatDOSText |
A DOS text file (the pre-Windows OS) |
wdFormatDOSTextLineBreaks |
A DOS text file with carriage returns |
wdFormatEncodedText |
A text file with encoding |
wdFormatFilteredHTML |
A filtered HTML file (Word 2003 and XP only) |
wdFormatFlatXML |
An unindexed XML document |
wdFormatFlatXMLMacroEnabled |
An unindexed XML document with macro capability |
wdFormatFlatXMLTemplate |
An unindexed XML template |
wdFormatFlatXMLTemplateMacroEnabled |
An unindexed XML template with macro capability |
wdFormatHTML |
An HTML file |
wdFormatOpenDocumentText |
An XML file format developed by Sun Microsystems |
wdFormatPDF |
Adobe's Portable Document Format |
wdFormatRTF |
A Rich Text format file |
wdFormatStrictOpenXMLDocument |
An XML document standard promoted for several years by Microsoft |
wdFormatTemplate |
A Word template |
wdFormatTemplate97 |
The Word version 97 template format |
wdFormatText |
A text file (plain ASCII) |
wdFormatTextLineBreaks |
A text file with carriage returns |
wdFormatUnicodeText |
A text file with Unicode characters |
wdFormatWebArchive |
A web archive file |
wdFormatXML |
An XML file (Word 2003 only) |
wdFormatXMLDocument |
XML document format |
wdFormatXMLDocumentMacroEnabled |
XML document format with macros enabled |
wdFormatXMLTemplate |
XML template format |
wdFormatXMLTemplateMacroEn |
XML template format with macros enabled |
wdFormatXPS |
XPS format |
As an example of how to use one of these constants, the following statement saves the active document as a filtered HTML file under the name Example.html in the current folder:
ActiveDocument.SaveAs2 FileName:="Example.html", _FileFormat:=wdFormatFilteredHTML
After you run this example code, use Windows Explorer to locate this new Example.html file and click it. It will open in Internet Explorer as if it were a web page, because it's stored using the HTML format (if Internet Explorer is the default application in which your machine opens .html files). Or, take a look at it in Notepad if you want to see the full horror of HTML markup.
AddToRecentFiles is an optional Variant argument that you can set to True to have Word add the document to the list of recently used files displayed when you click the File tab on the Ribbon and then click Recent. (Generally, you'll want to avoid listing documents on this Recent list, thus leaving the user's previous list of recent files undisturbed.)
To protect the document as you save it, you can use four different protection features:
LockCommentsis an optional Variant argument that you can set toTrueto lock the document so that reviewers can enter comments but can't change the text of the document.Passwordis an optional Variant argument that you can use to set a password required before opening the document.WritePasswordis an optional Variant argument that you can use to set a password required before saving changes to the document.ReadOnlyRecommendedis an optional Variant argument that you can set toTrueto have Word recommend that the user open the document as read-only.
Finally, there are these following optional arguments you'll use infrequently, if ever:
EmbedTrueTypeFontsis an optional Variant argument that you can set toTrueto save TrueType fonts with the document. (This is a good idea only if you're distributing the document to someone you know doesn't have the TrueType fonts installed to view the document correctly.)SaveNativePictureFormatis an optional Variant argument that you can set toTrueto have graphics imported from another platform saved as Windows graphics.SaveFormsDatais an optional Variant argument that you can set toTrueto save the data entered in a form as a data record (as opposed to saving the whole form, including its static text).SaveAsAOCELetteris an optional Variant argument that you can set toTrueto save the document as an AOCE (Apple Open Collaboration Environment) letter (a mailing format for routing documents).Encodingis an optional Variant argument for using a different code page than the system code page. For example, you might need to save a document using a Cyrillic code page.InsertLineBreaksis an optional Variant argument that you can set toTruewhen saving a document as a text file to make Word insert a line break at the end of each line of text.AllowSubstitutionsis an optional Variant argument that you can set toTruewhen saving a document as a text file to make Word substitute some symbol characters with similar text. For example, Word substitutes (TM) for a trademark symbol (™).LineEndingis an optional Variant argument that you can use when saving a document as a text file to control how Word marks line breaks and paragraph breaks.AddBiDiMarksis an optional Variant argument that you can set toTrueto make Word add control characters to the file to maintain bidirectional layout.
Usually, when saving a file for the first time, you'll need to specify only its name and path; if you want to save it in a format other than a Word document, specify that too. The following statement saves the active document under the name Beehives.doc in the folder C: emp:
ActiveDocument.SaveAs2 _"C: empBeehives.doc"
Saving a Document That Has Already Been Saved
After a document has been first saved, you can save it in the future under the same name by using the Save method. For a Document object, the Save method takes no arguments (all the document's current formats are saved unchanged). For example, the following statement saves the document named Guns01.doc:
Documents("Guns01.doc").Save
Saving All Open Documents
To save all open documents, use the Save method with the Documents collection. The syntax is as follows:
expression.Save(NoPrompt, OriginalFormat)
Here, expression is an expression that returns a Documents collection. Often, you'll use the Documents collection itself.
NoPrompt is an optional Variant argument that you can set to True to make Word save all open documents containing unsaved changes and any attached templates containing unsaved changes without prompting the user. The default setting is False, which causes Word to prompt the user whether to save each document and template. Even if you set NoPrompt to True, Word will prompt the user to save changes to Normal.dotm if the Prompt Before Saving Normal Template check box is selected in the Save section of the Advanced tab of the Options dialog box.
OriginalFormat is an optional Variant argument that you can set to wdOriginalDocumentFormat to save the documents in their original formats, wdWordDocument to force each document to be saved as a Word document, or wdPromptUserX to prompt the user about which format to use.
For example, the following statement saves all open documents and templates without prompting the user:
Documents.Save NoPrompt:=True
Checking Whether a Document Contains Unsaved Changes
To find out whether a document contains unsaved changes, check its Saved property. Saved is a read/write Boolean property that returns False if the document contains unsaved changes and True if it does not. A new document contains no unsaved changes, even though it has never been saved.
Opening a Document
To open a document, use the Open method with the appropriate Documents object. (Note that this method is a member of the documents collection rather than of an individual document object.) The syntax for the Open method is as follows:
expression.Open FileName, ConfirmConversions, ReadOnly,AddToRecentFiles, PasswordDocument, PasswordTemplate,Revert, WritePasswordDocument, WritePasswordTemplate,Format, Encoding, Visible, OpenConflictDocument,OpenAndRepair, DocumentDirection, NoEncodingDialog
The arguments are as follows:
expressionis a required expression that returns aDocumentscollection. Usually, you'll want to use theDocumentscollection itself.FileNameis a required Variant argument specifying the name (and path, if necessary) of the document to open.ConfirmConversionsis an optional Variant argument that you can set toTrueto have Word display the Convert File dialog box if the file is in a format other than Word.ReadOnlyis an optional Variant argument that you can set toTrueto open the document as read-only.AddToRecentFilesis an optional Variant argument that you can set toTrueto have Word add the filename to the list of recently used files at the foot of the File menu.PasswordDocumentis an optional Variant argument that you can use to set a password for opening the document.PasswordTemplateis an optional Variant argument that you can use to set a password for opening the template.Revertis an optional Variant argument that specifies what Word should do if theFileNamesupplied matches a file that's already open.By default (that is, if you don't include the
Revertargument),Revertis set toFalse, which means that Word activates the open instance of the document and doesn't open the saved instance. You can setReverttoTrueto have Word open the saved instance of the document and discard any changes to the open instance.WritePasswordDocumentis an optional Variant argument that indicates the password for saving changes to the document.WritePasswordTemplateis an optional Variant argument that specifies the password for saving changes to the template.Formatis an optional Variant argument that you can use to specify the file converter with which to open the document. Table 20.2 lists theWdOpenFormatconstants you can use to specify the file converter.Encodingis an optional Variant argument specifying the document encoding (the code page or the character set) for Word to use when opening the document.Visibleis an optional Variant argument that you can set toFalseto have Word open the document in a window that isn't visible. (The default setting isTrue, specifying a visible window.)OpenAndRepairis an optional Variant that, whenTrue, repairs the document to prevent corruption.OpenConflictDocumentis an optional Variant that specifies whether you want to open the conflict file for a document that has an offline conflict.DocumentDirectionis an optionalWdDocumentDirection variable type, indicating the horizontal flow of text in the document. The default iswdLeftToRight.NoEncodingDialogis an optional Variant that defaults toFalse. But if it's set toTrue, the Encoding dialog box is not displayed when Word cannot recognize text encoding.XMLTransformis mysterious. The only explanation I could find is in MSDN, and it merely says, “Specifies a transform to use.” So your guess is as good as mine about what this option accomplishes.
TABLE 20.2: WdOpenFormat constants for opening a document
| CONSTANT | EFFECT |
wdOpenFormatAllWord |
Word opens the document in any recognized Word format as a Word document. |
wdOpenFormatAllWordTemplates |
Word opens the document in any recognized Word format as a Word template. |
wdOpenFormatAuto |
Word chooses a converter automatically. This is the default setting. |
wdOpenFormatDocument |
Word opens the document as a Word document. |
wdOpenFormatDocument97 |
Microsoft Word 97 document format. |
wdOpenFormatEncodedText |
Word opens the document as a text file with encoding. |
wdOpenFormatOpenDocumentText |
Word opens the document in an XML file format developed by Sun Microsystems. |
wdOpenFormatRTF |
Word opens the document as a Rich Text format file. |
wdOpenFormatTemplate |
Word opens the document as a template. |
wdOpenFormatTemplate97 |
Word 97 template format. |
wdOpenFormatText |
Word opens the document as a text file. |
wdOpenFormatUnicodeText |
Word opens the document as a Unicode text file. |
wdOpenFormatWebPages |
Word opens the document as a web page. |
wdOpenFormatXML |
Word opens the document in XML format. |
wdOpenFormatXMLDocument |
XML document format. |
wdOpenFormatXMLDocumentMacroEnabled |
XML document format with macros enabled. |
wdOpenFormatXMLDocumentMacro-EnabledSerialized |
Word opens an XML document with macros enabled by reconstructing the original document from a one-dimensional stream of bits. |
wdOpenFormatXMLDocumentSerialized |
Word opens an XML document by reconstructing the original document structure from a one-dimensional stream of bits. |
wdOpenFormatXMLTemplate |
XML template format. |
wdOpenFormatXMLTemplateMacroEnabled |
XML template format with macros enabled. |
wdOpenFormatXMLTemplateMacro-EnabledSerialized |
Word opens an XML template with macros enabled by reconstructing the original document from a one-dimensional stream of bits. |
wdOpenFormatXMLTemplateSerialized |
Word opens an XML template by reconstructing the original document from a one-dimensional stream of bits. |
The following statement opens the document Times.docx found in the C:My Documents folder:
Documents.Open "C:My DocumentsTimes.docx"
The following statement opens the file notes.docm in the folder C: emp as read-only and adds it to the list of most recently used files (the list you see when you click the File tab on the Ribbon and then click Recent):
Documents.Open "C: emp otes.docm", ReadOnly:=True, _AddToRecentFiles:=True
Closing a Document
To close a document, use the Close method with the application Document object. The syntax is as follows:
expression.Close(SaveChanges, OriginalFormat, RouteDocument)
Here, expression is a required expression that returns a Document object or a Documents collection. Typically, you use the ActiveDocument object or, to close all documents, the Documents collection object.
SaveChanges is an optional Variant argument you can use to specify how to handle unsaved changes. Use wdDoNotSaveChanges to discard changes, wdPromptToSaveChanges to have Word prompt the user to save changes, or wdSaveChanges to save changes without prompting.
OriginalFormat is an optional Variant argument you can use to specify the save format for the document. Use wdOriginalDocumentFormat to have Word use the original document format, wdPromptUser to have Word prompt the user to choose a format, or wdWordDocument to use the Word document format.
RouteDocument is an optional Variant argument that you can set to True to route a document that has a routing slip attached.
For example, the following statement closes the active document without saving changes:
ActiveDocument.Close SaveChanges:=wdDoNotSaveChanges
The following statement closes all open documents (but not the Word application itself) and saves changes automatically:
Documents.Close SaveChanges:=wdSaveChanges
Changing a Document's Template
To change the template attached to a document, set the AttachedTemplate property of the Document object you want to affect to the path and name of the appropriate template. For example, the following statement attaches the template named SalesMarket02.dotm to the active document. In this example, the template is assumed to be stored in one of the Word templates folders, so the path need not be specified:
ActiveDocument.AttachedTemplate = "SalesMarket02.dotm"
Printing a Document
To print a document, use the PrintOut method for the appropriate Document object. (Note that this operates on the singular document object, not the documents collection.) The syntax for the PrintOut method is as follows:
expression.PrintOut(Background, Append, Range, OutputFileName, From, To, Item, Copies, Pages, PageType, PrintToFile, Collate, FileName, ActivePrinterMacGX, ManualDuplexPrint, PrintZoomColumn, PrintZoomRow, PrintZoomPaperWidth, PrintZoomPaperHeight)
These are the components of the PrintOut method:
expressionis a required expression specifying anApplication,Document, orWindowobject. Usually, you'll print aDocumentobject such asActiveDocument.Backgroundis an optional Variant argument that you can set toTrueto have Word print the document in the background, allowing the procedure to continue running.Appendis an optional Variant argument that you can set toTrueto append the document being printed to file to the print file specified.Rangeis an optional Variant argument specifying the selection or range of pages to print:wdPrintAllDocument(0, the default),wdPrintCurrentPage(2),wdPrintFromTo(3), use theFromandToarguments to specify the pages),wdPrintRangeOfPages(4), orwdPrintSelection(1).OutputFileNameis an optional Variant argument used to specify the name for the output file when printing to file.Fromis an optional Variant argument used to specify the starting page number when printing a range of pages.Tois an optional Variant argument used to specify the ending page number when printing a range of pages.Itemis an optional Variant argument used to specify the item to print:wdPrintAutoTextEntries(4),wdPrintComments(2),wdPrintDocumentContent(0, the default),wdPrintKeyAssignments(5), shortcut key assignments for the document or its template),wdPrintProperties(1), orwdPrintStyles(3).Copiesis an optional Variant argument used to specify the number of copies to print. (If you omitCopies, Word prints one copy.)Pagesis an optional Variant argument used to specify the pages to print—for example,1, 11-21, 31.PageTypeis an optional Variant argument used to specify whether to print all pages (wdPrintAllPages,0, the default), odd pages (wdPrintOddPagesOnly,1), or even pages (wdPrintEvenPagesOnly,2).PrintToFileis an optional Variant argument that you can set toTrueto direct the output of the print operation to a file.Collateis an optional Variant argument used when printing multiple copies of a document to specify whether to collate the pages (True) or not (False).FileNameis an optional Variant argument specifying the path and filename of a document you want to print.By default, Word will print the currently active document. But you can override that and specify a different file to be printed. This argument requires that you use the Application object instead of the Document object as the expression.
ActivePrinterMacGXis an optional Variant argument used on the Macintosh to specify the printer if QuickDraw GX is installed.ManualDuplexPrintis an optional Variant argument that you set toTruefor two-sided printing on a printer that doesn't have duplex capabilities.When
ManualDuplexPrintisTrue, you can use thePrintOddPagesInAscendingOrderproperty or thePrintEvenPagesInAscendingOrderproperty of theOptionsobject to print odd or even pages in ascending order to create a manual duplex effect (reloading the odd-page-printed paper into the printer the other way up to print the even pages). TheManualDuplexPrintargument is available only in some languages.PrintZoomColumnandPrintZoomRoware optional Variant arguments that you use to specify the number of pages to print on a page horizontally (PrintZoomColumn) and vertically (PrintZoomRow). Each property can be1,2, or4.PrintZoomPaperWidthis an optional Variant argument that you can use to specify the width (measured in twips) to which to scale printed pages.PrintZoomPaperHeightis an optional Variant argument that you can use to specify the height (measured in twips) to which to scale printed pages.
For example, the following statement prints three collated copies of the active document in the background:
ActiveDocument.PrintOut Background:=True, Copies:=3, Collate:=True
The following statement prints pages 2 through 5 of the active document:
ActiveDocument.PrintOut Range:=wdPrintFromTo, From:=2, To:=5
The following statement prints the active document at two virtual pages per sheet of paper:
ActiveDocument.PrintOut PrintZoomColumn:=2, PrintZoomRow:=1
Working with the ActiveDocument Object
The ActiveDocument object returns a Document object that represents the current document you're working with—in other words, whichever document has the focus in the Word window. Focus, recall, means that if you type something, it appears in the window that currently has the focus.
The ActiveDocument object behaves much like a Document object, but watch out for the following two possible problems when working with it.
First, you may have problems locating information about the ActiveDocument object in the Help system. The ActiveDocument is actually a property of the Application object, so its status as an actual object is somewhat iffy. Object taxonomy is an evolving clerical system and, as you see, is, in places, odd. This is as silly as if the adjective old in “old tire” were somehow also classified as a noun.
To find the ActiveDocument object in the Help system, MSDN system, or VBA Editor Object Browser, you need to first locate the Application object, and then look within the list of its properties (or members). Just remember, ActiveDocument is found only under the Application object. It's a clerical absurdity. It's as if you were looking for California in a geography book's index, but the index lists most states under their own names (Hawaii is under H, for example), but for no good reason, California is not listed under C. You're puzzled. It's a big, important state. Then you stumble upon the solution: In this wacky index, California is only found under the entry for United States. In the U section!
The second oddity about the ActiveDocument “property” is that it can be evanescent. Here's how. Say that there's no document open in Word and therefore there's no ActiveDocument object at all. As a result, any macro code that tries to work with the ActiveDocument object returns an error. No such thing exists. So, if you want to use the ActiveDocument object, remember to have your code first check the Count property of the Documents collection to make sure there's actually a document currently open (in which case Count will not be zero). Here's an example that tests to see if there is an open document:
If Documents.Count = 0 ThenIf MsgBox("No document is open." & vbCr & vbCr & _"Do you want to create a new blank document?", _vbYesNo + vbExclamation, "No Document Is Open") = vbYes ThenDocuments.AddElseEndEnd IfEnd If
A second example of ActiveDocument's evanescence is that a different document may be active than your code assumes is the active one. This problem tends to occur when a procedure starts with the active document and then creates a new document to work in. A new document automatically becomes the active document, and from this point on, confusion may result.
If you know the name of the document you want to be active, you can check to see if the name of the active document matches it, to verify that you'll be working with the right document.
If there's any doubt about which document you're working with, declare a Document object variable and employ that object variable in your code rather than the ActiveDocument object.
For example, the following statements declare a Document object and assign the ActiveDocument object to it so that subsequent code can work with the Document object:
Dim myDocument As DocumentSet myDocument = ActiveDocumentWith myDocument'actions hereEnd With
Or, if you know the name of the document you want to work with:
Dim myDocument As DocumentSet myDocument = ActiveDocumentIf myDocument.Name = "CorrectFile.docx" Then'actions hereEnd If
Working with the Selection Object
Up to now in this chapter, we've worked with programming that affects an entire document. But when you need to write code that works with only part of a document (a word, paragraph, a selected range, or whatever), you can access these zones in three ways:
- By using the
Selectionobject - By directly accessing the object you want to affect
- By defining a range that encompasses the object
Using the Selection object is analogous to working interactively with Word and is effective with procedures that require the user to select an object or to position the blinking insertion cursor in order to denote what content in the document the procedure should access or affect.
Understanding the Selection object is also worthwhile when you're learning to use VBA with Word, because many actions that you will record using the Macro Recorder use the Selection object.
The Selection object represents the current selection in the active document in Word. The selection can be very small (collapsed to the blinking cursor insertion point), in which case nothing is selected. Or, a Selection object can contain one or more objects—one or more characters, one or more words, one or more paragraphs, a graphic, a table, or the entire document. Or, the selection can be a combination of these objects. In other words, it represents whatever's selected.
Even if the selection is collapsed to an insertion point, you can use it to refer to objects outside the selection. This example returns the tenth word in the paragraph in which the insertion point is located (or, if a paragraph or multiple paragraphs are selected, the tenth word in the first paragraph):
Selection.Paragraphs(1).Range.Words(10).Text
Checking the Type of Selection
Word recognizes nine different kinds of selections. When you're working in the active document, you'll often need to check what kind of selection is active so that you know whether you're dealing with no selection (just the insertion point), a block of ordinary text, or a special type of text like a table or a graphic.
Depending on the current selection, you may not be able to take certain actions in your procedure, and you may not want to take other actions. You would not, for example, insert a table row into an ordinary text paragraph.
Table 20.3 lists the types of selections that Word differentiates.
TABLE 20.3: Selection types in Word
| WDSELECTIONTYPE CONSTANT | VALUE | MEANING |
wdNoSelection |
0 |
There's no selection. (This state seems impossible to achieve. You'd think it'd be when no document is open, but then Selection statements return runtime error 91. Stay tuned…) |
wdSelectionIP |
1 |
The selection is collapsed to a plain insertion point—nothing is selected. But the insertion cursor is blinking as usual. |
wdSelectionNormal |
2 |
A “normal” selection, such as a selected word or sentence. |
wdSelectionFrame |
3 |
A frame is selected. |
wdSelectionColumn |
4 |
A column or part of a column (two or more cells in a column or one cell in each of two or more columns) is selected. |
wdSelectionRow |
5 |
A full row in a table is selected. |
wdSelectionBlock |
6 |
A block is selected (a vertical part of one or more paragraphs, selected by holding down the Alt key and dragging with the mouse or by using column-extend mode). |
wdSelectionInlineShape |
7 |
An inline shape or graphic (a shape or graphic that's in the text layer rather than floating over it) is selected. |
wdSelectionShape |
8 |
A Shape object is selected. (A text box counts as a Shape object.) |
To find out what type of selection you currently have, look at the Type property of the Selection object. The following statements check that the current selection is merely an insertion point before inserting a text literal. The text will not be inserted if the user has dragged to select, for example, some characters, a word, or a paragraph:
If Selection.Type = wdSelectionIP ThenSelection.TypeText "This is inserted."End If
Checking the Story Type of the Selection
Beyond the type of selection, you'll sometimes need to find out which “story” the selection is in. There are 17 stories, representing the 17 different types of content in a document—the main text story, the comments story, the primary header story, and so on. Microsoft uses the word story (instead of zone, type, or other perhaps more descriptive terms) to mean a distinct kind of content. Put another way, a story is the context within which a selection resides.
Checking the story can help you steer clear of doing something weird, such as trying to modify a header or footer story in a way that is only possible inside the main text story.
The story is the zone of the document within which the current selection is located. So, most of the time the story is the main text story (wdMainTextStory). That's the document proper, and the items within it. But alternative “stories” are things like footnotes, frames, headers, and footers—as you can see in Table 20.4, which lists the wdStoryType constants and the stories to which they correspond.
TABLE 20.4: Word story types
| WDSTORYTYPE CONSTANT | VALUE | MEANING |
wdMainTextStory |
1 |
Main (body) text of the document |
wdCommentsStory |
4 |
Comments section |
wdEndnotesStory |
3 |
Endnotes section |
wdFootnotesStory |
2 |
Footnotes section |
wdTextFrameStory |
5 |
Text in frames |
wdPrimaryFooterStory |
9 |
Main footer |
wdEvenPagesFooterStory |
8 |
Even-page footer |
wdFirstPageFooterStory |
11 |
First-page footer |
wdPrimaryHeaderStory |
7 |
Main header |
wdEvenPagesHeaderStory |
6 |
Even-page header |
wdFirstPageHeaderStory |
10 |
First-page header |
wdFootnoteSeparatorStory |
12 |
Footnote separator |
wdFootnoteContinuationSeparatorStory |
13 |
Footnote continuation separator |
wdFootnoteContinuationNoticeStory |
14 |
Footnote continuation notice |
wdEndnoteSeparatorStory |
15 |
Endnote separator |
wdEndnoteContinuationSeparatorStory |
16 |
Endnote continuation separator |
wdEndnoteContinuationNoticeStory |
17 |
Endnote continuation notice |
You may notice another whimsical, enigmatic feature of Table 20.4. It starts the enumeration value with 1. Compare that to Table 20.3, which starts with 0. Inconsistencies like this make programming more challenging.
Here's a code example that displays a message box if the selection isn't in the main text of a document:
If Selection.StoryType <> wdMainTextStory ThenMsgBox "This range is not in the main text."End If
Getting Other Information About the Current Selection
To work effectively with a selection, you'll often need to know what it contains and where it's positioned. To find out, use the Information property to learn the details you need. Table 20.5 lists examples of useful information available in the Information property.
TABLE 20.5: Information available in the Information property
| CONSTANT | RETURNS THIS INFORMATION |
| Environment Information | |
wdCapsLock |
True if Caps Lock is on. |
wdNumLock |
True if Num Lock is on. |
wdOverType |
True if Overtype mode is on. (You can turn Overtype mode on and off by changing the Overtype property.) |
wdRevisionMarking |
True if Track Changes is on. |
wdSelectionMode |
A value that specifies the current selection mode: 0 indicates a normal selection, 1 indicates an extended selection (Extend mode is on), and 2 indicates a column selection. |
wdZoomPercentage |
The current zoom percentage. |
| Selection and Insertion Point Information | |
wdActiveEndAdjustedPageNumber |
The number of the page containing the active end of the selection or range. This number reflects any change you make to the starting page number; wdActiveEndPageNumber, the alternative, doesn't. |
wdActiveEndPageNumber |
The number of the page containing the active end of the selection or range. |
wdActiveEndSectionNumber |
The number of the section containing the active end of the selection or range. |
wdFirstCharacterColumnNumber |
The character position of the first character in the selection or range. If the selection or range is collapsed to an insertion point, this constant returns the character number immediately to the right of the insertion point. (Note that this “column” is relative to the currently active left margin and doesn't have to be inside a table.) |
wdFirstCharacterLineNumber |
In Print Layout view and Print Preview, this constant returns the line number of the first character in the selection. In nonlayout views (e.g., Normal view), it returns -1. |
wdFrameIsSelected |
True if the selection or range is a whole frame or text box. |
wdHeaderFooterType |
A value that specifies the type of header or footer containing the selection or range: -1 indicates that the selection or range isn't in a header or footer; 0 indicates an even page header; 1 indicates an odd page header in a document that has odd and even headers and the only header in a document that doesn't have odd and even headers; 2 indicates an even page footer; 3 indicates an odd page footer in a document that has odd and even footers and the only footer in a document that doesn't have odd and even headers; 4 indicates a first-page header; and 5 indicates a first-page footer. |
wdHorizontalPositionRelativeToPage |
The horizontal position of the selection or range—the distance from the left edge of the selection or range to the left edge of the page, measured in twips. |
wdHorizontalPositionRelativeToTextBoundary |
The horizontal position of the selection or range—the distance from the left edge of the selection or range to the text boundary enclosing it, measured in twips. |
wdInCommentPane |
True if the selection or range is in a comment pane. |
wdInEndnote |
True if the selection or range is an endnote (defined as appearing in the endnote pane in Normal view or in the endnote area in Print Layout view). |
wdInFootnote |
True if the selection or range is in a footnote (defined as appearing in the footnote pane in Normal view or in the footnote area in Print Layout view). |
wdInFootnoteEndnotePane |
True if the selection or range is in a footnote or endnote. |
wdInHeaderFooter |
True if the selection or range is in a header or footer (defined as appearing in the header or footer pane in Normal view or in the header or footer area in Print Layout view). |
wdInMasterDocument |
True if the selection or range is in a master document (a document containing at least one subdocument). |
wdInWordMail |
A value that specifies the WordMail location of the selection or range: 0 indicates that the selection or range isn't in a WordMail message; 1 indicates that it's in a WordMail message you're sending; 2 indicates that it's in a WordMail you've received. |
wdNumberOfPagesInDocument |
The number of pages in the document in which the selection or range appears. |
wdReferenceOfType |
A value that specifies where the selection is in relation to a footnote reference, endnote reference, or comment reference. -1 indicates the selection or range includes a reference. 0 indicates the selection or range isn't before a reference. 1 indicates the selection or range is before a footnote reference, 2 that it's before an endnote reference, and 3 that it's before a comment reference. |
wdVerticalPositionRelativeToPage |
The vertical position of the selection or range—the distance from the top edge of the selection to the top edge of the page, measured in twips. |
wdVerticalPositionRelativeToTextBoundary |
The vertical position of the selection or range—the distance from the top edge of the selection to the text boundary enclosing it, measured in twips. |
| Table Information | |
wdWithInTable |
True if the selection is in a table. |
wdStartOfRangeColumnNumber |
The number of the table column containing the beginning of the selection or range. |
wdEndOfRangeColumnNumber |
The number of the table column containing the end of the selection or range. |
wdStartOfRangeRowNumber |
The number of the table row containing the beginning of the selection or range. |
wdEndOfRangeRowNumber |
The number of the table row containing the end of the selection or range. |
wdAtEndOfRowMarker |
True if the selection or range is at the end-of-row marker in a table (not the end-of-cell marker). |
wdMaximumNumberOfColumns |
The largest number of table columns in any row in the selection or range. |
wdMaximumNumberOfRows |
The largest number of table rows in the table in the selection or range. |
| Macintosh | |
wdInClipboard |
Used with Microsoft Office Macintosh Edition |
Here's an example showing how to use the Information property:
If Selection.Information(wdCapsLock) = True ThenMsgBox "The caps lock is ON."End If
Sharp-eyed readers will notice a capricious inconsistency in this code. In the other code examples in this section, no parentheses were used around a constant, and the operator (= or <> or whatever) is placed between the property and the constant, as shown in this example:
Selection.Type = wdSelectionIP
But with the Information property, you do use parentheses, and you move the operator to the right of the constant:
Selection.Information(wdCapsLock) =
This syntax and punctuation irregularity is yet another of those fun exceptions to a Microsoft rule. You should, therefore, remember that if the expected or typical syntax results in an error message from the Editor, you need to try a different syntax and see if that works. Or look for a code sample that displays in action the object you're working with.
To see the complete list of all members, open the Object Browser (F2) and scroll down in the Classes list until you see wdInformation. Double-click it, and its members will be listed in the Members of “WdInformation” list on the right.
Inserting Text at a Selection
You can insert text at the selection by using the TypeText method of the Selection object, insert text before the selection by using the InsertBefore method, or insert text after the selection by using the InsertAfter method.
The TypeText method merely inserts a text string into the document if the selection is collapsed (if it's just the blinking insertion cursor with nothing actually selected). But if something is selected, such as a word or phrase, that selection is replaced by the string when you execute the TypeText method. However, the InsertBefore and InsertAfter methods do not replace a selection. They merely insert the new string.
The syntax is as follows:
Selection.TypeText stringSelection.InsertAfter stringSelection.InsertBefore string
Here, string is a required String expression containing the text you want to insert in double quotation marks, as in this example:
Selection.TypeText "Please come to the meeting next Friday at 9:00 A.M."Selection.InsertBefore "Dr. "Selection.InsertAfter vbCr & Address
When you use the InsertAfter or the InsertBefore method, VBA extends the selection to include the text you inserted. (You can see selected text, cells, or other items in a document because Word changes the background from the default white to the document frame color.) When you use the TypeText method, the result is a collapsed selection—whether you are replacing a selection or a collapsed selection. (Recall that a collapsed selection means nothing is selected—merely the blinking insertion point.)
Inserting a Paragraph in a Selection
You can insert paragraphs using the following methods:
- To insert a paragraph at the current selection, use the
InsertParagraphmethod. - To insert a paragraph before the current selection, use the
InsertParagraphBeforemethod. - To insert a paragraph after the current selection, use the
InsertParagraphAftermethod.
You can also have VBA type a paragraph by using the Selection.TypeParagraph command.
Applying a Style
To apply a style to a paragraph, set the Style property of the Paragraph object:
Selection.Style = "Heading 3"
View the styles available to the current document by pressing Ctrl+S, or click the Home tab on the Ribbon.
Similarly, you can apply a character style to the current selection or (as in the following example) to a specific range of words or characters. This example changes the fifth word in the second paragraph of the current document to boldface:
ActiveDocument.Paragraphs(2).Range.Words(5).Style = "Bold"
Note that a character style must always be applied to a range rather than directly to a paragraph. Also, depending on what styles are defined for the current document, you might see an error message “Item with specified name does not exist.” This means the style you're trying to describe isn't in the list of styles. To fix this, look at the styles and, for example, change Bold to whatever's listed for bold, such as Strong:
ActiveDocument.Paragraphs(2).Range.Words(5).Style = "Strong"
Extending an Existing Selection
To extend a selection programmatically (through programming rather than by the user), use the EndOf method for a Range or Selection object. The syntax for the EndOf method is as follows:
expression.EndOf(Unit, Extend)
Here, expression is a required expression that returns a Range or Selection object, such as an object in the Characters, Words, Sentences, or Paragraphs collection. Unit is an optional Variant specifying the unit of movement (see Table 20.6).
TABLE 20.6: Units of movement for the EndOf method
| UNIT | MEANING |
wdCharacter |
A character. |
wdWord |
A word. (This is the default setting if you omit the argument.) |
wdSentence |
A sentence. |
wdLine |
A line. (This unit can be used only with Selection objects, not with ranges.) |
wdParagraph |
A paragraph. |
wdSection |
A section of a document. |
wdStory |
The current story—for example, the document story or the header and footer story. |
wdCell |
A cell in a table. |
wdColumn |
A column in a table. |
wdRow |
A row in a table. |
wdTable |
A whole table. |
Extend is an optional Variant specifying whether to move or extend the selection or range. wdMove moves the selection or range and is the default setting; wdExtend extends the selection or range.
For example, the following statement extends the current selection to the end of the paragraph:
Selection.EndOf Unit:=wdParagraph, Extend:=wdExtend
The following statement moves the selection to the end of the paragraph:
Selection.EndOf Unit:=wdParagraph, Extend:=wdMove
The following statement selects from the current selection to the end of the current Word story:
Selection.EndOf Unit:=wdStory, Extend:=wdExtend
To select the whole active document, use ActiveDocument.Content.Select. This command has the same effect as pressing Ctrl+A when working interactively.
Collapsing an Existing Selection
When you've finished working with a selection larger than a blinking cursor insertion point, you often want to deselect it. In other words, you may want to force the selection into a collapsed state (just the blinking cursor) when your procedure ends. (If you don't do this and the user just starts typing, whatever is selected will be replaced by the user's typing.)
The easiest way to do so is to use the Collapse method of the Selection object to collapse the selection to its start or its end:
Selection.Collapse Direction:=wdCollapseStartSelection.Collapse Direction:=wdCollapseEnd
Alternatively, you can reduce the selection to just one point by setting the selection's end selection equal to its start (collapsing the selection to its start) or by setting the selection's start equal to its end (collapsing the selection to its end):
Selection.End = Selection.StartSelection.Start = Selection.End
Creating and Using Ranges
In Word, a range is a contiguous area of a document with a defined starting point and ending point. For example, if you define a range that consists of the first two paragraphs in a specified document, the range's starting point is at the beginning of the first paragraph, and its ending point is at the end of the second paragraph (after the paragraph mark).
Although similar to a selection, a range is more flexible. And, it's important to note that a range is named in your code, so you can refer to it by name at any time. Although there can be only one selection at a time, and a selection cannot be named, there can be multiple, named ranges.
The typical use of ranges in Word VBA is similar to how you use bookmarks when working interactively with Word: to mark a location in a document that you want to be able to access quickly or manipulate easily.
Like a bookmark, a range can contain any amount of text in a document, from a single character to the entire contents of the document. A range can even have the same starting point and ending point, which gives it no contents and makes it, in effect, an invisible mark in the document that you can use to insert text. (This is similar to a collapsed selection.)
Once you've created a range, you can refer to it, access its contents or insert new contents in it, or format it—all by using the methods and properties of the range object.
Defining a Named Range
To create a Range object, you use a Set statement and either the Range method (with the Document object) or the Range property for a different object—for example, the Selection object, the Paragraphs collection, or a Paragraph object classify Range as a property. You might be excused for thinking that a range is always a property of something, but it's how you view the timing. Before a range exists, you can think of it as an action that creates the range, so it's a method. However, after a range exists, it's clearly a property, like an object's color. As I say, object classification is a work in progress. And likely always will be.
The syntax for using the Range method is as follows:
Set RangeName = Document.Range(Start, End)
Here, RangeName is the name you are assigning to the range, and Start and End are optional arguments specifying the starting and ending points of the range.
The syntax for using the Range property on an object is as follows:
Set RangeName = object
.Range
For example, the following statement uses the Range property of the Paragraphs collection to define a range named FirstPara that consists of the first paragraph of the active document. This statement doesn't use Start and End arguments because the starting point and ending point of the paragraph are clearly understood:
Set FirstPara = ActiveDocument.Paragraphs(1).Range
The following code changes to uppercase the first three words at the start of a document:
Dim InitialCaps As RangeSet InitialCaps = ActiveDocument.Range _(Start:=ActiveDocument.Words(1).Start, _End:=ActiveDocument.Words(3).End)InitialCaps.Case = wdUpperCase
The first statement defines a Range object named InitialCaps. The second statement assigns InitialCaps to a range in the active document, from the beginning of the first word to the end of the third word. The third statement changes the case of the InitialCaps Range object to uppercase.
Because InitialCaps is now defined as a Range object for the duration of the procedure that declares it, you can return to InitialCaps and manipulate it later in the procedure if you want to.
Redefining a Range
To redefine a range to make it refer to another part of a document, use the SetRange method. The syntax is as follows:
expression
.SetRange(Start, End)
Here, expression is a required expression that returns a Range or Selection object, and Start and End are optional arguments specifying the starting and ending points of the range.
For example, the following statement redefines the range named InitialCaps so it now refers to the first two characters of the document:
InitialCaps.SetRange Start:=0, End:=2
You can also redefine a range by reusing the Set method, creating the range again from scratch.
Using the Duplicate Property to Store or Copy Formatting
You can use the Duplicate property to store or copy a range so that you can apply it to another range. For example, the following statements declare two ranges, Range1 and Range2; store the duplicate of the current selection's range in Range1; assign to Range2 the Range of the first bookmark in the active document; and then apply to Range2 the contents of Range1:
Dim Range1 As Range, Range2 As RangeSet Range1 = Selection.Range.DuplicateSet Range2 = ActiveDocument.Bookmarks(1).Range
Manipulating Options
In your macros, you'll often need to check the status of options in the Word application or in a particular document. In VBA, many of the options are controlled by the Options object, which has dozens of properties, but no methods. To see the full list of properties available for the Options object, look in MSDN here:
https://msdn.microsoft.com/EN-US/library/office/ff822397.aspx
Let's now look at four brief examples that show how you set options. Three of them use the Options object and one uses a property of the Document object.
Making Sure Hyperlinks Require Ctrl+Clicking
Hyperlinks in Word documents have proved a mixed blessing—especially since Microsoft's changes to the way Word handles hyperlinks have left users unsure whether to just click or to Ctrl+click the hyperlink to follow it. You can set the CtrlClickHyperlinkToOpen property of the Options object to True to ensure that hyperlinks require Ctrl+clicking:
Options.CtrlClickHyperlinkToOpen = True
Setting this option to False means you can trigger links by merely clicking them—no Ctrl key required.
Turning Off Overtype
To make sure your procedures behave as expected, you may need to check that Word is using Insert mode rather than Overtype mode. (In Insert mode, Word inserts the characters you type at the insertion point, moving right any existing text to make room. In Overtype mode, each character you type replaces the character to the right of the insertion point.)
Overtype mode is controlled by the Overtype property of the Options object. When Overtype is True, Overtype mode is on; when Overtype is False, Insert mode is on. The following statements store the user's current Overtype setting in a Boolean variable named blnOvertypeOn, set Overtype to False, perform its actions, and then restore the user's Overtype setting:
Dim blnOvertypeOn As BooleanblnOvertypeOn = Options.OvertypeOptions.Overtype = False 'write more code here to perform actionsOptions.Overtype = blnOvertypeOn
Setting a Default File Path
When configuring Word on a computer, you may need to make sure that its default file paths are set to the correct folders. You can do so by working with the DefaultFilePath property of the Options object. The syntax is as follows:
expression
.DefaultFilePath(Path)
Here, expression is a required expression that returns an Options object. Often, it's easiest to use the Options object itself. Path is one of the self-explanatory enumerated constants shown in the following list:
wdAutoRecoverPath |
wdStyleGalleryPath |
wdBorderArtPath |
wdTempFilePath |
wdCurrentFolderPath |
wdTextConvertersPath |
wdDocumentsPath |
wdToolsPath |
wdGraphicsFiltersPath |
wdTutorialPath |
wdPicturesPath |
wdUserOptionsPath |
wdProgramPath |
wdUserTemplatesPath |
wdProofingToolsPath |
wdWorkgroupTemplatesPath |
wdStartupPath |
For example, the following statements set the user templates path and the workgroup templates path:
Options.DefaultFilePath(wdUserTemplatesPath) = _"c:users ichardappdata oamingmicrosoft emplates"Options.DefaultFilePath(wdWorkgroupTemplatesPath) = _"\serverusers emplates"
Turning Off Track Changes
Before running a procedure that adds, deletes, or formats text, you may need to turn off the Track Changes feature so that the changes the procedure makes are not marked up in the text. If the user had Track Changes on, you should turn it back on at the end of the procedure so that changes the user makes are tracked again. Remember that it's usually a good practice when changing options to first store the user's current setting in a variable, carry out your procedure's task, and then restore the user's original setting. The following example illustrates this technique.
This example saves the user's setting for the TrackRevisions option in the ActiveDocument object in a Boolean variable named blnTrackChangesOn, sets TrackRevisions to False, performs its actions, and then restores the user's TrackRevisions setting:
Dim blnTrackChangesOn As BooleanblnTrackChangesOn = ActiveDocument.TrackRevisionsActiveDocument.TrackRevisions = False' write more code here to perform actionsActiveDocument.TrackRevisions = blnTrackChangesOn
The Bottom Line
- Understand Word's creatable objects. Word contains a set of creatable objects that VBA programmers will frequently employ in their code.
-
- Master It What is a creatable object?
-
- Work with the
Documentscollection and theDocumentobject. TheDocumentscollection represents all the currently open documents. Using VBA, you can manipulate this collection in a variety of ways.-
- Master It Here is the syntax for adding a new document to the
Documentscollection: Documents.Add Template, NewTemplate, DocumentType, Visible- If you merely want to add a new, empty document (based on the default
Normal.dotmtemplate) to the documents currently open in Word, the code is quite simple. What is the code that you would write in VBA to accomplish this?
- Master It Here is the syntax for adding a new document to the
-
- Work with the
Selectionobject. TheSelectionobject represents the current selection in the active document in Word. A zone can be selected by the user by dragging the mouse or by using various key combinations (such as pressing Shift and an arrow key). A selection can include one or more objects—one or more characters, one or more words, one or more paragraphs, a graphic, a table, and so on. Or, it can include a combination of these objects.-
- Master It One kind of selection is described as a collapsed selection. What is that?
-
- Create and use ranges. In Word, a range is a named area of a document with a defined starting and ending point. The typical use of ranges in Word VBA is similar to how you use bookmarks when working interactively with Word: to mark a location in a document that you want to be able to access quickly or manipulate easily.
-
- Master It Although a range is similar to a bookmark, what is the significant difference between them?
-
- Manipulate options. Word contains many options that can be manipulated from within VBA.
-
- Master It In Word, one object controls many of the options. This object has dozens of properties but no methods. Name this object.
-