4
Securing Kubernetes
In Chapter 3, High Availability and Reliability, we looked at reliable and highly available Kubernetes clusters, the basic concepts, the best practices, and the many design trade-offs regarding scalability, performance, and cost.
In this chapter, we will explore the important topic of security. Kubernetes clusters are complicated systems composed of multiple layers of interacting components. The isolation and compartmentalization of different layers is very important when running critical applications. To secure a system and ensure proper access to resources, capabilities, and data, we must first understand the unique challenges facing Kubernetes as a general-purpose orchestration platform that runs unknown workloads. Then we can take advantage of various securities, isolation, and access control mechanisms to make sure the cluster, the applications running on it, and the data are all safe. We will discuss various best practices and when it is appropriate to use each mechanism.
This chapter will explore the following main topics:
- Understanding Kubernetes security challenges
- Hardening Kubernetes
- Running multi-tenant clusters
By the end of this chapter, you will have a good understanding of Kubernetes security challenges. You will gain practical knowledge of how to harden Kubernetes against various potential attacks, establishing defense in depth, and will even be able to safely run a multi-tenant cluster while providing different users full isolation as well as full control over their part of the cluster.
Understanding Kubernetes security challenges
Kubernetes is a very flexible system that manages very low-level resources in a generic way. Kubernetes itself can be deployed on many operating systems and hardware or virtual machine solutions, on-premises, or in the cloud. Kubernetes runs workloads implemented by runtimes it interacts with through a well-defined runtime interface, but without understanding how they are implemented. Kubernetes manipulates critical resources such as networking, DNS, and resource allocation on behalf of or in service of applications it knows nothing about.
This means that Kubernetes is faced with the difficult task of providing good security mechanisms and capabilities in a way that application developers and cluster administrators can utilize, while protecting itself, the developers, and the administrators from common mistakes.
In this section, we will discuss security challenges in several layers or components of a Kubernetes cluster: nodes, network, images, pods, and containers. Defense in depth is an important security concept that requires systems to protect themselves at each level, both to mitigate attacks that penetrate other layers and to limit the scope and damage of a breach. Recognizing the challenges in each layer is the first step toward defense in depth.
This is often described as the 4 Cs of cloud-native security:

Figure 4.1: The 4 Cs of cloud-native security
However, the 4 Cs model is a coarse-grained approach for security. Another approach is building a threat model based on the security challenges across different dimensions, such as:
- Node challenges
- Network challenges
- Image challenges
- Deployment and configuration challenges
- Pod and container challenges
- Organizational, cultural, and process challenges
Let’s examine these challenges.
Node challenges
The nodes are the hosts of the runtime engines. If an attacker gets access to a node, this is a serious threat. They can control at least the host itself and all the workloads running on it. But it gets worse.
The node has a kubelet running that talks to the API server. A sophisticated attacker can replace the kubelet with a modified version and effectively evade detection by communicating normally with the Kubernetes API server while running their own workloads instead of the scheduled workloads, collecting information about the overall cluster, and disrupting the API server and the rest of the cluster by sending malicious messages. The node will have access to shared resources and to secrets that may allow the attacker to infiltrate even deeper. A node breach is very serious, because of both the possible damage and the difficulty of detecting it after the fact.
Nodes can be compromised at the physical level too. This is more relevant on bare-metal machines where you can tell which hardware is assigned to the Kubernetes cluster.
Another attack vector is resource drain. Imagine that your nodes become part of a bot network that, unrelated to your Kubernetes cluster, just runs its own workloads like cryptocurrency mining and drains CPU and memory. The danger here is that your cluster will choke and run out of resources to run your workloads or, alternatively, your infrastructure may scale automatically and allocate more resources.
Another problem is the installation of debugging and troubleshooting tools or modifying the configuration outside of an automated deployment. Those are typically untested and, if left behind and active, can lead to at least degraded performance, but can also cause more sinister problems. At the least, it increases the attack surface.
Where security is concerned, it’s a numbers game. You want to understand the attack surface of the system and where you’re vulnerable. Let’s list some possible node challenges:
- An attacker takes control of the host
- An attacker replaces the kubelet
- An attacker takes control of a node that runs master components (such as the API server, scheduler, or controller manager)
- An attacker gets physical access to a node
- An attacker drains resources unrelated to the Kubernetes cluster
- Self-inflicted damage occurs through the installation of debugging and troubleshooting tools or a configuration change
Mitigating node challenges requires several layers of defense such as controlling physical access, preventing privilege escalation, and reducing the attack surface by controlling the OS and software installed on the node.
Network challenges
Any non-trivial Kubernetes cluster spans at least one network. There are many challenges related to networking. You need to understand how your system components are connected at a very fine level. Which components are supposed to talk to each other? What network protocols do they use? What ports? What data do they exchange? How is your cluster connected to the outside world?
There is a complex chain of exposing ports and capabilities or services:
- Container to host
- Host to host within the internal network
- Host to the world
Using overlay networks (which will be discussed more in Chapter 10, Exploring Kubernetes Networking) can help with defense in depth where, even if an attacker gains access to a container, they are sandboxed and can’t escape to the underlay network’s infrastructure.
Discovering components is a big challenge too. There are several options here, such as DNS, dedicated discovery services, and load balancers. Each comes with a set of pros and cons that take careful planning and insight to get right for your situation. Making sure two containers can find each other and exchange information is not trivial.
You need to decide which resources and endpoints should be publicly accessible. Then you need to come up with a proper way to authenticate users, services, and authorize them to operate on resources. Often you may want to control access between internal services too.
Sensitive data must be encrypted on the way into and out of the cluster and sometimes at rest, too. That means key management and safe key exchange, which is one of the most difficult problems to solve in security.
If your cluster shares networking infrastructure with other Kubernetes clusters or non-Kubernetes processes, then you have to be diligent about isolation and separation.
The ingredients are network policies, firewall rules, and software-defined networking (SDN). The recipe is often customized. This is especially challenging with on-premises and bare-metal clusters. Here are some of the network challenges you will face:
- Coming up with a connectivity plan
- Choosing components, protocols, and ports
- Figuring out dynamic discovery
- Public versus private access
- Authentication and authorization (including between internal services)
- Designing firewall rules
- Deciding on a network policy
- Key management and exchange
- Encrypted communication
There is a constant tension between making it easy for containers, users, and services to find and talk to each other at the network level versus locking down access and preventing attacks through the network or attacks on the network itself.
Many of these challenges are not Kubernetes-specific. However, the fact that Kubernetes is a generic platform that manages key infrastructure and deals with low-level networking makes it necessary to think about dynamic and flexible solutions that can integrate system-specific requirements into Kubernetes. These solutions often involve monitoring and automatically injecting firewall rules or applying network policies based on namespaces and pod labels.
Image challenges
Kubernetes runs containers that comply with one of its runtime engines. It has no idea what these containers are doing (except collecting metrics). You can put certain limits on containers via quotas. You can also limit their access to other parts of the network via network policies. But, in the end, containers do need access to host resources, other hosts in the network, distributed storage, and external services. The image determines the behavior of a container. The infamous software supply chain problem is at the core of how these container images are created. There are two categories of problems with images:
- Malicious images
- Vulnerable images
Malicious images are images that contain code or configuration that was designed by an attacker to do some harm, collect information, or just take advantage of your infrastructure for their purposes (for example, crypto mining). Malicious code can be injected into your image preparation pipeline, including any image repositories you use. Alternatively, you may install third-party images that were compromised themselves and now contain malicious code.
Vulnerable images are images you designed (or third-party images you install) that just happen to contain some vulnerability that allows an attacker to take control of the running container or cause some other harm, including injecting their own code later.
It’s hard to tell which category is worse. At the extreme, they are equivalent because they allow seizing total control of the container. The other defenses that are in place (remember defense in depth?) and the restrictions you put on the container will determine how much damage it can do. Minimizing the danger of bad images is very challenging. Fast-moving companies utilizing microservices may generate many images daily. Verifying an image is not an easy task either. In addition, some containers require wide permissions to do their legitimate job. If such a container is compromised it can do extreme damage.
The base images that contain the operating system may become vulnerable any time a new vulnerability is discovered. Moreover, if you rely on base images prepared by someone else (very common) then malicious code may find its way into those base images, which you have no control over and you trust implicitly.
When a vulnerability in a third-party dependency is discovered, ideally there is already a fixed version and you should patch it as soon as possible.
We can summarize the image challenges that developers are likely to face as follows:
- Kubernetes doesn’t know what containers are doing
- Kubernetes must provide access to sensitive resources for the designated function
- It’s difficult to protect the image preparation and delivery pipeline (including image repositories)
- The speed of development and deployment of new images conflict with the careful review of changes
- Base images that contain the OS or other common dependencies can easily get out of date and become vulnerable
- Base images are often not under your control and might be more prone to the injection of malicious code
Integrating a static image analyzer like CoreOS Clair or the Anchore Engine into your CI/CD pipeline can help a lot. In addition, minimizing the blast radius by limiting the resource access of containers only to what they need to perform their job can reduce the impact on your system if a container gets compromised. You must also be diligent about patching known vulnerabilities.
Configuration and deployment challenges
Kubernetes clusters are administered remotely. Various manifests and policies determine the state of the cluster at each point in time. If an attacker gets access to a machine with administrative control over the cluster, they can wreak havoc, such as collecting information, injecting bad images, weakening security, and tampering with logs. As usual, bugs and mistakes can be just as harmful; by neglecting important security measures, you leave the cluster open for attack. It is very common these days for employees with administrative access to the cluster to work remotely from home or from a coffee shop and have their laptops with them, where you are just one kubectl command from opening the floodgates.
Let’s reiterate the challenges:
- Kubernetes is administered remotely
- An attacker with remote administrative access can gain complete control over the cluster
- Configuration and deployment is typically more difficult to test than code
- Remote or out-of-office employees risk extended exposure, allowing an attacker to gain access to their laptops or phones with administrative access
There are some best practices to minimize this risk, such as a layer of indirection in the form of a jump box where a developer connects from the outside to a dedicated machine in the cluster with tight controls that manages secure interaction with internal services, requiring a VPN connection (which authenticates and encrypts all communication), and using multi-factor authentication and one-time passwords to protect against trivial password cracking attacks.
Pod and container challenges
In Kubernetes, pods are the unit of work and contain one or more containers. The pod is a grouping and deployment construct. But often, containers that are deployed together in the same pod interact through direct mechanisms. The containers all share the same localhost network and often share mounted volumes from the host. This easy integration between containers in the same pod can result in exposing parts of the host to all the containers. This might allow one bad container (either malicious or just vulnerable) to open the way for an escalated attack on other containers in the pod, later taking over the node itself and the entire cluster. Control plane add-ons are often collocated with control plane components and present that kind of danger, especially because many of them are experimental. The same goes for DaemonSets that run pods on every node. The practice of sidecar containers where additional containers are deployed in a pod along with your application container is very popular, especially with service meshes. This increases that risk because the sidecar containers are often outside your control, and if compromised, can provide access to your infrastructure.
Multi-container pod challenges include the following:
- The same pod containers share the localhost network
- The same pod containers sometimes share a mounted volume on the host filesystem
- Bad containers might poison other containers in the pod
- Bad containers have an easier time attacking the node if collocated with another container that accesses crucial node resources
- Experimental add-ons that are collocated with master components might be experimental and less secure
- Service meshes introduce a sidecar container that might become an attack vector
Consider carefully the interaction between containers running in the same pod. You should realize that a bad container might try to compromise its sibling containers in the same pod as its first attack. This means that you should be able to detect rogue containers injected into a pod (e.g. by a malicious admission control webhook or a compromised CI/CD pipeline). You should also apply the least privilege principle and minimize the damage such a rogue container can do.
Organizational, cultural, and process challenges
Security is often held in contrast to productivity. This is a normal trade-off and nothing to worry about. Traditionally, when developers and operations were separate, this conflict was managed at an organizational level. Developers pushed for more productivity and treated security requirements as the cost of doing business. Operations controlled the production environment and were responsible for access and security procedures. The DevOps movement brought down the wall between developers and operations. Now, speed of development often takes a front-row seat. Concepts such as continuous deployment deploying multiple times a day without human intervention were unheard of in most organizations. Kubernetes was designed for this new world of cloud-native applications. But, it was developed based on Google’s experience.
Google had a lot of time and skilled experts to develop the proper processes and tooling to balance rapid deployments with security. For smaller organizations, this balancing act might be very challenging and security could be weakened by focusing too much on productivity.
The challenges facing organizations that adopt Kubernetes are as follows:
- Developers that control the operation of Kubernetes might be less security-oriented
- The speed of development might be considered more important than security
- Continuous deployment might make it difficult to detect certain security problems before they reach production
- Smaller organizations might not have the knowledge and expertise to manage security properly in Kubernetes clusters
There are no easy answers here. You should be deliberate in striking the right balance between security and agility. I recommend having a dedicated security team (or at least one person focused on security) participate in all planning meetings and advocate for security. It’s important to bake security into your system from the get-go.
In this section, we reviewed the many challenges you face when you try to build a secure Kubernetes cluster. Most of these challenges are not specific to Kubernetes, but using Kubernetes means there is a large part of your system that is generic and unaware of what the system is doing.
This can pose problems when trying to lock down a system. The challenges are spread across different levels:
- Node challenges
- Network challenges
- Image challenges
- Configuration and deployment challenges
- Pod and container challenges
- Organizational and process challenges
In the next section, we will look at the facilities Kubernetes provides to address some of those challenges. Many of the challenges require solutions at the larger system scope. It is important to realize that just utilizing all of Kubernetes’ security features is not enough.
Hardening Kubernetes
The previous section cataloged and listed the variety of security challenges facing developers and administrators deploying and maintaining Kubernetes clusters. In this section, we will hone in on the design aspects, mechanisms, and features offered by Kubernetes to address some of the challenges. You can get to a pretty good state of security by judicious use of capabilities such as service accounts, network policies, authentication, authorization, admission control, AppArmor, and secrets.
Remember that a Kubernetes cluster is one part of a bigger system that includes other software systems, people, and processes. Kubernetes can’t solve all problems. You should always keep in mind general security principles, such as defense in depth, a need-to-know basis, and the principle of least privilege.
In addition, log everything you think may be useful in the event of an attack and have alerts for early detection when the system deviates from its state. It may be just a bug or it may be an attack. Either way, you want to know about it and respond.
Understanding service accounts in Kubernetes
Kubernetes has regular users that are managed outside the cluster for humans connecting to the cluster (for example, via the kubectl command), and it has service accounts.
Regular user accounts are global and can access multiple namespaces in the cluster. Service accounts are constrained to one namespace. This is important. It ensures namespace isolation, because whenever the API server receives a request from a pod, its credentials will apply only to its own namespace.
Kubernetes manages service accounts on behalf of the pods. Whenever Kubernetes instantiates a pod, it assigns the pod a service account unless the service account or the pod explicitly opted out by setting automountServiceAccountToken to False. The service account identifies all the pod processes when they interact with the API server. Each service account has a set of credentials mounted in a secret volume. Each namespace has a default service account called default. When you create a pod, it is automatically assigned the default service account unless you specify a different service account.
You can create additional service accounts if you want different pods to have different identities and permissions. Then you can bind different service accounts to different roles.
Create a file called custom-service-account.yaml with the following content:
apiVersion: v1
kind: ServiceAccount
metadata:
  name: custom-service-account
$ kubectl create -f custom-service-account.yaml
serviceaccount/custom-service-account created
Here is the service account listed alongside the default service account:
$ kubectl get serviceaccounts
NAME                     SECRETS   AGE
custom-service-account   1         6s
default                  1         2m28s
Note that a secret was created automatically for your new service account:
$ kubectl get secret
NAME                                                    TYPE                                                   DATA   AGE
custom-service-account-token-vbrbm   kubernetes.io/service-account-token   3          62s
default-token-m4nfk                              kubernetes.io/service-account-token   3           3m24s
To get more detail, type the following:
$ kubectl get serviceAccounts/custom-service-account -o yaml
apiVersion: v1
kind: ServiceAccount
metadata:
  creationTimestamp: "2022-06-19T18:38:22Z"
  name: custom-service-account
  namespace: default
  resourceVersion: "784"
  uid: f70f70cf-5b42-4a46-a2ff-b07792bf1220
secrets:
- name: custom-service-account-token-vbrbm
You can see the secret itself, which includes a ca.crt file and a token, by typing the following:
$ kubectl get secret custom-service-account-token-vbrbm -o yaml
How does Kubernetes manage service accounts?
The API server has a dedicated component called the service account admission controller. It is responsible for checking, at pod creation time, if the API server has a custom service account and, if it does, that the custom service account exists. If there is no service account specified, then it assigns the default service account.
It also ensures the pod has ImagePullSecrets, which are necessary when images need to be pulled from a remote image registry. If the pod spec doesn’t have any secrets, it uses the service account’s ImagePullSecrets.
Finally, it adds a volume with an API token for API access and a volumeSource mounted at /var/run/secrets/kubernetes.io/serviceaccount.
The API token is created and added to the secret by another component called the token controller whenever a service account is created. The token controller also monitors secrets and adds or removes tokens wherever secrets are added to or removed from a service account.
The service account controller ensures the default service account exists for every namespace.
Accessing the API server
Accessing the API server requires a chain of steps that include authentication, authorization, and admission control. At each stage, the request may be rejected. Each stage consists of multiple plugins that are chained together.
The following diagram illustrates this:
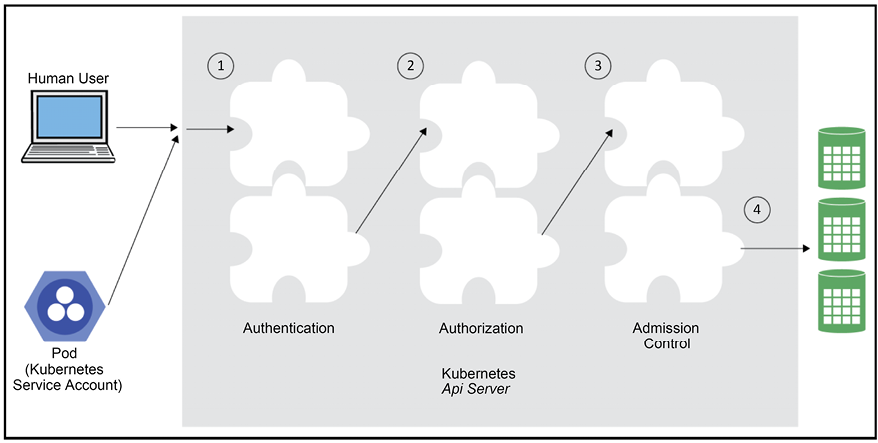
Figure 4.2: Accessing the API server
Authenticating users
When you first create the cluster, some keys and certificates are created for you to authenticate against the cluster. These credentials are typically stored in the file ~/.kube/config, which may contain credentials for multiple clusters. You can also have multiple configuration files and control which file will be used by setting the KUBECONFIG environment variable or passing the --kubeconfig flag to kubectl. kubectl uses the credentials to authenticate itself to the API server and vice versa over TLS (an encrypted HTTPS connection). Let’s create a new KinD cluster and store its credentials in a dedicated config file by setting the KUBECONFIG environment variable:
$ export KUBECONFIG=~/.kube/kind-config
$ kind create cluster
Creating cluster "kind" ...
  Ensuring node image (kindest/node:v1.23.4)
  Preparing nodes
  Writing configuration
  Starting control-plane
  Installing CNI
  Installing StorageClass
Set kubectl context to "kind-kind"
You can now use your cluster with:
kubectl cluster-info --context kind-kind
Set kubectl context to "kind-kind"
You can now use your cluster with:
kubectl cluster-info --context kind-kind
You can view your configuration using this command:
$ kubectl config view
apiVersion: v1
clusters:
- cluster:
    certificate-authority-data: DATA+OMITTED
    server: https://127.0.0.1:61022
  name: kind-kind
contexts:
- context:
    cluster: kind-kind
    user: kind-kind
  name: kind-kind
current-context: kind-kind
kind: Config
preferences: {}
users:
- name: kind-kind
  user:
    client-certificate-data: REDACTED
    client-key-data: REDACTED
This is the configuration for a KinD cluster. It may look different for other types of clusters.
Note that if multiple users need to access the cluster, the creator should provide the necessary client certificates and keys to the other users in a secure manner.
This is just establishing basic trust with the Kubernetes API server itself. You’re not authenticated yet. Various authentication modules may look at the request and check for various additional client certificates, passwords, bearer tokens, and JWT tokens (for service accounts). Most requests require an authenticated user (either a regular user or a service account), although there are some anonymous requests too. If a request fails to authenticate with all the authenticators it will be rejected with a 401 HTTP status code (unauthorized, which is a bit of a misnomer).
The cluster administrator determines what authentication strategies to use by providing various command-line arguments to the API server:
--client-ca-file=(for x509 client certificates specified in a file)--token-auth-file=(for bearer tokens specified in a file)--basic-auth-file=(for user/password pairs specified in a file)--enable-bootstrap-token-auth(for bootstrap tokens used by kubeadm)
Service accounts use an automatically loaded authentication plugin. The administrator may provide two optional flags:
--service-account-key-file=(If not specified, the API server’s TLS private key will be utilized as the PEM-encoded key for signing bearer tokens.)--service-account-lookup(When enabled, the revocation of tokens will take place if they are deleted from the API.)
There are several other methods, such as OpenID Connect, webhooks, Keystone (the OpenStack identity service), and an authenticating proxy. The main theme is that the authentication stage is extensible and can support any authentication mechanism.
The various authentication plugins will examine the request and, based on the provided credentials, will associate the following attributes:
- Username (a user-friendly name)
- UID (a unique identifier and more consistent than the username)
- Groups (a set of group names the user belongs to)
- Extra fields (these map string keys to string values)
In Kubernetes 1.11, kubectl gained the ability to use credential plugins to receive an opaque token from a provider such as an organizational LDAP server. These credentials are sent by kubectl to the API server that typically uses a webhook token authenticator to authenticate the credentials and accept the request.
The authenticators have no knowledge whatsoever of what a particular user is allowed to do. They just map a set of credentials to a set of identities. The authenticators run in an unspecified order; the first authenticator to accept the passed credentials will associate an identity with the incoming request and the authentication is considered successful. If all authenticators reject the credentials then authentication failed.
It’s interesting to note that Kubernetes has no idea who its regular users are. There is no list of users in etcd. Authentication is granted to any user who presents a valid certificate that has been signed by the certificate authority (CA) associated with the cluster.
Impersonation
It is possible for users to impersonate different users (with proper authorization). For example, an admin may want to troubleshoot some issue as a different user with fewer privileges. This requires passing impersonation headers to the API request. The headers are as follows:
- Impersonate-User: Specifies the username to act on behalf of.
- Impersonate-Group: Specifies a group name to act on behalf of. Multiple groups can be provided by specifying this option multiple times. This option is optional but requires Impersonate-User to be set.
- Impersonate-Extra-(extra name): A dynamic header used to associate additional fields with the user. This option is optional but requires Impersonate-User to be set.
With kubectl, you pass the –-as and --as-group parameters.
To impersonate a service account, type the following:
kubectl --as system:serviceaccount:<namespace>:<service account name>
Authorizing requests
Once a user is authenticated, authorization commences. Kubernetes has generic authorization semantics. A set of authorization modules receives the request, which includes information such as the authenticated username and the request’s verb (list, get, watch, create, and so on). Unlike authentication, all authorization plugins will get a shot at any request. If a single authorization plugin rejects the request or no plugin had an opinion then it will be rejected with a 403 HTTP status code (forbidden). A request will continue only if at least one plugin accepts it and no other plugin rejected it.
The cluster administrator determines what authorization plugins to use by specifying the --authorization-mode command-line flag, which is a comma-separated list of plugin names.
The following modes are supported:
--authorization-mode=AlwaysDenyrejects all requests. Use if you don’t need authorization.--authorization-mode=AlwaysAllowallows all requests. Use if you don’t need authorization. This is useful during testing.--authorization-mode=ABACallows for a simple, local-file-based, user-configured authorization policy. ABAC stands for Attribute-Based Access Control.--authorization-mode=RBACis a role-based mechanism where authorization policies are stored and driven by the Kubernetes API. RBAC stands for Role-Based Access Control.--authorization-mode=Nodeis a special mode designed to authorize API requests made by kubelets.--authorization-mode=Webhookallows for authorization to be driven by a remote service using REST.
You can add your own custom authorization plugin by implementing the following straightforward Go interface:
type Authorizer interface {
    Authorize(ctx context.Context, a Attributes) (authorized Decision, reason string, err error)
}
The Attributes input argument is also an interface that provides all the information you need to make an authorization decision:
type Attributes interface {
  GetUser() user.Info
  GetVerb() string
  IsReadOnly() bool
  GetNamespace() string
  GetResource() string
  GetSubresource() string
  GetName() string
  GetAPIGroup() string
  GetAPIVersion() string
  IsResourceRequest() bool
  GetPath() string
}
You can find the source code at https://github.com/kubernetes/apiserver/blob/master/pkg/authorization/authorizer/interfaces.go.
Using the kubectl can-i command, you can check what actions you can perform and even impersonate other users:
$ kubectl auth can-i create deployments
Yes
$ kubectl auth can-i create deployments --as jack
no
kubectl supports plugins. We will discuss plugins in depth later in Chapter 15, Extending Kubernetes. In the meantime, I’ll just mention that one of my favorite plugins is rolesum. This plugin gives you a summary of all the permissions a user or service account has. Here is an example:
$ kubectl rolesum job-controller -n kube-system
ServiceAccount: kube-system/job-controller
Secrets:
• */job-controller-token-tp72d
Policies:
• [CRB] */system:controller:job-controller  [CR] */system:controller:job-controller
Resource Name Exclude Verbs G L W C U P D DC
events.[,events.k8s.io] [*] [-] [-]
[CR] */system:controller:job-controller
Resource Name Exclude Verbs G L W C U P D DC
events.[,events.k8s.io] [*] [-] [-]  jobs.batch [*] [-] [-]
  jobs.batch/finalizers [*] [-] [-]
  jobs.batch/status [*] [-] [-]
pods [*] [-] [-]
jobs.batch/status [*] [-] [-]
pods [*] [-] [-] 
Check it out here: https://github.com/Ladicle/kubectl-rolesum.
Using admission control plugins
OK. The request was authenticated and authorized, but there is one more step before it can be executed. The request must go through a gauntlet of admission-control plugins. Similar to the authorizers, if a single admission controller rejects a request, it is denied. Admission controllers are a neat concept. The idea is that there may be global cluster concerns that could be grounds for rejecting a request. Without admission controllers, all authorizers would have to be aware of these concerns and reject the request. But, with admission controllers, this logic can be performed once. In addition, an admission controller may modify the request. Admission controllers run in either validating mode or mutating mode. As usual, the cluster administrator decides which admission control plugins run by providing a command-line argument called admission-control. The value is a comma-separated and ordered list of plugins. Here is the list of recommended plugins for Kubernetes >= 1.9 (the order matters):
--admission-control=NamespaceLifecycle,LimitRanger,ServiceAccount,PersistentVolumeLabel,DefaultStorageClass,MutatingAdmissionWebhook,ValidatingAdmissionWebhook,ResourceQuota,DefaultTolerationSeconds
Let’s look at some available plugins (more are added all the time):
DefaultStorageClass: Adds a default storage class to requests for the creation of aPersistentVolumeClaimthat doesn’t specify a storage class.DefaultTolerationSeconds: Sets the default toleration of pods for taints (if not set already):notready:NoExecuteandnotreachable:NoExecute.EventRateLimit: Limits flooding of the API server with events.ExtendedResourceToleration: Combines taints on nodes with special resources such as GPUs and Field Programmable Gate Arrays (FPGAs) with toleration on pods that request those resources. The end result is that the node with the extra resources will be dedicated for pods with the proper toleration.ImagePolicyWebhook: This complicated plugin connects to an external backend to decide whether a request should be rejected based on the image.LimitPodHardAntiAffinity: In therequiredDuringSchedulingRequiredDuringExecutionfield, any pod that specifies an AntiAffinity topology key other thankubernetes.io/hostnamewill be denied.LimitRanger: Rejects requests that violate resource limits.MutatingAdmissionWebhook: Calls registered mutating webhooks that are able to modify their target object. Note that there is no guarantee that the change will be effective due to potential changes by other mutating webhooks.NamespaceAutoProvision: Creates the namespace in the request if it doesn’t exist already.NamespaceLifecycle: Rejects object creation requests in namespaces that are in the process of being terminated or don’t exist.ResourceQuota: Rejects requests that violate the namespace’s resource quota.ServiceAccount: Automation for service accounts.ValidatingAdmissionWebhook: The admission controller invokes validating webhooks that match the request. The matching webhooks are called concurrently, and if any of them reject the request, the overall request fails.
As you can see, the admission control plugins have very diverse functionality. They support namespace-wide policies and enforce the validity of requests mostly from the resource management and security points of view. This frees up the authorization plugins to focus on valid operations. ImagePolicyWebHook is the gateway to validating images, which is a big challenge. MutatingAdmissionWebhook and ValidatingAdmissionWebhook are the gateways to dynamic admission control, where you can deploy your own admission controller without compiling it into Kubernetes. Dynamic admission control is suitable for tasks like semantic validation of resources (do all pods have the standard set of labels?). We will discuss dynamic admission control in depth later, in Chapter 16, Governing Kubernetes, as this is the foundation of policy management governance in Kubernetes.
The division of responsibility for validating an incoming request through the separate stages of authentication, authorization, and admission, each with its own plugins, makes a complicated process much more manageable to understand, use, and extend.
The mutating admission controllers provide a lot of flexibility and the ability to automatically enforce certain policies without burdening the users (for example, creating a namespace automatically if it doesn’t exist).
Securing pods
Pod security is a major concern, since Kubernetes schedules the pods and lets them run. There are several independent mechanisms for securing pods and containers. Together these mechanisms support defense in depth, where, even if an attacker (or a mistake) bypasses one mechanism, it will get blocked by another.
Using a private image repository
This approach gives you a lot of confidence that your cluster will only pull images that you have previously vetted, and you can manage upgrades better. In light of the rise in software supply chain attacks it is an important countermeasure. You can configure your HOME/.docker/config.json on each node. But, on many cloud providers, you can’t do this because nodes are provisioned automatically for you.
ImagePullSecrets
This approach is recommended for clusters on cloud providers. The idea is that the credentials for the registry will be provided by the pod, so it doesn’t matter what node it is scheduled to run on. This circumvents the problem with .dockercfg at the node level.
First, you need to create a secret object for the credentials:
$ kubectl create secret docker-registry the-registry-secret
    --docker-server=<docker registry server>
    --docker-username=<username>
    --docker-password=<password>
    --docker-email=<email>
secret 'docker-registry-secret' created.
You can create secrets for multiple registries (or multiple users for the same registry) if needed. The kubelet will combine all ImagePullSecrets.
But, since pods can access secrets only in their own namespace, you must create a secret on each namespace where you want the pod to run. Once the secret is defined, you can add it to the pod spec and run some pods on your cluster. The pod will use the credentials from the secret to pull images from the target image registry:
apiVersion: v1
kind: Pod
metadata:
  name: cool-pod
  namespace: the-namespace
spec:
  containers:
 - name: cool-container
   image: cool/app:v1
   imagePullSecrets:
   - name: the-registry-secret
Specifying a security context for pods and containers
Kubernetes allows setting a security context at the pod level and additional security contexts at the container level. The pod security context is a set of operating-system-level security settings such as UID, GID, capabilities, and SELinux role. The pod security context can also apply its security settings (in particular, fsGroup and seLinuxOptions) to volumes.
Here is an example of a pod security context:
apiVersion: v1
kind: Pod
metadata:
name: some-pod
spec:
  securityContext:
    fsGroup: 1234
    supplementalGroups: [5678]
    seLinuxOptions:
      level: 's0:c123,c456'
  containers:
    ...
For the complete list of pod security context fields, check out https://kubernetes.io/docs/reference/generated/kubernetes-api/v1.24/#podsecuritycontext-v1-core.
The container security context is applied to each container and it adds container-specific settings. Some fields of the container security context overlap with fields in the pod security context. If the container security context specifies these fields they override the values in the pod security context. Container context settings can’t be applied to volumes, which remain at the pod level even if mounted into specific containers only.
Here is a pod with a container security context:
apiVersion: v1
kind: Pod
metadata:
  name: some-pod
spec:
  containers:
  - name: some-container
    ...
    securityContext:
      privileged: true
      seLinuxOptions:
        level: 's0:c123,c456'
For the complete list of container security context fields, check out https://kubernetes.io/docs/reference/generated/kubernetes-api/v1.24/#securitycontext-v1-core.
Pod security standards
Kubernetes defines security profiles that are appropriate for different security needs and aggregates recommended settings. The privileged profile provides all permissions and is, unfortunately, the default. The baseline profile is a minimal security profile that just prevents privilege escalation. The restricted profile follows hardening best practices.
See more info here: https://kubernetes.io/docs/concepts/security/pod-security-standards/.
Protecting your cluster with AppArmor
AppArmor is a Linux kernel security module. With AppArmor, you can restrict a process running in a container to a limited set of resources such as network access, Linux capabilities, and file permissions. You configure AppArmor through profiles.
AppArmor requirements
AppArmor support was added as beta in Kubernetes 1.4. It is not available for every OS, so you must choose a supported OS distribution in order to take advantage of it. Ubuntu and SUSE Linux support AppArmor and enable it by default. Other distributions have optional support.
To check if AppArmor is enabled connect to a node (e.g. via ssh) and type the following:
$ cat /sys/module/apparmor/parameters/enabled
Y
If the result is Y then it’s enabled. If the file doesn’t exist or the result is not Y it is not enabled.
The profile must be loaded into the kernel. Check the following file:
/sys/kernel/security/apparmor/profiles
Kubernetes doesn’t provide a built-in mechanism to load profiles to nodes. You typically need a DaemonSet with node-level privileges to load the necessary AppArmor profiles into the nodes.
Check out the following link for more details on loading AppArmor profiles into nodes: https://kubernetes.io/docs/tutorials/security/apparmor/#setting-up-nodes-with-profiles.
Securing a pod with AppArmor
Since AppArmor is still in beta, you specify the metadata as annotations and not as bonafide fields. When it gets out of beta, this will change.
To apply a profile to a container, add the following annotation:
container.apparmor.security.beta.kubernetes.io/<container name>: <profile reference>
The profile reference can be either the default profile, runtime/default, or a profile file on the host/localhost.
Here is a sample profile that prevents writing to files:
> #include <tunables/global>
>
> profile k8s-apparmor-example-deny-write flags=(attach\\_disconnected)
> {
>
> #include <abstractions/base>
>
> file,
>
> # Deny all file writes.
>
> deny /\*\* w,
>
> }
AppArmor is not a Kubernetes resource, so the format is not the YAML or JSON you’re familiar with.
To verify the profile was attached correctly, check the attributes of process 1:
kubectl exec <pod-name> cat /proc/1/attr/current
Pods can be scheduled on any node in the cluster by default. This means the profile should be loaded into every node. This is a classic use case for a DaemonSet.
Writing AppArmor profiles
Writing profiles for AppArmor by hand is not trivial. There are some tools that can help: aa-genprof and aa-logprof can generate a profile for you and assist in fine-tuning it by running your application with AppArmor in complain mode. The tools keep track of your application’s activity and AppArmor warnings and create a corresponding profile. This approach works, but it feels clunky.
My favorite tool is bane, which generates AppArmor profiles from a simpler profile language based on the TOML syntax. bane profiles are very readable and easy to grasp. Here is a sample bane profile:
# name of the profile, we will auto prefix with `docker-`
# so the final profile name will be `docker-nginx-sample`
Name = "nginx-sample"
[Filesystem]
# read only paths for the container
ReadOnlyPaths = [
    "/bin/**",
    "/boot/**",
    "/dev/**",
    "/etc/**",
    "/home/**",
    "/lib/**",
    "/lib64/**",
    "/media/**",
    "/mnt/**",
    "/opt/**",
    "/proc/**",
    "/root/**",
    "/sbin/**",
    "/srv/**",
    "/tmp/**",
    "/sys/**",
    "/usr/**",
]
# paths where you want to log on write
LogOnWritePaths = [
    "/**"
]
# paths where you can write
WritablePaths = [
    "/var/run/nginx.pid"
]
# allowed executable files for the container
AllowExec = [
    "/usr/sbin/nginx"
]
# denied executable files
DenyExec = [
    "/bin/dash",
    "/bin/sh",
    "/usr/bin/top"
]
# allowed capabilities
[Capabilities]
Allow = [
    "chown",
    "dac_override",
    "setuid",
    "setgid",
    "net_bind_service"
]
[Network]
# if you don't need to ping in a container, you can probably
# set Raw to false and deny network raw
Raw = false
Packet = false
Protocols = [
    "tcp",
    "udp",
    "icmp"
]
The generated AppArmor profile is pretty gnarly (verbose and complicated).
You can find more information about bane here: https://github.com/genuinetools/bane.
Pod Security Admission
Pod Security Admission is an admission controller that is responsible for managing the Pod Security Standards (https://kubernetes.io/docs/concepts/security/pod-security-standards/). The pod security restrictions are applied at the namespace level. All pods in the target namespace will be checked for the same security profile (privileged, baseline, or restricted).
Note that Pod Security Admission doesn’t set the relevant security contexts. It only validates that the pod conforms to the target policy.
There are three modes:
enforce: Policy violations will result in the rejection of the pod.audit: Policy violations will result in the addition of an audit annotation to the event recorded in the audit log, but the pod will still be allowed.warn: Policy violations will trigger a warning for the user, but the pod will still be allowed.
To activate Pod Security Admission on a namespace you simply add a label to the target namespace:
$ MODE=warn # One of enforce, audit, or warn
$ LEVEL=baseline # One of privileged, baseline, or restricted
$ kubectl label namespace/ns-1 pod-security.kubernetes.io/${MODE}: ${LEVEL}
namespace/ns-1 created
Managing network policies
Node, pod, and container security are imperative, but it’s not enough. Network segmentation is critical to design secure Kubernetes clusters that allow multi-tenancy, as well as to minimize the impact of security breaches. Defense in depth mandates that you compartmentalize parts of the system that don’t need to talk to each other, while also carefully managing the direction, protocols, and ports of network traffic.
Network policies allow the fine-grained control and proper network segmentation of your cluster. At the core, a network policy is a set of firewall rules applied to a set of namespaces and pods selected by labels. This is very flexible because labels can define virtual network segments and be managed at the Kubernetes resource level.
This is a huge improvement over trying to segment your network using traditional approaches like IP address ranges and subnet masks, where you often run out of IP addresses or allocate too many just in case.
However, if you use a service mesh you may not need to use network policies since the service mesh can fulfill the same role. More on service meshes later, in Chapter 14, Utilizing Service Meshes.
Choosing a supported networking solution
Some networking backends (network plugins) don’t support network policies. For example, the popular Flannel can’t be used to apply policies. This is critical. You will be able to define network policies even if your network plugin doesn’t support them. Your policies will simply have no effect, giving you a false sense of security. Here is a list of network plugins that support network policies (both ingress and egress):
- Calico
- WeaveNet
- Canal
- Cillium
- Kube-Router
- Romana
- Contiv
If you run your cluster on a managed Kubernetes service then the choice has already been made for you, although you can also install custom CNI plugins on some managed Kubernetes offerings.
We will explore the ins and outs of network plugins in Chapter 10, Exploring Kubernetes Networking. Here we focus on network policies.
Defining a network policy
You define a network policy using a standard YAML manifest. The supported protocols are TCP, UDP, and SCTP (since Kubernetes 1.20).
Here is a sample policy:
apiVersion: networking.k8s.io/v1
kind: NetworkPolicy
metadata:
  name: the-network-policy
  namespace: default
spec:
  podSelector:
    matchLabels:
      role: db
  ingress:
  - from:
    - namespaceSelector:
        matchLabels:
          project: cool-project
    - podSelector:
        matchLabels:
          role: frontend
    ports:
    - protocol: TCP
      port: 6379
The spec part has two important parts, the podSelector and the ingress. The podSelector governs which pods this network policy applies to. The ingress governs which namespaces and pods can access these pods and which protocols and ports they can use.
In the preceding sample network policy, the pod selector specified the target for the network policy to be all the pods that are labeled role: db. The ingress section has a from sub-section with a namespace selector and a pod selector. All the namespaces in the cluster that are labeled project: cool-project, and within these namespaces, all the pods that are labeled role: frontend, can access the target pods labeled role: db. The ports section defines a list of pairs (protocol and port) that further restrict what protocols and ports are allowed. In this case, the protocol is tcp and the port is 6379 (the standard Redis port). If you want to target a range of ports, you can use endPort, as in:
  ports:
  - protocol: TCP
    port: 6379
    endPort: 7000
Note that the network policy is cluster-wide, so pods from multiple namespaces in the cluster can access the target namespace. The current namespace is always included, so even if it doesn’t have the project:cool label, pods with role:frontend can still have access.
It’s important to realize that the network policy operates in a whitelist fashion. By default, all access is forbidden, and the network policy can open certain protocols and ports to certain pods that match the labels. However, the whitelist nature of the network policy applies only to pods that are selected for at least one network policy. If a pod is not selected it will allow all access. Always make sure all your pods are covered by a network policy.
Another implication of the whitelist nature is that, if multiple network policies exist, then the unified effect of all the rules applies. If one policy gives access to port 1234 and another gives access to port 5678 for the same set of pods, then a pod may be accessed through either 1234 or 5678.
To use network policies responsibly, consider starting with a deny-all network policy:
apiVersion: networking.k8s.io/v1
kind: NetworkPolicy
metadata:
  name: deny-all
spec:
  podSelector: {}
  policyTypes:
  - Ingress
  - Egress
Then, start adding network policies to allow ingress to specific pods explicitly. Note that you must apply the deny-all policy for each namespace:
$ k create -n ${NAMESPACE} -f deny-all-network-policy.yaml
Limiting egress to external networks
Kubernetes 1.8 added egress network policy support, so you can control outbound traffic too. Here is an example that prevents access to the external IP 1.2.3.4. The order: 999 ensures the policy is applied before other policies:
apiVersion: networking.k8s.io/ v1
kind: NetworkPolicy
metadata:
  name: default-deny-egress
spec:
  order: 999
  egress:
  - action: deny
    destination:
      net: 1.2.3.4
    source: {}
Cross-namespace policies
If you divide your cluster into multiple namespaces, it can come in handy sometimes if pods can communicate across namespaces. You can specify the ingress.namespaceSelector field in your network policy to enable access from multiple namespaces. This is useful, for example, if you have production and staging namespaces and you periodically populate your staging environments with snapshots of your production data.
The costs of network policies
Network policies are not free. Your CNI plugin may install additional components in your cluster and on every node. These components use precious resources and in addition may cause your pods to get evicted due to insufficient capacity. For example, the Calico CNI plugin installs several deployments in the kube-system namespace:
$ k get deploy -n kube-system -o name | grep calico
deployment.apps/calico-node-vertical-autoscaler
deployment.apps/calico-typha
deployment.apps/calico-typha-horizontal-autoscaler
deployment.apps/calico-typha-vertical-autoscaler
It also provisions a DaemonSet that runs a pod on every node:
$ k get ds -n kube-system -o name | grep calico-node
daemonset.apps/calico-node
Using secrets
Secrets are paramount in secure systems. They can be credentials such as usernames and passwords, access tokens, API keys, certificates, or crypto keys. Secrets are typically small. If you have large amounts of data you want to protect, you should encrypt it and keep the encryption/decryption keys as secrets.
Storing secrets in Kubernetes
Kubernetes used to store secrets in etcd as plaintext by default. This means that direct access to etcd should be limited and carefully guarded. Starting with Kubernetes 1.7, you can now encrypt your secrets at rest (when they’re stored by etcd).
Secrets are managed at the namespace level. Pods can mount secrets either as files via secret volumes or as environment variables. From a security standpoint, this means that any user or service that can create a pod in a namespace can have access to any secret managed for that namespace. If you want to limit access to a secret, put it in a namespace accessible to a limited set of users or services.
When a secret is mounted into a container, it is never written to disk. It is stored in tmpfs. When the kubelet communicates with the API server, it normally uses TLS, so the secret is protected in transit.
Kubernetes secrets are limited to 1 MB.
Configuring encryption at rest
You need to pass this argument when you start the API server: --encryption-provider-config.
Here is a sample encryption config:
apiVersion: apiserver.config.k8s.io/v1
kind: EncryptionConfiguration
resources:
  - resources:
      - secrets
    providers:
      - identity: {}
      - aesgcm:
          keys:
            - name: key1
              secret: c2VjcmV0IGlzIHNlY3VyZQ==
            - name: key2
              secret: dGhpcyBpcyBwYXNzd29yZA==
      - aescbc:
          keys:
            - name: key1
              secret: c2VjcmV0IGlzIHNlY3VyZQ==
            - name: key2
              secret: dGhpcyBpcyBwYXNzd29yZA==
      - secretbox:
          keys:
            - name: key1
              secret: YWJjZGVmZ2hpamtsbW5vcHFyc3R1dnd4eXoxMjM0NTY=
Creating secrets
Secrets must be created before you try to create a pod that requires them. The secret must exist; otherwise, the pod creation will fail.
You can create secrets with the following command: kubectl create secret.
Here I create a generic secret called hush-hush, which contains two keys, a username and password:
$ k create secret generic hush-hush
    --from-literal=username=tobias
    --from-literal=password=cutoffs
secret/hush-hush created
The resulting secret is opaque:
$ k describe secrets/hush-hush
Name:         hush-hush
Namespace:    default
Labels:       <none>
Annotations:  <none>
Type:  Opaque
Data
====
password:  7 bytes
username:  6 bytes
You can create secrets from files using --from-file instead --from-literal, and you can also create secrets manually if you encode the secret value as base64.
Key names inside a secret must follow the rules for DNS sub-domains (without the leading dot).
Decoding secrets
To get the content of a secret you can use kubectl get secret:
$ k get secrets/hush-hush -o yaml
apiVersion: v1
data:
  password: Y3V0b2Zmcw==
  username: dG9iaWFz
kind: Secret
metadata:
  creationTimestamp: "2022-06-20T19:49:56Z"
  name: hush-hush
  namespace: default
  resourceVersion: "51831"
  uid: 93e8d6d1-4c7f-4868-b146-32d1eb02b0a6
type: Opaque
The values are base64-encoded. You need to decode them yourself:
$ k get secrets/hush-hush -o jsonpath='{.data.password}' | base64 --decode
cutoffs
Using secrets in a container
Containers can access secrets as files by mounting volumes from the pod. Another approach is to access the secrets as environment variables. Finally, a container (given that its service account has the permission) can access the Kubernetes API directly or use kubectl get secret.
To use a secret mounted as a volume, the pod manifest should declare the volume and it should be mounted in the container’s spec:
apiVersion: v1
kind: Pod
metadata:
  name: pod-with-secret
spec:
  containers:
  - name: container-with-secret
    image: g1g1/py-kube:0.3
    command: ["/bin/bash", "-c", "while true ; do sleep 10 ; done"]
    volumeMounts:
    - name: secret-volume
      mountPath: "/mnt/hush-hush"
      readOnly: true
  volumes:
  - name: secret-volume
    secret:
      secretName: hush-hush
The volume name (secret-volume) binds the pod volume to the mount in the container. Multiple containers can mount the same volume. When this pod is running, the username and password are available as files under /etc/hush-hush:
$ k create -f pod-with-secret.yaml
pod/pod-with-secret created
$ k exec pod-with-secret -- cat /mnt/hush-hush/username
tobias
$ k exec pod-with-secret -- cat /mnt/hush-hush/password
cutoffs
Managing secrets with Vault
Kubernetes secrets are a good foundation for storing and managing sensitive data on Kubernetes. However, storing encrypted data in etcd is just the tip of the iceberg of an industrial-strength secret management solution. This is where Vault comes in.
Vault is an identity-based source secret management system developed by HashiCorp since 2015. Vault is considered best in class and doesn’t really have any significant non-proprietary competitors. It exposes an HTTP API, CLI, and UI to manage your secrets. Vault is a mature and battle-tested solution that is being used by a large number of enterprise organizations as well as smaller companies. Vault has well-defined security and threat models that cover a lot of ground. Practically, as long as you can ensure the physical security of your Vault deployment, Vault will keep your secrets safe and make it easy to manage and audit them.
When running Vault on Kubernetes there are several other important measures to ensure the Vault security model remains intact such as:
- Considerations for multi-tenant clusters (single Vault will be shared by all tenants)
- End-to-end TLS (Kubernetes may skip TLS under some conditions)
- Turn off process core dumps to avoid revealing Vault encryption keys
- Ensure mlock is enabled to avoid swapping memory to disk and revealing Vault encryption keys
- Container supervisor and pods should run as non-root
You can find a lot of information about Vault here: https://www.vaultproject.io/.
Deploying and configuring Vault is pretty straightforward. If you want to try it out, follow this tutorial: https://learn.hashicorp.com/tutorials/vault/kubernetes-minikube-raft.
Running a multi-tenant cluster
In this section, we will look briefly at the option to use a single cluster to host systems for multiple users or multiple user communities (which is also known as multi-tenancy). The idea is that those users are totally isolated and may not even be aware that they share the cluster with other users.
Each user community will have its own resources, and there will be no communication between them (except maybe through public endpoints). The Kubernetes namespace concept is the ultimate expression of this idea. But, they don’t provide absolute isolation. Another solution is to use virtual clusters where each namespace appears as a completely independent cluster to the users.
Check out https://www.vcluster.com/ for more details about virtual clusters.
The case for multi-tenant clusters
Why should you run a single cluster for multiple isolated users or deployments? Isn’t it simpler to just have a dedicated cluster for each user? There are two main reasons: cost and operational complexity. If you have many relatively small deployments and you want to create a dedicated cluster for each one, then you’ll have a separate control plane node and possibly a three-node etcd cluster for each one. The cost can add up. Operational complexity is very important too. Managing tens, hundreds, or thousands of independent clusters is no picnic. Every upgrade and every patch needs to be applied to each cluster. Operations might fail and you’ll have to manage a fleet of clusters where some of them are in a slightly different state than the others. Meta-operations across all clusters may be more difficult. You’ll have to aggregate and write your tools to perform operations and collect data from all clusters.
Let’s look at some use cases and requirements for multiple isolated communities or deployments:
- A platform or service provider for software-as-a-service
- Managing separate testing, staging, and production environments
- Delegating responsibility to community/deployment admins
- Enforcing resource quotas and limits on each community
- Users see only resources in their community
Using namespaces for safe multi-tenancy
Kubernetes namespaces are a good start for safe multi-tenant clusters. This is not a surprise, as this was one of the design goals of namespaces.
You can easily create namespaces in addition to the built-in kube-system and default. Here is a YAML file that will create a new namespace called custom-namespace. All it has is a metadata item called name. It doesn’t get any simpler:
apiVersion: v1
kind: Namespace
metadata:
  name: custom-namespace
Let’s create the namespace:
$ k create -f custom-namespace.yaml
namespace/custom-namespace created
$ k get ns
NAME                 STATUS   AGE
custom-namespace     Active   5s
default              Active   24h
kube-node-lease      Active   24h
kube-public          Active   24h
kube-system          Active   24h
We can see the default namespace, our new custom-namespace, and a few other system namespaces prefixed with kube-.
The status field can be Active or Terminating. When you delete a namespace, it will move into the Terminating state. When the namespace is in this state, you will not be able to create new resources in this namespace. This simplifies the clean-up of namespace resources and ensures the namespace is really deleted. Without it, the replication controllers might create new pods when existing pods are deleted.
Sometimes, namespaces may hang during termination. I wrote a little Go tool called k8s-namespace-deleter to delete stubborn namespaces.
Check it out here: https://github.com/the-gigi/k8s-namespace-deleter
It can also be used as kubectl plugin.
To work with a namespace, you add the --namespace (or -n for short) argument to kubectl commands. Here is how to run a pod in interactive mode in the custom-namespace namespace:
$ k run trouble -it -n custom-namespace --image=g1g1/py-kube:0.3 bash
If you don't see a command prompt, try pressing enter.
root@trouble:/#
Listing pods in the custom-namespace returns only the pod we just launched:
$ k get po -n custom-namespace
NAME      READY   STATUS    RESTARTS      AGE
trouble   1/1     Running   1 (15s ago)   57s
Avoiding namespace pitfalls
Namespaces are great, but they can add some friction. When you use just the default namespace, you can simply omit the namespace. When using multiple namespaces, you must qualify everything with the namespace. This can add some burden but doesn’t present any danger.
However, if some users (for example, cluster administrators) can access multiple namespaces, then you’re open to accidentally modifying or querying the wrong namespace. The best way to avoid this situation is to hermetically seal the namespace and require different users and credentials for each namespace, just like you should use a user account for most operations on your machine or remote machines and use root via sudo only when you have to.
In addition, you should use tools that help make it clear what namespace you’re operating on (for example, shell prompt if working from the command line or listing the namespace prominently in a web interface). One of the most popular tools is kubens (available along with kubectx), available at https://github.com/ahmetb/kubectx.
Make sure that users that can operate on a dedicated namespace don’t have access to the default namespace. Otherwise, every time they forget to specify a namespace, they’ll operate quietly on the default namespace.
Using virtual clusters for strong multi-tenancy
Namespaces are fine, but they don’t really cut it for strong multi-tenancy. Namespace isolation obviously works for namespaced resources only. But, Kubernetes has many cluster-level resources (in particular CRDs). Tenants will share those. In addition, the control plane version, security, and audit will be shared.
One trivial solution is not to use multi-tenancy. Just have a separate cluster for each tenant. But, that is not efficient especially if you have a lot of small tenants.
The vcluster project (https://www.vcluster.com) from Loft.sh utilizes an innovative approach where a physical Kubernetes cluster can host multiple virtual clusters that appear as regular Kubernetes clusters to their users, totally isolated from the other virtual clusters and the host cluster. This reaps all benefits of multi-tenancy without the downsides of namespace-level isolation.
Here is the vcluster architecture:

Figure 4.3: vcluster architecture
Let’s create a couple of virtual clusters. First install the vcluster CLI: https://www.vcluster.com/docs/getting-started/setup.
Make sure it’s installed correctly:
$ vcluster version
vcluster version 0.10.1
Now, we can create some virtual clusters. You can create virtual clusters using the vcluster CLI, Helm, or kubectl. Let’s go with the vcluster CLI.
$ vcluster create tenant-1
info   Creating namespace vcluster-tenant-1
info   Detected local kubernetes cluster kind. Will deploy vcluster with a NodePort
info   Create vcluster tenant-1...
done √ Successfully created virtual cluster tenant-1 in namespace vcluster-tenant-1
info   Waiting for vcluster to come up...
warn   vcluster is waiting, because vcluster pod tenant-1-0 has status: ContainerCreating
info   Starting proxy container...
done √ Switched active kube context to vcluster_tenant-1_vcluster-tenant-1_kind-kind
- Use `vcluster disconnect` to return to your previous kube context
- Use `kubectl get namespaces` to access the vcluster
Let’s create another virtual cluster:
$ vcluster create tenant-2
? You are creating a vcluster inside another vcluster, is this desired?
  [Use arrows to move, enter to select, type to filter]
> No, switch back to context kind-kind
  Yes
Oops. After creating the tenant-1 virtual cluster the Kubernetes context changed to this cluster. When I tried to create tenant-2, the vcluster CLI was smart enough to warn me. Let’s try again:
$ k config use-context kind-kind
Switched to context "kind-kind".
$ vcluster create tenant-2
info   Creating namespace vcluster-tenant-2
info   Detected local kubernetes cluster kind. Will deploy vcluster with a NodePort
info   Create vcluster tenant-2...
done √ Successfully created virtual cluster tenant-2 in namespace vcluster-tenant-2
info   Waiting for vcluster to come up...
info   Stopping docker proxy...
info   Starting proxy container...
done √ Switched active kube context to vcluster_tenant-2_vcluster-tenant-2_kind-kind
- Use `vcluster disconnect` to return to your previous kube context
- Use `kubectl get namespaces` to access the vcluster
Let’s check our clusters:
$ k config get-contexts -o name
kind-kind
vcluster_tenant-1_vcluster-tenant-1_kind-kind
vcluster_tenant-2_vcluster-tenant-2_kind-kind
Yes, our two virtual clusters are available. Let’s see the namespaces in our host kind cluster:
$ k get ns --context kind-kind
NAME                 STATUS   AGE
custom-namespace     Active   3h6m
default              Active   27h
kube-node-lease      Active   27h
kube-public          Active   27h
kube-system          Active   27h
local-path-storage   Active   27h
vcluster-tenant-1    Active   15m
vcluster-tenant-2    Active   3m48s
We can see the two new namespaces for the virtual clusters. Let’s see what’s running in the vcluster-tenant-1 namespace:
$ k get all -n vcluster-tenant-1 --context kind-kind
NAME                                                    READY   STATUS    RESTARTS   AGE
pod/coredns-5df468b6b7-rj4nr-x-kube-system-x-tenant-1   1/1     Running   0          16m
pod/tenant-1-0                                          2/2     Running   0          16m
NAME                                        TYPE        CLUSTER-IP      EXTERNAL-IP   PORT(S)                  AGE
service/kube-dns-x-kube-system-x-tenant-1   ClusterIP   10.96.200.106   <none>        53/UDP,53/TCP,9153/TCP   16m
service/tenant-1                            NodePort    10.96.107.216   <none>        443:32746/TCP            16m
service/tenant-1-headless                   ClusterIP   None            <none>        443/TCP                  16m
service/tenant-1-node-kind-control-plane    ClusterIP   10.96.235.53    <none>        10250/TCP                16m
NAME                        READY   AGE
statefulset.apps/tenant-1   1/1     16m
Now, let’s see what namespaces are in the virtual cluster:
$ k get ns --context vcluster_tenant-1_vcluster-tenant-1_kind-kind
NAME              STATUS   AGE
kube-system       Active   17m
default           Active   17m
kube-public       Active   17m
kube-node-lease   Active   17m
Just the default namespaces of a k3s cluster (vcluster is based on k3s). Let’s create a new namespace and verify it shows up only in the virtual cluster:
$ k create ns new-ns --context vcluster_tenant-1_vcluster-tenant-1_kind-kind
namespace/new-ns created
$ k get ns new-ns --context vcluster_tenant-1_vcluster-tenant-1_kind-kind
NAME     STATUS   AGE
new-ns   Active   19s
$ k get ns new-ns --context vcluster_tenant-2_vcluster-tenant-2_kind-kind
 Error from server (NotFound): namespaces "new-ns" not found
$ k get ns new-ns --context kind-kind
Error from server (NotFound): namespaces "new-ns" not found
The new namespace is only visible in the virtual cluster it was created in as expected.
In this section, we covered multi-tenant clusters, why they are useful, and different approaches for isolating tenants such as namespaces and virtual clusters.
Summary
In this chapter, we covered the many security challenges facing developers and administrators building systems and deploying applications on Kubernetes clusters. But we also explored the many security features and the flexible plugin-based security model that provides many ways to limit, control, and manage containers, pods, and nodes. Kubernetes already provides versatile solutions to most security challenges, and it will only get better as capabilities such as AppArmor and various plugins move from alpha/beta status to general availability. Finally, we considered how to use namespaces and virtual clusters to support multi-tenant communities or deployments in the same Kubernetes cluster.
In the next chapter, we will look in detail into many Kubernetes resources and concepts and how to use them and combine them effectively. The Kubernetes object model is built on top of a solid foundation of a small number of generic concepts such as resources, manifests, and metadata. This empowers an extensible, yet surprisingly consistent, object model to expose a very diverse set of capabilities for developers and administrators.
Join us on Discord!
Read this book alongside other users, cloud experts, authors, and like-minded professionals.
Ask questions, provide solutions to other readers, chat with the authors via. Ask Me Anything sessions and much more.
Scan the QR code or visit the link to join the community now.
https://packt.link/cloudanddevops
