
7
Running Stateful Applications with Kubernetes
In this chapter, we will learn how to run stateful applications on Kubernetes. Kubernetes takes a lot of work out of our hands by automatically starting and restarting pods across the cluster nodes as needed, based on complex requirements and configurations such as namespaces, limits, and quotas. But when pods run storage-aware software, such as databases and queues, relocating a pod can cause a system to break.
First, we’ll explore the essence of stateful pods and why they are much more complicated to manage in Kubernetes. We will look at a few ways to manage the complexity, such as shared environment variables and DNS records. In some situations, a redundant in-memory state, a DaemonSet, or persistent storage claims can do the trick. The main solution that Kubernetes promotes for state-aware pods is the StatefulSet (previously called PetSet) resource, which allows us to manage an indexed collection of pods with stable properties. Finally, we will dive deep into a full-fledged example of running a Cassandra cluster on top of Kubernetes.
This chapter will cover the following main topics:
- Stateful versus stateless applications in Kubernetes
- Running a Cassandra cluster in Kubernetes
By the end of this chapter, you will understand the challenges of state management in Kubernetes, get a deep look into a specific example of running Cassandra as a data store on Kubernetes, and be able to determine the state management strategy for your workloads.
Stateful versus stateless applications in Kubernetes
A stateless Kubernetes application is an application that doesn’t manage its state in the Kubernetes cluster. All the state is stored in memory or outside the cluster, and the cluster containers access it in some manner. A stateful Kubernetes application, on the other hand, has a persistent state that is managed in the cluster. In this section, we’ll learn why state management is critical to the design of a distributed system and the benefits of managing the state within the Kubernetes cluster.
Understanding the nature of distributed data-intensive apps
Let’s start with the basics here. Distributed applications are a collection of processes that run on multiple machines, process inputs, manipulate data, expose APIs, and possibly have other side effects. Each process is a combination of its program, its runtime environment, and its inputs and outputs.
The programs you write at school get their input as command-line arguments; maybe they read a file or access a database, and then write their results to the screen, a file, or a database. Some programs keep state in memory and can serve requests over a network. Simple programs run on a single machine and can hold all their state in memory or read from a file. Their runtime environment is their operating system. If they crash, the user has to restart them manually. They are tied to their machine.
A distributed application is a different animal. A single machine is not enough to process all the data or serve all the requests quickly enough. A single machine can’t hold all the data. The data that needs to be processed is so large that it can’t be downloaded cost-effectively into each processing machine. Machines can fail and need to be replaced. Upgrades need to be performed over all the processing machines. Users may be distributed across the globe.
Taking all these issues into account, it becomes clear that the traditional approach doesn’t work. The limiting factor becomes the data. Users/clients must receive only summary or processed data. All massive data processing must be done close to the data itself because transferring data is prohibitively slow and expensive. Instead, the bulk of processing code must run in the same data center and network environment of the data.
Why manage the state in Kubernetes?
The main reason to manage the state in Kubernetes itself as opposed to a separate cluster is that a lot of the infrastructure needed to monitor, scale, allocate, secure, and operate a storage cluster is already provided by Kubernetes. Running a parallel storage cluster will lead to a lot of duplicated effort.
Why manage the state outside of Kubernetes?
Let’s not rule out the other option. It may be better in some situations to manage the state in a separate non-Kubernetes cluster, as long as it shares the same internal network (data proximity trumps everything).
Some valid reasons are as follows:
- You already have a separate storage cluster and you don’t want to rock the boat
- Your storage cluster is used by other non-Kubernetes applications
- Kubernetes support for your storage cluster is not stable or mature enough
- You may want to approach stateful applications in Kubernetes incrementally, starting with a separate storage cluster and integrating more tightly with Kubernetes later
Shared environment variables versus DNS records for discovery
Kubernetes provides several mechanisms for global discovery across the cluster. If your storage cluster is not managed by Kubernetes, you still need to tell Kubernetes pods how to find it and access it.
There are two common methods:
- DNS
- Environment variables
In some cases, you may want to use both, as environment variables can override DNS.
Accessing external data stores via DNS
The DNS approach is simple and straightforward. Assuming your external storage cluster is load-balanced and can provide a stable endpoint, then pods can just hit that endpoint directly and connect to the external cluster.
Accessing external data stores via environment variables
Another simple approach is to use environment variables to pass connection information to an external storage cluster. Kubernetes offers the ConfigMap resource as a way to keep configuration separate from the container image. The configuration is a set of key-value pairs. The configuration information can be exposed in two ways. One way is as environment variables. The other way is as a configuration file mounted as a volume in the container. You may prefer to use secrets for sensitive connection information like passwords.
Creating a ConfigMap
The following file is a ConfigMap that keeps a list of addresses:
apiVersion: v1
kind: ConfigMap
metadata:
  name: db-config
data:
  db-ip-addresses: 1.2.3.4,5.6.7.8
Save it as db-config-map.yaml and run:
$ k create -f db-config-map.yaml
configmap/db-config created
The data section contains all the key-value pairs, in this case, just a single pair with a key name of db-ip-addresses. It will be important later when consuming the ConfigMap in a pod. You can check out the content to make sure it’s OK:
$ k get configmap db-config -o yaml
apiVersion: v1
data:
  db-ip-addresses: 1.2.3.4,5.6.7.8
kind: ConfigMap
metadata:
  creationTimestamp: "2022-07-17T17:39:05Z"
  name: db-config
  namespace: default
  resourceVersion: "504571"
  uid: 11e49df0-ed1e-4bee-9fd7-bf38bb2aa38a
There are other ways to create a ConfigMap. You can directly create one using the --from-value or --from-file command-line arguments.
Consuming a ConfigMap as an environment variable
When you are creating a pod, you can specify a ConfigMap and consume its values in several ways. Here is how to consume our configuration map as an environment variable:
apiVersion: v1
kind: Pod
metadata:
  name: some-pod
spec:
  containers:
  - name: some-container
    image: busybox
    command: ["/bin/sh", "-c", "env"]
    env:
    - name: DB_IP_ADDRESSES
      valueFrom:
        configMapKeyRef:
          name: db-config
          key: db-ip-addresses
  restartPolicy: Never
This pod runs the busybox minimal container and executes an env bash command and it immediately exists. The db-ip-addresses key from the db-configmap is mapped to the DB_IP_ADDRESSES environment variable, and is reflected in the logs:
$ k create -f pod-with-db.yaml
pod/some-pod created
$ k logs some-pod | grep DB_IP
DB_IP_ADDRESSES=1.2.3.4,5.6.7.8
Using a redundant in-memory state
In some cases, you may want to keep a transient state in memory. Distributed caching is a common case. Time-sensitive information is another one. For these use cases, there is no need for persistent storage, and multiple pods accessed through a service may be just the right solution.
We can use standard Kubernetes techniques, such as labeling, to identify pods that belong to the distributed cache, store redundant copies of the same state, and expose them through a service. If a pod dies, Kubernetes will create a new one and, until it catches up, the other pods will serve the state. We can even use the pod’s anti-affinity feature to ensure that pods that maintain redundant copies of the same state are not scheduled to the same node.
Of course, you could also use something like Memcached or Redis.
Using DaemonSet for redundant persistent storage
Some stateful applications, such as distributed databases or queues, manage their state redundantly and sync their nodes automatically (we’ll take a very deep look into Cassandra later). In these cases, it is important that pods are scheduled to separate nodes. It is also important that pods are scheduled to nodes with a particular hardware configuration or are even dedicated to the stateful application. The DaemonSet feature is perfect for this use case. We can label a set of nodes and make sure that the stateful pods are scheduled on a one-by-one basis to the selected group of nodes.
Applying persistent volume claims
If the stateful application can use effectively shared persistent storage, then using a persistent volume claim in each pod is the way to go, as we demonstrated in Chapter 6, Managing Storage. The stateful application will be presented with a mounted volume that looks just like a local filesystem.
Utilizing StatefulSet
StatefulSets are specially designed to support distributed stateful applications where the identities of the members are important, and if a pod is restarted, it must retain its identity in the set. It provides ordered deployment and scaling. Unlike regular pods, the pods of a StatefulSet are associated with persistent storage.
When to use StatefulSet
StatefulSets are great for applications that necessitate any of the following capabilities:
- Consistent and distinct network identifiers
- Persistent and enduring storage
- Methodical and orderly deployment and scaling
- Systematic and organized deletion and termination
The components of StatefulSet
There are several elements that need to be configured correctly in order to have a working StatefulSet:
- A headless service responsible for managing the network identity of the
StatefulSetpods - The
StatefulSetitself with a number of replicas - Local storage on nodes or persistent storage provisioned dynamically or by an administrator
Here is an example of a headless service called nginx that will be used for a StatefulSet:
apiVersion: v1
kind: Service
metadata:
  name: nginx
  labels:
    app: nginx
spec:
  selector:
    app: nginx
  ports:
  - port: 80
    name: web
    clusterIP: None
Now, the StatefulSet manifest file will reference the service:
apiVersion: apps/v1
kind: StatefulSet
metadata:
  name: web
spec:
  serviceName: "nginx"
  replicas: 3
  template:
    metadata:
      labels:
        app: nginx
The next part is the pod template, which includes a mounted volume named www:
spec:
  terminationGracePeriodSeconds: 10
  containers:
  - name: nginx
    image: gcr.io/google_containers/nginx-slim:0.8
    ports:
    - containerPort: 80
      name: web
    volumeMounts:
    - name: www
      mountPath: /usr/share/nginx/html
Last but not least, volumeClaimTemplates use a claim named www matching the mounted volume. The claim requests 1 Gib of storage with ReadWriteOnce access:
volumeClaimTemplates:
    - metadata:
      name: www
      spec:
        accessModes: ["ReadWriteOnce"]
        resources:
            requests:
                storage: 1Gib
Working with StatefulSets
Let’s create the nginx headless service and statefulset:
k apply -f nginx-headless-service.yaml
service/nginx created
$ k apply -f nginx-stateful-set.yaml
statefulset.apps/nginx created
We can use the kubectl get all command to see all the resources that were created:
$ k get all
NAME          READY   STATUS    RESTARTS   AGE
pod/nginx-0   1/1     Running   0          107s
pod/nginx-1   1/1     Running   0          104s
pod/nginx-2   1/1     Running   0          102s
NAME                 TYPE        CLUSTER-IP   EXTERNAL-IP   PORT(S)   AGE
service/nginx        ClusterIP   None         <none>        80/TCP    2m5s
NAME                     READY   AGE
statefulset.apps/nginx   3/3     107s
As expected, we have the statefulset with three replicas and the headless service. What is not pre-set is a ReplicaSet, which you find when you create a Deployment. StatefulSets manage their pods directly.
Note that the kubectl get all doesn’t actually show all resources. The StatefulSet also creates a persistent volume claim backed by a persistent volume for each pod. Here they are:
$ k get pvc
NAME          STATUS   VOLUME                                     CAPACITY   ACCESS MODES   STORAGECLASS   AGE
www-nginx-0   Bound    pvc-40ac1c62-bba0-4e3c-9177-eda7402755b3   10Mi       RWO            standard       1m37s
www-nginx-1   Bound    pvc-94022a60-e4cb-4495-825d-eb744088266f   10Mi       RWO            standard       1m43s
www-nginx-2   Bound    pvc-8c60523f-a3e8-4ae3-a91f-6aaa53b02848   10Mi       RWO            standard       1m52h
$ k get pv
NAME                                       CAPACITY   ACCESS MODES   RECLAIM POLICY   STATUS   CLAIM                 STORAGECLASS   REASON   AGE
pvc-40ac1c62-bba0-4e3c-9177-eda7402755b3   10Mi       RWO            Delete           Bound    default/www-nginx-0   standard                1m59s
pvc-8c60523f-a3e8-4ae3-a91f-6aaa53b02848   10Mi       RWO            Delete           Bound    default/www-nginx-2   standard                2m2s
pvc-94022a60-e4cb-4495-825d-eb744088266f   10Mi       RWO            Delete           Bound    default/www-nginx-1   standard                2m1s
If we delete a pod, the StatefulSet will create a new pod and bind it to the corresponding persistent volume claim. The pod nginx-1 is bound to the www-nginx-1 pvc:
$ k get po nginx-1 -o yaml | yq '.spec.volumes[0]'
name: www
persistentVolumeClaim:
  claimName: www-nginx-1
Let’s delete the nginx-1 pod and check all remaining pods:
$ k delete po nginx-1
pod "nginx-1" deleted
$ k get po
NAME      READY   STATUS    RESTARTS   AGE
nginx-0   1/1     Running   0          12m
nginx-1   1/1     Running   0          14s
nginx-2   1/1     Running   0          12m
As you can see, the StatefulSet immediately replaced it with a new nginx-1 pod (14 seconds old). The new pod is bound to the same persistent volume claim:
$ k get po nginx-1 -o yaml | yq '.spec.volumes[0]'
name: www
persistentVolumeClaim:
  claimName: www-nginx-1
The persistent volume claim and its backing persistent volume were not deleted when the old nginx-1 pod was deleted, as you can tell by their age:
$ k get pvc www-nginx-1
NAME          STATUS   VOLUME                                     CAPACITY   ACCESS MODES   STORAGECLASS   AGE
www-nginx-1   Bound    pvc-94022a60-e4cb-4495-825d-eb744088266f   10Mi       RWO            standard       143s
$ k get pv pvc-94022a60-e4cb-4495-825d-eb744088266f
NAME                                       CAPACITY   ACCESS MODES   RECLAIM POLICY   STATUS   CLAIM                 STORAGECLASS   REASON   AGE
pvc-94022a60-e4cb-4495-825d-eb744088266f   10Mi       RWO            Delete           Bound    default/www-nginx-1   standard                2m1s
That means that the state of the StatefulSet is preserved even as pods come and go. Each pod identified by its index is always bound to a specific shard of the state, backed up by the corresponding persistent volume claim.
At this point, we understand what StatefulSets are all about and how to work with them. Let’s dive into the implementation of an industrial-strength data store and see how it can be deployed as a StatefulSet in Kubernetes.
Running a Cassandra cluster in Kubernetes
In this section, we will explore in detail a very large example of configuring a Cassandra cluster to run on a Kubernetes cluster. I will dissect and give some context for interesting parts. If you wish to explore this even further, the full example can be accessed here:
https://kubernetes.io/docs/tutorials/stateful-application/cassandra
The goal here is to get a sense of what it takes to run a real-world stateful workload on Kubernetes and how StatefulSets help. Don’t worry if you don’t understand every little detail.
First, we’ll learn a little bit about Cassandra and its idiosyncrasies, and then follow a step-by-step procedure to get it running using several of the techniques and strategies we covered in the previous section.
A quick introduction to Cassandra
Cassandra is a distributed columnar data store. It was designed from the get-go for big data. Cassandra is fast, robust (no single point of failure), highly available, and linearly scalable. It also has multi-data center support. It achieves all this by having a laser focus and carefully crafting the features it supports and—just as importantly—the features it doesn’t support.
In a previous company, I ran a Kubernetes cluster that used Cassandra as the main data store for sensor data (about 100 TB). Cassandra allocates the data to a set of nodes (node ring) based on a distributed hash table (DHT) algorithm.
The cluster nodes talk to each other via a gossip protocol and learn quickly about the overall state of the cluster (what nodes joined and what nodes left or are unavailable). Cassandra constantly compacts the data and balances the cluster. The data is typically replicated multiple times for redundancy, robustness, and high availability.
From a developer’s point of view, Cassandra is very good for time-series data and provides a flexible model where you can specify the consistency level in each query. It is also idempotent (a very important feature for a distributed database), which means repeated inserts or updates are allowed.
Here is a diagram that shows how a Cassandra cluster is organized, how a client can access any node, and how a request will be forwarded automatically to the nodes that have the requested data:
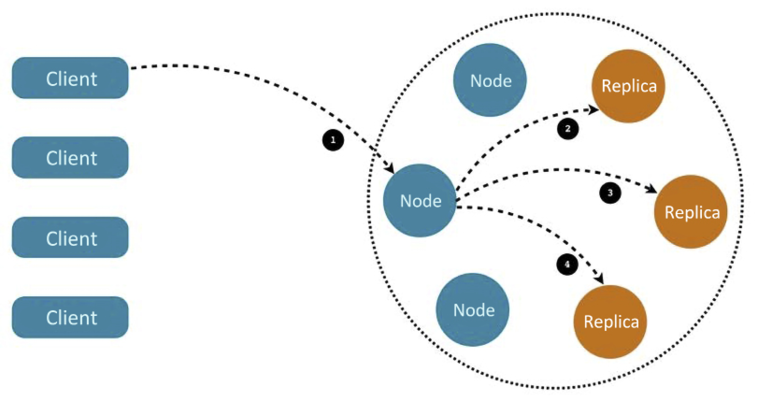
Figure 7.1: Request interacting with a Cassandra cluster
The Cassandra Docker image
Deploying Cassandra on Kubernetes as opposed to a standalone Cassandra cluster deployment requires a special Docker image. This is an important step because it means we can use Kubernetes to keep track of our Cassandra pods. The Dockerfile for an image is available here: https://github.com/kubernetes/examples/blob/master/cassandra/image/Dockerfile.
See below the Dockerfile that builds the Cassandra image. The base image is a flavor of Debian designed for use in containers (see https://github.com/kubernetes/kubernetes/tree/master/build/debian-base).
The Cassandra Dockerfile defines some build arguments that must be set when the image is built, creates a bunch of labels, defines many environment variables, adds all the files to the root directory inside the container, runs the build.sh script, declares the Cassandra data volume (where the data is stored), exposes a bunch of ports, and finally, uses dumb-init to execute the run.sh scripts:
FROM k8s.gcr.io/debian-base-amd64:0.3
ARG BUILD_DATE
ARG VCS_REF
ARG CASSANDRA_VERSION
ARG DEV_CONTAINER
LABEL
    org.label-schema.build-date=$BUILD_DATE
    org.label-schema.docker.dockerfile="/Dockerfile"
    org.label-schema.license="Apache License 2.0"
    org.label-schema.name="k8s-for-greeks/docker-cassandra-k8s"
    org.label-schema.url="https://github.com/k8s-for-greeks/"
    org.label-schema.vcs-ref=$VCS_REF
    org.label-schema.vcs-type="Git"
    org.label-schema.vcs-url="https://github.com/k8s-for-greeks/docker-cassandra-k8s"
ENV CASSANDRA_HOME=/usr/local/apache-cassandra-${CASSANDRA_VERSION}
    CASSANDRA_CONF=/etc/cassandra
    CASSANDRA_DATA=/cassandra_data
    CASSANDRA_LOGS=/var/log/cassandra
    JAVA_HOME=/usr/lib/jvm/java-8-openjdk-amd64
    PATH=${PATH}:/usr/lib/jvm/java-8-openjdk-amd64/bin:/usr/local/apache-cassandra-${CASSANDRA_VERSION}/bin
ADD files /
RUN clean-install bash
    && /build.sh
    && rm /build.sh
VOLUME ["/$CASSANDRA_DATA"]
# 7000: intra-node communication
# 7001: TLS intra-node communication
# 7199: JMX
# 9042: CQL
# 9160: thrift service
EXPOSE 7000 7001 7199 9042 9160
CMD ["/usr/bin/dumb-init", "/bin/bash", "/run.sh"]
Here are all the files used by the Dockerfile:
build.sh
cassandra-seed.h
cassandra.yaml
jvm.options
kubernetes-cassandra.jar
logback.xml
ready-probe.sh
run.sh
We will not cover all of them, but will focus on a couple of interesting scripts: the build.sh and run.sh scripts.
Exploring the build.sh script
Cassandra is a Java program. The build script installs the Java runtime environment and a few necessary libraries and tools. It then sets a few variables that will be used later, such as CASSANDRA_PATH.
It downloads the correct version of Cassandra from the Apache organization (Cassandra is an Apache open source project), creates the /cassandra_data/data directory where Cassandra will store its SSTables and the /etc/cassandra configuration directory, copies files into the configuration directory, adds a Cassandra user, sets the readiness probe, installs Python, moves the Cassandra JAR file and the seed shared library to their target destination, and then cleans up all the intermediate files generated during this process:
...
clean-install
    openjdk-8-jre-headless
    libjemalloc1
    localepurge
    dumb-init
    wget
CASSANDRA_PATH="cassandra/${CASSANDRA_VERSION}/apache-cassandra-${CASSANDRA_VERSION}-bin.tar.gz"
CASSANDRA_DOWNLOAD="http://www.apache.org/dyn/closer.cgi?path=/${CASSANDRA_PATH}&as_json=1"
CASSANDRA_MIRROR=`wget -q -O - ${CASSANDRA_DOWNLOAD} | grep -oP "(?<="preferred": ")[^"]+"`
echo "Downloading Apache Cassandra from $CASSANDRA_MIRROR$CASSANDRA_PATH..."
wget -q -O - $CASSANDRA_MIRROR$CASSANDRA_PATH
    | tar -xzf - -C /usr/local
mkdir -p /cassandra_data/data
mkdir -p /etc/cassandra
mv /logback.xml /cassandra.yaml /jvm.options /etc/cassandra/
mv /usr/local/apache-cassandra-${CASSANDRA_VERSION}/conf/cassandra-env.sh /etc/cassandra/
adduser --disabled-password --no-create-home --gecos '' --disabled-login cassandra
chmod +x /ready-probe.sh
chown cassandra: /ready-probe.sh
DEV_IMAGE=${DEV_CONTAINER:-}
if [ ! -z "$DEV_IMAGE" ]; then
    clean-install python;
else
    rm -rf  $CASSANDRA_HOME/pylib;
fi
mv /kubernetes-cassandra.jar /usr/local/apache-cassandra-${CASSANDRA_VERSION}/lib
mv /cassandra-seed.so /etc/cassandra/
mv /cassandra-seed.h /usr/local/lib/include
apt-get -y purge localepurge
apt-get -y autoremove
apt-get clean
rm -rf <many files>
Exploring the run.sh script
The run.sh script requires some shell skills and knowledge of Cassandra to understand, but it’s worth the effort. First, some local variables are set for the Cassandra configuration file at /etc/cassandra/cassandra.yaml. The CASSANDRA_CFG variable will be used in the rest of the script:
set -e
CASSANDRA_CONF_DIR=/etc/cassandra
CASSANDRA_CFG=$CASSANDRA_CONF_DIR/cassandra.yaml
If no CASSANDRA_SEEDS were specified, then set the HOSTNAME, which is used by the StatefulSet later:
# we are doing StatefulSet or just setting our seeds
if [ -z "$CASSANDRA_SEEDS" ]; then
  HOSTNAME=$(hostname -f)
  CASSANDRA_SEEDS=$(hostname -f)
fi
Then comes a long list of environment variables with defaults. The syntax, ${VAR_NAME:-}, uses the VAR_NAME environment variable, if it’s defined, or the default value.
A similar syntax, ${VAR_NAME:=}, does the same thing but also assigns the default value to the environment variable if it’s not defined. This is a subtle but important difference.
Both variations are used here:
# The following vars relate to their counter parts in $CASSANDRA_CFG
# for instance rpc_address
CASSANDRA_RPC_ADDRESS="${CASSANDRA_RPC_ADDRESS:-0.0.0.0}"
CASSANDRA_NUM_TOKENS="${CASSANDRA_NUM_TOKENS:-32}"
CASSANDRA_CLUSTER_NAME="${CASSANDRA_CLUSTER_NAME:='Test Cluster'}"
CASSANDRA_LISTEN_ADDRESS=${POD_IP:-$HOSTNAME}
CASSANDRA_BROADCAST_ADDRESS=${POD_IP:-$HOSTNAME}
CASSANDRA_BROADCAST_RPC_ADDRESS=${POD_IP:-$HOSTNAME}
CASSANDRA_DISK_OPTIMIZATION_STRATEGY="${CASSANDRA_DISK_OPTIMIZATION_STRATEGY:-ssd}"
CASSANDRA_MIGRATION_WAIT="${CASSANDRA_MIGRATION_WAIT:-1}"
CASSANDRA_ENDPOINT_SNITCH="${CASSANDRA_ENDPOINT_SNITCH:-SimpleSnitch}"
CASSANDRA_DC="${CASSANDRA_DC}"
CASSANDRA_RACK="${CASSANDRA_RACK}"
CASSANDRA_RING_DELAY="${CASSANDRA_RING_DELAY:-30000}"
CASSANDRA_AUTO_BOOTSTRAP="${CASSANDRA_AUTO_BOOTSTRAP:-true}"
CASSANDRA_SEEDS="${CASSANDRA_SEEDS:false}"
CASSANDRA_SEED_PROVIDER="${CASSANDRA_SEED_PROVIDER:-org.apache.cassandra.locator.SimpleSeedProvider}"
CASSANDRA_AUTO_BOOTSTRAP="${CASSANDRA_AUTO_BOOTSTRAP:false}"
By the way, I contributed my part to Kubernetes by opening a PR to fix a minor typo here. See https://github.com/kubernetes/examples/pull/348.
The next part configures monitoring JMX and controls garbage collection output:
# Turn off JMX auth
CASSANDRA_OPEN_JMX="${CASSANDRA_OPEN_JMX:-false}"
# send GC to STDOUT
CASSANDRA_GC_STDOUT="${CASSANDRA_GC_STDOUT:-false}"
Then comes a section where all the variables are printed on the screen. Let’s skip most of it:
echo Starting Cassandra on ${CASSANDRA_LISTEN_ADDRESS}
echo CASSANDRA_CONF_DIR ${CASSANDRA_CONF_DIR}
echo CASSANDRA_CFG ${CASSANDRA_CFG}
echo CASSANDRA_AUTO_BOOTSTRAP ${CASSANDRA_AUTO_BOOTSTRAP}
...
The next section is very important. By default, Cassandra uses a simple snitch, which is unaware of racks and data centers. This is not optimal when the cluster spans multiple data centers and racks.
Cassandra is rack-aware and data center-aware and can optimize both for redundancy and high availability while limiting communication across data centers appropriately:
# if DC and RACK are set, use GossipingPropertyFileSnitch
if [[ $CASSANDRA_DC && $CASSANDRA_RACK ]]; then
  echo "dc=$CASSANDRA_DC" > $CASSANDRA_CONF_DIR/cassandra-rackdc.properties
  echo "rack=$CASSANDRA_RACK" >> $CASSANDRA_CONF_DIR/cassandra-rackdc.properties
  CASSANDRA_ENDPOINT_SNITCH="GossipingPropertyFileSnitch"
fi
Memory management is also important, and you can control the maximum heap size to ensure Cassandra doesn’t start thrashing and swapping to disk:
if [ -n "$CASSANDRA_MAX_HEAP" ]; then
  sed -ri "s/^(#)?-Xmx[0-9]+.*/-Xmx$CASSANDRA_MAX_HEAP/" "$CASSANDRA_CONF_DIR/jvm.options"
  sed -ri "s/^(#)?-Xms[0-9]+.*/-Xms$CASSANDRA_MAX_HEAP/" "$CASSANDRA_CONF_DIR/jvm.options"
fi
if [ -n "$CASSANDRA_REPLACE_NODE" ]; then
   echo "-Dcassandra.replace_address=$CASSANDRA_REPLACE_NODE/" >> "$CASSANDRA_CONF_DIR/jvm.options"
fi
The rack and data center information is stored in a simple Java propertiesfile:
for rackdc in dc rack; do
  var="CASSANDRA_${rackdc^^}"
  val="${!var}"
  if [ "$val" ]; then
    sed -ri 's/^('"$rackdc"'=).*/1 '"$val"'/' "$CASSANDRA_CONF_DIR/cassandra-rackdc.properties"
  fi
done
The next section loops over all the variables defined earlier, finds the corresponding key in the Cassandra.yaml configuration files, and overwrites them. That ensures that each configuration file is customized on the fly just before it launches Cassandra itself:
for yaml in
  broadcast_address
  broadcast_rpc_address
  cluster_name
  disk_optimization_strategy
  endpoint_snitch
  listen_address
  num_tokens
  rpc_address
  start_rpc
  key_cache_size_in_mb
  concurrent_reads
  concurrent_writes
  memtable_cleanup_threshold
  memtable_allocation_type
  memtable_flush_writers
  concurrent_compactors
  compaction_throughput_mb_per_sec
  counter_cache_size_in_mb
  internode_compression
  endpoint_snitch
  gc_warn_threshold_in_ms
  listen_interface
  rpc_interface
  ; do
  var="CASSANDRA_${yaml^^}"
  val="${!var}"
  if [ "$val" ]; then
    sed -ri 's/^(# )?('"$yaml"':).*/2 '"$val"'/' "$CASSANDRA_CFG"
  fi
done
echo "auto_bootstrap: ${CASSANDRA_AUTO_BOOTSTRAP}" >> $CASSANDRA_CFG
The next section is all about setting the seeds or seed provider depending on the deployment solution (StatefulSet or not). There is a little trick for the first pod to bootstrap as its own seed:
# set the seed to itself.  This is only for the first pod, otherwise
# it will be able to get seeds from the seed provider
if [[ $CASSANDRA_SEEDS == 'false' ]]; then
  sed -ri 's/- seeds:.*/- seeds: "'"$POD_IP"'"/' $CASSANDRA_CFG
else # if we have seeds set them.  Probably StatefulSet
  sed -ri 's/- seeds:.*/- seeds: "'"$CASSANDRA_SEEDS"'"/' $CASSANDRA_CFG
fi
sed -ri 's/- class_name: SEED_PROVIDER/- class_name: '"$CASSANDRA_SEED_PROVIDER"'/' $CASSANDRA_CFG
The following section sets up various options for remote management and JMX monitoring. It’s critical in complicated distributed systems to have proper administration tools. Cassandra has deep support for the ubiquitous JMX standard:
# send gc to stdout
if [[ $CASSANDRA_GC_STDOUT == 'true' ]]; then
  sed -ri 's/ -Xloggc:/var/log/cassandra/gc.log//' $CASSANDRA_CONF_DIR/cassandra-env.sh
fi
# enable RMI and JMX to work on one port
echo "JVM_OPTS="$JVM_OPTS -Djava.rmi.server.hostname=$POD_IP"" >> $CASSANDRA_CONF_DIR/cassandra-env.sh
# getting WARNING messages with Migration Service
echo "-Dcassandra.migration_task_wait_in_seconds=${CASSANDRA_MIGRATION_WAIT}" >> $CASSANDRA_CONF_DIR/jvm.options
echo "-Dcassandra.ring_delay_ms=${CASSANDRA_RING_DELAY}" >> $CASSANDRA_CONF_DIR/jvm.options
if [[ $CASSANDRA_OPEN_JMX == 'true' ]]; then
  export LOCAL_JMX=no
  sed -ri 's/ -Dcom.sun.management.jmxremote.authenticate=true/ -Dcom.sun.management.jmxremote.authenticate=false/' $CASSANDRA_CONF_DIR/cassandra-env.sh
  sed -ri 's/ -Dcom.sun.management.jmxremote.password.file=/etc/cassandra/jmxremote.password//' $CASSANDRA_CONF_DIR/cassandra-env.sh
fi
Finally, it protects the data directory such that only the cassandra user can access it, the CLASSPATH is set to the Cassandra JAR file, and it launches Cassandra in the foreground (not daemonized) as the cassandra user:
chmod 700 "${CASSANDRA_DATA}"
chown -c -R cassandra "${CASSANDRA_DATA}" "${CASSANDRA_CONF_DIR}"
export CLASSPATH=/kubernetes-cassandra.jar
su cassandra -c "$CASSANDRA_HOME/bin/cassandra -f"
Hooking up Kubernetes and Cassandra
Connecting Kubernetes and Cassandra takes some work because Cassandra was designed to be very self-sufficient, but we want to let it hook into Kubernetes at the right time to provide capabilities such as automatically restarting failed nodes, monitoring, allocating Cassandra pods, and providing a unified view of the Cassandra pods side by side with other pods.
Cassandra is a complicated beast and has many knobs to control it. It comes with a Cassandra.yaml configuration file, and you can override all the options with environment variables.
Digging into the Cassandra configuration file
There are two settings that are particularly relevant: the seed provider and the snitch. The seed provider is responsible for publishing a list of IP addresses (seeds) for nodes in the cluster. Each node that starts running connects to the seeds (there are usually at least three) and if it successfully reaches one of them, they immediately exchange information about all the nodes in the cluster. This information is updated constantly for each node as the nodes gossip with each other.
The default seed provider configured in Cassandra.yaml is just a static list of IP addresses, in this case, just the loopback interface:
# any class that implements the SeedProvider interface and has a
# constructor that takes a Map<String, String> of parameters will do.
seed_provider:
    # Addresses of hosts that are deemed contact points.
    # Cassandra nodes use this list of hosts to find each other and learn
    # the topology of the ring.  You must change this if you are running
    # multiple nodes!
    #- class_name: io.k8s.cassandra.KubernetesSeedProvider
    - class_name: SEED_PROVIDER
      parameters:
          # seeds is actually a comma-delimited list of addresses.
          # Ex: "<ip1>,<ip2>,<ip3>"
          - seeds: "127.0.0.1"
The other important setting is the snitch. It has two roles:
- Cassandra utilizes the snitch to gain valuable insights into your network topology, enabling it to effectively route requests.
- Cassandra employs this knowledge to strategically distribute replicas across your cluster, mitigating the risk of correlated failures. To achieve this, Cassandra organizes machines into data centers and racks, ensuring that replicas are not concentrated on a single rack, even if it doesn’t necessarily correspond to a physical location.
Cassandra comes pre-loaded with several snitch classes, but none of them are Kubernetes-aware. The default is SimpleSnitch, but it can be overridden:
# You can use a custom Snitch by setting this to the full class
# name of the snitch, which will be assumed to be on your classpath.
endpoint_snitch: SimpleSnitch
GossipingPropertyFileSnitchPropertyFileSnitchEc2SnitchEc2MultiRegionSnitchRackInferringSnitch
The custom seed provider
When running Cassandra nodes as pods in Kubernetes, Kubernetes may move pods around, including seeds. To accommodate that, a Cassandra seed provider needs to interact with the Kubernetes API server.
Here is a short snippet from the custom KubernetesSeedProvider (a Java class that implements the Cassandra SeedProvider API):
public class KubernetesSeedProvider implements SeedProvider {
...
    /**
     * Call Kubernetes API to collect a list of seed providers
     *
     * @return list of seed providers
     */
    public List<InetAddress> getSeeds() {
        GoInterface go = (GoInterface) Native.loadLibrary("cassandra-seed.so", GoInterface.class);
        String service = getEnvOrDefault("CASSANDRA_SERVICE", "cassandra");
        String namespace = getEnvOrDefault("POD_NAMESPACE", "default");
        String initialSeeds = getEnvOrDefault("CASSANDRA_SEEDS", "");
        if ("".equals(initialSeeds)) {
            initialSeeds = getEnvOrDefault("POD_IP", "");
        }
        String seedSizeVar = getEnvOrDefault("CASSANDRA_SERVICE_NUM_SEEDS", "8");
        Integer seedSize = Integer.valueOf(seedSizeVar);
        String data = go.GetEndpoints(namespace, service, initialSeeds);
        ObjectMapper mapper = new ObjectMapper();
        try {
            Endpoints endpoints = mapper.readValue(data, Endpoints.class);
            logger.info("cassandra seeds: {}", endpoints.ips.toString());
            return Collections.unmodifiableList(endpoints.ips);
        } catch (IOException e) {
            // This should not happen
            logger.error("unexpected error building cassandra seeds: {}" , e.getMessage());
            return Collections.emptyList();
        }
    }
Creating a Cassandra headless service
The role of the headless service is to allow clients in the Kubernetes cluster to connect to the Cassandra cluster through a standard Kubernetes service instead of keeping track of the network identities of the nodes or putting a dedicated load balancer in front of all the nodes. Kubernetes provides all that out of the box through its services.
Here is the Service manifest:
apiVersion:  v1
kind: Service
metadata:
  labels:
    app: cassandra
    name: cassandra
spec:
  clusterIP: None
  ports:
    - port: 9042
  selector:
    app: Cassandra
The app: cassandra label will group all the pods that participate in the service. Kubernetes will create endpoint records and the DNS will return a record for discovery. The clusterIP is None, which means the service is headless and Kubernetes will not do any load-balancing or proxying. This is important because Cassandra nodes do their own communication directly.
The 9042 port is used by Cassandra to serve CQL requests. Those can be queries, inserts/updates (it’s always an upsert with Cassandra), or deletes.
Using StatefulSet to create the Cassandra cluster
Declaring a StatefulSet is not trivial. It is arguably the most complex Kubernetes resource. It has a lot of moving parts: standard metadata, the StatefulSet spec, the pod template (which is often pretty complex itself), and volume claim templates.
Dissecting the StatefulSet YAML file
Let’s go methodically over this example StatefulSet YAML file that declares a three-node Cassandra cluster.
Here is the basic metadata. Note the apiVersion string is apps/v1 (StatefulSet became generally available in Kubernetes 1.9):
apiVersion: "apps/v1"
kind: StatefulSet
metadata:
  name: cassandra
  labels:
     app: cassandra
The StatefulSet spec defines the headless service name, the label selector (app: cassandra), how many pods there are in the StatefulSet, and the pod template (explained later). The replicas field specifies how many pods are in the StatefulSet:
spec:
  serviceName: cassandra
  replicas: 3
  selector:
    matchLabels:
      app: cassandra
  template:
      ...
The term “replicas” for the pods is an unfortunate choice because the pods are not replicas of each other. They share the same pod template, but they have a unique identity, and they are responsible for different subsets of the state in general. This is even more confusing in the case of Cassandra, which uses the same term, “replicas,” to refer to groups of nodes that redundantly duplicate some subset of the state (but are not identical, because each can manage an additional state too).
I opened a GitHub issue with the Kubernetes project to change the term from replicas to members:
https://github.com/kubernetes/kubernetes.github.io/issues/2103
The pod template contains a single container based on the custom Cassandra image. It also sets the termination grace period to 30 minutes. This means that when Kubernetes needs to terminate the pod, it will send the containers a SIGTERM signal notifying them they should exit, giving them a chance to do so gracefully. Any container that is still running after the grace period will be killed via SIGKILL.
Here is the pod template with the app: cassandra label:
  template:
    metadata:
      labels:
        app: cassandra
    spec:
      terminationGracePeriodSeconds: 1800
      containers:
      ...
The containers section has multiple important parts. It starts with a name and the image we looked at earlier:
      containers:
      - name: cassandra
        image: gcr.io/google-samples/cassandra:v14
        imagePullPolicy: Always
Then, it defines multiple container ports needed for external and internal communication by Cassandra nodes:
        ports:
        - containerPort: 7000
          name: intra-node
        - containerPort: 7001
          name: tls-intra-node
        - containerPort: 7199
          name: jmx
        - containerPort: 9042
          name: cql
The resources section specifies the CPU and memory needed by the container. This is critical because the storage management layer should never be a performance bottleneck due to CPU or memory. Note that it follows the best practice of identical requests and limits to ensure the resources are always available once allocated:
        resources:
          limits:
            cpu: "500m"
            memory: 1Gi
          requests:
           cpu: "500m"
           memory: 1Gi
Cassandra needs access to inter-process communication (IPC), which the container requests through the security context’s capabilities:
        securityContext:
          capabilities:
            add:
              - IPC_LOCK
The lifecycle section runs the Cassandra nodetool drain command to make sure data on the node is transferred to other nodes in the Cassandra cluster when the container needs to shut down. This is the reason a 30-minute grace period is needed. Node draining involves moving a lot of data around:
        lifecycle:
          preStop:
            exec:
              command:
              - /bin/sh
              - -c
              - nodetool drain
The env section specifies the environment variables that will be available inside the container. The following is a partial list of the necessary variables. The CASSANDRA_SEEDS variable is set to the headless service, so a Cassandra node can talk to seed nodes on startup and discover the whole cluster. Note that in this configuration we don’t use the special Kubernetes seed provider. POD_IP is interesting because it utilizes the Downward API to populate its value via the field reference to status.podIP:
        env:
          - name: MAX_HEAP_SIZE
            value: 512M
          - name: HEAP_NEWSIZE
            value: 100M
          - name: CASSANDRA_SEEDS
            value: "cassandra-0.cassandra.default.svc.cluster.local"
          - name: CASSANDRA_CLUSTER_NAME
            value: "K8Demo"
          - name: CASSANDRA_DC
            value: "DC1-K8Demo"
          - name: CASSANDRA_RACK
            value: "Rack1-K8Demo"
          - name: CASSANDRA_SEED_PROVIDER
            value: io.k8s.cassandra.KubernetesSeedProvider
          - name: POD_IP
            valueFrom:
              fieldRef:
                fieldPath: status.podIP
The readiness probe makes sure that requests are not sent to the node until it is actually ready to service them. The ready-probe.sh script utilizes Cassandra’s nodetool status command:
        readinessProbe:
          exec:
            command:
            - /bin/bash
            - -c
            - /ready-probe.sh
          initialDelaySeconds: 15
          timeoutSeconds: 5
The last part of the container spec is the volume mount, which must match a persistent volume claim:
        volumeMounts:
        - name: cassandra-data
          mountPath: /var/lib/cassandra
That’s it for the container spec. The last part is the volume claim templates. In this case, dynamic provisioning is used. It’s highly recommended to use SSD drives for Cassandra storage, especially its journal. The requested storage in this example is 1 GiB. I discovered through experimentation that 1–2 TB is ideal for a single Cassandra node. The reason is that Cassandra does a lot of data shuffling under the covers, compacting and rebalancing the data. If a node leaves the cluster or a new one joins the cluster, you have to wait until the data is properly rebalanced before the data from the node that left is properly redistributed or a new node is populated.
Note that Cassandra needs a lot of disk space to do all this shuffling. It is recommended to have 50% free disk space. When you consider that you also need replication (typically 3x), then the required storage space can be 6x your data size. You can get by with 30% free space if you’re adventurous and maybe use just 2x replication depending on your use case. But don’t get below 10% free disk space, even on a single node. I learned the hard way that Cassandra will simply get stuck and will be unable to compact and rebalance such nodes without extreme measures.
The storage class fast must be defined in this case. Usually, for Cassandra, you need a special storage class and can’t use the Kubernetes cluster default storage class.
The access mode is, of course, ReadWriteOnce:
  volumeClaimTemplates:
  - metadata:
      name: cassandra-data
    spec:
      storageClassName: fast
      accessModes: [ "ReadWriteOnce" ]
      resources:
        requests:
          storage: 1Gi
When deploying a StatefulSet, Kubernetes creates the pods in order per their index number. When scaling up or down, it also does so in order. For Cassandra, this is not important because it can handle nodes joining or leaving the cluster in any order. When a Cassandra pod is destroyed (ungracefully), the persistent volume remains. If a pod with the same index is created later, the original persistent volume will be mounted into it. This stable connection between a particular pod and its storage enables Cassandra to manage the state properly.
Summary
In this chapter, we covered the topic of stateful applications and how to integrate them with Kubernetes. We discovered that stateful applications are complicated and considered several mechanisms for discovery, such as DNS and environment variables. We also discussed several state management solutions, such as in-memory redundant storage, local storage, and persistent storage. The bulk of the chapter revolved around deploying a Cassandra cluster inside a Kubernetes cluster using a StatefulSet. We drilled down into the low-level details in order to appreciate what it really takes to integrate a third-party complex distributed system like Cassandra into Kubernetes. At this point, you should have a thorough understanding of stateful applications and how to apply them within your Kubernetes-based system. You are armed with multiple methods for various use cases, and maybe you’ve even learned a little bit about Cassandra.
In the next chapter, we will continue our journey and explore the important topic of scalability, in particular auto-scalability, and how to deploy and do live upgrades and updates as the cluster dynamically grows. These issues are very intricate, especially when the cluster has stateful apps running on it.