
In This Chapter
Using handwriting recognition to control Mac OS X
Speaking to your MacBook
Having your laptop speak back
Using VoiceOver to provide feedback in Snow Leopard
If you're a hunt-and-peck typist — leaving you certain that there must be some better way to get information into your computer — you'll be happy to know that Apple has you in mind. Since the very first Mac rolled off the assembly line, Apple has had a keen interest in alternative modes of interaction between human and machine. Mac OS X continues in this tradition of alternative computer controls, offering two options for controlling Mac OS X without the keyboard: handwriting and speech.
Handwriting: By using a pen and computer tablet, you can enter text into your MacBook by simply writing as you would on a sheet of paper.
Speech: Talk to your MacBook to make it listen and obey your commands. It even talks back!
This chapter guides you through the various options that you have for controlling your laptop without using the keyboard. First, I cover the Mac OS X Ink feature, which you use to write on a tablet to enter data into your computer. (Although it sounds a bit ironic, think of Ink as your "digital paper" for the new millennium.) Whatever you write on the tablet appears on the screen as text.
I also give you a look at the more space-age speech capabilities available to you in Mac OS X. With your voice, you can command a Macintosh to perform all sorts of interesting feats. And just so you don't get lonely, the MacBook even talks back to you. (Now you can control your computer just as Spock from "Star Trek" could!) And Snow Leopard's VoiceOver feature makes it easy for your MacBook to read aloud all sorts of text, including Web pages, Mail messages, and word processing documents.
So scoot away from your computer, lean that chair back, and let your laptop take care of the rest.
Typing on a keyboard can be a tedious and error-prone experience for even the best typists. To help out, Apple added some useful handwriting features to Mac OS X. Based in part on some of Apple's handheld software for the Newton (one of the first personal digital assistants [PDAs] and a product released before its time), the handwriting recognition in Mac OS X gives you the ability to write text on a compatible tablet for use in your favorite applications.
The basic process of working with handwriting on Mac OS X goes like this:
Attach a tablet to your MacBook.
Most tablets use a Universal Serial Bus (USB) connection, so connecting one to your computer is as simple as plugging in the cable from your tablet to a USB port on your MacBook.
Write on the tablet with the stylus that accompanies it.
Tip
A stylus is the name given the fake "pen" that accompanies most tablets. A stylus doesn't have any ink in it: It's just a pen-shaped tool with a plastic tip meant for writing on a tablet.
Your MacBook interprets your handwriting.
After your laptop recognizes the handwriting, it sends that text to the foremost application at the cursor location where you would normally type with the keyboard. You're spared the whole training bit, too.
You aren't restricted to writing just text on the tablet, naturally. You can use it to control the interface of your MacBook as you would a mouse. A tablet also works great for graphics applications, such as Corel Painter and Adobe Photoshop. Many artists are frustrated when drawing with a mouse; when you use a tablet, though, you can feel right at home with the natural pen or brush movements that you've always used, and you can vary the pressure on the pad to control the density and spread of a stroke.
Although Snow Leopard takes care of handwriting recognition, it does offer you a few settings in the Ink pane within System Preferences. To view the System Preferences, click the System Preferences icon in the Dock. From there, click the Ink icon to adjust settings for your tablet.
Note
If you don't have a tablet connected to your MacBook, you can't view the System Preferences pane for Ink. Mac OS X is smart enough to show you only the settings for your current hardware setup.
Remember that classic scene from the movie Star Trek IV: The Voyage Home in which Scotty picks up the mouse on a Macintosh and tries to talk directly to the computer? Since the very early days of the Mac OS, Apple has included some form of speech recognition in its computers. Snow Leopard continues to improve on speech recognition by offering a host of tools that let you get more work done in a shorter amount of time. (We're not to that point yet, Scotty, but we're working on it.)
The Speech Recognition features of Mac OS X let you speak a word, phrase, or sentence. After you've spoken, your MacBook goes to work translating what you said — and if it understands the phrase, it then performs an action associated with that phrase. The great part about this system is that you can say any phrase in continuous speech and have your MacBook perform any sort of action that you can imagine. In fact, you aren't limited to just one action: You can perform dozens of actions upon speaking a particular phrase.
Before you get started using Speech Recognition, you need a microphone to get sound into your MacBook. All current MacBook models have a built-in microphone.
Tip
If you're looking for the best quality audio input for use with iChat or GarageBand, check out a microphone with a USB connection. You'll get far better sound quality than a microphone that connects to your analog jack.
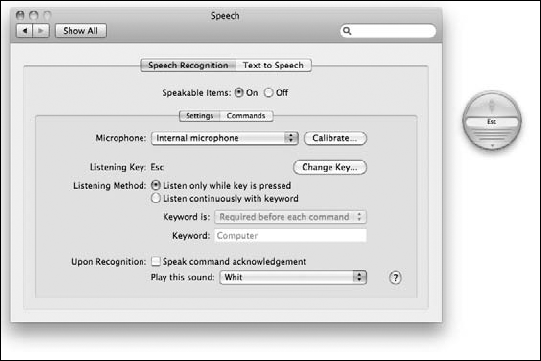
To get started with Speech Recognition in Mac OS X, open the System Preferences window by clicking its icon in the Dock and then clicking the Speech icon. This brings up the Speech pane, as shown in Figure 3-1.
You'll find that two tabs comprise the speech settings of Mac OS X:
Speech Recognition
Text to Speech
In this section, I'm concerned only with the Speech Recognition tab. Later, in the "Your Mac Talks Back!" section, I explore the Text to Speech tab.
The Speech Recognition pane contains two tabs:
Settings: The Settings pane provides a number of settings that control how your MacBook listens to Its Master's Voice. (Meaning you, friend reader.) From here, you can set the sound input, adjust the key on the keyboard that toggles speech recognition on and off, change microphone settings, and name your computer with a keyword. (You do want to call your computer by name as any techno-wizard does, don't you?)
Commands: When Speech Recognition is active, your MacBook can understand any number of commands. From the Commands tab, you tell the laptop what type of command it should expect you to give. You can also specify whether you'll be giving the commands word for word or your MacBook should be prepared to interpret paraphrasing. A number of specific applications and menus can be configured with speakable items, such as contact names within Snow Leopard's Address Book.
Crowning the Speech Recognition pane are the Speakable Items On and Off radio buttons. You've probably already guessed how to use 'em to switch Speech Recognition features on and off.
Tip
When you select the On radio button, the small circular Speech Recognition Feedback window appears on your screen, floating above all other windows. Know this face well because the Feedback window (also shown in Figure 3-1) is your friend and partner. If you use Speech Recognition often, it'll become a constant companion on your Desktop. (More on it in the next section.)
At the bottom of the Settings pane is the Upon Recognition section. When your MacBook comprehends one of your stentorian commands, you can set it to respond by playing a sound, speaking a confirmation, or both. This is helpful when you're not sure whether your MacBook understands you. One hundred percent recognition isn't a reality on any computer at this point, so sometimes it helps to have any feedback you can get. Otherwise, you might feel silly shouting at your machine while it sits there doing nothing. (Or perhaps not, if you're into really inexpensive anger management.)
You can choose between two styles of listening with the Listening Method options:
Listen Only While Key Is Pressed: Speech Recognition works only while the designated key is held down.
Listen Continuously with Keyword: When you speak the keyword, listening turns on and remains on.
Tip
To change what key must be toggled or held down, click the Change Key button.
Why change the keyword? Instead of saying, "Computer, empty the Trash!" you might prefer, "Elrond, empty the Trash!" This adds a little bit of personality to the interaction and also gives your computer a slightly longer time to react to your command. (As a general rule, the longer the spoken phrase, the more likely your MacBook will understand it.) If you select the Listen Continuously with Keyword feature, you can change your computer's name via the Keyword text box.
Finally, you can select the microphone that you want to use from the Microphone pop-up menu on the Settings pane — a great feature if you have more than one microphone connected to your MacBook. Click the Calibrate key to adjust the sound volume for better recognition.
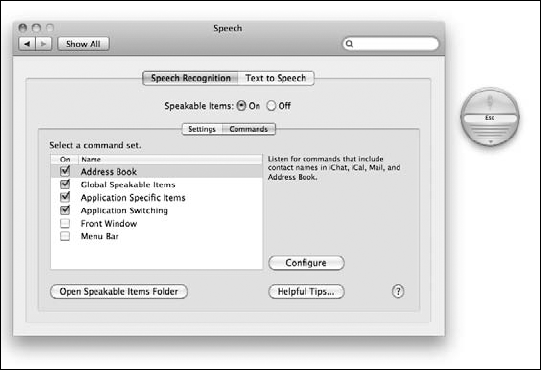
When Speech Recognition is active, your Mac listens for whatever phrases appear in your Speakable Items folder (a directory on your hard drive that holds a number of scripts). The Commands pane (shown in Figure 3-2) allows you to view the contents of this folder. When you speak a phrase that matches one of these filenames, your Mac automatically executes that script. The script can perform any number of actions, which is what makes Speech Recognition so powerful. Apple includes a large number of scripts with Mac OS X, but you're free to create your own, too.
Tip
To make something speakable, select the item and then speak the command "Make this speakable." The new speakable command is based upon the item's name.
To view the contents of the Speakable Items folder, click the Open Speakable Items Folder button on the Commands pane. The Finder comes to the foreground and navigates to the folder that holds the scripts. This is handy because each item in the Speakable Items folder is speakable.
Tip
To the right of the Open Speakable Items Folder button is another button: Helpful Tips. Click it to get some pointers on how to get the best performance from your microphone.
As I mention in the preceding section, the Speech Recognition features of Mac OS X aren't restricted to items in the Speakable Items folder. Any application that supports Speech Recognition is also fair game for your verbal manipulation. To control commands within other applications, use the Commands pane (refer to Figure 3-2). Here you can select the following check boxes:
Address Book
Global Speakable Items
Application Specific Items
Application Switching
Front Window (requires that you activate assistive devices in the Universal Access pane within System Preferences)
Menu Bar (requires that you activate assistive devices in the Universal Access pane within System Preferences)
Mark any one of these options to allow your MacBook to listen to those kinds of commands.
After you activate Speech Recognition, you instantly see the Feedback window. You can click and drag the edge of the window to position it anywhere on your Desktop.
The Feedback window includes controls and displays of its own:
Microphone Level Meter: The Feedback window displays indicators to let you know how loud the input to your microphone is.
Visual Indicator: The Feedback window displays visual feedback to let you know what mode it is in: idle, listening, or hearing a command. When the microphone isn't grayed out but there are no arrows on either side of the microphone, you're in listening mode. When the microphone is flanked by animated arrows, your computer is hearing a command spoken. When Speech Recognition is idle, no arrows are present and the microphone is grayed out.
Quick-Access Menu: You can quickly access the Speech preferences for the System or view the Speech Commands window. Just click the downward-pointing arrow at the bottom of the Feedback window, and a menu appears, giving you one-click access to both.
As soon as you disable speech recognition in the System Preferences, the Feedback window disappears.
Because Speech Recognition might be listening for different sets of commands from the Finder or many other applications, Mac OS X provides you with a single listing of all commands that you might speak at any given time: the Speech Commands window. To open the Speech Commands window, click the triangle at the bottom of the Feedback window and choose Open Speech Commands Window from the menu that appears.
The Speech Commands window is a simple one, but it serves an important purpose: to let you know what commands Mac OS X understands. The Speech Commands pane, as shown in Figure 3-3, organizes commands into categories that match the settings in the Speech pane of the System Preferences.

If you launch another application that supports Speech Recognition, Mac OS X adds that application's commands to the Speech Commands window. Speak any of these commands to make your Mac execute that function. For example, Mac OS X ships with speech commands for Address Book, such as Mail To and Video Chat With.
Tip
Apple might be a big, serious, computer company — yeah, right — but it isn't without a humorous side! With Speech Recognition enabled, say the phrase, "Tell me a joke." Your MacBook replies with a random joke. Say it again, and your MacBook tells you another joke. (Brace yourself, these jokes were likely written by preschoolers ...they're really, really bad.) Oh, and if you get a "Knock, Knock" joke, remember that you have to actually say, "Who's there?"
Mac OS X is great at listening to your speech, but the fun doesn't stop there ...your MacBook can talk to you, too! By using one of the many available voices — including the default Snow Leopard voice, Alex — you can make your computer talk or even sing. (Not as well as Sinatra, but better than Bob Dylan.) And although Speech Recognition lets you speak to your laptop, the VoiceOver feature gives your MacBook the ability to speak text. This is an especially useful feature because it lets you listen to your e-mails, Web pages, or even your homework — sometimes the eyes need a break. The text-to-speech capability gives you the opportunity to lean back in your chair or even get up and walk around while still using your computer.
Text-to-speech settings appear in three places within System Preferences: our old friend, the Speech pane; the Date & Time pane; and the VoiceOver settings within the Universal Access pane.
The text-to-speech engine that comes with Snow Leopard has a collection of many different voices from which to choose; some voices are male, some are female, and some aren't human at all. To select your MacBook's voice in Mac OS X, follow these steps:
Click the System Preferences icon in the Dock.
Click the Speech icon.
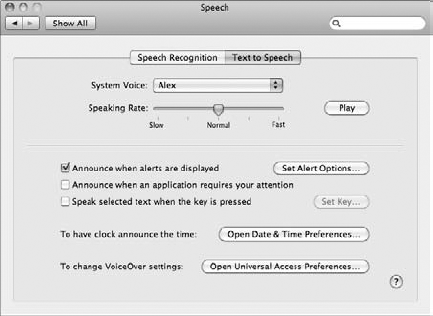
Click the Text to Speech tab, as shown in Figure 3-4.
Click the System Voice pop-up menu to choose a voice for your MacBook.
To hear the voice, click Play; Snow Leopard speaks a sentence as a demonstration. To the left of the Play button is a slider for adjusting the speed of the speech. Move the slider to the right to increase the speed at which your MacBook speaks and to the left to slow it down.
Tip
Naturally, Alex receives the most attention these days, because he's the default voice for Snow Leopard ...and Alex definitely provides the most natural-sounding tone and best pacing of the bunch. However, I also think that the old-school voices, like Bruce and Vicki, are still quite intelligible. (I'm a Vicki kinda guy myself.)
After you select a voice, you have a variety of ways to make your laptop speak automatically to you, based on some simple rules. For example, every Mac owner has run into an Alert dialog. (Alert dialogs are typically accompanied by a select group of words — better left unspoken — from the human behind the keyboard.) An Alert dialog usually displays some kind of icon from the following list:
Stop sign: Indicates that something particularly important requires your attention — usually an error or a dire warning.
Yield sign: Signals that you should proceed cautiously; not as severe as the Stop sign, but important nonetheless.
Notification: Looks like the profile of a person speaking; displays an informative message, but not a warning. You could use this feature, for example, to have a calendar application alert you when you have a meeting or a deadline.
From the Text to Speech pane, you can choose to have your MacBook speak a specific phrase or the contents of the Alert dialog by selecting one of the check boxes at the middle of the pane. If you select the Announce When Alerts Are Displayed check box, click the Set Alert Options button to set alert-specific options:
Voice: Choose the voice that should speak alerts. (By default, it's the voice you chose earlier.)
Phrase: Click this pop-up menu to choose a "prefix" phrase that's spoken before the actual alert text. By default, Snow Leopard speaks the name of the application that displayed the alert, but you can also choose a phrase from the list or choose to mix up the phrases for a little variety. To add or remove phrases, click the Edit Phrases item.
Delay: Drag this slider to control the increment of time that Snow Leopard allows to pass before it speaks.
To hear what your spoken alert settings sound like in use, click the Play button.
Tip
If you click the Play button on the Set Alert Options sheet and don't hear anything right away, remember that it doesn't begin speaking until the time has elapsed that you set with the Delay slider. To hear the spoken alerts speak as soon as you click the Play button, move the slider to 0 (zero).
In addition to spoken alerts, you can allow your Mac to speak when other actions occur. Again, these settings are found on the Text to Speech pane. Your MacBook can speak in the following circumstances:
Announce when an application requires your attention: In case you have your Dock hidden from view, it's not always clear when an application needs your attention. In these instances, Mac OS X grabs your attention via speech.
Read a selection of text when you press a particular key: If you have a child who's learning to read, the MacBook can help him or her by reading a selection of text. Kids can figure out how to drag and select text often more quickly than they can read that text.
Announce the time: Are you like me, constantly getting lost in time while immersed in your work? (Not to mention your favorite game.) I've set my MacBook Pro to announce the hour, which always keeps my time sense firmly planted.
There you are, deep in concentration as you finish up the final chapter of your Great American Novel, when you glance at the clock in the Finder menu bar and realize that you were supposed to pick up your kids at soccer practice a full hour ago!
You can avoid this shameful lapse of parental responsibility by turning on Snow Leopard's automatic spoken time feature, which is controlled from the Date & Time pane within System Preferences (and is much more effective than a mechanical cuckoo clock). But why go to all the trouble of clicking Show All when you can just click the Open Date & Time Preferences button on the Text to Speech pane? Snow Leopard immediately switches to display the Date & Time pane. You can even click the Clock on the Finder menu bar and click Open Date & Time. (Again, it's all about the convenience when it comes to the geniuses at Apple.)
From the Date & Time pane, click the Clock tab and select the Announce the Time check box to enable your MacBook to speak the time; then use the Period pop-up menu to choose spoken time at the quarter, half, or full hour. You can also customize the voice for spoken time as well.
After you're done, zip back to the Speech pane by clicking the Back button at the top-left corner of the System Preferences window.
With Snow Leopard's VoiceOver utility, your MacBook can provide you with all sorts of verbal feedback, creating a spoken English interface with Snow Leopard — a valuable addition to the operating system for the physically impaired. The feedback includes
Announcing when certain keys are pressed: Snow Leopard can tell you when a modifier key (such as Control, Option, or

Announcing cursor movements: You hear an audible alert when your mouse cursor switches between windows or when you've clicked a menu.
Announcing the position of the VoiceOver cursor: VoiceOver can audibly identify all operating system controls (such as buttons, sliders, and list boxes) by using a special on-screen cursor.
Reading documents, Web pages, and Mail messages: VoiceOver can read aloud the contents of all sorts of documents and application windows.
Speaking the characters you type: You can set VoiceOver to speak every character or each word you type.
Here is how to enable VoiceOver (or to launch the VoiceOver utility, as shown in Figure 3-5):
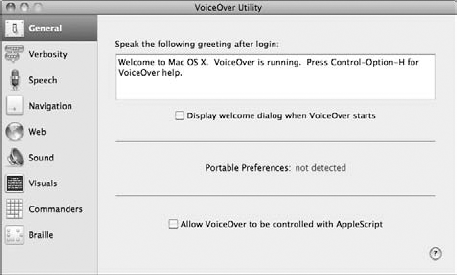
Click the Open Universal Access Preferences button on the Text to Speech pane.
Select the On radio button (or press
To customize how VoiceOver operates, click the Open VoiceOver Utility button.
Although VoiceOver provides a comprehensive text-to-speech interface for Mac OS X, it might be more than you need. If you simply want to hear text spoken within your applications, a number of alternative methods are included in Snow Leopard that don't require VoiceOver.
One of the simplest ways to hear spoken text in Mac OS X is by using the TextEdit application. TextEdit is a simple text processor that accompanies every copy of Mac OS X. Besides its handy word processing features, TextEdit can also speak text. This is good for reviewing a document after you've written it by listening to it. To hear spoken text with TextEdit, follow these steps:
Launch TextEdit from the Applications folder.
To open the Applications folder, choose Go

This launches the TextEdit application and opens a new document.
Enter some text.
Either type some text on the keyboard or paste some into the document from the Clipboard. Here's an example:
Billy Gates has lots of cash
Lots of cash
Lots of cash
Billy Gates has lots of cash
I'd like $10 please!
Choose Edit
Your MacBook begins speaking the text from the document. The speech engine has some intelligence, so you can enter dollar amounts (such as $25,423.12) or Roman numerals (such as Chapter XIV), and the speech engine reads them back in plain English. The result of these two strings would be "twenty-five thousand, four-hundred twenty-three dollars, and twelve cents" and "chapter fourteen."
Choose Edit
Your MacBook stops speaking. It also stops speaking when it reaches the end of the text.
You can also speak text within most applications by using the Services menu, located under the application's named menu. To speak text from an application, first select that text. Then, choose Application
Speaking a Web page aloud
Reading your e-mail
Listening to a speech you've written in Pages
As you might expect, choosing Application
Tip
Alas, not all applications are created equal. Some applications can't access the Services offered in the Services menu. If you don't see Speech in the list of services, you're out of luck.