The example in the previous chapter contained the key components you need to work with Rails and began to demonstrate how they work together. Rails is more than just a set of components, however—it’s a tightly knit package that includes tools to get you started more quickly. Rails can even teach you some best practices while making your work easier.
So, how do Rails developers build applications more quickly? One key piece of the puzzle is scaffolding. Instead of building a detailed controller and view, you can let Rails put up an interface to your data. In most cases, the scaffolding will be temporary, something you build on and replace, but in some cases the scaffolding may be enough to do what you need. The scaffolding also provides an excellent way to see what Rails’ creators think is a good way to accomplish common tasks.
Note
If you’re wondering what happened to the instant one-line dynamic scaffolding that used to be a constant part of the Rails sales pitch, it’s gone. It disappeared in Rails 2.0, replaced by generated scaffolding that provides a much more solid foundation.
To get started, create a new application. Then create a model and
supporting scaffolding with a single command from the command line. Or,
if you’re in Heroku, go to the gear menu, choose Generate, and enter
scaffold Person name:string.
(You can also find all of these files in ch05/guestbook003.)
$ ruby script/generate scaffold Person name:string
exists  app/models/
      exists  app/controllers/
      exists  app/helpers/
      create  app/views/people
      exists  app/views/layouts/
      exists  test/functional/
      exists  test/unit/
      create  app/views/people/index.html.erb
      create  app/views/people/show.html.erb
      create  app/views/people/new.html.erb
      create  app/views/people/edit.html.erb
      create  app/views/layouts/people.html.erb
      create  public/stylesheets/scaffold.css
  dependency  model
      exists    app/models/
      exists    test/unit/
      exists    test/fixtures/
      create    app/models/person.rb
      create    test/unit/person_test.rb
      create    test/fixtures/people.yml
      create    db/migrate
      create    db/migrate/001_create_people.rb
      create  app/controllers/people_controller.rb
      create  test/functional/people_controller_test.rb
      create  app/helpers/people_helper.rb
       route  map.resources :people
Warning
If you get an error message, the problem is likely that you’re
starting in the same guestbook application described in the previous
chapter, and the Person model there
is blocking the creation of the Person model here. There isn’t anything in
the last chapter’s code that is needed here, so it’s easiest to
reissue the initial rails guestbook
command to start with a clean slate.
This command makes Rails do a lot of different things. First, examine the initial line:
ruby script/generate scaffold Person name:stringIt tells Rails to generate scaffolding, based around a model named
Person, whose content is a name that is a string. If the model has more pieces to it—and
most will—you can just keep listing the different data fields and their
types.
Given this information, Rails goes on to create:
Four views (index, show, new, and edit)
A layout file for all of those views
A stylesheet for all of those views
A model (with accompanying tests and fixtures for the tests)
A data migration to establish the tables needed for the model
A controller to send data among the different components, and tests for it
An empty file for helper methods
A new route that will map user requests to the controller
You’ll need to run the migration file with rake
db:migrate, and then you can run ruby
script/server to fire up the application. Visit http://localhost:3000/people, and you’ll see something
like Figure 5-1.
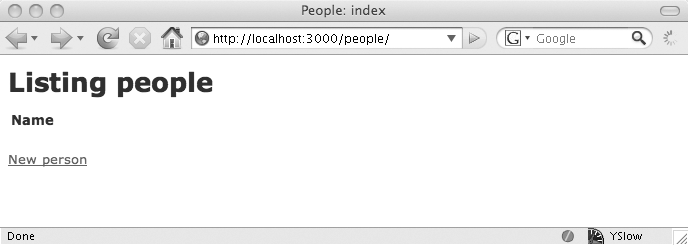
While Figure 5-1 lacks the “Hello” of the application built in the previous chapter, and the form field to enter your name isn’t right on the first page, it’s still basically the same idea. You can see who visited, and you can enter new names. If you click on the “New person” link, you’ll see the screen in Figure 5-2, which lets you enter a new name.

When you enter a name and click the Create button, you’ll see a page representing the newly created person, as shown in Figure 5-3. (The URL, though it points to a single person, still uses the plural form, “people,” as the record is one of a set.)
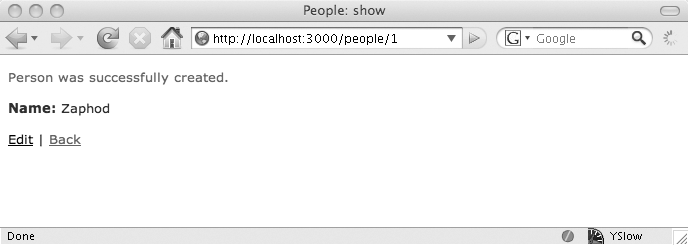
There are two options here. Edit will let you change the name (as shown in Figure 5-4), while clicking Back returns you to the original (index) page—only now you’ll see the name in a table, as shown in Figure 5-5.


It’s not quite as simple as the application built by hand in the previous chapter, but much of it is actually identical. The migration file looks just like the one created by hand (plus or minus some whitespace), and the model has exactly as much new code in it as the one built by hand: none at all.
The scaffolding’s action takes place in the single line added to the routing file, in a controller that needs a careful explanation and in the views, which don’t do very much that you haven’t already seen before. To understand why this controller works the way it does, though, there’s another story that needs to be told. Fortunately, it’s a RESTful story.