
Chapter 28. Running the Puppet Agent on Windows
The fastest-growing segment of Puppet users is companies who utilize Puppet agent to manage their Windows nodes. Puppet brings a configuration management toolset (and mindset) to Windows administration far beyond the tools provided by Microsoft. The Windows admins I have met who have become Puppet users cannot imagine how they would do without it now.
Puppet on Windows with the Puppet Labs Supported modules provides the ability to:
- Create, modify, and remove users and groups
- Install and configure applications
- Manage registry keys and values
- Download and execute PowerShell and cmd scripts
- Control icons on the user’s desktop
- Build IIS sites and applications
- Install and manage SQL Server
Everything you’ve already learned about Puppet applies to Puppet on Windows. For the remainder of this chapter, we’ll review the differences between Windows and Linux nodes.
Creating a Windows Virtual Machine
If you want to build a Windows virtual machine for testing against the Puppet Server virtual machine used in this book, follow the steps outlined in the following sections.
Tip
If you aren’t using the Vagrant virtual machines as your learning environment, skip ahead to “Installing Puppet on Windows”.Creating a VirtualBox Windows VM
To create a Windows virtual machine, start the VirtualBox Manager program as follows (see Figure 28-1):
- Mac: Applications → VirtualBox
- Windows: Start Menu → Programs|Apps → VirtualBox → VirtualBox Manager
Create a new virtual machine as follows:
- Click New in the top menu.
- Give the machine a name.
- Selected a version of Windows—for example, Windows 10 (64-bit).
- Click Continue.
- Select 4096 MB memory size if the arrow remains in the green range.
- Click through, selecting the defaults for all other options.

Figure 28-1. Create a new Windows 10 VM in VirtualBox
Adding an Internal Network Adapter
Now attach an internal network interface used to communicate with the Puppet server as follows (see Figure 28-2):
- Return to the VirtualBox Manager program.
- Select the Windows VM in the left sidebar, then click Settings.
- Click Network in the top menu bar.
- Select Adapter 2 in the tab bar.
- Check Enable Network Adapter.
- Attached to: Internal Network.
- Click OK.

Figure 28-2. Attach Adapter 2 to the Internal Network
Connecting the Windows Installation Media
Acquire an ISO image of the Windows version you would like to install. Windows 10 ISOs can be found on Microsoft’s site at “Download Windows 10 Disc Image”.
Now make the Windows installation media ISO image available as a mounted drive as follows (see Figure 28-3):
- Return to the VirtualBox Manager program.
- Select the Windows VM in the left sidebar, then click Settings.
- Click Storage in the top menu bar.
- Select the small DVD icon that says Empty.
- Click the small DVD icon on the far right.
- Find the Windows installation media ISO file—for example, Win10_English_x64.iso
- Click OK.
- Click Start → in the top menu
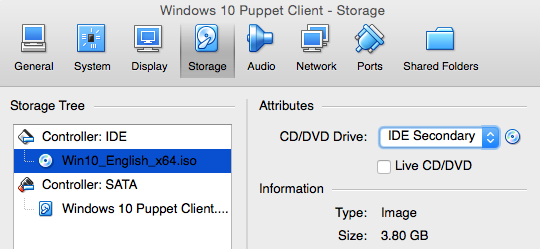
Figure 28-3. Select the Win10 English x64 ISO
The Windows Installer will start automatically. Install Windows as you normally do.
Configuring the Internal Network Adapter
After Windows has been installed and running, you will need to configure the IP address of the internal network interface. Open Network Connections in one of the many ways that Windows provides. In Windows 10, you would do as follows (see Figure 28-4):
- Click the Windows start menu button on the bottom left.
- Click Settings.
- Click the Network & Internet box.
- Select Ethernet on the left sidebar.
- Under “Related settings,” click “Change adapter options.”
The internal network interface will likely be named Ethernet 2. You may want to rename this for convenience.

Figure 28-4. Windows 10: Network connections
Now configure this interface to have an IP on the same network as the Puppet server by performing the following steps (see Figure 28-5):
- Double-click or right-click on the internal connection and choose Properties.
- Select Internet Protocol Version 4 (TCP/IPv4) and click Properties.
- IP address: 192.168.250.21.
- Subnet mask: 255.255.255.0.
- Leave all other fields blank and click OK.

Figure 28-5. Windows IPv4 configuration
On this interface, we configure only a unique IP on the same network as the Puppet server. All other fields are blank as DNS and routing will happen on the primary interface.
Installing Puppet on Windows
Download the Puppet agent for Windows from “Open Source Puppet” on the Puppet Labs site:
- Click the options for Open Source until you reach the Installation Instructions screen.
- Under Download & Install, select Microsoft Windows.
- From the package list, select puppet-agent-x64-latest.msi.
- Run this installer, accepting the defaults, as shown in Figure 28-6.
- When prompted for a Puppet server, enter
puppet.example.comwhen using the Vagrant instances (or the name of your server if you called it something else).
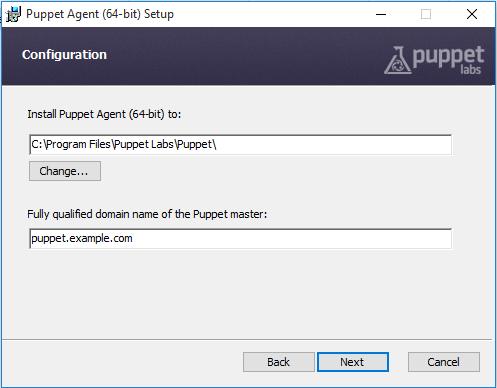
Figure 28-6. Puppet Windows setup
You can also install Puppet noninteractively with the same installer:
C:>msiexec/qn/norestart/ipuppet-latest.msiPUPPET_MASTER_SERVER=puppet.example.com
You can find a list of all the MSI exec properties at “Installing Puppet: MSI Properties” on the Puppet docs site.
Configuring Puppet on Windows
On Windows the Puppet configuration file can be found at C:ProgramDataPuppetLabspuppetetcpuppet.conf. This file contains the same configuration settings in the same format as on Linux, but paths with spaces in them must be quoted.
Warning
Do not be confused by the file C:Program FilesPuppet LabsPuppetpuppetconfpuppet.conf. This is the same file, but it is not used by the Puppet agent.Check the puppet.conf file to ensure it contains the following:
[agent]server=puppet.example.com
The file as installed by default should work as well. Just ensure that the server name is correct:
[main]server=puppet.example.compluginsync=trueautoflush=trueenvironment=production
Then edit the hosts file at C:WindowsSystem32driversetchosts to add an entry for the Puppet server. You can do this from an administrator Command Prompt with the following commands:
C:>sethostspath=%windir%System32driversetchostsC:>echo192.168.250.6puppet.example.com>>%hostspath%
Running Puppet Interactively
The Puppet installer creates a folder in the Start menu with shortcuts to Puppet documentation, and direct invocation of many Puppet commands, including Facter and Puppet Agent (see Figure 28-7). Each of these will request elevated privileges in order to run.

Figure 28-7. Puppet Start menu items
After installation, when you start Command Prompt or PowerShell, you’ll find the Puppet command in your PATH by default. Running Puppet commands with or without elevated privileges behaves exactly the same as running Puppet commands on Linux with or without sudo.
The menu option “Start Command Prompt with Puppet” initializes a command prompt with many Puppet installation directories in the PATH. Furthermore, the environment will contain the necessary settings for using Ruby gem and related commands. Start this command prompt and run set by itself to see the values for:
FACTER_DIRFACTER_env_windows_installdirHIERA_DIRMCOLLECTIVE_DIRPL_BASEDIRPUPPET_DIRRUBYLIBSSL_CERT_DIRSSL_CERT_FILE
Every command shown in this chapter will need to be run with administrator privileges. The best way to execute these commands is to right-click on “Start Command Prompt with Puppet” and select “Run as administrator,” as shown in Figure 28-8.

Figure 28-8. Start Command Prompt with Puppet -> Run as administrator
The alternative is to preface each command with the following: runas /noprofile/user:Administrator, which is the Windows equivalent of sudo.
Starting the Puppet Service
The Puppet agent must run with elevated privileges. You can select one of two Start menu items:
- Command Prompt
- Start Command Prompt with Puppet
Either one needs to be started by right-clicking and choosing “Run as administrator.”
Use the following commands to stop, start, and query the Puppet service on Windows:
C:>scstoppuppetC:>scstartpuppetC:>scquerypuppet
You can configure the service to start at boot or run only on demand. Choose the appropriate command:
C:>scconfigpuppetstart=disabledC:>scconfigpuppetstart=autoC:>scconfigpuppetstart=demand
Warning
The space after the equals sign is necessary!Debugging Puppet Problems
To run the Puppet service with debug output, use the following command arguments:
C:>scstoppuppetC:>scstartpuppet--debug--logdesteventlog
You’ll find detailed Puppet debugging in the Windows Event Viewer.
You can find more suggestions for debugging at “Troubleshooting Puppet on Windows” on the Puppet docs site.
Writing Manifests for Windows
For most things, writing Puppet manifests for Windows hosts is identical to writing them for Linux hosts, with some fairly straightforward exceptions:
- Semicolon path separator
- Windows uses a semicolon for path separation instead of a colon.
- Case-insensitive
- Files, users, groups, and random other attributes are case-insensitive on Windows but case-sensitive within Puppet. Windows users need to be aware of case when writing manifests.
- Windows service name
- Always use the Windows short name for the service, not the display name.
- Filesystem paths
- Puppet uses forward slashes for filesystem paths even on Windows. This works most of the time in my experience, but you’ll need to use backslashes in a limited set of cases, documented at “Handling File Paths on Windows” on the Puppet docs site.
- Double backslash in double quotes
- As the backslash is an escape character used to prevent interpolation, backslashes inside double quotes need to have an additional backslash to indicate that it was the intended character. Alternatively, place the entire path inside single quotes.
- Line endings
- Everyone loves line feeds versus carriage-return/line-feed differences, don’t they? Unfortunately, this means you’ll need to edit file sources or templates for Windows hosts to contain the CR/LF line-ending combination. (If you make your own resource providers, the
flatfiletype can handle this translation for you.)
You can find the latest tips for writing manifests for Windows hosts on the Puppet docs site at “Puppet on Windows: Writing Manifests”.
Finding Windows-Specific Modules
There is a combined package of the Puppet Forge’s best Windows modules available in the puppetlabs/windows collection on the Puppet Forge.
A few of my personal favorites on the Puppet Forge above and beyond this collection are:
- opentable/windowsfeature
- Disable or enable Windows Server features.
- puppetlabs/inifile
- Manage settings in INI files.
You can find other modules that support Windows by performing a Puppet Forge search filtered with Operating System = Windows.
When you attempt to use Puppet to upgrade a package on Windows, you’ll get an unexpected result:
Failed to apply catalog: Parameter ensure failed on Package[thing]: Provider must have features'upgradeable'toset'ensure'to'latest'
That’s right—the built-in package management in Windows doesn’t allow for upgrades of packages.
You might be wishing you had the Yum or Apt package managers on Windows right about now. The good news that something similar exists, and has been used successfully at thousands of sites. The Chocolatey package manager provides an API for automated installation and removal of packages:
[Chocolatey] was designed to be a decentralized framework for quickly installing applications and tools that you need. It is built on the NuGet infrastructure currently using PowerShell as its focus for delivering packages from the distros to your door, err computer.
The Puppet module to use Chocolatey can be found at chocolatey/chocolatey on the Puppet Forge.
Tip
Even Microsoft has added support for the Chocolatey package repositories, as explained in the Windows Management Framework V5 Preview.Concluding Thoughts on Puppet Windows
Adding your Windows servers to Puppet will give you consistent management of Windows resources in a way that you’d never believe if I tried to describe it to you.
In many organizations, this creates social dynamic changes that were hard to imagine a decade ago. It will break down the door between your Linux and Windows support teams, allowing each to benefit from the knowledge and experience of the other. Be prepared to embrace this opportunity.