
Although geocoding can be used to map discrete locations with an address, such as coffee shops, it is often the case that geocoding leads to routing. Once you choose the coffee shop that you want to go to, it's then desirable to compute the shortest path so that you can minimize your travel time. Routing is the process of minimizing the distance traveled on a street network. The good news is that routing uses the concept of a task just like the previous tasks we've explored. To compute a route, we're going to use the RouteTask class. The RouteTask class will find the shortest or fastest route between two or more locations, called
stops. It goes beyond just traversing the route though. The RouteTask class will also take into account restricted areas, and you can even specify a time window that incorporates the arrival and departure times.
In order to do routing, it is necessary to either use online services or create your own routing service. No matter which option is required, a network dataset is required. A network dataset is a model of the transportation network, such as streets, highways, and freeways. They are derived from the polyline geometry in a dataset that is either purchased or created. Once this street data is brought into ArcGIS Desktop or Pro, it is then translated into a network dataset, which, in a highly optimized manner, stores relationships such as the connectivity between roads. For example, based on the source data's fields and the way the geometry is organized, the network datasets will know that bridges pass over roads and are therefore not connected. See here:
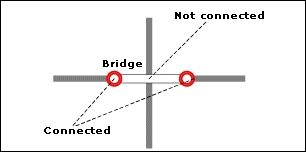
Network datasets
The preceding image is also available at https://desktop.arcgis.com/en/desktop/latest/guide-books/extensions/network-analyst/GUID-3F65156A-E4F4-4FEA-9A1B-D3AC816746D9-web.gif.
It will also store information such as the number of turns at an intersection, the speed limit along each segment, the time it takes to traverse a road segment, the hierarchy of the streets (interstates, highways, streets, and so on), and other information that allows for a complete model of the street system. Once the network dataset is built, it can then be published as a service for online use or converted to a ArcGIS Runtime geodatabase for offline use. This service is called a Network Analyst service and it can be accessed just like the many other services available from ArcGIS Online. To learn more about network datasets, navigate to http://resources.arcgis.com/en/help/main/10.2/index.html#//004700000007000000. To learn how to create a Network Analyst service, navigate to http://resources.arcgis.com/en/help/main/10.2/index.html#/Route_analysis/004700000045000000/.
An example of an online service is the Network Analyst service available at the following site:
http://sampleserver6.arcgisonline.com/arcgis/rest/services/NetworkAnalysis/SanDiego/NAServer
If you open up the service in your favorite browser, you will note that it has Service Description. In Service Description, it states that this is for the area of San Diego, CA and that it has the capabilities shown in the following screenshot:
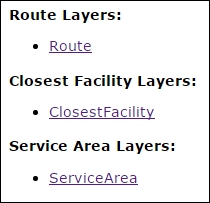
If you click on each of these links, you will discover what each kind of analysis service can do. For example, Route Layers exposes a routing service (Route) which allows you to calculate the route between two or more locations. It also lists a set of parameters, such as Impedance, Restrictions, Output Spatial Reference, and Network Analysis Classes. In the sections that follow, we'll explain what these types of analysis mean and how to use them.
In this section, we're going to be using objects in Esri.ArcGISRuntime.Tasks.NetworkAnalyst. Let's take a look at the object model diagram:
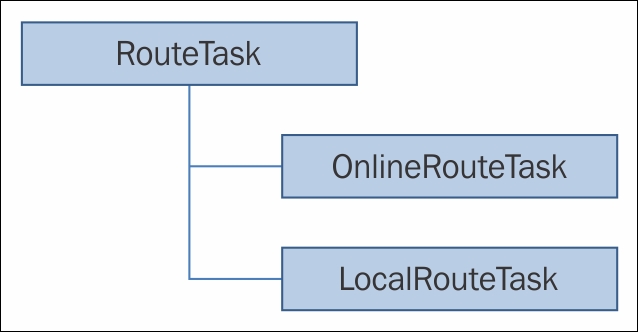
As shown in the diagram, routing tasks work just like the other tasks we've seen. There is an abstract class called RouteTask, and under it are OnlineRouteTask and LocalRouteTask. The only real difference between the two is that OnlineRouteTask requires an input URI and LocalRouteTask requires a Runtime geodatabase. Here are the two examples of creating a routing task:
// Online Routing Task.
string onlineRoutingService = "http://sampleserver6.arcgisonline.com/arcgis/rest/services/NetworkAnalysis/SanDiego/NAServer/Route";
OnlineRouteTask routeTask = new OnlineRouteTask(new
    Uri(onlineRoutingService));

// Offline routing task.
LocalRouteTask task = new LocalRouteTask
(@"C:ArcGISRuntimeBookDataNetworksRuntimeSanFrancisco.geodatabase", "Streets_ND"); Now that we have a task, we need to pass in the information it requires in order for it to produce a route. The RouteParameters class comes to the rescue. The RouteParameters class requires a minimum of two stops (the MapPoint class) to calculate a route. This is accomplished with SetStops. However, as we saw when we looked at the service earlier, it comes with a set of parameters already built in. As such, you can use GetDefaultParametersAsync for the default parameters. This can be a time saver if your routing service has been set up to meet your particular needs. Otherwise, you'll need to set the parameters for your particular requirements.
Some of the options you have to consider are impedance, barriers, driving directions, U-turn policy, geometry options, restrictions, and so on. Let's look at some of these options, and then we'll build an app that shows how offline routing is set up and executed using the San Francisco data we've been using in this book.
The SetStops method allows you to specify the stops the routing task will use to create the routes. The SetStops method takes two or more MapPoint classes in a collection in order to create a route. The order in which the route is generated is based on the order in which you've added the MapPoint classes to the collection. However, if you set FindBestSequence to true on RouteParameters, the order will be re-ordered. When FindBestSquence is true, the routing algorithm will switch from the shortest-path problem to the traveling salesperson problem (TSP). We won't cover TSP in this book.
Impedance is the cost that needs to be minimized when traversing the streets. Impedance could be distance, time, or some other value such as cost. If you go back and look at the San Diego routing service again, you'll note that the impedance is TravelTime, which is a field in the underlying street network. You could change this to another field, such as Length. To set this field, use ImpedanceAttributeName. If you open the service, you will note, under Network Attributes, one or more fields. For any field that is of Usage Type: esriNAUTCost, you can use this field name for the impedance. See here:
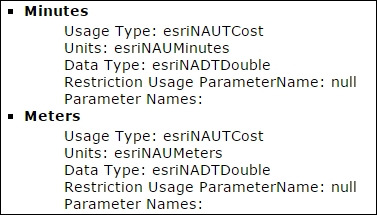
The fields called
Minutes and Meters could be used as impedance fields.
A barrier is a point, polyline, or polygon that forces the route to navigate around it. In the following screenshot, note that there is an X mark on the road between stops 1 and 2. Because of this point barrier, the route was re-routed around it:
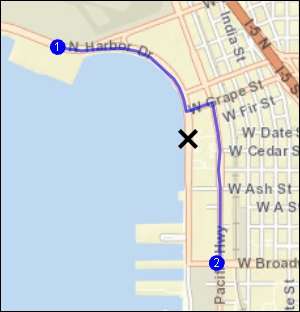
Route being re-routed
This X mark could represent an accident, for example. You can also specify a polyline, such as an entire road or a road block. It can also be a polygon to represent a spill of a toxic substance, for instance. Of course, barriers come at a cost because the routing engine will need to compute a new route around the barrier, which results in greater route length, time, or cost.
Barriers are added to a collection, just like stops, but you need to specify the type of geometry. For example, to set point barriers, you need to use SetPointBarriers. To use polylines, use SetPolylineBarriers. Lastly, to incorporate polygon barriers, use SetPolygonBarriers.
Another option you can enable with RouteParameters is to return directions. Set ReturnDirections to true and RouteTask will return directions. With ReturnDirections you can set the distance units using DirectionsLengthUnits. Also, you can specify the language to use with DirectionsLanguage. Lastly, you can specify the style of the directions with DirectionsStyleName. There are three string options:
With RestrictUTurns, you can specify whether U-turns are allowed. However, in order to understand these settings, a few key terms need to be understood. A junction is where two polylines meet. An intersection is where three or more polylines intersect. The end of a cul-de-sac is a dead end. There are three options for UTurnRestriction, which is the enumeration for RestrictUTurns:
Another option available on
RouteParameters is OutputLines. With this property, you can specify the complexity of the output routes. The output line can be generalized with OutputLine via these enumerations: Default, None, Straight, TrueShape and TrueShapeWithMeasure. The Straight option returns simple point-to-point lines, no geometry is returned with the None option, TrueShape returns the same shape as the underlying street network, and TrueShapeWithMeasure lets RouteParameters know to return the accumulated route cost (distance, time, and so on) for the routes. Using some of these options, such as None or Straight, can improve performance. However, a LocalRouteTask class will always return the full geometry payload no matter which option you choose for OutputLine.
Another way to generalize polylines is to set the OutputGeometryPrecision and OutputGeometryPrecisionUnits properties. Generalization is the process of simplifying the geometry so that the essential points (vertices) that make up the polyline are returned. The simplifying process uses a distance to determine which vertices to remove from the polyline. See here:
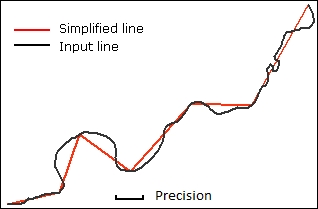
Note here that the input line in black is made of many vertices, but once it is generalized, it produces a much simpler-looking line in red. When you specify the distance as 25 meters, for example, you are telling the generalization algorithm to remove any vertices within that distance. If there are three consecutive vertices and they are within a distance of 25 meters, the middle vertex will be removed. You specify the unit of precision with OutputGeometryPrecisionUnits.
In some situations, you are going to want to place constraints on how the routing engine works. For example, you can tell the route to go down one-way streets, which is a requirement for emergency vehicles such as ambulances. To know which restrictions are available for the service, look under Restrictions for the service. For example, the San Diego service has the following options: Avoid Gates, Avoid Private Roads, Avoid Unpaved Roads, Divider Restriction, Driving an Automobile, Oneway, and Through Traffic Prohibited. To specify these restrictions, add them to a generic list of string objects, like so:
List<string> restrictions = new List<string>();
restrictions.Add("Avoid Ferries");
restrictions.Add("Avoid Toll Roads");
routeParameters.RestrictionAttributeNames = restrictions;When you need to specify a time frame for your stops, you can specify a time window using UseTimeWindows on RouteParameters. Just set it to true. Then, set the departure time using StartTime on RouteParameters. Once the route completes, it will return the stops with their TimeWindowStart and TimeWindowEnd. However, these properties are only available if the analysis layer was created with these options.
Once parameters are set, the route task can be initiated with SolveAsync. The SolveAsync method will return a RouteResult class, which you can iterate over. Typically, you want the first route returned, but you can also use some other properties, such as the returned route attributes, directions, and any warnings or errors. With this information, you can add more logic to return exactly what the user wants to see on the map, or presented in a side panel.
Let's create an app that illustrates using offline routing for San Francisco. You will need to create an app like we created with Chapter7a, and then perform the following steps:
- Add the following private members:
public RelayCommand AddStopsRelayCommand { get; private set; } GraphicsLayer routeGraphicsLayer = null; GraphicsLayer stopsGraphicsLayer = null; LocalRouteTask routeTask; - In the anonymous MVVM
Messengermethod, add the following lines of code at the end of the method:// Create a new renderer to symbolize the routing polyline and apply it to the GraphicsLayer SimpleLineSymbol polylineRouteSymbol = new SimpleLineSymbol(); polylineRouteSymbol.Color = System.Windows.Media.Colors.Blue; polylineRouteSymbol.Style = Esri.ArcGISRuntime.Symbology.SimpleLineStyle.Dot; polylineRouteSymbol.Width = 2; SimpleRenderer polylineRouteRenderer = new SimpleRenderer(); polylineRouteRenderer.Symbol = polylineRouteSymbol; // Create a new renderer to symbolize the start and end points that define the route and apply it to the GraphicsLayer SimpleMarkerSymbol stopSymbol = new SimpleMarkerSymbol(); stopSymbol.Color = System.Windows.Media.Colors.Green; stopSymbol.Size = 12; stopSymbol.Style = SimpleMarkerStyle.Circle; SimpleRenderer stopRenderer = new .SimpleRenderer(); stopRenderer.Symbol = stopSymbol; // create the route results graphics layer this.routeGraphicsLayer = new GraphicsLayer(); this.routeGraphicsLayer.ID = "RouteResults"; this.routeGraphicsLayer.DisplayName = "Routes"; this.routeGraphicsLayer.Renderer = polylineRouteRenderer; this.routeGraphicsLayer.InitializeAsync(); this.mapView.Map.Layers.Add(this.routeGraphicsLayer); // create the stops graphics layer this.stopsGraphicsLayer = new GraphicsLayer(); this.stopsGraphicsLayer.ID = "Stops"; this.stopsGraphicsLayer.DisplayName = "Stops"; this.stopsGraphicsLayer.Renderer = stopRenderer; this.stopsGraphicsLayer.InitializeAsync(); this.mapView.Map.Layers.Add(this.stopsGraphicsLayer); // Offline routing task. routeTask = new LocalRouteTask(@"C:ArcGISRuntimeBookDataNetworksRuntimeSanFrancisco.geodatabase", "Streets_ND"); - Add the following method:
public async void AddStops() { // If the user clicked the SolveRouteButton more than once, clear out any existing stops and routes graphics. routeGraphicsLayer.Graphics.Clear(); stopsGraphicsLayer.Graphics.Clear(); try { // Mouse click 1: setting the start point for the route // --------------------------------------------------- // Get the Editor from the MapView. Editor startPointEditor = this.mapView.Editor; // Get the MapPoint from where the user clicks in the Map // Control. This will be the starting point for the route. MapPoint startLocationMapPoint = await startPointEditor.RequestPointAsync(); // Create a new Graphic and set it's geometry to the user // clicked MapPoint Graphic startPointGraphic = new Graphic(); startPointGraphic.Geometry = startLocationMapPoint; // Add the start point graphic to the stops GraphicsLayer. stopsGraphicsLayer.Graphics.Add(startPointGraphic); // Mouse click 2: setting the end point for the route // --------------------------------------------------- // Get the Editor from the MapView. Editor endPointEditor = this.mapView.Editor; // Get the MapPoint from where the user clicks in the Map // Control. This will be the ending point for the route. MapPoint endLocationMapPoint = await startPointEditor.RequestPointAsync(); // Create a new Graphic and set it's geometry to the user // clicked MapPoint Graphic endPointGraphic = new Graphic(); endPointGraphic.Geometry = endLocationMapPoint; // Add the start point graphic to the stops GraphicsLayer. stopsGraphicsLayer.Graphics.Add(endPointGraphic); // Set the arguments for the RouteTask: // Get the RouteParameters from the RouteTask. RouteParameters routeParameters = await routeTask.GetDefaultParametersAsync(); // Define the settings for the RouteParameters. This includes // setting the SpatialReference, // ReturnDirections, DirectionsLengthUnit and Stops. routeParameters.OutSpatialReference = this.mapView.SpatialReference; routeParameters.ReturnDirections = false; routeParameters.DirectionsLengthUnit = LinearUnits.Kilometers; // Define a List of Graphics based upon the user start and end // clicks in the Map Control that will serve as input // parameters for the RouteTask operation. List<Graphic> graphicsStops = new List<Graphic>(); graphicsStops.Add(new Graphic(startLocationMapPoint)); graphicsStops.Add(new Graphic(endLocationMapPoint)); // Set the stops for the Route. routeParameters.SetStops(graphicsStops); // Call the asynchronous function to solve the RouteTask. RouteResult routeResult = await routeTask.SolveAsync(routeParameters); // Ensure we got at least one route back. if (routeResult.Routes.Count > 0) { // Get the first Route from the List of Routes Route firstRoute = routeResult.Routes[0]; // Get the Geometry from the Graphic in the first Route. Geometry routeGeometry = firstRoute.RouteFeature.Geometry; // Create a new Graphic based upon the Graphic. Graphic routeGraphic = new Graphic(routeGeometry); // Add the Graphic (a polyline) to the route GraphicsLayer. this.routeGraphicsLayer.Graphics.Add(routeGraphic); } } catch (System.AggregateException ex) { // There was a problem, display the results to the user. var innermostExceptions = ex.Flatten().InnerExceptions; if (innermostExceptions != null && innermostExceptions.Count > 0) Messenger.Default.Send<NotificationMessage>(new NotificationMessage((innermostExceptions[0].Message.ToString()))); else Messenger.Default.Send<NotificationMessage>(new NotificationMessage(ex.Message.ToString())); } catch (System.Exception ex) { // There was a problem, display the results to the user. Messenger.Default.Send<NotificationMessage>(new NotificationMessage("Error: " + ex.Message.ToString())); } finally { } } - Add the following XAML code to your
MainWindow.xamlfile:<StackPanel VerticalAlignment="Center"> <Button Content="Add Stops" Width="100" Height="40" HorizontalAlignment="Left" VerticalAlignment="Center" Command="{Binding AddStopsRelayCommand}"> </Button> </StackPanel> - Run the app, and then click on the Add Stops button. Click on two locations along the streets as shown below. After you click on the second point, a route should be calculated and displayed on the map along with the stops:
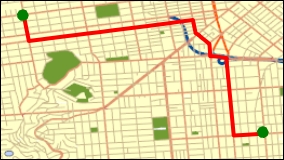
Calculation and display of a route
Refer to the sample app that comes with this book. It's called Chapter8.
There was a fair amount of code to just do routing, but it provides us with a good understanding of how to set up routing and execute a simple example. In short, we first added a new RelayCommand class called AddStops, and some graphics layer private members so that we can store our results. We then added some initialization code in the anonymous method of Messenger, along with some symbology for the route and stops. We also instantiated the RouteTask class. After that, we added the AddStops method.
The AddStops method first requests a MapPoint class using the Editor object of MapView. We're going to return to this Editor object in the next chapter when we turn our attention to editing. For now, all that is necessary to know is that it allows us to click on the map and return a MapPoint class using RequestPointAsync. We do this for the beginning MapPoint class and the ending MapPoint class. We then add these MapPoint classes to their GraphicsLayer class. Next, we set up the RouteParameters class to use the SpatialReference, ReturnDirections, and DirectionsLengthUnit classes of MapView,. After this, we add Graphics to a generic list and set the RouteParameters stops using SetStops. Note that SetStops can also use features. Finally, we execute the RouteTask class using SolveAsync. This will return RouteResults, which contains a collection of routes that we can use to display in the GraphicsLayer route.
We could expand this sample to include both geocoding and routing, by providing the user with the ability to enter addresses and return routes. We could even provide the user with the ability to click and drag the route too, if that was a requirement.