
The ADB pull command can be used to pull single files or entire directories directly from the device on to the forensic examiner's computer. This method is especially useful for small, targeted examinations. For example, in an investigation strictly involving SMS messages, the examiner can choose to pull just the relevant files.
Setting up the ADB environment has been previously discussed in this book. However, the device under examination must also be configured properly. USB debugging is the actual method through which the examiner's computer will communicate with the device. The USB debugging option is found under the Developer options in the Settings menu. However, as of Android 4.2, the Developer Options menu is hidden; to reveal it, a user has to go to Settings | About Phone, and then tap the Build Number field seven times. An on-screen dialog will appear that says You are now a developer! At this point, Developer options is available in the Settings menu; simply open this menu and select Enable USB debugging.
In addition to USB debugging, the correct drivers must be installed on the examiner's computer. Generally they can be found online, either from the manufacturer's website or at www.xda-developers.com. If commercial forensic tools are installed on the machine, the appropriate drivers may already be installed.
Tip
Another excellent resource is the Universal ADB Driver that can be downloaded for free at http://drivers.softpedia.com/get/MOBILES/Clockworkmod/Clockworkmod-Universal-Android-ADB-Driver.shtml.
Prior to Android 4.2.2, enabling USB debugging was the only requirement to communicate with the device over ADB. In Android 4.2.2, Google added Secure USB debugging option. The Secure USB debugging option adds an additional requirement of selecting to connect to a computer on the device's screen; this prevents ADB access to locked devices from untrusted computers:

RSA fingerprint dialog
If Always allow from this computer is selected, the device will store the computer's RSA key and the prompt will not appear on future connections to that computer, even if the device is locked.
Tip
It may be possible, depending on the device and OS version, to circumvent the Secure USB debugging protection. Find more information at https://labs.mwrinfosecurity.com/advisories/2014/07/03/android-4-4-2-secure-usb-debugging-bypass/.
It is also possible to bypass Secure USB debugging by using a computer previously authorized to access the device, which is discussed in the Issues with Android Lollipop section later in this chapter.
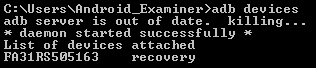
Once USB debugging has been enabled and the Secure USB debugging check passed (depending on Android version), the device is ready for examination. To verify that the device is connected and ready to use ADB, execute the following command:
adb devices
If no devices are shown, ensure that USB debugging is enabled and that the proper device drivers have been installed:
If the device status is offline or unauthorized, the Secure USB debugging prompt needs to be selected on the screen:

If everything is running correctly, the device status should show device:

The simplest method to determine if a device is rooted is to use the ADB shell. This will open a shell on the device that will be accessed on the examiner's computer; this means that any commands run in the shell will be executed on the device. Once USB debugging is enabled and Secure USB debugging is bypassed (or from recovery mode, as discussed in later in this chapter), open a terminal on the local computer and run:
adb shell
The shell will appear one of two ways, either with $ or #:
On Linux systems, the # symbol is used to indicate a root user, and the $ symbol indicates a non-root user. If the shell returns showing #, the shell has root access:
One further step may be required on some rooted devices. If the shell returns $, try running the su command:
su
If the su binary is installed on the device, which is usually a part of the root process, this will escalate the shell's permissions to root if it did not open with them.
As discussed in Chapter 2, Setting Up an Android Forensic Environment, the ADB pull command is used to transfer files from the device to the local workstation. The format for the ADB pull command is:
adb pull [-p] [-a] <remote> [<local>]
The optional -p flag shows the transfer's progress, while the optional -a flag will copy the file's timestamp and mode. The <remote> parameter is the exact path to the file on the device. The optional <local> parameter is the path where the file will be written on the examiner's computer. If no local path is specified, the file will be written to the present working directory. To see what an ADB pull command may look like, run the following command:
adb pull –p /data/data/com.android.providers.telephony/databases/mmssms.db C:/Users/Cases/Case_0001
This command would pull the SMS database file from the device, and write it to a directory for the case. Again, note that the device must be rooted for this to work; otherwise, the output would simply show that 0 files were pulled. In our case, the following output is obtained:

The preceding output shows that the file is 1020400 bytes in size. As a result of our command, the mmssms.db database now resides in the Case_0001 folder:
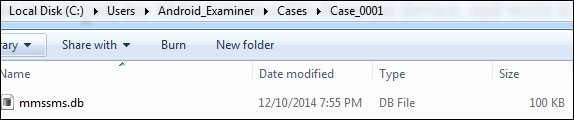
The database pulled from the device, seen in Windows Explorer
The database can now be examined with a SQL Browser or other forensic tools, which will be covered in Chapter 7, Forensic Analysis of Android Applications.
Similarly, if an investigator wishes to pull the files for an entire application, that can be done with ADB pull also:

This time, the ADB pull command fetched every file in the com.google.android.gm directory, which happens to contain all of the data for Gmail. The output was quite long, as it individually listed all 31 pulled files, so the entire output is not shown in the following figure, in which we see the total size of the transfer is shown as 1233373 bytes:

Now, the Case_0002 directory contains all of the files from the Gmail application, as shown in the following screenshot:

All files pulled from the Gmail directory, seen in Windows Explorer
It is even possible to do the following:
adb pull -p /data/data/ CasesCase_0003
This would pull every logical file available from the /data/data directory, and put them in the examiner's Case_0003 folder. This is not equivalent to a physical image, as certain files are skipped and deleted files will not be copied, but it is a simple method for pulling the vast majority of a user's application data.
Another advantage of the ADB pull command is that it is highly useful for scripting purposes. A knowledgeable examiner can maintain a list of paths for common files of interest, and write a script that automatically pulls these files from a device, or even have the script automatically pull the entire /data/data directory. A simple example of Python code that will perform this function is:
from subprocess import Popen
from os import getcwd

command = "adb pull /data/data " + getcwd() + "data_from_device"
p = Popen(command)
p.communicate()
Note that code is not very refined; it's only purpose is to illustrate the ease with which ADB commands can be scripted. At the very least, properly implementing the code should include the option to specify an output directory and handle any errors. However, the six lines of the preceding code would be sufficient to pull the entire /data/data directory logically assuming USB debugging is enabled and the device is rooted.
In order to truly be forensically sound, ADB data extractions should not be used against a phone while it is turned on. While the device is running, timestamps can be modified and applications may be running and updating files in the background. To avoid this, an examiner should place the device into a custom recovery mode, as shown in Chapter 2, Setting Up an Android Forensic Environment, if possible. ADB access is not available through the stock Android recovery mode. Typically, the first step in the rooting process is to flash a custom recovery mode to allow a method for repairing the device if something goes wrong. Rooted devices are far more likely to contain a custom recovery, but it is possible to flash a custom recovery to a non-rooted device. This method also allows the examiner to avoid the Secure USB debugging prompt on newer versions of Android, although our testing shows that this does not work on Android Lollipop. Recovery mode also may not require USB debugging to be enabled, which makes it an excellent option for bypassing a locked device.
The process to boot into recovery mode will vary for each device. Typically, it involves some combination of powering the device off and holding the volume and power keys. Guides for specific models can be found online.
The stock recovery mode will typically show a picture of an Android being operated on:

Stock Recovery mode
Custom recoveries look like the following screenshots. Also, stock recoveries will not allow ADB communication; running adb devices will simply show no devices.
Note
Custom recovery images for many devices can be found at https://www.clockworkmod.com/rommanager and http://teamw.in/project/twrp2.
If a device is in a custom Recovery Mode and the correct drivers have been installed on the examiner's computer, the device can be accessed via ADB as if it were live. Note that its status using the adb devices command now shows that it is in recovery mode:
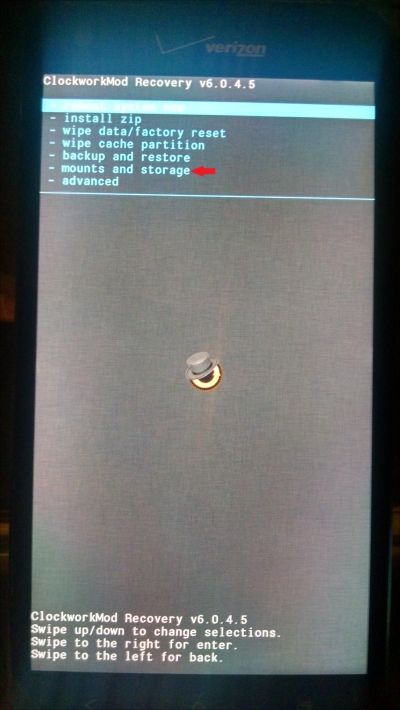
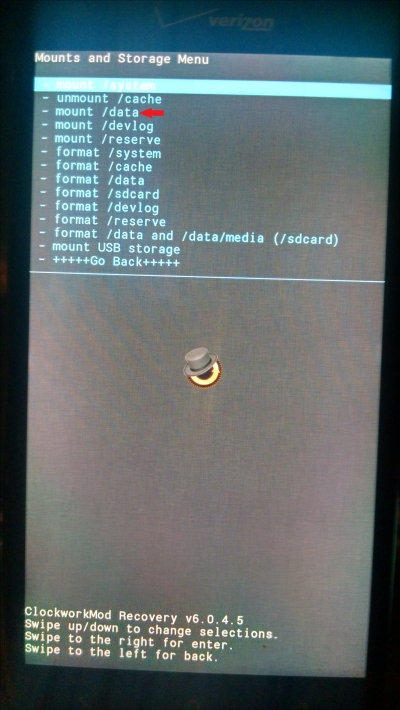
There is one final step before the examiner can begin extracting data over ADB: the data partition must be mounted in order to access user data. Some custom recoveries may mount this automatically, and others might not. If using either the Clockwork Mod Recovery or Team Win Recovery Project (TWRP) images from the URLs above, the data partition can be mounted by selecting Mounts and then selecting the data partition, as shown in the following screenshots. The recovery menu is generally either navigated by using the volume keys to move up and down and the power button to select, or may be touch-based depending on the custom recovery image used.
For a TWRP recovery, from the main recovery screen, select Mount:

After choosing Mount, select the partition(s) to be mounted:

In a Clockwork Mod Recovery, select mounts and storage:
Then select the partition(s) to mount:
Once the data partition (and any other partition the examiner wants to investigate) is mounted, the examiner can perform ADB data extractions, as demonstrated earlier in this chapter.
If the device does not have a custom recovery, the following section will show how to boot into one.
Fastboot is another protocol utility built into the Android SDK, and is used for interacting directly with a device's bootloader. Essentially, it is a much lower-level version of ADB, and is frequently used to flash new images to a device. How can this be helpful to an examiner?
Fastboot can allow an examiner to boot from a custom recovery image, and temporarily gain root access on a device, thus gaining access to data that would have been unavailable otherwise. Fastboot does not require USB debugging to be enabled or root access. The process of loading a custom bootloader onto a device is commonly used by commercial forensic tools to temporarily root a device, but a skilled examiner can also perform the process manually. Using this method, the recovery image is loaded into RAM; no permanent data on the device is altered in any way.
The most important requirement for using fastboot is an unlocked bootloader; locked bootloaders will not allow a device to boot from code that isn't specifically signed by the manufacturer. Unfortunately for forensic purposes, most devices no longer ship with an unlocked bootloader as it is a serious security risk, and manually unlocking a bootloader typically erases the user data. As such, the number of devices for which this is a feasible method is somewhat limited. But, when it works, it's an absolutely invaluable tool for an examiner to have in their arsenal.
Much like everything involving Android forensics, there is no one guaranteed method to determine if a bootloader is locked, as it varies depending upon the manufacturer. To boot into the bootloader, use the following ADB command:
adb reboot bootloader
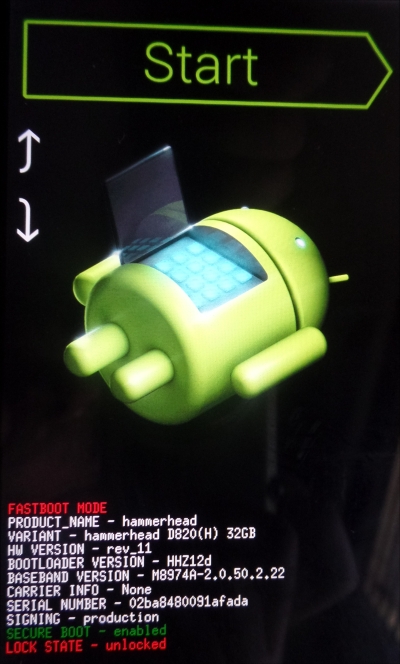
The device should boot to a screen that shows information regarding the bootloader. Frequently, this screen will display the bootloader status, as seen in the following screenshot.
Here's a generic, stock fastboot menu from a Nexus 5. Note that the Lock State indicates that the bootloader is unlocked:
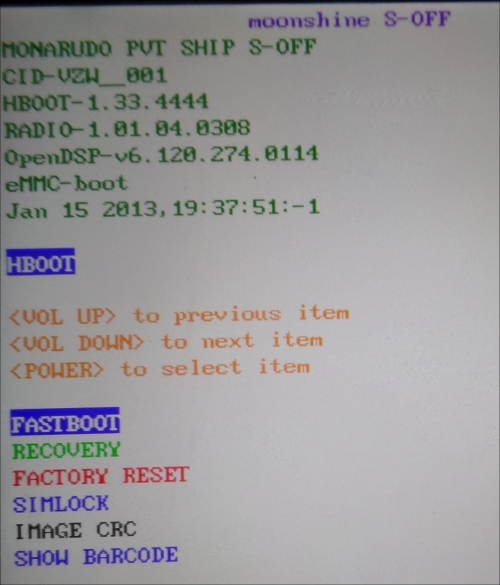
A standard HTC fastboot screen is as follows:
Following is a standard Samsung Odin mode screen; Odin is the Samsung proprietary equivalent to fastboot:

Once the bootloader is determined to be unlocked, an examiner will need a custom recovery image from which to boot. An excellent source of recovery images is either https://www.clockworkmod.com/rommanager or http://teamw.in/twrp_view_all_devices. Both sites offer coverage of a wide variety of devices, and will provide the same functionality for the purposes of this method.
Once a recovery image is selected and downloaded, the device needs to be placed into fastboot mode. This can be accomplished in one of two ways:
- ADB
- Physical device buttons
To enter fastboot device over ADB, the device must already have USB debugging enabled. The command to enter fastboot mode over ADB is:
adb reboot bootloader
If USB Debugging cannot be enabled or ADB cannot be used, there is also typically a combination of buttons to press while the device is booting, similar to entering Recovery Mode. The exact combination can be found online for each device specifically.
Once the device is in fastboot mode, running the following command will verify if the device is connected and ready to communicate:
fastboot devices
The following command will load the custom recovery image into RAM and boot the device into Recovery Mode:
fastboot boot 'path to image'

The device should now reboot and enter Recovery Mode. As shown in the Recovery Mode section, the /data partition may need to be mounted in order to access user data.
Entering the ADB shell will show that the examiner now has root access. The device will allow root access until it is rebooted.

If the fastboot boot command fails, it is a likely indicator that the device's bootloader is locked, as shown in the following screenshot:
