
Core Data Basics
In earlier chapters, we showed you various ways that Cocoa lets you display data in view objects, from manually getting and setting values based on the contents of model objects to having the data automatically synchronized between model and view objects using Cocoa Bindings, which eliminates the need for a lot of boring controller code. Now it’s time to learn about Core Data, a powerful framework that gives our model objects a complete set of built-in capabilities. We’ll start by talking about what Core Data is and how it fits in with the other parts of Cocoa. Then we’ll use Core Data to create a full-featured database application called MythBase, including a GUI that allows us to create, search, edit, and delete entries, all without writing a single line of code (see Figure 8-1 for a shot of MythBase in action). Then we’ll explore some of the code resources that are created for us automatically when we create a Core Data project, and finally we’ll demonstrate how to add functionality (“business logic”) to our model objects.
What We’ve Been Missing
All of our examples in previous chapters used instances of NSMutableDictionary in the place of real model objects. What do we mean by “real model objects?” Well, besides just being able to hold onto pieces of data, which are accessible using field names or keys (something that NSMutableDictionary does well enough), real model objects should include some of the following features:
- Archiving: Model objects should have access to a built-in mechanism for being saved to disk and later reloaded.
- Business Logic: There should be a way to give a model object custom behavior that operates in response to input values.
- Validation: Each model object should be able to automatically validate input values.

Figure 8-1. The MythBase application, in all its glory
In the past, Mac application developers following MVC principles would typically have to roll their own solutions for these common needs, but Core Data provides all of this and more. Besides the features listed previously, Core Data also provides the following additional key features:
- Undo/Redo Support: Core Data’s mechanisms for handling values are tied into the standard undo facility in Mac OS X. Having this built in to our model classes saves us the additional effort of implementing this common functionality ourselves.
- Integration with Cocoa Bindings: Together with Cocoa bindings, Core Data provides us with a mechanism for connecting views to models using generic controller objects, thereby eliminating a lot of boring glue code.
- Persistence: Core Data offers a variety of ways to persist objects to disk, allowing us to save and load object state from one run to the next.
Taken together, all of these features provide the core of our application with some sturdy infrastructure. We can use Core Data to build GUI apps (with or without Cocoa bindings), command-line tools, games, or any other sort of software system that can be specified using traditional object modeling techniques. In other words, almost any application at all.
Creating MythBase
Now, let’s get started creating MythBase, a GUI application that lets us maintain a database of mythological figures. We’ll use Core Data for the model layer and Cocoa bindings to handle most of the controller functionality. There will be some new concepts and terminology to tackle, and we’ll cover each piece as we get to it.
In the first iteration, we’ll define a model for our application using a special tool inside Xcode, and create a simple GUI using an assistant in Xcode. In the second iteration, we’ll refine the GUI to improve the user experience a bit. Then, after explaining some other aspects of the application, we’ll take a third pass at the functionality, adding some business logic to the application’s model layer.
Start by creating a new application project. In Xcode, choose File ![]() New Project, select OS X/Application on the left side of the window, pick Cocoa Application from the list of project templates, and then click Next. Enter MythBase as the Product Name, MB for the Class Prefix, click to turn on the Use Core Data and Use Automatic Reference Countin
g checkboxes (see Figure 8-2), and then click Next. To save our project, navigate to an appropriate directory and click Create.
New Project, select OS X/Application on the left side of the window, pick Cocoa Application from the list of project templates, and then click Next. Enter MythBase as the Product Name, MB for the Class Prefix, click to turn on the Use Core Data and Use Automatic Reference Countin
g checkboxes (see Figure 8-2), and then click Next. To save our project, navigate to an appropriate directory and click Create.

Figure 8-2. Creating a new application project, and turning on the Core Data option
Defining the Model
At this point, we’ll have a brand-new project, similar to the ones we’ve created before. Choosing to use Core Data causes Xcode to use a slightly different project template, so this project will have a thing or two you haven’t seen in the old projects. Xcode’s navigator pane contains a new file named MythBase.xcdatamodeld, which is the empty Core Data model file. A model file contains metadata about our application’s model layer. We create the model file using a graphical tool built into Xcode, and our application reads the model file at runtime. We’ll also find, if we go digging for it in the project navigator area, that CoreData.framework was added under Frameworks/Other Frameworks.
MODELING: WHAT?
From this point, we’re going to assume that you have some understanding of object modeling or database modeling. But on the off chance that you’re totally perplexed by this, here’s a very brief summary. The idea is that the things your application is dealing with, the content that your application is “about,” can be split into independent chunks and organized into a reasonable structure through modeling techniques. Using Core Data, you’ll want to figure out how to organize your data along the following lines:
- Entities : An entity is used to describe a uniquely identifiable “thing” in your application, something that can exist and be described and identified on its own terms. Entities are usually the big “nouns” of your system. People, companies, and monetary transactions are all entities. Eye color, market capitalization, and transaction amounts are not.
- Attributes : Anything that seems like a descriptive feature of an entity, without referring to anything else, is probably an attribute of that entity. Eye color, market capitalization, and transaction amounts are all likely to be attributes of the aforementioned people, companies, and monetary transactions. A person’s current account balance, the phone number of a company’s CEO, and a transaction recipient’s email address are not attributes of the entities we mentioned. Each of these is better modeled by traversing a relationship to another entity and accessing an attribute found there.
- Relationships : Use relationships to establish linkages between entities. Relationships can be one-to-many (one person may be the recipient of many transactions), many-to-one (many people can be employed by the same company), one-to-one (each person can have exactly one spouse), or many-to-many (a company can have many people as customers, and at the same time a person can be a customer of many companies).
The model file contains information that should be familiar to anyone who’s ever done any sort of object modeling, database modeling, or really any sort of entity-relationship modeling at all. First, there’s the concept of an entity, which corresponds roughly to a class in object modeling or a table in database modeling. Each entity consists of several attributes, and entities can be joined together with relationships. Within Xcode and the documentation, attributes and relationships are referred to collectively as properties, and this reuse of the same term in Objective-C 2.0 is no coincidence. Within a model object, each attribute and each relationship can be accessed through an Objective-C property, named the same as the property defined in the model file. In the model we’re going to build for MythBase, we’ll create a single entity with several attributes. We’ll cover relationships in Chapter 9.
Start by single-clicking the MythBase.xcdatamodeld file in Xcode’s navigation pane. This opens up the model file in Xcode’s built-in model editor, which lists three table views: Attributes, Relationships, and Fetched Properties, along with an outline view of Entities, Fetch Requests, and Configurations along the left. Press ![]() 3 to open the Data Model Inspector as well; since we haven’t yet defined any structure for our entity, it will initially show “No Selection,” as shown in Figure 8-3. The model editor has two different view styles: the initial view with three table views, and one that resembles a blank sheet of graph paper. We’ll be working with the default table-view style as seen in Figure 8-3 since we’ll only have one model class. When working with a complex model, the graph-paper view can be very useful for giving an overview of all the different entities and their interrelationships.
3 to open the Data Model Inspector as well; since we haven’t yet defined any structure for our entity, it will initially show “No Selection,” as shown in Figure 8-3. The model editor has two different view styles: the initial view with three table views, and one that resembles a blank sheet of graph paper. We’ll be working with the default table-view style as seen in Figure 8-3 since we’ll only have one model class. When working with a complex model, the graph-paper view can be very useful for giving an overview of all the different entities and their interrelationships.
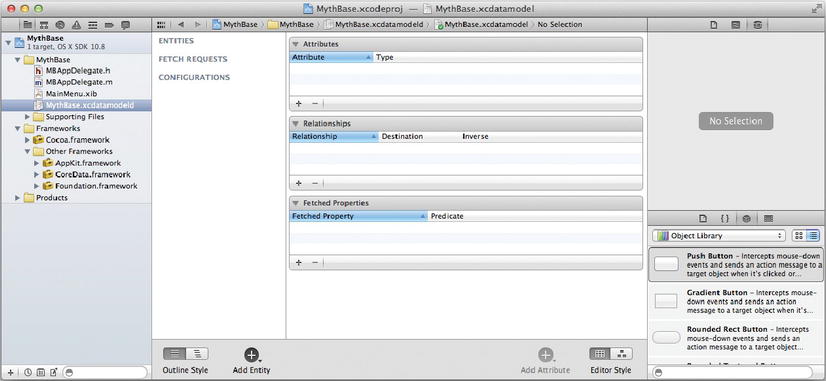
Figure 8-3. A new model file, before creating any entities
For MythBase, we’re going to create a single entity called MythicalPerson with a handful of attributes. To start, create a new entity by clicking the Add Entity button that appears near the bottom of the window. As you would expect, this creates a new entity, called simply Entity, in the Entities list on the left. With the new entity selected, its details are visible in the table views to the right. Go change the new entity’s name to “MythicalPerson,” and leave the rest of the controls in their default states. Our entity is an instance of a class named NSManagedObject, a generic class included in Core Data that provides all the basic functionality for Core Data’s model objects. Later we’ll need to write some code for this entity, at which point we’ll create a custom subclass of NSManagedObject, but for now the generic class will do just fine.
Now let’s create our entity. We’ve done some object modeling and have come up with a few characteristics that a mythical person may have.
The MythicalPerson entity will have six attributes. These are shown in Table 8-1, which includes a general description of the type of each attribute and the corresponding Core Data storage type.
Table 8-1. MythicalPerson Attributes
| Attribute Name | General Type | Core Data Type |
|---|---|---|
| Name | String | String |
| Details | String | String |
| Divinity | Integer (0-100) | Integer 16 |
| Goodness | Integer (0-100) | Integer 16 |
| Power | Integer (0-100) | Integer 16 |
| Depiction | Image | Transformable |
Core Data includes String and Date types, as well as a selection of numeric types: Integer 16, Integer 32, Integer 64, Float, Double, Decimal, and Bool. In addition, it includes a Binary type that allows generic storage of any sort of data we may want to attach to an entity (which we pack into a binary chunk on our own), and a special Transformable type that allows many otherwise unsupported Cocoa classes, such as NSImage, to be stored with Core Data (more on that later). Note that the Core Data storage types have different names from the value classes in Cocoa (NSString, NSNumber, and the like). When Core Data attributes are read into a running application, they are converted into the nearest Cocoa equivalent, which means, for example, that all the numeric types end up as NSNumber in an application and are converted back into the underlying storage format for saving.
Creating Attributes
Let’s start creating MythicalPerson’s attributes. With the MythBase.xcdatamodeld file open in Xcode, click to select the MythicalPerson entity, then click the small + sign in the lower-left-hand-corner of the Attributes table view at the top of the window. A new attribute will appear in the table view. Set its name to “name” and its type to String, then press Enter.
Now look at the checkboxes in the inspector on the right, labeled Optional, Transient, and Indexed. By default, Optional is checked and the others are not. The meaning of Optional is clear enough. Having it checked means that users can choose to not enter a value for that attribute when creating or editing an object. As for the others, checking Transient configures things so that this attribute isn’t saved along with the other data (although Core Data will still track changes to the attribute to provide undo/redo support), while checking Indexed turns on indexing for the attribute, enabling speedy search of a Core Data storage back-end based on this attribute. For the name attribute, make sure that Indexed is checked and that the others are not.
Below the checkboxes, you can specify the attribute’s type using a pop-up list (this is the same setting as the pop-up in the table view). If we specify “name” as a String in the main table view, then we’ll see some additional options appear in the space just below it. Here we can specify simple validation rules such as the string’s length. We can also specify the default value, which will appear whenever a new MythicalPerson instance is created. Enter “Name” for the default value, leaving the other fields blank.
Now let’s move on to the details attribute, which is meant to hold a textual description of the MythicalPerson in question. Click the + button below the Attributes table view to add a new attribute and change the new attribute’s name to “details.” We’re going to configure this one a little differently than the name attribute. It should be a String (chosen from the pop-up list), and the Indexed checkbox should be checked, but in this case the Optional checkbox should also be checked so that users can choose to leave this field empty if they want. Also, we’ll leave the default value blank.
Now we’ll tackle MythicalPerson’s numeric attributes: divinity, goodness, and power. Make a new attribute and name it “divinity,” and set its type to Integer 16, the smallest integer type supported by Core Data. This time configure the checkboxes so that it’s optional, but neither transient nor indexed (because we don’t anticipate any real need to search for MythicalPersons using the divinity value as a search parameter). The display will change to show some additional configuration that applies to the chosen type. Here we can set up some automatic validation rules by specifying min and max values, and also specifying the default value for this attribute.
In Table 8-1, we defined divinity as an integer value from 0 to 100, the idea being to place the character somewhere on a scale between human and godlike. For example, the Greek god Zeus would have a divinity value of 100, his son Heracles (whose mother Alcmene was a normal human) would have 50, and a normal human (like, again, Heracles’ mother) would have 0 divinity. By specifying min and max values for the attribute, we let Core Data help us out, ensuring that no invalid values for these attributes can be saved. Enter 0 for the min value, 100 for the max value, and 50 for the default value. See Figure 8-4 to see some entity/attribute editing in progress.

Figure 8-4. This is what editing an entity in a Core Data model file looks like
Now we’re going to create the other two numeric values, goodness and power. These also express characteristics of each MythicalPerson on a scale from 0 to 100 and will have the exact same configuration as divinity (except, of course, for the name of the attribute itself). The easiest way to make these, giving them the exact same options, is to select the divinity attribute by clicking on it in the table view, then copy it (![]() C), then paste it (
C), then paste it (![]() V) twice, resulting in two new attributes named “divinity1” and “divinity2.” Rename those “goodness” and “power,” and that’s it; those two new attributes will have the same min and max values as the original.
V) twice, resulting in two new attributes named “divinity1” and “divinity2.” Rename those “goodness” and “power,” and that’s it; those two new attributes will have the same min and max values as the original.
Attributes for Unsupported Types
The last attribute left to configure is the depiction attribute. As mentioned earlier, the depiction attribute is meant to store an image, and Core Data doesn’t know anything about the NSImage class normally used in Cocoa. Fortunately, Core Data’s Transformable type provides a simple way to store an image anyway. Create a new attribute, naming it “depiction,” and then select Transformable as the type. Note that the Inspector changes to show the configuration options for Transformable. In the Inspector, turn the Optional checkbox on (and the others off). The configuration options for Transformable are pretty simple: a single text field labeled Value Transformer Name. However, there’s more here than meets the eye. The idea is that a Transformable attribute holds a chunk of data that Core Data doesn’t really understand; when Core Data reads this chunk of data from storage, it puts it into an NSData object (an object that can hang onto any old chunk of data, acting as an Objective-C “wrapper” for it), which it then passes through a transformer, a special class that knows how to take an object of one kind and transform it into something else. In the other direction, when an object is going to be saved to storage, Core Data takes the new value and passes it through the same transformer, however this time doing the transformation in the reverse direction.
In this case, we’re going to use a transformer called NSKeyedUnarchiveFromData, which knows how to produce an object of any kind, given an NSData object containing a key-archived version of the object. What is keyed archiving? We won’t go into it in detail here, but basically keyed archiving is a way of archiving or serializing all of an object’s instance variables in a dictionary-like format, making it possible to reconstruct the object later. This technology is used in a variety of ways in Cocoa, and all of Cocoa’s classes have this functionality built in. This means that we can take an NSImage, or an instance of any other Cocoa class, and stuff it into an NSData object using NSKeyedUnarchiveFromData’s reverse transformation. And if we implement the NSCoding protocol in our own classes, saving and loading their instance variables in a keyed fashion, we can archive our own objects in the same way.
Getting back to the depiction field, the idea is to write the name of the transformer class into the Value Transformer Name text field. As it turns out, keyed archiving is so widespread that in this situation, specifying a transformer for an attribute in Xcode’s modeling tool, it’s used as a default. If we just leave the field blank, the entity will be configured to use NSKeyedUnarchiveFromData to transform model attribute values to and from NSData for storage.
We’ve now defined the entire model for this chapter’s MythBase application, so let’s move on to creating the GUI.
Designing the GUI
Since we’ve laid out several user interfaces using Interface Builder already, we’re going to go through the basics pretty quickly, and we won’t give the keyboard shortcuts for each inspector. This app will be similar to the VillainTracker app from Chapter 6. Our user interface will allow a user to search the database of mythical people, add and delete them, and change their characteristics. What’s more, we’ll be using Cocoa bindings to make the connections.
AUTOMATIC GUI
Xcode 3 included a feature called the Core Data Entity Interface Assistant for automatically laying out a GUI with basic CRUD features based on a Core Data model. This feature was removed in Xcode 4, so we have to do it by hand. As it turns out, this is really easy, and the process should feel familiar having worked through the previous chapters. Not only that, the UI generated by Xcode usually needed a bunch of cleanup anyway.
Creating the MythBase display
To start, in Xcode, single-click on the MainMenu.xib file. In the Object Dock on the left, open up the main window called “Window - MythBase.” We’re going to drag out a table view and a bunch of fields to allow us to create and edit the attributes of the mythical people managed by our database, so we’ll start by making the window taller. Drag it out to be 500 pixels high. Next, in the Object Library, type “search” in the search field in the bottom of the Inspector. The Object Library should show a single object, a Search Field. Drag the Search Field out of the Object Library and onto the main MythBase window, positioning it in the upper right-hand corner of the window, letting the blue guidelines indicate where to position it. Next, type “table” in the Object Library search field. Drag a Table View out to MythBase window, positioning it to the left edge of the window. Stretch it out to fill the width of the window, until it connects with the vertical blue guideline in the right. Position the table view below the search field; it will snap into place a few pixels below the search field.
Open the Attributes Inspector, and set the table view’s Content Mode to be view-based. Set the Column Sizing to be “First Column Only.” Below the Content Mode, set the table view to have five columns. While setting the table view to five columns, you may note a horizontal scroll bar flashing underneath the table view. The added columns will be off the right side of the table view, so click on the second column and resize it to be narrower until all five columns are visible, as shown on Figure 8-5.

Figure 8-5. Laying out the table view for MythBase
The table view will show all of the attributes we’ve defined for the MythicalPerson entity except for details, so we’ll want to set labels in the column header. In the table view, click on the header of the first column until it turns into an editable text field. Type “Name” in the textfield to set the column title. Click in the next column, and set its name to “Divinity.” Set the titles of the next three columns to “Power,” “Goodness,” and “Depiction.”
Next, we’ll set up an indicator to show how many results are found when doing a search. In the Object Library search field, type “Label” and drag out a Label field to the left of the window, just below the table view. As always, the blue guidelines will indicate where to put it. Set the title of the label to “# out of #” and resize it so that all the text is visible.
Our next set of controls will be buttons to search, add, and delete records. In the Object Library search field, type “Button.” Cocoa has a variety of button styles, so we’ll get a healthy set of choices. For this app, let’s use Gradient buttons. Drag out one and position it underneath the table view, and parallel with the text field from the previous step. Title it “Fetch.” Drag out two more, positioning them to the right of the Fetch button. Title these new buttons “Delete” and “Add.” After titling them, position them underneath the table view and aligned with the right edge of the window. The layout should match that of Figure 8-6.

Figure 8-6. Adding a result counter and buttons
Displaying Details
We now need to lay out controls to display the details of a selected Mythical Person. Our Core Data entity’s attributes are name, divinity, power, goodness, depiction, and details, and that’s what our user interface will show. Start by finding and dragging out a Label below the buttons and near the centerline of the window. Double-click in it to set its title to “Name:.” In the Object Library, find and drag out a Text Field (enter “field” in the search field) next to the Name: label. Stretch it out until it’s about a third of the width of the window, 200 pixels or so. Drag it to be below the buttons and aligned with the right edge of the screen. The blue guidelines show to snap it into place. Drag the Name: label to have it snap into place to the left of the text field.
Click the Label once to select it, hit ![]() C to copy it, and then
C to copy it, and then ![]() V to paste a new one below it. The pasted label will appear below and to the right of the first one. Drag it into position directly below the first label; it will snap into place at the right distance below the first label. Do this two more times so that there are three labels lined up below the first one. Select all four of them and select Editor
V to paste a new one below it. The pasted label will appear below and to the right of the first one. Drag it into position directly below the first label; it will snap into place at the right distance below the first label. Do this two more times so that there are three labels lined up below the first one. Select all four of them and select Editor ![]() Align
Align ![]() Right Edges (
Right Edges (![]() ]). Lastly, set the titles of these labels to be “Divinity:,” “Power:,” and “Goodness:.” The labels should automatically resize to show the whole title, but keeping the right edges aligned.
]). Lastly, set the titles of these labels to be “Divinity:,” “Power:,” and “Goodness:.” The labels should automatically resize to show the whole title, but keeping the right edges aligned.
The divinity, power, and goodness attributes are all numeric, so we’ll use a slider to set them. In the Object Library, search for slider, and then drag out a Horizontal Slider next to the Divinity: label and below the text field for Name. Stretch it out to be the same width as the text field. As always, the blue guidelines will show the way. In the Attributes Inspector, make sure that the slider has a min value of 0, a max value of 100, and a default value of 50, just like the divinity attribute that we created on the Mythical Person Core Data entity. Check the Continuous checkbox in the Attributes Inspector as well. As we did with the labels, select this slider and hit ![]() C to copy it, and then
C to copy it, and then ![]() V to paste a new one below it. Reposition the new slider to line up with the Divinity slider and be aligned with the Power: label. Press
V to paste a new one below it. Reposition the new slider to line up with the Divinity slider and be aligned with the Power: label. Press ![]() V again to paste another slider, and position that one below the first two and aligned with the Goodness: label. The window should look like Figure 8-7.
V again to paste another slider, and position that one below the first two and aligned with the Goodness: label. The window should look like Figure 8-7.
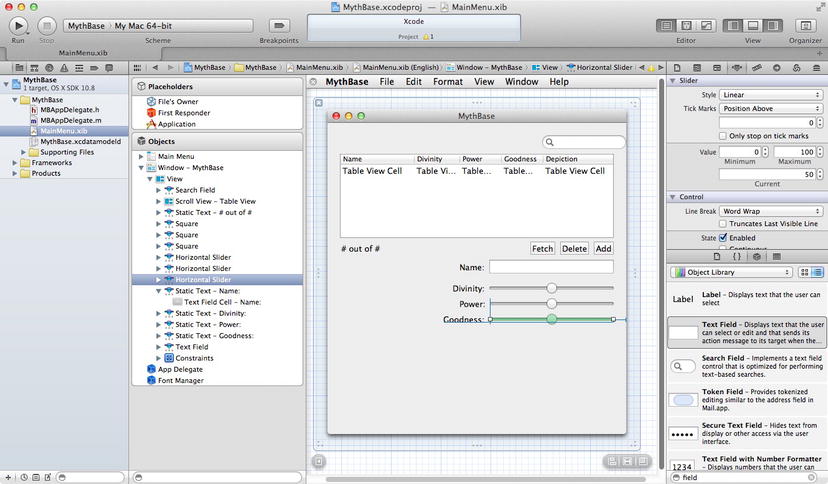
Figure 8-7. Adding controls to manage Mythical Details
The two attributes that don’t yet have a display control are depiction and details. We’ll use an image well and a text box for these. In the search field in the Object Library, type in “image,” and then drag an Image Well out to the lower left corner of the screen and let it snap to the blue guidelines in the corner. Resize it to be 150 pixels high and 200 pixels wide. In the Attributes Inspector, set the image well to be editable. This will allow a user to drag an image into the image well.
Next, type “text” in the search field in the Object Library, and drag a Text View out to the lower right corner. Resize it to be 150 pixels high and 250 pixels wide, which should be wide enough to fill in the space between the edge of the window and the image well, with a visually pleasing gap. You should see blue guidelines when you’re close to the right position, and the text view should snap into place. We have one important change to make to its attributes. NSTextView is able, by default, to display rich text, which is a great feature but it comes at a price: In Cocoa, rich text is represented by instances of NSAttributedString, a class that’s a lot more complicated than NSString, and not something we want to get into here and now. In order for the text view to be able to bind its display value to a plain old string, we have to turn off rich text handling. So, in the Attributes Inspector, click to turn off the Rich Text checkbox (if you don’t see it, you’ve probably selected the text view’s superview, an NSScrollView. Click the text view once more to select the NSTextView inside). You can also change the Find settings to Uses Bar and check Incremental Search to have text searching utilize the Find Bar feature introduced in OS × 10.7.
These controls will need labels, so enter “label” in the Object Library search field, and drag a Label out above the image well, in line with the image well’s left edge. Change its text to “Depiction”. Drag out another label above the text view, and title it “Details.” Line the Details label up so that the right edge is aligned with the labels for the sliders.
The last thing to do is to configure the table view’s columns. Four of the five columns will display text or numbers, so the default configuration is fine. For the Depiction column, however, we want to display an image, so the NSTextField currently in that column needs to be replaced with an image well. Select the “Static Text” object contained within the table view cell for the Depiction column by using the object dock on the left, as shown in Figure 8-8. Once you’ve got it, press the Delete key to remove it. Enter “image” into the search field in the Object Library, and drag an Image Well into the empty table cell view in the Depiction column of the table view. The image well will get clipped to the height of the table cell view, so expand the height of the table view cell to be 48 pixels high, tall enough to show the whole image.
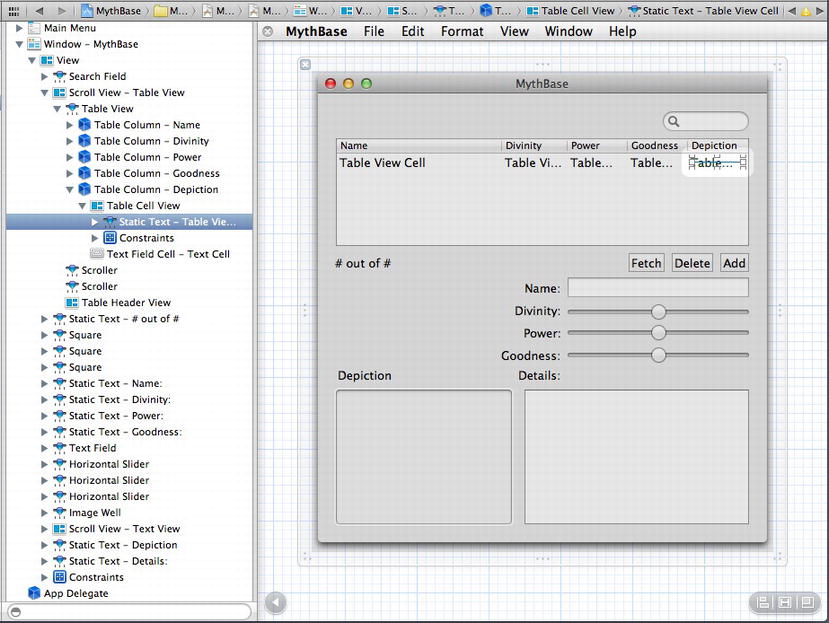
Figure 8-8. Selecting the Depiction textfield in the Object Dock
That completes the GUI layout. It’s a thing of beauty, isn’t it? Now we need to connect it to a data source to populate it. We’ll do that using Cocoa bindings, discussed in the previous chapter.
Setting up Cocoa Bindings
When we told Xcode that we wanted to make a Core Data application, it generated an application delegate class (called MBAppDelegate) that includes special support for working with Core Data. Part of this support is that the generated MBAppDelegate class now has a managedObjectContext property. The Managed Object Context is an object that lets an array controller (or, for that matter, your own code) tap into a source of model objects (instances of NSManagedObject or a subclass) through Core Data. We’ll see how the app controller provides this a little later when we examine the controller code that was put in place automatically when we created this project. Just like in the previous chapter, we’ll use an NSArrayController to manage the data, but the NSArrayController created here will access its data through Core Data instead of through an NSMutableDictionary. And as we did in the last chapter, we’ll connect it to the user interface using Cocoa bindings.
Binding with an Array Controller
To get started, we need to get an Array Controller into the app. In the Object Library search field, search for “array.” The results should show an Array Controller. Drag one of those out onto the Interface Builder canvas; it can get dropped anywhere in the editor pane. No matter where we drop it, it will show up in the Object Dock to the left side of the Interface Builder canvas. Select it in the Object Dock and rename it to be Mythical Person Array Controller. Open up the Attributes Inspector, and change its mode from Class to Entity Name. Enter an Entity Name of “MythicalPerson”, which is the same name we used in the Model Editor. Lastly, check the Prepares Content checkbox. This will trigger the array controller to load data when the app is launched.
We’re going to link the array controller to the managedObjectContext now. With the array controller still selected in the Object Dock, select the Bindings Inspector. Expand the Parameters section, and select App Delegate from the pop-up list. After that, check the Bind to checkbox that’s just next to the pop-up list. Next, type “managedObjectContext” into the Model Key Path field. This connects the array controller to the Core Data plumbing present in the App Delegate.
Now that we’ve got the array controller connected, we need to start setting up bindings with the UI controls. We’ll start with the basic controls (the text fields and sliders), and then deal with the more complex controls (the depiction and the table view), and then finish up by wiring up the buttons.
The first binding will be for the Name textfield. Select the Name text box and then open the Bindings Inspector. Expand the Value section, check the Bind to checkbox, and then select Mythical Person Array Controller from the pulldown. Make sure that the Controller Key box shows “selection,” and enter “name” in the Model Key Path field, as shown in Figure 8-9. This connects the textfield to the name property of the array controller’s selected object.

Figure 8-9. The Bindings Inspector for connecting the Name textfield to the Mythical Person Array Controller
Setting up bindings for the sliders will be similar; we’ll establish a binding to the Mythical Person Array Controller’s selection, with a different Model Key Path depending on the appropriate property for the control. For each of the three sliders, this will be the divinity, power, and goodness attributes that we created in the model file. To make these bindings, select the Divinity slider and look at the Bindings Inspector. Expand the Value section, check the Bind to checkbox, and then select Mythical Person Array Controller from the pulldown. Make sure that the Controller Key box shows “selection,” and enter “divinity” in the Model Key Path field. Repeat this for the Power and Goodness sliders, changing the Model Key Path as appropriate.
Setting up bindings for the Depiction and Details areas will be just slightly more complex. We’ll do the Details first. Select the Text view (remember that the Text view is embedded in an NSScrollView; you’ll need to click through the scroll view to get to the Text view itself). In the Bindings Inspector, there are different choices than with the Name text field and the sliders. However, there’s still a Value section, which is what we’ll be using. Expand the Value section, check the Bind to checkbox, and use “details” as the Model Key Path.
For the Depiction, we need to get an NSImage for the image well to display. Core Data doesn’t know about NSImages, but this isn’t a problem. Remember the earlier discussion about transformers and the Transformable type used by Core Data? Because depiction is a transformable attribute, its value needs to be converted between what we see in the GUI (an NSImage) and something that Core Data is capable of storing (NSData). We’ll do this by adding NSKeyedUnarchiveFromData to the Cocoa bindings configuration for this control. Select the image well and bring up the Bindings Inspector. As with the other fields, open the Value section. Check the Bind to checkbox, ensure that the Controller Key shows “selection,” and set the Model Key Path to be “depiction”. To make the conversion from NSData to NSImage, click on the Value Transformer pop-up list, and choose NSKeyedUnarchiveFromData.
Configuring Bindings for the Table View
It’s time to do the bindings for the table view. Setting up Cocoa bindings for a view-based table view is a two-step process. First, we have to set up a binding for the table view itself. Next, we’ll set up bindings for each view in the row. The table view works some magic to expose a bindings source to its subviews, titled Table Cell View. Within that binding is a Model Key Path of “objectValue” that represents the object for that row.
To start, select the table view itself. This is most easily done from the Object Dock on the left. In the Bindings Inspector, expand the Content section, and check the Bind to checkbox, ensure that the pulldown menu shows Mythical Person Array Controller and Controller Key shows “arrangedObjects.” For the table view itself, we don’t have a Model Key Path setting. We also want to have the selected row in the table view get passed back to the array controller. To set this, expand the Selection Indices section of the Bindings Inspector. Check the Bind to checkbox here, set the pulldown menu to Mythical Person Array Controller, and set the Controller Key to “selectionIndexes.” Your binding should look like Figure 8-10.
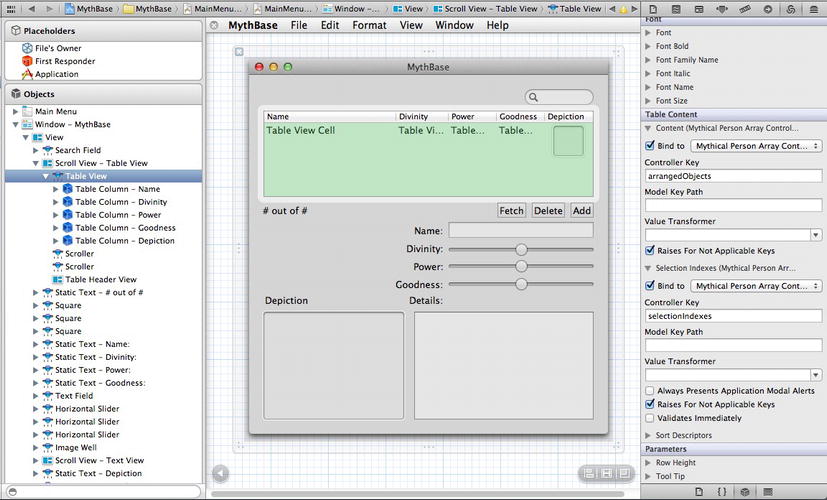
Figure 8-10. Setting bindings for the table view
We’ve got five columns in the table: Name, Divinity, Power, Goodness, and Depiction. We don’t set bindings on the columns directly; instead, we’ll set up bindings to the views contained within each column. For the first four columns, the view is an NSTextField contained within an NSTableCellView. For the Depiction column, the view is an NSImageWell contained within an NSTableCellView. Unfortunately, Xcode sets the default value of the text field contained within an NSTableCellView to be “Table View Cell,” which seems almost designed to create confusion. The views in the table view are instances of NSTableCellView, despite their default text. The text field and image well will be bound to the objectValue property of the Table Cell View.
We’ll start with the Name column. Select the Table View Cell in the Name column, which may take two clicks if you’re clicking in the UI itself, or by expanding the Table Column - Name entry in the Object Dock on the left and drilling down to the Static Text - Table View Cell entry within. In the Bindings Inspector, expand the Value section. Check the Bind to checkbox, ensure that the pulldown menu shows Table Cell View, and set the Model Key Path to be “objectValue.name.” The Controller Key should be blank.
The Divinity, Power, and Goodness bindings will all be similar. Select each column in turn and drill down to the Static Text field within. Set the Value binding as we did for the Name column: open the Value section, check the Bind to checkbox, ensure that the pulldown menu shows Table Cell View, and set the Model Key Path to be “objectValue.divinity,” “objectValue.power,” or “objectValue.goodness” as appropriate.
Now for the Depiction column. Select the image well inside the Table Cell View in the Depiction column. In the Bindings Inspector, open the Value section. As before, check the Bind to checkbox, ensure that the pulldown menu shows Table Cell View. Set the Model Key Path to “objectValue.depiction”. As we did with the Depiction view above, click on the Value Transformer pop-up list, and choose NSKeyedUnarchiveFromData, as shown in Figure 8-11. That wraps up the table view!

Figure 8-11. Setting up bindings for the Depiction column
For the text field below and to the left of the table view showing the number of matches, we’ll use a different binding method that will let us use a format string to build the contents of the text field. In this case, we’ll use Display Pattern Value1 rather than Value. Expand the Display Pattern Value1 section, and check the Bind to checkbox and set the pulldown menu to Mythical Person Array Controller as before. Enter “selection” as the Controller Key. This time, we’re going to use a different key path. Set the Model Key Path to “@count,” and the Display Pattern to “%{value1}@ out of %{value2}@.” There’s another binding available below Display Pattern Value1 now, titled Display Pattern Value2. Expand the Display Pattern Value2 section, and check the Bind to checkbox and set the pulldown menu to Mythical Person Array Controller as before. This time, enter “@count” as the Model Key Path, and enter “arrangedObjects” as the Controller Key instead of “selection.” The Display Pattern will auto-fill with the same value that we entered in the Display Pattern Value1 binding.
Now, we need to wire up the Fetch, Delete, and Add buttons. For this, we’ll use a combination of target-action connections for responding to clicks and Cocoa bindings to enable or disable the buttons as appropriate. Let’s start with the target-action connections. Select the Fetch button and control-drag a connection out to the Mythical Person Array Controller. The array controller will be at the bottom of the list of objects in the Object Dock; if you can’t see it, hover your mouse at the bottom of the Object Dock and it will scroll down to reveal the array controller. Select the fetch: action. Do the same thing with the Delete and Add buttons, selecting the remove: and add: actions respectively.
Next, we’ll establish bindings for the Enabled property of the Add and Remove buttons. Select the Add button and open the Bindings Inspector. Expand the Enabled section, shown under Availability. Can you guess the next step? That’s right; check the Bind to checkbox, ensure that the pulldown menu shows Mythical Person Array Controller. This time, however, change the Controller Key field to be “canAdd.” When you start typing in the Controller Key field, you’ll get a list of potential completions. Do the same thing for the Remove button, changing the Controller Key to “canRemove.”
We’ve now built enough of the UI that we should try it out before going any further. Let’s try it out. Save the nib file and click Run. You should be able to click the Add button and get blank rows in the table view. You should also be able to edit the name and move the sliders, and have the changes reflected in the selected row in the table view. If that’s not the case, then check the bindings and connections in the nib file and see whether they match the instructions.
Finishing the Bindings: Save and Search
Our application should be able to handle multiple records and allow creating and removing of mythical people. But we can’t save or search it, which makes it a pretty poor database. Let’s fix that now.
Saving is easy. The Application Delegate class generated by Xcode manages that for us; we just need to tell it when to do so. In the Main Menu, there’s a File menu with a Save menu item. The Save menu item comes pre-bound to the ![]() S key equivalent. We’ll use this for our app as well. In the Object Dock in Interface Builder, expand the Main Menu object, then expand the File menu and then the Menu Item – Save item. Note that we’re talking about objects in the Object Dock, not Xcode’s own menu! Control-drag a connection to the App Delegate in the Object Dock, and select the saveAction: action from the list. Done!
S key equivalent. We’ll use this for our app as well. In the Object Dock in Interface Builder, expand the Main Menu object, then expand the File menu and then the Menu Item – Save item. Note that we’re talking about objects in the Object Dock, not Xcode’s own menu! Control-drag a connection to the App Delegate in the Object Dock, and select the saveAction: action from the list. Done!
Search isn’t quite as straightforward, and there’s a bit of terminology to cover first. Core Data search support is based on predicates. A predicate is made up of an attribute name, an operator, and a search value; and a search field can support many predicates. Two examples of predicates are name contains Heracles or goodness greater than 75. If you’re familiar with SQL, the WHERE clause of a SQL command is built up of predicates. For MythBase, all of the attributes of the MythicalPerson entity should be searchable with the exception of depiction, so we’ll need to define several predicates. We can’t search depiction, as binary and transformable attribute are inherently not searchable. The predicates can be defined in the Bindings Inspector, and that’s where we’re heading to next.
We’ll start by defining a predicate to search on the name attribute. Select the Search field at the upper right corner of the screen, and open the Bindings Inspector. Near the bottom of the Bindings Inspector is a section titled Predicate. Open it up and check the Bind to checkbox, binding it to Mythical Person Array Controller. The Controller Key should say “filterPredicate”. Set the Display Name to “Name,” and the predicate format to “name contains[c] $value” where $value indicates the contents of the search box, and name indicates the MythicalPerson entity attribute that should be searched. The operator, contains[c], indicates that we want to return any records where the name attribute contains the value represented in $value, using a case insensitive search—that’s what the [c] at the end means. Without the [c], the search is case-sensitive.
Note that a new binding has been created titled Predicate2. We’ll use that one to define a predicate to search on all the searchable fields in the entity. Open up Predicate2 and, just like the first one, check the Bind to checkbox, binding it to Mythical Person Array Controller. The Controller Key should say “filterPredicate.” For Predicate2, set the Display Name to “All,” and the predicate format to the following mouthful: “(name contains $value) or (divinity.description contains $value) or (power.description contains $value) or (goodness.description contains $value) or (details contains[c] $value).” Note that there’s now a new binding available called Predicate3.
We’ve shown how to search on one attribute or many. If you’d like to be able to search on other specific fields, such as name or details, feel free to add more predicates by following the same pattern as described above, changing the field name in the predicate format value as appropriate. There are many more possibilities for constructing search predicates than we’ve discussed here, and Apple offers a Predicate Programming Guide section in the Xcode documentation that covers it in detail.
Well, with all that behind us, it’s time to run the app. Press the Run button in the upper-left-hand corner of the Xcode window, and you should be able to create some Mythical Person records, drag an image into the large image well to show a picture, use the File ![]() Save menu item to save the records, and search the database. The question mark icon on the left edge of the search field should let you select which search predicate is operative. When you quit and rerun the app, the records should be preserved and reloaded on launch.
Save menu item to save the records, and search the database. The question mark icon on the left edge of the search field should let you select which search predicate is operative. When you quit and rerun the app, the records should be preserved and reloaded on launch.
We’ve now made a pretty cool-looking app entirely by defining a model and building a GUI. Notably, we haven’t written any code! This is a great example of the kind of visual programming model that Cocoa has always enabled, and with the addition of Cocoa bindings and Core Data in the past few years it’s become even more complete. Of course, underlying all this stuff are frameworks and APIs that enable all this “magic” to happen in Xcode, and there are times when you will want or need to access Core Data functionality from code. The rest of this chapter will introduce some aspects of programming (in the traditional, code-based sense) with Core Data, starting with a tour of the generated code in the Application Delegate class.
When we created the MythBase project, an application delegate class called MBAppDelegate was created for us. This class contains code to load the model information from the Core Data model files contained within our application. It also opens up the on-disk storage where Core Data reads and writes its model objects, or creates this storage if it doesn’t already exist. And finally, it provides access to the data storage via an NSManagedObjectContext, which other objects can in turn bind to (such as the array controller in our nib file) in order to read from and write to storage.
All the code shown here has been reformatted to better fit the format of this book, so your version may look slightly different, but it should be syntactically identical.
Let’s jump right in and take a look at the header file, MBAppDelegate.h, shown in the following listing. This is the autogenerated code created by Xcode 4.5 for Mountain Lion. The version created by different versions of Xcode may be slightly different, and if you like you can change it to match the version shown here:
#import <Cocoa/Cocoa.h>

@interface MBAppDelegate : NSObject <NSApplicationDelegate>

@property (assign) IBOutlet NSWindow *window;

@property (readonly, strong, nonatomic) NSPersistentStoreCoordinator *persistentStoreCoordinator;
@property (readonly, strong, nonatomic) NSManagedObjectModel *managedObjectModel;
@property (readonly, strong, nonatomic) NSManagedObjectContext *managedObjectContext;

- (IBAction)saveAction:(id)sender;

@end
This code declares a simple class with four properties and one method. The window variable also features IBOutlet in its property declaration, which makes it into an outlet available for connecting to a window in Interface Builder. The other three properties are instances of some important Core Data classes:
- NSPersistentStoreCoordinator manages the back-storage, giving access to one or more instances of NSPersistentStore, each of which represents a storage location (in a file or in memory). The purpose of the coordinator is to let the application access several persistent stores as if they were one. Some applications may want to use this to partition application data across multiple stores. For example, you may want to distinguish between normal entities, whose objects that are saved to disk, and transient entities, whose objects that are only held in memory and will disappear when the user quits the app. Even though they’re not saved to disk, the transient objects will still benefit from the other features of Core Data (simple Undo support, integration with Cocoa bindings, and the like).
- NSManagedObjectModel loads information about entities and their properties from one or more model files (normally contained inside your application bundle), and acts as a sort of metadata repository containing the structure of the application’s managed objects. Many applications will never need to interact with this directly.
- NSManagedObjectContext is responsible for dealing with the lifecycle of all managed objects (the model objects that we’re storing via Core Data). It accesses the objects themselves through an NSPersistentStoreCoordinator and provides high-level functionality for creating, reading, updating, and deleting objects. Most applications will use an NSManagedObjectContext at some time or another for creating objects, saving changes, and so on.
We’ll see how each of those objects is used when we look at the implementation file. The final declaration in the header file is for the saveAction: method, which is called when the user selects File ![]() Save from the MythBase menu. We’ll see how that works in the next section.
Save from the MythBase menu. We’ll see how that works in the next section.
The App Delegate Implementation
Now let’s switch over to MythBase_AppDelegate.m, and see what it does. Besides implementing the saveAction: method declared in the interface, it also needs to make sure that the appropriate accessors for its declared properties are all implemented. That includes both a getter and a setter for window, and just a getter for the others (which were declared read-only). As with the header file, this code was auto-generated using Xcode 4.5 running on Mountain Lion. If you’re using something else, you might see slightly different code.
The applicationSupportDirectory Method
The file starts out like this:
#import "MBAppDelegate.h"

@implementation MBAppDelegate

@synthesize persistentStoreCoordinator = _persistentStoreCoordinator;
@synthesize managedObjectModel = _managedObjectModel;
@synthesize managedObjectContext = _managedObjectContext;

- (void)applicationDidFinishLaunching:(NSNotification *)aNotification
{
    // Insert code here to initialize your application
}

// Returns the directory the application uses to store the Core Data store file. This code uses a directory named "com.learncocoa.MythBase" in the user's Application Support directory.
- (NSURL *)applicationFilesDirectory
{
    NSFileManager *fileManager = [NSFileManager defaultManager];
    NSURL *appSupportURL = [[fileManager URLsForDirectory:NSApplicationSupportDirectory inDomains:NSUserDomainMask] lastObject];
    return [appSupportURL URLByAppendingPathComponent:@"com.learncocoa.MythBase"];
}
The first things shown in the class’s implementation are some @synthesize directives, which take care of the getters and setters for the properties declared in the header file. Next is the stub for the applicationDidFinishLaunching: method, which we’ve seen before and is standard for any application delegate class. After that comes the implementation of a method called applicationFilesDirectory, which returns an NSURL containing the name of a directory where the application can save its data (in our case, the location where Core Data should save its persistent store). Normally this method returns the full path of a subdirectory of the Application Support directory, which is located inside the Library directory in the user’s home directory (/Users/somebody/Library/Application Support/MythBase).
The applicationFilesDirectory: method is a “helper” method, called elsewhere in the class’s implementation. Note that this method is neither declared in the header file nor in a private category or anything of the sort. In an Objective-C implementation block, code can call any methods that appear earlier in the same implementation block, even if they’re not declared anywhere. This is sometimes a handy shortcut when you want to refactor your code a bit, extracting some functionality into a method of its own, but don’t need to make it accessible anywhere outside the current class implementation.
The managedObjectModel Accessor Method
Next is the managedObjectModel method. This method serves as the getter for the managedObjectModel property.
// Creates if necessary and returns the managed object model for the application.
- (NSManagedObjectModel *)managedObjectModel
{
    if (_managedObjectModel) {
        return _managedObjectModel;
    }

    NSURL *modelURL = [[NSBundle mainBundle] URLForResource:@"MythBase" withExtension:@"momd"];
    _managedObjectModel = [[NSManagedObjectModel alloc] initWithContentsOfURL:modelURL];
    return _managedObjectModel;
}
The method simply checks to see if the managedObjectModel has already been created. If so, it returns it, and if not, it creates it by reading the MythBase.momd resource file contained within the application bundle. This file is created by Xcode from the model file we created at the beginning of the chapter. The managedObjectModel: method may be called by any piece of code that needs access to metadata about the model. In particular, it’s called when we create the NSPersistentStoreCoordinator, which will need to either read from, or create storage for our model, so it needs the gritty details.
ERROR HANDLING WITH NSERROR
Some of the code shown here makes use of NSError objects to handle errors that may occur. We haven’t yet covered NSError, so we’ll offer a brief explanation here.
The basic idea behind NSError is that some methods need to be able to inform the caller about potential errors that may occur, without using the return value for this purpose. To make this work, you pass in a pointer to a pointer (sometimes called a “handle” in C parlance) to an NSError, so that the method may create an NSError object and point a pointer at it, something like this:
NSError *error = nil;
[someObject doSomething:&error];
if (error) {
// handle the error somehow!
}
For more details about NSError, see Chapter 14.
The persistentStoreCoordinator Accessor Method
Next up is the considerably longer persistentStoreCoordinator method:
// Returns the persistent store coordinator for the application. This implementation creates and returns a coordinator, having added the store for the application to it. (The directory for the store is created, if necessary.)

- (NSPersistentStoreCoordinator *)persistentStoreCoordinator
{
    if (_persistentStoreCoordinator) {
        return _persistentStoreCoordinator;
    }

    NSManagedObjectModel *mom = [self managedObjectModel];
    if (!mom) {
        NSLog(@"%@:%@ No model to generate a store from", [self class], NSStringFromSelector(_cmd));
        return nil;
    }

    NSFileManager *fileManager = [NSFileManager defaultManager];
    NSURL *applicationFilesDirectory = [self applicationFilesDirectory];
    NSError *error = nil;

    NSDictionary *properties = [applicationFilesDirectory resourceValuesForKeys:@[NSURLIsDirectoryKey] error:&error];

    if (!properties) {
        BOOL ok = NO;
        if ([error code] == NSFileReadNoSuchFileError) {
            ok = [fileManager createDirectoryAtPath:[applicationFilesDirectory path] withIntermediateDirectories:YES attributes:nil error:&error];
        }
        if (!ok) {
            [[NSApplication sharedApplication] presentError:error];
            return nil;
        }
    } else {
        if (![properties[NSURLIsDirectoryKey] boolValue]) {
            // Customize and localize this error.
            NSString *failureDescription = [NSString stringWithFormat:@"Expected a folder to store application data, found a file (%@).", [applicationFilesDirectory path]];

            NSMutableDictionary *dict = [NSMutableDictionary dictionary];
            [dict setValue:failureDescription forKey:NSLocalizedDescriptionKey];
            error = [NSError errorWithDomain:@"YOUR_ERROR_DOMAIN" code:101 userInfo:dict];

            [[NSApplication sharedApplication] presentError:error];
            return nil;
        }
    }

    NSURL *url = [applicationFilesDirectory URLByAppendingPathComponent:@"MythBase.storedata"];
    NSPersistentStoreCoordinator *coordinator = [[NSPersistentStoreCoordinator alloc] initWithManagedObjectModel:mom];
    if (![coordinator addPersistentStoreWithType:NSXMLStoreType configuration:nil URL:url options:nil error:&error]) {
        [[NSApplication sharedApplication] presentError:error];
        return nil;
    }
    _persistentStoreCoordinator = coordinator;

    return _persistentStoreCoordinator;
}
This method looks a little intimidating, but we’ll go through it piece by piece. It starts by looking for an existing object in the persistentStoreCoordinator instance variable, returning it if there is one. Otherwise, it needs to initialize the coordinator itself, so it goes on to look for a managedObjectModel by calling the method of the same name. If it doesn’t exist, then the application contains no model, and this method logs an error, effectively giving up, and returns nil.
Otherwise, it goes on to check for the existence of a directory (specified by the value returned by the applicationFilesDirectory method) where the app’s Core Data storage should be loaded. It does this by calling resourceValuesForKeys:error: on the NSURL returned by applicationFilesDirectory, which returns a NSDictionary containing information about the properties requested. In this case, we’re requesting the resource value for the NSURLIsDirectoryKey key, which asks the URL if it represents a directory (as opposed to a file).
The resourceValuesForKeys:error: method might return nil if the directory isn’t there at all—such as the first time the application is run. If this is the case, the code checks the contents of the NSError to see if the path isn’t there. If it’s not there, it tries to create the directory and then checks to see whether the directory creation succeeded. If not, it reports the error and returns nil. On the other hand, if resourceValuesForKeys:error: did return a properties object, then it checks the contents of the properties object to see if the path exists but doesn’t represent a directory. This might be the case if there’s a file with the same name already present. If this is the case, the method reports the error (after looking up a localized error message) and returns nil.
If we get past all those edge cases (and we usually will), then the method builds a URL pointing at where the storage file should be located, creates an NSPersistentStoreCoordinator, and tells the coordinator to add a new store, given the URL. The coordinator is smart enough to look at the URL, figure out if there’s already a persistent store there, and if not, create one for us. If it encounters any error along the way, it tells us so, and the application reports an error to the user.
A few points of interest about this method: for one thing, this is where the actual filename for our app’s data store (currently MythBase.storedata, though in an earlier version of Mac OS/X it defaulted to MythBase.xml) is specified. If you wanted to name your file something else, this is where you’d change it.
Also, this is where the type of the backing store is specified, in the call to the addPersistentStoreWithType:configuration:URL:options:error: method. It’s currently set to NSXMLStoreType, which means that the stored data will be in an XML-formatted file. This sort of storage is nice while you’re developing your app, since the resulting file is easy to parse with other tools, or for that matter read with your own eyes. However, before delivering a final application, you may want to consider changing your data store to another type for the sake of size, speed, and other considerations.
The other choices we have are NSBinaryStoreType, which saves its data in a binary format that takes less disk space and is faster to read and write, and NSSQLiteStoreType, which in addition to the advantages of NSBinaryStoreType also frees the persistent store from the burden of holding the entire object graph in memory at once; it only loads objects as they’re accessed. That difference becomes crucial when dealing with a large data set. Because of this advantage, we recommend changing from NSXMLStoreType to NSSQLiteStoreType before releasing your application. There’s an additional store type, NSInMemoryStoreType, which can be used for maintaining an in-memory object graph that’s never saved to disk.
The default Core Data application template does a pretty good job of tucking away the data storage for you so that you don’t have to give it too much thought, but at some point before shipping your app you will have to decide which of these formats to use for your app’s storage. We’ve given our recommendations, but you might want to consult the documentation in Xcode (search for “core data programming guide” to gain more understanding before deciding how to tackle this issue.
The final thing to point out about persistentStoreCoordinator is that if you want to partition your data into different stores (for example one that’s on disk and one that’s only in memory, disappearing when the app terminates) this is where you’d need to make the changes, adding each of your persistent stores to the coordinator.
The managedObjectContext Accessor Method
Now let’s look at the managedObjectContext method, which is the getter for the read-only property of the same name:
// Returns the managed object context for the application (which is already bound to the persistent store coordinator for the application.)
- (NSManagedObjectContext *)managedObjectContext
{
    if (_managedObjectContext) {
        return _managedObjectContext;
    }

    NSPersistentStoreCoordinator *coordinator = [self persistentStoreCoordinator];
    if (!coordinator) {
        NSMutableDictionary *dict = [NSMutableDictionary dictionary];
        [dict setValue:@"Failed to initialize the store" forKey:NSLocalizedDescriptionKey];
        [dict setValue:@"There was an error building up the data file." forKey:NSLocalizedFailureReasonErrorKey];
        NSError *error = [NSError errorWithDomain:@"YOUR_ERROR_DOMAIN" code:9999 userInfo:dict];
        [[NSApplication sharedApplication] presentError:error];
        return nil;
    }
    _managedObjectContext = [[NSManagedObjectContext alloc] init];
    [_managedObjectContext setPersistentStoreCoordinator:coordinator];

    return _managedObjectContext;
}
Like the other methods we’ve seen acting as a getter for a property, this method first checks to see if the instance variable has been set, and if so, returns it. Otherwise, it checks for the existence of a persistent store coordinator by calling the persistentStoreCoordinator method. If that returns nil, then the method reports an error and returns nil itself. If not, it simply creates a managed object context, sets its persistent store coordinator, and returns the context.
This code is pretty straightforward and is probably nothing you’ll ever pay much attention to, except perhaps to customize the error reporting.
Next up is an NSWindow delegate method called windowWillReturnUndoManager.
// Returns the NSUndoManager for the application. In this case, the manager returned is that of the managed object context for the application.
- (NSUndoManager *)windowWillReturnUndoManager:(NSWindow *)window
{
    return [[self managedObjectContext] undoManager];
}
This method lets us specify the object that handles undo/redo actions for the window containing our GUI. We’ll discuss the undo/redo system in a later chapter, but for now what you need to know is that this method tells the system to use Core Data’s undo manager, which is accessed through the managed object context.
Next up, the saveAction: method, which is called when the user clicks the relevant menu item.
// Performs the save action for the application, which is to send the save: message to the application's managed object context. Any encountered errors are presented to the user.
- (IBAction)saveAction:(id)sender
{
    NSError *error = nil;

    if (![[self managedObjectContext] commitEditing]) {
        NSLog(@"%@:%@ unable to commit editing before saving", [self class], NSStringFromSelector(_cmd));
    }

    if (![[self managedObjectContext] save:&error]) {
        [[NSApplication sharedApplication] presentError:error];
    }
}
This method is pretty straightforward. It first tells the context to ensure that any pending edits are committed to the underlying model objects and prints a warning in case the commit fails. Whether the commit succeeds or fails, it then proceeds to tell the context to save all model objects to storage. If that fails, it shows the user an error.
An NSApplication Delegate Method
Now we come to this class’s last method, the NSApplication delegate method applicationShouldTerminate:. This method is called by the application when the user selects Quit from the menu, and gives the delegate a chance to save changes, inspect its state, ask the user if they really want to quit, and so on. The value returned by this method determines whether the application will really terminate or not. Here’s the code:
- (NSApplicationTerminateReply)applicationShouldTerminate:(NSApplication *)sender
{
    // Save changes in the application's managed object context before the application terminates.

    if (!_managedObjectContext) {
        return NSTerminateNow;
    }

    if (![[self managedObjectContext] commitEditing]) {
        NSLog(@"%@:%@ unable to commit editing to terminate", [self class], NSStringFromSelector(_cmd));
        return NSTerminateCancel;
    }

    if (![[self managedObjectContext] hasChanges]) {
        return NSTerminateNow;
    }

    NSError *error = nil;
    if (![[self managedObjectContext] save:&error]) {

        // Customize this code block to include application-specific recovery steps.
        BOOL result = [sender presentError:error];
        if (result) {
            return NSTerminateCancel;
        }

        NSString *question = NSLocalizedString(@"Could not save changes while quitting. Quit anyway?", @"Quit without saves error question message");
        NSString *info = NSLocalizedString(@"Quitting now will lose any changes you have made since the last successful save", @"Quit without saves error question info");
        NSString *quitButton = NSLocalizedString(@"Quit anyway", @"Quit anyway button title");
        NSString *cancelButton = NSLocalizedString(@"Cancel", @"Cancel button title");
        NSAlert *alert = [[NSAlert alloc] init];
        [alert setMessageText:question];
        [alert setInformativeText:info];
        [alert addButtonWithTitle:quitButton];
        [alert addButtonWithTitle:cancelButton];

        NSInteger answer = [alert runModal];

        if (answer == NSAlertAlternateReturn) {
            return NSTerminateCancel;
        }
    }

    return NSTerminateNow;
}
As with the persistentStoreCoordinator method, we’ll go through this one piece by piece. First, it checks to see whether there really is a managedObjectContext to worry about. If not, it just returns NSTerminateNow immediately, and the application terminates. If there is a managedObjectContext, it tells the context to commit any pending changes. If that fails, it logs an error message and returns NSTerminateCancel, which makes the application abort the current termination procedure and just continue about its business. Then it checks to see whether the managedObjectContext actually has any pending changes, and if it doesn’t, it returns NSTerminateNow.
Finally, it does the big step of telling the context to save its changes. If the save fails, then the final big conditional block is triggered. That block constructs an NSAlert, a special type of window that appears in front of all other application windows and forces you to make a choice by clicking a button (you’ll learn more about NSAlert and other windows in Chapter 11). In this case, it tells the user that their changes were not saved, and asks them to choose whether to quit the app anyway or cancel the termination and go back to normal. Depending on the return value from this request, it either returns NSTerminateCancel or “falls through” and returns NSTerminateNow.
Time to point out a small bug in this method: near the end, when the method checks to see if the Cancel button was pressed, it’s actually comparing answer to the wrong value. It should be NSAlertSecondButtonReturn instead of NSAlertAlternateReturn. Not such a big deal perhaps, and we won’t bother to fix it for our sample app, but this error in the logic makes it impossible to avoid quitting when the app is in a particular invalid state. Oops!
One interesting thing to note is the use of NSLocalizedString in this method. NSLocalizedString is a simple way to let our code use localized resources if present. It’s a C function that takes two arguments: a default string and a key used for looking up a localized string. For instance, in a call like NSLocalizedString(@"Cancel", @"Cancel button title"), NSLocalizedString will first check to see which language the user prefers, then check to see if there exists a localized string for that language, keyed off @“Cancel button title”, and if so, returns it. Otherwise, it will just return the first parameter, @”Cancel”.
Adding Business Logic
Now that we’ve seen the basic idea of constructing an application with Core Data, including defining the model, configuring the GUI, and knowing our way around the template-provided code in our project, it’s time to learn a bit about how to use Core Data to actually implement something “interesting” in our model objects: our application’s “business logic.”
Some amount of business logic is specified right in the model file, such as an integer’s min and max size, while some things require a bit of code. Fortunately, NSManagedObject provides several “hooks” into spots where we can test our objects’ attributes to validate them and make sure they’re okay. In order for us to make use of these, however, we first need to make a subclass of NSManagedObject to represent our MythicalPerson entity. Up until now, we’ve used NSManagedObject itself, but to add code we need to make a subclass.
Making The MythicalPerson Class
Xcode will merrily make a subclass of NSManagedObject for us. To do so, click on File ![]() New
New ![]() File (or press
File (or press ![]() N). In the template selector, choose Core Data from the OS X section on the left. Then, select NSManagedObject subclass from the main window. Click Next. In the table view that appears, check the checkbox for MythBase, which indicates that we’re making an NSManagedObject subclass that will work with the entities described in the MythBase data model. Click Next. The next choice is to indicate for which entity we’re making an NSManagedObject class. Since we’ve only defined one entity, there’s only one choice here, MythicalPerson. Check that, and click Next. Lastly, we’re asked where to save the file. The file panel should default to the main directory for MythBase, which is just where we want it. Leave the other options at their default values, and click Create. We now have a MythicalPerson.h and MythicalPerson.m file to work with.
N). In the template selector, choose Core Data from the OS X section on the left. Then, select NSManagedObject subclass from the main window. Click Next. In the table view that appears, check the checkbox for MythBase, which indicates that we’re making an NSManagedObject subclass that will work with the entities described in the MythBase data model. Click Next. The next choice is to indicate for which entity we’re making an NSManagedObject class. Since we’ve only defined one entity, there’s only one choice here, MythicalPerson. Check that, and click Next. Lastly, we’re asked where to save the file. The file panel should default to the main directory for MythBase, which is just where we want it. Leave the other options at their default values, and click Create. We now have a MythicalPerson.h and MythicalPerson.m file to work with.
The MythicalPerson.h file looks like this:
#import <Foundation/Foundation.h>
#import <CoreData/CoreData.h>


@interface MythicalPerson : NSManagedObject

@property (nonatomic, retain) id depiction;
@property (nonatomic, retain) NSString * details;
@property (nonatomic, retain) NSNumber * divinity;
@property (nonatomic, retain) NSNumber * goodness;
@property (nonatomic, retain) NSString * name;
@property (nonatomic, retain) NSNumber * power;

@end
We’ve got properties for each of the entity attributes we defined in the model, which appropriate classes for their contents.
In the MythicalPerson.m file, we find the following:
#import "MythicalPerson.h"

@implementation MythicalPerson

@dynamic depiction;
@dynamic details;
@dynamic divinity;
@dynamic goodness;
@dynamic name;
@dynamic power;

@end
We haven’t seen the @dynamic directive before. This tells Xcode to suppress warnings if it can’t find implementations of accessor methods, even though we didn’t include a @synthesize directive, and not to synthesize them automatically. Core Data will generate the appropriate accessors at runtime.
Let’s say we want to add a special constraint to MythBase to ensure that no MythicalPerson can be named “Bob.” To do this, we just have to add the method shown here to the @implementation section of MythicalPerson.m:
- (BOOL)validateName:(id *)ioValue error:(NSError **)outError
{
  if (*ioValue == nil) {
    return YES;
  }
  if ([*ioValue isEqualToString:@"Bob"]) {
    if (outError != NULL) {
      NSString *errorStr = NSLocalizedString(
        @"You're not allowed to name a mythical person 'Bob'.  "
          " 'Bob' is a real person, just like you and me.",
        @"validation: invalid name error");
      NSDictionary *userInfoDict = [NSDictionary dictionaryWithObject:errorStr
        forKey:NSLocalizedDescriptionKey];
      NSError *error = [[NSError alloc] initWithDomain:@"MythicalPersonErrorDomain"
        code:13013 userInfo:userInfoDict];
      *outError = error;
    }
    return NO;
  }
  return YES;
}
Note the name of this method, validateName:error:. This naming convention comes from the key-value coding model that’s pervasive in Cocoa. Attribute validation in Core Data works through the use of methods named validate<attribute name>:error:, which are called (if they exist) on each managed object when it’s time to save changes to the data store. Within this method, we should check the proposed value and return YES if it’s okay. If not, it returns NO and should also create an NSError object describing the error, setting the passed-in NSError** to point at it. Note that when creating the error we need to specify a string identifying the error name and an integer specifying just which error it was. In a larger application, it’s a good idea to standardize these values in some way. Doing so can help us track down errors that users may report and can also give us a way to catch some recurring errors and handle them individually (for instance, in the app controller’s saveAction: method). We’ll talk about this more in Chapter 12.
At this point, we can compile and run MythBase, and everything should work the same as before… up until when we change a MythicalPerson’s name to “Bob” and try to save our changes, at which point we’ll be warned that it’s an invalid value.
Validating Multiple Attributes
Sometimes we’ll need to be able to validate several attributes at once, making sure that they make sense together. For example, let’s say that we decide on a new constraint for each MythicalPerson: the value of the power attribute can only exceed 50 if the value of the divinity attribute is 100 (meaning that only a person operating in full “god mode” can have a power level above 50). Rather than check for this condition in validatePower:error: or validateDivinity:error:, the recommended procedure is to check for this in two other validation methods that are called whenever a new managed object is created, or edited: validateForInsert:, and validateForUpdate:. Because we’re going to check for the same internal consistency problem (where power > 50 and divinity < 100) in both spots, we’ll put that check into a method of our own, validateConsistency:, which is called by the other two. First, let’s implement the two Core Data validation methods in MythicalPerson.m:
- (BOOL)validateForInsert:(NSError **)error
{
  BOOL propertiesValid = [super validateForInsert:error];
  BOOL consistencyValid = [self validateConsistency:error];
  return (propertiesValid && consistencyValid);
}

- (BOOL)validateForUpdate:(NSError **)error
{
  BOOL propertiesValid = [super validateForUpdate:error];
  BOOL consistencyValid = [self validateConsistency:error];
  return (propertiesValid && consistencyValid);
}
These methods both work in the same way. First, they call the superclass’s version of the same method; that’s very important because that’s the method that actually calls all of the validate<attribute name>:error: methods for each changed attribute. Then our own validateConsistency: method is called. If the return values for both of these calls return YES, then the method itself returns YES; otherwise it returns NO.
Now let’s see what validateConsistency: looks like.
- (BOOL)validateConsistency:(NSError **)error
{
  int divinity = [[self valueForKey:@"divinity"] intValue];
  int power = [[self valueForKey:@"power"] intValue];
  if (divinity < 100 && power > 50) {
    if (error != NULL) {
      NSString *errorStr = NSLocalizedString(
        @"Power cannot exceed 50 unless divinity is 100",
        @"validation: divinity / power error");
      NSDictionary *userInfoDict = [NSDictionary dictionaryWithObject:errorStr
        forKey:NSLocalizedDescriptionKey];
      NSError *divinityPowerError = [[NSError alloc]
        initWithDomain:@"MythicalPersonErrorDomain" code:182
        userInfo:userInfoDict];
      if (*error == nil) {
        // there was no previous error, return the new error
        *error = divinityPowerError;
      }
      else {
        // combine previous error with the new one
        *error = [self errorFromOriginalError:*error
          error:divinityPowerError];
      }
    }
    return NO;
  }
  return YES;
}
This method is a little more complicated than the single attribute validation method. We do the same sort of checking for a problem, returning YES if it’s okay, and otherwise constructing an NSError, setting the error parameter to point at it, and returning NO. However, in order to “play nice” with Core Data, we have to check for the existence of a pre-existing error, and if there is one, combine it with our own into a special kind of error. This lets Core Data eventually report back all the errors it finds when it tries to save. This error combining is done using another method of our own, errorFromOriginalError:error:, which we should add to our class.
- (NSError *)errorFromOriginalError:(NSError *)originalError
   error:(NSError *)secondError
{
  NSMutableDictionary *userInfo = [NSMutableDictionary dictionary];
  NSMutableArray *errors = [NSMutableArray
    arrayWithObject:secondError];

  if ([originalError code] == NSValidationMultipleErrorsError) {
    [userInfo addEntriesFromDictionary:[originalError userInfo]];
    [errors addObjectsFromArray:[userInfo
      objectForKey:NSDetailedErrorsKey]];
  }
  else {
    [errors addObject:originalError];
  }
  [userInfo setObject:errors forKey:NSDetailedErrorsKey];
  return [NSError errorWithDomain:NSCocoaErrorDomain
                             code:NSValidationMultipleErrorsError
                         userInfo:userInfo];
}
Basically, this method checks the originalError parameter to see if it already contains multiple errors, and if so, just adds the new one to the list. Otherwise, it combines the two single errors into a new multiple error object.
With all that in place, we should now be able to compile and run, select a MythicalPerson, set their power above 50, their divinity below 100, and try to save. We’ll see an error telling us about the problem. We can also make sure that reporting of multiple problems works by leaving this power/divinity inconsistency in place, changing the name to “Bob,” and trying to save. We should see a warning panel telling us that multiple validation errors occurred, but we won’t see details about any of them. This suggests a good idea for a future expansion of the app delegate’s saveAction: and applicationShouldTerminate: methods: come up with a way to display multiple errors instead of just calling presentError: as is currently done. There’s something to tackle on a rainy day!
Another common sort of simple “business logic” calls for the creation of custom attributes that are based on the values contained in an object’s attributes. For example, if we have an entity with firstName and lastName attributes, we might want to make a custom attribute called fullName that combines the two together.
This sort of thing is a piece of cake with Core Data. In our case, let’s say we want to add an attribute to MythicalPerson called awesomeness, which will be calculated from the MythicalPerson’s power, divinity, and goodness. We start off by defining a method called awesomeness in MythicalPerson’s implementation:
- (int)awesomeness
{
  int awesomeness = [[self valueForKey:@"divinity"] intValue] * 10 +
    [[self valueForKey:@"power"] intValue] * 5 +
    [[self valueForKey:@"goodness"] intValue];
  return awesomeness;
}
With that in place, we can call the awesomeness method on any MythicalPerson and get the result. This also works with Cocoa bindings, of course, so we can easily bind a GUI control’s value to this new property. Go back to Xcode, make the window and box a little bigger, and add a label and a level indicator from the Library window, something similar to Figure 8-12.
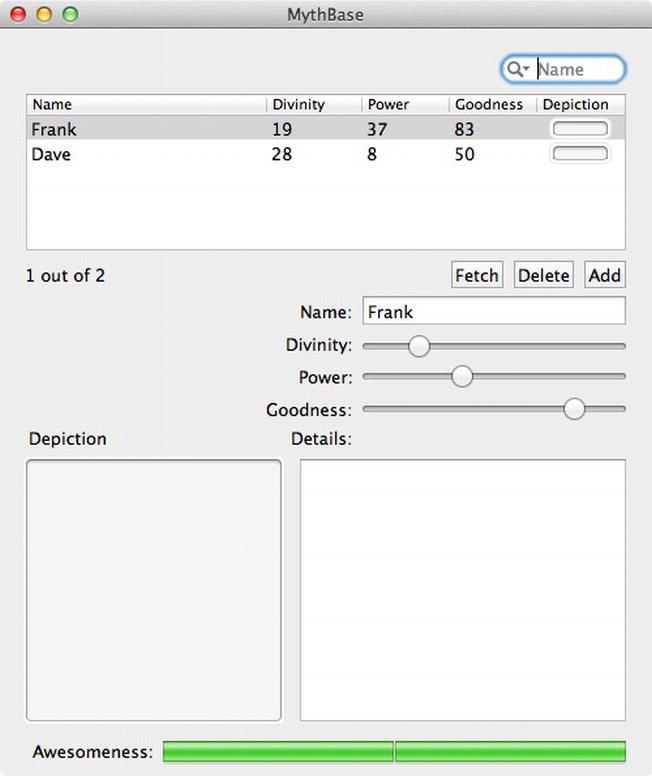
Figure 8-12. MythBase, now with added Awesomeness
Now select the Awesomeness control, and bring up the Attributes Inspector. Set the Style to Continuous, and the Minimum and Maximum to 0 and 1600, respectively. Now switch to the Bindings Inspector, and bind the level indicator’s Value via the Mythical Person Array Controller, with the controller key “selection” and the model key “awesomeness”. Xcode doesn’t know anything about Awesomeness, so we’ll have to type it in ourselves instead of just picking it from the combo box; we’re sure you’ll agree that’s a small price to pay for awesomeness.
Save the changes, switch back to Xcode, click Run, and off we go. Switch between different rows in the table view and see the bar of awesomeness change. Drag a slider and, now wait a minute; the Awesomeness value doesn’t change! The reason for this is that no part of Core Data—not our model file, not our MythicalPerson class, not the controller we’re using—knows that Awesomeness depends on other values and needs to be recalculated if they change. This is fixed by implementing one more small method in MythicalPerson:
+ (NSSet *)keyPathsForValuesAffectingAwesomeness {
  return [NSSet setWithObjects:@"divinity", @"power", @"goodness",
    nil];
}
This is another method name that’s constructed dynamically based on an accessor name. We saw this pattern when validating a single attribute as well. In this method, we return a set of attribute names that our awesomeness attribute is dependent on. With this in place, Core Data will automatically call this method at some point early on in the application’s lifecycle and sort things out so that changes made to any attributes in the set will also trigger controllers to update any objects with bindings to the awesomeness attribute. Note the plus sign rather than minus sign in the method signature—this indicates that keyPathsForValuesAffectingAwesomeness is a class method, not an instance method. This is part of the Cocoa key-value observing system. Cocoa KVO looks for methods of this structure and calls them if present.
Build and run the app, and now the green bar changes when we drag one of the other sliders. Awesome!
Wrap Up
In this chapter, we covered a pretty wide range of material about Core Data. We learned about creating a model file in Xcode and about using the combo of Core Data and Cocoa bindings to quickly put together a decent GUI. We also got some idea of the underpinnings of how Core Data stores its data and learned some basics about implementing our own business logic. In Chapter 9, we’ll build on this knowledge, learning how to complete our data models by adding relationships.