
Using Table Views
Chapters 4 and 5 covered some of Cocoa’s most common GUI components, from buttons and simple input fields to full-fledged text editors. We haven’t yet talked about one of Cocoa’s biggest, most complex view classes, NSTableView. This chapter will cover how to use an NSTableView to display data for whole collection of components, how to respond when the user changes the table’s selection by clicking a row, and how to edit values right in the table.
We’ll learn how to use a table view by extending the VillainTracker application from Chapter 5. The new version of VillainTracker we create in this chapter will maintain an array of villains, display them all in a table, and let the user edit all the attributes of the selected villain when they click on its entry in the table. We’ll start by using Xcode to extend the VillainTrackerAppDelegate class’s interface to include an array of villains. Since we’re in that code anyway, we’ll look at another way to add some new outlets by hand for connecting to the new table view and the window itself, and action methods for adding and deleting villains. Then we’ll extend the nib file in Interface Builder mode, adding a table view and wiring it up. Then we’ll go back to Xcode to change our controller’s implementation for handling the table. Figure 6-1 shows the end result.

Figure 6-1. The completed app window
In the previous chapters, we created new outlets and actions by control-dragging from the GUI to our code and letting Xcode generate the appropriate stubs. In this chapter, as we’re extending existing code, we’ll create the stubs by hand. Both methods are perfectly valid, and it’s good to know about both ways so you can use whichever is most convenient.
Preparing VillainTrackerAppDelegate for Multiple Villains
In Xcode, open the project we created in Chapter 4, and navigate to VillainTrackerAppDelegate.h so we can update the class’s interface to accommodate our upcoming changes. First, we’ll add the new instance variables we need. Because we’re going to maintain a list of villains, we’ll create an NSMutableArray called villains to contain them all. We’ll also add an outlet called villainsTableView in order to access the NSTableView where we’re going to present the list of villains.
We’ll also add declarations for newVillain: and deleteVillain:, our two new action methods. The following code shows the state of VillainTrackerAppDelegate.h after making these changes (new lines are in bold):
#import <Cocoa/Cocoa.h>

@interface VillainTrackerAppDelegate : NSObject <NSApplicationDelegate>

@property (assign) IBOutlet NSWindow *window;
@property (weak) IBOutlet NSTextField *nameView;
@property (weak) IBOutlet NSTextField *lastKnownLocationView;
@property (weak) IBOutlet NSDatePicker *lastSeenDateView;
@property (weak) IBOutlet NSComboBox *swornEnemyView;
@property (weak) IBOutlet NSLevelIndicator *evilnessView;
@property (weak) IBOutlet NSMatrix *powersView;
@property (weak) IBOutlet NSPopUpButton *powerSourceView;
@property (weak) IBOutlet NSMatrix *primaryMotivationView;
@property (weak) IBOutlet NSImageView *mugshotView;
@property (unsafe_unretained) IBOutlet NSTextView *notesView;
@property (weak) IBOutlet NSTableView *villainsTableView;

@property (strong) NSMutableDictionary *villain;
@property (strong) NSMutableArray *villains;

- (IBAction)takeName:(id)sender;
- (IBAction)takeLastKnownLocation:(id)sender;
- (IBAction)takeLastSeenDate:(id)sender;
- (IBAction)takeSwornEnemy:(id)sender;
- (IBAction)takeEvilness:(id)sender;
- (IBAction)takePowers:(id)sender;
- (IBAction)takePowerSource:(id)sender;
- (IBAction)takePrimaryMotivation:(id)sender;
- (IBAction)takeMugshot:(id)sender;

- (IBAction)newVillain:(id)sender;
- (IBAction)deleteVillain:(id)sender;

@end
The new declarations follow the same structure as the properties and methods generated by Xcode when we control-dragged to the VillainTrackerAppDelegate class in the last chapter. Xcode will note that this code has been added, and these outlets and actions are just as valid as the ones that Xcode generated. In fact, note the small circles that appear in the left margin of the Code Editor pane. These circles are endpoints that we can control-drag to, showing that Xcode recognized what we did as creating an outlet or an action. When working on laying out a user interface, creating these via control-dragging is convenient because we can make the connections and create the stubs at the same time. However, when tweaking existing code, doing it by hand can be faster.
Now we’ll add two new method implementations (just empty shells for now) for the new action methods in VillainTrackerAppDelegate.m. Add these lines to the @implementation VillainTrackerAppDelegate section:
- (IBAction)newVillain:(id)sender {}
- (IBAction)deleteVillain:(id)sender {}
Now we’ve added all that we need to VillainTrackerAppDelegate’s interface and some empty stub methods to the implementation. Hit the Run button just to make sure it compiles cleanly, and then we’ll move on to adjusting the GUI to make room for the table.
Making Way for the Table View
In Xcode’s Project Navigator panel, click MainMenu.xib to open it in Interface Builder mode (we can also double-click the MainMenu.xib file to open it in a new window). We’re going to make the window bigger, add a table view and a few buttons, reorganize the layout, and adjust the resizing characteristics of all the NSBoxes so that the table view will resize fully in both dimensions, and the other boxes will move accordingly.
Start by resizing the window, making it about 300 pixels wider (about half as wide again as it was to begin with), but the same height as before. We’re going to follow the conventions of the western, left-to-right world and arrange things so that the selection on the left (in the table view) determines what is presented on the right (all the other views), so you should also drag all the existing views to the right side of the window. See Figure 6-2 to get an idea of what to aim for. Open up the Attributes Inspector (![]() 4) with the Window selected, and check the box labeled Resize.
4) with the Window selected, and check the box labeled Resize.

Figure 6-2. Make your window look like this in preparation for the table view
Now open up the Object Library pane (![]() 4) in the Utility area (it might be collapsed below the Inspector pane), and type “table” into the Search field. One of the results should be a Table View, which is an instance of the NSTableView class contained in an NSScrollView. Drag the Table View into to the upper left part of the space in the window, letting the blue guidelines appear to position it the recommended distance from the edge of the window frame. The default size for the table view is quite a bit smaller than the space we’re putting it in, but don’t bother with resizing it to fill the available space just yet, we’ll get to that in a bit.
4) in the Utility area (it might be collapsed below the Inspector pane), and type “table” into the Search field. One of the results should be a Table View, which is an instance of the NSTableView class contained in an NSScrollView. Drag the Table View into to the upper left part of the space in the window, letting the blue guidelines appear to position it the recommended distance from the edge of the window frame. The default size for the table view is quite a bit smaller than the space we’re putting it in, but don’t bother with resizing it to fill the available space just yet, we’ll get to that in a bit.
The first thing we’re going to do with this table view is configure its columns. By default, a new table view has two columns, but we’d like it to have three, so that we can show the name, date of last sighting, and mugshot for each villain in our list. To add a column, we must sort of “drill down” through a few layers of views. Open the Attributes Inspector (![]() 4) to help guide the way; it will always show a bit of info about the selected object, most critically the class name. The first time we click on the table view in our window, we’ll see that the Attributes Inspector shows the Scroll View at the top. That’s because the table view we dragged out from the library is actually contained inside an NSScrollView. Click again, and the inspector will show Table View.
4) to help guide the way; it will always show a bit of info about the selected object, most critically the class name. The first time we click on the table view in our window, we’ll see that the Attributes Inspector shows the Scroll View at the top. That’s because the table view we dragged out from the library is actually contained inside an NSScrollView. Click again, and the inspector will show Table View.
One of the attributes visible in the Inspector is the number of columns. Change it from 2 to 3. When the number of columns is changes, there’s a brief flash of a horizontal scrollbar in the table view, but it’s easy to miss. Other than that flash and the hint of a resize bar at the edge of the table header, the table view won’t really visually reflect that there are actually three columns there; we’ll deal with that in a moment. In the meantime, there are two other changes to make to the table view. The first is to change the Column Sizing behavior from resizing Last Column Only to First Column Only. Our first column will hold the villain’s name, and the name of the villain will vary in width more than the date or mugshot, so we’ll want resizing to expand that column. By default, the user will be able to resize columns at will.
The second is to change the table view’s Content Mode from being cell-based to view-based, using the pop-up menu just above the number of columns. Note that the name of the placeholders in the table has changed from text cell to table view cell. The naming of the objects that are initially displayed in the NSTableView is a little confusing, unfortunately. A text cell is an NSTextFieldCell, which is a subclass of NSCell. However, a table view cell is an instance of NSTableCellView, which is a subclass of NSView, not NSCell, despite the use of the word “cell” in the default title. For this book, everything we’ll do with table views will be using view-based table views.
Note We touched on cells in the previous chapter. Here’s a bit more background. Back when a 33Mhz processor was considered speedy, the designers of the AppKit found that having individual view objects for every cell in a matrix or table was too expensive. To deal with this, they invented the idea of a “cell” object for these parts of the user interface. Cells are just data-bearing objects that represent the state of a control, with their own target and action outlets, but without any of the overhead for drawing or text and event management. Cells are not subclasses of NSView, which makes them lighter-weight objects. This means that a user-interface control based on cells has to deal with coordinating state between views, which can actually draw on the screen and respond to user actions, and cells, which can’t. In iOS, this split is gone, and Apple appears to be moving Cocoa in this direction as well; NSTableView now supports using cells (like traditional Cocoa) or using views (like iOS) for its subviews. NSMatrix doesn’t do this yet, but perhaps it will in a future release.
Let’s see if we can find that third column. Click in the window away from the table view to deselect it, and then click once on the table view to select the containing scroll view. Your Interface Builder pane in Xcode should look something like Figure 6-3. Click on the right edge of the table view and expand it a bit so that all three columns are visible. Expand it further until it snaps into place next to the adjoining box holding the basic information on our villains. The blue guideline will appear, extending down only as far as the size of the Basic Information box.
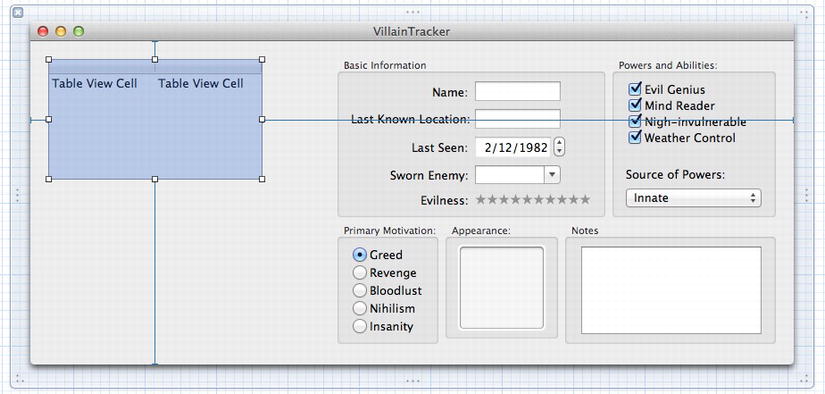
Figure 6-3. We’ve got the scrollview selected
That final column needs a little extra configuration because it’s going to display an image instead of text. Fortunately, Cocoa provides a class that makes this easy. Open the Identity
Inspector (![]() 3) in the Utility area, so we can see where we are. Click the last column until the table view cell is selected. It might take four clicks to get there—through the Scroll view, the table view, the Table column, and then the table cell view. Once there, we’ll see NSTableCellView as the class name in the Identity Inspector. However, after all that work to click through to it, it’s time for it to go. Press the Delete key to delete it. We’re going to replace it with an image well. In the Object Library Search box, type Image and the top item should be an Image Well. Drag it out from the Object Library into the third column of the table view. The cursor should turn into a green plus sign and the column should highlight with a blue border when we’re over a drop-ready spot. Release the button, and voila! That table column is now ready to display an image.
3) in the Utility area, so we can see where we are. Click the last column until the table view cell is selected. It might take four clicks to get there—through the Scroll view, the table view, the Table column, and then the table cell view. Once there, we’ll see NSTableCellView as the class name in the Identity Inspector. However, after all that work to click through to it, it’s time for it to go. Press the Delete key to delete it. We’re going to replace it with an image well. In the Object Library Search box, type Image and the top item should be an Image Well. Drag it out from the Object Library into the third column of the table view. The cursor should turn into a green plus sign and the column should highlight with a blue border when we’re over a drop-ready spot. Release the button, and voila! That table column is now ready to display an image.
Since the image well is taller than the two table view cell views in the other two columns, resize each of the table view cells to be the same height as the image well. They should all have a height of 48 points. To resize them, click on the text that reads “Table View Cell” in each column until the table view cell itself is blue, with a resize handle at the bottom. Drag down on the resize handle and a Utility window will appear indicating the current size.
Before we’re done with the table view, we need to configure these table columns to correspond to the name, lastSeenDate, and mugshot values in our villain objects, and we’ll do that by supplying each of them with an identifier that is the same as the key-name for the attribute we want to show. Later on, we’ll see how to use this identifier in our code to easily prepare values for display. Select the first column by clicking in the table view below the “Table View Cell” text. In the Identity Inspector (![]() 3), NSTableColumn should be the class name. Type “name” into the Identifier field. Switch to the Attributes Inspector (
3), NSTableColumn should be the class name. Type “name” into the Identifier field. Switch to the Attributes Inspector (![]() 4), and type “Name” into the Title field; this determines what will appear in the text of the column’s header. Repeat this process for the second column, entering “lastSeenDate” as the identifier and “Last Seen” as the title, and again for the third title, entering “mugshot” for the identifier and “Mugshot” for the title.
4), and type “Name” into the Title field; this determines what will appear in the text of the column’s header. Repeat this process for the second column, entering “lastSeenDate” as the identifier and “Last Seen” as the title, and again for the third title, entering “mugshot” for the identifier and “Mugshot” for the title.
Now we’re going to add a pair of buttons, one for adding a new villain to the list and one for deleting the selected villain. Back in the Object Library pane, type “button” into the Search field; a surprisingly large list of buttons will show up in the results. Someone at Apple really likes to design buttons! Despite their differences in appearance, just about everything in this list is just an NSButton, which at its core always does the same basic thing. Some of them are preconfigured in different modes to work as a checkbox or disclosure triangle, but otherwise they all do the same basic thing: call an action method in a target object when clicked.
Pick one of the first few buttons in the list (maybe Push Button or Rounded Rect Button) and drag it to our window, dropping it just below the Table View. This will be our “Add Villain” button. Instead of just titling the button with the text “Add Villain”, we’ll use one of Cocoa’s built-in graphic images to make it resemble Add buttons in other applications. While the button is still selected, bring up the Attributes Inspector, and locate the Image combo box. Click the small triangle at the right end of the combo box, and start typing “nsaddtemplate”. When you see that it’s filled in the full text as “NSAddTemplate”, press Enter and you’ll see that your new button now has a + image, overlaid on the “Add Villain” label. Underneath the Image combo box is another combo box labeled Alternate. Set that to NSAddTemplate also. Below that is a set of buttons labeled Position, indicating the position of the image (shown as a square) relative to the button title (shown as a line). Select the item that just shows a square with no text, and the Button title will disappear. Resize the button horizontally so that it is just wide enough to contain the image, then duplicate the button (with ![]() D) to make another one. Select this second button, go back to the Image combo box in the Attributes Inspector again, and begin typing “nsremovetemplate”, which will provide you with a – image in your button. As before, also set the Alternate image to be NSRemoveTemplate.
D) to make another one. Select this second button, go back to the Image combo box in the Attributes Inspector again, and begin typing “nsremovetemplate”, which will provide you with a – image in your button. As before, also set the Alternate image to be NSRemoveTemplate.
Now, take the Add button, and drag it to a point just above the bottom edge of the window, using the blue guidelines to make its left edge line up with the left edge of the Table View and its bottom edge the recommended distance from the bottom of the window. Drag the Remove button into location just to the right of the Add button—it will snap to a comfortable distance from the Add button. Resize the Table View to fill the remaining space in the window. The window should resemble Figure 6-4 at this point.

Figure 6-4. The Table View is just where we want it
We need to set up some connections between the buttons that we just added and the VillainTrackerAppDelegate object so that the VillainTrackerAppDelegate object gets notified when the user clicks on a button. After the last few chapters, you can probably guess how we’ll do it. Select the button with the plus sign, and control-drag a connection from the button to the VillainTrackerAppDelegate object in the dock on the left side of the Interface Builder area. A utility window will appear with the list of available actions exposed by VillainTrackerAppDelegate. Select the newVillain: action that we added earlier. Next, select the button with the minus sign, and control-drag a connection out to VillainTrackerAppDelegate. This time, select the deleteVillain: action.
We also need to set up connections between the VillainTrackerAppDelegate and the table view. Select the VillainTrackerAppDelegate in the dock on the left, and control-drag a connection out to the Table View. The Table View will highlight when the mouse is over it. Release the mouse, and a list of available outlets will appear. Choose villainsTableView. Now we need to make two connections in the other direction, from the Table View to the VillainTrackerAppDelegate. Select the Table View in the window (which will take two clicks to drill down through the Scroll view). Control-drag from the Table View to the VillainTrackerAppDelegate, and select dataSource from the list of options. Then, do it again, and this time select Delegate. With that, the connections are in place!
Let’s see how this all behaves at run time. Click on the Run button in the upper left-hand corner of the Xcode window. Try dragging the lower right corner of the window around to resize things and let’s see what we get. Be wary, because it’s time for…
A Nasty Resize Surprise, or, Constraints To The Rescue!
The first time running the program with the window reorganized, you’ll probably see something pretty ugly like Figure 6-5. This is the result of stretching the window vertically and shrinking it horizontally by using the resize handle. Looking at the window in the picture, the table view is in good shape, as are the Powers and Abilities box and the Primary Motivation box. The appearance box has expanded downward. The Notes box has shrunk horizontally, as has the Basic Information box. In fact, the Basic Information box is kind of a mess. Your layout may break in different ways than the illustration shows, but it probably doesn’t work exactly the way you expected it to. You may wish to work with the source code provided with the chapter in order to play along.

Figure 6-5. Ugh! That’s not pretty
Before we can fix any of this, let’s think about what we want to have happen. For this program, we want all of the original UI elements from the last chapter (all the items in NSBoxes) to stay the same size and stay pegged to the right side of the window. The two new buttons should stay the same size, stay the same distance from each other, and stay pegged to the left side of the window below the table view. The new table view should expand both vertically and horizontally as the window is expanded, it should stick to the left side of the window, and it should not shrink below the current size in either direction. The boxes just to the right of the table view should maintain their distance from it.
In order to make this all work, we have to understand about how Cocoa deals with resizing. Starting in Mac OS X Lion, resizing happens through a system called Cocoa Auto Layout. Resizing behavior in Auto Layout is specified using prioritized constraints, which means that you declare the minimum or maximum size of a view, the relationships between subviews that need to be preserved, the relationships between a view and its parent, and so on. When the user resizes the window, a constraint satisfaction engine dynamically tries to determine the best layout that preserves the constraints as best as possible, based on the priority order. The constraints also handle how the user interface behaves in right-to-left writing systems like Arabic and Hebrew.
Each constraint expresses a relationship, such as “equals,” “less than,” or “greater than,” and either a pair of views or a view and a constant. A very simple constraint would be “myButton’s width = 87.” This, obviously, should hold the button to be 87 points wide. Constraints do not need to be equalities; a valid constraint would be “myButton’s height >= 32,” which indicates that the button’s height can’t be any smaller than 32. The system will prefer smaller sizes over larger ones; a button that must have a width greater than or equal to 32 will generally be 32 (the smallest value that satisfies the inequality).
A more complex one would be the following pair: “the horizontal space between myButton’s leading edge and the window’s leading edge = 10” and “the horizontal space between myButton’s trailing edge and the window’s trailing edge = 15.” For these two constraints to be held true during resizing, the button will need to grow and shrink with the window. Note that we used “leading” and “trailing” rather than “left” and “right.” In left-to-right writing systems, the leading edge is the left side. However, on right-to-left writing systems, the leading edge is the right side.
Each constraint also has a priority, which ranges from 1 to 1000. Constraints with higher priorities are satisfied before constraints with lower priorities, and if two conflicting constraints can’t both be satisfied, the one with the higher priority will win and the one with the lower priority will be violated. An example of this would be “myButton’s width >= 32 at priority 1000” and “myButton’s width = someField’s width – 40 at priority 750.” As long as someField’s width is greater than 72, then both constraints can be satisfied and myButton will be 40 points smaller than someField. However, if someField shrinks to be smaller than 72 points, the higher-priority constraint will win and myButton won’t shrink any further.
Each view has a Content Hugging Priority and a Content Compression Resistance Priority as well. These describe how the view resizes relative to the most appropriate size—its intrinsic size. For a button, the intrinsic size is the size required to display its label (and icon if appropriate) without clipping. Content Hugging controls how the view will resize if it’s asked to be larger than its intrinsic size. Compression Resistance controls how the view will resize if it’s asked to be smaller than its intrinsic size. Generally, the defaults for these priorities are good choices, and in this chapter, we’ll leave them alone.
Creating and Editing Constraints
Interface Builder lets us specify the constraints that govern each view’s resizing behavior. In fact, we’ve actually been doing this all along via the dashed blue line guidelines that Interface Builder shows us as we drag new controls onto the window. The constraints are initially created in Interface Builder based on the blue guidelines that are highlighted when a control is positioned and can change if the control is repositioned. For example, when we drag the table view into the upper right-hand corner of the window, a vertical and horizontal dashed blue line appear when we get close to the edge. This indicates that the table view should stick to that corner and creates a pair of constraints indicating that the table view should maintain a position at a constant distance from the top and left edges of the window. A complex window, like ours, might have a dozens of constraints.
In order to determine what constraints are appropriate, we first need to decide the appropriate resize behavior for the window. For our window, let’s say that we want the new table view to resize both horizontally and vertically as the window is enlarged. We want all the boxes to hold their sizes constant and flex to the right as the user resizes the window. Lastly, we want the buttons to be the same size as each other and to stick to the bottom of the window. We’ll need to set up new constraints that make this happen and maybe remove some unintentional ones. As a side note, dealing with resizing is an iterative process. Trial and error, in combination with playing with resizing windows in Interface Builder mode and using the Simulate Document feature in Xcode, are generally how it gets polished. Investing some time in playing with resizing and seeing how the constraints interact will advance your grasp of this more than anything you read in a book.
These constraints are editable from within Xcode; we can see them both onscreen, in the Size Inspector in the Utility area, and in the icon dock on the left edge of the Interface Builder pane. Select the small expansion triangle hiding in the lower left-hand corner of the Interface Builder pane, and the icon dock will expand, showing the entire hierarchy of views in the window. Each view can have a set of associated constraints, and our window has a lot of views. In the Utility area, select the Size Inspector (![]() 5), and then select the box that’s labeled Appearance, and expand the Constraints item on the left. When the box is selected, the Interface Builder pane should look like Figure 6-6.
5), and then select the box that’s labeled Appearance, and expand the Constraints item on the left. When the box is selected, the Interface Builder pane should look like Figure 6-6.
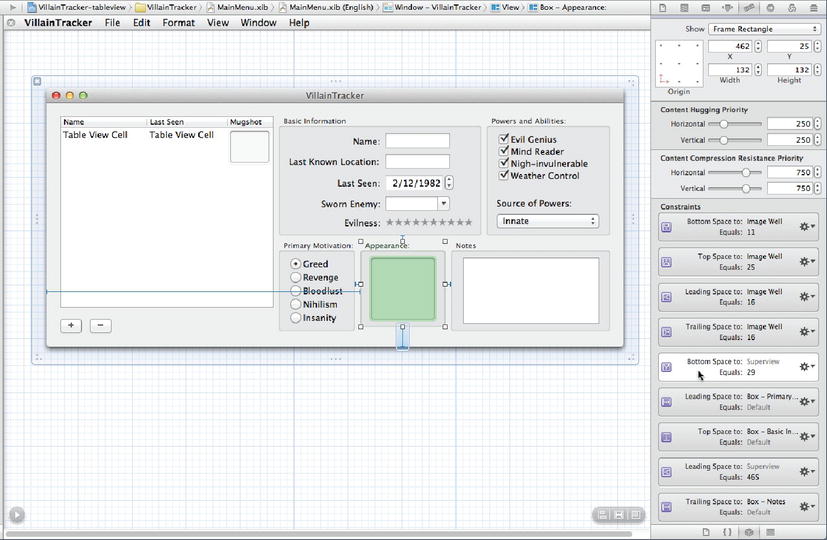
Figure 6-6. Resizing constraints for the Appearance box
In the Size Inspector, we can see nine constraints that affect the Appearance box, at least as we’ve laid it out so far. (Depending on how you laid out the window, your constraints may be in a different order or with slightly different constants.) Each of the blue lines extending off the box also represents a resizing constraint that is in relationship with another view. Not all the constraints are in relation to another view, so there are more constraints active than are visualized in the blue lines.
The problem with the Appearance box is that it expanded downward as the window was lengthened during resizing, expanding the Image view along with it. Looking at the list of constraints in the Size Inspector, one of them says “Bottom Space to: Superview equals: 29.” This constraint means that the bottom of the Appearance box should stay 29 points above the bottom of the window. Another constraint that deals with vertical size says “Top Space to: Box – Basic Information Equals: Default.” This means that the top edge of the box should maintain the system-default distance from the bottom of the Basic Information box. The purple icon on the left of the constraints indicates that these are system-created constraints—ones that were set up when we positioned the box in Interface Builder. When we previously positioned the Appearance box to snap to the blue guidelines that appear near the bottom of the window, we implicitly created that Bottom Space constraint. However, if we click the gear icon by the Bottom Space constraint, we can see that the Delete menu item is disabled. In order to remove it, we’ll need to think differently.
Let’s play with this a bit. In Interface Builder, grab the bottom of the window and enlarge it by dragging downward. The Appearance box does indeed flex to be larger in the vertical direction. The Bottom Space constraint is causing the box to grow to maintain a distance of 29 points from the bottom of the window. Resize the window back to 364 points high to put everything back (or release the mouse and then hit Undo (![]() Z) to undo the resize operation).
Z) to undo the resize operation).
Since we can’t delete the constraint on the Appearance box outright, we’ll change the circumstances that caused the system to create it in the first place, and we’ll do that by making use of the blue guidelines (or lack thereof). The easiest way to do this is move the Appearance box away from the bottom edge of the window. Follow these steps.
- Create a new constraint to hold the Appearance box to its current size. To do this, select the box, and then select Editor
 Pin Height from the menu bar.
 - Move the Appearance box near the top of the window, away from the bottom. This will remove the constraint holding the bottom of the box to the bottom of the window.
- Resize the window downward to make more room.
- Put the Appearance box back, with the box title aligned with two other boxes in the bottom area of the window and spaced evenly between them. Since the bottom of the window is further away, we should avoid creating the constraint. The window should look something like Figure 6-7.
- Resize the window back.
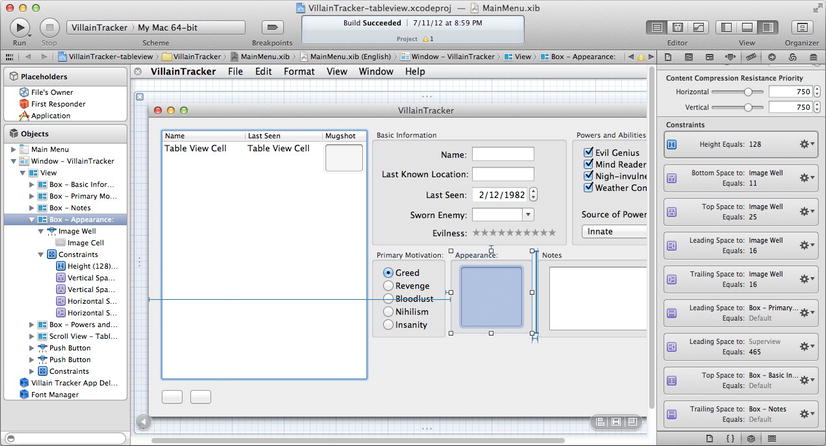
Figure 6-7. The Appearance box constraints rearranged
When resizing vertically, the window behaves the way that we want. We now have two things to address in terms of horizontal resizing: the table view isn’t flexing but the two rightmost boxes (Notes, and Powers and Abilities) are. We can check that this is occurring by selecting Editor ![]() Simulate Document and seeing what happens.
Simulate Document and seeing what happens.
Let’s check the table view first. Select the table view in Interface Builder, and look at the constraints. There are no leading- or trailing-space constraints that will hold the size fixed, so the problem must lie with the two boxes on the right. Since we want them to hold their size, rather than enlarging as the window is resized, select the Powers and Abilities box and then select Editor ![]() Pin
Pin ![]() Width. Do the same for all the other boxes.
Width. Do the same for all the other boxes.
Select Editor ![]() Simulate Document and try to resize horizontally. The window won’t budge at all. We’ve got some constraints holding things in place that we need to identify and remove. For each box, look at the constraints listed in the Size Inspector and find ones that say “Leading Space to: Superview” with anything as the value. You can tell if these constraints exist by selecting the box and looking for a blue bar extending from the left edge of the box out to the edge of the window. Delete the ones that are deleteable, either by selecting Delete from the menu hiding under the gear icon in the Constraint’s entry in the Size Inspector for the box, or by selecting the blue bar and pressing the Delete key.
Simulate Document and try to resize horizontally. The window won’t budge at all. We’ve got some constraints holding things in place that we need to identify and remove. For each box, look at the constraints listed in the Size Inspector and find ones that say “Leading Space to: Superview” with anything as the value. You can tell if these constraints exist by selecting the box and looking for a blue bar extending from the left edge of the box out to the edge of the window. Delete the ones that are deleteable, either by selecting Delete from the menu hiding under the gear icon in the Constraint’s entry in the Size Inspector for the box, or by selecting the blue bar and pressing the Delete key.
After removing them all, again select Editor ![]() Simulate Document and try to resize horizontally. This time the window should resize the way we want it to, as shown in Figure 6-8.
Simulate Document and try to resize horizontally. This time the window should resize the way we want it to, as shown in Figure 6-8.

Figure 6-8. Finally, resizing works!
Before we move on to implementing code, here are a few more words about resizing. Debugging resizing problems is almost always an iterative, trial-and-error process. We’ve touched on a few ways to make it work here:
- Resize the window in Interface Builder, and see how things resize in relation to the window.
- If the window design has evolved, try moving user-interface elements around to reset the constraints.
- Play with the Simulate Document feature and experiment.
- Look at how constraints are visualized in Interface Builder, via the blue bars and the Size Inspector.
There’s more to learn about constraints and Cocoa Auto Layout; these are just the basics. Check out the Cocoa Auto Layout Guide on the Apple Developer Connection web site and in the Xcode documentation for more details and debugging tips.
Note Cocoa Auto Layout was introduced in Mac OS X 10.7. Prior to that, resizing was controlled using a mechanism called “springs and struts,” which controlled how views resized relative to the window that contained them. In 10.7 and beyond, the old springs and struts resizing behavior is translated into constraints behind the scenes; applications can have nib files using constraints and nib files using springs and struts that co-exist. However, if you come across pre-2011 Cocoa code, you’ll almost surely encounter nib files that don’t use constraints.
Making Way for the Table View: Code Edition
With the connections in place and resizing now under control, we can turn our attention to the code necessary to drive the table view and respond to clicks on the Add and Remove buttons. To do this, we need to leave Interface Builder mode and get back to our code. Open the Project Navigator (![]() 1), if it isn’t already open. Single-click the entry for the VillainTrackerAppDelegate.m file and the Editor area should change from Interface Builder to a code window showing the code for our object.
1), if it isn’t already open. Single-click the entry for the VillainTrackerAppDelegate.m file and the Editor area should change from Interface Builder to a code window showing the code for our object.
With the groundwork already laid in the last chapter, adding support for an array of villains is surprisingly simple. Basically, we have to create an array, tell the table view when we want it to display its content (whenever its content has changed), implement a few dataSource methods to give the table view its content, and implement a delegate method that will be called when the table view’s selection changes (so that we can update all the other views to match the selected villain). Then we’ll add a pair of methods to add and delete villains from the array, and we’ll be done!
Let’s start off by initializing an array to hold our villains and telling the table view that it should load its content. We do this by adding just a few lines to applicationDidFinishLaunching:, as seen in bold in the following code. First we create an array to hold all villains (which initially contains just the first villain we created in code earlier) and assign it to our villains instance variable. Then we tell the table view to load its content, and then to select its first row.
Telling the table view which row to select is more complicated than it might seem at first. The NSTableView method that we use is called selectRowIndices:byExtendingSelection:. Since a table view can have more than one selected row, and the selected rows need not be contiguous, the table view expects a set of indices to select in the selectRowIndices:byExtendingSelection: method. In our case, we want only one row selected, so we construct a set with just one element on the fly.
- (void)applicationDidFinishLaunching:(NSNotification *)aNotification {
  self.villain = [[NSMutableDictionary alloc] initWithObjectsAndKeys:
                  @"Lex Luthor", kName,
                  @"Smallville", kLastKnownLocation,
                  [NSDate date], kLastSeenDate,
                  @"Superman", kSwornEnemy,
                  @"Revenge", kPrimaryMotivation,
                  [NSArray arrayWithObjects:@"Evil Genius", nil], kPowers,
                  @"Superhero action", kPowerSource,
                  @9, kEvilness,
                  [NSImage imageNamed:@"NSUser"], kMugshot,
                  @"", kNotes,
                  nil];
  /* new code is here */
  self.villains = [NSMutableArray arrayWithObject:self.villain];
  [self.villainsTableView reloadData];
  [self.villainsTableView selectRowIndexes:[NSIndexSet indexSetWithIndex:0] byExtendingSelection:NO];
  /* end of new code */

  [self updateDetailViews];
}
We’ll also need to add the [villainsTableView reloadData] call to the end of each of the takeName:, takeLastSeenDate:, and takeMugshot: methods, so that when the user edits the controls for those attributes, the table view will be updated accordingly. Just copy that line and paste it into the end of each of those methods. It may seem like overkill to call a method that looks like it’s going to reload the entire table of data just because a single value has been changed, but don’t worry: NSTableView uses lazy loading, and normally only requests content for a given row when that row is about to be displayed. You might have a million rows of content, but if you never scroll past the first 30, no more than the first 30 are likely to be loaded by the table view. Likewise, telling a table view to reload its data will only make it load the visible rows immediately; the rest will only be reloaded when they scroll into display.
At this point, we should be able to compile and run our app, and we should see roughly the same thing we saw at the end of the last chapter, plus a big empty table view and a couple of buttons that have no effect. Time to fill that table view with villains!
The Table View Needs Help
We’ve told the table view to load its content, but it can’t do anything until we implement some methods from the NSTableDataSource and NSTableViewDelegate protocols in the object we connected to the table view’s dataSource and delegate outlets: our VillainTrackerAppDelegate. NSTableDataSource and NSTableViewDelegate are informal protocols, similar to most delegate protocols, which means that we don’t have to declare that our class conforms to the protocol. As a result, implementing the NSTableDataSource and NSTableViewDelegate methods are, as far as Objective-C is concerned, optional. In spite of that, there are a few methods that are in fact required for the table view to display anything: numberOfRowsInTableView: from NSTableViewDataSource and tableView:viewForTableColumn:row: from NSTableViewDelegate, both of which are used by the table view to prepare content for display. Here’s how these should be implemented in VillainTrackerAppDelegate.m:
- (NSInteger)numberOfRowsInTableView:(NSTableView *)aTableView {
  return [self.villains count];
}

- (NSView *)tableView:(NSTableView *)aTableView
   viewForTableColumn:(NSTableColumn *)tableColumn
                  row:(NSInteger)row {

    NSMutableDictionary *thisVillain = [self.villains objectAtIndex:row];
    NSString *thisColName = [tableColumn identifier];

    NSView *result = nil;

    // Depending on which column we’re using, we need to do different things.
    // Passing [tableColumn identifier] to makeViewWithIdentifier ensures that we get
    // the view that’s already been configured for the column in IB, and AppKit manages this for us.
    if ([thisColName isEqualToString:kName]) {
        NSTableCellView *thisCell = [aTableView makeViewWithIdentifier:thisColName owner:self];
        thisCell.textField.stringValue = [thisVillain objectForKey:kName];
        result = thisCell;
    } else if ([thisColName isEqualToString:kLastSeenDate]) {
        NSTableCellView *thisCell = [aTableView makeViewWithIdentifier:thisColName owner:self];
        thisCell.textField.stringValue = [thisVillain objectForKey:kLastSeenDate];
        result = thisCell;
    } else if ([thisColName isEqualToString:kMugshot]) {
        NSImageView *thisCell = [aTableView makeViewWithIdentifier:thisColName owner:self];
        [thisCell setImage:[thisVillain objectForKey:kMugshot]];
        result = thisCell;
    }

    // return the result.
    return result;
}
The first method should be self-explanatory: we just return the size of the array so that the table view knows how many rows it needs to display. The second method is called by the table view each time a cell is going to be displayed in the table. The table view tells us the column and row index number that it wants to display. The row index number is the same as the index number for the relevant object in our content array, so calling [villains objectAtIndex:rowIndex] returns the relevant model object from villains. As you may recall, the model objects we’re using are in fact just NSMutableDictionary instances, with all their values accessible by keys. When we configured the identifier attribute of each column in our table view, we used the same key names that our model objects use. Based on the identifier of the column, we ask the table view to make an instance of the appropriate NSView subclass for the column using makeViewWithIdentifier:owner:. We then configure the view based on the relevant value from the model object and return the view to the table view.
For example, when the cell in the top row under the Name column is about to be displayed, this method will be called with a rowIndex of 0 and a TableColumn pointing to the Name NSTableColumn. We use the 0 to specify which villain to grab from our villains array, then we use the value returned by the table column’s identifier method, @"name", to retrieve a value from the chosen villain. We ask the table view to get an instance of the appropriate NSView for that column (which we configured in Interface Builder), and then populate it in whatever manner works for that NSView. Lastly, we return that view, and the table view draws it.
Now we should be able to compile and run VillainTracker, and see that the default villain is displayed both in the controls and as the only row in the table view. Furthermore, if we edit the villain’s name, last seen date, or mugshot in the controls, we should see those new values reflected in the table view. However, we still only have one villain, and no way to track more. Let’s change that right now.
We stubbed out the newVillain: method earlier. Let’s fill in the implementation now. The newVillain: method adds a new “empty” villain object to our array of villains, tells the table to reload, and tells the table view which row to select (the last one, since that’s the one we just added).
- (IBAction)newVillain:(id)sender {
 [_window endEditingFor:nil];
 [self.villains addObject:[NSMutableDictionary
  dictionaryWithObjectsAndKeys:
            @"", kName,
            @"", kLastKnownLocation,
            [NSDate date], kLastSeenDate,
            @"", kSwornEnemy,
            @"Greed", kPrimaryMotivation,
            [NSArray array], kPowers,
            @"", kPowerSource,
            [NSNumber numberWithInt:0], kEvilness,
            [NSImage imageNamed:@"NSUser"], kMugshot,
            @"" , kNotes,
            nil]];

 [self.villainsTableView reloadData];

 [self.villainsTableView selectRowIndexes:[NSIndexSet indexSetWithIndex:[villains count]-1]
  byExtendingSelection:NO];
}
The only new thing we might see in here is the very first method call, [_window endEditingFor:nil]. Let’s look at both parts of that. First, where did the _window instance variable come from? Xcode constructed this for us from a declared property that it generated in the VillainTrackerAppDelegate.h file, and automatically connected to the window:
@property (assign) IBOutlet NSWindow *window;
Since we didn’t give an explicit name via a @synthesize declaration, Xcode defaulted to creating a new instance variable with a leading underscore. Second is the method that we’re calling on the window, endEditingFor:. This simply tells the window that it’s time to end whatever other editing behavior the user is currently engaged in, such as typing in a text field. We need to call this method so that the edited value can be “saved” to its underlying villain object because later in newVillain: we’re going to change the table view’s selection, which would in turn wipe out the values shown in the various controls!
The details part of our application still shows only the first villain in our list. In order to update the detail views, we need to implement a delegate method that is called whenever the table view’s selection changes. This lets us notice which row the user has selected, change our villain instance variable to point at the relevant row in the villains array, and redisplay all the other controls to match the new selection. Add this method to the @implementation section in VillianTrackerAppDelegate.m:
- (void)tableViewSelectionDidChange:(NSNotification *)aNotification {
 if ([self.villainsTableView selectedRow] > -1) {
  self.villain = [self.villains
           objectAtIndex:[self.villainsTableView selectedRow]];
  [self updateDetailViews];
  NSLog(@"current villain properties: %@", self.villain);
 }
}
Note that the meat of this method is wrapped inside an if clause. That’s necessary because it’s possible for a table view to tell us that it currently has no selected row at all, which it does by returning –1 from its selectedRow method. Beyond that, you should be able to understand what’s happening in there by now.
Now compile and run the app, and see that the + button now actually makes something happen, as shown in Figure 6-9. Furthermore, we should be able to click back and forth between all of the villains in the table view and see the values in the other controls change accordingly.

Figure 6-9. The + button now works to add villains
Stop Your Evil Ways!
It’d be nice to be able to delete a villain. Once our hero has convinced a villain to stop their evil ways, we might want to drop them from the database. Or maybe we just made a typo. Either way, let’s add the ability to delete a bad guy. We’ve got the deleteVillain: method stubbed out, and here’s what that method should do. (We’ve added comments to show the different sections, which will be described after the code.)
- (IBAction)deleteVillain:(id)sender {
          //
          // Section 1:
          //
          [_window endEditingFor:nil];
          NSInteger selectedRow = [self.villainsTableView selectedRow];

          //
          // Section 2:
          //
          [self.villains removeObjectIdenticalTo:self.villain];
          [self.villainsTableView reloadData];

          //
          // Section 3:
          //
          if (selectedRow >= [self.villains count]) {
                    selectedRow = [self.villains count]-1;
          }

          //
          // Section 4:
          //
          if (selectedRow > -1) {
                    // deselect all rows to ensure that the tableview sees the
                    // selection as "changed", even though it might still have
                    // the same row index.

                    //
                    // Section 5:
                    //
                    [self.villainsTableView deselectAll:nil];
                    [self.villainsTableView selectRowIndexes:[NSIndexSet indexSetWithIndex:selectedRow] byExtendingSelection:NO];

                    [self updateDetailViews];
           }
}
This method is a bit more complicated than most of the code we’ve shown you in this book so far, so a little additional explanation is in order.
In Section 1, we tell the window to finish up any editing that’s going on, then we grab the index of the table’s currently selected row—that is, the row that’s going to be deleted. Note that we already know which villain is selected because it’s stored in an instance variable, but having the row index is important for making sure the post-delete selection makes sense (which we’ll tackle in Section 4).
In Section 2, we delete the selected object (pointed at by the villain property) from the villains array, then we tell the table view to reload. Note the method for removing the villain from the array, removeObjectIdenticalTo:. This method makes the NSMutableArray scan itself for the object by comparing its actual memory address with the memory addresses of the objects it contains, so that it finds and removes only the exact object we pass in. Otherwise, if we had gone with the more commonly used removeObject: method, it would be comparing objects by sending the isEqual: method, which in turn compares values. In that case, any other villain objects we had entered with attributes identical to those of the selected villain would run the risk of being deleted as well.
In Section 3, we make a small adjustment. If the previous selected row index was the last in the array, now that we’ve removed an object from the array, that index is now out of bounds. In that case, we reset it to point at what is now the last object.
Next, Section 4 checks to see if selectedRow is 0 or higher. This check is important because there’s a real chance that Section 3 set it to –1! Consider the case where we only have one object in the array, and click the Remove button: at the outset, selectedRow would be 0 (the index of the only row in the array), but after Section 3 it would be –1, which Section 4 handles by just skipping the rest of the method.
Finally, Section 5 deselects everything in the table view, then selects what we now want for the selected row, and finally updates all the views based on the current selection. It may not seem obvious, but it’s important to first deselect all rows in the table view, otherwise the tableViewSelectionDidChange: delegate method may not always be called (because often, after deleting a row, the selected row index itself will be the same number, and the table view has no way of knowing that we’ve deleted an object from our content array, making the row index number now refer to a different object).
Now compile and run the app; we can now delete the selected villain and the values in the controls will change to match the new selection.
There’s just one last feature we want to implement. Our users can’t yet edit values directly in the table view. Let’s fix that now.
A user should be able to edit the name of a villain or drag in a new mugshot to any row in the table view and update the appropriate villain. Since the columns of the table view are NSViews, each cell in the table view can have a target and action specified in Interface Builder; user-interface elements inside of a table view work just like any other view. When the user edits a value inside the table view, the action can connect back to our code to inform us of the change. We’re limited in that the target must be the delegate of the table view, but that’s not a problem for this application. In addition, our existing takeName: and takeMugshot: methods are available, but they’ll need some minor changes. These methods work on the selected villain, but the user can’t edit a value inside the table view without selecting the row, which selects the villain. However, these methods currently expect to only be called from the control in the Details view, but now we’re adding the ability to set it from more than one place. For this app, we’ll only allow in-row editing of the name and the mugshot, and we’ll prohibit editing of the date last seen.
There’s another small barrier that we’ll need to resolve. The table view cells are, by default, not editable. This is easy to change from within Xcode.
To wire this up, we need to control-drag a connection from the view in each column into the VillianTrackerAppDelegate instance. However, the table view cells are buried pretty deep in the window’s view hierarchy, so we’ll look at a different way to set up the connection that makes it easier to get to the right user-interface component.
Back in Xcode, open up the MainMenu.xib file, which will open up in an Interface Builder canvas. Click the small expansion triangle in the lower left-hand corner of the screen, which will expand the object dock along the left edge of the screen into an outline of the window’s view hierarchy. Also, open up the Attributes Inspector in the Utility area.
Drill down into the outline to the Name column’s text field; from the outside in, the path is Window – Villain Tracker ![]() View
View ![]() Scroll View – Table View
Scroll View – Table View ![]() Table View
Table View ![]() Table Column – Name
Table Column – Name ![]() Table Cell View
Table Cell View ![]() Static Text – Table View Cell
Static Text – Table View Cell ![]() Text Field Cell – Table View Cell. As you drill in, you’ll also see this path laid out in the jump bar above the Editor canvas. Click the Text Field Cell – Table View Cell and control-drag to the Villain Tracker App Delegate instance further down in the dock, as shown in Figure 6-10. When the Utility window appears, select takeName: from the list of actions. Before moving on, look in the Attributes Inspector, also shown in Figure 6-10. There’s a pop-up menu labeled Behavior, with a current value of None. Select that and change it to Editable.
Text Field Cell – Table View Cell. As you drill in, you’ll also see this path laid out in the jump bar above the Editor canvas. Click the Text Field Cell – Table View Cell and control-drag to the Villain Tracker App Delegate instance further down in the dock, as shown in Figure 6-10. When the Utility window appears, select takeName: from the list of actions. Before moving on, look in the Attributes Inspector, also shown in Figure 6-10. There’s a pop-up menu labeled Behavior, with a current value of None. Select that and change it to Editable.

Figure 6-10. Control-dragging using the dock
Lastly, do the same thing from the Image Well. The path to the Image Well is Window – Villain Tracker ![]() View
View ![]() Scroll View – Table View
Scroll View – Table View ![]() Table View
Table View ![]() Table Column – Mugshot
Table Column – Mugshot ![]() Image Well
Image Well ![]() Image Cell. Control-drag from the Image Well row (not the Image Cell row, but the one above it) down to the Villain Tracker App Delegate, and select takeMugshot:. To make the Image Well editable, there’s a checkbox near the top of the Attributes Inspector. If you like, you can also enable Animates. If your villain’s mugshot includes animation information or multiple frames, for instance, an animated GIF from the villain’s MySpace page, then this will play the animation on display.
Image Cell. Control-drag from the Image Well row (not the Image Cell row, but the one above it) down to the Villain Tracker App Delegate, and select takeMugshot:. To make the Image Well editable, there’s a checkbox near the top of the Attributes Inspector. If you like, you can also enable Animates. If your villain’s mugshot includes animation information or multiple frames, for instance, an animated GIF from the villain’s MySpace page, then this will play the animation on display.
As mentioned, the takeName: and takeMugshot: methods all expect to be called from the control doing the update in the Details view. Earlier, we added a call to [villainsTableView reloadData] to the end of each of these methods. We now need to add another call after that one. In both takeName: and takeMugshot:, add a call to [self updateDetailViews] at the end. This ensures that regardless of where a user makes an edit (in the table view or in the Details view) it’ll be reflected in both places.
It’s time to compile and run the app again to see if we can edit within the table view. At this point, we should be able to add a new villain, edit their attributes, and then delete them. We still can’t save any information about the villain; that’ll be the topic of an upcoming chapter.
Wrap Up
This chapter contained a simple demonstration of how to maintain a list of items, display them in a table view, and edit the details for the selected item in a separate set of controls. We learned a bit about how NSTableView uses its dataSource to access items for display and editing, and saw how it informs its delegate when the selection changes, allowing us to manually update the content in views that are dependent on the table view’s selection.
If you’re familiar with other desktop GUI development environments, some of this may have seemed a bit foreign to you, but we hope you can see some of the advantages included in the approach that Cocoa supports, such as providing a clean division between code and GUI layout. However, at this point it’s time for a confession: the way we’ve been doing things thus far isn’t necessarily the best way to do these sorts of things in Cocoa. As simple as it’s all been so far, we’ve actually been showing you the hard way to solve some of these problems! During the past few years, a new approach to GUI programming has taken root in the Cocoa community, and it’s becoming more prevalent all the time. It’s a technology called Cocoa bindings, and it’s the topic of Chapter 7.