
Cocoa Bindings
Chapters 5 and 6 covered how to connect a controller object to various kinds of view objects, both to display values and to retrieve new values in response to user actions. In our examples, we typically had one small action method for each view (triggered when the user edited the value displayed in the view), plus one large updateDetailViews method that updated the contents of all the views at once (called whenever the selection changed). That’s fine for a simple project, but there are some problems with that approach. First of all, there’s a scalability issue. Imagine having not ten but a hundred views. Following this approach, we’d end up with a controller having a hundred small action methods and one huge method to push values into all of the views!
Plus, we really have some tight coupling between our controller and its associated views. For example, what if we start off with an NSDatePicker for displaying and editing a date, but later decide we want to use an NSTextField? Besides modifying the GUI, we’d also have to change the outlet, the corresponding action method, and the updateDetailViews method.
Fortunately for us, Apple recognized this problem some time ago, and since Mac OS × 10.3 it has included a technology called Cocoa bindings that solves many of these problems. Cocoa bindings lets us use Interface Builder to configure a view so that it retrieves its value and passes changes back to a model object more or less automatically. All we do is tell it which controller object to deal with and which string it should use as a key for getting and setting a value. We can access model objects through our own controller classes or by using generic controller classes provided in Cocoa.
This results in an architecture where our own controller class often doesn’t need to know anything specific about any of the view objects in use. We don’t need to have instance variables pointing at them, and we don’t need to implement action methods to get their input! Our controller ends up as little more than a simple channel between a model object and a bunch of view objects, and from the controller’s point of view it doesn’t make a difference if there are ten views or a hundred.
In this chapter, we’ll learn how to use Cocoa bindings with simple controls such as checkboxes, sliders, and text fields, as well as with complex controls such as table views. We’ll create bindings that connect to model objects through a couple of Apple’s included controller classes. We’ll also get an introduction to using NSUserDefaults and its bindings-ready friend NSUserDefaultsController to deal with preferences in our application.
Binding to Simple Controls
The example application for this chapter is something that could be used by a Game Master in a role-playing game to randomly create characters, monsters, and dungeons. The main window will contain buttons that create random game objects when the user clicks them and text fields to display the result. We’ll also make a Preferences window where the user can specify some parameters for the creation of the game objects. We won’t do the actual “rolling” of these random objects. We’ll just display a summary of the parameters used each time the user clicks one of the buttons. The random game object creation is a bit too far afield for this book, but it could be a fun exercise for the reader if you are so inclined!
Creating the DungeonThing Project and Preferences Window
Launch Xcode, and select File ![]() New Project from the menu. Choose Cocoa Application, and name it “DungeonThing” on the New Project pane. For this example application, we’re also using DungeonThing as the class prefix. (If that’s too much to type, you can use DT, in which case all the references to DungeonThingAppDelegate that you’ll encounter later in the chapter will show up as DTAppDelegate in Xcode.) As before, leave the checkboxes in their default settings: Use Automatic Reference Counting should be checked, and the other checkboxes (Create Document-based Application, Use Core Data, and Include Unit Tests) should be unchecked.
New Project from the menu. Choose Cocoa Application, and name it “DungeonThing” on the New Project pane. For this example application, we’re also using DungeonThing as the class prefix. (If that’s too much to type, you can use DT, in which case all the references to DungeonThingAppDelegate that you’ll encounter later in the chapter will show up as DTAppDelegate in Xcode.) As before, leave the checkboxes in their default settings: Use Automatic Reference Counting should be checked, and the other checkboxes (Create Document-based Application, Use Core Data, and Include Unit Tests) should be unchecked.
Now find MainMenu.xib in Xcode (it’s in the Project Navigator in the navigation area, on the far left) and single-click to open it in an Interface Builder canvas. This starts off as a standard empty application GUI, which should look pretty familiar by now. This nib file already contains a main window, which we’ll get to a little later on, but first we’ll get to the heart of the matter by creating a Preferences window whose GUI controls will be configured exclusively with Cocoa bindings.
In the Object Library pane (![]() 4), type “window” into the Search box at the bottom, and drag out the Window object from the result list onto the Interface Builder canvas (we can’t drag it out on top of another window in Interface Builder, so if the pre-existing window in the nib file is open on the canvas, close it first). This window will be our Preferences window. Use the Attributes Inspector (
4), type “window” into the Search box at the bottom, and drag out the Window object from the result list onto the Interface Builder canvas (we can’t drag it out on top of another window in Interface Builder, so if the pre-existing window in the nib file is open on the canvas, close it first). This window will be our Preferences window. Use the Attributes Inspector (![]() 4) to set the window’s title to “DungeonThing Preferences,” and note that the label under the corresponding icon in the nib window also changes. In the same Inspector pane, click to turn off the Resize checkbox because there’s no reason to allow the user to resize this window. Also, click to turn off the Visible at Launch checkbox so that the window doesn’t appear on-screen as soon as the nib loads, and click to turn on the Hide on Deactivate checkbox so that the window disappears when a user clicks away from the application. We only want the Preferences window to appear when the user selects the appropriate menu item, and it should only be visible when DungeonThing is the foreground application.
4) to set the window’s title to “DungeonThing Preferences,” and note that the label under the corresponding icon in the nib window also changes. In the same Inspector pane, click to turn off the Resize checkbox because there’s no reason to allow the user to resize this window. Also, click to turn off the Visible at Launch checkbox so that the window doesn’t appear on-screen as soon as the nib loads, and click to turn on the Hide on Deactivate checkbox so that the window disappears when a user clicks away from the application. We only want the Preferences window to appear when the user selects the appropriate menu item, and it should only be visible when DungeonThing is the foreground application.
Make the window a bit wider than its default size in order to accommodate the controls we’re about to add. Press ![]() 3 to bring up the Size Inspector, and make sure that the new window is selected by clicking its title bar, then type 530 into the Width field.
3 to bring up the Size Inspector, and make sure that the new window is selected by clicking its title bar, then type 530 into the Width field.
The final step for the window itself is to hook things up so that a user can open this window by accessing the Preferences item in the menu. Click the DungeonThing menu item at the top of the Interface Builder canvas, and then single-click the Preferences item. This object will connect to the Preferences window with target/action, so Control-drag from the menu item to the Preferences window (either drag to the icon representing the window in the object dock on the left of the Interface Builder canvas, or to the title bar of the real window), and select the makeKeyAndOrderFront: action. That’s a method that will make any window become the front-most window in its application and also become the “key” window, ready to receive events in response to the user pressing keys on the keyboard (hence the “makeKey” in the method name).
We’re going to split up the application preferences into three different groups, one for each of the three game objects the user can create. We’ll separate the groups by placing the controls in an NSTabView, which lets the user switch between different views by selecting from a list of tabs along the top. In the Object Library pane, type in “tab,” then drag the resulting Tab view into our empty window. Resize it so that it nearly fills the window (as shown in Figure 7-1), leaving the standard margin that the blue lines will happily show us.

Figure 7-1. The preferences window for DungeonThing looks like this after adding and naming the tabs
When we drag out a new tab view from the Object Library, by default it has two tabs, but we want ours to have three. Click the Tab view, and open the Attributes Inspector (![]() 4). Note the Tabs field. Click the tiny up-arrow to change its value from 2 to 3, and see three tabs. Double-click the title of each tab, and change their titles to “Character Generation,” “Monster Generation,” and “Dungeon Generation,” respectively. Figure 7-1 shows what the window should look like at this point.
4). Note the Tabs field. Click the tiny up-arrow to change its value from 2 to 3, and see three tabs. Double-click the title of each tab, and change their titles to “Character Generation,” “Monster Generation,” and “Dungeon Generation,” respectively. Figure 7-1 shows what the window should look like at this point.
Character Generation Preferences
Now let’s start populating these tabs with some controls. First up is the Character Generation tab, so click that tab to select it. By now you should be comfortable enough finding views and controls in the Object Library that we won’t hold your hand and tell you every single step of grabbing these objects and dragging them into your window. It should be just about enough for you to look at Figure 7-2 and know that you’re using a slider, a matrix of radio buttons, a matrix of checkboxes, and a handful of labels, including the small one out to the right of the slider. (As a reminder, to get a matrix of checkboxes, drag one out and then select Editor ![]() Embed In
Embed In ![]() Matrix. To get more rows and columns in the matrix, Option-drag the resize handle.)
Matrix. To get more rows and columns in the matrix, Option-drag the resize handle.)

Figure 7-2. The preferences for character generation in DungeonThing
Drag out each of these objects from the Object Library and align them roughly as seen in Figure 7-2. To make the NSSlider look and act like the one seen in the image, select it and open the Attributes Inspector (![]() 4). Give it 19 tick marks, check the box to make it stop only on tick marks, and then set its minimum and maximum values to 2 and 20, and its current value to 10. A bit further down, click to turn on the Continuous checkbox (so the slider will report its value continuously while the user is dragging it), and we’re all set. Figure 7-3 shows how it’s done.
4). Give it 19 tick marks, check the box to make it stop only on tick marks, and then set its minimum and maximum values to 2 and 20, and its current value to 10. A bit further down, click to turn on the Continuous checkbox (so the slider will report its value continuously while the user is dragging it), and we’re all set. Figure 7-3 shows how it’s done.

Figure 7-3. Configuration of an NSSlider for selecting an integer between 2 and 20
One other adjustment that needs to be made (but can’t be seen from the screenshot) is to make the matrix containing the checkboxes behave appropriately in response to mouse clicks. Because NSMatrix is designed to contain a variety of controls, it has multiple ways of interacting with its cells when the user clicks one of them. Select the matrix of checkboxes, and in the Attributes Inspector, set the Mode pop-up to Highlight if it isn’t already set to that. This mode makes the matrix respond to a click in a cell by toggling the clicked cell’s selected state between zero and one, which switches the checkbox on and off.
The last configuration required for this tab is to set the tags for the two radio buttons so we can tell them apart later (the checkboxes don’t need to have their tags set because they will be dealt with a little differently when we get to the bindings). Do this by keeping the Attributes Inspector up, then click one radio button and then the other, typing in new tag values for each of them in the Inspector. Set the tag for the first radio button cell to 1, and set the second to 2.
Monster Generation Preferences
The next tab contains controls that let the user specify preferences for random monster generation, which is depicted in Figure 7-4.

Figure 7-4. Monster Generation preferences
Here we have a slider, a matrix of checkboxes, and a couple of text fields as labels. The slider should be configured similarly to the one used in the Character Generation tab, but with a few different attributes: minimum value of 1, maximum value of 10, and showing 10 tick marks.
Dungeon Generation Preferences
Finally, we’ll create the GUI for the Dungeon Generation preferences. This is a simple one—just sliders and text fields, as seen in Figure 7-5. These sliders should be configured just like the one in the Monster Generation tab, with a range from 1 to 10 and showing 10 ticks.

Figure 7-5. Dungeon Generation preferences tab
Binding to NSUserDefaultsController
At this point, we have all these GUI controls in a window, but we have no outlets to connect to them and no action methods for them to call when the user clicks on them. So, now what? Now it’s time to create our first bindings! We’re going to use a class called NSUserDefaultsController, which is a bindings-ready generic controller class that is included in Cocoa. A bindings-ready controller like this lets us bind view objects to an underlying model object right within Interface Builder. One nice thing about this class is that it maintains its own storage in the form of NSUserDefaults, which is the standard class used in Cocoa applications for saving and retrieving a user’s application preferences. This will let us bind each view object’s value to a uniquely keyed value in the application’s preferences. These preferences are automatically saved before a user exits the application and reloaded the next time the user launches the application.
Bindings for Character Generation
Go to the Preferences window we’re building, and switch back to the Character Generation pane. Click on the slider, and then bring up the Bindings Inspector (![]() 7). In this Inspector, we can see all the attributes of a view object that can be bound to a value in a model object. Most often, we’ll be binding the Value to something, but each view class offers its own set of attributes available for binding. The slider, for instance, can have its Max Value and Min Value attributes bound to something, which would allow us to vary those extremities based on values in a model object. Some other view objects can bind text colors and fonts to model values, and most of them can have their Hidden and Enabled states bound to model values. For now, we’re going to bind this slider’s Value attribute, so click the Value disclosure triangle to see its configuration options. Figure 7-6 shows the default settings.
7). In this Inspector, we can see all the attributes of a view object that can be bound to a value in a model object. Most often, we’ll be binding the Value to something, but each view class offers its own set of attributes available for binding. The slider, for instance, can have its Max Value and Min Value attributes bound to something, which would allow us to vary those extremities based on values in a model object. Some other view objects can bind text colors and fonts to model values, and most of them can have their Hidden and Enabled states bound to model values. For now, we’re going to bind this slider’s Value attribute, so click the Value disclosure triangle to see its configuration options. Figure 7-6 shows the default settings.
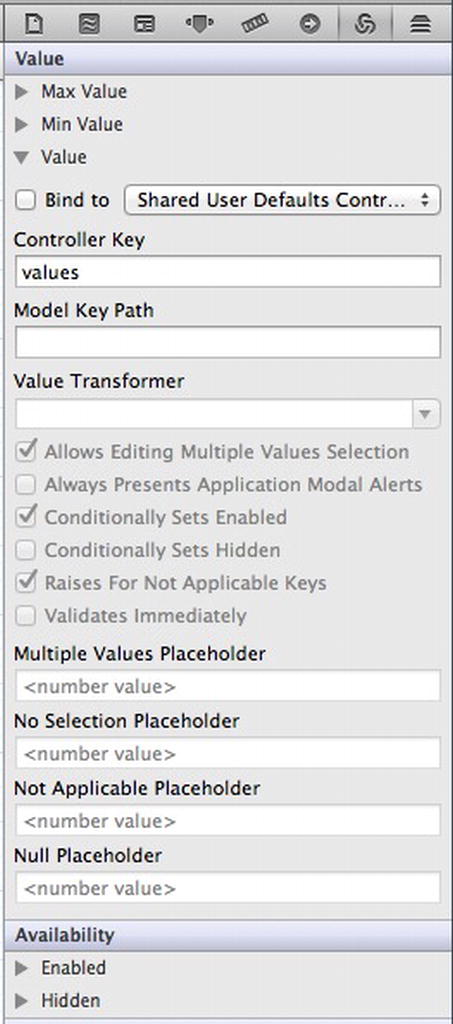
Figure 7-6. The default “unbound” state for an NSSlider’s Value binding options
To establish a binding, we need to configure at least three things: the controller object to bind to, the controller key, and model key path (all the rest are optional settings that allow us to refine the binding’s behavior in special situations, some of which we’ll cover later). Pick the controller object from the Bind to pop-up list, which contains all controller objects that are present in our nib file, including any controllers of our own, any generic controllers we’ve dragged over from the Library, and special controllers like NSUserDefaultsController, which is available automatically in every nib file (and shows up as Shared User Defaults Controller in the pop-up list). The controller key lets us choose different “aspects” of the model object or objects that a controller provides. For example, NSArrayController, which provides binding access to an array of objects, has different controller keys to provide access to the entire sorted array or just the current selection. The model key path is a string that is used as a key to get and set a value in the model object.
So, for our first binding, start off by picking the Shared User Defaults Controller from the pop-up list. This controller is automatically available in any nib file, though we can’t see it anywhere until we use it in a binding, at which point it appears in the main nib window. Now check the Controller Key combo box, and make sure it’s set to values. Then click on the Model Key Path combo box, and type “characterMaxNameLength” into the combo box. This string defines the key that will be used to store the slider’s value in NSUserDefaults—the user’s application preferences. Press Enter or tab out of the field, and note that the Bind to checkbox at the top of the Inspector gets checked. That’s it! We don’t need to worry about any of the remaining controls for now; their default values are fine for our purposes. Figure 7-7 shows what the relevant configured bits in the Inspector should look like when this binding is configured.
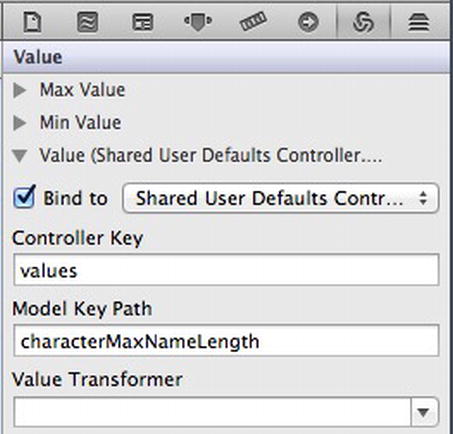
Figure 7-7. The completed binding for the first slider
Now select the small text field to the right of the slider, and configure the exact same binding we did for the slider: Shared User Defaults Controller, “values,” and “characterMaxNameLength.” That will make it pull its display value from the same place (the value for characterMaxNameLength) in the same model object (the user’s application preferences). To see a little Cocoa bindings magic in action now, select Editor ![]() Simulate Interface from the menu, click and drag the slider, and watch the value in the small text field update simultaneously. Note that this is the same feature we built in Chapter 2 but with a different mechanism: while we’re dragging the slider, its value is being pushed into our application preferences by the NSUserDefaultsController, which also passes the value along to the other object that’s bound to the same key, the little text field. Pretty neat trick! But it’s not a trick at all. It’s a simple example of the dynamic nature of Cocoa bindings. Using this technology, we can eliminate a lot of boring code from our controller classes and sometimes get rid of our controller classes entirely—using only Cocoa’s included controller classes instead.
Simulate Interface from the menu, click and drag the slider, and watch the value in the small text field update simultaneously. Note that this is the same feature we built in Chapter 2 but with a different mechanism: while we’re dragging the slider, its value is being pushed into our application preferences by the NSUserDefaultsController, which also passes the value along to the other object that’s bound to the same key, the little text field. Pretty neat trick! But it’s not a trick at all. It’s a simple example of the dynamic nature of Cocoa bindings. Using this technology, we can eliminate a lot of boring code from our controller classes and sometimes get rid of our controller classes entirely—using only Cocoa’s included controller classes instead.
Let’s move on to the next GUI control, the matrix of radio buttons in the middle. Click the matrix, and then look at the Bindings Inspector where we’ll see that there is no Value option. For this control, instead of binding a Value, we’ll be binding the Selected Tag attribute, which means that when a user selects a cell, that cell’s tag will be pushed down to the model, and when the Preferences window is brought up next time, that saved tag will determine which radio button is selected. Open up the Selected Tag section of the Bindings Inspector, and again make sure that Shared User Defaults Controller is selected and that the Controller Key is “values,” but this time type “characterStatsGenerationPolicy” into the Model Key Path and press Enter.
Next, let’s tackle the Allowed Character Classes checkboxes. For each of these, we’ll make up a new key name and use it to bind the Selected status to a value in the user’s application preferences. Click the first cell, Paladin. The Inspector title should change to Button Cell Bindings. If not, click the button again until it does. Now bind this button cell’s Value attribute to the characterClassAllowedPaladin key. Repeat these steps for each of the remaining button cells, binding each of them via Shared User Defaults Controller with the appropriate key name. Bard should be bound with characterClassAllowedBard, Fighter with characterClassAllowedFighter, and so on. When we get to Magic-User, for the sake of consistency, use the key name characterClassAllowedMagicUser, leaving out the - symbol.
Bindings for Monster Generation
Now switch over to the Monster Generation tab. Bind the Value of the slider to monsterBootyFrequency, and do the same for the small text field to the right. Then configure the checkboxes the same way we did on the Character Generation tab. Click the Orc checkbox until the checkbox itself is selected, and bind its Value to monsterTypeAllowedOrc. Continue through the rest of the checkboxes, binding the Value for each of them to the appropriate key name: monsterTypeAllowedGoblin, monsterTypeAllowedOgre, and so on.
Bindings for Dungeon Generation
Finally, switch to the Dungeon Generation tab, which contains just three slider and text field pairs. To the right of the Tunnel Twistiness label, configure the Value bindings for both the slider and the text field to “dungeonTunnelTwistiness.” Bind both of the Monster Frequency controls’ Values to dungeonMonsterFrequency and both of the Treasure Frequency controls’ Values to dungeonTreasureFrequency.
Now it’s time to pay some attention to our main window, which will contain buttons the user can click to generate the characters, monsters, and dungeons, plus text fields to display the results. Click the main window’s title bar (or double-click its icon in the main window if it’s not already visible) and bring up the Size Inspector (![]() 5). Change the window size to 731 by 321, then switch to the Attributes Inspector (
5). Change the window size to 731 by 321, then switch to the Attributes Inspector (![]() 4) and click to turn off the Resize checkbox, which will give us one less thing to worry about. This application displays a limited data set, so there’s no reason for the user to make the window any bigger. We’re now going to create three sets of GUI components, one set for each of the three types of data we’re dealing with. We’ll manually lay out the first set, and then duplicate it for the other two.
4) and click to turn off the Resize checkbox, which will give us one less thing to worry about. This application displays a limited data set, so there’s no reason for the user to make the window any bigger. We’re now going to create three sets of GUI components, one set for each of the three types of data we’re dealing with. We’ll manually lay out the first set, and then duplicate it for the other two.
First, we’ll create a text field inside a box for displaying results. Go to the Object Library pane and enter “nsbox” into the Search field. Look for the box in the results, and drag one of these out to our window. While the new box is selected, switch back to the Size Inspector, and set the box’s size to width 227 by height 247. While we’re at it, go ahead and set each of its X and Y values to 20. This puts the box in the lower-left corner of the window, about in the position it would be in if we dragged it to the lower left and let it sit where the blue guidelines recommend. Then switch back to the Attributes Inspector, and set the Title Position to None so that the title won’t be shown.
Now, go back to the Object Library pane and enter “label” in the Search box. One of the results is Wrapping Label; grab that, drag it so that it is directly overlapping the box we created, and let go. Doing this puts it inside the box. Once it’s there, expand the label to fill the box, by first dragging its bottom left corner down to the lower left, then dragging its top right corner to the upper right. In both cases, the blue guidelines will show up when we’re just the right distance from the edge of the box. Finally, triple-click to select the text (“Multiline Label”) in the text field, and press Backspace or Delete to clear out the text.
Let’s top this box off by adding the button that will eventually put some text into the text field we just created. Find a button in the Object Library (a push button will do nicely), and drag it out to a spot just above the box. During the drag, the blue lines will appear, showing us the correct distance from the top of the window, and also showing us when the button is lined up directly above the center of the box. That’s where we want to drop it! Double-click the button to edit its title, and change it to “Generate Character.” Depending on how the resizing constraints have been set up, we may need to reset the size of the box afterwards. Figure 7-8 shows what we should be seeing at this point.

Figure 7-8. We’ve created the first of three sets of views for the main window. The text field inside the box is highlighted just so we can see where it is
Now select all the views we just created by clicking anywhere in the window and then pressing ![]() A to select all objects in the window. Duplicate them by pressing
A to select all objects in the window. Duplicate them by pressing ![]() D, which will show us a new set of identical objects, overlapping and slightly position-shifted from the originals. Drag this cluster to the center of the window, using the blue guidelines to make sure that they are at the same vertical position at the originals, and with just the right horizontal spacing between the boxes. Then press
D, which will show us a new set of identical objects, overlapping and slightly position-shifted from the originals. Drag this cluster to the center of the window, using the blue guidelines to make sure that they are at the same vertical position at the originals, and with just the right horizontal spacing between the boxes. Then press ![]() D again, and drag the third cluster of objects to the right side of the window, again using the blue guidelines to help position them properly. Finally, double-click on the two new buttons, changing their titles to “Generate Monster” and “Generate Dungeon,” respectively. Again, depending on how the resizing constraints have been set up, we may need to reset the size of the boxes back to 227 x 247. Figure 7-9 shows what the window should look like now.
D again, and drag the third cluster of objects to the right side of the window, again using the blue guidelines to help position them properly. Finally, double-click on the two new buttons, changing their titles to “Generate Monster” and “Generate Dungeon,” respectively. Again, depending on how the resizing constraints have been set up, we may need to reset the size of the boxes back to 227 x 247. Figure 7-9 shows what the window should look like now.

Figure 7-9. The completed main window for DungeonThing
Setting Up the DungeonThingAppDelegate
Now that the initial set of bindings are out of the way and the main window is all set up, we can connect things to the DungeonThingAppDelegate. Open an Assistant Editor (![]() ↵) pane by clicking the small butler-like icon in the group of icons labeled Editor in the toolbar (or using the keyboard shortcut), and select DungeonThingAppDelegate.h from the Jump Bar. One at a time, Control-drag from the label in the box under the Generate Character button, and drag out to the DungeonThingAppDelegate.h file in the Assistant Editor, to just below the predefined @property for the window. When we get there, a small window should appear indicating the possibility to create a new outlet or action. Release the mouse and create a new outlet titled characterLabel. Do the same from the other two labels in boxes in the window, creating new outlets titled monsterLabel and dungeonLabel.
↵) pane by clicking the small butler-like icon in the group of icons labeled Editor in the toolbar (or using the keyboard shortcut), and select DungeonThingAppDelegate.h from the Jump Bar. One at a time, Control-drag from the label in the box under the Generate Character button, and drag out to the DungeonThingAppDelegate.h file in the Assistant Editor, to just below the predefined @property for the window. When we get there, a small window should appear indicating the possibility to create a new outlet or action. Release the mouse and create a new outlet titled characterLabel. Do the same from the other two labels in boxes in the window, creating new outlets titled monsterLabel and dungeonLabel.
Then Control-drag from each of the three buttons back to DungeonThingAppDelegate.h file in the Assistant Editor, and create new actions titled createCharacter:, createMonster:, and createDungeon:. At this point, it should be clear which action goes with which button. In addition to adding the outlets and actions to the DungeonThingAppDelegate.h file, this will also add method stubs for the actions in the DungeonThingAppDelegate.m file.
At this point, the GUI is completed, and the relevant bindings are all configured so that the controls in the Preferences window will all have their values saved in the user’s application preferences. All that’s left is for us to write the action methods that will use NSUserPreferences to retrieve the preferences values and display them. As mentioned, we’re stopping short of actually using the values to generate game item descriptions, but feel free to make that enhancement later on if you’d like.
Let’s start off by defining some constants, just like we’ve done in previous examples (if it’s slipped your mind, see Chapter 4 for a discussion of the benefits of doing this). Here are the constants to match all the values we’ve already set in for the preferences’ key names in the nib file. Insert these somewhere at the top of DungeonThingAppDelegate.m:
#define kCharacterMaxNameLength @"characterMaxNameLength"
#define kCharacterStatsGenerationPolicy
  @"characterStatsGenerationPolicy"
#define kCharacterClassAllowedPaladin @"characterClassAllowedPaladin"
#define kCharacterClassAllowedBard @"characterClassAllowedBard"
#define kCharacterClassAllowedFighter @"characterClassAllowedFighter"
#define kCharacterClassAllowedCleric @"characterClassAllowedCleric"
#define kCharacterClassAllowedRogue @"characterClassAllowedRogue"
#define kCharacterClassAllowedMonk @"characterClassAllowedMonk"
#define kCharacterClassAllowedMagicUser
  @"characterClassAllowedMagicUser"
#define kCharacterClassAllowedThief @"characterClassAllowedThief"

#define kMonsterBootyFrequency @"monsterBootyFrequency"
#define kMonsterTypeAllowedOrc @"monsterTypeAllowedOrc"
#define kMonsterTypeAllowedGoblin @"monsterTypeAllowedGoblin"
#define kMonsterTypeAllowedOgre @"monsterTypeAllowedOgre"
#define kMonsterTypeAllowedSkeleton @"monsterTypeAllowedSkeleton"
#define kMonsterTypeAllowedTroll @"monsterTypeAllowedTroll"
#define kMonsterTypeAllowedVampire @"monsterTypeAllowedVampire"
#define kMonsterTypeAllowedSuccubus @"monsterTypeAllowedSuccubus"
#define kMonsterTypeAllowedShoggoth @"monsterTypeAllowedShoggoth"

#define kDungeonTunnelTwistiness @"dungeonTunnelTwistiness"
#define kDungeonMonsterFrequency @"dungeonMonsterFrequency"
#define kDungeonTreasureFrequency @"dungeonTreasureFrequency"
Note In order to fit the confines of the book format while still showing valid code, we’ve wrapped some of these lines by putting a backslash as the very last character of a line, which makes the C preprocessor just tack on the content of the next line as if it were all on the same line to begin with. Feel free to omit this manual wrapping in your own code, making each of those #defines into a one-line declaration.
Specifying Default Preferences Values
With the constant definitions in place, we’re ready start coding. Before we implement our action methods, we need to learn a bit about NSUserDefaults. As mentioned, this class lets us store and retrieve a user’s application preferences as a sort of hash or dictionary, keyed off strings of our choosing. One thing that every application should do is create a set of default values for NSUserDefaults, which it will use as a fallback position in case the user hasn’t set a value for a given key. For example, say we want to store an integer whose relevant range is a number between 1 and 10, using the key @"greatness". Setting a default value of 1 for the @"greatness" key ensures that the first time a user runs the application, and NSUserDefaults tries to retrieve the @"greatness" value, it finds the default value (1) that we specified in code. Without taking this step, retrieving any numeric value that hasn’t already been set by the user will get us a zero, and retrieving any unset object value will get us a nil.
It’s common practice to set up these values in a method that is called early in the application’s startup phase, typically in a class that is included in the main nib. The initialize class method is a good place for this since it’s called exactly once for each class, the first time a class is accessed. It’s bad form to try to access other application objects at initialize time since we don’t know how far the startup process has progressed, but we don’t need to do that here. Create such a method in our DungeonThingAppDelegate.
+ (void)initialize
{
  [[NSUserDefaults standardUserDefaults] registerDefaults:
   [NSDictionary dictionaryWithObjectsAndKeys:
    [NSNumber numberWithInt:1], kMonsterBootyFrequency,
    [NSNumber numberWithBool:YES], kMonsterTypeAllowedOrc,
    [NSNumber numberWithBool:YES], kMonsterTypeAllowedGoblin,
    [NSNumber numberWithBool:YES], kMonsterTypeAllowedOgre,
    [NSNumber numberWithBool:YES], kMonsterTypeAllowedSkeleton,
    [NSNumber numberWithBool:YES], kMonsterTypeAllowedTroll,
    [NSNumber numberWithBool:YES], kMonsterTypeAllowedVampire,
    [NSNumber numberWithBool:YES], kMonsterTypeAllowedSuccubus,
    [NSNumber numberWithBool:YES], kMonsterTypeAllowedShoggoth,
    [NSNumber numberWithInt:7], kCharacterMaxNameLength,
    [NSNumber numberWithInt:1], kCharacterStatsGenerationPolicy,
    [NSNumber numberWithBool:YES], kCharacterClassAllowedPaladin,
    [NSNumber numberWithBool:YES], kCharacterClassAllowedBard,
    [NSNumber numberWithBool:YES], kCharacterClassAllowedFighter,
    [NSNumber numberWithBool:YES], kCharacterClassAllowedCleric,
    [NSNumber numberWithBool:YES], kCharacterClassAllowedRogue,
    [NSNumber numberWithBool:YES], kCharacterClassAllowedMonk,
    [NSNumber numberWithBool:YES], kCharacterClassAllowedMagicUser,
    [NSNumber numberWithBool:YES], kCharacterClassAllowedThief,
    [NSNumber numberWithInt:3], kDungeonTunnelTwistiness,
    [NSNumber numberWithInt:7], kDungeonMonsterFrequency,
    [NSNumber numberWithInt:1], kDungeonTreasureFrequency,
    nil]];
}
This method calls NSUserDefaults' registerDefaults: method, passing in a dictionary of default values for our application. We’re setting a default value for every key-name that we’re using in our application, so that we know that when we ask for a value, we’ll always get something relevant.
Now we can start implementing our action methods. Let’s start with createCharacter:, which will display a summary of all the preferences values related to character creation. We start off by grabbing the shared instance of NSUserDefaults, then we create an empty string to hold the summary text, and then we actually create the summary, one preferences entry at a time. At the end, we put the summary text into the relevant NSTextField. Note that at the beginning of this method, we create an NSMutableString with a particular capacity, but this is not an upper size limit; NSMutableString is smart enough to “grow” if necessary. The method looks like this:
- (IBAction)createCharacter:(id)sender {
  NSUserDefaults *ud = [NSUserDefaults standardUserDefaults];
  NSMutableString *result = [NSMutableString stringWithCapacity:1024];
  [result appendString:
    @"Generating a character within these parameters:
"
     "-----------------
"];   // protip: split strings across lines like this!
  [result appendFormat:
    @"Maximum name length: %ld
",
    [ud integerForKey:kCharacterMaxNameLength]];
  [result appendFormat:
   @"Stats generation policy: %ld
",
   [ud integerForKey:kCharacterStatsGenerationPolicy]];
  [result appendFormat:
   @"Allows Paladin: %@
",
   [ud boolForKey:kCharacterClassAllowedPaladin] ? @"YES" : @"NO"];
  [result appendFormat:
   @"Allows Bard: %@
",
   [ud boolForKey:kCharacterClassAllowedBard] ? @"YES" : @"NO"];
  [result appendFormat:
   @"Allows Fighter: %@
",
   [ud boolForKey:kCharacterClassAllowedFighter] ? @"YES" : @"NO"];
  [result appendFormat:
   @"Allows Cleric: %@
",
   [ud boolForKey:kCharacterClassAllowedCleric] ? @"YES" : @"NO"];
  [result appendFormat:
   @"Allows Rogue: %@
",
   [ud boolForKey:kCharacterClassAllowedRogue] ? @"YES" : @"NO"];
  [result appendFormat:
   @"Allows Monk: %@
",
   [ud boolForKey:kCharacterClassAllowedMonk] ? @"YES" : @"NO"];
  [result appendFormat:
   @"Allows Magic-User: %@
",
   [ud boolForKey:kCharacterClassAllowedMagicUser] ? @"YES" : @"NO"];
  [result appendFormat:
   @"Allows Thief: %@
",
   [ud boolForKey:kCharacterClassAllowedThief] ? @"YES" : @"NO"];
  [self.characterLabel setStringValue:result];
}
After entering that code, try compiling and running the application. If all goes well, we should be able to see the main window, press the Generate Character button, and see a result something like Figure 7-10.

Figure 7-10. The first run of DungeonThing
The next step is to open the Preferences window, and start making some changes in the Character Generation tab. Disable some checkboxes, drag the slider, etc. After each change, click the Generate Character button in the main window again, and the displayed parameters should change to reflect the contents of the Preferences window.
Now that that’s working, let’s fill in the method bodies for createMonster: and createDungeon: as shown below. These methods both work just like the createCharacter: method already shown.
- (IBAction)createMonster:(id)sender {
  NSUserDefaults *ud = [NSUserDefaults standardUserDefaults];
  NSMutableString *result = [NSMutableString stringWithCapacity:1024];
  [result appendString:@"Generating a monster within these parameters:
-----------------
"];
  [result appendFormat:
   @"Booty frequency: %ld
",
   [ud integerForKey:kMonsterBootyFrequency]];
  [result appendFormat:
   @"Allows Orc: %@
",
   [ud boolForKey:kMonsterTypeAllowedOrc] ? @"YES" : @"NO"];
  [result appendFormat:
   @"Allows Goblin: %@
",
   [ud boolForKey:kMonsterTypeAllowedGoblin] ? @"YES" : @"NO"];
  [result appendFormat:
   @"Allows Ogre: %@
",
   [ud boolForKey:kMonsterTypeAllowedOgre] ? @"YES" : @"NO"];
  [result appendFormat:
   @"Allows Skeleton: %@
",
   [ud boolForKey:kMonsterTypeAllowedSkeleton] ? @"YES" : @"NO"];
  [result appendFormat:
   @"Allows Troll: %@
",
   [ud boolForKey:kMonsterTypeAllowedTroll] ? @"YES" : @"NO"];
  [result appendFormat:
   @"Allows Vampire: %@
",
   [ud boolForKey:kMonsterTypeAllowedVampire] ? @"YES" : @"NO"];
  [result appendFormat:
   @"Allows Succubus: %@
",
   [ud boolForKey:kMonsterTypeAllowedSuccubus] ? @"YES" : @"NO"];
  [result appendFormat:
   @"Allows Shoggoth: %@
",
   [ud boolForKey:kMonsterTypeAllowedShoggoth] ? @"YES" : @"NO"];
  [self.monsterLabel setStringValue:result];
}

- (IBAction)createDungeon:(id)sender {
  NSUserDefaults *ud = [NSUserDefaults standardUserDefaults];
  NSMutableString *result = [NSMutableString stringWithCapacity:1024];
  [result appendString:@"Generating a dungeon within these parameters:
-----------------
"];
  [result appendFormat:
   @"Tunnel twistiness: %ld
",
   [ud integerForKey:kDungeonTunnelTwistiness]];
  [result appendFormat:
   @"Monster frequency: %ld
",
   [ud integerForKey:kDungeonMonsterFrequency]];
  [result appendFormat:
   @"Treasure frequency: %ld
",
   [ud integerForKey:kDungeonTreasureFrequency]];
  [self.dungeonLabel setStringValue:result];
}
With those methods in place, we should be able to compile and run DungeonThing, modify all the values under every tab in the Preferences window, and see the modified values reflected in the output text fields. The first version of DungeonThing is now complete!
Note We used the NSUserDefaults object to hold the settings in the Preferences window. NSUserDefaults is used by nearly all Cocoa apps for holding user settings. We haven’t discussed using the Terminal program to access the Unix command line yet, but one of the features of the NSUserDefaults system is that there’s command-line access to it. If you’re interested in seeing this, open up Terminal.app (in Finder, you can find it in the Utilities folder under Applications) and type
defaults read com.learncocoa.DungeonThing
If you type
defaults domains
you’ll get a list of all the applications that store their defaults in the NSUserDefaults system, and you can see all the settings that are stored for any of them. Happy hunting!
Binding to a Table View
DungeonThing is fine for what it does (aside from the fact that it doesn’t really generate the game objects, of course), but if you started using such a system “in production” (say, while playing Dungeons and Dragons or a similar game), you’d quickly encounter one major problem: the random game objects aren’t retained in any way! As soon as you click to create a new random character, for example, the previous character is just wiped out, and you have no way of ever seeing it again.
For the next iteration of DungeonThing, we’re going to add some table views to show lists of all created game objects. Clicking a game object in a table view will show its values in the relevant text field. Unlike Chapter 6, where we showed how to handle the table view in our own code, here we’re going to demonstrate how to use the NSArrayController class, a generic controller class included with Cocoa to manage the display of these table views with no custom code of our own, thanks to Cocoa bindings. We’ll need to add a few outlets and other instance variables to our DungeonThingAppDelegate class for three instances of NSArrayController and three arrays (one for each type of game object). We’ll also remove the NSTextField outlets that we just put in because those will also be configured with bindings to display their contents. Finally, we’ll change the action methods just slightly to insert each created object into the relevant array. When we’re done, the source code will be almost identical in size because all configuration of the table views is done right in the nib file.
We’re going to start by adding some properties to DungeonThingAppDelegate and modifying our create: methods to make use of these new properties. Before we can use bindings in Interface Builder, we need to set them up in the code first. We’ll then move over to Interface Builder to connect the bindings and then back to the code for some cleanup.
Making the Code Bindings-Ready
Let’s start by making the necessary changes in the header file. In order to maintain lists of generated objects, our DungeonThingAppDelegate needs three new NSMutableArray instance variables, one for each kind of game object. These can’t be created from within Interface Builder; we need to declare them explicitly. Each array will be managed by an NSArrayController in the nib file, which we’ll create and configure within Interface Builder in a bit. We declare the three NSMutableArrays as properties so that they are readily available for the NSArrayControllers to access them. The changes we need to make in DungeonThingAppDelegate.h are as follows:
#import <Cocoa/Cocoa.h>

@interface DungeonThingAppDelegate : NSObject <NSApplicationDelegate>

// add these three:
@property (strong) NSMutableDictionary *characters;
@property (strong) NSMutableDictionary *monsters;
@property (strong) NSMutableDictionary *dungeons;

@property (assign) IBOutlet NSWindow *window;
@property (weak) IBOutlet NSTextField *characterLabel;
@property (weak) IBOutlet NSTextField *monsterLabel;
@property (weak) IBOutlet NSTextField *dungeonLabel;

- (IBAction)createCharacter:(id)sender;
- (IBAction)createMonster:(id)sender;
- (IBAction)createDungeon:(id)sender;

@end
After adding those three property declarations, we need to complete the setup for our NSMutableArray instances in the DungeonThingAppDelegate.m file. We’ll initialize the NSMutableArray instances themselves, and modify the action methods to push the created values into our arrays, instead of just displaying the values directly in the text fields.
First, let’s implement a new init method to contain the initialization for the arrays. Place the following code near the top of the @implementation DungeonThingAppDelegate section of the .m file:
- (id)init {
  if ((self = [super init])) {
    self.characters = [NSMutableArray array];
    self.monsters = [NSMutableArray array];
    self.dungeons = [NSMutableArray array];
  }
  return self;
}
THE CANONICAL INIT METHOD
The preceding code snippet shows an example of an init method that creates values for our class’s instance variables. The form of this init method is fairly standard, and you’re likely to see something similar in most Objective-C classes you see, but it does some things that seem strange at first glance and so is worth explaining a bit. The method starts off with this peculiar if statement:
if ((self = [super init])) {
That if statement is really killing two (or more) birds with one stone. First, it’s calling the superclass’s implementation of init and assigning its return value to the special variable self. Then it checks the value of the assignment itself (that is, the value of self after it’s been assigned) and only executes the following block of code if it’s not something that evaluates as false, such as a nil pointer value.
This usage of self, assigning a value to it, is really unusual. In fact, the only time we’re ever likely to see code assigning a value to self is within an init method such as this. The reason for doing it this way is to allow for the possibility, however slight, that the superclass’s init method will return a different value than what was pointed at by self from the outset. On the one hand, the superclass may find that it fails to initialize itself properly for some reason and signals this by returning nil from the init method, which is the “standard” way of dealing with an object initialization failure (rather than, say, raising an exception). In this case, the class will notice the nil value and skip the block following the if statement, dropping down to the end where it returns the value pointed at by self, which is now nil.
The other possible alternate return value for the superclass’s init method is a different instance altogether. The idea is that the superclass might have a smart scheme for recycling objects in a private pool instead of constantly deallocating and creating new ones, and a part of that scheme would be that the init method would sometimes return an old, second-hand object instead of the shiny new one we just tried to create. The question of whether or not this situation is a realistic one is a subject of occasional debate among Cocoa programmers. Here, we’re erring on the side of caution by writing our init method to allow for this possibility.
There it is—all the code changes we need to make to start connecting things in Interface Builder! Note that unlike the example in Chapter 6, the code here doesn’t have to do anything at all regarding the table views. No delegate or dataSource methods to implement, no outlets pointing to the table views, nothing. Thanks to bindings and NSArrayController, the table views will really take care of themselves.
Configuring the Table Views and Text Views
We’ll now ready to move to the nib file. We’ll create some table views, add some array controller objects, and set up their bindings to the new arrays we added to DungeonThingAppDelegate. We’ll also configure the existing text fields to get their data through bindings. Single-click the MainMenu.xib file in Xcode to get back to the Interface Builder canvas.
We’re going to start by making changes to the main application window. The first step is to make some room in the window for our new table views. We’re going to create three “history” table views, one below each of the existing sets of views, so we need to make the window taller (but we can keep the current width). Use the window’s resize control in the lower right to make the window about twice its current height. The blue guidelines will help us maintain the current width.
In the Object Library pane, search for “table” and drag the resulting table view out into the window. Position it so that its upper left corner is just below the lower left corner of the left-most box, then grab the table view’s lower right resize handle, and drag it down until the table fills most of the available space down to the bottom of the window, with its left and right edges lined up with the edges of the box above it, as shown in Figure 7-11.

Figure 7-11. Adding tables to the window
In our history tables, we’re only going to display the time that the object was created. The user can then click on a row to see the relevant object displayed in the text field above the table. This means that we only want to have one column in the table, so open the Attributes Inspector (![]() 4). Select the table view (which is inside a scroll view, so click twice to get to the table view itself). In the Inspector, change the number of columns to 1 and set the Content Mode to be view-based rather than cell-based.
4). Select the table view (which is inside a scroll view, so click twice to get to the table view itself). In the Inspector, change the number of columns to 1 and set the Content Mode to be view-based rather than cell-based.
Next, resize the remaining column so that it fills the width of the table. Do this by clicking in the table header until the entire table header is selected. Then mouse over the vertical line marking the edge of the table column header, and drag it to the right until the column fills the whole table.
Finally, disable editing in the remaining column since we don’t want to let the user change the timestamp of a created object. Click the table column until it’s selected, then bring up the Attributes Inspector (![]() 4) and click to turn off the Editable checkbox. Next, change resizing from Both to Autoresizes with Table, as there’s no reason to let the user resize the table view’s only column.
4) and click to turn off the Editable checkbox. Next, change resizing from Both to Autoresizes with Table, as there’s no reason to let the user resize the table view’s only column.
At this point, the table view and its column are graphically laid out and everything is configured except its bindings. This is a perfect time to duplicate the table we’ve just made for displaying characters so that we can use the exact same configuration for monsters and dungeons. Click the window background, then click once on the table view to select it (along with its enclosing NSScrollView). Now press ![]() D to duplicate the table view, and drag it the new one into place at the bottom of the center view group. Then press
D to duplicate the table view, and drag it the new one into place at the bottom of the center view group. Then press ![]() D once again, and drag the final table view into place in the window’s bottom right corner. For both of those, we’ll of course use the blue guidelines to help us line them up properly. Figure 7-12 shows the final layout.
D once again, and drag the final table view into place in the window’s bottom right corner. For both of those, we’ll of course use the blue guidelines to help us line them up properly. Figure 7-12 shows the final layout.
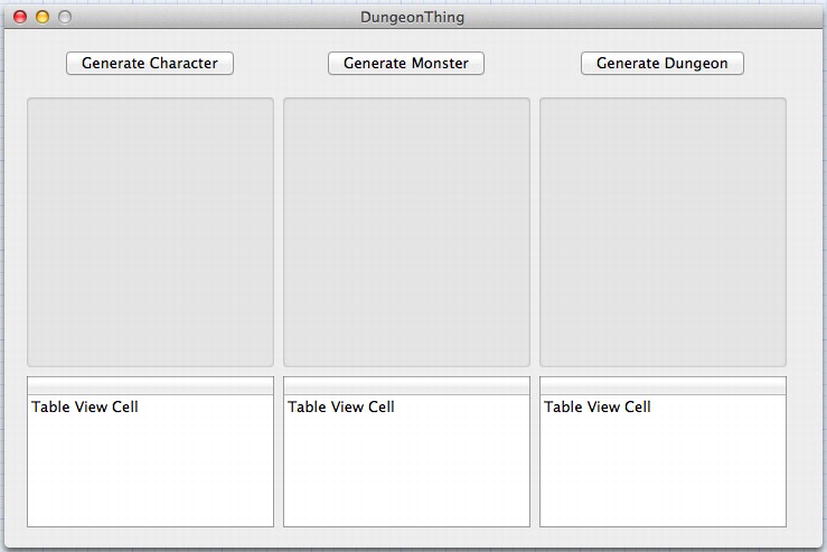
Figure 7-12. The final DungeonThing window layout
Creating and Configuring an Array Controller
Now it’s time to add an NSArrayController so that we can configure some bindings for the first set of objects, the characters. In the Object Library pane, search for “array.” Note the Array Controller that appears in the results; this is an instance of the NSArrayController object. Drag one of these out to the object dock on the far left of the Interface Builder canvas. If the dock area isn’t already expanded, click the disclosure triangle in the lower-left corner of the Interface Builder canvas to expand it. The NSArrayController will need a more meaningful name, so click the “Array Controller” text twice slowly (just like renaming a file in Finder) to edit the name. We’ll be using this controller to provide access to the characters array, so name it “characters.” Giving this top-level nib object a unique name of its own will help a bit later on when we’ll be adding two more array controllers to this nib. (Note that in the initial release of Xcode 4.5, the name may not refresh in the Object Dock after we change it. If so, we can get the new name to appear by clicking on the Object Dock’s disclosure triangle twice.)
In order for our DungeonThingAppDelegate to make use of the NSArrayController instances, we’ll need to add outlets to the app delegate. Open an Assistant Editor pane, as we did above, with the DungeonThingAppDelegate.h file displayed. Control-drag from the new characters array controller into the DungeonthingAppDelegate.h file, and create a new outlet named characterArrayController.
Next, click the array controller again and bring up the Attributes Inspector (![]() 4). We’ll see some options at the top that let us fine-tune the behavior of the array controller, but for now we’ll leave them all as they are. What we need to configure is the lower portion of the Inspector, in the Object Controller section. Make sure that Mode is set to Class, and that Class Name is “NSMutableDictionary.” This configuration tells the controller that the model objects it’s dealing with are instances of NSMutableDictionary, a “normal” class (rather than an Entity, which we’ll cover as a part of Core Data in Chapter 7). Below that we’ll see a table view that lists the attributes that the array controller should be able to access in the model objects. Click the + button below the table view, and type in “createdObject,” then click + again, and type in “timestamp.” Figure 7-13 shows the completed attributes configuration for the array controller.
4). We’ll see some options at the top that let us fine-tune the behavior of the array controller, but for now we’ll leave them all as they are. What we need to configure is the lower portion of the Inspector, in the Object Controller section. Make sure that Mode is set to Class, and that Class Name is “NSMutableDictionary.” This configuration tells the controller that the model objects it’s dealing with are instances of NSMutableDictionary, a “normal” class (rather than an Entity, which we’ll cover as a part of Core Data in Chapter 7). Below that we’ll see a table view that lists the attributes that the array controller should be able to access in the model objects. Click the + button below the table view, and type in “createdObject,” then click + again, and type in “timestamp.” Figure 7-13 shows the completed attributes configuration for the array controller.

Figure 7-13. The configured attributes for your first NSArrayController
Yes, these are the keys that we used in the code for creating an NSMutableDictionary each time the user clicks a button. These keys are what we’ll now use to creating bindings for our GUI objects.
The next thing we have to do is configure a binding, not for a GUI object, but for the array controller itself! It just so happens that NSArrayController is not only a provider of bindings-ready access to model objects. It’s a consumer as well, retrieving its content array from another object via Cocoa Bindings. In our case, it will get its content from DungeonThingAppDelegate’s characters array. With the array controller still selected, bring up the Bindings Inspector (![]() 7). Click the disclosure triangle next to Content Array to open it up, and set up the desired binding by choosing Dungeon Thing App Delegate from the pop-up list, typing “characters” into the Model Key Path field, and pressing Enter. Note that our DungeonThingAppDelegate requires no special preparation in order to be bindings-friendly. All we have to do is expose an instance variable as a property (as we’ve done for our three content arrays), and we can immediately use it to bind other objects to!
7). Click the disclosure triangle next to Content Array to open it up, and set up the desired binding by choosing Dungeon Thing App Delegate from the pop-up list, typing “characters” into the Model Key Path field, and pressing Enter. Note that our DungeonThingAppDelegate requires no special preparation in order to be bindings-friendly. All we have to do is expose an instance variable as a property (as we’ve done for our three content arrays), and we can immediately use it to bind other objects to!
Now we’ve added an NSArrayController and configured it to access the right data from our DungeonThingAppDelegate. It’s time to bind some GUI objects to this new controller.
Binding the Table Display via the Array Controller
First, we’ll set up a single binding for the table view. We’re going to bind the table view’s Content binding to the characters array (through the array controller), and then have the table view cell grab the timestamp attribute from each model object.
Here’s how: click the table view by drilling down through the Object Dock on the left side of the Interface Builder canvas, then open the Value binding configuration section in the Bindings Inspector (![]() 7). Choose characters from the pop-up list, then arrangedObjects in the Controller Key combo box. This connects the table view to the array controller, and for each object managed by the array controller, it creates a row in the table view and sets the objectValue property of that row. We mentioned earlier that the Controller Key combo box lets us choose different aspects of the controller object we’re binding through. In this case, binding through arrangedObjects means that we’re binding to the entire sorted array of objects. This sort of binding is usually only appropriate for view objects that can display an entire array of content, such as a table.
7). Choose characters from the pop-up list, then arrangedObjects in the Controller Key combo box. This connects the table view to the array controller, and for each object managed by the array controller, it creates a row in the table view and sets the objectValue property of that row. We mentioned earlier that the Controller Key combo box lets us choose different aspects of the controller object we’re binding through. In this case, binding through arrangedObjects means that we’re binding to the entire sorted array of objects. This sort of binding is usually only appropriate for view objects that can display an entire array of content, such as a table.
Next, expand the Selection Indices binding configuration section (just below the Value section). Again, choose characters from the pop-up list, and this time enter selection Indices in the Controller Key combo box. This tells the array controller which row (or rows) are selected in the table view and passes the selection status along to any other objects that are bound to the array controller. In particular, this is how the text field will get updated when the selection changes.
Now we need to establish a binding for each subview contained in the table view so we can pull out the appropriate information from the objectValue. Since we only have one column with one view—an NSTableCellView—this is straightforward. The NSTableCellView has an embedded NSTextField, and that’s what we need to bind. Select the “Static Text - Table View Cell” entry within the Table Cell View within the table view (this is easiest from the expanded Object Dock on the left). In the Bindings Inspector, select Bind to the Table Cell View, and then enter objectValue.timestamp in the Model Key Path. This tells the NSTextField to use the timestamp property of the object bound to the NSTableCellView in which the text field is embedded.
Binding a Text Field via the Array Controller’s Selection
The final binding that needs to be done for the characters section is for the text field that displays the value. This binding will also be done through the array controller, grabbing the createdObject attribute from the controller’s selected object.
Click to select the text field in the box on the left. The first click probably selects the box itself, and clicking again will then select the text field. Now look again at the Bindings Inspector, and find the Value binding configuration. Select characters from the pop-up list, selection from the Controller Key combo box, and createdObject from the Model Key Path combo box, and then click to turn on the Bind checkbox. Note that by choosing selection for the Controller Key, we specify that the array controller will only make the selected object available to this control, rather than a whole array of them as it does with the table column.
Populating the Array
We now need to go back to the code. Open up DungeonThingAppDelegate.m in an editor pane. In order for the table view to display anything, we need to put some data into the NSArrayController. To do this, we’re going to change a single line at the end of the createCharacter: action method. Instead of putting the summary text created by the method directly into a text field, we’ll add each summary to an array, using NSArrayController to do this so that all dependent views (any views that have bindings through the same NSArrayController) will be automatically updated as well. Rather than inserting the bare string into the array, we’re creating an NSMutableDictionary containing the created object and the current time, using the dictionary as the simplest sort of model object, containing two keyed values. Implement this change at the end of createCharacter: by changing
[self.characterLabel setStringValue:result];
to
[self.characterArrayController addObject:[NSMutableDictionary dictionaryWithObjectsAndKeys:
  result, @"createdObject",
  [NSDate date], @"timestamp",
  nil]];
Recall that we used createdObject and timestamp as keys in the NSArrayController that we set up in Interface Builder, and for the binding for the text field within the table view. By putting objects into the array using these key names, we’re enabling the bindings to pull them back out.
In fact, while we’re in the code, we can also remove the @property declaration for characterLabel in the DungeonThingAppDelegate.h file. We don’t have any references to this property anywhere in the code anymore, and keeping the code clean is a good habit.
Making Sure it Works
OK, that’s been a lot of prep work. Fire it up and see what happens; go ahead and build and run the application. We should be able to create a new character and see it appear in the text field along with a timestamp entry in the table below. Modify some preferences, then make another character, and see the new parameter summary in the text field and a new timestamp in the table view. Switch between the rows by clicking on them and watch the value in the text field change accordingly.
If any of those things don’t work, go back to the nib and double-check the configuration of our bindings, as well as DungeonThingAppDelegate's connection to the array controller.
Rinse, Repeat, Rinse, Repeat
Now that we’re dealing with characters entirely via bindings, we can go back and do the same things for monsters and dungeons. Create a new NSArrayController by duplicating the characters array controller (thereby keeping its existing configuration, including the key names we already entered) and name it “monsters” to keep it consistent. As we did with the characters array controller before, connect monsters to the DungeonThingAppDelegate by creating a new outlet called monsterArrayController, configure its Content Array and Selected Indices bindings to connect to the monsters attribute in DungeonThingAppDelegate, and configure the two relevant GUI objects (the table column and the text field) through the monsters array controller, all as described previously. Lastly, update the createMonster: action method by changing the last line from
[self.monsterLabel setStringValue:result];
to
[self.monsterArrayController addObject:[NSMutableDictionary dictionaryWithObjectsAndKeys:
  result, @"createdObject",
  [NSDate date], @"timestamp",
  nil]];
Build and run the app and make sure it’s all working, then repeat all this once more for dungeons.
Once all three NSArrayControllers are created and the bindings are set up, we can remove the monsterLabel and dungeonLabel @property declarations in DungeonThingAppDelegate.h that referred to the text fields since these are now being populated through the bindings.
Okay, But How Did That Work?
Now that you’ve gotten your feet wet with Cocoa bindings, you may have the distinct feeling that you’ve just witnessed some sort of magic show—and you’re wondering how the tricks actually work! That’s a completely understandable feeling. We programmers are accustomed to being required to spell out every movement of a chunk of data and every update to the screen in excruciating detail, and suddenly we find that simply setting a value somewhere causes some unseen forces to propagate the value to other views on the screen. This section will attempt to clarify the process for you by explaining the Cocoa concepts of key-value coding and key-value observing, and how Cocoa bindings uses them to do its magic.
First let’s talk about key-value coding (KVC). The idea behind KVC is to allow us to refer to an object’s attributes by using strings that match attribute names or that match the names of some getter and setter methods. Say, for instance, that we have a class called Person, which has the concept of a firstName, either in the form of an instance variable called firstName, or a pair of methods called firstName and setFirstName:. Using KVC, we can access a person’s firstName attribute using the following incantation:
[myPerson setValue:@"Frodo" forKey:@"firstName"];
Given the key name firstName, this method call first checks to see whether the object has a method called setFirstName:, and if so, invokes it to set the value. If that doesn’t work, it checks to see if there’s an instance variable called firstName and tries to set it directly.
We can also retrieve a value in a similar manner:
myNameString = [myPerson valueForKey:@"firstName"];
A similar sequence occurs in this case. It first looks for a method called firstName, and if there isn’t one, it tries to find an instance variable with the same name.
The result of all this is that KVC gives us a way to talk about an object’s attributes in an extremely generic fashion. Not only is the object’s storage of its attributes transparent to us, even the way to access an attribute from the outside is something that we don’t need to worry about. It could change, perhaps even inside a running a program, and we wouldn’t notice the difference.
The setValue:forKey: and valueForKey: methods are defined in NSObject (with some additional extensions for collection classes like NSArray and NSSet) to try to determine, on the fly, the best way to access the value based on the name of the key. This means that they are ready to use on every class in Cocoa.
One additional point to make about KVC is that the strings used as keys can actually be used as a sort of path to traverse relationships between objects. For example, let’s imagine that our Person class also contains a property called mother, which is a pointer to another Person. If we want to set the firstName of myPerson's mother, in normal code we would likely do it one of these ways:
myPerson.mother.firstName = @"Anne";
[myPerson.mother setFirstName:@"Anne"];
[[myPerson mother] setFirstName:@"Anne"];
Using KVC, we have an additional way to accomplish this:
[myPerson setValue:@"Anne" forKeyPath:@"mother.firstName"];
The KVC methods are smart enough to look at the key string, split it apart by paths, and traverse any object relationships mentioned in the path, so the previous line ends up calling something like this:
[[myPerson valueForKey:@"mother"] setValue:@"Anne" forKey:@"firstName"];
While neither of the KVC options are really appealing for regular use in our own code (because the “normal” versions all read a bit more nicely), they can be used to great advantage in situations requiring more flexibility, such as, say, an interface that lets us configure which values will be displayed in a view object just by typing in the name of the path to the attribute, without requiring compilation of any source code or anything. Sound familiar?
The next piece of the puzzle is key-value observing (KVO). With KVO, an object can register with another object to be informed of changes as they occur. For instance, continuing with the last example, we can tell myPerson to notify us whenever the value of its firstName attribute changes, like this:
[myPerson addObserver:self forKeyPath:@"firstName" options:nil context:NULL];
In return, myPerson will call a method called observeValueForKeyPath:ofObject:change:context: in the observer whenever the firstName attribute changes, whether that change occurs via the setValue:forKey: method or by someone calling the setFirstName: method. The way this is implemented is quite clever and involves some meta-programming deep inside Cocoa, creating a subclass of Person at runtime that overrides the setFirstName: method, and passing along a message to all observers after the value changes. This is done so smoothly that we would never suspect the existence of the hidden Person subclass unless we went looking for it—and really dug deep in just the right places. As a result, we don’t really need to know about these implementation details. Just be glad we’re entering into the world of Cocoa programming at a time when this particular technology has matured as much as it has, because it was a little rough around the edges when it first came out!
At the end of the day, we probably won’t need to deal with KVO directly at all. Almost everything we’d ever want to do with KVO can be done more cleanly and easily with Cocoa bindings, which is built on top of it and provides a higher-level interface. That’s why we’ve focused on the functionality of Cocoa bindings and aren’t doing any direct programming with KVO.
Cocoa Bindings: How It Works
While a complete and accurate description of the implementation of Cocoa bindings is outside the scope of this book, it may be useful to get a fuller picture of how it uses KVC and KVO to do its work. Now that we’ve gotten a brief intro into KVC and KVO, let’s take a look at how these bits fit together.
When we establish a binding in Interface Builder, like we’ve done numerous times in this chapter already, we’re actually defining a sort of contract. We’re declaring that when this nib is loaded and these objects are set up, a sequence of events will occur to establish some KVO relationships between the objects, using a key path string (using KVC) to define which attribute is in focus for each binding, along with other information to identify which aspect (such as the displayed value, the enabled state, and the like) of the “receiving end” (typically a GUI control) should be affected by changes in the underlying value. At runtime, Cocoa will set things up so that the control (or any other object we’ve established a binding on) will be set up to observe changes in the controller based on the relevant key and the controller will be set up to observe changes in the control’s chosen aspect.
Wrap Up
Bindings are a really powerful technology. In retrospect, you can probably see that’s it’s possible to implement nearly everything shown in the previous chapters using Cocoa bindings, creating an app with almost no custom code whatsoever! This doesn’t in any way diminish the usefulness of the techniques shown in previous chapters, however. The fact is that sometimes you will want to access values in the GUI manually in methods called by target-action. A general rule of thumb is that if you’re in a situation (a simple app or a subcomponent of a larger app) where you don’t have any apparent model objects to work with, you may be best served by doing things “the old way” with outlets and target/action connections, but, in general, Cocoa bindings are the preferred method for developing Mac apps from here on out.
The next few chapters will demonstrate how to do even more with bindings using Core Data. Core Data’s functionality is orthogonal to Cocoa Binding’s; whereas Cocoa bindings lets you eliminate some boring controller code, Core Data takes care of a lot of the plumbing that you’d otherwise have to write for your model classes, giving you a storage back-end, built-in Undo/Redo support, and much more. Together, Cocoa bindings and Core Data can get you building so much software so effectively that you’ll be making other people’s heads spin!