
4
Exploring the Flexibility of Modules
In the previous chapters, we explored the main content management features offered by Joomla, with a specific focus on articles. In this chapter, we will get to explore an additional method to manage content and customize our website: modules.
After reading this chapter, you will be able to do the following:
- Understand what modules are in Joomla
- Understand what module positions are
- Understand the different types of modules available
- Understand how to use modules to customize your website layout
- Build your custom backend dashboard with modules
Let’s start with some basic concepts about modules.
What is a module?
As the official Joomla documentation says, a module is a basic extension for Joomla that allows you to display content, generally as an output of a component or another extension. A module is generally displayed in a position of the template, either the frontend or backend, and is used to show additional content, for example, in sidebars or after the main content position. Modules are extensively used in Joomla, for example, to show a menu, display the login feature, show the footer of the website, display the latest published articles, and so on.

Figure 4.1 – Menu and login modules
In Figure 4.1, we can observe two of the most used modules in Joomla: a module that shows the main menu of the website, and the login form module. These modules are shown in the frontend of the website and are connected to a component from which they take their respective functionalities. For example, the main menu takes the menu management component to provide the list of menu items of a specific menu, and the login form takes the user component to provide the login/logout features.
As I mentioned before, modules are also extensively used in the backend of the website. In fact, the whole dashboard is made up of modules.

Figure 4.2 – System and notifications modules
In Figure 4.2, taken from Home Dashboard, we can observe two different modules, System and Notifications. The System module provides some options to access system features, while the Notifications module displays the status of the CMS instance including updates of core, extensions, overrides, and the status of privacy requests.
There are many different modules that are shipped by default with Joomla. Let’s explore the main types in the next section.
Exploring the types of modules
Joomla includes several types of modules, many of which are connected to the components included by default in Joomla. In the following list, we will review the modules of a standard Joomla installation. You can install many additional modules from the Joomla Extensions Directory or other sources. Please also note that many third-party components include additional modules that display content from them:
- Articles - Archived: Displays a list of months with archived articles
- Articles - Categories: Displays a list of categories
- Articles - Category: Displays a list of articles present in one or more categories
- Articles - Latest: Displays a list of the most recent published articles
- Articles - Most Read: Displays the list of the most visited articles
- Articles - Newsflash: Displays a fixed number of articles from a selected category
- Articles - Related: Displays the articles related to the one visited, based on keywords
- Banners: Shows the active banners from the Banners component
- Breadcrumbs: Displays the breadcrumbs, that is, the navigation path within the website
- Custom: The custom HTML module that we’ll explore in a dedicated section later
- Feed Display: Shows an RSS/Atom feed
- Footer: Displays the default Joomla copyright and licensing information
- Language Switcher: Shows the flags to switch between the available languages of the website
- Latest Users: Displays the list of recently registered users
- Login: The default login modules with fields for username and password, plus the links to reset password and registration features
- Menu: Displays a menu on the public website
- Random Image: Shows a random image taken from the selected folder
- Smart Search: Displays the Smart Search functionality
- Statistics: Shows information and statistics about your Joomla installation
- Syndication Feeds: Creates a syndicated feed for the website content
- Tags - Popular: Displays a list of most used tags in a list or cloud layout
- Tags - Similar: Displays links to other items related by tags to the current one
- Who’s Online: Shows the number of visitors and logged-in users on the website
- Wrapper: Displays a URL within an iFrame
The modules in the preceding list are frontend modules that are included in every installation of Joomla. Many additional modules might be available in your installation, given that they are commonly distributed and installed with other extensions, and a great number of them are also available in the Joomla Extensions Directory. For example, if you install an e-commerce extension such as HikaShop or VirtueMart, you will have additional modules available to show the shopping cart, the best-seller products, the latest arrivals, and much more.
Going back to the list of available modules, it’s evident that many modules are linked to components. For example, seven modules are connected to the Article component (com_content), the Banners module is connected to the Banners component (com_banners), the two Tags modules are linked to the Tags component (com_tags), and so on. The list also included the custom module, which is a particular kind of module that we’ll explore next.
The custom module
The custom module is a specific type of module that allows you to put custom HTML code in it. You can easily input HTML code in a custom module using the WYSIWYG visual editor, similar to the article editing experience.
A custom module can be used to show rich text, images, and media on your website. This type of module is also used to put HTML or JavaScript code that does not have a visible output on the website, for example, a tracking code.
Custom modules are also used in many websites as boxes to show extra information or to handle the footer details (for example, showing the name of the website, some contact information, and so on), and are a very dynamic layout item since you can place them in a specific position, or show them only in selected pages. Let’s discover how in the next section.
Module positions and assignments
Modules are considered the most flexible content unit in Joomla, even more than articles, because modules can be placed in specific positions and be assigned to selected pages.
Each module should be assigned to a position. A position is a place in the layout grid in which a module is displayed. Every template has several module positions in which modules can be placed. Depending on the template structure, a position might host one or more modules; we will explore templates and their positions in depth in Chapter 12.

Figure 4.3 – Some of the module positions of the Cassiopeia template
In the preceding figure, you can observe some of the module positions available in the default frontend template of Joomla 4: Cassiopeia. As you can see, each of the positions has a specific name, such as top-a, top-b, sidebar-left, sidebar-right, breadcrumbs, main-top, and main-bottom.
In Figure 4.3, you can also observe that there are two modules published in the same position: in fact, the Main Menu and Login Form modules are published both in the position called sidebar-right. In this case, modules are shown one after the other vertically. In other cases, they might be displayed inline depending on the template and module configuration and styling.
The position’s name and number depend on the template in use.
Modules can be assigned also to a special position called ::None::. This means that the module is not displayed in any of the available positions. But modules can be placed literally everywhere. In fact, you can place a module in any article by using the dedicated button in the editor.
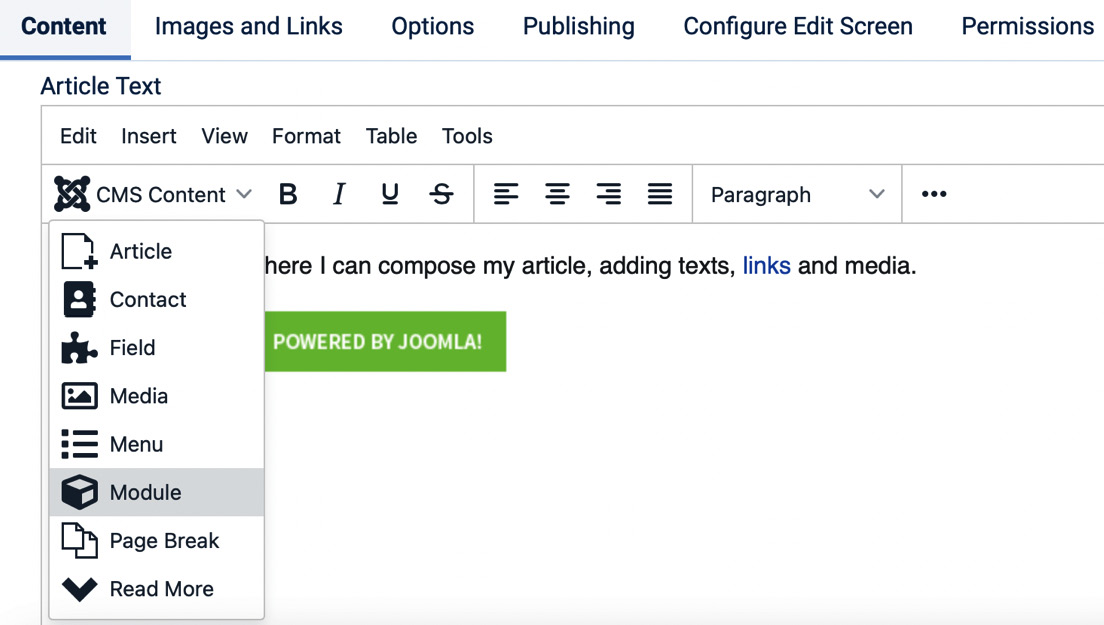
Figure 4.4 – Adding a module
Clicking on CMS Content | Module, as shown in Figure 4.4, you can choose which module should be displayed within the article.

Figure 4.5 – Selecting a module
You can add any of the available modules to any of the articles of your website.
Furthermore, you can show a module on all pages, or only on a selected page, thanks to the Assignment features available for each of the modules.

Figure 4.6 – Module Assignment
While creating/editing a module, there is a specific tab called Menu Assignment, as shown in Figure 4.6, in which you can choose whether the module should be displayed:
- On all pages (default)
- On no pages
- Only on the selected pages
- On all pages except those selected
These options grant you a high level of flexibility as to when to show or hide a specific module and is connected to the menu system. In fact, you can select the menu items in which the module is to be shown or hidden, as per the options listed earlier.
When you select Only on the selected pages or On all pages except those selected, you will be prompted to check the menu items to enable/disable the display of the module, as shown in the following figure.

Figure 4.7 – Menu Assignment | Menu Selection
This level of flexibility allows you to show different modules based on the page the user is visiting. In the next section, we will see how to add a module to our website and explore the available options.
Adding a module to your website
Let’s see how to add a module to our website. From the backend of the website, we go to Content Dashboard and then to Site Modules. On this page, we can see all the modules currently installed/configured on the website.

Figure 4.8 – Site modules
To create a new module, just click on the New button in the toolbar. We will see the list of available module types, as displayed in the following figure:

Figure 4.9 – Module type selection screen
Let’s choose the Custom type and create the module by clicking on the plus sign near the desired card. The custom module creation screen will look like this:

Figure 4.10 – Custom module creation
The first field to fill out is Title. The main editing area is meant to host the content of the module that can be inserted through the visual editor.
The other options in the Module tab are the following:
- Title: Show/hide the title of the module in the frontend
- Position: Choose the position in which the module should be published
- Status: Choose whether the module should be published/unpublished/ archived/trashed
- Start Publishing: Schedule the publishing of the module at a specific date/time
- Finish Publishing: Unpublish the module automatically at a specific date/time
- Access: Specify the access level for the module
- Ordering: Specify the order of the module; useful when there are multiple modules in the same position
- Note: Internal notes for the website administrators
The Menu Assignment tab includes the controls to decide the pages on which the module should be visible. We went through these controls while describing Figure 4.7.
The Options tab shows only two controls, as shown in Figure 4.11.

Figure 4.11 – Custom module options
The Prepare Content option enables the Joomla content plugins on the contents of the module. This type of plugin generally acts on contents to detect some activation strings to represent galleries, videos, and more.
The other option allows you to select a background image that will be shown as the background of the module.
The Advanced tab groups controls to act on the styling of the module, as displayed in Figure 4.12.

Figure 4.12 – Custom module advanced controls
Let’s explore the available options:
- Layout: Select a layout for the module if the template provides additional specific layouts.
- Module Class: Specify the CSS class to display the module.
- Caching: Choose whether to enable cache for the module or not.
- Cache Time: Specify the time of the cache.
- Module Tag: Choose the HTML markup to be used to represent the module (default is div).
- Bootstrap Size: Choose how many columns of the 12-columns Bootstrap grid the module should span.
- Header Tag: Select the level of header for the module title (default is h3).
- Header Class: Specify the CSS class to render the title of the module.
- Module Style: Choose a style for the module. There are some default styles provided by Joomla and additional styles provided by the template in use.
The latest tab is dedicated, as usual, to permissions, which we will explore in Chapter 6. Once we have completed the configuration of the module, we can click on Save & Close to save the module we created and configurated on our website.
In this section, we explored the settings and controls offered by the custom module, but every module might have additional or different options. Some tabs will be available in every module you install, for example, the Menu Assignment and Advanced tabs.
As mentioned at the beginning of this chapter, modules are heavily used both in the frontend and the backend of the website. In the upcoming sections, we will explore the backend modules.
Backend modules
The backend dashboard is completely made of modules, which gives us extreme flexibility and the opportunity to customize the layout of the administration side.
Home Dashboard in Joomla 4 includes many modules: Site, System, Sample Data, Notifications, Latest Actions, Privacy Dashboard, Logged-in Users, Popular Articles, and Recently Added Articles. Furthermore, there are other modules to display data such as the version number, the admin menu, a link to the frontend, a logged-user menu, and the notification of post-installation messages.
To check the administrator modules available on the website, you just need to open the Administrator Module link from Content Dashboard. You will then see the list of available modules as shown in Figure 4.13.

Figure 4.13 – Administrator module
From the list, we can see that the module types for the backend are slightly different, and that in the backend also, modules are published into a position. Available positions differ by template, but it’s not that common to use a different backend template.
By clicking on the New button, you can create a new backend module, choosing from those available, as displayed in Figure 4.14.

Figure 4.14 – Available backend module types
As for the frontend, the number of available module types might differ based on the extensions installed. Those listed in the preceding figure are shipped by default in Joomla.
Thanks to the available modules, you can set up a completely customized dashboard, placing modules at your convenience to show relevant information.
This feature is very useful, especially when you have multiple administrators for the website and you want to simplify their operations by placing buttons, instructions, and information on a single screen without having them dig through menus and other dashboards.
Also, as you might have noticed, every system dashboard in the Joomla backend has a button that invites you to add another module, as shown in Figure 4.15.

Figure 4.15 – Adding a module to the dashboard
Adding modules to existing dashboards will help you operate your website easier and faster, and your website administration will be tailored to your needs. In the next section, we will learn more about custom backend dashboards with the help of a case study.
Case study – a custom backend dashboard
Throughout this chapter, we discovered that modules increase the flexibility of your website, either on the frontend or backend. We also saw that modules can be used in the backend to customize the administration experience, simplifying paths, and enriching the level of information shown in the dashboards.
With Joomla 4 dashboards, every backend can be different from the others, thanks to the custom modules placed in different positions. In this section, we will analyze, as a case study, a customized backend dashboard.
The scenario
We are building a website for a school, and we will give administrator access (with some limited privileges) to the school’s staff to allow them to create articles. We also want to provide some on-screen guidance to them, to remind them where they should go to do the operations. To do so, we need to create custom modules with some text instructions and links to access features. In this case study, we will not operate on access levels and permissions. We will only remove non-useful modules and add additional modules to the dashboard.
Implementation
We will work on the Home Dashboard. First, we will remove the modules that are not useful for our users.
Let’s remove the Sample Data module. We can do this by simply clicking on the gears icon at the top right of the module and clicking on Unpublish, as shown in Figure 4.16.
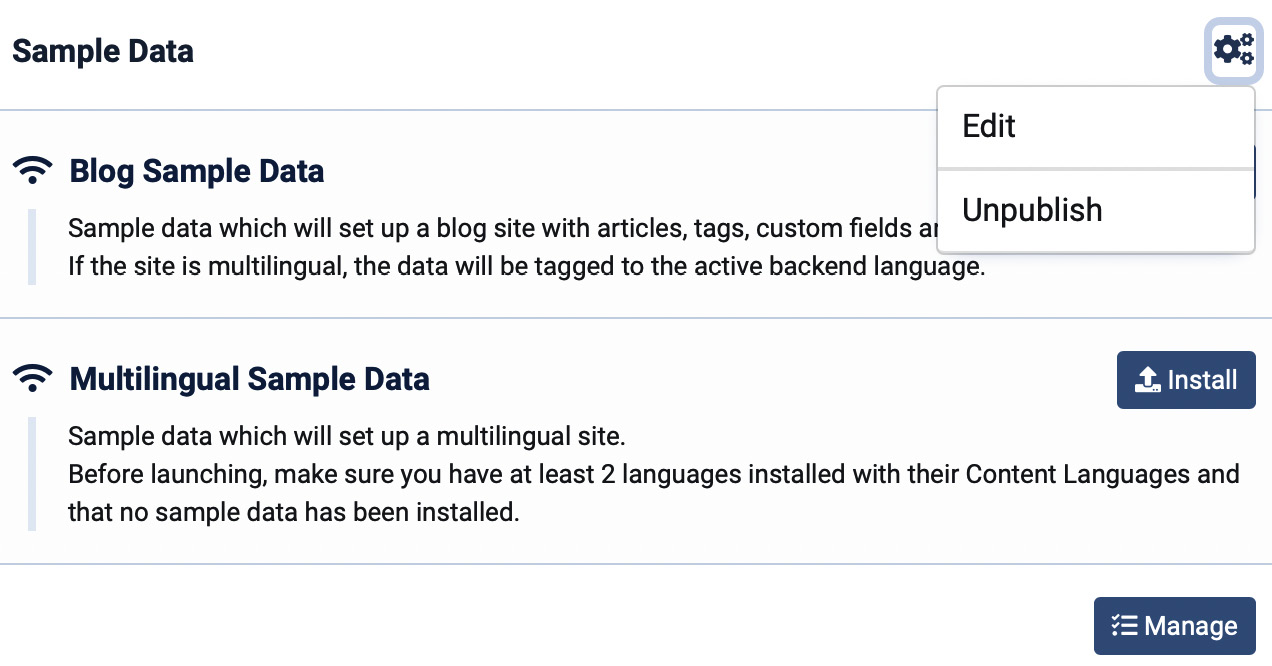
Figure 4.16 – Unpublishing a module
We can repeat the procedure for the following modules, if we don’t want to have them visible:
- Latest Actions
- Privacy Dashboard
- Logged-in Users
- Popular Articles
- Latest Actions
- Recently Added Articles
We then proceed to create new custom modules in which we can include instructions for the backend users.
To do this, click on Administrator Modules, then New and Custom. We can set the title to Instructions for Staff and put as content some text to guide administrators, similarly to what is displayed in Figure 4.17.

Figure 4.17 – Sample instructions for school staff
This module should be published in the cpanel position and will be shown in the dashboard.
With this, we have simplified the administration experience for the school staff. This case study can be heavily improved using access levels in modules and displaying modules only to specific user groups.
Summary
In this chapter, we’ve explored modules, what they are, how they work, and their usage in the frontend and backend of websites. We saw how to add a module to our website’s frontend and to our backend dashboard. We explored the different types of modules and their options and customizations.
In the next chapter, we will explore the Menu management system.
Exercises
Let’s apply the knowledge acquired in this chapter.
Exercise 1 – creating a custom module
In your Joomla backend, create a new site module, selecting the Custom Module type. Give the module the following title: MyModule, and configure it to be published on all pages in the sidebar-left position. In the content section of the module, type the following text: This is the text of my first module. Save and close, then open your website frontend and see how the module looks.
Resources
- Joomla Extensions Directory: https://extensions.joomla.org
- Explore the core! The Joomla 4 Dashboard: https://magazine.joomla.org/all-issues/august-2021/explore-the-core-the-joomla-4-dashboard
- Joomla 4 for Clients, Part 2: Creating a Streamlined Admin Experience: https://magazine.joomla.org/all-issues/february-2022/joomla-4-for-clients-part-2-creating-a-custom-admin-experience
- My favourite Joomla 4 feature - customizable dashboard: https://magazine.joomla.org/all-issues/september-2021/my-favourite-joomla-4-feature-customizable-dashboard