
6
Managing Users and Their Permissions
In the previous chapter, we explored Joomla Menus, and understood how to create menu items, defining the navigation mechanisms for our website.
We’ll now dig into users and their permissions management feature.
After reading this chapter, you will understand the following:
- How to create and manage users in your website
- How to manage permissions to access a specific part of your websites
- What access levels are in Joomla and how to create your own custom levels
- How to create and manage user groups
- How to use the features provided by the Privacy Tool Suite
Joomla integrates many functionalities related to users, as you will discover throughout this chapter. Let’s start with Users Dashboard.
Users Dashboard
The first contact of the website administrator with Joomla’s features related to user management is represented by Users Dashboard, displayed in Figure 6.1.

Figure 6.1 – Users Dashboard
Users Dashboard shows three modules with links to user-related functionalities:
- The first module, called Users, has links to manage users, groups, and access levels, plus the link to create a new user.
- The second module is called User Fields and has links to manage custom fields and field groups. As you can guess, you can create custom fields to enrich your users’ profiles with additional data.
- The third module is Miscellaneous, and it includes links to the User Notes, User Note Categories, and Mass Mail Users functionalities.
We will explore each of the features linked by the three modules in the following sections of this chapter.
The dashboard also includes the Logged-in Users module, which shows a list of the latest accesses to the website, reporting the name of the user, the location (Site or Administration), and the date and time of the access.
As with all the other Joomla dashboards, Users Dashboard can also be completely customized by adding or removing modules.
Let’s now present the user account features.
User accounts
Joomla integrates all the needed features to create and manage user accounts out of the box. Accounts allow users to log into the website, perform operations, and access content and pages for which they have the appropriate permissions. Accounts can be created either in the backend of the website by an administrator or in the frontend of the website by the user directly through a self-registration form.
Administrators can choose whether to allow self-registration to the website or not through the options available in the Users component’s options.
Users on the website may have different permissions and roles. In fact, each user belongs to one or more User Groups and, through the group, receives specific permissions. We’ll explore User Groups in depth in a later section.
Let’s now see how to create a user account from the website backend.
Creating a new user account
Starting from Users Dashboard, displayed in Figure 6.1, click on the + sign, next to Manage in the Users module. The account creation screen is then displayed, as per Figure 6.2.
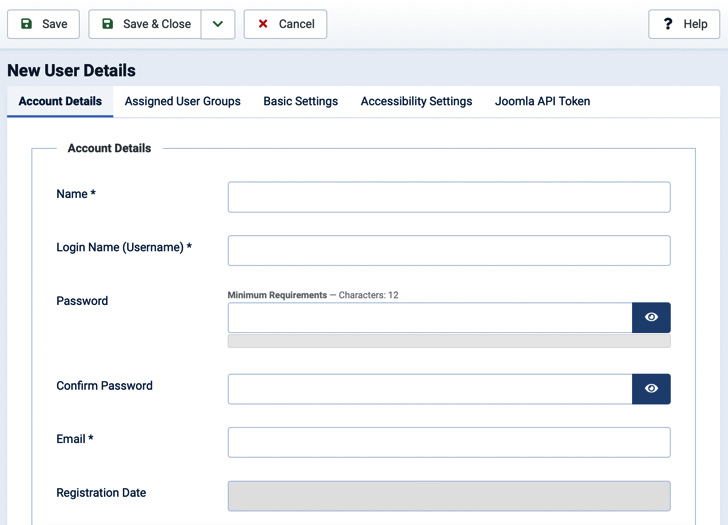
Figure 6.2 – New user screen
Let’s analyze the fields proposed in the Account Details tab:
- Name: This is the name of the user. Generally, this field contains the full name or the legal name of the user.
- Login Name (Username): As per the field name, this field represents the username used to log in to the website.
- Password: Specifies the password for the user. This is used when logging in to the website. When empty, the system will generate a random password for the user.
- Confirm Password: This is the field where you re-type the password specified in the preceding field to confirm it.
- Email: This is the email address of the users. It’s used to receive notifications and communications from the website.
- Registration Date: This is a read-only field populated automatically with the registration date, once the account is created.
- Last Visit Date: A read-only field populated automatically with the last date/time that the user logged in to the website.
- Last Reset Date: Reports automatically the date/time that the user requested a password reset.
- Password Reset Count: Reports automatically the number of times that the user requested a password reset.
- Receive System Emails: Choose whether the user should receive notifications from the system, such as update availability notices or new users’ registration messages. The default is No and this option should be activated only for administrative users.
- User Status: Choose whether the user account should be enabled or not. This option is useful when you want to disable a user account.
- Require Password Reset: When set to Yes, the user will be prompted by the password change screen at the next login.
- ID: An automatically populated field with the unique ID assigned to the user’s account, after its creation.
Password requirements
In Figure 6.2, there is a visible meter under the Password field that indicates the complexity level of the selected password. This evaluation is made against the password requirements specified in the Options section of the Users component. There, you can specify a series of parameters for your website passwords, including the minimum password length, the minimum quantity of symbols, and the use of lowercase and uppercase characters as well as numbers. Through these options, you can increase the security of the users of your website, forcing them to choose more robust passwords. In Password Options, you can also specify the maximum number of password reset attempts and how long in hours must lapse before the count of reset password attempts is restored.
Let’s move to the Assigned User Groups tab, displayed in Figure 6.3.

Figure 6.3 – New user: Assigned User Groups
On this screen, you can assign the user account to one or more User Groups. By default, all user accounts belong to the Registered user group. In Figure 6.3, you can see the list of predefined User Groups, available in all Joomla installations. You may create, edit, and delete user groups at your convenience. In the next section, we will explore User Groups and their importance in assigning permissions on the website.
Let’s move on to the Basic Settings tab, displayed in Figure 6.4.

Figure 6.4 – New user: Basic Settings
The controls in this tab allow you to customize the experience of the user, selecting the template style for the backend, the language for either the frontend or backend, the editor to use, and the time zone of the users. Through these options, you can offer an experience tailored to the user, showing the website in a specific language, or allowing the user to input their content using an editor different from the one set as the default for the website. You can also offer the user the ability to apply these options through the profile page on the website frontend.
Let’s move on to the Accessibility Settings tab, displayed in Figure 6.5.
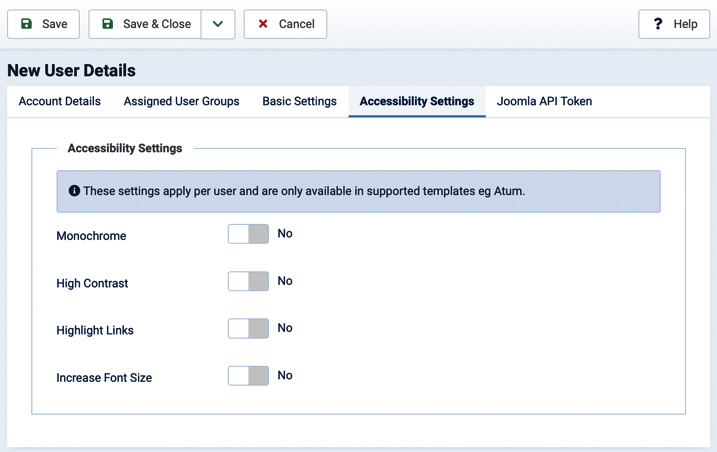
Figure 6.5 – New user: Accessibility Settings
The controls offered by this tab allow you to customize the experience of the user in terms of accessibility, enabling the high contrast or monochromatic version of the website, highlighting links, or increasing the font size, where these options are supported by the backend or frontend template in use. These options are available for each user and can be set by the user through their profile page.
Let’s now move on to the last tab, Joomla API Token, displayed in Figure 6.6.

Figure 6.6 – New user: Joomla API Token
This screen shows the unique token that allows you to use the web services offered by the Joomla API, as a specific user. For example, you can authenticate to the website and execute operations through a command line or a script, without the need to type the user credentials, by simply using the token.
On the screen, you can also choose whether the token should be active or not and whether you want to regenerate the token at the next user save.
Once you have completed the mandatory fields in the tabs we explored, just click on Save & Close to create the user account. Based on the options selected, the user may receive a notification via email to inform them about the account’s creation, with login instructions included.
Based on the user role or the functionalities enabled on your website, the user creation and edit screen may show additional tabs, such as the User Action Log tab (only visible to super users) or the WebAuthn login and Multi-factor authentication tabs, which are displayed only when the respective plugins are enabled.
Editing a user profile
From the list of users, accessible through the Manage link on Users Dashboard, you can edit the user accounts of the website. To edit an account, just click on the name of the user. You can see all the fields and tabs that we’ve explored during the creation of a new account.
Being able to create and edit user accounts, we’ll now discover User Groups and understand their purpose.
User Groups
In Joomla, User Groups are used to grant permissions to resources, that is, content, menu items, and extensions, in both the frontend and backend. Each user of the website must be assigned to one or more User Groups, as we saw while creating or editing a user account.
Groups are heavily connected to access levels; in fact, each access level should be assigned to one or more groups, granting users of the selected group the permissions defined at that access level. We’ll explore access levels in depth in the next section.
Let’s now review the User Groups available by default in Joomla, as displayed in Figure 6.7.

Figure 6.7 – User Groups
To access the User Groups page, from the sidebar menu click on Users then on Groups. You’ll then see the list of all the groups created on the website, the number of enabled users in each group, the number of blocked users in each group, and a link to check the permissions that users of each group have on the website.
Groups can also be nested, one under another. In this way, the subgroup inherits permissions from its parent, allowing you to customize only the needed permissions, without re-defining the whole permissions set.
As we can observe in Figure 6.7, the root group is called Public, and it represents the base for the permissions for the whole website. All the other groups inherit the basic permissions from Public.
Creating a user group
You can create and nest user groups at your convenience. To create a user group, click on the New button. You will be taken to the screen visible in Figure 6.8.

Figure 6.8 – New user group screen
The creation of a new user group is a very simple process that provides only the following two fields:
- Group Title: Allows you to specify the name of the user group.
- Group Parent: Allows you to select the parent user group for the new group you are creating. By default, all user groups are placed under the Public group.
As you can see, groups are basic entities, without many options. We’ll now dig into access levels, which allow us to grant permissions to users through user groups.
Access levels
Access levels are very important in Joomla, since they allow us to assign permissions to user groups, and to users. Some access levels are already provided by default in a standard installation, but you can create as many access levels as you need.
Each access level can be assigned to one or more user groups. Let’s explore the standard access levels, displayed in Figure 6.9.

Figure 6.9 – Access Levels
To view the access levels of your website, just click on Access Levels in the Users sidebar menu. As you can see, Joomla comes with five built-in access levels: Public, Guest, Registered, Special, and Super Users. For each of the access levels, we can find the list of user groups assigned to them. In the next section, we’ll see how to create a new access level.
Creating a new access level
To create a new access level, just click on the New button shown in the toolbar. The access level creation screen will look like Figure 6.10.

Figure 6.10 – New access level: Level Details
In the first tab, Level Details, we can only specify the name of the access level, using the Level Title field. The second tab, User Groups With Viewing Access, allows you to choose which user groups should receive this access level, as shown in Figure 6.11.
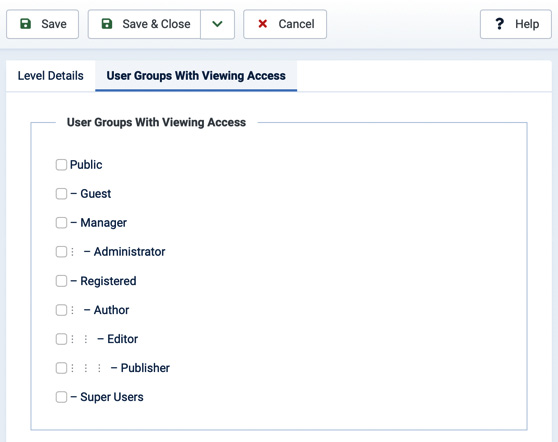
Figure 6.11 – New access level: User Groups With Viewing Access
Creating several access levels will allow us to have a higher granularity in managing permissions on the website. For example, if we are building the website for a school, it would be common to have at least three additional access levels: Teachers, Students, and School Personnel. In this way, we can grant those groups access to the relevant sections of the website or reserved areas, differentiated by role.
In the next section, we’ll see how to manage permissions using access levels.
Managing permissions and privileges
In this chapter, we’ve introduced two basic entities that are crucial in the Joomla permission management system: User Groups and Access Levels. Specifically, through access levels, we can manage permissions and privileges for almost all the entities in the CMS, contents, modules, components, and menu items, either in the backend or the frontend of the website. You can, in fact, create custom permissions sets for each of the sides of the application: limiting features of the backend, allowing only certain parts of the backend to be used, or creating a specific access level for the frontend that allows users with this level to access only a specific set of pages. The Joomla Access Control List (ACL) is a very powerful feature.
Let’s start to understand the permission management functionalities by accessing the Settings link from System Dashboard.
The page shown will be the Permissions tab of Global Configuration, as displayed in Figure 6.12.

Figure 6.12 – Global Configuration: Permissions
In the tab, we can see the list of User Groups on the left and the list of actions on the right side. For each action, you can select a setting through the dropdown. The system will show the result of the permission applied based on the permissions inherited and set there, in the Calculated Setting column. For each action you can set one of the three following values: Not Set, Allowed, or Denied. In Figure 6.12, we can observe that the permissions shown are intended for the Public user group.
Let’s now explore the available permission types that can be assigned globally to an access level:
- Site Login: Allows the users to access the frontend of the website through their user account.
- Administrator Login: Allows the users to access the backend of the website through their user account.
- Web Services Login: Allows the users to access the website through their API token.
- Offline Access: Allows the users to access the website when it’s offline or in maintenance mode.
- Super User: Grants the users Super User permissions that allow full control over the website.
- Configure Options Only: Allows the users to edit the options of any component, except for permissions.
- Access Administration Interface: Allows the users to access the backend interface, except for Global Configuration.
- Create: Allows the users to create any item in any component. For example, they can create new articles, new menus, new menu items, new categories, and new custom fields.
- Delete: Allows the users to delete any item in any component. For example, they can delete articles, menus, and menu items.
- Edit: Allows the users to edit or update any item in any component. For example, they can edit an article or a menu item.
- Edit State: Allows the users to change the state of any item. For example, they can change an article state from Published to Unpublished, or publish a menu item.
- Edit Own: Allows the users to edit only their own items. For example, the author of an article can modify only their article and not those of other authors.
- Edit Custom Field Value: Allows the users to edit the value of custom fields, in any extension.
The Public access level has the Not Allowed (Default) permission on all of the actions reported in the preceding list since it’s meant to be the group where website visitors belong and they shouldn’t have any specific permissions.
Other access levels have specific permissions; for example, we can see a preview of the permissions for the Manager access level in Figure 6.13.

Figure 6.13 – Global Configuration: Permissions | Manager
We can observe that the Not Set option – seen in Figure 6.12 – has been replaced by Inherited. This means that permissions are inherited from the parent user groups. That’s why it can be useful to nest user groups in a meaningful way.
Beyond Global Configuration, permissions can be set on a per-component basis and even on a per-item basis. Let’s see how.
Managing permissions of a component
As we mentioned earlier in this section, almost every item in Joomla allows you to define specific permissions for each access level. In this way, you can have full control of privileges on your website.
The permissions management screen for each component can be accessed from System | User Permissions | Settings, by selecting the desired component in the list shown on the left side, as we saw earlier in Figure 6.12.
Let’s explore the permissions manageable for the Articles component, displayed in Figure 6.14.

Figure 6.14 – Global Configuration – Articles: Permissions
Actions shown for each component may vary, extending the granularity of the permissions from the standard set of permissions set in Global Configuration. Again, the Calculated Setting column will ensure you reach the desired permissions result, showing eventual conflicts between global and specific permissions set in the components.
For example, in Figure 6.14, we can see that there are some additional permissions for the Articles component. Let’s check them out:
- Configure ACL & Options: Allows the users with a specific access level to access and edit the component options and permissions
- Configure Options Only: Allows the users to access and edit only the component options
- Access Administration Interface: Allows the users to access the backend interface of the component
- Create: Allow the users to create new items (in this case, new articles)
- Delete: Allows the users to delete items (articles)
- Edit: Allows the users to edit items (articles)
- Edit State: Allows the users to change the state of the items (for example Published, Unpublished, and so on)
- Edit Own: Allows the users to edit their own items (the articles they wrote)
- Edit Custom Field Value: Allows the users to edit the value of the custom fields linked to articles
- Manage Workflows: Allows the users to manage workflows
- Execute Transition: Allows the users to execute a workflow transition
The number and type of actions may vary based on the component. Some of the actions, such as Access Administration Interface and Configure ACL & Options, are available for all the components.
Scenario – custom backend permissions
Through the appropriate permissions, you can restrict access to functionalities to specific backend users. For example, for a magazine website, you can create an access level for authors, allowing them to access only the Articles component, granting them only Create and Edit Own permissions, and allowing them to submit new articles or edit their articles. Another backend access level could be useful for editors, allowing them to execute transitions of the workflow, edit items, and change the state of items so that they can review, approve, and publish articles. With an ACL, you can fully apply the principle of minimum privilege.
But permissions can also be managed on a per-item basis. Let’s now see how.
Managing permissions for a single item
Almost every item in Joomla allows you to specify the permissions based on the access level. This is specifically useful when you want to restrict permissions of specific articles, categories, or modules.
On an article edit screen, you can see the Permissions tab, in which you are allowed to define who can delete, edit, or edit the state for the specific article, as shown in Figure 6.15.

Figure 6.15 – Single article permissions
The same pattern applies to modules; in fact, for each module you can specify who can perform a specific action through the Permissions tab, as shown in Figure 6.16.

Figure 6.16 – Module permissions
Joomla also allows you to specify who should see specific content, such as an article, a category, a menu item, or even a module. In the next section, we’ll see how to restrict access to content to specific users.
Specifying access permission for items
For each item in Joomla, from articles to categories, from modules to menu items, you can specify who should be able to access the item. This is pursued through the Access field, visible in the item creation/editing screen, as displayed in Figure 6.17.

Figure 6.17 – Article edit screen: Access
Through the Access field, you can choose from the dropdown the user group who should be able to access the item. If you have nested User Groups and you select a group that is parent to other user groups, all the user groups nested under the selected group will be granted access to the item.
This access setting is available on both sides of the application, allowing you to customize access permissions for each item for both the frontend and the backend of the site.
Scenario – custom backend dashboard
You can build a customized dashboard in the backend of the website, hiding some modules and menus and adding other modules to simplify their operations. To do so, just create a user group for those users and assign it to the modules that are meant to be shown to them only. Hide modules that should not be visible to them by selecting a higher user group, such as super users. In this way, you can completely customize the backend experience of your coworkers.
With this section, we completed the part related to permissions and ACLs. We’ll now move on to custom fields related to users.
Users – custom fields
In Chapter 3, Advanced Content Management, we discovered custom fields, focusing on their usage as enrichment for articles. But Joomla also allows you to add custom fields to users, allowing you to enrich data about your users.
For example, you can use custom fields tied to users to collect data such as a short biography, birth date, province, city, phone number, email, and much more.
Custom Fields are organized in Custom Field Groups, which are used to display fields in an ordered way.
Custom Fields will be displayed in the user creation and editing form in the backend, while they are shown on the profile page and registration page on the website frontend.
To create and manage custom fields related to users, from Users Dashboard click on Fields in the module called User Fields. The procedure to create a custom field is identical to the one already presented in Chapter 3, Advanced Content Management.
We’re now going to explore another feature that is useful for administrators, User Notes.
User notes
Joomla allows administrators to add internal notes to users. Notes are organized through Note Categories, so you can create different categories to manage your notes, for example, billing, behavior, and so on. You can then create a note, assigning it to the respective category and adding it to the user, noting for example bad behavior on the part of the user, a missing payment, and so on.
Notes are not visible to the users, and they are only displayed to the website administrators.
To create a user note, from the sidebar menu, click on Users, then on User Notes, and on New, as shown in Figure 6.18.

Figure 6.18 – New user note
The user note creation screen includes the following fields:
- Subject: Allows you to specify the subject and the title of the note.
- User: Allows you to select the user to which you want to add the note.
- Category: Allows you to select or create a new category to which you want to add the note.
- Status: Allows you to choose whether the note should be published, unpublished, trashed, or archived.
- Review Date: Allows you to select the date on which the note has been reviewed. By default, it’s the date on which the note has been created.
- Version Note: Allows you to specify a name for the version of the note.
- Note: Allows you to use the text editor to write the note.
You can add any number of notes you want to any of your users, as well as create all the categories you need to organize your notes. These can be useful while managing your website to remind you of specific things, such as misbehavior, late payments, and much more.
After user notes, we will explore Mass Mail Users, which allows administrators to contact website users in an easy way.
Mass mail
Mass Mail Users is a feature that allows administrators to write an email to users of the website easily and quickly. To access the functionality, click on Users in the sidebar menu, then on Mass Mail Users.
You will be prompted by a screen like the following figure, Figure 6.19:

Figure 6.19 – Mass Mail Users
As you can see, using this feature is very easy. You just have to type the subject and the message in the related box and select the desired options:
- Mail to Child User Groups: This includes users of subgroups when selecting a parent group.
- Send in HTML Mode: This sends the email in HTML.
- Send to Blocked Users: This also includes in the recipient list users that are currently blocked.
- Recipients as BCC: This puts recipients as a Blind Carbon Copy (BCC) of the email so that they can’t see the list of recipients. This is enabled by default for privacy reasons.
- Group: This selects the user group that should receive the message, or if you click the All Users Groups option then it will contact all users registered to the website.
Once the message is ready for delivery, click on Send Email to send it. Please note that there is no track of sent messages, nor information about the delivery status of your messages.
Note – when you should avoid using Mass Mail Users
As mentioned at the end of the section, Mass Mail Users does not track sent email messages, nor the delivery status of the messages. Furthermore, this feature creates a single message with all the selected users as recipients. This might not work in certain hosting environments due to some limits on the number of recipients for a message or the daily email send rate, especially when you have many users selected as the recipient. If you want to send mass communications, schedule the sending process, collect information about the delivery status, and track the openings, then you should use a newsletter component.
Having seen the Mass Mail Users feature, it’s time to discover the privacy-related functionalities.
Built-in privacy features
Since version 3.9, Joomla includes a series of features dedicated to privacy, simplifying the process to comply with privacy regulations through a set of functionalities called the Privacy Tools Suite.
This suite of tools has been designed in line with GDPR requirements and includes the following:
- A feature to collect and manage users’ requests for information about their processed data or to delete their data
- A feature to collect and manage consent from users to process their data
- A feature to log user actions that is useful for audits
- An API to connect other extensions to Privacy Dashboard and expand those privacy features to third-party extensions
All those features are accessible from Privacy Dashboard, which you can open from the sidebar menu by clicking on Users, then clicking on the dashboard icon next to the Privacy menu item. Let’s start exploring Privacy Dashboard.
Privacy Dashboard
Privacy Dashboard, as displayed in Figure 6.20, shows two main modules and allows you to check at a glance the status of privacy requests and needed actions:

Figure 6.20 – Privacy Dashboard
The first module, Privacy Requests, shows the list of outstanding information or deletion requests coming from your website users. We’ll see in the next section what a privacy request is and how to submit one.
The second module, Privacy Status, shows the status of some checks, including the following:
- Published Privacy Policy: This checks whether or not you published a privacy policy and whether you enabled the Privacy Consent plugin, which allows collecting consent from the users when they register or log in to your website.
- Published Request Form Menu Item: This checks whether or not you published a menu item pointing to Privacy | Create Request. This type of menu item publishes a form in which users can submit data information or a deletion request.
- Outstanding Urgent Requests: This checks whether you have requests older than 14 days to be processed.
- Mail Sending Enabled: This checks whether the website is able to send emails.
- Database connection encryption: This checks whether the connection to the database is encrypted or not.
As with all the other dashboards of the backend, you can customize this dashboard with additional modules. Let’s see how to set a privacy policy for your website.
Setting a privacy policy
In order to allow the website to collect consent from your users, you need to make them aware of the privacy policy. Joomla can manage two types of privacy policies: an article or a menu item (for example, if you have a specific URL for the policy).
To set your privacy policy, after having created the article or the menu item, open the plugin called System - Privacy Consent, which will look like Figure 6.21.

Figure 6.21 – System – Privacy Consent plugin
Let’s explore the options offered by the plugin, starting from the Plugin tab:
- Short Privacy Policy: A short statement about consenting to your privacy policy. The field contains placeholder text that may be used.
- Privacy Type: Allows you to choose whether your privacy policy is an article or a menu item.
- Privacy Article: Allows you to select the article (or the menu item) that includes your privacy policy.
- Redirect Message: A custom message shown to users when prompted to consent to your privacy policy. Also, in this case, you can have placeholder text that may be used in most cases.
Let’s now move to the Expiration tab, shown in Figure 6.22
.

Figure 6.22 – System – Privacy Consent: Expiration
Through this tab, you can choose to enable the expiration of consent to your privacy policy and set the following options:
- Enable: Activates the consent expiration checks.
- Period check (days): Allows you to specify how often the system should check the validity of consent.
- Expiration: Allows you to specify the duration of consent provided by the users. The default is 360 days.
- Remind: This allows you to specify the number of days to send a reminder about the approaching consent expiration.
After configuring the plugin as desired, it’s important to enable it and change Status to Published, then click on Save & Close.
Let’s now move to privacy requests.
Privacy requests
A privacy request is a request from a user to either inform them about the data the website holds about them (information request) or delete their data from the website (deletion request). Those requests are part of the rights to data subjects offered by the GDPR and other privacy regulations.
When processing an information request, the system will produce an XML file containing the data that the website holds about the user (for example, name, email address, and preferences). The contents of the file might not include all the data that the website holds about the user, since not all extensions implement the Privacy API. The data included may differ based on the extensions used on your website.
This type of request is also called an export request, as it allows you to comply with the right to data portability provided by privacy regulations.
While processing a deletion request, the system will pseudonymize all the information related to the user. In fact, it’s not a complete removal of data, since that could create issues related to the operations of the website (for example, in the case of e-commerce or when deleting data about an author, which might result in having orphan articles).
The first step to collecting privacy requests is to create a menu item on your website pointing to Privacy | Create Request. This would result in a page accessible to your users on which they can submit a privacy request, selecting from export and data removal types.
Also, it is important to note that privacy requests cannot be deleted from your website.
When a user submits a privacy request, they will be required to confirm it, validating their email address, through a link included in a confirmation email.
You can also create a privacy request from the backend of the website, but also, in this case, users should confirm it via the confirmation link. This is required to ensure the security of data.
Once a request has been opened, but not yet confirmed, it will show as Pending and can be invalidated by an administrator, as you can see in Figure 6.23.
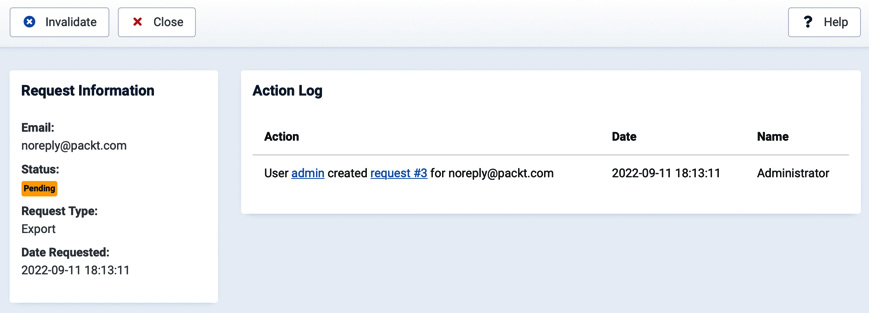
Figure 6.23 – An export request pending confirmation
For each request, we can see the email, the status, the type of request, and the date of the request. Also, on the right side of the screen, we have complete tracking of the activity executed on the request.
Each request can have one of the following statuses:
- Pending: A request that has been submitted but not yet confirmed
- Invalid: A request that has been invalidated by the administrator
- Confirmed: A request that has been confirmed by the user, but not yet executed by the administrator
- Completed: A request that has 5 been processed by the administrator
By default, only super users are allowed to see and process privacy requests.
Let’s now explore the last feature introduced with the Privacy Tools Suite: User Action Log.
User Action Log
Even if it’s not strictly related to privacy, the User Action Log feature has been introduced together with the other privacy functionalities as it’s propaedeutic for the work of other mechanisms and tools. In fact, we’ve seen that a log of actions executed is kept in each privacy request.
As the feature name suggests, User Action Log represents a registry of the actions taken by users. In the options of the component, you can choose which type of actions you want to record. By default, the operations executed in the following components are logged: articles, banners, cache, categories, check-in, configuration, contacts, installer, media, menus, messaging, modules, news feeds, plugins, redirects, scheduled tasks, tags, templates, and users.
So, every operation, such as creating an article, editing a menu item, or logging into the website, is logged, with the user involved and the date and time of the operations. These logs are useful for administrators to find out who did an operation and when.
The component allows you to export logs as CSV and execute search/filtering in logs.
User Action Log is accessible from the respective menu item available under the Users menu in the sidebar.
With User Action Log, we completed our look at the features dedicated to users.
Summary
In this chapter, we explored the functionalities to create and manage users and user groups and grant them appropriate permissions through access levels. We went through the privacy-related features, discovering privacy requests, privacy consent, and the user action log.
In the next chapter, we’ll explore the SEO-oriented features offered by the CMS.
Exercises
It’s time to apply the knowledge acquired in this chapter to work with users and permissions.
Exercise 1 – user groups and permissions
Create a user group called MyGroup. The group should be nested under the Registered user group. Change the menu item called MyArticle (created in the exercise of Chapter 5, Build Your Site Structure: The Menu System), to grant access to users in the MyGroup group.
Then create a new user on your website from the backend and add the user to the MyGroup user group.
Exercise 2 – privacy features
Create an article called Privacy Policy and write your policy text. Then, open the System – Privacy Consent plugin and set the article created as a privacy policy for the website. Once done, enable the consent expiration with the default values and enable the plugin.
Create a new menu item, selecting the Privacy | Create Request type, with the name Privacy Request, setting Access as Registered, and saving it.
In this way, you created a privacy policy for your website, ensured that your website collects the consent to your policy, and made available a form to receive privacy requests from your users. The menu item will be visible only to registered users.