13 Java Database Connectivity
In This Chapter
JDBC is a call-level interface built with Java for performing operations on relational databases. It resembles the Open Database Connectivity (ODBC) standard created by Microsoft, but it is generally easier to use. The range of operations it can perform is extremely broad: queries, inserts, updates, deletes, and stored procedure calls. It also has an API that allows access to database metadata, which includes capabilities for obtaining information about tables and columns.
Although JDBC is included in the Java Standard Edition SDK, I am going to discuss it as a part of Enterprise Java because, in most cases, Enterprise Java requires access to relational database systems. Much enterprise technology simplifies database access and provides pooling mechanisms to minimize the overhead and cost of establishing and releasing database connection.
HOW JDBC WORKS
Most business applications today need to store information in relational databases. Business applications written in Java are no exception. The standard Java database access technology is JDBC. JDBC is essentially a variation on ODBC with some Java bindings. It is designed as a Java API to Structured Query Language (SQL) data.
JDBC is just a specification; it is up to the various database vendors or third parties to create JDBC drivers for a particular database. In some cases, a JDBCODBC bridge can be used, but likely not for production purposes.
JDBC provides a fairly complete set of SQL-friendly data access mechanisms, such as scrollable result sets, absolute and relative positioning (in the result set), access to stored procedures, and data type conversions. Most SQL-92 (Entry Level 2) statements are supported in JDBC.
In order to access relational databases through Java and JDBC, we need a JDBC driver that can perform whatever communications and translations are required to act upon the database. A driver is a set of Java classes (usually in the form of a jar file) provided by the vendor that adopts the standard behaviors required for all JDBC drivers. These standard behaviors are defined in the various Java interfaces that comprise the JDBC API. The API, in addition, defines certain optional behaviors that a driver may choose to support. The API provides the ability to query the capabilities of the driver once it is loaded.
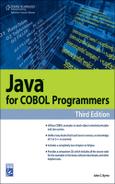
How the driver goes about its business behind the scenes is completely up to the driver. JDBC drivers may communicate from Java to native code, which then communicates with the database.
Other drivers use Java to communicate with the database using middleware or through direct communication with the database. These do not require that any native code be installed on the client machine.
Type 1 and Type 2 JDBC drivers fall into the first group of drivers. They require native code on the client machine. A Type 1 driver is a JDBC-ODBC bridge. It translates the JDBC calls into ODBC calls and uses ODBC to access the database. A Type 2 driver converts JDBC calls into the native API for the database. This requires that binary code from the database vendor be installed and configured properly on the client.
Type 3 and Type 4 JDBC drivers fall into the second group of drivers. They do not require native code on the client machine. They require only the Java packages and classes that support the driver. A Type 3 JDBC driver relies on a middleware server to handle its communications with the database. A Type 4 JDBC driver communicates directly with the database from Java without any intermediary software other than the communication protocol itself. Figure 13.1 illustrates how JDBC works with the various driver types.
Sometimes you have a choice about which type of driver to use. You may also have a choice about vendors. Clearly Type 3 and Type 4 drivers are easier to deploy to a large number of client machines, since they do not require any code other than the driver itself on the machines. A Type 1 driver is useful for learning how JDBC works, including simple testing and prototyping. For production, a Type 1 driver is the worst choice and should be considered only when no other option is available. Not only does it require ODBC software correctly configured on the machine, it also has the overhead of ODBC on top of whatever overhead JDBC carries. Beyond this, generalizations become more difficult. A vendor’s Type 2 driver may perform dramatically better than its Type 4 driver. If it is not required to be deployed to many client machines or if its performance advantages outweigh the deployment difficulties, the Type 2 driver could be the better choice. A Type 3 driver with its middleware server might be the best choice in a heterogeneous environment with many different databases, particularly if it performs well. With a Type 3 driver, one driver could be deployed to all client machines to provide access to all the databases in the enterprise.
CONNECTING TO THE DATABASE
The typical JDBC sequence required to access the database is slightly involved but quite straightforward after some practice. You create a connection to the database; you perform some actions, such as querying or updating; then you free the resources and the connections.
The first step is to create a connection to the database. To do this you need to have the JDBC driver class in your CLASSPATH. Most often the driver will be in a jar file supplied by the JDBC developer or vendor. To establish the connection, first you must load the driver. Then you can use the DriverManager class to establish the actual connection.
Class.forName("sun.jdbc.odbc.JdbcOdbcDriver");
Connection dbConnection =
DriverManager.getConnection("jdbc:odbc:mydata");
Although I have not discussed the class named Class, don’t be confused by the Class.forName() that is used to accomplish the driver load. Every VM has a class loader that performs the task of locating the actual code on disk, performing required integrity and security checks on it, and loading it into memory. As a complex program executes using many different classes, the driver-loading process takes place transparently behind the scenes. The forName() method is one way of loading a class explicitly in code (similar to an import statement that is resolved at runtime). If the class loader is unable to find the class, it will throw a ClassNotFoundException; otherwise, the class loader locates the class in the CLASSPATH and performs the same tasks it would for any other class. In the preceding code, you are loading the Sun JDBC-ODBC Bridge Driver explicitly by passing the correct class name to the forName() method.
After the driver is loaded, you can obtain a connection to a specific database that the driver supports by using the DriverManager. When the driver is loaded, it interacts with the DriverManager class to register itself. This registration process allows the DriverManager to map the URL string that is passed from the getConnection() method to a driver. The driver interprets the URL string and establishes the connection to the actual database.
The required conventions for the URL string are different for each driver, so you must consult the driver documentation for the exact parameters needed to establish the connection. In the example ("jdbc:odbc:mydata"), you are using JDBC to connect to an ODBC data source called “mydata.” The JDBC-ODBC Bridge Driver requires the information in this format to establish the connection. If you are unfamiliar with ODBC and data sources, don’t worry. I will cover the topic more thoroughly later in this chapter.
The Connection class returned by the driver is a factory class that generates many of the other classes required to perform database operations with JDBC. In particular, the Connection class provides the facilities for processing SQL statements, either by executing the statement directly or by returning an instance of a class implementing Statement or one of the Statement subinterfaces.

A factory class is a popular design pattern. A factory class creates an object for you. The factory pattern provides more control than the standard new operator. For example, you might want to globally control each instance of a Connection object so that when the system is rebooting, you can attempt to close all connections. If all Connection objects are created by a single factory class, then that class will know about each Connection that was created. Therefore, it can manage them properly when the system is rebooting.
The Connection class also controls the various aspects of database transactions. By default, new connections are in auto-commit mode. This means that each statement that modifies the database is automatically committed if it succeeds. Unless your requirements are relatively simple, auto-commit mode is not what you want. If you require the data in multiple tables to be synchronized with each other, you will want to turn auto-commit off, like this:
dbConnection.setAutoCommit(false);
Once auto-commit is off, you can perform transaction logic as you update the database. Transaction logic, for example, enables you to roll back (or reverse) the changes to one or more tables when the attempted update to another fails. The tradeoff is that you must become very explicit about committing and rolling back the updates. This is handled completely by the Connection class. As you might expect, the methods are called commit() and rollback().
// Post the changes since the last commit or rollback.
dbConnection.commit();
// Reverse the changes since the last commit.
dbConnection.rollback();
I will discuss the methods in Connection that deal with statement processing later. Some other methods in the Connection class are shown in the following table:
Unless you are writing a traditional client-server application, you might (seldom) actually need to manage database connections. Enterprise Java and server-side Java typically utilize a connection-pooling technology to manage database connections. A connection pool is a cluster of connections that can be reused as necessary to fulfill the needs of applications. Since the cost of establishing connections and maintaining large numbers of connections is significant, a pool reduces this overhead. The Connection returned from the pool-management technology still behaves the same way as the Connection you would obtain directly from JDBC code.
QUERYING A TABLE
After connecting to the database, you will have created a Connection object that will allow you to perform actions upon the database. One of the most common actions is the query.
Java defines a Statement interface that you can use to process a variety of SQL statements. You must first create an object of that type, based on your Connection object.
Statement sqlStmt = dbConnection.createStatement();
The next step is to execute an SQL statement and place the results in a Result-Set. A ResultSet object is one that will contain the rows that are returned for your SQL statement. For example, this statement will select posting account IDs and currency IDs from the posting_accounts table and place the results in the Result-Set object named accounts:
ResultSet rs = sqlStmt.executeQuery(
"SELECT POSTING_ACCOUNT_ID, CURRENCY_ID FROM POSTING_ACCOUNTS WHERE
COMPANY_ID = 'CC1'");
The ResultSet class contains a next() method. This method positions the cursor (the current position in the result set) in the next available row. When the result set is exhausted, next() returns false. This method is similar to the READ NEXT statement in COBOL.
while (rs.next()) {}
You cannot retrieve any data from the ResultSet until you have done the first next(). The next() method, however, does not actually return any data. To get data into your own variables, you will need to call the proper getXXX() method where XXX is the specific data type to return (e.g., getFloat(), getLong(), getInt(), etc.). JDBC is a strongly typed interface, meaning that each get() method is specific to the data type referenced. There is a separate getXXX() method for strings, another for floats, and another for ints.
The statements to retrieve information from the ResultSet named accounts might look as follows. (Of course, each iteration of the next loop as written will overwrite the results of the previous iteration, but I want to keep the example simple.)
int postingAccountID;
String currencyID;
while (rs.next()) {
postingAccountID = acounts.getInt("POSTING_ACCOUNT_ID");
currencyID = acounts.getString("CURRENCY_ID");
}
In the preceding example, you are retrieving data from the result set by passing a column name as a string. You can also retrieve data by passing a column number. Column numbers begin with one rather than zero, so the following code would be equivalent.
while (rs.next()) {
postingAccountID = acounts.getInt (1);
currencyID = acounts.getString(2);
}
INSERTING, UPDATING, AND DELETING
Performing update operations on a database is quite similar to performing queries. A statement is passed as a string to the Connection object, and a Statement object is returned. The statement can then be executed. The only difference is that the method that executes an update is executeUpdate(), whereas the statement to execute the query was executeQuery(). The executeUpdate() method is used for inserting, updating, or deleting, that is, for all operations that modify the database.
Since updating is so similar to querying from a Java perspective (even though the SQL is quite different), I’ll use this opportunity to introduce two new concepts: the prepared statement and parameter handling.
For the database manager to process SQL, two steps must occur. First, the database manager must parse the SQL and decide on an optimization strategy for execution. Second, it must carry out the execution.
If you intend to use the same SQL statement repeatedly, you would like to avoid the overhead of the first step since in every case the parsing and the strategy determination will arrive at the same result. The prepared statement allows you to do this. A prepared statement is a precompiled SQL statement with the statement parsed and the optimization strategy already determined. By supplying placeholders in the SQL statement for the values that need to change from execution to execution, you can execute the same statement repeatedly with different values and avoid the overhead of compiling the statement more than once.
Look at the following update statement:
String updateSQL = "UPDATE POSTING_ACCOUNTS SET ACCOUNT_BAL = ?
WHERE COMPANY_ID = ?";
The question marks represent placeholders for parameters that you will supply prior to execution. The parameters are numbered left to right in the statement, beginning with 1. Parameter 1 represents the value that will be used to set the value of ACCOUNT_BAL. Parameter 2 is the value for completing the equal condition in the WHERE clause. You create a PreparedStatement by calling the prepareStatement() method of Connection.
PreparedStatement sqlStmt = dbConnection .prepareStatement(updateSQL);
Once you have prepared the statement, you then set the values of your parameters.
sqlStmt.setDouble(1, 1000.00);
sqlStmt.setString(2, "C001");
Finally, you can execute the update itself.
sqlStmt.executeUpdate();
You could execute the same statement repeatedly with different values simply by setting the parameters to new values and calling the executeUpdate() method. Closing the statement would release the statement; and the statement could not be executed again without going through the preparation process. This same logic can be applied to inserting or deleting rows from a table.
CONFIGURING THE JDBC-ODBC BRIDGE
The JDBC-ODBC Bridge may be an option for you if you do not have a JDBC driver and database and you want to experiment with JDBC. As mentioned previously, the bridge is not desirable for production situations. It carries high overhead and is not fully supported.
The bridge is useful for prototyping and educational purposes if you are developing on a Windows platform. The driver itself comes with the Java SDK. If you have any database with an ODBC driver, you can access it from Java code using the JDBC-ODBC Bridge.
To use the JDBC-ODBC Bridge, follow these steps:
Open up the Control Panel from the Settings menu selection on the Start menu.
Find the ODBC Data Sources Administrator icon and double-click it. This may be located in the Administrative Tools folder. You should see a list of data sources that have been configured.
If you need to add a new data source, click the Add button. You should see a list of ODBC drivers that are installed on your system.
Select a driver that supports the database you wish to access through Java. For example, select Microsoft Access Driver.
The next dialog box varies by driver. You should supply a data source name, which is the logical name by which the database will be known. If you would like to use the code in the example class without any changes, name the data source “mydatasource.” You may also supply a description of the data source if you want. The Microsoft Access Setup requires you to select a database or to create a new one. For this exercise, select the file named mydatabase.mdb.
Once you have completed the setup, the new data source you configured should appear in the master list of data sources.
To access the database using Java, enter the following code:
Class.forName("sun.jdbc.odbc.JdbcOdbcDriver");
Connection dbConnection =
driverManager.getConnection("jdbc:odbc:mydatasource");where mydatasource is the name of the data source you configured in the ODBC Data Sources Administrator.
EXERCISES

The Chapter 13 subdirectory in the Exercises folder on the CD-ROM contains a Java file called JDBCTest. Included in the same directory is a Microsoft Access database called mydatabase.mdb. In order to use this database and run the examples without modifications, you will need to use Microsoft Access. You will also need to configure an ODBC interface to Access as previously described. A simplified Microsoft Access database comes with Microsoft Excel.
This database has a table called Contacts, which contains some records you can use for this exercise if you do not have access to another database. If you do have access to another database, you can modify the program to retrieve the rows from a different database and table.
The program as written uses the JDBC-ODBC Bridge Driver. To use a different driver, you will need to change this line to indicate the correct class name for the driver.
private static String driver = "sun.jdbc.odbc.JdbcOdbcDriver";
The program accesses a datasource called mydatasource. If you want to use the sample database in the directory, you will need to set up a datasource in ODBC that points to the mydatabase.mdb file. Follow the instructions in the previous section. If you use a different database, you may need to change this URL.
// Needs an ODBC datasource with name mydatasource to be set up.
private static String url = "jdbc:odbc:mydatasource";The program uses the getConnection() method in the sample program to get the connection. It then creates a statement.
Connection connection = getConnection();
Statement stmt = connection.createStatement();You query the Contacts table, retrieving all rows and all columns.
// Get everything from Contacts table in mydatabase.mdb.
ResultSet rs = stmt.executeQuery("select * from contacts");You iterate through the result set, display the results, and then free all the resources.
// Iterate result set and print rows.
while (rs.next())
{
System.out.println("name=" + rs.getString(1));
System.out.println("phone num=" + rs.getString(2));
System.out.println("email=" + rs.getString(3));
System.out.println("note=" + rs.getString(4));
}
// Close down.
rs.close();
stmt.close();
closeConnection();The output for the sample table looks like this:
name=Susan Cobb
phone num=777-555-1212
company=Sun
[email protected]
note=Not a real person
name=Bill Smith
phone num=121-333-3433
company=Empire Bank
[email protected]
note=Not a real person
name=John Smith
phone num=444-343-3333
company=XYZ Corp
[email protected]
note=Not a real person
REVIEWING THE EXERCISES
JDBC provides a robust and relatively simple interface for accessing most industry standard relational databases. The basic logic involved in database access is as follows:
Load the driver specific to the database.
Establish a connection to the database.
Perform queries and updates using Statements.
Examine and process the results of queries, or commit the updates.
Free the statement resources and free the connection to the database.