
Chapter 7: Using Cyber Threat Intelligence in Incident Response
Every incident is unique and can be approached differently, depending on the context and nature of the attack. You will work in a scenario regarding a fictitious company but use the intelligence information of actual attacks. Surely some colleagues could propose different work paths, and I do not mean to say that there is a unique way to do this. My only interest is to provide you with the means to apply what you have learned.
In this part two of the book, Knowing the Adversary, you learned that Cyber Threat Intelligence (CTI) is crucial when responding to security incidents. The knowledge you have about threat actors and malicious campaigns gives you a strategic advantage to identify Indicators of Attack (IoAs) or Indicators of Compromise (IoCs) associated with a security breach faster and more efficiently.
In this chapter, you will learn about the following topics:
- The Diamond Model of Intrusion Analysis
- Mapping Adversarial Tactics, Techniques, and Common Knowledge (ATT&CK) tactics, techniques, and procedures (TTPs) from CTI reports
- Integrating CTI into incident response (IR) reports
Technical requirements
In case you haven't already, you need to download and install VMware Workstation Player from this link https://www.vmware.com/products/workstation-player/workstation-player-evaluation.html.
You'll also need to download the following from the book's official GitHub repository https://github.com/PacktPublishing/Incident-Response-with-Threat-Intelligence:
- Virtual machine:
- IR-Workstation
- Lab file:
- Chapter07
Configuring the lab environment
Before we start with the practical exercises, we will prepare the work environment. In this case, we will use the IR-Workstation VM.
Start the IR-Workstation virtual machine and log in using the following credentials:
- Username: investigator
- Password: L34rn1ng!
Once you have logged in, you will download, install, and run the Docker containers that contain the tools we will use in this chapter.
Running MITRE ATT&CK Navigator from a Docker container
To install and run MITRE ATT&CK Navigator from a Docker container, follow these steps:
- Open a new command-line terminal by pressing Ctrl + Alt + T.
- Clone the GitHub project, as follows:
git clone https://github.com/mitre-attack/attack-navigator.git
- Change to the attack-navigator directory by running the following command:
cd attack-navigator
- Build the Docker container, like this:
sudo docker build -t attack-navigator .
You can see a visual representation of the build process in the following screenshot:

Figure 7.1 – Building the attack-navigator Docker container
Note
If you receive any warning messages through the build, don't worry—it won't affect the practical labs.
- To run the container, execute the following command:
sudo docker run -p 4200:4200 attack-navigator
- Finally, when the container is compiled, from the IR-Workstation VM, open a web browser and navigate to the following Uniform Resource Locator (URL): http://localhost:4200/.
You will see MITRE ATT&CK Navigator running locally on your VM, as shown in the following screenshot:

Figure 7.2 – MITRE ATT&CK Navigator running locally
Now that you have a local instance of MITRE ATT&CK Navigator, you can use it offline. Next, we are going to install Threat Report ATT&CK Mapper (TRAM).
Installing TRAM
TRAM is an open source tool created by the Center for Threat-Informed Defense (CTID) of MITRE Engenuity to automatically map the content of CTI reports to MITRE ATT&CK TTPs.
The TRAM platform uses machine learning (ML) to identify techniques described in the reports, reducing the time and costs required to identify and classify this information.
To install TRAM on your IR-Workstation VM, proceed as follows:
- Open a new command-line terminal by pressing Ctrl + Alt + T.
- Clone the TRAM GitHub project, as follows:
git clone https://github.com/center-for-threat-informed-defense/tram.git
- Change to the tram directory by running the following command:
cd tram
- Open the docker/docker-compose.yml file using the text editor of your choice, as follows:
vim docker/docker-compose.yml
- Under the environment: section, change the following parameters to these values:
DJANGO_SUPERUSER_USERNAME=analyst
DJANGO_SUPERUSER_PASSWORD=P4cktIRBook!
DJANGO_SUPERUSER_EMAIL=[email protected]
You can see a visual representation of this in the following screenshot:

Figure 7.3 – Changing the parameters of the docker-compose.yml file
- Run the TRAM platform's Docker container, like this:
sudo docker-compose -f docker/docker-compose.yml up
Note
If you receive any warning messages through the build, don't worry—it won't affect the practical labs.
- Once the Docker container is up, from your web browser, navigate to the following URL: http://localhost:8000/.
- Sign in to the TRAM dashboard using the following credentials previously defined in the docker-compose.yml file:
- Username: analyst
- Password: P4cktIRBook!
You can see a visual representation of this in the following screenshot:

Figure 7.4 – Signing in to the TRAM dashboard
Now that you have prepared your work environment, let's review some TI concepts before starting with the practical exercises.
The Diamond Model of Intrusion Analysis
When we talk about TI, we don't only mean the IoCs integrated into monitoring and detection tools in the form of feeds.
In an IR modern approach, CTI information is vital for the early identification and containment of threats as it provides the necessary context for threat hunting and identifying malicious behaviors.
The Diamond Model of Intrusion Analysis was created by Sergio Caltagirone, Andrew Pendergast, and Christopher Betz from the Center for Cyber Threat Intelligence and Threat Research (http://www.activeresponse.org/wp-content/uploads/2013/07/diamond.pdf).
This model has become one of the pillars for intelligence analysts and is based on four main components, as outlined here:
- Adversary: This could be an organization or individual, also known as an adversary or threat actor.
- Infrastructure: The threat actor's technology infrastructure could be a domain name, Internet Protocol (IP) address, and so on.
- Capability: These are the tactics and techniques an adversary uses to achieve their objectives.
- Victim: This is an organization or individual of interest that is the target of a cyberattack.
This model is represented in the form of a diamond, as shown in the following diagram:

Figure 7.5 – The Diamond Model of Intrusion Analysis
The basis of this model is this: "For every intrusion, an adversary has the infrastructure and capacity to attack their victim."
That means that if we use this model, we will have the ability to know our adversaries better and thus develop robust defense strategies and respond better to security incidents.
In the next diagram, we are analyzing a cybersecurity incident from the perspective of the Diamond Model of Intrusion Analysis:

Figure 7.6 – Example of a cybersecurity incident
Once you have TI information about an adversary or a malicious campaign, you can map the diamond model with every stage of the Cyber Kill Chain framework, as shown in the following table:

Table 7.1 – Mapping the Diamond Model of Intrusion Analysis with the Cyber Kill Chain framework
This approach will allow you to know not just the IoCs related to a security incident but also be able to visualize adversaries' goals, the different routes they could follow, and the tactics and techniques used.
Later in this chapter, you will learn how to integrate the Diamond Model of Intrusion Analysis and MITRE ATT&CK TTPs in the IR analysis and investigation processes.
Mapping ATT&CK TTPs from CTI reports
In the identification stage of responding to a security incident, obtaining enough information about IoCs and IoAs is crucial.
One of the main challenges of mapping CTI to ATT&CK is the approach used to create reports. When analysts document information about an attack or campaign, they focus more on providing technical details regarding the attack and IoCs, but the ATT&CK framework is based more on behaviors or IoAs.
So, let's learn how to identify behaviors from a TI report to map it to ATT&CK TTPs.
Case study – a weaponized document
It is 3 A.M., and you get a call from an important manufacturing company in South Korea. The cybersecurity department reports that there has been suspicious behavior within their corporate network. The security operations center (SOC) team identified and blocked a connection from the production area manager's computer, PROD-SK07, to the mail[.]namusoft[.]kr domain.
According to the SOC team, the source of information from the intelligence feeds tagged the IoC as a domain related to a campaign of the threat actor Lazarus. For that reason, they opened a security incident ticket.
After the call, you connect to the company's cybersecurity team via a web meeting. They provide you with more details about the incident and share the IoC of the domain that was identified in the connection.
So, you have the connections that were made from the suspicious computer to the malicious domain. Using the Cyber Kill Chain model as a reference, we can determine that the attack is probably in phase 6 (communication with the C2 server).
At this point, you have the following information:
- PROD-SK07: Compromised computer
- mail[.]namusoft[.]kr: C2 server
Responding to the incident
You could start by getting an image of the computer's memory or retrieving forensic artifacts to start the investigation, just as you did in Chapter 4, Applying First Response Procedures. However, in this chapter, we will focus on gathering intelligence information, which will help you identify, contain, and eradicate the threat.
From an IR perspective, you can begin validating with the TI area if the IoC is already known or something new.
You can start searching this IoC on Open Source Intelligence (OSINT) sources, a Threat Intelligence Platform (TIP), or directly on the IR system (IRS) with a TI-integrated module, as you will learn in Chapter 10, Implementing an Incident Management System.
In this case, we found this IoC was referenced in a published TI report by the antivirus company Malwarebytes at the following URL: https://blog.malwarebytes.com/threat-intelligence/2021/04/lazarus-apt-conceals-malicious-code-within-bmp-file-to-drop-its-rat/.
According to this report, the threat actor behind this IoC is Lazarus (https://attack.mitre.org/groups/G0032/), a known state-sponsored cyber-threat group who, among other things, is attributed to attacks such as WannaCry (https://securelist.com/wannacry-and-lazarus-group-the-missing-link/78431/). So, you now have the profile of the potential threat actor, and you can calculate the risk level to which the organization is exposed, as you learned in Chapter 5, Identifying and Profiling Threat Actors.
At this time, it is crucial to identify other computers connecting to this C2 server, as you will learn in Chapter 13, Creating and Deploying Detection Rules, or find new IoCs related to this malicious campaign.
Using TRAM to map ATT&CK TTPs
As you learned in Chapter 6, Understanding the Cyber Kill Chain and the MITRE ATT&CK Framework, ATT&CK is a knowledge base to identify tactics and techniques used by malicious actors in cyberattacks.
Becoming familiar with ATT&CK tactics and techniques takes time and requires dedication and experience. I recommend using ATT&CK in a practical and applicable way instead of just reading the theory.
According to MITRE, the best way to map CTI information to ATT&CK techniques is by following the next steps.
Finding malicious behavior
We need to read the threat intelligence report and identify the techniques used by attackers. Sometimes, you will see a direct reference, but on other occasions, you must read between the lines and understand the context to deduce the possible technique used.
To analyze and find attackers' behaviors using TRAM, proceed as follows:
- On the IR-Workstation VM, go to the web browser and open a new tab to navigate to go the following CTI report: https://blog.malwarebytes.com/threat-intelligence/2021/04/lazarus-apt-conceals-malicious-code-within-bmp-file-to-drop-its-rat/.
- Read about this malicious campaign to familiarize yourself with the context and details of the attack.
Now, we will import this intelligence report to the TRAM platform to map its content to ATT&CK more efficiently.
- Save this web page as Lazarus_Malicious_APT_campaign in the /home/investigator/Workspace/Labs/Chapter-7 folder, selecting Webpage, HTML Only from the format list at the button of the dialog box.
- On the web browser, go to the TRAM dashboard and click on the Upload Report button, as shown in the following screenshot:

Figure 7.7 – Uploading a new report to be processed
Note
TRAM supports the following file formats: .pdf, .docx, .html, .json, and .txt.
You will see a new report imported with a status of Queued, as shown in the following screenshot:

Figure 7.8 – Processing the imported report
After a few seconds, the status will change to Reviewing, which means that the report is ready for processing.
- Click on the Analyze button, as illustrated in the following screenshot, to start mapping this report:

Figure 7.9 – Starting the report analysis
You will see the two columns; on the left is the report's content in text format, and on the right are the mappings to the ATT&CK framework, as you can see in the following screenshot:

Figure 7.10 – TRAM's report analysis dashboard
- Scroll down on the Report Sentences column until the following paragraph:
In one of their most recent campaigns, Lazarus used a complex targeted phishing attack against security researchers.
As you can see, phishing was one of the threat actor's techniques in this campaign. However, we don't know what kind of phishing this could be, so we will try to get additional information about the specific sub-technique used.
We could assume that phishing was at least one of the attack vectors and start looking for the characteristics and content of emails and the users who received them.
Researching malicious behavior
Sometimes, you may not be familiar with a particular behavior used by attackers, so you should go further and look at additional sources about it and try to figure out how you could better match some technique defined in ATT&CK.
To research malicious behavior, proceed as follows:
- Continue scrolling down on the Report Sentences column until the following paragraph:
In this campaign, Lazarus resorted to an interesting technique of BMP files embedded with malicious HTA objects to drop its Loader.
This paragraph is shown in the following screenshot:

Figure 7.11 – Analyzing an unknown behavior
Suppose that you don't have background knowledge about this technique. In that case, you could search for sources about the use of HyperText Markup Language (HTML) Application (HTA) objects embedded in bitmap image (BMP) files.
- Open a new tab in the web browser and use your favorite search engine to find information about HTA objects and embedded files on BMP files. Here are a couple of sources regarding both topics:
Read about this campaign and analyze how the techniques could be used together by attackers to navigate under the radar or avoid detection.
Translating malicious behavior into a tactic
To translate a malicious behavior into a tactic, you need to focus on what the threat actor is trying to accomplish, and which phase the attack is in.
To map a particular behavior into an ATT&CK tactic, proceed as follows:
- Read this paragraph again:
In this campaign, Lazarus resorted to an interesting technique of BMP files embedded with malicious HTA objects to drop its Loader.
- What do you think the threat actor is trying to do?
They are doing the following:
- First, they are writing malicious code in a .hta file to be executed (Execution).
- Secondly, they are hiding the .hta file inside a .bmp image file (Defense Evasion).
We now have an idea of the attacker's intention and what they were trying to do; if we use the MITRE ATT&CK Navigator tool, we can start looking at which of the possible techniques the attackers used.
Figuring out which technique applies to the behavior
Once you have identified the adversary objectives in the distinct phases of the attack, the next step is to find out which actions they take to achieve them. We could define ATT&CK techniques as the "what" and tactics as the "how".
Now, the next step will be mapping the behaviors identified in the CTI report to ATT&CK techniques. Proceed as follows:
- In the web browser, return to the previously opened ATT&CK Navigator tab.
- Click on Create New Layer and then click on Enterprise.
- Review the list of techniques associated with the Execution and Defense Evasion tactic columns.
If you carefully review the Execution techniques, the one that corresponds to the behavior described in the report is the Command and Scripting Interpreter technique.
- On the Execution tactic column, select the Command and Scripting Interpreter technique and expand it to see a list of associated sub-techniques.
- Select JavaScript as a sub-technique.
- Click on the background color button (paint icon).
- Select the green color from the palette.
The previous steps are shown in the following screenshot:

Figure 7.12 – Selecting and coloring a sub-technique
You could save this layer of ATT&CK with the identified techniques to share or consult later.
Next, we will see another way to find a technique or sub-technique in the ATT&CK browser quickly.
One of the attacker's behaviors described in the TI report was the use of a .hta file that executes JavaScript code. You can search for this term directly as follows:
- On ATT&CK Navigator, click on the search and filter button (magnifying glass icon).
- The search panel will open, and then on the search textbox, write hta and press Enter.
In the Techniques section, you will see a list of techniques related to the hta search criteria.
- In Command and Scripting Interpreter : JavaScript, proceed as follows:
- Click on the view link if you want to see detailed information about this technique.
- Click on the select button if you want to select this sub-technique on the ATT&CK layer.
The previous steps are shown in the following screenshot:

Figure 7.13 – Searching for a specific behavior to correlate with an ATT&CK technique
As you can see, we could find a technique and sub-technique without previously knowing the tactic and using only the method used by the adversary.
Now, go back to the TRAM report analysis dashboard to add the following sub-techniques:
- Command and Scripting Interpreter : JavaScript
- Obfuscated Files or Information : Steganography
- Click on the Add… button next to Technique, as shown in the following screenshot:

Figure 7.14 – Manually mapping an ATT&CK technique
- On the Add Mapping dialog box, write the word JavaScript to return and filter techniques related to this term, then select T1059.007 – JavaScript/JScript corresponding to the technique/sub-technique as shown in the following screenshot:
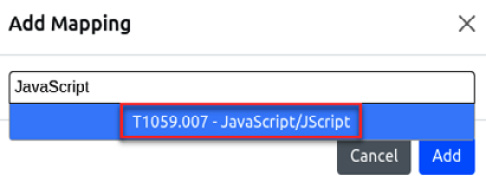
Figure 7.15 – Selecting associated technique sub-technique with the behavior
- Click on the Add button to incorporate this sub-technique in the Mappings column, and you will then see the added sub-technique and the confidence level associated with the text in the paragraph, as shown in the following screenshot:

Figure 7.16 – Adding techniques to the Mapping list
In this way, you associated a malicious behavior described in the CTI report with a specific ATT&CK technique.
- Repeat the same process to add the T1001.002 - Steganography sub-technique.
- Once you have added the two sub-techniques, click on the Accepted button to accept the mappings.
Sometimes, the ML functionality of TRAM will automatically recognize the behaviors in the CTI report and will assign them an associated technique/sub-technique. You can see an example of this next.
- Scroll down to the next paragraph, shown here, and select it:
Process Graph This attack likely started by distributing phishing emails that were weaponized with a malicious document.
You will see that TRAM recognized the behavior and assigned the T1566.001 - Spearphishing Attachment sub-technique, as you can see in the following screenshot:

Figure 7.17 – Adding techniques to the Mapping list (continued)
- If you agree with these criteria, click on the Accepted button to accept the mapping.
- Continue with this process until you cover all the CTI report content and add the technique/sub-technique.
- Once you have finished analyzing the report, click on the Close Report button, as shown in the following screenshot:

Figure 7.18 – Closing the report to finish the analysis
You will see the report status change to Accepted (in green). Now, you can export the analysis results in two different formats, JSON and DOCX, as you can see in the following screenshot:

Figure 7.19 – Exporting the analysis results
- Export the analysis report to DOCX format and save it to the /home/investigator/Workspace/Labs/Chapter-7 folder.
- Open the exported file in LibreOffice.
In the first part of the analysis report, you will see a summary of the sentences accepted and reviewed. Additionally, you will find the ATT&CK techniques organized by identifier (ID) and the matched sentences, as shown in the following screenshot:

Figure 7.20 – Exporting the analysis results
From an IR point of view and with the information obtained up to now, the chances that the company was the target of the same threat actor and this attack is part of the same campaign launched against other companies, is high.
Now that you have TI information about the potential threat actor and the related campaign, tactics, and techniques, you can start the threat-hunting process to identify compromised assets in the organization.
Note
In Chapter 12, Working with Analytics and Detection Engineering in Incident Response, and Chapter 13, Creating and Deploying Detection Rules, you will learn more about detection engineering and threat hunting.
Using Visual Studio Code to research ATT&CK techniques and create reports
There is another way to map behaviors from TI to ATT&CK TTPs—you can use Visual Studio Code (VS Code) with the VSCode ATT&CK extension as a valuable tool for your investigations.
In Chapter 5, Identifying and Profiling Threat Actors, you learned how to use this tool to create threat actor profiles using the Markdown language.
Before starting, we need to configure the VSCode ATT&CK extension settings. To do so, proceed as follows:
- First, click on the VS Code button from the Ubuntu taskbar, as shown in the following screenshot:

Figure 7.21 – Opening VS Code in the IR-Workstation VM
- Open the File menu, and then click on Preferences | Settings, as shown in the following screenshot:

Figure 7.22 – Changing the settings of the VS Code ATT&CK extension
- On the Settings search textbox, write MITRE ATT&CK, and you will then see the parameters related to the VSCode ATT&CK extension.
- Select all the checkboxes to enable code completion, as shown in the following screenshot:

Figure 7.23 – Configuring VSCode ATT&CK extension settings
- Close the Settings panel to save your changes.
Now that we have configured the VS Code ATT&CK extension, let's begin documenting the techniques we found in various TI sources.
Creating an ATT&CK techniques report
We are going to create a new ATT&CK techniques report using the Markdown language. To do so, proceed as follows:
- From VS Code, create a new file and save it as IR-012_22-APT.md on the /home/investigator/Workspace/Labs/Chapter-7 folder, selecting Markdown from the format list at the bottom, as shown in the following screenshot:

Figure 7.24 – Saving the ATT&CK TTPs report
- Press Ctrl + K, release the keys, and then press V to see the Preview panel.
- Write the following text in the VS Code editor:
# Incident Response Investigation - Threat Intelligence information
#### Report ID: IR-012_22-APT
## Executive Summary
The SOC team of the South Korean branch reported a suspicious connection from the PROD-SK07 computer to the domain mail[.] namusoft[.] kr.
According to threat intelligence sources, the domain is related to malicious campaigns operated by Lazarus's threat actor.
## Related campaigns
Lazarus APT conceals malicious code within BMP image to drop its RAT
https://blog.malwarebytes.com/threat-intelligence/2021/04/lazarus-apt-conceals-malicious-code-within-bmp-file-to-drop-its-rat/
## Tactics Techniques and Procedures (TTPs)
Your text should look as shown in the following screenshot:

Figure 7.25 – Documenting the report
- Under Tactics Techniques and Procedures (TTPs) write the word Phishing followed by pressing Ctrl + spacebar.
You will see the name of the techniques related to the term Phishing, as you can see in the following screenshot:

Figure 7.26 – Autocompleting an ATT&CK technique by name
- Press Ctrl + spacebar, and a technique with ID T1566, which correspond to Phishing, will appear.
- If you press Ctrl + spacebar again and then select the arrow at the right of the technique, you will see the technique description, as shown in the following screenshot:
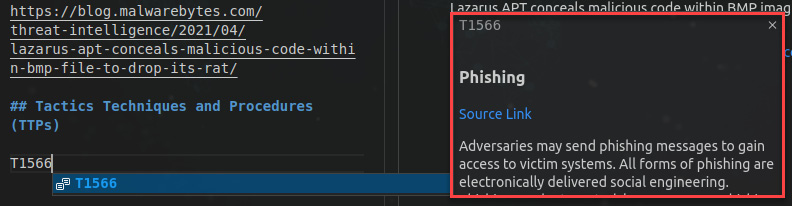
Figure 7.27 – Autocompleting an ATT&CK technique by ID
Now, let's try providing a technique ID.
- Write the technique ID T100 and then Ctrl + spacebar, after which you will see a list of sub-techniques related to this technique.
- From this list, select the .002 sub-technique.
- Press Ctrl + spacebar, and you will then see a definition of this sub-technique, as shown in the following screenshot:

Figure 7.28 – Autocompleting an ATT&CK sub-technique by ID
You can also insert a link associated with a specific technique/sub-technique.
- Right-click on the technique or sub-technique and select ATT&CK : Insert link to ATT&CK website.
- You will see the technique with an added link to the MITRE ATT&CK website, as shown in the following screenshot:

Figure 7.29 – Inserting a MITRE ATT&CK technique URL
By default, Markdown and YAML Ain't Markup Language (YAML) files support the VSCode ATT&CK extension; this is particularly useful for writing Sigma rules, for example. You can also add support to other languages; for more details, consult the official wiki at https://github.com/redcanaryco/vscode-attack/wiki.
Now that you have learned to map TI to ATT&CK techniques, you will next learn how to include CTI information in IR reports.
Integrating CTI into IR reports
You can incorporate TI information into IR reports regarding threat actors and campaigns and correlate it with the Cyber Kill Chain framework and the Diamond Model of Intrusion Analysis.
There is no doubt that TI and the knowledge of threat actors' behaviors are critical in IR processes, especially in the Identification and Containment phases, but how can we make it actionable?
Lenny Zeltser (Twitter handle @lennyzeltser) created a handy template for the documentation of TI to trigger that information and use it in IR. The Report Template for Threat Intelligence and Incident Response is free for use and distributed according to the Creative Commons Attribution license (CC BY 4.0). You can download it from this URL: https://zeltser.com/cyber-threat-intel-and-ir-report-template/.
To learn how to use this template, we will use the same hypothetical IR case described in this chapter, whereby we will need to identify critical pieces of information to create a report.
To start collecting intelligence information and create a report, proceed as follows:
- On the IR-Workstation VM, open a web browser and download the Microsoft Word format template directly from this URL: https://zeltser.com/media/docs/cyber-threat-intel-and-ir-report-template.dotx.
- Save the file to the /home/investigator/Workspace/Labs/Chapter-7 folder.
- Double-click on the file to open the template in LibreOffice.
- Using the same path as the template, save the file as IR-012_22-APT using the Word 2007–365 (.docx) format, as shown in the following screenshot:

Figure 7.30 – Saving the template in Word 2007–365 (.docx) format
- When you click the Save button, you will see the following warning message. Click on the Use Word 2007–365 Format button to use the regular Microsoft Office Word format:

Figure 7.31 – Selecting the Microsoft Word 2007–365 format
In the first part of the template, there is a brief description of the frameworks related to this document, as shown in the following screenshot:

Figure 7.32 – Navigating to read about TI
- Delete the description of the template of the first paragraph, and add the following IR report ID: Report ID: IR-012_22-APT.
- Selecting the Styles menu, change the style of the text in the Cyber Threat Intelligence and Incident Response report to Title.
- Repeat the process to change the style of the report ID text to Subtitle.
- Fill in the report's header details, providing the following information:
Incident Name: Detection of IoCs related to a Lazarus Threat Actor's Campaign
Report Author: Investigator
Report Date: 05/10/2022
Once you complete the previous steps, your document should look like the following screenshot:

Figure 7.33 – Editing the report template
Next, you will document all the information you can get from different sources. For example, this is another good source with valuable information about this threat actor and the campaigns attributed to them: Andariel evolves to target South Korea with ransomware (https://securelist.com/andariel-evolves-to-target-south-korea-with-ransomware/102811/—Kaspersky).
- Provide the following information in different sections of the document (you will find detailed instructions on each area of the template):
- In the first part of the report's template, Executive Summary, you will provide details about the incident, the adversary's profile (Lazarus), and the related malicious campaigns associated with the IoCs found corresponding to the information you read previously.
- In the second part of the report's template, The Adversary's Actions and Tactics, you will be able to document all information related to the adversary, as follows:
- Description of the Adversary
- The Adversary's Capabilities
- The Adversary's Infrastructure
- The Victims and Affected Assets
- In the third part of the report's template, Course of Action During Incident Response, you will summarize the steps taken in the different phases of the IR, as follows:
- Identify
- Discover
- Detect
- Actions to contain and eradicate the detected threats:
- Deny
- Disrupt
- Degrade
- Deceive
- Destroy
- In the last part, Intrusion Campaign Analysis, you will summarize the relationship with the information you collected in the IR and other related campaigns, including additional geopolitical or socioeconomic factors.
You will find an example of this report with information in the book's repository in the Lab-files section.
As you can see, this template covers different models, such as the IR and Cyber Kill Chain frameworks, and the Diamond Model of Intrusion Analysis.
Also, it is a valuable tool for integrating the profiles of threat actors, malicious campaigns, and TI information into different stages of IR.
Summary
In this chapter, you learned the main concepts of the Diamond Model of Intrusion Analysis to create CTI reports.
You learned how to install local instances of MITRE ATT&CK Navigator and TRAM on your VM.
You also learned how to use VS Code with the VSCode ATT&CK extension to research and use ATT&CK techniques interactively.
Finally, you learned how to provide TI information to include it in IR reports.
In the next chapter, you will learn how to develop an IR capacity in an organization to facilitate activities and processes in different IR scenarios.
Further reading
To learn more about the topics that were covered in this chapter, look at the following resources:
- A Threat-Driven Approach to Cyber Security: https://www.lockheedmartin.com/content/dam/lockheed-martin/rms/documents/cyber/LM-White-Paper-Threat-Driven-Approach.pdf
- Automating threat actor tracking: Understanding attacker behavior for intelligence and contextual alerting: https://www.microsoft.com/security/blog/2021/04/01/automating-threat-actor-tracking-understanding-attacker-behavior-for-intelligence-and-contextual-alerting/
- Cyber Threat Modeling: Survey, Assessment, and Representative Framework: https://www.mitre.org/sites/default/files/publications/pr_18-1174-ngci-cyber-threat-modeling.pdf
- Enriching Attack Models with Cyber Threat Intelligence: https://www.diva-portal.org/smash/get/diva2:1477504/FULLTEXT01.pdf
- ATT&CK 101: https://medium.com/mitre-attack/att-ck-101-17074d3bc62
- Getting Started with ATT&CK: https://www.mitre.org/sites/default/files/publications/mitre-getting-started-with-attack-october-2019.pdf
- MITRE ATT&CK®: Design and Philosophy: https://attack.mitre.org/docs/ATTACK_Design_and_Philosophy_March_2020.pdf
- Incident Response using MITRE ATTACK: https://www.huntsmansecurity.com/blog/incident-response-using-mitre-attack/
- Research ATT&CK techniques from the comfort of your VSCode editor: https://redcanary.com/blog/vscode-attack/