
So, let's start editing the lookup; in the Integration view, click on FlightStatusEnquiry_Ch6_2 so we can start to edit it. Open up the target to source mapping view and we are going to add a mapping to the simpleNote element that takes the suffix that we are going to use to represent the two-letter IATA airline code and retrieves the airline's full name. So, select simpleNote field on the right side of the mapping, which will take us to the Build Mapping view. On the left side of the panel, select Mapping Components, and then open up the folder tree beneath it so the tree reveals Functions | ICS and the lookupValue option with in. You should see part of the Build Mappings screen shown as follows.

Select the lookupValue function on the left side and drag it to the right-hand side and release it where it says: Drag and Drop or Type here... The right-hand statement area will expand to show all the parameters of the lookup function. At the same time, a dialog will also pop up to help us to select the relevant lookups. The dialog displayed is very much like the dialogs used when defining the trigger and invoke information for a connection in an integration and will allow us to select the correct lookup and retained details, as you can see:

Note that in the previous screenshot, we have also clicked on the information icon, which will display the lookup description. The first step in the wizard is to select our lookup; as we only have one lookup we can select this and move on using the Next button. This will then present us with a view of the lookup. By clicking on the Source and Target column names we get a popup that will allow us to choose which column to use in the lookup. Once selected, values from that column are displayed as you can see:

For our scenario we want to set the columns to be SOAP and REST in this order. By clicking on the Next button now, we get to define what the default value should be. In our case this should be Not Known, as follows:

Again, we can move on with the Next button to see a Summary of our lookup. The summary shows the details of our chosen lookup and its settings, along with the XSLT. This can be seen here:
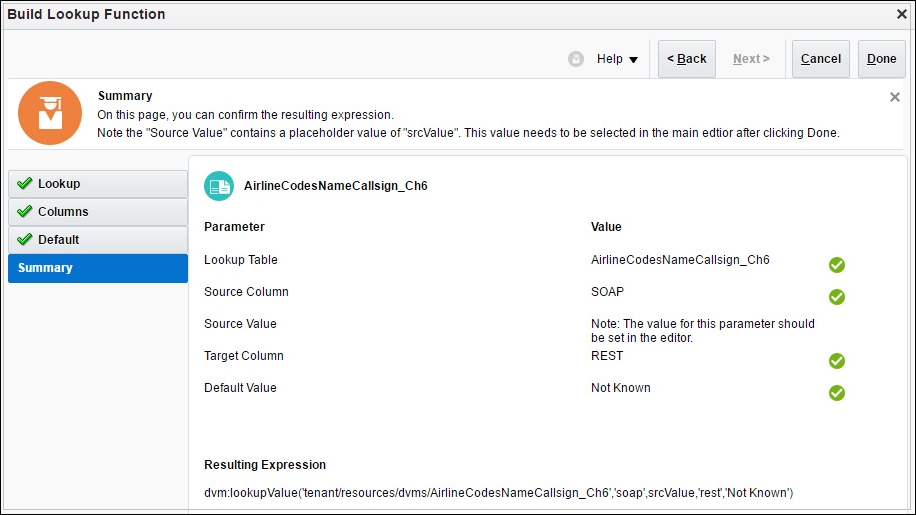
With this we can click on the Done button. We can now see the lookup displayed as an expression, but note that the value to put into the lookup is still represented as srcValue, as shown next.

We need to select the suffix field from our source and list on the left and drag it over to replace that value. This result in the screen looks something like this:

It is also possible to configure a lookup without needing the dialogs, but it is a lot easier to define the lookup using them. We can Save and Close this dialog. Likewise, we can save and close the Build Mapping screen.
Before we go too far, we can test the mapping within the editor; it is worth using the facility to test the mapping. So select the Test button, which will launch the Test Mapper screen. We can use the tool to generate some initial XML values for us with the Generate Inputs button, which will populate the left-hand side of the panel. Note the value in the suffix field on the input side. Given the value, we should see simpleNote element with the value of Not Known. Now if you edit the suffix on the source as a value of BA and Execute again, the simpleNote element will reflect the expected value of British Airways, as you can see next:

As you can see in the following screenshot, by double-clicking on the function listed, we get a little popup that will provide a brief description and a Learn More link. Clicking that link will launch a browser page explaining the industry standard definition of that function as you can see here:

You will note that the list of Mapping Components in the previous image includes a folder for ICS. This is where ICS' extensions are held.
With this complete, let's follow what we did in Chapter 3, Distribute Messages Using the Pub-Sub Model, by setting the Tracking. Then Save, Exit Integration, and Activate the integration.
We can repeat the previous process of adjusting the invocation of FlightStatusEnquiry_Ch6 with the trigger URL for this integration (remember, the security timestamp will need resetting). The response should look like this:
<soapenv:Body xmlns:flig="http://oracle-integration.cloud/soap/FlightStatusEnquiry">
   <flig:FlightLastStatusReply>
      <flig:faFlightID>530</flig:faFlightID>
      <flig:ident>1</flig:ident>
      <flig:prefix>BA</flig:prefix>
      <flig:suffix>1</flig:suffix>
      <flig:timestamp>1463266075432</flig:timestamp>
      <flig:longitude>01.27</flig:longitude>
      <flig:latitude>51.50</flig:latitude>
      <flig:updateType>POS</flig:updateType>
      <flig:altitude>25000</flig:altitude>
      <flig:heading>90</flig:heading>
      <flig:flightNotes>
         <flig:NoteType>Europe/London</flig:NoteType>
         <flig:Note>GB</flig:Note>
      </flig:flightNotes>
      <flig:simpleNote>British Airways</flig:simpleNote>
   </flig:FlightLastStatusReply>
</soapenv:Body>
Note that, the value in the simpleNote element should reflect the lookup values configured.