
In the previous chapter, we built upon the ideas presented so far, and explored how to integrate SaaS solutions and how you can test your integration without impacting a live system. We continue this road and look at how connecting social applications differ. As social capabilities become ever more important, we explore how to connect and authenticate against such services.
To demonstrate the different social interaction we are going to use Twitter and Google. ICS provides out-of-the-box cloud adapters for connecting to these services. While one adapter provides all Twitter services there is one adapter per supported Google service, for example, Mail, Calendar, and Tasks.
The first social integration we are demonstrating is when a flight schedule is changed and the flight is delayed or is arriving early, a tweet is sent out to inform passengers about the change, as you can see here:

To demonstrate the scenario, we start by showing how to set up a Twitter account and the necessary application. Then we define the necessary social connection and show how to give consent to ICS to use our social account. We then use it in our integration. This time, we create a mapping and use XSL Elements to make the tweet text dynamic based on the request. We conclude the scenario by showing how to test and troubleshoot the social integration.
As with Chapter 4, Integrations between SaaS Applications, before we can build the integration we need to set up the social application we are integrating with. As shown in the preceding diagram, our inbound call receives the notification of the flight schedule update. Our outbound call is a synchronous call to Twitter. To call Twitter from ICS, we need to authorize ICS as an application that is allowed to tweet to our account.
In our case, we are going to invoke Twitter to post a message on the timeline of our corporate account. Besides tweeting a message, Twitter also allows applications to search tweets; get trends, followers, and subscribers; look up statuses, and more. To complete our setup of Twitter so ICS can interact with our account, we need to follow these steps:
- Get access to a Twitter account.
- Register a new application.
- Create access token and obtain API credentials.
For this integration we can use any Twitter account you can get access to. If you do not have an account yet, or want to have an extra account for testing purposes, go to https://twitter.com/signup and follow the instructions.
To allow ICS to interact with your Twitter account, we need to create an application and set its permissions. Go to https://apps.twitter.com/ and click the Create New App button.

Complete the form with following information:
|
Section |
Field |
Value |
|
Application Details |
Name |
Your application name, for example, |
|
Description |
Application for connecting Oracle Integration Cloud Service. | |
|
Website |
URL to your application's website, for example, | |
|
Callback URL |
Leave blank. This is only necessary for OAuth 1.0 authentication, and ICS uses OAuth 2.0. | |
|
Developer Agreement |
Twitter Developer Agreement |
Read the agreement and tick the Yes, I agree box. |

Once the application is created, you can go to the Settings page and update the settings if you want. You can also set an application icon and info about your organization.

Finally, we need to create our access token and obtain the API credentials. Go to the Keys and Access Tokens page. On this page, you find the Consumer Key and Consumer Secret.

Obtain the values and save them somewhere you can retrieve when we create the connection. At the bottom of the page, click Create my access token to obtain your token and save the values of Access Token and the Access Token Secret.

For our inbound call, this time we use a WSDL with multiple operations. The operations define the use of a SOAP header for both the request and the response. The WSDL definition used is shown here:

The WSDL consists of two operations, FlightScheduleUpdate and MissingPersonReport. Both operations define an input, output, and fault message, and the input and output binding includes a SOAP header and a SOAP body. For this integration, we are going to use the first operation. We have made the WSDL available in the downloads as ICSBook-Ch5-FlightSchedules-Source.WSDL.
For this integration, we are going to create a connection for our inbound SOAP service and a Twitter connection for integrating with our IntegrationCloud application.
Let's first create the client connection using ICSBook-Ch5-FlightSchedules-Source.WSDL. The steps to create the connection are the same as in Chapter 2, Integrating Our First Two Applications, and Chapter 3, Distribute Messages Using the Pub-Sub Model, so if you need the detailed steps, you should refer back to those chapters. Use the following configuration to create the connection:
|
Property |
Value |
|
Connection name |
|
|
Identifier |
This will be proposed based on the Connection name, and there is no need to change it unless you would like an alternate name. |
|
Description |
|
|
Email Address |
Your e-mail address. |
|
WSDL URL | Connection Properties |
Tick the Upload File, and then use the File selection to upload the |
|
Security Policy | Credentials |
Set Security Policy to No Security Policy. Close the dialog with the OK button. |
Test the connection to validate the configuration and subsequently click the Save and Exit Connection button. Now we take a look at the interesting part of the integration, which is the connection to Twitter.

Create a Twitter connection with the following details:
|
Property |
Value |
|
Connection name |
|
|
Identifier |
This will be proposed based on the Connection name and there is no need to change it unless you would like an alternate name. |
|
Connection Role |
Invoke (social adapter cannot be used as triggers) |
|
Description |
|
After creation configure the connection with the following details:
|
Property |
Value |
|
Email Address |
Your e-mail address |
|
Configure Security | Credentials |
Set Security Policy to Enter the four values we collected in third step of the setup for consumer key and consumer secret, and for the access token and access secret. Close the dialog with the OK button. |
Never share your consumer secret and access secret with anymore unauthorized. Keep in mind the values are visible within ICS, so be careful if you use a shared environment. The finished configuration is shown as follows:

Test the connection to validate the configuration. After validating the connection, click the Save and Exit Connection button. We should have created two connections.
With the connectors established, we can start the process of creating the integration. Because we have already done this many times before, we only provide the details to create the integration. Create an integration with the Basic Map Data pattern using the following details:
|
Property |
Value |
|
Integration name |
|
|
Identifier |
This will be proposed based on the integration name and there is no need to change it unless you would like an alternate name. |
|
Version |
01.00.0000 |
|
Package Name |
|
|
Description |
|
With the basic integration created, we can now drag and drop our connections from the connector palette. For the Trigger side, we drag and drop the FlightSchedules_Ch5 connector. This is a SOAP connection, but because we now have a WSDL with multiple operations and the operations support SOAP headers, the process is slightly different:
|
Tab |
Question |
Action |
|
Basic Info |
Call your endpoint field? |
Because of multiple operations, call it |
|
What does this end point do? |
Add the following description: |
The Operations tab is different in this case; it lets us select the operation to expose:

Complete the wizard using the following details:
|
Tab |
Section |
Action |
|
Operations |
Selected Port Type |
This is automatically selected because only one is defined in WSDL, |
|
Select the Operation |
Select | |
|
Request Object |
The objects that are assigned to the operation are displayed. These values change when a different operation is selected. | |
|
Response Object | ||
|
Fault Object | ||
|
Request-Headers |
Header Object |
The object that is assigned to the operation as a request header is displayed, that is, |
|
Response-Headers |
Header Object |
The object that is assigned to the operation as a response header is displayed, that is, |
|
Summary |
WSDL URL |
The Summary tab, as always, shows the selected connector information. The Cloud Operation matches the operation we selected in the Operations tab, that is, |
|
Selected Port Type | ||
|
Cloud Operation | ||
|
Message Exchange Pattern |
Click Done and the Save button to secure our progress. The next step is to configure the invoke to Twitter. Drag and drop the Twitter_Ch5 connector to the invoke drop zone. The resultant dialog can be completed with the following information:
|
Tab |
Question |
Action |
|
Basic Info |
Call your endpoint field? |
Call it |
|
What does this end point do? |
Add the following description: | |
|
Operation |
Select Operation |
Select Tweet. |
|
Summary |
Description |
This tab shows the connector settings. The Twitter URI shows the URL of the Twitter API: https://api.twitter.com/1.1/statuses/update.json It also lists the query parameters we can provide to send out a more advanced tweet, such as geo-location information. |
|
Twitter Resource URI | ||
|
Method | ||
|
Query Parameters |
We mentioned earlier there are more options to interact with Twitter, as shown here:

Complete configuring the trigger and invoke operation and Save the integration.
Because both connectors are synchronous operations, that is request-response, and the operation defined a WSDL fault we need to define three mappings.
We start with the request mapping. Click the mapping icon, and then on the plus sign to create a new mapping. Notice that the target message contains nine parameters we can assign, but the most important one is status. We will assign one of four different messages to the status node depending on the request message, but first assign the optional source's latitude and longitude to the target's lat and long nodes.
As we said, we want to send out a dynamic tweet. In total, we want to send out four different messages. The four message types will be similar to this:
- Flight #KL1350 en route from #AMS to #PRG is 23 minutes delayed
- Flight #KL1350 en route from #AMS to #PRG is 10 minutes early
- Flight #KL1350 arrival to #PRG from #AMS is 1 hour and 2 minutes delayed
- Flight #KL1350 arrival to #PRG from #AMS is 6 minutes early
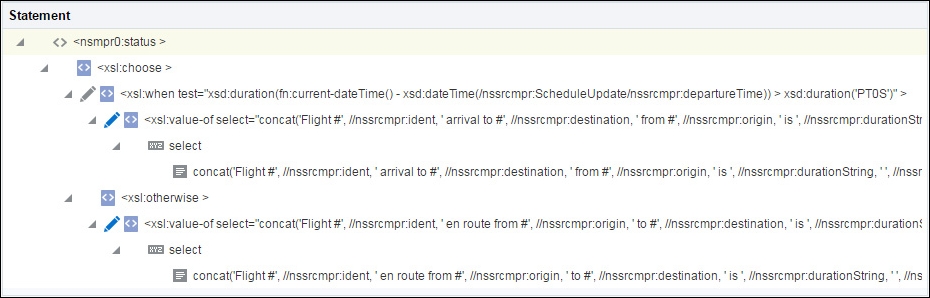
In the mapper, click on the status node to create these dynamic messages. First, drag and drop the choose element to the status node statement, which can be found under Mapping Components | XSL Elements. The reason we are doing this is because we want to determine whether a flight is en route, at its origin, or is in flight to destination.
Notice that a choose statement is built and a when element is added as a child. The when element has a test attribute we need to configure with an expression. The result of the expression should be a Boolean.
Instead of creating the expression from scratch by dragging and dropping the different parts, it is also possible to enter the expression itself. To check if a flight has departed, we can use the following expression:
xsd:duration(fn:current-dateTime() - xsd:dateTime(/nssrcmpr:ScheduleUpdate/nssrcmpr:departureTime)) > xsd:duration('PT0S')
We check whether the duration between the current-dateTime and departureTime, which is also a dateTime, is greater than zero seconds. If this is true, then it means the flight has arrived; otherwise, the flight is en route. Click Type here... for 'test' and enter the preceding expression.
Next, we create the otherwise clause. We can do this by creating a new Sibling After the xsl:when element using the right-click contextual menu. Drag the element otherwise from the Mapping components | XSL Elements to the new created sibling. The statement should now look similar to the following screenshot:

Now that the main XSL construction is in place, we add a child to both the xsl:when and xsl:otherwise elements. Right-click the element and select Insert Child. Each child is a concatenated string of source nodes and literal text phrases.
Tip
Remember that we talked about XSLT constructs in Chapter 1, Introducing the Concepts and Terminology. You can always refer to this to get more context about specific XSL elements.
For our own convenience, we will not drag and drop with functions and source nodes. We are going to use the value-of XSL element. Using this element, we can add an expression that represents the same outcome as when we would have used the mapper UI in the same way we have demonstrated in past chapters.
Drag the value-of element from Mapping components | XSL Elements to the child of xsl:when. This will create a value-of element with a select attribute. Click Type here... for 'select' and enter the following expression. This expression concatenates source nodes to create the message that will be tweeted if an airplane is on its way. We use the double slashes, which is a wildcard, to shorten the expression.
concat('Flight #', //nssrcmpr:ident, ' arrival to #', //nssrcmpr:destination, ' from #', //nssrcmpr:origin, ' is ', //nssrcmpr:durationString, ' ', //nssrcmpr:updateType)
Save your progress and do the same process for the otherwise, but instead use the following expression:
concat('Flight #', //nssrcmpr:ident, ' en route from #', //nssrcmpr:origin, ' to #', //nssrcmpr:destination, ' is ', //nssrcmpr:durationString, ' ', //nssrcmpr:updateType)
Again, save your progress, and we should now have a complete mapping for the target's status node. The statement should now look similar to the following screenshot:
Close the mapping of the status node to return to the mapper. Notice that all the used elements we mapped using the wildcard expression are visually mapped in the UI:

To test our mapping, we can click the Test button below the Save button. This will open the Test Mapper. Generate inputs and execute the test to see the result. Play around with destinationTime to the see different messages. Close the Test Mapper and subsequently click Save and Exit Mapper to return to our integration.
For the response mapping, we are mapping the result from Twitter to the result of our SOAP service. Create the response mapping and map the nodes as follows:
|
Source |
Target |
|
|
|
|
|
|
|
|
|
Save the mapping and click on Exit Mapper.
Now that we have mapped all the data of our integration, we again need to add the tracking fields before we can complete and activate the integration.
At the top-right, click Tracking to open the business identifiers dialog. In this case, we are going to set three tracking fields: ident, updateType, and duration. Drag and drop the trigger fields to the list and use ident as primary identifier. Change the Tracking Names to Flight Number, Status, and Duration.
Click Done to save the identifiers, and in the integration canvas click on Save and Exit Integration to finish our Integration. Use the PENDING ACTIVATION button of the integration to make it active.
Now that the integration is done, the final step is testing the SOAP service. Again, we first need to know the web address for the endpoint our integration is running. Click the info icon on the right side of our entry to view its activation details.
In the details, we find the Endpoint URL the integration can be invoked on. Copy the URL to your clipboard since we are going to use it shortly.
For testing our cloud endpoint, we are going to use SoapUI again to simulate our Flight Tracking and Incident system. With our WSDL endpoint URL, create a new SOAP project. This can be done through the File menu and selecting New SOAP Project.
Create the SOAP project using the following information:
|
Property |
Value |
|
Project name |
|
|
Initials WSDL |
The WSDL endpoint URL of integration |
|
Create Requests |
Check this box |
|
Create TestSuite |
Keep this box unchecked |
|
Relative Paths |
Keep this box unchecked |
On the left side of the SoapUI window, expand the project and find the binding FlightSchedulesPortType and its FlightScheduleUpdate operation. Double-click on the generated sample request, named Request 1.

The request will represent a flight update sent from our Flight Tracking system. To test our integration, we are going to send different updates to test all possible conditions. Our first update represents flight KL2016, whose its departure is delayed by 10 minutes.
We can use the following example snippet for our request:
<FS:ScheduleUpdate xmlns:FS="http://oracle-integration.cloud/soap/IntegratedSourceFlightSchedules/">
  <FS:faFlightID>102</FS:faFlightID>
  <FS:ident>KL2016</FS:ident>
  <FS:origin>AMS</FS:origin>
  <FS:destination>SFO</FS:destination>
  <!-- delayed, early, on time -->
  <FS:updateType>delayed</FS:updateType>
  <FS:departureTime>
   2016-07-01T07:50:00
  </FS:departureTime>
  <FS:arrivalTime>
   2016-07-01T18:25:00
  </FS:arrivalTime>
  <FS:duration>PT10M</FS:duration>
  <FS:durationString>10 minutes</FS:durationString>
  <FS:longitude>52.3105419</FS:longitude>
  <FS:latitude>4.7660857</FS:latitude>
</FS:ScheduleUpdate>
The departureTime, updateType, and durationString elements in the preceding snippet are the drivers for different outcomes we send to Twitter, and the longitude and latitude elements are optional. If the departureTime is before the current date and time, the flight has departed; otherwise, the plane is still at its origin. The departureTime and the arrivalTime can include time zones, but to keep it simple we do not specify one that is using the UTC time zone. The current date and time is determined by ICS, which also uses the UTC time zone. So to fully test your integration you should check on which time your instance runs, which can be determined when you test the mapping in ICS.
Before executing any requests, add the required WS-Security header and WS-Timestamp header, as we demonstrated in past chapters, for example, Chapter 2, Integrating Our First Two Applications.
Let's play around with these fields and look at the results when we execute the request. When a tweet is sent successfully, we get a response from ICS that includes the text message that was generated based on the values of the request message:
<FS:ScheduleUpdateResult xmlns:FS="..."
  <FS:parentID>101</nstrgmpr:parentID>
  <FS:processed>true</nstrgmpr:processed>
  <FS:message>Flight #KL2016 en route from #AMS to #SFO is 10 minutes delayed</FS:message>
</FS:ScheduleUpdateResult>
Let's have a look at the following messages and how we can trigger them:
- Flight #KL1350 en route from #AMS to #PRG is 23 minutes delayed. This is triggered when
departureTimeis after the current date and time andupdateTypeis delayed. - Flight #KL1350 en route from #AMS to #PRG is 10 minutes early. This is triggered when
departureTimeis after the current date and time andupdateTypeis early. - Flight #KL1350 arrival to #PRG from #AMS is 1 hour and 2 minutes delayed. This is triggered when
departureTimeis before the current date and time andupdateTypeis delayed. - Flight #KL1350 arrival to #PRG from #AMS is 6 minutes early. This is triggered when
departureTimeis before the current date and time andupdateTypeis early. - Flight #KL1350 arrival to #PRG from #AMS is on time. This is triggered when
departureTimeis before the current date and time andupdateTypeis on time.
Execute these requests to the cloud endpoint of your integration to see the results in Twitter. If all goes successfully, you will see five new tweets on the timeline of your account:

If we take a look in the Tracking section of the monitoring page, we also see the same five instances. The monitoring information will be examined in more depth in Chapter 12, Are My Instances Running Fine, and What if They Are Not?:

During testing, it may happen that you run into errors/exceptions returned by ICS to the client. In this short section, we will look into a few of them:
- Twitter rejects duplicate messages
- No valid authentication token
- No rights to write a tweet on the timeline
Another obvious one is a missing or incorrect WS-Security or WS-Timestamp header, but since we already covered that one in previous chapters, we will focus on the first three.
When an identical message is sent within a period of time, Twitter can reject the message because it is categorized as a duplicate message. This can easily be reproduced by sending the requests twice, immediately after each other.
This will result in the following exception visible at the client, that is, SoapUI:
{"errors": [
 {
  "code":187,
  "message":"Status is a duplicate."
 }]
}
Try not to send multiple source events with the same values so that the call to Twitter will have different messages and prevent this error.
If one of the authentication settings, such as consumer key/secret and access token/secret, is invalid, Twitter will reject the message because it can not authenticate the caller. This can be reproduced by editing the security settings in ICS or by revoking the access token of the Twitter application.
When invoking the integration, the following exception will result:
{"errors": [
 {
  "code":32,
  "message":"Could not authenticate you."
 }]
}
The owner of the Twitter account can set the access the Twitter application requires. To post a tweet, the application needs read and write access at a minimum. This can be reproduced by changing the access token to read only within the Twitter configuration.
When invoking the integration, the following exception will result:
{
 "request":"/1.1/statuses/update.json",
 "error":"Read-only application cannot POST."
}