

N series cloning
This chapter provides information about the best ways to use N series cloning technologies with VMware vSphere 5.1. It includes the following topics:
8.1 VMware and N series cloning technologies
Cloning virtual machines is a feature available with VMware for years. Cloning consists in copying all the files containing in a VM. These files are virtual disks (.vmdk), configuration files (.vmx), BIOS configuration (nvram), and logs (.log). Cloning results in a new guest, with the exact same configuration of its parent, but running independently from the virtual machine that originated it.
By applying that concept, you can create a template, also known as a “golden image,” of a base server, with all the tools that are server name and IP agnostic. You then use it to provision new servers for building up your environment.
8.1.1 Provisioning new servers
N series FlexClone can also be used to provision new servers. If you have a traditional VMFS file system in a Fibre Channel environment, FlexClone does not offer a significant advantage over the native VMware cloning feature. However, if you are using NFS, FlexClone offers the benefit of performing the clone procedure from the storage side, reducing the load on the VMware side. Also, if using RDMs, you can clone them using a LUN clone and then split the LUN clone, which also removes the load from the VMware host.
So far, none of these cloning solutions save storage space. The real value of FlexClone (Figure 8-1) in a virtual infrastructure is realized when you use it to create temporary guests. It is beneficial for creating a large number of guests to provision a test and development center, a demonstration center, or a training center, and when you need 30 guests for testing. In a traditional VMware environment, that operation would take 30 times the clone of the original machine. You must wait while that data copies 30 times. Obviously, it can be expensive to provision large numbers of guests in such a traditional environment.

Figure 8-1 FlexClone
8.1.2 Cloning individual virtual machines
You can use the N series FlexClone or LUN clone feature to quickly provision a large number of virtual disks on N series storage systems. You then attach new guests to the cloned drives. Because of the N series cloning technology, the storage space consumed by the cloned virtual disks is only a fraction of the space that another storage system might use. You might need many guests, or are constantly creating and recreating temporary guests. N series FlexClone or LUN clone technology provides significant space savings while dramatically reducing the time needed to complete the cloning process.
In such situations, the N series storage virtualization technologies can play a key role in guest deployments.
To clone a large number of guests, follow these steps:
1. Build a datastore and create a virtual machine to be the prototype for the cloned guests. For Windows systems, use Sysprep to ensure that, when the guests are cloned, they are recognized by the operating system as unique systems.
2. Take a Snapshot of that datastore, and create a FlexClone. You do not want to use the original copy in case something goes wrong. Then mount the FlexVol on the VMware ESXi Server.
3. Using VMware vSphere, create clones of the original virtual machine in that datastore. You can create as many clones as you want, taking in consideration the datastore size and your needs. Figure 8-2 shows six guest systems. In this example, you have a datastore that contains multiple clones of the original guest system.
You can also run the N series Advanced Single Instance Storage (A-SIS) feature on the datastore to reduce the consumed storage space back down to the size of the original guest.
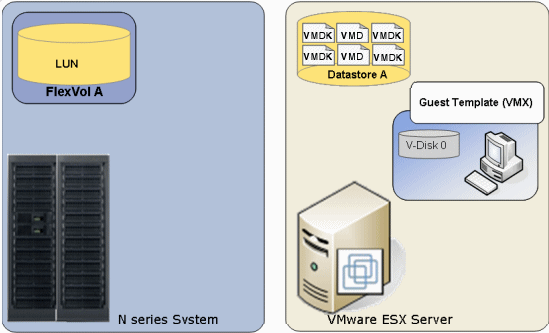
Figure 8-2 A datastore with six cloned guests
4. Use N series to create FlexClones of the initial FlexVol that contains the datastore where the cloned virtual machines reside.
5. After the FlexClones are created (Figure 8-3), add the datastores to the VMware hosts, register the virtual machines in the vCenter and start them. You can write a script to boot the guests in an orderly fashion, so that you do not overburden the VMware hosts. You are done. You went from one to many guests without consuming any additional storage; you did it quickly, and you can repeat the process at any time.

Figure 8-3 Virtual infrastructure with four quickly deployed, space-efficient datastores
8.2 Cloning guests within a datastore
To clone a guest by using VMware, follow these steps:
1. In the left pane of the VMware Infrastructure Client (Figure 8-4), right-click the guest you want to clone, and click Clone.

Figure 8-4 Cloning a virtual machine
2. In the Clone Virtual Machine Wizard shown in Figure 8-5, specify the name for your clone, and select the data center in which to place the cloned guest. Then click Next.

Figure 8-5 Enter a name for the new server
3. In the Specify a Specific Host panel (Figure 8-6), review the details about the capability of the host to run the guest you are cloning. If no changes are necessary, click Next.

Figure 8-6 Selecting a host and check if the validation succeeded
4. In the Choose a Datastore and Disk Format for the Virtual Machine panel (Figure 8-7), select a datastore for the cloned guest. Additionally, click Advanced, and select specific datastores for each file of the guest. It is a best practice for easy maintenance to keep everything together in a single datastore. After you make your selection, click Next.

Figure 8-7 Selecting a datastore
5. In the Select Guest Customization Option panel, select the Do not customize radio button. Although you can have Sysprep attached to the cloned guest so that it can be made a new system when starting, it is not in the scope of the topic of this chapter. Then click Next.
6. In the Ready to Complete New Virtual Machine window, in Figure 8-8, confirm all of your selections. Then decide if the guest must power on after the copy has completed, or if you need to edit the virtual hardware. Then click Finish.

Figure 8-8 Verifying the options to create a new cloned virtual machine
7. After the Clone Virtual Machine is completed on the Recent Tasks pane of the vCenter, you will have your clone as shown in Figure 8-9. It is ready to be started and modified as necessary.

Figure 8-9 Cloned VM ready to be used
8.3 Cloning an entire datastore
To clone a datastore with multiple guests in it, follow these steps:
1. Ensure that all guests within the datastore are powered off so that the clone of the datastore is in a consistent state, as shown in Figure 8-10.

Figure 8-10 All the virtual machines within the datastore are down
2. To clone a LUN and assign it to an Initiator Group containing your VMWare hosts.
3. Back in the vCenter, on the Configuration tab for the hosts to which you are adding this new LUN, select Storage and run a Rescan All
4. After the rescan is completed, click Add Storage...
5. Follow the process outlined in 4.5, “Storage connectivity” on page 42, but when prompted, select Assign a New Signature and click Next. See Figure 8-11.
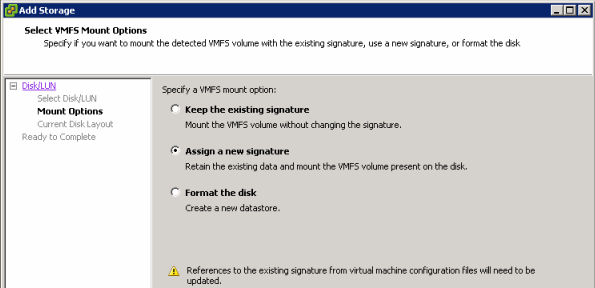
Figure 8-11 Changing the LUN signature to avoid duplication
8.4 Adding a virtual machine to the inventory
To add a virtual machine, follow these steps:
1. On the Datastore view, you see that the newly created VMFS datastore has the prefix snap-xxxxxxxx- and then the same name of the original datastore, as the same size, as shown in Figure 8-12.

Figure 8-12 New datastore name related to the cloned datastore
2. Right-click the new datastore Figure 8-13, and select Browse Datastore. You can rename the datastore to something more logical if you prefer. In this example, for our purposes, we leave the automatically assigned name.

Figure 8-13 Browsing the cloned datastore
3. In the left pane of the Datastore Browser window (Figure 8-14), select one of the guests. In the right pane, right-click the .vmx file and select Add to Inventory.

Figure 8-14 Adding a Virtual Machine to inventory
4. In the Add Inventory Wizard (Figure 8-15), provide a name for the new guest, select the inventory location, and click Next.

Figure 8-15 Providing a name to the virtual machine being added

Figure 8-16 Selecting a cluster
6. In the Specify a Specific Host panel (Figure 8-17), select a specific host in a cluster that was selected. Click Next.

Figure 8-17 Selecting a specific host
7. To complete the addition of the guest to the host, confirm your choices and click Finish.
In our environment, we added the other guest, as shown in Figure 8-18.
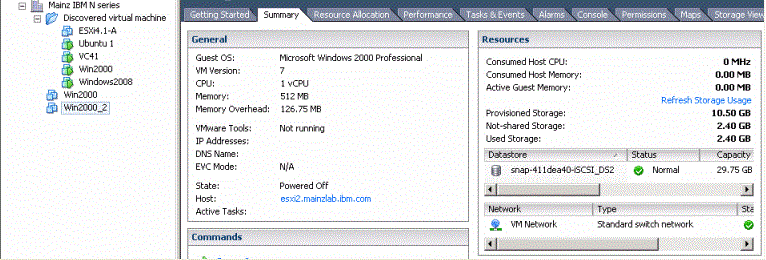
Figure 8-18 Finished adding guests
You are now finished with adding guests to the Inventory from a clone. As a final step, you might want to run A-SIS to deduplicate the blocks for all of these guests down to a single set.
8.5 Cloning VMware ESXi servers
Although installing VMware ESXi server from a CD is fairly quick and simple, you might want to deploy multiple servers in a short time. Deploying these servers from a cloned golden image is quicker and easier than using the CD.
To use an existing VMware ESXi Server, quickly make it a golden image, and then return it to service, follow these steps:
1. In the vCenter, select the host that you want to use to make the golden image.
2. Remove the IP configuration of the host:
a. Log in to the ESXi host console with the root user.
b. Go to Configure Management Network.
c. Select IP Configuration.
Here we are changing the server to be the image to DHCP, so the clones generated from it will not conflict when starting.
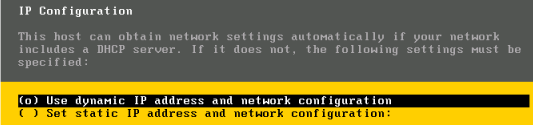
Figure 8-19 Changing server to be the image to DHCP, so clones do not conflict when starting
e. Press Esc to exit this panel and Y to accept the management agents restart.
3. Shut down the host so the image is consistent.
4. On the IBM N series System Manager, take a Snapshot of the volume that contains the LUN that you want to clone, as shown in Figure 8-20.

Figure 8-20 Taking a Snapshot for the golden image
5. Create a LUN clone by using the IBM N series VSC CLI as Example 8-1.
Example 8-1 Creating a LUN clone
N6070A> lun clone create /vol/vol_06/lun_06_clone -b /vol/vol_06/lun_06 snapshot_vol_06
6. To separate the golden image from the parent LUN, split the clone as shown in Example 8-2.
Example 8-2 Splitting the LUN clone
N6070A> lun clone split start /vol/vol_06/lun_06_clone
N6070A> Tue Nov 6 01:39:13 CET [N6070A:lun.clone.split.started:info]: Clone spl
it was started on LUN /vol/vol_06/lun_06_clone.
Tue Nov 6 01:39:14 CET [N6070A:lun.clone.split.completed:info]: Clone split was
completed on LUN /vol/vol_06/lun_06_clone.
Put the original host back in service by undoing the modifications that you made.
Now that you have a stand-alone golden image, continue as though it were days or months later and you now want to deploy a new VMware ESXi server:
1. Take a Snapshot of the volume where the golden image resides. Create a clone for use as a new host. Then split the new host’s LUN from the parent, as shown in Example 8-3.
Example 8-3 Making a new host LUN
N6070A> snap create -V vol_06 vol_06_getclone
N6070A> lun clone create /vol/vol_06/lun_07 -b /vol/vol_06/lun_06 vol_06_getclone
Thu May 1 09:15:07 MST [N6070A: lun.clone.created:info]: Created Clone /vol/vol_06/lun_07 of LUN /vol/vol_06/.snapshot/vol_06_getclone/vol_06
N6070A> lun clone split start /vol/vol_06/lun_07
N6070A> Tue Nov 6 01:56:08 CET [N6070A:lun.clone.split.started:info]: Clone spl
it was started on LUN /vol/vol_06/lun_07.
Tue Nov 6 01:56:08 CET [N6070A:lun.clone.split.completed:info]: Clone split was completed on LUN /vol/vol_06/lun_07.
2. Map the LUN to the new host:
a. Right-click the desired LUN → Edit and at the Edit LUN panel of the IBM N series System Manager (Figure 8-21), clear the Map check box for the current Initiator Group and select a different Initiator. In this panel, you can also assign a LUN ID for this LUN that presents it to the host. For this boot LUN, for LUN ID, type 0, or the VMware ESXi server will not boot from it. Then click Save and Close.
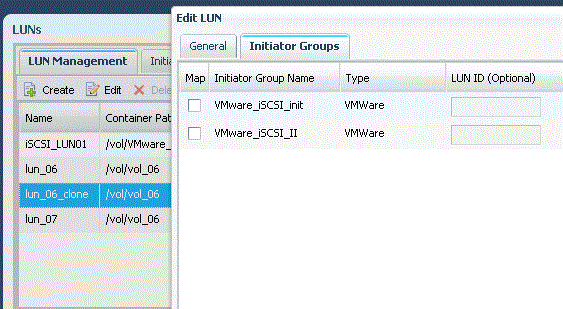
Figure 8-21 Edit LUN and select LUN ID panel
b. In the Edit Initiator Group panel, add the server to map the cloned LUN and click Save and Close.

Figure 8-22 LUN Map Edit Initiator Group panel
3. After applying the LUN ID to the map, under LUNs in the right pane of the IBM N series System Manager, click LUN Management. You can now see your new LUN mapped to the new host, as shown in Figure 8-23. Notice that the LUN ID on which the LUN is mapped is 0.

Figure 8-23 Mapped LUN of the new host
You have finished creating the LUN for the new host from the N series side. After the new host boots off the cloned LUN, configure the ESXi as shown in Chapter 5, “Installing the VMware ESXi 5.1 using N series storage” on page 59.
|
Important: To clone servers, you must ensure that they have the same hardware.
|
..................Content has been hidden....................
You can't read the all page of ebook, please click here login for view all page.