

Embedded VASA Provider for Virtual Volumes
This chapter describes the implementation of the Embedded VASA Provider feature and includes the following sections:
6.1 Overview
VMware vSphere Virtual Volumes require the VASA application programming interfaces (APIs) to function, which are facilitated by a VASA Provider (also known as a storage provider). Historically, IBM storage systems that are powered by IBM Spectrum Virtualize required a separate, external application to fulfill the VASA provider role, that is,
IBM Spectrum Connect. This application was installed in a Linux environment and required TCP/IP connectivity between the VMware vSphere environment and the management interface of the IBM Spectrum Virtualize storage system.
IBM Spectrum Connect. This application was installed in a Linux environment and required TCP/IP connectivity between the VMware vSphere environment and the management interface of the IBM Spectrum Virtualize storage system.
However, this external IBM Spectrum Connect component introduces an additional administrative burden in VMware vSphere Virtual Volume (vVol) environments because it requires the following items:
•Dedicated virtual machines (VMs).
•Installation of a supported Linux distribution to host the application.
•Installation of several prerequisite packages and services.
•On-going support to secure, update, and back up the VM or application.
•A separate management interface.
•Additional complexity in configuring and maintaining the environment.
Starting with IBM Spectrum Virtualize firmware 8.5.1.0 or later, the VASA Provider function has been incorporated natively in to the configuration node of the cluster to simplify the overall architecture of a vVol environment. This feature is referred to as the Embedded VASA Provider.
6.1.1 Supported platforms for the Embedded VASA Provider
Of all the hardware platforms that support the 8.5.1.0 firmware, Table 6-1 shows the ones that support the Embedded VASA Provider feature of IBM Spectrum Virtualize.
Table 6-1 Supported platforms for the Embedded VASA Provider
|
Platform name
|
Supports Embedded VASA Provider
|
|
IBM FlashSystem 5015
|
No
|
|
IBM FlashSystem 5035
|
No
|
|
IBM FlashSystem 5100
|
Yes
|
|
IBM FlashSystem 5200
|
Yes (minimum of 64 GB of memory required)
|
|
IBM Storwize V7000
|
Yes (Gen3 only)
|
|
IBM FlashSystem 7200
|
Yes
|
|
IBM FlashSystem 7300
|
Yes
|
|
IBM FlashSystem 9110
|
Yes
|
|
IBM FlashSystem 9150
|
Yes
|
|
IBM FlashSystem 9200
|
Yes
|
|
IBM FlashSystem 9500
|
Yes
|
|
IBM SAN Volume Controller - 2145-SV2
|
Yes
|
|
IBM SAN Volume Controller - 2145-SV3
|
Yes
|
|
IBM SAN Volume Controller - 2145-SA2
|
Yes
|
6.1.2 Feature comparison between the Embedded VASA Provider and IBM Spectrum Connect
In the initial release of the Embedded VASA Provider, there are several limitations that might restrict functions when compared to existing vVol support that uses IBM Spectrum Connect. Evaluate the requirements of your environment before selecting a VASA Provider.
Table 6-2 shows the feature comparison.
Table 6-2 Feature comparison between the Embedded VASA Provider and IBM Spectrum Connect
|
Item
|
IBM Spectrum Connect
|
Embedded VASA Provider
|
|
Enhanced Stretched Cluster
|
Yes
|
No
|
|
vVol mirroring
|
Yes
|
No
|
|
Multiple vCenter connectivity
|
Yes, with multiple IBM Spectrum Connect instances
|
No
|
|
Multiple vVol data stores
|
Yes
|
Yes (command-line interface (CLI) configuration only)
|
6.2 System prerequisites
In this section, we describe the system prerequisites for implementing the Embedded VASA Provider feature.
6.2.1 Preparing IBM Spectrum Virtualize for vVol
Before vVols can be enabled in the GUI, there are several prerequisites that must be completed. When you select Settings → vVols GUI and the window opens, you see that there are many checks that are being evaluated.
The Enable vVols toggle switch is disabled until the following tasks are completed, as shown in Figure 6-1.

Figure 6-1 vVols prerequisites
• The system must have a standard pool with storage capacity that is allocated.
|
Note: Data reduction pools (DRPs) are not supported for either the metadata volume disk (VDisk) or individual vVols.
|
• The system must be configured with a Network Time Protocol (NTP) server to ensure that the date and time are consistent with the VMware infrastructure.
• The system must be configured with a certificate with a defined Subject Alternative Name value.
|
Note: Hosts that require access to the vVol data store must be configured with the vVol host type.
|
6.2.2 Configuring the NTP server
To configure the NTP server on the system, complete the following steps:
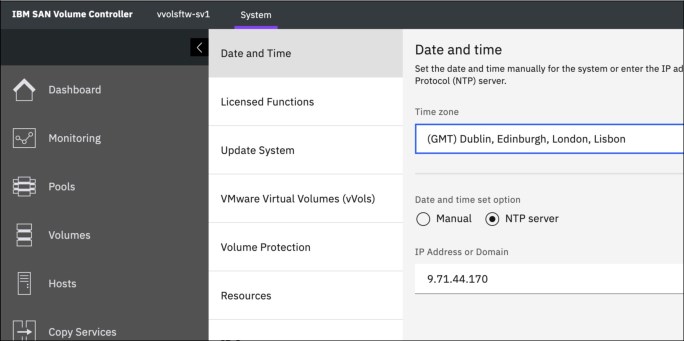
Figure 6-2 NTP time zone
2. Select the time zone.
3. Specify NTP server and enter the IP address or fully qualified domain name (FQDN) for the NTP server within your environment.
|
Note: If you use an FQDN or DNS name for the NTP server, you must ensure that a DNS server is configured in the system. To configure DNS servers, select Settings → Network and select DNS.
|
4. Click Save to complete the change.
6.2.3 Configuring a storage system certificate
Rather than using simple username and password credentials, the Embedded VASA Provider uses SSL certificates for secured communication between vSphere and the IBM Spectrum Virtualize storage system.
When you use a self-signed certificate, you must update the Subject Alternative Name field in the certificate before registering the Embedded VASA Provider within vCenter. When you use a signed certificate, this value is likely defined.
To configure a storage system certificate, complete the following steps:
1. Confirm whether this value is defined on the system certificate by connecting to the web user interface for the storage system and inspecting the certificate information in the browser window. Review the certificate information in the browser window, as shown in Figure 6-3.

Figure 6-3 Reviewing the certificate information
2. Expand the details and review the Subject Alternative Name value, as shown in Figure 6-4.

Figure 6-4 Reviewing the Subject Alternative Name value
3. Alternatively, run the lssystemcert command, which shows the following output:
IBM_2145:vvolsftw-sv1:superuser>lssystemcert | grep -A 1
"Subject Alternative Name"
X509v3 Subject Alternative Name:
IP Address:9.71.20.20
4. If no Subject Alternative Name field is defined, update the self-signed certificate. To do this task, select Settings → Security and select Secure Communications, as shown in Figure 6-5.

Figure 6-5 Secure Communications

Figure 6-6 Update Certificate
6. Complete the certificate notification and ensure that a Subject Alternative Name value is defined. This value can either be an IP address, DNS name, or FQDN, but the specified Subject Alternative Name extension must resolve to the same host as the VASA provider's advertised IP address, hostname, or FQDN, as shown in Figure 6-7.
|
Note: If you use an FQDN or DNS name, you must ensure that a DNS server is configured in the system. To configure DNS servers, select Settings → Network and select DNS.
|

Figure 6-7 Update Certificate
During this step, the cluster IP is unavailable for a few minutes while the new security settings are applied. After a few minutes, you might need to refresh your browser window, and then you are prompted to accept the new self-signed certificate.
6.2.4 Preparing Elastic Sky X integrated hosts for vVol connectivity
Any Elastic Sky X integrated (ESXi) hosts that require access to a vVol data store must be defined as a vVol host type in the storage system.
|
Note: As a best practice, create a single host object in IBM Spectrum Virtualize to represent each physical ESXi server in the configuration. When you use clustered host environments, for example, when multiple ESXi hosts are part of a vSphere cluster, you should use IBM Spectrum Virtualize Host Cluster objects.
|
Complete the following steps:
1. To create a Host Cluster, select Hosts → Host Clusters in the management GUI, and select Create Host Cluster, as shown in Figure 6-8.

Figure 6-8 Create Host Cluster
2. Specify a name for the host cluster object and click Next. To simplify troubleshooting, consider using the same name for the Host Cluster object as is defined on the vSphere Cluster within vCenter, as shown in Figure 6-9.

Figure 6-9 Create Host Cluster

Figure 6-10 Make Host Cluster
4. When creating a host object, ensure that it is defined with the Host Type of vVol. To do this task, access the Hosts view in the GUI by selecting Hosts → Hosts, and clicking Add Host, as shown in Figure 6-11.

Figure 6-11 Add Host
5. Enter a descriptive name, select the Host Port definitions, and define the Host Type as vVol. Consider naming the host object in IBM Spectrum Virtualize with the same name as the one that the ESXi host uses in vCenter, as shown in Figure 6-12.

Figure 6-12 Entering the details
6. If the host object will be a member of a Host Cluster, expand the advanced view and select the Host Cluster from the list, as shown in Figure 6-13 on page 141.

Figure 6-13 Selecting the Host Cluster
|
Note: When creating the host object by using the CLI, use the host type adminlun:
IBM_2145:vvolsftw-sv1:superuser>mkhost -fcwwpn 2100000E1EC249F8:2100000E1EC249F9 -name vvolsftw-02 -hostcluster vvolsftw -type adminlun
|
7. Repeat the process for each additional host that you want to create.
8. Verify that all hosts are correctly defined as vVol host types by selecting Hosts → Hosts in the storage system GUI, as shown in Figure 6-14.

Figure 6-14 Hosts
9. You can ensure consistency across all members of the host cluster by defining the host type at the host cluster level. To do this task, select Hosts → Host Clusters. Right-click the host cluster and select Modify Host Types, as shown in Figure 6-15.

Figure 6-15 Selecting Modify Host Types

Figure 6-16 Clicking Modify
By configuring the vVol host type on the host or host cluster object, the system automatically presents the Protocol Endpoints to the ESXi hosts.
11. Before continuing with the Embedded VASA Provider configuration, verify that all hosts in the vSphere cluster correctly detected the Protocol Endpoints from the storage system. To do this task, rescan the storage adapters on each ESXi host and verify that there is a Small Computer System Interface (SCSI) device with SCSI ID 768 and 769, as shown in Figure 6-17.

Figure 6-17 Rescanning the storage adapters
|
Note: A Protocol Endpoint is presented from each node in the IBM Spectrum Virtualize cluster. Ensure that all ESXi hosts correctly identified all Protocol Endpoints (PEs) before continuing.
|
6.3 Enabling vVols by using Embedded VASA Provider
After the three system prerequisites are met, the Enable vVol toggle becomes available, as shown in Figure 6-18.

Figure 6-18 Enable vVol toggle becomes available
Click Enable vVol to start the process.
After all the values are defined, the GUI creates all the necessary objects within
IBM Spectrum Virtualize to facilitate vVol support, as shown in Figure 6-19 on page 145.
IBM Spectrum Virtualize to facilitate vVol support, as shown in Figure 6-19 on page 145.
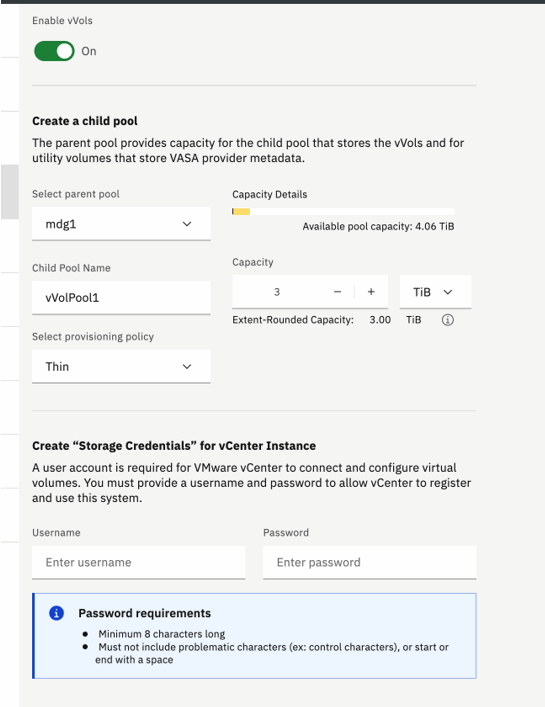
Figure 6-19 Required objects for vVol support are created
6.3.1 Parent pool
You are required to select a parent pool in which to store both the metadata VDisk and the associated (first) child pool. The child pool is presented to vSphere as a vVol-enabled storage container.
A metadata volume (utility volume) is created as a thin-provisioned volume with a capacity of 2 TB. This metadata volume is mounted internally on the configuration node and used to store associated metadata for the vVol configuration. This metadata can include metadata for storage containers, virtual volumes, and other objects that are required to facilitate the vVol infrastructure.
|
Note: Even though it has been allocated a maximum capacity of 2 TB, this volume is only intended to store system metadata, so it is likely that the used capacity will never grow beyond a few gigabytes in size.
|
6.3.2 Child pool (vVol-enabled Storage Container)
You are prompted to enter a name and capacity for a new child pool. This pool is presented to the vSphere environment as a vVol-enabled storage container, so the specified capacity of the pool dictates the size of the vVol data store within vSphere. The capacity can be increased or decreased later, so there is flexibility for expansion and scale as the infrastructure matures.
Although the initial vVol configuration allows only for the creation of a single child pool, more vVol-enabled child pools can be created later through the storage system CLI if increased capacity or different tiers of storage are required.
6.3.3 Provisioning policy
This provisioning policy dictates how vVols are created within the IBM Spectrum Virtualize storage system. Each vVol child pool is associated with a specific provisioning policy, which means that where possible all vVols that are created in a vVol data store are provisioned in the same way.
|
Note: Swap vVols always are created as fully allocated volumes within IBM Spectrum Virtualize regardless of the specified provisioning policy.
|
There are two available provisioning policies to select:
•Standard: The Standard provisioning policy uses fully allocated volumes. All vVols that are created in pools with this policy are created as fully allocated volumes within
IBM Spectrum Virtualize.
IBM Spectrum Virtualize.
•Thin-provisioning: The Thin-provisioning policy uses space-efficient, thin-provisioned volumes. All vVols are created as space-efficient, thin-provisioned volumes within
IBM Spectrum Virtualize.
IBM Spectrum Virtualize.
6.3.4 Storage credentials
To register the VASA Provider within vCenter, you must enter the following information:
• Name
• URL
• Username
• Password
The storage credentials that are defined in this window are required when registering the Storage Provider within vSphere, and they are initially used to authenticate the vSphere environment against the IBM Spectrum Virtualize storage system.
The system automatically creates a user group that is assigned with a specific role within
IBM Spectrum Virtualize. Then, the user account that is specified here is created as a member of this group and granted specific access rights to allow manipulation of vVol objects within the storage system.
IBM Spectrum Virtualize. Then, the user account that is specified here is created as a member of this group and granted specific access rights to allow manipulation of vVol objects within the storage system.
However, upon successful registration of the storage provider within vCenter, the password is removed from the user account within IBM Spectrum Virtualize, and instead the vSphere certificate is used to authenticate the user account.
|
Note: The password that is defined in the window is used once, and it is required only in the initial Storage Provider registration process.
|
After a successful registration, if it is necessary to reregister the storage provider in vCenter for whatever reason, the defined user account must be reconfigured with a new password and the certificate authentication must be removed. To do this task, connect to the storage system CLI and run the following commands:
1. To list all users that are configured on the system, run the following command:
lsuser
2. Identify the user account that requires reconfiguration, and run the following commands:
chuser -nocert <user_id or name>
chuser -password <new password> <user_id or name>
Now, the Storage Provider can be reregistered in vCenter by using the new password.
6.3.5 Registering the Storage Provider in vSphere
After you finish your work in the vVol configuration window, you see an option that is called “Copy the following URL:”, as shown in Figure 6-20. This string is the URL that is required when registering the storage provider within vCenter, and it should have the following format:
https:// <FQDN/IP address> + :8440 + /services/vasa

Figure 6-20 Copy the following URL: option
To register the Storage Provider in vSphere, complete the following steps:
1. Click the copy icon for Copy the following URL to copy the string to your clipboard.
2. Open the vCenter web interface and find the vCenter server in the inventory tree. Select Configure → Storage Providers, and then click Add, as shown in Figure 6-21.

Figure 6-21 Selecting Storage Providers
3. Enter an identifiable name, and paste the URL into the URL field. Add the user credentials that were defined earlier and click OK, as shown in Figure 6-22.
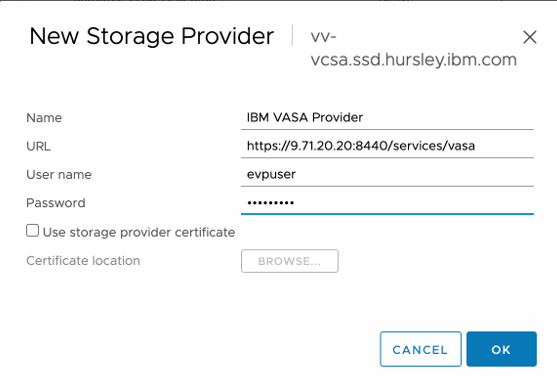
Figure 6-22 New Storage Provider
4. You might see an error or warning saying that the operation failed, but this message is related only to the initial certificate thumbprint warning, so it can be ignored (Figure 6-23).

Figure 6-23 Operation failed message
5. Verify that the newly added Storage Provider is showing online and active in the Storage Providers list (Figure 6-24).

Figure 6-24 Newly added Storage Provider is showing online and active
6.3.6 Creating the vVol data store
Review the vCenter inventory and identify the cluster or host that you want to mount on the vVol data store by completing the following steps:

Figure 6-25 Selecting New Datastore

Figure 6-26 Selecting vVol
3. Select the backing storage container in the list and define the name of the new vVol data store. Click NEXT (Figure 6-27).

Figure 6-27 Defining the name of the new vVol data store

Figure 6-28 Selecting the hosts

Figure 6-29 Summary window
6. Review the Datastores tab and ensure that the capacity and accessibility are correctly reported, as shown in Figure 6-30.

Figure 6-30 Reviewing the Datastores tab
6.3.7 Provisioning more vVol data stores
In this section, we cover the steps for provisioning more vVol data stores.
Identifying the parent pool
To create more child pools, use Secure Shell (SSH) to connect to the CLI of the
IBM Spectrum Virtualize management interface. Familiarize yourself with the available parent pools by running the following command:
IBM Spectrum Virtualize management interface. Familiarize yourself with the available parent pools by running the following command:
lsmdiskgrp -filtervalue type=parent
Identify the target parent pool in which to create the child pool and note the mdiskgrp ID or name.
Identifying the ownership group
Identify the ownership group that is assigned to the VASA provider by running the command in Example 6-1.
Example 6-1 The lsownershipgroup command
IBM_2145:vvolsftw-sv1:superuser>lsownershipgroup
id name
0 VASA
By default, the name that is associated with the VASA ownership group is VASA.
Identifying the provisioning policy
When vVol was enabled in IBM Spectrum Virtualize, the requested provisioning policy was created along with the other required objects. If both provisioning policies are not listed, you might need to create them manually.
Identify the provisioning policy that is required for the new vVol child pool by running the lsprovisioningpolicy command, as shown in Example 6-2.
Example 6-2 The lsprovisioningpolicy command
IBM_2145:vvolsftw-sv1:superuser>lsprovisioningpolicy
id name capacity_saving deduplicated in_use
0 Thin thin no yes
1 Standard none no no
Creating the vVol Storage Container
To create a vVol-enabled child pool by using the values that are identified in the earlier sections, run the command that is shown in Example 6-3.
Example 6-3 The mkmdiskgrp command
svctask mkmdiskgrp -name <name> -owner vvol_child_pool -ownershipgroup <VASA ownershipgrp_id or name> -parentmdiskgrp <mdiskgrp id or name> -provisioningpolicy <Thin or Standard> -size <capacity> -unit tb
6.4 Migrating from existing IBM Spectrum Connect vVol configurations
In this section, we cover the process of migrating from existing IBM Spectrum Connect vVol configurations.
6.4.1 Supported migration path
In the initial release of the Embedded VASA Provider, it is not possible to use both external and embedded VASA providers from the same vCenter to the same storage system. Therefore, there is no direct method of migrating between vVol data stores that are presented through IBM Spectrum Connect and vVol data stores that are provided by the Embedded VASA Provider.
To perform a migration between vVol solutions, you must complete the following steps:
1. Provision Virtual Machine File System (VMFS) data stores with sufficient capacity to store all VMs that are on the vVol storage.
2. Use Storage vMotion to migrate existing VMs or templates from vVol storage to VMFS data stores.
3. Remove the vVol IBM Spectrum Connect configuration from vCenter.
4. Disable or decommission the vVol function on the storage system.
5. Enable vVol by using the Embedded VASA Provider and create vVol data stores.
6. Use Storage vMotion to migrate VMs and templates from VMFS storage to the new vVol data stores.
7. Remove the temporary VMFS data stores if they are no longer needed.
6.4.2 VM migrations by using Storage vMotion
Temporary storage is required to store the VMs during the decommissioning of IBM Spectrum Connect. If required, create volumes of suitable capacity to store all the VMs or templates while the IBM Spectrum Connect vVol storage is being decommissioned.
After the new volumes are created and mapped to the appropriate hosts or host cluster in the storage system, create the VMFS data stores.
Identify the VMs that are on the vVol data stores that are presented by IBM Spectrum Connect and perform a storage migration to move them to the new VMFS data stores. Depending on the number of VMs, consider using, for example, PowerCLI to automate bulk VM migrations.
|
Note: VM templates might exist on the vVol data stores that require conversion into a VM before they can be migrated. After the migration completes, they can be converted back into a VM template.
|
6.4.3 Removing the vVol IBM Spectrum Connect configuration from vCenter
In this section, we describe removing the vVol IBM Spectrum Connect configuration from vCenter.
Removing or unmounting the vVol data stores
After all VMs and templates are migrated away from the IBM Spectrum Connect vVol data stores, it is safe to unmount and remove them from vCenter. To do this task, complete the following steps:

Figure 6-31 Selecting Unmount Datastore
2. Select Unmount Datastore and select all connected hosts to unmount the data store from all hosts, as shown in Figure 6-32. Click OK.

Figure 6-32 Unmount Datastore option
3. After the data store is unmounted from all hosts, it automatically is removed from vCenter.
4. Repeat these steps for all the vVol data stores that are presented by IBM Spectrum Connect.
Removing Storage Policies
Check for any configured Storage Policies that correspond to IBM Spectrum Connect. To do this task, complete the following steps:
1. Go to the Policies and Profiles view within vCenter, as shown in Figure 6-33 on page 157.

Figure 6-33 Policies and Profiles view
2. Select VM Storage Policies and identify any policies that were created by using
IBM Spectrum Connect.
IBM Spectrum Connect.

Figure 6-34 Selecting the policy to remove
4. Repeat these steps for any remaining policies that are associated with IBM Spectrum Connect.
Removing IBM Spectrum Connect Storage Provider
After all the vVol data stores are unmounted and removed, it is safe to remove the Storage Provider from within vCenter. To do this task, complete the following steps:
1. Find the vCenter entry in the inventory tree and click the Configure tab.
2. Select Storage Providers.

Figure 6-35 Removing the IBM Spectrum Connect Storage Provider
6.5 Decommissioning IBM Spectrum Connect
IBM Spectrum Connect offers multiple integrations into different VMware products. Before continuing, review the integration interfaces that are configured, and be conscious of how they are being used in your environment.
6.5.1 Identifying and removing the vVol child pools for IBM Spectrum Connect
Identify the child pools that were allocated to any vVol Storage Spaces within the
IBM Spectrum Connect GUI and delete them, as shown in Figure 6-36 on page 159.
IBM Spectrum Connect GUI and delete them, as shown in Figure 6-36 on page 159.

Figure 6-36 Deleting the child pools that were allocated to any vVol Storage Spaces
Alternatively, log on to the storage system CLI with a user account that has the VASA Provider role and run the following command to identify any existing vVol child pools that are used by IBM Spectrum Connect:
lsmdiskgrp -filtervalue owner_type=vvol_child_pool
Note the mdiskgrp name or ID, and then verify that the vVol pool is no longer required and that the name and ID are correct because there is no way to recover the pool after it is deleted. Once you are sure, run the following command to remove the child pool:
rmmdiskgrp <name or id>
|
Warning: Removing the pool might fail if any vVols are in the pool. You might need to manually remove any vVols in the pool before removing the pool itself. To identify any vVols that are in the pool to be deleted, run the following command:
lsvdisk -filtervalue mdisk_grp_name=<child pool name>
|
For each vVol, identify the VDisk ID or name and run the following command to delete the vVol.
|
Warning: Verify that the vVol is no longer required and that the name and ID are correct because there is no way to recover the data after the volume is deleted.
|
rmvdisk -force <vVol name or id>
After any lingering vVols are deleted, retry the pool removal command until all IBM Spectrum Connect vVol pools are removed.
6.5.2 Removing the user account that is used by IBM Spectrum Connect
|
Warning: If other integration interfaces are configured, for example, vCenter or vRealize Orchestration, do not remove the user account because its removal will cause future integration commands to fail.
|
Identify the user account that is used by IBM Spectrum Connect by either reviewing the Storage System Credentials window in the IBM Spectrum Connect GUI or by using the CLI.

Figure 6-37 Storage credentials
You see the user account that is used by IBM Spectrum Connect, as shown in Figure 6-38.

Figure 6-38 User account that is used by IBM Spectrum Connect
You also can use the command in Example 6-4 on page 161 on the storage system CLI.
Example 6-4 Identifying the user account that is used by IBM Spectrum Connect by using the command-line interface
IBM_2145:vvolsftw-sv1:superuser>lsuser
id name password ssh_key remote usergrp_id usergrp_name owner_id owner_name locked password_change_required
0 superuser yes yes no 0 SecurityAdmin no no
1 vasa_server yes no no 6 VASAUsers no no
Remove the user account that is used by IBM Spectrum Connect, and then run the following command:
rmuser <user_id or name>
To identify the User Group that is associated with the VASA Provider role, run the command in Example 6-5 on the storage system CLI.
Example 6-5 The lsusergrp command
IBM_2145:vvolsftw-sv1:superuser>lsusergrp
id name role remote multi_factor password_sshkey_required gui_disabled cli_disabled rest_disabled
0 SecurityAdmin SecurityAdmin no no no no no no
1 Administrator Administrator no no no no no no
2 CopyOperator CopyOperator no no no no no no
3 Service Service no no no no no no
4 Monitor Monitor no no no no no no
5 RestrictedAdmin RestrictedAdmin no no no no no no
6 VASAUsers VasaProvider no no no no no no
Assuming no other user accounts are in the user group, remove the VASA Provider user group by running the following command:
rmusergrp <usergrp_id or name>
To identify the location of the metadata VDisk, run the command in Example 6-6 on the storage system CLI.
Example 6-6 The lsmetadatavdisk command
IBM_2145:vvolsftw-sv1:superuser>lsmetadatavdisk
vdisk_id 13
vdisk_name vdisk0
status online
Remove the metadata VDisk by running the following command on the storage system CLI.
|
Warning: The metadata VDisk contains all metadata that is associated with the vVol environment. This operation cannot be undone.
|
rmmetadatavdisk
6.5.3 Migrating virtual machines to the vVol data store
Now that the IBM Spectrum Connect vVol configuration is removed, complete the steps in 6.3, “Enabling vVols by using Embedded VASA Provider” on page 144 to enable and configure vVol functions through the Embedded VASA Provider.
After the new vVol data store is online, do the migration by completing the following steps:
1. Identify the VMs that will be migrated, select them, right-click them, and click Migrate, as shown in Figure 6-39.

Figure 6-39 Selecting Migrate
2. In the Select Storage window, identify the newly created vVol data store and click NEXT, as shown in Figure 6-40 on page 163.

Figure 6-40 Identifying the newly created vVol data store
3. Complete the Storage vMotion workflow and review the tasks to ensure that the VMs successfully migrated (Figure 6-41).

Figure 6-41 Reviewing the tasks to ensure that the VMs successfully migrated
During the migration operation, vVols automatically are created on the storage system within the child pool that was configured as a vVol storage container.
4. To review the vVol objects within IBM Spectrum Virtualize, select Pools → Volumes by Pool within the GUI, as shown in Figure 6-42.

Figure 6-42 Volumes by Pool view
5. Select the vVol-enabled child pool in the list by identifying the vVol logo underneath the pool information on the left side. When you select the vVol pool, the individual vVol objects appear, as shown in Figure 6-43.

Figure 6-43 Selecting the vVol-enabled child pool
6. The Display Name column was added to provide some more information about the vVol that can help to identify the specific VM to which it belongs (Figure 6-44).
|
Note: By default, the Name column is not displayed in the GUI table view, but it is an optional field that can be added by right-clicking the column headers and selecting the Name checkbox.
|

Figure 6-44 Displaying the Name column
..................Content has been hidden....................
You can't read the all page of ebook, please click here login for view all page.