

CICS Explorer resource manipulation scenarios
The CICS Explorer is described as “The New Face of CICS”. One of the main assets of the Explorer and the plug-ins is to introduce a whole new community to CICS and the System z in general. Traditionally, the accepted interface to CICS was always through the 3270, with its ability to perform operational tasks through the CEMT transaction (“The Master Terminal”) and resource definition tasks through the CEDA transaction (“RDO - Resource Definition Online”). With the advent of the CICS Web User Interface, CICSPlex SM users can perform these tasks by an implementation of Web Services utilizing the CICSPlex SM API.
The CICS Explorer, with its Eclipse-based environment, took this to another level by presenting CICS and CICSplex through a Graphical User Interface, thus giving it a very modern “look and feel” and enabling integration with a multitude of IBM Enterprise Software Portfolio products.
In this chapter, we discuss how we can manipulate resource definitions using the CICS Explorer to manage some of the scenarios that typically confront us when supporting CICS environments.
18.1 Resource locking scenarios
Resource locking is a constant factor that affects the day-to-day running of CICS applications all over the world. One of the best examples of locks being held on resources is that of the VSAM file, which has multiple users trying to update the same copy of a record. There are many programming techniques that are available today to circumvent this problem; however, they still occur on a daily basis.
18.1.1 VSAM record locking
We have an application that updates records on a VSAM file on a regular basis. In general, this runs satisfactorily throughout most of the day. However, a user calls us to say that his transaction appears to be suspended, so we must investigate. The initial window from the CICS Explorer shows us the transactions in region REDDEV41, and it appears that our problem transaction is one of the the ones shown in Figure 18-1.
Figure 18-1 Transactions suspended
Initially, we customize the columns so that we can see the reason for the suspend on each of our transactions. We do this by selecting the Customize Columns tab in the top right corner of the perspective, as shown in Figure 18-2.

Figure 18-2 Customize columns
From here, we can add SuspendType and SuspendValue so that we have a much more efficient view of where the problem is, which results in Figure 18-3.

Figure 18-3 Suspend Types display
Now we can see that it appears that task 10401 issued some form of request against a dataset and is suspended with an ENQUEUE. The SuspendValue of FCDSRECD tells us there is a wait for a record lock in a VSAM file or CICS-maintained data table. If a transaction attempts to access a record that is locked by another transaction, it is suspended on resource type ENQUEUE until the lock is released. This can be a long wait because an update might depend on a terminal operator typing in data. Also, the suspended transaction relinquishes its VSAM string and, perhaps, its exclusive control of the CI, and has to wait again for those resources.
If transactions are commonly made to wait for this reason, review the programming logic of your applications to see if the record-locking time can be minimized.
So in our case, we have an earlier task, 10378, that is running the same transaction. In this case, this task has a suspend type of EDF, which means that someone is debugging this transaction and failed to release the record lock. Because we must resolve the situation quickly, we PURGE the task and see if that sorts out the problem. By right-clicking the task, we can select the option to remove the task, as shown in Figure 18-4.

Figure 18-4 Force Purge a Task
Before we do this, we get a confirmation window to ensure that we selected the right task, as shown in Figure 18-5 on page 371.

Figure 18-5 Confirm Force Purge
The operational view of our tasks now shows that the task causing the wait was purged, Figure 18-6 on page 372, and that our suspended transaction has (hopefully) completed successfully.
Figure 18-6 Transactions resumed
One final task we could do is to reset the columns back to their original settings, which we do by selecting the same drop-down list from the right corner and using the Reset Columns option.
18.2 Resource state manipulation
When connecting the CICS Explorer for the first time, the initial perspective you get is the System Management view, shown in Figure 18-7 on page 373.

Figure 18-7 CICS Explorer System management view
From the view in Figure 18-8 on page 374, you can display all of the resources that are relevant to the CICS regions within the CICSplex. CICS regions can be individually selected just by clicking on the region name, which dynamically displays those details, or you can view the whole CICSplex by selecting the CICSplex name.
Across the top of this perspective is a list of resources that can be displayed. The default view contains a number of resources, one of them being transactions, as shown in Figure 18-8 on page 374.
If we select the Transactions tab, we are presented with a list of transactions that are defined, dependent upon the scope that is selected. In Figure 18-8 on page 374, we selected the CICS region REDDEV41, to reduce the amount of data displayed.
Figure 18-8 Transaction list
We still have a large list of transactions, so what we need to do is filter this down until we are presented with the transactions that we actually want to work with, which we do by entering the criteria in the filter window, shown in Figure 18-9.

Figure 18-9 Filter window
Figure 18-10 on page 375 shows the resulting filter criteria.

Figure 18-10 Filter criteria
If we now select the Apply Filter button, the results should display the transactions that we are interested in. In this case, we look for all transactions in CICS region REDDEV41 that begin with the characters NA. After applied, we get a much shorter list of transactions to work with, as shown in Figure 18-11.

Figure 18-11 Filter criteria applied
There is more than one method of changing the state of a particular resource. In our case, we want to disable one of our transactions. The quickest method of doing this is to select the resource in question, and then right-click, as shown in Figure 18-12 on page 376.
Figure 18-12 Disable a Transaction
A window is displayed that offers us a number of options, and one option is to DISABLE the transaction. If we choose that option, we receive a confirmation dialog box, Figure 18-13.

Figure 18-13 Figure 16-13 Confirm disable window
Our transaction display should automatically refresh to display the new status of the transaction, as shown in Figure 18-14 on page 377.
Figure 18-14 Transaction disabled
Let us assume that we inadvertently disabled the wrong transaction. We can use the alternative method of altering the resource to get it back into its correct state by double-clicking the resource in question. We disabled transaction NACT, so by double-clicking Figure 18-15 on page 378 is displayed.
Figure 18-15 Transaction Attributes
In Figure 18-15, we scroll to the attribute that we want to change and update. In this instance, it is Transaction Status that we want to alter. When we select the attribute field, we are presented with a list of the only options that are available for this resource. In the case of Status, it can only be DISABLED or ENABLED, as shown in Figure 18-16 on page 379.
Figure 18-16 Transaction Status Attributes
We select the ENABLED status and receive a confirmation message to save the changes. On confirming this, we should have a display of our transaction list, similar to Figure 18-17 on page 380.

Figure 18-17 Confirmation of Save Changes
18.3 Discarding resources
One of the abilities of the CICS Explorer is to discard resources from a running CICS region. The command executes under the CICS API, effectively performing a CEMT DISCARD command.
The DISCARD command deletes the definition of a resource installed in the local CICS system, so that the system no longer has access to the resource. It reverses the effect of the installation of the resource, which can occur at system startup, through a subsequent CREATE command or CEDA transaction, by an automatic installation process or by a CICSPlex SM BAS command.
Each DISCARD command removes the definition of one resource. You can remove definitions for the following types of resources.
Autoinstall models for terminals:
•Connections
•CorbaServer (CORBASERVER)
•DB2Conns
•DB2Entrys
•DB2Trans
•Deployed JAR files (DJAR)
•Document templates
•ENQ models
•Files
•Journals and journal models
•LIBRARY concatenations
•Partners
•PIPELINEs
•Process types
•Profiles
•Programs, map sets, and partition sets
•Request models
•TCP/IP service
•Temporary storage queue models
•Terminals
•Transaction classes
•Transactions
•Transient data queues
•URIMAPs
•WEBSERVICEs
You cannot discard a resource that is currently in use, for example, you cannot discard a PROFILE definition if some installed TRANSACTION definition still points to it, or a FILE that is open, or a TRANSACTION that is scheduled for execution.
In addition, some resources are not eligible for discard at all, which include resources whose names begin with the letters DFH (reserved for CICS-supplied definitions) and transactions with names that begin with C (also reserved for CICS).
Some DISCARD commands cause a sync point on behalf of the issuing task, as the CREATE commands do.
DISCARD commands are recorded in the CICS catalog so that their effects persist over a warm or emergency restart, but they do not modify the CSD file and thus are lost on a cold or initial start
If we return to our list of transactions, we can use the previous transaction, NACT, as our target. With the filter criteria still in place, refer to Figure 18-18 to see that there are two transactions in the list.
Figure 18-18 Transaction List
Select the NACT transactions, and right-click it to bring up the pop-up window that displays our options. In this case, we DISCARD the transaction, as shown in Figure 18-19.
Figure 18-19 Discard a Transaction
When selecting the DISCARD option, you will get a confirmation window before you can proceed, as shown in Figure 18-20 on page 383.
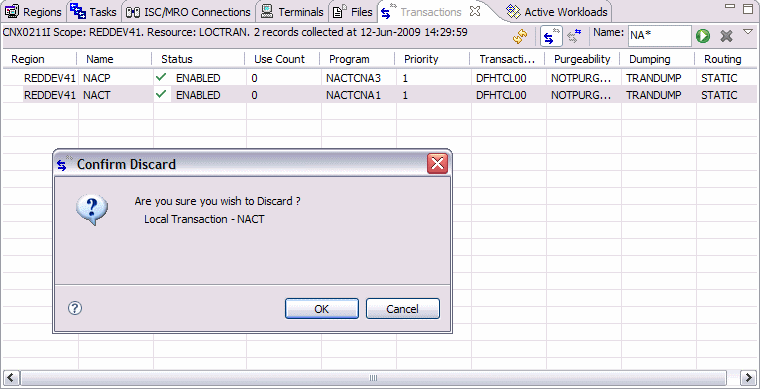
Figure 18-20 Confirm Discard window
After you confirm your action, you are presented with the transaction list again minus the resource you just discarded, as shown in Figure 18-21.
Figure 18-21 Transaction List after Discard
Let us assume that we made another mistake. We want to re-instate the transaction that we just discarded. How would we go about that? Select the Administration View from the toolbar. We receive a list of resource types that we can choose from, as shown in Figure 18-22 on page 384.

Figure 18-22 Administration resource options
If we select Transaction Definitions, then we are presented with a list of transactions that match our criteria. The filter that we applied in the Transaction View perspective still applies here, so we only see our filtered list.
By selecting the transaction that we just discarded, NACT, we now have an option to INSTALL it, as shown in Figure 18-23 on page 385.
Figure 18-23 Install transaction
After we select the Install option, we are presented with a list of available regions to install it into. We choose our current region, REDDEV41, as shown in Figure 18-24 on page 386.
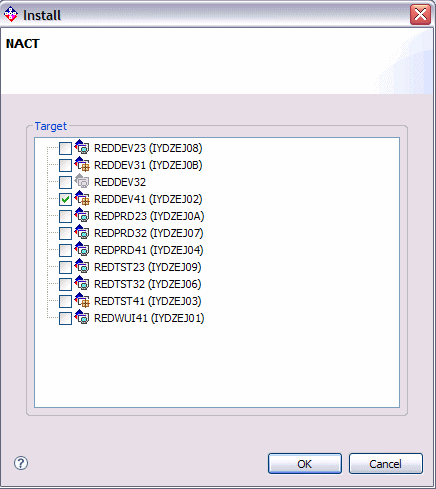
Figure 18-24 Region selection
You should receive a message indicating the success of your install, as shown in Figure 18-25.

Figure 18-25 Successful install
Let us return to our transaction list, shown in Figure 18-26 on page 387. We should see that both of our transactions are now displayed. Also, if we select the Properties View, we can see that the Resource Signature details are updated to reflect the install. These attributes were introduced in CICS Transaction Server V4.1.
Figure 18-26 Transaction Install and Resource Signature
As we discussed earlier, you can DISCARD a number of resources. However, these resources must be in an acceptable state before we can successfully remove them. So what happens when we try to remove a resource that is currently in use by the CICS region? Let us consider the case of the CONNECTION. What conditions must exist for the connection to be successfully discarded?
The DISCARD CONNECTION command removes a CONNECTION definition from the local CICS system. When a connection is removed, all of the associated sessions also are removed.
For deletion to be successful:
•The connection can have no active sessions if it is remote (that is, has a REMOTESYSTEM value other than the name of the local region) and must be in OUTSERVICE status if it is not remote.
•The interregion communications facility must be closed if the connection is an MRO connection. You can use the SET IRC CLOSED command to close it.
•If the connection is an APPC connection and the local CICS system is a member of a VTAM® generic resource group, there can be no deferred work pending. Deferred work occurs when a failure causes a unit of work, which used a session on the connection at SYNCLEVEL 2, to be "shunted" (held for later disposition because recovery action is required before disposition can be completed).
Other types of connection can be discarded, even if there is recovery work outstanding for them; however, it is recommended that you do not discard them if there is. You can use the INQUIRE CONNECTION RECOVSTATUS command to check.
There can be no indirect CONNECTION definitions pointing to the connection to be discarded.
|
Note: In unusual circumstances, the discard of an LU6.1 connection can fail, even when it is out-of-service, if some of its sessions are still in-service. If this happens, set the connection status to INSERVICE, then OUTSERVICE, and then reissue the DISCARD command.
|
CICS completes successful DISCARD CONNECTION processing with an implicit sync point on behalf of the issuing task, committing changes to recoverable resources made up to that point in the task. If the discard processing fails, CICS raises the INVREQ exception condition with a RESP2 value of 27, and does a SYNCPOINT ROLLBACK instead, rolling back changes to recoverable resources. For all other exception conditions, however, discard processing is not attempted and SYNCPOINT nor SYNCPOINT ROLLBACK is issued.
So our attempt to DISCARD a CONNECTION should fail if it is in use. First, select a suitable connection in our current CICS region, REDDEV41, as shown in Figure 18-27 on page 389.
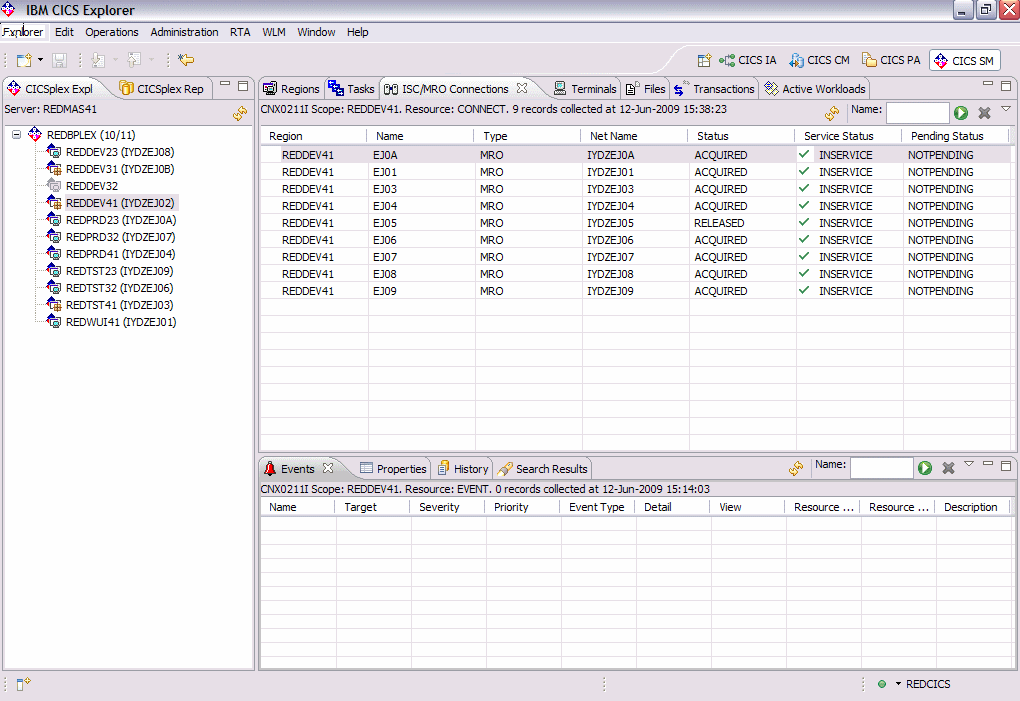
Figure 18-27 Connection list
So now let us try to DISCARD the connection. Right-click to display the pop-up window with all of the options available. Notice in Figure 18-28 on page 390 that there are many more options for this resource than there were for our transaction.

Figure 18-28 Discard a connection
We receive a confirmation panel for the command that we are trying to execute, as shown in Figure 18-29 on page 391.
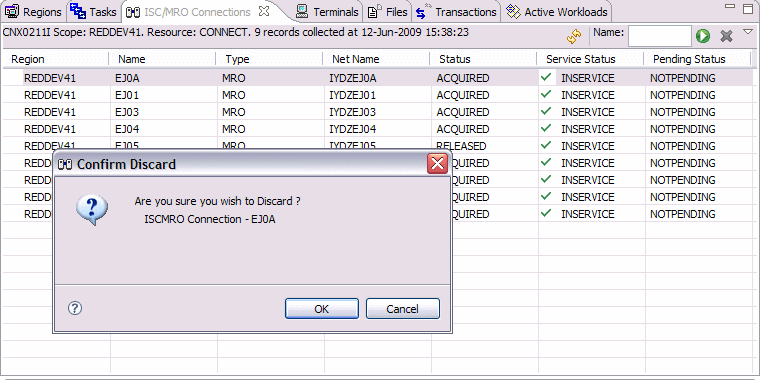
Figure 18-29 Confirm Discard connection
This time, our DISCARD command will fail, and we should receive a message telling us the reason why, as shown in Figure 18-30 on page 392.

Figure 18-30 Discard connection failure
We receive a message in the pop-up panel telling us that our DISCARD command was not successfully executed, but the information bar on the perspective details more of the failed command. It describes the failure and includes the RESP and RESP2 values that were recorded. In this instance, our RESP code has a value of 16, which signals the INVREQ condition, and the RESP2 code has a value of 29, which signals that the connection is an MRO connection and the IRC is not closed.
..................Content has been hidden....................
You can't read the all page of ebook, please click here login for view all page.