

WebSphere MQ plug-in
In this chapter, we provide an overview of the WebSphere MQ plug-in. We discuss both the WebSphere MQ Explorer and the WebSphere MQ plug-in for CICS Explorer. Additionally, we explain how to integrate WebSphere MQ Explorer with CICS Explorer and how to manage MQ resources from this interface.
12.1 WebSphere MQ plug-in for CICS Explorer
The WebSphere MQ plug-in for CICS Explorer provides an integration of the WebSphere MQ Explorer into the CICS Explorer. Therefore it is possible to operate CICS systems and WebSphere MQ resources from the same desktop application, providing benefit if you carry out cross system administration, monitoring, and problem determination.
12.2 The WebSphere MQ Explorer
The WebSphere MQ Explorer, like the CICS Explorer, is an Eclipse-based graphical tool that you can use to explore and configure all WebSphere MQ objects and resources. The WebSphere MQ Explorer is included with the WebSphere MQ server installation. SupportPac MS0T is also available for download, separately from the WebSphere MQ Explorer. Having WebSphere MQ Explorer installed on your system is a prerequisite to the CICS Explorer MQ plug-in.
12.3 CICS Explorer WebSphere MQ plug-in
Although you can use CICS Explorer and WebSphere MQ Explorer independently, it shows considerable advantages in using the WebSphere MQ plug-in into the CICS Explorer. From a single point of control, you can manage your CICS resources and your WebSphere MQ resources.
12.3.1 Downloading SupportPac CS1Q
To get the latest version of the SupportPac:
1. Type ibm.com/cics/explorer into your browser. This directs you to the IBM web page.
2. Select Click here to get CICS Explorer - Free Product Download to start the download. On the next page you find the download link for SupportPac CS1Q.
3. Accept the software licence agreement, and then the download will start. After the download, do not extract the file at that time.
12.3.2 Downloading SupportPac MS0T
To download SupportPac MS0T:
1. To download the SupportPac you must have a IBM registered user ID. If you have no such user ID, register yourself on the web page before you start the download. When you have resolved the registration, you are ready to download the 2 files mst0_eclipse331_windows.zip and mst0_explorer7013_windows.zip.
2. Type ibm.com/webspheremq/explorer into your browser, and download the MST0 SupportPac. Note the installation instructions on that web page.
3. After the SupportPac is downloaded, navigate to the directory where you saved the files, and first unpack the Eclipse .zip file. Double-click Setup.exe, and follow the on screen instructions to install Eclipse.
4. After Eclipse is successfully installed, unpack the MQ Explorer .zip file. Double-click Setup.exe, and follow the on screen instructions to install MQ Explorer.
|
Note: IBM WebSphere Eclipse Platform and IBM WebSphere MQ Explorer are installed as real Windows application. If you want to uninstall it, you can enter the Windows Control Panel subfolder Add or Remove Programs to remove it from your PC.
The CICS Explorer is installed in a normal folder, which you can remove by deleting that folder.
|
12.4 Integrating MQ Explorer with CICS Explorer
In this section, we describe how to integrate MQ Explorer into CICS Explorer.
12.4.1 Importing CSQ1 into CICS Explorer
To install the MQ Explorer integration pack into the CICS Explorer:
1. Select the menu option HELP of CICS Explorer, and click Software updates.
2. Select Software Updates → Available Software → Add Site button → Archive.
3. Specify the previously downloaded csq1.zip file as the input file name, and click Open.
4. Select the appropriate options, and click Install to install the SupportPac.
12.4.2 Copying WebSphere MQ Explorer files into CICS Explorer
You must copy two MQ Explorer files into the CICS Explorer. If you did not change the installation path, the files are in:
C:Program FilesIBMWebSphere MQeclipseSDK33eclipselinks
The two file names are
•com.ibm.mq.explorer-feature-ms0t.link and
•com.ibm.mq.explorerhelp-feature-ms0t.link
Copy the files into this directory or wherever you installed CICS Explorer:
C:Program FilesIBMCICS_Explorerlinks
Remember that you can install CICS Explorer in any folder.
12.4.3 Restarting CICS Explorer
The MQ plug-in installation is now finished and ready to use when you restart CICS Explorer.
|
Note: For detailed installation instructions, read the HTML Document CS1Q Release Notes - Readme. This readme file is included in the cs1q.zip file.
|
12.5 Managing WebSphere MQ resources in CICS Explorer
In this section, we describe how to manage WebSphere MQ resources.
12.5.1 Starting CICS Explorer and switching to WebSphere MQ Explorer perspective
After you successfully install the WebSphere MQ plug-in into the CICS Explorer and restart CICS Explorer, locate the MQ Explorer button, which is in the right upper corner, as shown in Figure 12-1. It is now listed under all available perspectives. Click the icon to open the WebSphere MQ Explorer perspective.

Figure 12-1 WebSphere MQ Explorer plug-in button
12.5.2 Defining and connecting a Queue Manager
Now you must enter some WebSphere MQ-specific credentials. The basic information you must have available is to which queue manager you want to connect to and what is the port number.
To enter this information:
1. Right-click the folder Queue Manager in the left window, titled MQ Explorer Navigator.
2. When the pop-up window appears, select Add Remote Queue Manager, enter your queue manager name, and click Next. A window opens, where you can specify the host name or the IP address and the Port number and some additional information.
In our example in Figure 12-2, we used the queue manager name MQCR. The example host name is wtsc66.itso.ibm.com with a port name of 1415.

Figure 12-2 Enter queue manager name, host address, and port number
3. Click Finish complete the process. The system automatically connects you to the queue manger, as shown in Figure 12-3 on page 257 and Figure 12-4 on page 258.

Figure 12-3 Connect to queue manger successful

Figure 12-4 Left-click the queue manager name to show the details
12.5.3 Hints and tips
Be careful when entering the WebSphere MQ credentials. A wrong port number, for example, can lead to messages that are not necessarily directly pointing you to the correct cause of the problem.

Figure 12-5 Invalid Port number message
12.6 Migration issues and versioning
In this section, we describe how to manage different versions and automatic software upgrades.
12.6.1 Multiple CICS Explorer versions coexisting
You can have several CICS Explorer versions installed on your system. You can have more than one instance of CICS Explorer running simultaneously; however, each instance must have its own workspace. If you, nevertheless, start two CICS Explorers using the same workspace, you will get the message displayed in Figure 12-6.
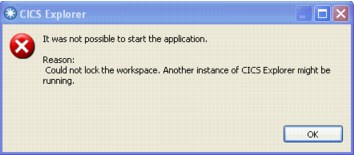
Figure 12-6 Workspace is looked at by another CICS Explorer instance (version)
|
Note: We strongly recommend that you use different workspaces for each CICS Explorer version!
|
12.6.2 WebSphere MQ plug-in with new CICS Explorer version installed
Before you start the newly installed CICS Explorer for the first time, we strongly recommend that you allocate a new workspace. See 3.3, “Updating the CICS Explorer” on page 63.
After you allocate a new workspace and the CICS Explorer is restarted, re-import CSQ1 into the CICS Explorer (see 12.4.1, “Importing CSQ1 into CICS Explorer” on page 254), and then copy the WebSphere MQ Explorer files (see 12.4.2, “Copying WebSphere MQ Explorer files into CICS Explorer” on page 254).
12.6.3 Locating and changing the workspace
By default CICS Explorer allocates the workspace on Microsoft Windows operating system in C:Documents and Settingsusername .cicsexplorer. You can use any name for additional workspaces. If the workspace does not exist, CICS Explorer creates it. To change a workspace:

Figure 12-7 Create a shortcut
2. Right-click the shortcut, and select Properties.
3. Append your new workspace to the target, as shown in Figure 12-8 on page 261. In this example, we decided to allocate a workspace in c:CICS_Explorer_V1007workspace. You must not preallocate this folder because CICS Explorer automatically does it.
|
Note: A shortcut is mandatory. You cannot provide the -data option from the primary cicsexplorer icon.
|

Figure 12-8 Append -data
An alternative way to provide different workspaces is to start explorer from a Microsoft Windows command prompt.
..................Content has been hidden....................
You can't read the all page of ebook, please click here login for view all page.