

CICS Deployment Assistant
In this chapter, we provide an introduction to the CICS Deployment Assistant. This new, tightly integrated plug-in for the CICS Explorer works together with host components to give you a powerful toolkit to manage your CICS deployment and to discover your CICS assets.
11.1 Introduction to CICS Deployment Assistant
The CICS Deployment Assistant (CICS DA) is a new tool designed to help you to discover, model, visualize, and deploy new and existing CICS regions. With CICS DA you can visualize and control all your CICS resources. You can also visualize and manage all key relationships from a single point of control. With CICS DA you can automate and standardize your CICS environment.
CICS DA is an interactive control system that allows CICS systems programmers to create and maintain a CICS environment easily. CICS DA is a part PC and a part mainframe based graphical user interface (GUI). The CICS PC part is incorporated into the CICS Explorer as a plug-in.
11.2 The prerequisites for CICS DA
In this section, we discuss the components that are required to run CICS DA.
11.2.1 CICS Explorer
The CICS DA plug-in must be installed in the CICS Explorer V1.0.1.
11.2.2 z/OS host component
IBM z/OS version 1.9 or higher is required. If access to the MVS™ system log is needed by users of CICS DA, z/OS V1.11 is required. JES3 user must have z/OS version 1.10 or higher.
11.2.3 CICS Transaction Server
CICS/TS version 3.1 or higher is required. Recommended is CICS/TS V4.1. APAR PM15583 with PTF UK60398 and APAR PM15214 with PTF UK60399 provide the ability for CICS/TS V4.1 server, to access the System Initialization Parameters (SIT) and any overrides with CICS DA.
11.3 Installing the CICS DA components
There are three main steps that are necessary to install the CICS DA:
1. Install the CICS DA host component.
2. Perform the post-installation configuration for CICS.
3. Download and install the CICS DA plug-in.
|
Note: We did the installation according to the instructions in the Release Notes for CICS Deployment Assistant, and we recommend that you use the release notes as a guide to install the products host component.
You will find the release notes and the zip file for the CICS DA plug-in on the CICS Explorer download page. To download both files:
1. Enter in your browser ibm.com/cics/explorer/download.
2. Click Link to Download page, and then logon with your IBM ID.
3. Select CICS Explorer plug-in for CICS Deployment Assistant V1.1 or CICS Explorer plug-in release notes for download.
4. Save the compressed file in a temporary directory, and do NOT extract the file. The CICS Explorer automatically extracts the contents.
The download does not include the host components; instead, they must be ordered separately. CICS Deployment Assistant for z/OS Version 1 Release 1 Compid 5655-W4800.
|
11.3.1 Installing the CICS DA plug-in into CICS Explorer
In this section, we describe how to install the CICS DA plug-in:
1. Download the CICS DA plug-in zip file from the IBM server. Do NOT extract it.
2. Start the CICS Explorer (must be CICS Explorer V1.0.1), and click Help → Software updates → Available Software → Add Site. A window opens entitled Add Site. There you can enter the location of the zip file.
3. Click Archive, and select the previously downloaded CICS DA plug-in zip file.
11.3.2 Establishing a connection to a host
In this section, we describe how to create a CICS DA type connection:
1. Start your CICS Explorer and open the CICS DA perspective. You can open the CICS DA perspective if you click the CICS DA icon on the right-upper corner. Alternatively you can navigate through Windows → Open perspective → Other. There you can select CICS DA.
2. If you changed the perspective to CICS DA the first time, you see on the right-lower corner (see Figure 11-1) that no CICS DA connection is open. Refer to Table 4-1 on page 79 to read more about connection manager status icons.

Figure 11-1 No connection defined
3. Click the text to open the preference connection window. From there you can define your connection.
|
Note: First define your credentials, specifying user ID and password. Later in the connection definition you can refer to these credentials.
|
4. Start by selecting the connection type you want to define. In this case it is a CICS Deployment Assistant type of connection.
5. Press New, and give a name for this connection. Also, specify the host name and the port name. Refer to the previously defined credentials (user ID and password).
6. Additionally specify the z/OS system ID, console name, and the CICS DA data sets HLQ.
|
Note: After the installation of the CICS DA host component, there are three data sets cataloged on your z/OS system. The <llq> of this data sets are SCPHAUTH, SCPHINST and SCPHLOAD. The CICS DA HLQ means, that all qualifiers before <llq> must be specified. See Figure 11-3 on page 235 for an example.
|
7. When the connection is defined, click the red square at the lower right corner to connect to the host. A successful connection is indicated by a green circle as shown in Figure 11-2.
Figure 11-2 Connection established
In Figure 11-3 on page 235, you can see how we defined our connection.

Figure 11-3 Defining a connection for CICS Deployment Assistant
The CICS DA connected window is divided into multiple frames.
|
Note: If you resized the frames or you closed one, perhaps by accident, and you want to reopen or resize it, you can use the Window → Reset Perspective function at any time.
|
In the lower window on the right side you might see the error message shown in Figure 11-4 on page 236. In this case your z/OS level is not V1.11 (see prerequisites for browsing the MVS system log in 11.2.2, “z/OS host component” on page 232).

Figure 11-4 Error message when z/OS version is lower than V1.11
11.3.3 Connection types
At this point, we do a brief description into connection types because it is important to select the right connection type. Early versions of the CICS Explorer were using the CICSPlex SM Data Interface only, which was a kind of read-only access. The CICS Management Interface (CMCI) followed soon to connect also stand-alone CICS regions that are not part of a CICSPLex. This interface allows update access. To connect successfully to the CICS DA host component, a new CICS DA type connection is required. Table 11-1 provides an overview of the connection types that are currently available. For further information, refer to 4.2, “Connections and credentials” on page 78.
Table 11-1 Connection types
|
System
|
Connection type
|
|
System z/OS
|
System z - FTP
|
|
CICPlex
|
CICSPlex SM Data Interface (read-only)
|
|
CICSPlex & CICS
|
CICS Management Interface (CMCI)
|
|
CICS DA
|
CICS Deployment Assistant
|
11.4 Creating a new CICS DA project
The Eclipse platform is project oriented, and the CICS Explorer is based on Eclipse. So if you want to start new work, you must have a CICS DA project open. A CICS DA project is used as the repository where the system configuration data that is collected by CICS DA is saved. This system information in the project is known as the model. CICS DA projects are created during the system discovery process. You cannot create a CICS DA project without performing a system discovery:
1. Select Explorer → New Wizards → CICS Deployment Assistant Project.
2. Specify a name for your project. Select the connection to use for your discovery. By default it is the connection currently in use.
3. Click Discover MVS Images to let the system start to discover your z/OS sysplex.
11.4.1 Discovering and creating the system model
When you perform a discovery operation you import the discovered system information into your CICS DA project. The system information that is contained in the project is known as the system model. When you run discovery, CICS DA submits a job through FTP to execute a discovery program. The first thing the discovery program does is identify all of the MVS systems in the sysplex. You then select the MVS images on which to perform the next stage of the discovery process. The discovery program then looks at the regions that are running on each selected MVS image and identifies supported releases of CICS and other running instances, such as CICSPlex SM CMASes, Web User Interface servers, and DB2 and MQ servers, as well as CICS Temporary Storage, Coupling Facility Data Tables (CFDT), and Named Counter Server.
|
Note: Only active instances are discovered. If a CICS region or another CICS asset is not active, it will NOT be discovered.
|
The Finish button ends the process, creating a new project. The project is now visible in the left upper frame. Expand the folder and, click the plus sign to see your CICS assets.
11.5 Discovering your CICS assets
In this section, we review some figures to give you an overview of how CICS DA discovers CICS assets.
11.5.1 Discovering CICS regions
The main CICS asset is a CICS region. CICS DA can discover CICSPlex managed and un-managed CICS regions with a few clicks. Figure 11-5 on page 239 gives you an overview how powerful CICS DA is.
To discover CICS regions:
1. On the left-upper side window, select CICS Regions → Managed by CICSPlex SM and CICS regions → Unmanaged.
2. Double-click the EPRED3 region to bring all the information you see in the right-upper window, such as, the CICS versions running in that region (660), the MVS system ID (SC66), the name of the CICSPlex (EPRED), and the name of the CMAS (EPREDC). You can see issues to stop and start that region with a mouse click (see 11.5.6, “Starting and stopping CICS regions” on page 246). You can even clone the region from that window (see 11.5.7, “Cloning an existing CICS region” on page 248) by simply moving and using your mouse.
You can see some blue hypertext (blue underlined text), for instance, Data set name. Others are MVS Image, DB2, WebSphere MQ, CICSPlex, and so on. Simply clicking that hypertext gives you more information about that topic.
If you click Data set name, for example, you can edit your CICS startup JCL. You can change it, save it, stop CICS, and re-start CICS to activate your changes with a few clicks from one window. No need to switch back to TSO or SDSF.
Figure 11-5 on page 239 shows the CICS regions.

Figure 11-5 Discovering CICS regions
Let us discuss the two windows on the lower part of Figure 11-5. On the left window, you can see jobs in your system. The jobs can be running or they are already in the held output queue.
Look at figure Figure 11-6 on page 240, you can see five jobs in the system with jobname EPRED3. The first job (JOB02783) was canceled (notice the RC=S222). The following three jobs are in the held output queue for further review or processing (print or delete). The last job (JOB03997) is currently running, indicated by the small green triangle. A double-click opens the whole job. Expanding the plus sign gives you all the available JES data sets (for example, the JESMSGL, JESJCL, MSGUSR). Clicking the plus sign is comparable to the ? in SDSF just before the job. Clicking a specific data set (for example, MSGUSR) opens the CICS TDQ CSMT on the right-upper window, where you can investigate specific messages. You get the same functionality by clicking the z/OS job tab in the opposite window.
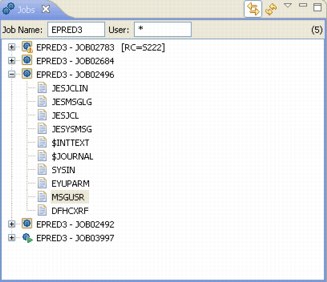
Figure 11-6 Jobs in the system
The window on the lower-right side shows the MVS syslog (if you are on z/OS version 1.11; otherwise, see Figure 11-4 on page 236). When you double-click the Syslog Tab, the small window expands to a full window. See Figure 11-7 on page 241. Now you can easily go through the syslog using the mouse and the scroll bar on the right side.
Notice, the top of the Window, where you can see which MVS syslog you are browsing. This also shows the date and start time of the syslog currently viewed.

Figure 11-7 Syslog view full window size
You can enter z/OS commands by clicking the z/OS command tab. In Figure 11-8, we entered the z/OS command d iplinfo for demonstration purposes.
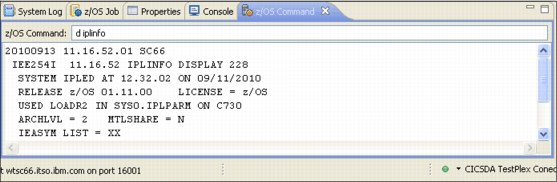
Figure 11-8 Enter z/OS commands
The results of this command are displayed underneath the command line.
Figure 11-9 shows that the Console tab is activated. We edited and changed the start-up JCL and viewed the confirmation message. Next, we tried to shutdown CICS and get the response that the CICS was not up at that time. Finally, we started the CICS and got the message that a job has been submitted. No need to go back to TSO, or switch to SDSF. This all can be done from a single point of control.
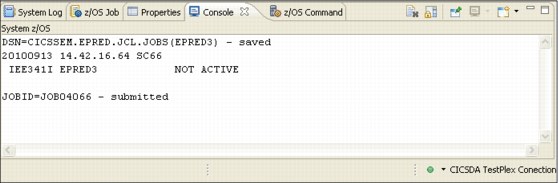
Figure 11-9 The Console view
11.5.2 Checking the CICS topology
You can distribute CICS applications and the resources they use between interconnected CICS regions. You can group CICS regions into CICS system groups and CICSPlexes and distribute regions across the z/OS systems on a sysplex. That is your CICS topology. Without CICS DA, it requires several steps per CICS, plus inside knowledge of the expected CICS topology to get an overview of your CICS topology. With CICS DA, you are almost only a couple of clicks away to manage the configuration for ALL CICS systems within the CICSplex.
A CICS topology must be well documented. However, the documentation is sometimes neglected and often not up-to-date. With the CICS DA, you can easily get an up-to-date picture of your current CICS topology. Make the CICS DA project window on the left-upper side of your CICS DA perspective your active window. Open the CICSPlexes folder and double-click the CICSplex you want to investigate.
To give you an example on how easy you can get up-to-date topology information about your CICSPlex, we added Figure 11-10 on page 243. We opened the ALLTORS folder to see which CICS regions are dedicated as Terminal Owning Regions (TOR). Clicking any item gives you further information or the possibility to change your topology.

Figure 11-10 Discover the CICS topology
The CICSPlex topology frame is divided into four sub-areas:
•Groups
•Regions
•CMASes
•WUIs
The information provided in each sub-area works like a hyperlink. Double-click the EPREDC (MP) in the CMAS area for example, opens the CMAS view where you get further information and the ability to dig deeper into your CICS topology.
11.5.3 Investigating CICS initialization options
CICS initialization options can be at various places. You must have a SIT table or at least a pre-generated table with all of the default initialization values. You can have initialization options specified in the SYSIN data set. You can also specify initialization options in the JCL. To check all of these options for all CICS regions can be cumbersome and time consuming. Additional expert knowledge is necessary, for instance, you must know the location of the SIT source and the location for the overrides.
By contrast, using CICS DA, you can stay on one window and make the necessary changes to the initialization options, for example, select a CICS region, right-click, and highlight Show SIT Parameters. A new menu is displayed which then you can select a CICS initialization option location. In Figure 11-11, we show how we selected the CICS initialization options specified in the SYSIN data set for CICS region EPRED3.

Figure 11-11 Investigate the CICS initialization options
|
Note: To access the CICS Transaction Server startup initialization table parameters (SIT) and any overrides, you must be on CICS/TS version 4.1 with UK60398 and UK60399 applied.
|
11.5.4 Viewing CICS-related spool files
If you work with CICS-related spool files, CICS DA eases the handling of this process. There is no need to switch back to another interface anymore. Stay within the CICS Explorer environment.
If you refer back to Figure 11-11 on page 244 you see in the lower-right side the MVS syslog. Remember that z/OS 1.11 is mandatory for viewing the syslog; otherwise, you will see the error message shown in Figure 11-4 on page 236. The next tab on the right of System Log is z/OS Job. If you click this tab, you see all the spool files for the currently selected region, in this case region EPRED3. We selected JESMSGLG, as shown in Figure 11-12 to find the Control is being given to CICS message.
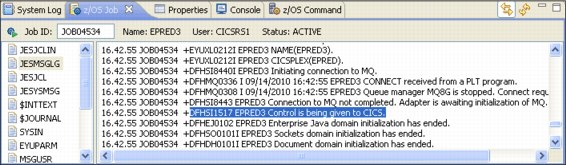
Figure 11-12 Find message Control is being given to CICS in spool file
In the lower left-side window, you can easily change your selection by clicking the job you want to see. Alternatively, you can view spool files in that window by clicking the plus sign.
11.5.5 Working with CICS-related data sets and JCL
Working with data sets is similar to the spool files. An important thing to mention here is, you must change the perspective. But you still stay in the CICS Explorer. For demonstration purposes, we show Figure 11-13 on page 246. We switched back to the CICS SM perspective and opened the Files tab. We selected the file STOCK to be closed.
Notice in the right-upper corner that the CICS SM perspective is now in the foreground and the CICS DA perspective is in the background.
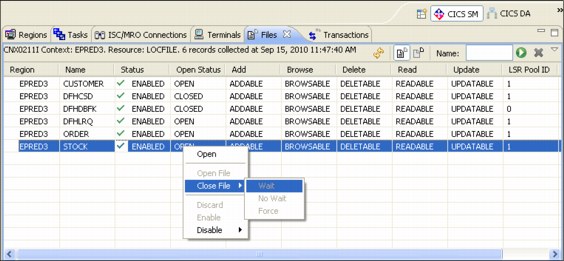
Figure 11-13 Closing a file from the CICS SM perspective
11.5.6 Starting and stopping CICS regions
In this chapter, we demonstrate that you can start and stop your CICS regions with CICS DA. Switch to the CICS DA perspective.
Defining a start policy
Before you can start a CICS region with CICS DA, you must define a policy to CICS DA. If you start your CICS systems as batch jobs, select the Batch Job option, and add the fully-qualified name of the PDS or the PDS/E, and append the member name in round brackets. See example in Figure 11-14.
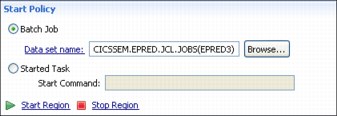
Figure 11-14 Start policy for a batch started CICS system
When CICS is started as a started task, select the Started Task option, and add the start command in the free area after Start Command.
Starting a CICS region
To start a CICS region:
1. Click Start Region, which is located after the green triangle.
2. When you are prompted whether you really want to start this region, reply with yes. Notice the confirmation message in the console tab in the lower window. It confirms that a job (including job number) was submitted.
Stopping a CICS region
To stop a CICS region:
1. Click Stop Region, which is located right after the red square. CICS DA submits a job and uses the MVS MODIFY command to shutdown the CICS region.
2. CICS DA uses the console name that was specified in the connection definition (see Figure 11-3 on page 235). You must define this console in CICS; otherwise, you will receive an error in the CICS DA console, as shown in Figure 11-15.
An alternative to this is to allow autoinstall for MVS consoles (SIT option AICONS=YES). In the CICS Resource Definition Guide, Chapter 42 Autoinstall, you find further information about implementing autoinstall for MVS consoles.

Figure 11-15 Error message when console is not defined to CICS
|
Note: Only Managed Address Spaces (MAS) and stand-alone CICS regions are eligible for CICS DA shutdown. CMASes or WUI servers are NOT allowed to be shutdown with CICS DA.
|
Checking region status: Refreshing the window
On the left-side, upper window, you can see all of your CICS regions. The regions that are up and running have a small green triangle. However, this status does not change until you refresh this window. You can do a refresh either by pressing the PF5 key or by right-clicking and selecting Refresh.
11.5.7 Cloning an existing CICS region
If your workload grows and you need an additional CICS system, you can use CICS DA to clone a region. The CICS region you want to clone must be a CICSPlex SM-managed region and it must be up and running. To clone an existing CICS region:
1. Double-click the region you want to clone.
2. Select Clone CICS Region Wizard. When a new window opens, specify all essential values, such as new applid, sysid, start policy, as shown in Figure 11-16.

Figure 11-16 Clone a CICS region from EPRED3 to EPRED9
3. Click Next. A new dialog window shows all of the CICS-related data sets as they currently exist and new data set names.
4. If you have a shared CSD, click that option to indicate that the CSD name for both CICS regions is the same. If the new data set name is greyed out and the Share option is selected but also greyed out, then the data set must be shared, as shown in Figure 11-17.

Figure 11-17 New data set names
5. Click Finish to confirm your choices. CICS DA performs a check to ensure that the new data set names and batch job do not already exist. If the check is successful, the data sets are allocated and initialized. CICS DA then adds the new region to your CICSPlex SM definitions and to the system model. Finally, the CICS region editor opens showing details of the CICS region, and a report is shown in the Console view.
There are some operations in which CICS DA cannot execute, such as defining the region to your security policy, connectivity steps, MVS system logger setup, and so on. This action must occur before CICS can start.
|
Hint: CICS DA provides a User Guide. The User Guide is incorporated into the CICS Explorer Help function when the CICS DA plug-in is installed. It is a valuable source of documentation and information for how-to questions.
|
11.5.8 Adding a CICS to an existing CICSPlex
Using CICS DA you can install the CICSPlex SM definitions in an unmanaged CICS region, and add the region to an existing CICSplex and, optionally, one or more of the system groups in the CICSplex. CICS DA can add a CICS region to a CICSplex only if the region is started by a batch job. For further information, refer to the CICS DA User Guide. Remember that you find the CICS DA User Guide in the CICS Explorer Help → Help Contents when the CICS DA plug-in is installed.
..................Content has been hidden....................
You can't read the all page of ebook, please click here login for view all page.