
Our sample site is coming along nicely. We’ve given it some basic structure, along the way learning more about marking up content using HTML5’s new elements.
In this chapter, we’ll discuss even more new elements, along with some changes and improvements to familiar elements. We’ll also add some headings and basic text to our project, and we’ll discuss the potential impact of HTML5 on SEO and accessibility.
Before we dive into that, though, let’s take a step back and examine a few new—and a little tricky—concepts that HTML5 brings to the table.
For layout and styling purposes, developers have become accustomed to thinking of elements in an HTML page as belonging to one of two categories: block and inline. Although elements are still rendered as either block or inline by browsers, the HTML5 spec takes the categorization of content a step further. The specification now defines a set of more granular content models. These are broad definitions about the kind of content that should be found inside a given element. Most of the time they’ll have little impact on the way you write your markup, but it’s worth having a passing familiarity with them, so let’s have a quick look.
- Metadata content
-
This category is what it sounds like: data that’s not present on the page itself, but affects the page’s presentation or includes other information about the page. This includes elements like
title,link,meta, andstyle. - Flow content
-
Flow content includes just about every element that’s used in the body of an HTML document, including elements like
header,footer, and evenp. The only elements excluded are those that have no effect on the document’s flow:script,link, andmetaelements in the page’s head, for example. - Sectioning content
-
This is the most interesting—and for our purposes, most relevant—type of content in HTML5. In the last chapter, we often found ourselves using the generic term “section” to refer to a block of content that could contain a heading, footer, or aside. In fact, what we were actually referring to was sectioning content. In HTML5, this includes
article,aside,nav, andsection. We’ll talk about sectioning content and how it can affect the way you write your markup in more detail very shortly. - Heading content
-
This type of content defines the header of a given section, and includes the various levels of heading (
h1,h2, and so on), as well as the newhgroupelement, which we’ll cover a bit later. - Phrasing content
-
This category is roughly the equivalent to what you’re used to thinking of as inline content, it includes elements like
em,strong,cite, and the like. - Embedded content
-
This one’s fairly straightforward, and includes elements that are, well, embedded into a page, such as
img,object,embed,video,canvas, and others. - Interactive content
-
This category includes any content with which users can interact. It consists mainly of form elements, as well as links and other elements that are interactive only when certain attributes are present.
As you might gather from reading the list above, some elements can belong to more than one category. There are also some elements that fail to fit into any category. Don’t worry if this seems confusing: just remember that these distinctions exist—that should be more than enough.
In previous versions of HTML, you could draw up an outline of any
given document by looking at the various levels of headings (h1 through to h6) contained in the page. Each time a new level
of heading was added, you’d go one step deeper into the hierarchy of your
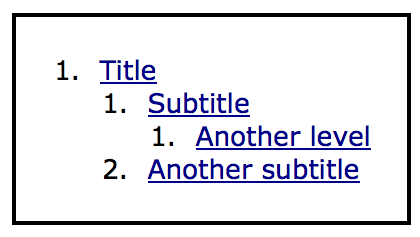
outline. For example, take this markup:
<h1>Title</h1>
…
<h2>Subtitle</h2>
…
<h3>Another level</h3>
…
<h2>Another subtitle</h2>
This would produce the document outline shown in Figure 3.1.
It was preferred that each page have a single h1 element, with other headings following
sequentially.
In order to make content easier to syndicate and more portable, the
HTML5 specification provides a clear algorithm for constructing the
outline of an HTML document. Each element that falls under the category of
“sectioning content” creates a new node in the document
outline. Heading (h1–h6) elements within a block of sectioning
content also create
“implied” sections—this is actually what was happening in
our simple outline above.
This all sounds more complicated than it is. To start to gain an understanding of it, let’s look at how the above example could be rewritten using some additional HTML5 elements:
<section>
  <h1>Title</h1>
  …
  <article>
    <h1>Article Title</h1>
    …
    <h2>Article Subtitle</h2>
    …
  </article>
  <article>
    <h1>Another subtitle</h1>
    …
  </article>
</section>
This results in exactly the same document outline as above: each
piece of sectioning content (the article elements in this example) creates a new
branch in the document tree, and so can have its own h1. This way, each section has its own mini
document outline.
The advantage of the new outlining algorithm is that it allows us to
move an entire section to a completely different document while preserving
the same markup. Beforehand, a post’s title on that post’s page might have
been an h1, but the same post’s title
on the home page or a category page listing might have been an h2 or h3.
Now, you can just keep the same markup, as long as the headings are
grouped together in a sectioning content element.
Tip: Testing Document Outlines
Getting a document’s outline right in HTML5 can be tricky at first. If you’re having trouble, you can use a handy JavaScript bookmarklet called h5o to show the outline of any document you’re viewing with the HTML5 outline algorithm. The resulting display will reveal your document’s hierarchy in accordance with the HTML5 standard, so you can make corrections as needed.
To install it in your browser, download the HTML file from the site and open it in your browser; then drag the link to your favorites or bookmarks bar. Now you can use the h5o link to display a document outline for any page you’re viewing.
It’s important to note that the old way of coding and structuring
content, with a single h1 on each page,
is still valid HTML5. Your pages will still be valid, even though you’ll
miss out on the portability and syndication benefits.
Note: Understanding Sectioning Roots
Distinct from—but similar to—sectioning content, HTML5 also
defines a type of element called a sectioning
root. These include blockquote, body, details, fieldset, figure, and td. What makes the sectioning root elements
distinct is that, although they may individually have their own
outlines, the sectioning content and headings inside these elements do
not contribute to the overall document outline
(with the exception of body, the
outline of which is the document’s outline).
Now that we’ve got a solid handle on HTML5’s content types and document outlines, it’s time to dive back into The HTML5 Herald and add some headings for our articles.
For brevity, we’ll deal with each section individually. Let’s add a
title and subtitle to our header, just
above the navigation:
<header>
<hgroup>
<h1>The HTML5 Herald</h1>
<h2>Produced With That Good Ol’ Timey HTML5 & CSS3</h2>
</hgroup>
<nav>
…
</nav>
</header>
You’ll notice we have introduced three elements into our markup:
the title of the website, which is marked up with the customary h1 element; a tagline immediately below the
primary page title, marked up with an h2; and a new HTML5 element that wraps our
title and tagline, the hgroup
element.
To understand the purpose of the hgroup element, consider again how a page’s
outline is built. Let’s take our heading markup without the hgroup element:
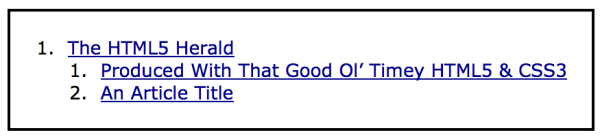
<h1>The HTML5 Herald</h1> <h2>Produced With That Good Ol’ Timey HTML5 & CSS3</h2>
This would produce the document outline shown in Figure 3.2.

The h2 element creates a new,
implicit section: all content that follows is logically
grouped under a subsection created by that tagline—and that’s not what
we want at all. Furthermore, if we have additional headings (for
example, for article titles) that use h2, those new headings will be hierarchically
on the same level as our tagline; this is also incorrect, as shown in
Figure 3.3.
Well, we could mark up subsequent headings starting with h3, right? But again, this causes problems in
our document’s outline. Now, the headings beginning with h3 will become subsidiary to our tagline, as
Figure 3.4 shows.

That’s also undesirable; we want the new headings to be
subsections of our primary heading, the h1 element.
What if, instead, we opted to mark up our tagline using a generic
element like a p or span:
<h1>HTML5 Herald</h1> <p id="tagline">Produced With That Good Ol’ Timey HTML5 & CSS3 ↵</p>
While this does avoid cluttering up the document outline with a
superfluous branch, it’s a little lacking in terms of semantics. You
might be thinking that the id
attribute helps define the element’s meaning by using a value of
tagline. But the id attribute cannot be used by the browser
to infer meaning for the element in question—it adds nothing to the
document’s semantics.
This is where the hgroup
element comes in. The hgroup element
tells the user agent that the headings nested within it form a composite
heading (a heading group, as it were), with the h1 being the primary parent element. This
prevents our document outline from becoming jumbled, and it helps us
avoid using nonsemantic elements in our page.
So any time you want to include a subheading without affecting the
document’s outline, just wrap the headings in an hgroup element; this will resolve the problem
without resorting to undesirable methods. Figure 3.5
shows the outline produced for the header, with the hgroup wrapping the two headings.

In addition to the structural elements we saw in Chapter 2 and the hgroup
element we’ve just covered, HTML5 introduces a number of new semantic
elements. Let’s examine some of the more useful ones.
The figure and figcaption elements are another pair of new
HTML5 elements that contribute to the improved semantics in HTML5. The
figure element is explained in the
spec as follows:
The element can […] be used to annotate illustrations, diagrams, photos, code listings, etc, that are referred to from the main content of the document, but that could, without affecting the flow of the document, be moved away from that primary content, e.g. to the side of the page, to dedicated pages, or to an appendix.
Think of charts, graphs, images to accompany text, or example
code. All those types of content might be good places to use figure and potentially figcaption.
The figcaption element is
simply a way to mark up a caption for a piece of content that appears
inside of a figure.
In order to use the figure
element, the content being placed inside it must have some relation to
the main content in which the figure
appears. If you can completely remove it from a document, and the
document’s content can still be fully understood, you probably shouldn’t
be using figure; you might, however,
need to use aside or another
alternative. Likewise, if the image or listing forms part of the flow of
the document, and the text would need rewording if you moved it, it’s
probably best to use another option.
Let’s look at how we’d mark up a figure inside an article:
<article>
  <hgroup>
    <h1>WAI-ARIA</h1>
    <h2>Web App Accessibility</h2>
  </hgroup>

  <p>Lorem ipsum dolor … </p>

  <p>As you can see in <a href="#fig1">Figure 1</a>,

  <figure id="fig1">
    <figcaption>Screen Reader Support for WAI-ARIA</figcaption>
    <img src="figure1.png" alt="JAWS: Landmarks 1/1, Forms 4/5 … ">
  </figure>

  <p>Lorem ipsum dolor … </p>
</article>
The mark element “indicates a
part of the document that has been highlighted due to its likely
relevance to the user’s current activity.” Admittedly, there are very
few uses we can think of for the mark
element. The most common is in the context of a search, where the
keywords that were searched for are highlighted in the results.
Avoid confusing mark with
em or strong; those elements add contextual
importance, whereas mark separates
the targeted content based on a user’s current browsing or search
activity.
For example, if a user has arrived at an article on your site from a Google search for the word “HTML5,” you might highlight words in the article using the mark element, like this:
<h1>Yes, You Can Use <mark>HTML5</mark> Today!</h1>
The mark element can be added
to the document either using server-side code, or JavaScript once the
page has loaded.
Two new elements added in HTML5 allow for marking up of data
that’s being measured or gauged in some way. The difference between them
is fairly subtle: progress is used
to describe the current status of a changing process that’s headed for
completion, regardless of whether the completion state is defined. The
traditional download progress bar is a perfect example of progress.
The
meter element,
meanwhile, represents an element whose range is known, meaning it has
definite minimum and maximum values. The spec gives the examples of disk
usage, or a fraction of a voting population—both of which have a
definite maximum value. Therefore, it’s likely you wouldn’t use meter to indicate an age, height, or
weight—all of which normally have unknown maximum values.
Let’s first look at progress.
The progress element can have a
max attribute to
indicate the point at which the task will be complete, and a
value attribute to
indicate the task’s status. Both of these attributes are optional.
Here’s an example:
<h1>Your Task is in Progress</h1>
<p>Status: <progress min="0" max="100" value="0"><span>0</span>%
↵</progress></p>
This element would best be used (along with some JavaScript) to
dynamically change the value of the percentage as the task progresses.
You’ll notice that the code includes
<span> tags, isolating
the number value; this facilitates targeting the number directly from
your script when you need to update it.
The meter element has
six associated attributes. In addition to max and value, it also allows use of min, high, low, and optimum.
The
min and
max attributes
reference the lower and upper boundaries of the range, while
value indicates the
current specified measurement. The
high and
low attributes
indicate thresholds for what is considered “high” or “low” in the
context. For example, your grade on a test can range from 0% to 100%
(max), but anything below 60% is
considered low and anything above 85% is considered high.
optimum refers to the
ideal value. In the case of a test score, the value of optimum would be 100.
Here’s an example of meter,
using the premise of disk usage:
<p>Total current disk usage: <meter value="63" min="0" max="320"
↵low="10" high="300" title="gigabytes">63 GB</meter>
Dates and times are invaluable components of web pages. Search engines are able to filter results based on time, and in some cases, a specific search result can receive more or less weight by a search algorithm depending on when it was first published.
The time element has been
specifically designed to deal with the problem of humans reading dates
and times differently from machines. Take the following example:
<p>We'll be getting together for our next developer conference on
↵12 October of this year.</p>
While humans reading this paragraph will understand when the event will take place, it would be less clear to a machine attempting to parse the information.
Here’s the same paragraph with the time element introduced:
<p>We’ll be getting together for our next developer conference on
↵<time datetime="2011-10-12">12 October of this year</time>.</p>
The time element also allows
you to express dates and times in whichever format you like while
retaining an unambiguous representation of the date and time behind the
scenes, in the
datetime attribute.
This value could then be converted into a localized or preferred form
using JavaScript, or by the browser itself, though currently no browsers
implement any special handling of the time element.
If you want to include a time along with the date, you would do it like this:
<time datetime="2011-10-12T16:24:34.014Z">12 October of this year.
↵</time>
In the above example, the T character is used
to indicate the start of the time. The format is HH:MM:SS with
milliseconds after the decimal point. The Z character
is optional and indicates that the time zone is Coordinated Universal
Time (UTC). To indicate a time zone offset (instead of UTC), you would
append it with a plus or minus, like this:
<time datetime="2011-10-12T16:24:34.014-04:00">12 October of
this year</time>
In addition to the datetime
attribute shown in the above examples, the time element allows use of the
pubdate attribute.
This is a Boolean attribute, and its existence indicates that the
content within the closest ancestor article element was published on the specified
date. If there’s no article element,
the pubdate attribute would apply
to the entire document.
For example, in the header of The HTML5
Herald, the issue’s publication date is a perfect candidate
for the time element with a pubdate attribute:
Because this element indicates the publication date of our
newspaper, we’ve added the pubdate
attribute. Any other dates referred to on the page—in the text of
articles, for example—would omit this attribute.
The time element has some
associated rules and guidelines:
-
You should not use
timeto encode unspecified dates or times (for example, “during the ice age” or “last winter”). -
The date represented cannot be “BC” or “BCE” (before the common era); it must be a date on the Gregorian Calendar.
-
The
datetimeattribute has to be a valid date string. -
If the
timeelement lacks adatetimeattribute, the element’s text content (whatever appears between the opening and closing tags) needs to be a valid date string.
The uses for the time element
are endless: calendar events, publication dates (for blog posts, videos,
press releases, and so forth), historic dates, transaction records,
article or content updates, and much more.
While new elements and APIs have been the primary focus of HTML5, this latest iteration of web markup has also brought with it changes to existing elements. For the most part, any changes that have been made have been done with backwards compatibility in mind, to ensure that the markup of existing content is still usable.
We’ve already considered some of the changes (the doctype declaration, character encoding, content types, and the document outline, for example). Let’s look at other significant changes introduced in the HTML5 spec.
In previous versions of HTML and XHTML, elements that were no longer recommended for use (and so removed from the spec), were considered “deprecated.” In HTML5, there is no longer any such thing as a deprecated element; the term now used is “obsolete.”
This may seem like an insignificant change, but the difference is important: while a deprecated element would be removed from the specification, an obsolete element will remain there. This is so that browser makers still have a standard way of rendering these elements consistently, even if their use is no longer recommended. For example, you can view information in the W3C’s specification on frames (an obsolete feature) at http://dev.w3.org/html5/spec/Overview.html#frames.
Although most browsers handled this situation just fine in the
past, it was never actually valid to place a block-level element inside
an
a element. Instead, to
produce valid HTML, you’d have to use multiple a elements and style the group to appear as a
single block.
In HTML5, you’re now permitted to wrap almost anything—other than
form elements or other links—in an a
element without having to worry about validation errors.
A few changes have been made in the way that bold text is
semantically defined in HTML5. There are essentially two ways to make
text bold in most browsers: using the b element, or using the strong element.
Although the b element was
never deprecated, before HTML5 it was discouraged in favor of strong. The b element previously was a way of saying “make
this text appear in boldface.” Since HTML markup is supposed to be all
about the meaning of the content, leaving the presentation to CSS, this
was unsatisfactory.
In HTML5, the b element has
been redefined to represent a section of text that is “stylistically
offset from the normal prose without conveying any extra
importance.”
The strong element, meanwhile,
still conveys more or less the same meaning. In HTML5, it represents
“strong importance for its contents.” Interestingly, the HTML5 spec
allows for nesting of strong
elements. So, if an entire sentence consisted of an important warning,
but certain words were of even greater importance, the sentence could be
wrapped in one strong element, and
each important word could be wrapped in its own nested strong.
Along with the modifications to the b and strong elements, changes have been made in the
way the i element is defined in
HTML5.
Previously, the i element was
used to simply render italicized text. As with b, this definition was unsatisfactory. In
HTML5, the definition has been updated to “a span of text in an
alternate voice or mood, or otherwise offset from the normal prose.” So
the appearance of the text has nothing to do with the semantic meaning,
although it may very well still be italic—that’s up to you.
An example of content that can be offset using i tags might be an idiomatic phrase from
another language, such as reductio ad
absurdum, a latin phrase meaning “reduction to the point
of absurdity.” Other examples could be text representing a dream
sequence in a piece of fiction, or the scientific name of a species in a
journal article.
The
em element is
unchanged, but its definition has been expanded to clarify its use. It
still refers to text that’s emphasized, as would be the case
colloquially. For example, the following two phrases have the exact same
wording, but their meanings change because of the different use of
em:
<p>Harry’s Grill is the best <em>burger</em> joint in town.</p>
<p>Harry’s Grill <em>is</em> the best burger joint in town.</p>
In the first sentence, because the word “burger” is emphasized, the meaning of the sentence focuses on the type of “joint” being discussed. In the second sentence, the emphasis is on the word “is,” thus moving the sentence focus to the question of whether Harry’s Grill really is the best of all burger joints in town.
Neither i nor em should be used to mark up a publication
title; instead, use cite (see the section called “
A cite for Sore
Eyes”).
Of all the four elements discussed here (b, i,
em, and strong), the only one that gives contextual
importance to its content is the strong element.
The big element was previously
used to represent text displayed in a large font. The big element is now obsolete and should not be
used. The small element, however, is
still valid, but has a different meaning.
Previously, small was intended
to describe “text in a small font.” In HTML5, it represents “side
comments such as small print.” Some examples where small might be used include information in
footer text, fine print, and terms and conditions. The small element should only be used for short
runs of text.
Although the presentational implications of small have been removed from the definition,
text inside small tags will more than
likely still appear in a smaller font than the rest of the
document.
For example, the footer of The HTML5 Herald
includes a copyright notice. Since this is essentially legal fine print,
it’s perfect for the small
element:
<small>© SitePoint Pty. Ltd.</small>
The cite element is another one
that’s been redefined in HTML5, accompanied by a fair bit of
controversy. In HTML4, the cite
element represented “a citation or a reference to other sources.” Within
the scope of that definition, the spec permitted a person’s name to be
marked up with cite (in the case of a
quotation attributed to an individual, for example).
HTML5 expressly forbids the use of cite for a person’s name, seemingly going
against the principle of backwards compatibility. Now the spec describes
cite as “the title of a work,” and
gives a whole slew of examples, including a book, a song, a TV show, and
a theatre production.
Some notable web standards advocates (including Jeremy Keith and
Bruce Lawson) have opposed this new definition forbidding people’s names
within cite. For more information on
the ongoing debate, see the page on this topic on the
WHATWG Wiki.
The existing dl (definition
list) element, along with its associated dt (term) and dd (description) children, has been redefined
in the HTML5 spec. Previously, in addition to terms and definitions, the
spec allowed the dl element to mark
up dialogue, but the spec now prohibits this.
In HTML5, these lists are no longer called “definition lists”; they’re now the more generic-sounding “description lists.” They should be used to mark up any kind of name-value pairs, including terms and definitions, metadata topics and values, and questions and answers.
We’ve introduced you to and expounded upon some of the more practical new elements and features. Now, in this section, we’ll touch on lesser-known elements, attributes, and features that have been added to the HTML5 spec.
This new element helps mark up a section of the document that’s hidden, but can be expanded to reveal additional information. The aim of the element is to provide native support for a feature common on the Web—a collapsible box that has a title, and more info or functionality hidden away.
Normally this kind of widget is created using a combination of markup and scripting. The inclusion of it in HTML5 intends to remove the scripting requirements and simplify its implementation for web authors.
Here’s how it might look:
<details>
  <summary>Some Magazines of Note</summary>
  <ul>
    <li><cite>Bird Watchers Digest</cite></li>
    <li><cite>Rowers Weekly</cite></li>
    <li><cite>Fishing Monthly</cite></li>
  </ul>
</details>
The example above would cause the contents of the
summary element to
appear to the user, with the rest of the content hidden. Upon clicking
summary, the hidden content
appears.
If details lacks a defined
summary, the user agent will define a
default summary (for example, “Details”). If you want the hidden content
to be visible by default, you can use the Boolean open attribute.
The summary element can only be
used as a child of details, and it
must be the first child, if used.
So far, details has little to
no support in browsers. A couple of JavaScript-based polyfills are available, including one by Mathias
Bynens.
Ordered lists, using the
ol element, are quite
common in web pages. HTML5 introduces a new Boolean attribute called
reversed that, when
present, reverses the order of the list items.
While we’re on the topic of ordered lists, HTML5 has brought back
the
start attribute,
deprecated in HTML4. The start
attribute lets you specify with which number your list should
begin.
Support is good for start,
but reversed has yet to be
implemented in most browsers.
The style element, used for
embedding styles directly in your pages, now allows use of a Boolean
attribute called scoped. Take the
following code example:
<h1>Page Title</h1>
<article>
  <style scoped>
    h1 { color: blue; }
  </style>
  <h1>Article Title</h1>
  <p>Article content.</p>
</article>
Because the scoped attribute
is present, the styles declared inside the style element will only apply to the parent
element and its children (if cascading rules permit), instead of the
entire document. This allows specific sections inside documents (like
the article in the above example) to
be easily portable along with their associated styles.
This is certainly a handy new feature, but as of this writing, no
browser supports the scoped
attribute. As a temporary solution, a jQuery-based polyfill is available at https://github.com/thingsinjars/jQuery-Scoped-CSS-plugin.
The script element now allows
the use of the async attribute,
which is similar to the existing
defer attribute.
Using defer specifies that the
browser should wait until the page’s markup is parsed before loading the
script. The new async attribute
allows you to specify that a script should load asynchronously (meaning
it should load as soon as it’s available), without causing other
elements on the page to delay while it loads. Both defer and async are Boolean attributes.
These attributes must only be used when the script element defines an external file. For
legacy browsers, you can include both async and defer
to ensure that one or the other is used,
if necessary. In practice, both attributes will have the effect of not
pausing the browser’s rendering of the page while scripts are
downloaded; however, async can
often be more advantageous, as it will load the script “in the
background” while other rendering tasks are taking place, and execute
the script as soon as it’s available.
The async attribute is
particularly useful if the script you’re loading has no other
dependencies, and it would benefit the user experience if the script is
loaded as soon as possible, rather than after the page loads.
In chapter two, we introduced you to a number of syntax changes in HTML5, and touched on some issues related to validation. Let’s expand upon those concepts a little more so that you can better understand how validating pages has changed.
The HTML5 validator is no longer concerned with code style. You can use uppercase, lowercase, omit quotes from attributes, leave tags open, and be as inconsistent as you like, and your page will often still be valid.
So, you ask, what does count as an error for the HTML5 validator? It will alert you to incorrect use of elements, elements included where they shouldn’t be, missing required attributes, incorrect attribute values, and the like. In short, the validator will let you know if your markup conflicts with the specification, so it’s still an extremely valuable tool when developing your pages.
However, since many of us are accustomed to the stricter validation rules imposed on XHTML documents, let’s go through some specifics. This way, you can understand what is considered valid in HTML5 that was invalid when checking XHTML-based pages:
-
Some elements that were required in XHTML-based syntax are no longer required for a document to pass HTML5 validation; examples include the
htmlandbodyelements. -
Void elements, or elements that stand alone and don’t contain any content, are not required to be closed using a closing slash; examples include
<meta>and<br>. -
Elements and attributes can be in uppercase, lowercase, or mixed case.
-
Quotes are unnecessary around attribute values, unless multiple space-delimited values are used, or a URL appears as a value and contains a query string with an equals (
=) character in it. -
Some attributes that were required in XHTML-based syntax are no longer required in HTML5; examples include the
typeattribute for thescriptelement, and thexmlnsattribute for thehtmlelement. -
Some elements that were deprecated and thus invalid in XHTML are now valid; one example is the
embedelement. -
Stray text that doesn’t appear inside any element would invalidate an XHTML document; this is not the case in HTML5.
-
Some elements that needed to be closed in XHTML can be left open without causing validation errors in HTML5; examples include
p,li, anddt. -
The
formelement isn’t required to have anactionattribute. -
Form elements, such as
input, can be placed as direct children of theformelement; in XHTML, another element (such asfieldsetordiv) was required to wrap form elements. -
The
textareaelement is not required to haverowsandcolsattributes. -
The
targetattribute, deprecated and thus invalid in XHTML, is now valid in HTML5. -
The ampersand character (&) doesn’t need to be encoded as
&if it appears as text on the page.
That’s a fairly comprehensive, though hardly exhaustive, list of differences between XHTML and HTML5 validation. Some are style choices, so you’re encouraged to choose a style and be consistent. We outlined some preferred style choices in the previous chapter, and you’re welcome to incorporate some if not all of those suggestions in your own HTML5 projects.
Tip: Lint Tools
If you want to validate your markup’s syntax style using stricter guidelines, you can use an HTML5 lint tool, such as http://lint.brihten.com/html/. At the time of writing, it’s still in development, but it works well. You can use it to check that your attributes and tags are lowercase, that void tags are self-closed, that Boolean attributes omit their value, that closing tags are never omitted—or any combination of these style rules. It can even ensure that your markup is indented consistently!
By now, we’ve gotten our heads around just about all the new semantic and syntactic changes in HTML5. Some of this information may be a little hard to digest straight away, but don’t worry! The best way to become familiar with HTML5 is to use it—you can start with your next project. Try using some of the structural elements we covered in the last chapter, or some of the text-level semantics we saw in this chapter. If you’re unsure about how exactly an element is meant to be used, go back and read the section about it, or better yet, read the specification itself. While the language is certainly drier than the text in this book (at least, we hope it is!), the specifications can give you a more complete picture of how a given element is intended to be used. Remember that the HTML5 specification is still in development, so some of what we’ve covered is still subject to change. The specifications will always contain the most up-to-date information.
In the next chapter, we’ll look at a crucial segment of new functionality introduced in HTML5: forms and form-related features.