
We’ve added quite a lot of decoration to The HTML5 Herald, but we’re still missing some key components to give it that really old-fashioned feel. To look like a real newspaper, the text of the articles should be laid out in narrow columns, and we should use some suitably appropriate fonts for the period.
In this chapter, we’ll finish up the look and feel of our website with
CSS3 columns and @font-face.
Since the early days of the Web, designers have been dreaming of creating sites with beautiful typography. But, as we all know too well, browsers are limited to rendering text in the fonts the user has installed on their system. In practical terms, this has limited most sites to a handful of fonts: Arial, Verdana, Times, Georgia, and a few others.
Over the years, we have come up with a number of clever workarounds for this problem. We created JPEGs and PNGs for site titles, logos, buttons, and navigation elements. When those elements required additional states or variants, we created even more images, or image sprites to ensure the page stayed snappy and responsive. Whenever the design or text changed, all those images had to be recreated.
This can be an acceptable solution for some elements on a page, but it’s just unrealistic to expect a designer to handcraft the title of every new article in Photoshop and then upload it to the site. So, for key page elements that need to change frequently, we were stuck with those same few fonts.
To fill this typographic void, some very cool font embedding scripts were created, like sIFR, based on Flash and JavaScript, and the canvas-based Cufón. While these methods have been a great stopgap measure, allowing us to include our own fonts, they had severe drawbacks. Sometimes they were tricky to implement, and they required that JavaScript be enabled and, in the case of sIFR, the Flash plugin be installed. In addition, they significantly slowed the page’s download and rendering.
Fortunately, there’s now a better way:
@font-face is a pure CSS solution for embedding
fonts—and it’s supported on every browser with any kind of market share,
from IE6 on up.
We’ll be including two embedded fonts on The HTML5 Herald site: League Gothic from The League of Movable Type, and Acknowledgement Medium by Ben Weiner of Reading Type. The two fonts are shown, respectively, in Figure 9.1 and Figure 9.2.


We’ll now look at how we can embed these fonts and use them to power any of the text on our site, just as if they were installed on our users’ machines.
@font-face is one of several CSS
at-rules, like @media,
@import, @page, and the one we’ve
just seen, @keyframes.
At-rules are ways of encapsulating several rules together
in a declaration to serve as instructions to the browser’s CSS
processor. The @font-face at-rule allows us to
specify custom fonts that we can then include in other declaration
blocks.
To include fonts using @font-face, you have
to:
-
load the font file onto your servers in a variety of formats to support all the different browsers
-
name, describe, and link to that font in an
@font-facerule -
include the font’s name in a
font-familyproperty value, just as you would for system fonts
You already know how to upload a file onto a server, so we’ll
discuss the details of the various file types in the next section. For
now, we’ll focus on the second and third steps so that you can become
familiar with the syntax of @font-face.
Here’s an example of an @font-face
block:
@font-face {
  font-family: 'fontName';
  src: source;
  font-weight: weight;
  font-style: style;
}
The font family and source are required, but the weight and style are optional.
You need to include a separate @font-face
at-rule for every font you contain in your site. You’ll also have to
include a separate at-rule for each variation of the font—regular, thin,
thick, italic, black, and so on. The HTML5 Herald
will require two imported fonts, so we’ll include two
@font-face blocks:
The
font-family part of the
@font-face at-rule declaration is slightly different
from the font-family property with which you’re
already familiar. In this case, we’re declaring a
name for our font, rather than assigning a font with a given name to an
element. The font name can be anything you like—it’s only a reference to
a font file, so it needn’t even correspond to the name of the font. Of
course, it makes sense to use the font’s name to keep your CSS readable
and maintainable. It’s good to settle on a convention and stick to it
for all your fonts. For our two fonts, we’ll use camel case:
@font-face {
  font-family: 'LeagueGothic';
}

@font-face {
  font-family: 'AcknowledgementMedium';
}
Now that we have a skeleton laid out for our
@font-face rules, and we’ve given each of them a
name, it’s time to link them up to the actual font files. The
src property can take several
formats. Additionally, you can declare more than one source. If the
browser fails to find the first source, it will try for the next one,
and so on, until it either finds a source, or it runs out of
options.
Let’s add more formats to our League Gothic declaration:
@font-face {
  font-family: 'LeagueGothicRegular';
  src: url('../fonts/League_Gothic-webfont.eot') format('eot'),
       url('../fonts/League_Gothic-webfont.woff') format('woff'),
       url('../fonts/League_Gothic-webfont.ttf') format('truetype'),
       url('../fonts/League_Gothic-webfont.svg#webfontFHzvtkso')
↵format('svg'),
}
There are four font sources listed in the code block above. The first declaration is an EOT font declaration, a proprietary format for Internet Explorer, and the only file type understood by IE4–8.
Then we define the WOFF (Web Open Font Format, an emerging standard), OTF (OpenType), TTF (TrueType), and SVG (Scalable Vector Graphics) font files. While most desktop browsers will use one of the first three declarations, be sure to include the SVG format, which was originally the only format supported by the iPhone.[10]
Table 9.1 shows a breakdown of browser support for different formats. As you can see, there’s no single format that’s supported in every browser, so we need to provide a number of formats, as we did with video in Chapter 5.
Table 9.1. Browser support for font formats
| IE | Safari | Chrome | Firefox | Opera | iOS | |
|---|---|---|---|---|---|---|
@font-face
| 4+ | 3.1+ | 4+ | 3.5+ | 10+ | 3.2+ |
| WOFF | 9+ | 6+ | 6+ | 3.6+ | 11.1+ | |
| OTF | 3.1+ | 4+ | 3.5+ | 10+ | 4.2+ | |
| TTF | 9+? | 3.1+ | 4+ | 3.5+ | 10+ | 4.2+ |
| SVG | 3.1+ | 4+ | 10+ | 3.2+ | ||
| EOT | 4+ |
Adding these extra font formats ensures support for every browser,
but unfortunately it will cause problems in versions of IE older than
IE9. Those browsers will see everything between the first
url(' and the last ') as one URL,
so will fail to load the font. At first, it would seem that we’ve been
given the choice between supporting IE and supporting every other
browser, but fortunately there’s a solution. Detailed in a FontSpring
blog post, it involves adding a query string to the end of the
EOT URL. This tricks the browser into thinking that the rest of the
src property is a continuation of that query
string, so it goes looking for the correct URL and loads the
font:
@font-face {
  font-family: 'LeagueGothicRegular';
  src: url('../fonts/League_Gothic-webfont.eot?#iefix')
↵format('eot'),
       url('../fonts/League_Gothic-webfont.woff') format('woff'),
       url('../fonts/League_Gothic-webfont.ttf') format('truetype'),
       url('../fonts/League_Gothic-webfont.svg#webfontFHzvtkso')
↵format('svg'),
}
This syntax has one potential point of failure: IE9 has a feature
called
compatibility mode, in which it
will attempt to render pages the same way IE7 or 8 would. This was
introduced to prevent older sites appearing broken in IE9’s more
standards-compliant rendering. However, IE9 in compatibility mode
doesn’t reproduce the bug in loading the EOT font, so the above
declaration will fail. To compensate for this, you can add an additional
EOT URL in a separate src property:
@font-face {
  font-family: 'LeagueGothicRegular';
  src: url('../fonts/League_Gothic-webfont.eot'),
  src: url('../fonts/League_Gothic-webfont.eot?#iefix')
↵format('eot'),
       url('../fonts/League_Gothic-webfont.woff') format('woff'),
       url('../fonts/League_Gothic-webfont.ttf') format('truetype'),
       url('../fonts/League_Gothic-webfont.svg#webfontFHzvtkso')
↵format('svg'),
}
This may be an unnecessary precaution, as generally a user would
need to deliberately switch IE to compatibility mode while viewing your
site for this issue to arise. Alternatively, you could also force IE out
of compatibility mode by adding this meta element to your document’s head:
<meta http-equiv="X-UA-Compatible" content="IE=Edge">
It’s also possible to achieve the same result by adding an extra HTTP header; this can be done with a directive in your .htaccess file (or equivalent):
<IfModule mod_setenvif.c>
  <IfModule mod_headers.c>
    BrowserMatch MSIE ie
    Header set X-UA-Compatible "IE=Edge"
  </IfModule>
</IfModule>
Font property descriptors—including
font-style, font-variant,
font-weight, and others—can optionally be added to
define the characteristics of the font face, and are used to match
styles to specific font faces. The values are the same as the equivalent
CSS properties:
@font-face {
  font-family: 'LeagueGothicRegular';
  src: url('../fonts/League_Gothic-webfont.eot'),
  src: url('../fonts/League_Gothic-webfont.eot?#iefix')
↵format('eot'),
       url('../fonts/League_Gothic-webfont.woff') format('woff'),
       url('../fonts/League_Gothic-webfont.ttf') format('truetype'),
       url('../fonts/League_Gothic-webfont.svg#webfontFHzvtkso')
↵format('svg'),
  font-weight: bold;
  font-style: normal;
}
Again, the behavior is different from what you’d expect. You are not telling the browser to make the font bold; rather, you’re telling it that this is the bold variant of the font. This can be confusing, and the behavior can be quirky in some browsers.
However, there is a reason to use the
font-weight or font-style
descriptor in the @font-face rule declaration. You
can declare several font sources for the same
font-family name:
@font-face {
  font-family: 'CoolFont';
  font-style: normal;
  src: url(fonts/CoolFontStd.ttf);
}

@font-face {
  font-family: 'CoolFont';
  font-style: italic;
  src: url(fonts/CoolFontItalic.ttf);
}

.whichFont {
  font-family: 'CoolFont';
}
Notice that both at-rules use the same font-family name, but
different font styles. In this example, the
.whichFont element will use the
CoolFontStd.ttf font, because it matches the style
given in that at-rule. However, if the element were to inherit an italic
font style, it would switch to using the
CoolFontItalic.ttf font instead.
Also available is the unicode-range descriptor,
which is employed to define the range of Unicode characters supported by
the font. If this property is omitted, the entire range of characters
included in the font file will be made available.
We won’t be using this on our site, but here’s an example of what it looks like:
unicode-range: U+000-49F, U+2000-27FF, U+2900-2BFF, U+1D400-1D7FF;
Once the font is declared using the @font-face
syntax, you can then refer to it as you would any normal system font in
your CSS: include it in a “stack” as the value of a
font-family property. It’s a good idea to declare a
fallback font or two in case your embedded font fails to load.
Let’s look at one example from The HTML5 Herald:
h1 {
  text-shadow: #fff 1px 1px;
  font-family: LeagueGothic, Tahoma, Geneva, sans-serif;
  text-transform: uppercase;
  line-height: 1;
}
Our two embedded fonts are used in a number of different places in our stylesheet, but you get the idea.
We’ve included the markup for two fonts on our site, but we’re yet
to put the font files themselves in place. We found both of these fonts
freely available online. They are both licensed as
freeware—that is, they’re free to use for both
personal and commercial use. Generally, you should consider this the
only kind of font you should use for @font-face,
unless you’re using a third-party service.
How is @font-face any different from using a
certain font in an image file? By having a website on the Internet, your
font source files are hosted on publicly available web servers, so in
theory anyone can download them. In fact, in order to render the text on
your page, the browser has to download the font
files. By using @font-face, you’re distributing the
font to everyone who visits your site. In order to include a font on
your website, then, you need to be legally permitted to distribute the
font.
Owning or purchasing a font doesn’t mean you have the legal right to redistribute it—in the same way that buying a song on iTunes doesn’t grant you the right to throw it up on your website for anyone to download. Licenses that allow you to distribute fonts are more expensive (and rarer) than licenses allowing you to use a font on one computer for personal or even commercial use.
However, there are several websites that have free downloadable
web fonts with Creative Commons,[11] shareware, or freeware licensing. Alternatively, there are
paid and subscription services that allow you to purchase or rent fonts,
generally providing you with ready-made scripts or stylesheets that make
them easy to use with @font-face.
A few sites providing web font services include Typekit, Typotheque, Webtype, Fontdeck, and Fonts.com.
Google’s web
fonts directory has a growing collection of fonts provided free
of charge and served from Google’s servers. It simply provides you with
a URL pointing to a stylesheet that includes all the required
@font-face rules, so all you need to do is add a
link element to your document in
order to start using a font.
When selecting a service, font selection and price are certainly important, but there are other considerations. Make sure that any service you choose to use takes download speed into consideration. Font files can be fairly large, potentially containing several thousand characters. Good services allow you to select character subsets, as well as font-style subsets, to decrease the file size. Bear in mind, also, that some services require JavaScript in order to function.
If you have a font that you’re legally allowed to redistribute, there’ll be no need for you to use any of the font services above. You will, however, have to convert your font into the various formats required to be compatible with every browser on the market. So how do you go about converting your fonts into all these formats?
One of the easiest tools for this purpose is Font Squirrel’s @font-face generator. This service allows you to select fonts from your desktop with a few clicks of your mouse and convert them to TTF, EOT, WOFF, SVG, SVGZ, and even a Base64 encoded version.[12]
By default, the Optimal option is selected
for generating an @font-face kit; however, in some
cases you can decrease the file sizes by choosing
Expert… and creating a character subset. Rather
than including every conceivable character in the font file, you can
limit yourself to those you know will be used on your site.
For example, on The HTML5 Herald site, the Acknowledgement Medium font is used only in specific ad blocks and headings, so we need just a small set of characters. All the text set in this font is uppercase, so let’s restrict our font to uppercase letters, punctuation, and numbers, as shown in Figure 9.3.

Figure 9.4 below shows how the file sizes of our subsetted fonts stack up against the default character sets. In our case, the uppercase-and-punctuation-only fonts are 25–30% smaller than the default character sets. Font Squirrel even lets you specify certain characters for your subset, so there’s no need to include all the letters of the alphabet if you know you won’t use them.

For the League Gothic font, we’ll need a more expanded character subset. This font is used for article titles, which are all uppercase like our ads, so we can again omit lowercase letters; however, we should consider that content for titles may include a wider range of possible characters. Moreover, users might use in-browser tools, or Google Translate, to translate the content on the page—in which case other characters might be required. So, for League Gothic, we’ll go with the default Basic Subsetting—this will give you all the characters required for Western languages.
When employing @font-face, as a general
rule minimize font file size as much as reasonably possible, while
making sure to include enough characters so that a translated version of
your site is still accessible.
Once you’ve uploaded your font for processing and selected all your options, press Download Your Kit. Font Squirrel provides a download containing: your font files with the extensions requested, a demo HTML file for each font face style, and a stylesheet from which you can copy and paste the code directly into your own CSS.
Tip: Font Squirrel’s Font Catalogue
In addition to the @font-face generator, the
Font Squirrel site includes a catalog of hand-picked free fonts whose
licenses allow for web embedding. In fact, both of the fonts we’re
using on The HTML5 Herald can also be found on
Font Squirrel, with ready-made @font-face kits to
download without relying on the generator at all.
To target all browsers, make sure you’ve created TTF,
WOFF, EOT, and SVG font file formats. Once you’ve created the font
files, upload the web fonts to your server. Copy and paste the CSS
provided, changing the paths to point to the folder where you’ve put
your fonts. Make sure the font-family name specified in the
@font-face rule matches the one you’re using in your
styles, and you’re good to go!
Note:
Troubleshooting @font-face
If your fonts are failing to display in any browser, the problem could very well be the path in your CSS. Check to make sure that the font file is actually where you expect it to be. Browser-based debugging tools—such as the Web Inspector in WebKit, Dragonfly in Opera, or the Firebug Firefox extension—will indicate if the file is missing.
If you’re sure that the path is correct and the file is where it’s supposed to be, make sure your server is correctly configured to serve up the fonts. Windows IIS servers won’t serve up files if they’re unable to recognize their MIME type, so try adding WOFF and SVG to your list of MIME types (EOT and TTF should be supported out of the box):
.woff  application/x-font-woff
.svg   image/svg+xml
Finally, some browsers require that font files be served from the same domain as the page they’re embedded on.
Note: Browser-based Developer Tools
Safari, Chrome, and Opera all come standard with tools to help save you time as a web developer. Chrome and Opera already have these tools set up. Simply right-click (or control-click on a Mac) and choose . A panel will open up at the bottom of your browser, highlighting the HTML of the element you’ve selected. You’ll also see any CSS applied to that element.
While Safari comes with this tool, it needs to be manually enabled. To turn it on, go to > , and then click the Advanced tab. Be sure that you check the Show Develop menu in menu bar checkbox.
Firefox comes without such a tool. Luckily, there’s a free Firefox plugin called Firebug that provides the same functionality. You can download Firebug at http://getfirebug.com/.
Embedded fonts can improve performance and decrease maintenance time when compared to text as images. Remember, though, that font files can be big. If you need a particular font for a banner ad, it may make more sense (given the limited amount of text required) to simply create an image instead of including font files.
When pondering the inclusion of multiple font files on your site, consider performance. Multiple fonts will increase your site’s download time, and font overuse can be tacky. Furthermore, the wrong font can make your content difficult to read. For body text, you should almost always stick to the usual selection of web-safe fonts.
Another factor worth considering is that browsers are unable to
render the @font-face font until it has been
downloaded entirely. They’ll behave differently in how they display your
content before the download is complete: some browsers will render the
text in a system font, while others won’t render any text at all.
This effect is referred to as a
“flash of unstyled text,” or FOUT, a term coined by Paul
Irish.[13] To try to prevent this from happening (or to minimize its
duration), make your file sizes as small as possible, Gzip them, and
include your @font-face rules in CSS files as high up
as possible in your markup. If there’s a script above the @font-face
declaration in the source, IE experiences a bug, whereby the page won’t
render anything until the font has downloaded—so be
sure your fonts are declared above any scripts on your page.
Another option to mitigate @font-face’s impact
on performance is to defer the font file download until after the page
has rendered. This may be unviable for your designer or client, however,
as it may result in a more noticeable FOUT, even if the page loads
faster overall.[14]
Of course, we don’t want to scare you away from using
@font-face, but it’s important that you avoid using
this newfound freedom to run wild without regard for the consequences.
Remember that there are trade-offs, so use web fonts where they’re
appropriate, and consider the available alternatives.
Nothing says “newspaper” like a row of tightly packed columns of text. There’s a reason for this: newspapers break articles into multiple columns because lines of text that are too long are hard to read. Browser windows can be wider than printed books, and even as wide as some newspapers—so it makes sense for CSS to provide us with the ability to flow our content into columns.
You may be thinking that we’ve always been able to create column
effects using the
float property. But the behavior of
floats is subtly different from what we’re after. Newspaper-style columns
have been close to impossible to accomplish with CSS and HTML without
forcing column breaks at fixed positions. True, you could break an article
into divs, floating each one to make it
look like a set of columns. But what if your content is dynamic? Your
back-end code will need to figure out where each column should begin and
end in order to insert the requisite div tags.
With CSS3 columns, the browser determines when to end one column and begin the next without requiring any extra markup. You retain the flexibility to change the number of columns as well as their width, without having to go back in and alter the page’s markup.
For now, we’re mostly limited to splitting content across a few columns, while controlling their widths and the gutters between them. As support broadens, we’ll be able to break columns, span elements across multiple columns, and more. Support for CSS3 columns is moderate: Firefox and WebKit have had support via vendor-prefixed properties for years, while Opera has just added support in 11.10 (without a vendor prefix), and IE still offers no support.
Almost all the content on the main page of The HTML5 Herald is broken into columns. Let’s dig deeper into the properties that make up CSS3 columns and learn how to create these effects on our site.
The column-count property specifies the
number of columns desired, and the maximum number of columns allowed.
The default value of auto means that the element has
one column. Our leftmost articles are broken into three columns, and the
article below the ad blocks has two columns:
#primary article .content {
  -webkit-column-count: 3;
  -moz-column-count: 3;
  column-count: 3;
}

#tertiary article .content {
  -webkit-column-count: 2;
  -moz-column-count: 2;
  column-count: 2;
}
This is all we really need to create our columns. By default, the columns will have a small gap between them. The total width of the columns combined with the gaps will take up 100% of the width of the element.
Yet, there are a number of other properties we can use for more granular control.
The column-gap property specifies the width
of the space between columns:
#primary article .content,
#tertiary article .content {
  -webkit-column-gap: 10px;
  -moz-column-gap: 10px;
  column-gap: 10px;
}
Declare the width in length units, such as ems or pixels, or use
the term normal. It’s up to the browser to determine
what normal means, but the spec suggests 1em. We’ve
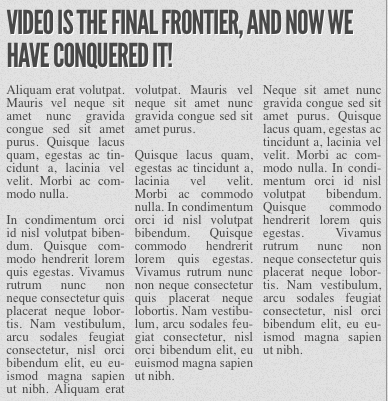
declared our gaps to be 10px wide. The resulting columns are shown in
Figure 9.5.
The column-width property is like having a
min-width for your columns. The browser will
include as many columns of at least the given width as it can to fill up
the element—up to the value of the column-count
property. If the columns need to be wider to fill up all the available
space, they will be.
For example, if we have a parent that is 400 pixels wide, a
10-pixel column gap, and the column-width is
declared as 150px, the browser can fit two
columns:
The browser rounds down to two columns, making columns that are as
large as possible in the allotted space; in this case that’s 195px for
each column—the total width minus the gap, divided by the number of
columns. Even if the column-count were set to
3, there would still only be two columns, as there’s
not enough space to include three columns of the specified width. In
other words, you can think of the column-count
property as specifying the maximum column
count.
The only situation in which columns will be narrower than the
column-width is if the parent element itself is too
narrow for a single column of the specified width. In this case, you’ll
have one column that fills the whole parent element.
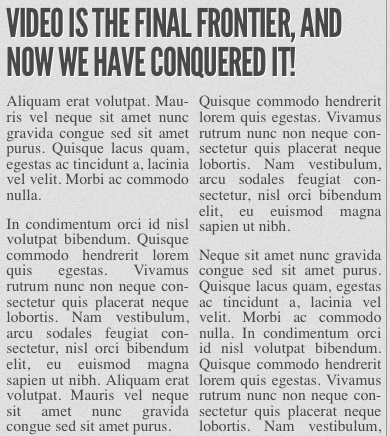
It’s a good idea to declare your column-width
in ems, to ensure a minimum number of characters for each line in a
column. Let’s add a column-width of
9em to our content columns:
#primary article .content,
#tertiary article .content {
  …
  -webkit-column-width: 9em;
  -moz-column-width: 9em;
  column-width: 9em;
}
Now, if you increase the font size in your browser, you’ll see that the number of columns is decreased as required to maintain a minimum width. This ensures readability, as shown in Figure 9.6.
The columns shorthand property is a composite
of the column-width and
column-count properties. Declare the two
parameters—the width of each column and the number of columns—as
described above.
At the time of this writing, this compound property is
only supported in WebKit, so you will need to at least continue
providing separate properties for the -moz-
implementation:
#primary article .content {
  -webkit-columns: 3 9em;
  -moz-column-count: 3;
  -moz-column-width: 9em;
  columns: 3 9em;
}
Rather than specifying different properties for
-webkit- and -moz-, you might find
it simpler to just stick with the separate
column-width and column-count
properties for now. It’s up to you.
With the above declarations—and no height
specified on the element—browsers will balance the column heights
automatically, so that the content in each column is approximately equal
in height.
But what if a height is declared? When the
height property is set on a multicolumn block, each
column is allowed to grow to that height and no further before a new
column is added. The browser starts with the first column and creates as
many columns as necessary, creating only the first column if there is
minimal text. Finally, if too little space is allocated, the content
will overflow from the box—or be clipped if overflow:
hidden; is set.
If you want to declare a height on your
element, but would also like the content to be spread across your
columns, you can use the
column-fill property. When supported,
and set to balance, the browser will balance the
height of the columns as though there were no
height declared.
Note: Margins and Padding
Even with a height declared, columns may
still not appear to have exactly the desired height, because of the
bottom margins on paragraphs. WebKit currently splits margins and
padding between columns, sometimes adding the extra spacing at the top
of a following column. Firefox allows margins to go beyond the bottom
of the box, rather than letting them show up at the top of the next
column, which we think makes more sense.
As with the column-width, you may also want
to declare your height in ems instead of pixels;
this way, if your user increases the font size, they are less likely
to have content clipped or overflowing.
Beyond the core count,
width, and gap properties,
CSS3 provides us with a few additional features for laying out
multicolumn content, some of which are yet to be supported.
Column rules are essentially borders
between each column. The column-rule property
specifies the color, style, and width of the column rules. The rule
will appear in the middle of the column gap. This property is actually
shorthand for the column-rule-color,
column-rule-style, and
column-rule-width properties.
The syntax for the value is exactly the same as for
border and the related
border-width, border-style,
and border-color properties. The width can be any
length unit, just like border-width, including
the key terms of medium, thick,
and thin. And the color can be any supported color
value:
-webkit-column-rule: 1px solid #CCCCCC;
-moz-column-rule: 1px solid #CCCCCC;
column-rule: 1px solid #CCCCCC;
There are three column-breaking properties that allow developers
to define where column breaks should appear. The
break-before, break-after,
and break-inside properties take a limited number
of key terms as values to define whether a column break can and should
occur before, after, or inside an element, respectively. Rather than
being applied to the same element on which we defined our primary
column properties, they’re applied to other elements nested inside
it.
The values available are the same as for
page-break-after,
page-break-before, and
page-break-inside in CSS 2.1:
auto, always,
avoid, left, and
right. CSS3 also adds a few new possible values for
these properties: page, column,
avoid-page, and avoid-column.
The page and column values
function like always, and will force a break. The
difference is that page will only force page breaks
and column applies only to columns. This gives you
a bit more flexibility in how you manage breaks.
avoid-page and avoid-column are
similar, except that they function like
avoid.
For example, you might want to avoid a column break occurring
immediately after an h2 element in
your content. Here’s how you’d do that:
.columns {
  column-count: 3;
  column-gap: 5px;
}

.columns h2 {
  break-after: avoid;
}
The only browser engine that currently supports column
breaks is WebKit. As well as being vendor-prefixed, the WebKit
properties also take a different syntax from what’s in the proposed
specifications (note the addition of the word
column to the property names):
-webkit-column-break-after: always;
-webkit-column-break-before: auto;
-webkit-column-break-inside: never;
The column-span property will make it
possible for an element to span across several columns. If
column-span: all; is set on an element, all content
that comes before that element in the markup
should be in columns above that element. All
content in columns appearing in the markup after
the element should be in columns below the
spanned element.
Currently, column-span is only
supported in WebKit (as -webkit-column-span).
Because it results in a very different appearance when it’s
unsupported, it’s probably best to avoid using it for now—unless you
can be sure that all your visitors will be using WebKit.
For example, for the first article on The HTML5
Herald, we could have applied the column properties to the
article element rather than the
.content
div,
and used column-span to ensure that the video
spanned across the full width of the article. However, this would
appear badly broken in browsers that support columns but not
spanning—like Firefox—so we instead opted to separate the video from
the column content.
If you’ve been following along with our examples, you might notice that some of your blocks of text have ugly holes in them, like the one shown in Figure 9.7.
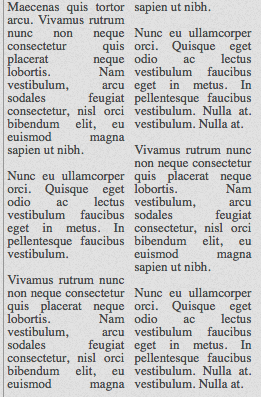
This problem occurs when text with text-align:
justify; is set in very narrow columns—as we’re doing for
The HTML5 Herald. This is because browsers don’t
know how to hyphenate words in the same way that word processors do, so
they space words out awkwardly to ensure that the left and right edges
stay justified.
For The HTML5 Herald, we’ve used a JavaScript library called Hyphenator to hyphenate words and keep our text looking tidy. This may, however be unnecessary for your site—our columns are extremely narrow, as we’re trying to replicate an old-style newspaper. Few real-world sites would likely need justified columns that narrow, but if you ever come across this issue, it’s good to know that there are solutions available.
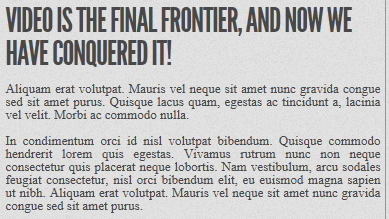
While columns still have limited browser support, there’s no harm including them in your sites unless your designer is a stickler for detail. Columns can be viewed as a progressive enhancement: making long lines easier to read. Those with browsers that lack support for columns will be none the wiser about what they’re missing. For example, The HTML5 Herald will have no columns when viewed in Internet Explorer 9, as Figure 9.8 shows—but the site certainly doesn’t look broken, it’s simply adapted to the capabilities of the browser.
If, however, columns are an important feature of your design, and must be provided to all visitors, there are scripts that can help, such as Columnizer, a jQuery plugin by Adam Wulf.
At this point, we’ve added a number of CSS3 enhancements to The HTML5 Herald. Along the way, we’ve filled in some knowledge gaps by presenting aspects of CSS3 that were outside the scope of our sample site. So while we’re on the topic of columns, it’s fitting that we introduce another CSS3 feature that’s received much attention among designers targeting audiences on various devices.
In Chapter 1, we talked about the growth rate of mobile devices and the importance of considering the needs of mobile users. With CSS3 media queries, you can do just that—create a layout that resizes to accommodate different screen resolutions.
Media queries are at the heart of a recent design trend called responsive web design. This is when all page elements, including images and widgets, are designed and coded to resize and realign seamlessly and elegantly, depending on the capabilities and dimensions of the user’s browser.
Before CSS3, a developer could specify a media type for a
stylesheet using the media
attribute. So you might have come across a link element that looked like this:
<link rel="stylesheet" href="print.css" media="print">
Notice that the media type is
specified as print. Acceptable
values in addition to print include
screen, handheld, projection, all, and a number of others you’ll see less
often, if ever. The media attribute
allows you to specify which stylesheet to load based on the type of
device the site is being viewed on. This has become a fairly common
method for serving a print stylesheet.
With CSS3’s media queries you can, according to the W3C spec, “extend the functionality of media types by allowing more precise labeling of style sheets.” This is done using a combination of media types and expressions that check for the presence of particular media features. So media queries let you change the presentation (the CSS) of your content for a wide variety of devices without changing the content itself (the HTML).
Let’s use the example from above, and implement a simple media query expression:
<link rel="stylesheet" href="style.css" media="screen and (color)">
This tells the browser that the stylesheet in question should be
used for all screen devices that are in color. Simple—and it should
cover nearly everyone in your audience. You can do the same using
@import:
@import url(color.css) screen and (color);
Additionally, you can implement media queries using the
@media at-rule, which we touched on earlier in this
chapter when discussing @font-face.
@media is probably the most well-known usage for
media queries, and is the method you’ll likely use most often:
@media handheld and (max-width: 380px) {
  /* styles go here */
}
In the example above, this expression will apply to all handheld devices that have a maximum display width of 380 pixels. Any styles within that block will apply only to the devices that match the expression.
Here are a few more examples of media queries using
@media, so that you can see how flexible and varied
the expressions can be. This style will apply only to screen-based
devices that have a minimum device width (or screen width) of 320px and
a maximum device width of 480px:
@media only screen and (min-device-width: 320px) and
↵(max-device-width: 480px) {
  /* styles go here */
}
Here’s a slightly more complex example:
@media only screen and (-webkit-min-device-pixel-ratio: 1.5),
↵only screen and (min-device-pixel-ratio: 1.5) {
  /* styles go here */
}
In the above example, we use the only keyword,
along with the and keyword in addition to a
comma—which behaves like an or keyword. This code
will specifically target the iPhone 4’s higher resolution
display, which could come in handy if you want that device to display a
different set of images.
Using the above syntax, media queries allow you to change the layout of your site or application based on a wide array of circumstances. For example, if your site uses a two-column layout, you can specify that the sidebar column drop to the bottom and/or become horizontally oriented, or you can remove it completely on smaller resolutions. On small devices like smartphones, you can serve a completely different stylesheet that eliminates everything except the bare necessities.
Additionally, you can change the size of images and other elements that aren’t normally fluid to conform to the user’s device or screen resolution. This flexibility allows you to customize the user experience for virtually any type of device, while keeping the most important information and your site’s branding accessible to all users.
Support for media queries is very good:
-
IE9+
-
Firefox 3.5+
-
Safari 3.2+
-
Chrome 8+
-
Opera 10.6+
-
iOS 3.2+
-
Opera Mini 5+
-
Opera Mobile 10+
-
Android 2.1+
The only area of concern is previous versions of Internet Explorer. There are two options for dealing with this: you can supply these versions of IE with a “default” stylesheet that’s served without using media queries, providing a layout suitable for the majority of screen sizes, or you can use a JavaScript-based polyfill. One such ready-made solution can be found at http://code.google.com/p/css3-mediaqueries-js/.
Thus, by taking advantage of CSS3 media queries, you can easily create a powerful way to target nearly every device and platform conceivable.
In a book like this, we can’t possibly describe every aspect of media queries. That could be another book in itself—and an important one at that. But if you’d like to look into media queries a little further, be sure to check out the following articles:
We’ve now covered all the new features in CSS that went into making The HTML5 Herald—and quite a few that didn’t. While we haven’t covered everything CSS3 has to offer, we’ve mastered several techniques that you can use today, and a few that should be usable in the very near future. Remember to check the specifications —as these features are all subject to change—and keep up to date with the state of browser support. Things are moving quickly for a change, which is both a great boon and an additional responsibility for web developers.
Up next, we’ll switch gears to cover some of the new JavaScript APIs. While, as we’ve mentioned, these aren’t strictly speaking part of HTML5 or CSS3, they’re often bundled together when people speak of these new technologies. Plus, they’re a lot of fun, so why not get our feet wet?
[10] The iPhone recently expanded support to include OTF in 4.2, but it still makes sense to include SVG for the time being.
[11] If you’re unfamiliar with Creative Commons licenses, you can find out more at http://creativecommons.org/.
[12] Base64 encoding is a way of including the entire contents of a font file directly in your CSS file. Sometimes this can provide performance benefits by avoiding an extra HTTP request, but that’s beyond the scope of this book. Don’t sweat it, though—the files generated by the default settings should be fine for most uses.
[14] For more on @font-face and performance, as
well as an example of how to “lazy load” your font files, see http://www.stevesouders.com/blog/2009/10/13/font-face-and-performance/.