
Chapter Eight
Working Practices
The working practices presented in this chapter are commonly accepted guidelines, or good tips, for you to think about while you are editing. Some offer specific techniques to follow, while others simply suggest some good habits that you may consider as you work. You may not encounter these precise scenarios on every job or in each motion media project, but you should be aware that they may come up. You will learn how to recognize them and you will find ways to address them appropriately. The working practices have been developed over time and have been found to work within many editing styles and within different genres. Each project should be viewed with fresh eyes and you will be left to judge whether or not these working practices apply to the piece that you are editing.
It should be noted that in today’s highly visual media marketplace there are many venues where motion images are displayed. The variety of television programming, webisodes, commercials, short films, feature films, documentaries, promotional videos, broadcast news packages, etc. all require some degree of editing before they are experienced by the viewing public. As you advance in your editing career, you will learn what each of these program types requires for its individual editorial workflow and established styles, etc. Starting with the following section of working practices as a solid base, you will be in a good position to fine-tune and augment your own list of editing “dos” and “don’ts.”
Finally, there will be cases where an editor has done everything right – the correct type of edit, the correct elements, etc. – so that in theory the cut or dissolve or wipe should work. But it does not. One of the skills of an editor is to analyze the material and find out why the awkward edit exists. Of course, it could be that an exact cause cannot be found, but it is still up to you to find a solution. Editing is not a perfect craft. There is always room for creativity and discovery, and that is part of the fun of the process.
1. Pay Careful Attention to Media and Project Organization
Reason
As much as editing is about creative, visual storytelling, the process relies heavily on efficiency and timeliness. Establishing good habits of project asset management and organization will help an editor to work more confidently through any project.
Solution
Known drive allocations, clear folder structures, and purposeful naming conventions across the board can go a long way in helping any person involved with the post-production workflow to stay on top of his or her project’s materials. Solid organization is key – especially if more than one person has to share time working on the video piece.
Whenever possible, original source media files need to have a complete set of copies on another drive as back-up. Keep your functional set of source files in the same folder on the same drive throughout the edit. Give your project a name that will be short and clear to all who need to access it. It can be helpful to pre-create bins/folders inside your project for some of the most common assets: footage, sequence versions, music, SFX, titles, imported graphics, etc. Using a date as part of a name (for a bin or sequence) can help you to figure out what is old and what is most recent. Many editing software apps have the ability to color code files, sort and sift bin contents, or make duplicates of pointer or source files with different names.
Exception
No exceptions. Even the most simple or quick project should follow your same good habits of organization. Keep everything where it belongs and you will reduce your risks of headaches and lower your stress levels.
2. Learn and Use Keyboard Shortcuts
Reason
All video-editing applications have some keyboard shortcuts available and the professional-level software has many that can even be customized per user. Moving the mouse and clicking buttons and menus in the interface is a good way to first figure out how an application functions, but it is time consuming and not entirely elegant. Learning and using the available keyboard shortcuts that execute commands in the application will save time. Speed and efficiency are highly valued in post-production.
Solution
When you are first starting out, take note of the equivalent keyboard command each time you mouse-open a menu to select a function. Try new keyboard shortcuts every time you work in that particular software. Over time, you will remember what lives where and you will use the shortcuts more and more. Most applications will have a master list of keyboard commands in their Help menu. Some even come with a “cheat-sheet” PDF or printout that shows the icon for the command on each programmed key cap.
As several of the major video-editing applications can live on either a Windows or a Macintosh operating system, it would also be very wise for you to become familiar with some basic operating system keyboard shortcuts as well.
Exception
Certain functions in each video-editing application cannot be mapped to keyboard keystrokes, so they can only be selected by using the mouse cursor to click within the interface. Also, depending on your software, the layout of the interface buttons for simple and frequently used commands may make it easier sometimes to just click the mouse. The “Function” keys on certain small keyboard laptops can be a bit snarky at times as well and may have to be “freed” from operating system command mapping. Also be aware that some apps embed certain commands on the numeric keypad of full-size keyboards and, sometimes, such key equivalents are not present on laptop keyboards.

FIGURE 8.1 Using keyboard shortcuts within the editing application will greatly increase an editor’s efficiency. Memorizing and using the most common operating system keyboard commands is also advisable.
3. Organize Your Timeline Tracks and Maintain Consistency Across Projects
Reason
You can potentially have many different types of video and audio sources that will need to find a home in your sequence. If you organize your video and audio tracks in the timeline so that they contain particular assets, you always know where to place things. Simplicity and clarity lead to efficiency and speed during the editing process.
Solution
Create an order to the track content. Perhaps V1 and V2 are reserved for production video, V3 is for keyed titles, and V4 is for keyed imported graphics. On the audio side, you may place sync audio production tracks on A1 and A2, voice-over narration on A3 and A4, ambient clips (NATS) on A5 and A6, music tracks on A7 through A10, SFX on A11 and A12, etc.
The order of video tracks does matter for image processing with special effects and keyed titles, etc. but audio tracks can live wherever you wish. The point is that you should figure out an orderly arrangement for media types that fit your workflow and your style. If you maintain this track organization across sequences and across editing jobs, then you will work more efficiently. Capability and speed are valuable skills for an editor to possess.
Exception
Even the most basic of video sequences will still default to production footage living on V1 and sync audio living on A1 and A2. That is an aspect of track media organization. Also be aware that certain post-production facilities use prescribed track orders of their own to maintain consistency across their edit suites and edited programming. It is always best to check with the producers or engineers to see how they want things set up when you are doing work in someone else’s “house.”

FIGURE 8.2 Some software allows for track panel renaming. This may help with sequence organization across projects.
4. Keep Your Rough Cut Long
Reason
No matter what kind of programming you are editing, this guideline applies. Keep your sequence longer in the first pass or two after the full construction of the assembly edit. Without knowing overall pacing or timing issues or scene-ordering issues, it will be hard to make final decisions about shot, scene, and sequence length. You will be better able to judge what can be removed after the entire assembly edit has been viewed a few times. If usable material is already missing from the rough cut, then you may be inadvertently ignoring a better creative opportunity.
Solution
From the outset, you should include everything from picture and sound tracks that you feel will help to properly show/tell the story. At that early stage of editing, you really do not know what will be useful or superfluous, so keep it all in. After a pass or two at the entire piece, you will get a much better feel for what works and what does not, what should stay and what should really go.
Often, you have much more material than the final running time of the program will allow (30-second commercial, 15-minute educational video, 30-minute situation comedy show, two-hour feature film, etc.). Some things that were initially included in your first versions of the edit will stand out as unnecessary. Other times, you will have to make hard choices that call for removing very good segments just to make the final running time cut-off. Regardless, you should always start with the most material and then pare it down – that is what editing is all about.
Exception
Some news packages have extremely short airtime and you will not be able to pad out the first cuts and then tweak. You will most likely have very little time to finesse and you will simply have just enough time to cut something together to get it to air in the right time slot.
Motion media pieces made for the web (YouTube, Hulu, vlogs, even Netflix and Amazon Prime originals) are not specifically limited to time slot durations (unlike shows that air on traditional commercial broadcast television). These projects can add more material if the quality of the show can bear it out – although many do keep to the traditional time slot durations because they are future-proofing their sale and playback by traditional television broadcasting networks.
5. Review Each Edit or Series of Edits as You Make Them
Reason
You will not know how the shot transition works if you do not watch it play back after you perform the edit. Without reviewing the edits in your sequence, with real-time playback and not scrubbing, you will not be able to appropriately judge any matching action, dialogue continuity, shot timing, overall scene pacing, etc.
Solution
After an edit or a series of edits in the assembly stage, you should move your playhead earlier in the timeline and watch across the shots and the cuts that you have just laid in. Watching every single edit may take up some time during this phase, but you need to gauge your progress frequently. During the rough and fine cut stages, you should review each trim and tweak as it is being worked on to know if you are getting the timing that is needed. After you complete an entire scene, it would be wise to sit back, watch it through from beginning to end, and note any moments that seem to require more attention.
Exception
Even projects that have a very fast turnaround time will require the editing and reviewing process.
6. Duplicate Your Sequence Before Making Major Changes
Reason
Moving ahead with your sequence construction is your main goal, but sometimes you can take one step forward just to take two steps back. Rather than keeping one version of your sequence that you constantly change around trying to get to your final edit, it is preferable to copy, duplicate, or iterate your sequence so you maintain an archive of your progress across time.
Solution
Each video-editing software application should have a way for an editor to make a copy of the sequence under construction in the project. Some apps copy while others duplicate, but your goal is to keep your current version as it is and make any new changes (especially significant changes) to a new version. Some editors append things like “_v1” or “_v16” to the name of the sequence to keep track of the chronology of versions. Others tag the date to the end of the name, etc. This way, if you (or the client) are displeased with the direction in which a particular section of the sequence is going, it is easy to open an older, archived version and replace parts in the newer version as needed.
Exception
If your sequence has a very brief turnaround time or it is just a fun project for yourself, this may not be necessary, but otherwise, duplicating/copying a sequence into versions can become a good habit to get into.
7. Seek Feedback While Editing Your Motion Picture
Reason
A project worked on for many hours, days, or sometimes months can become stale to you over time. The fresh eyes of other individuals may help you to see weaknesses that you could no longer objectively notice. Parts that you have grown fond of may not actually be suitable to the overall story. It may also be that you are having some difficulties with a certain scene’s assembly or you are hitting a wall trying to find ways to bridge two disparate segments of the project.
Solution
It is strongly advisable for an editor to show his or her work to other people to get their feedback. Just because you, as an editor, think something really works does not mean that it will play the same way for others. Often, showing your work to other people will bring up points that need to be addressed, edits that do not quite work, or even places that are rather successful.
Listening to constructive feedback and suggestions from other people and creating your own solution to those potential problem areas is an essential skill that you will need to develop as an editor. You may feel that you have done everything right, but the opinions of others bear a certain weight as well – especially if they are paying you.
Exception
Unless you live alone in a cave somewhere, you should always make time to have other people review your edited piece. No one should work in a feedback vacuum.
8. Put Aside Your Edited Sequence for a While and Watch It Again with Fresh Eyes
Reason
When you are the editor of a feature film or any long-form documentary piece, etc., you become “married” to the movie. You live with it day in and day out, sometimes for weeks or months at a time. You are often listening to the same sections over and over and over again. You grow to anticipate the words and the pictures until they no longer really stand out in your mind but are part of the editing “wallpaper.” It becomes very easy to blind yourself to edits that are not working or entire sections that may play better in another location within the sequence.
Solution
Time allowing, you would be wise to take a break from the editing process. A day or two away from the well-known material will help you to forget the exact pacing, the cut points, the lines of dialogue, etc. – perhaps not forget entirely, but you will be watching the piece with less anticipation. This respite should give you fresh eyes and ears to view and listen to your story. When you approach the same material with fresh senses, you may pick up on which edits are not working and which scenes within the piece may play better elsewhere.
Exception
Obviously, if you are involved with much shorter or more straightforward cutting jobs that have a quick turnaround time, then you will not have the luxury of taking a day or two away from the material to refresh your senses. You will hope that an overnight break will be enough time away for you to be more critical of your own work come morning.
9. Use Shots with Matching Headroom When Cutting a Dialogue Scene
Reason
Let us assume that the clean single MCU shots found in Figure 8.3 are part of an established two-person dialogue scene. To cut from a shot with correctly framed headroom to another shot with incorrectly framed headroom will look as if one of the subjects has suddenly altered her height.
To cut from one take of Character A with incorrectly framed headroom to a good shot of Character B and then back to another correct take of Character A will make it look as if A is bobbing up and down.
Solution
The incorrectly framed headroom shot is nearly impossible to correct. Video-editing software may have the ability to resize and reframe the footage, but enlarging video frames may cause image quality to degrade depending on the resolution of the original footage. If the poorly framed MCU of Character A is of high enough resolution (full HD or higher), you could enlarge it to a standard close-up and edit it with the well-framed MCU of Character B. Otherwise, some of the footage might be usable for cutaways, if it is not too badly framed. If there is not more than one take of this action or dialogue delivery, the entire shot might have to be rejected and replaced by another, even if the speaker is not seen to be speaking. An over-the-shoulder two-shot may be a solution – or stick to the wider two-shot as a safety.
Exception
The exception here is when the two shots being edited together both suffer from the same bad headroom framing. Obviously, if the headroom is completely wrong, the shots may not look traditionally well framed, but because you may not be able to do much about it, throw caution to the wind and go for the shots with the best performance regardless of headroom. If the performance is engaging enough, most viewers may not even notice the differences in framing.

FIGURE 8.3 Beware of headroom issues when cutting “answering” coverage shots of a dialogue scene.
10. Avoid Shots Where Distracting Objects Are Too Near to the Subject’s Head
Reason
This is a question of shot composition that has failed at the shooting stage. As an editor, you will not be able to change this questionably composed image. The presence of unwanted lines, shapes, objects, signs, etc. in the shot’s background can be rather confusing or distracting to the viewer. It may also result in a humorous reaction not wanted by the filmmakers at that time. If offered such a shot, it is best not to use it if at all possible (Figure 8.4).
Solution
There really is no solution to this problem short of using some special effects like a picture-in-picture, a split screen, or some kind of mask, clone, or blur effect that either crops or obscures the offending background object. Of course, if the filmmakers made such a composition intentionally for comedic reasons, then it would be appropriate for use.

FIGURE 8.4 Poor shot composition is not the fault of the editor, but the choice to use any of these shots in the final edit does fall under her or his domain. Omit, use effects, or just go for it, but be aware of the possible consequences when the audience observe these oddly placed background objects.
Exception
You may be able to use this shot if it has a very shallow depth of field and the background (containing the offending object) is almost completely out of focus. The only other possible use is in a fast montage, where the shot is seen only for a very brief period of time.
11. Avoid Shots Where the Subject Gets Awkwardly Cut Off at the Edge of the Frame
Reason
This type of framing may be considered aesthetically unpleasing by many viewers, but that would not be your fault for you did not shoot the footage. Attempting to use closer shots (medium shots, medium close-ups) that have such framing will cause complications for the edit. When the partial face of a character is in one shot and then that same face needs to be cut to for the next shot, it will cause a jump cut or potentially a continuity problem with action, line delivery, performance, or screen direction (Figure 8.5).

FIGURE 8.5 Compositions like these can make a smooth edit tricky. Try to avoid using footage that contains missing heads or where portions of faces are only partially visible.
Solution
Sometimes the shot can be used, but it depends what comes before and what comes after. It also depends on the duration of the shot and the type of motion media project being edited.
Exception
These shots could be used in music videos, commercials, experimental films, and maybe in quick-cut action scenes, or where clips before and after do not cause a jump cut.
12. Cut Matched Shots in a Back-and-Forth Dialogue Scene
Reason
As you edit coverage from a traditional dialogue scene between two characters, you will most likely move in from a wide two-shot to tighter singles or over-the-shoulder shots. This allows the audience to get more familiar with the characters and their actions/reactions during the scene.
Established film grammar would suggest that the production team shot matching coverage of each character for this scene (this is not always the case, but let us assume that we have these assets within the footage that you are editing). It is possible that you may have been given a variety of shot types for each character (medium shot, medium close-up, close-up, over-the-shoulder shot, etc.). Matching shots, when recorded with similar focal lengths, at similar distances from the subject, and under similar lighting conditions, often yield similar frame composition, focus depths, etc. Audiences like to see two similar shots cut together as opposed to two mismatched shots within the same scene’s back-and-forth dialogue. It creates a coherence and a flow to the visual imagery.
In Diagram A in Figure 8.6, two people are standing having a conversation. Cameras 1 and 2 are at a similar distance from each subject, Character A and Character B. Both of the shots are taken, for example, at a narrow lens angle (telephoto or long focal length) and both of the shots are framed as medium close-ups. When this is the case, the editor has subjects roughly the same size in the frame and backgrounds that are out of focus to the same extent. The audience get to focus their attention solely on the speaking characters.

FIGURE 8.6 Diagram A – matching coverage generated by reciprocating camera placement and lens angle of view; Diagram B – mismatching coverage due to altered camera distance and focal length; Diagram C – the depth of field changes with focal length. (Photo credits: Anthony Martel)
In Diagram B, the position for Camera 2 has changed. The shot type should remain the same: a medium close-up. So at the new set-up for Camera 2, the lens angle will now have to be wider (shorter focal length). In this case, the background may be in focus and the perspective on the distant background may be altered. Consequently, the editor would be cutting from a medium close-up with an out-of-focus background to a medium close-up with an in-focus background revealing a wider field of view.
Solution
If a selection of good shots is available, then preference should be given to those with similarity in the quality of framing, focus, lighting, and perspective. If not, then see if you could cut away or insert some other shot in between to distract the audience from noticing the dissimilar shots.
Exception
The exception to this practice is where a wide angle must be used to show a subject moving from foreground to background or the other way around. Generally, with significant available light, the wider the lens angle used, the more the picture background is in focus. In other words, the depth of field is greater (Diagram C in Figure 8.6). Additionally, shots of unmatched visual qualities may have to be edited together in this scenario if those are the only takes made available to you.
13. Ensure that Subjects Talking on the Telephone Appear to Be Looking Across the Screen at One Another
Reason
Traditionally, film grammar indicates that the characters speaking over the telephone from two separate locations should be composed so that they look across the empty frame, and from opposite sides. This will generate the idea in the viewer’s mind that they are addressing one another across the screen as you cut from one single shot to the next and back again (Figure 8.7). The subjects’ look room, lines of attention, and screen placements, etc. all combine to engage the audience in the conversation.
Solution
Hope that the composition of the footage for this scene was done in such a fashion. Otherwise, edit whatever material you have because you cannot alter the subject’s placement within the frame unless you use a flip effect and reverse the video image horizontally (provided there are no written words or numbers on the screen that would then appear backward). If both shots are framed correctly, you may even create a split-screen effect with this coverage and have both faces on screen at one time.
Exception
There may be good dramatic reasons to change this working practice. If one person is shot with his or her back directly toward the camera, then the direction of the other person may be changed if the footage allows it. Additionally, if the coverage of each individual shows him or her moving around with mobile phones, then this practice may not apply due to the constantly changing action line of each shot.

FIGURE 8.7 Static shots of a two-person telephone dialogue recorded in two separate locations should be treated as if the subjects occupied the same film space and were speaking to one another in person. Proper framing and look room should be present in the shots. Joining them together in a split screen can be easily achieved.
14. In a Three-Person Dialogue, Beware of Cutting from a Two-Shot to Another Two-Shot
Reason
If you have coverage of a three-person dialogue scene that contains several two-shots, then in all likelihood the central character will appear to jump from one side of the screen to the other (Figure 8.8). A shot taken from Camera Position 1 shows the center person (Character B) on the right-hand side of the screen with Character A on the left. If you now cut to another two-shot from Camera Position 2, then this shot will show Character B on the left-hand side of the screen, with Character C on the right-hand side. This is a screen placement jump cut for Character B and can disrupt the visual flow of the shots and confuse or annoy the audience.

FIGURE 8.8 In this example, three people covered by two two-shots will result in a compositional jump for Character B from frame right to frame left at the cut point. Instead, use any other coverage to separate the connection of the troublesome two-shots.
Solution
Provided other coverage shots are available, cut to a single shot of a person instead. For example, cut from a two-shot of Characters A and B to a medium close-up of Character C. Or, conversely, cut from a medium close-up of Character A to a two-shot of Characters B and C.
You could also cut back out to a wide shot of the entire trio between both of the two-shots, provided there is appropriate continuity. If available and appropriate, you could also edit in a cutaway or insert shot before you return to Characters A, B, and C.
Exception
There are no exceptions to this practice unless the style of editing for this project accepts and encourages such visual jumps.
15. With a Single Subject, Try to Avoid Cutting to the Same Camera Angle
Reason
There is a strong chance that a jump cut would result if you edit two shots taken from an identical or extremely similar camera angle (see the six elements of the cut in Chapter Five). This relates directly to the traditional film shooting practice known as the 30-degree rule, whereby each coverage shot of the same subject or object in a scene should come from the same side of the axis of action and be at least 30 degrees different in camera placement along the 180-degree shooting arc.
In Example 1 of Figure 8.9, cutting from the medium shot at Camera Position A into a medium close-up at Camera Position B could present a problem in the form of a jump cut. Cutting from a medium close-up to a medium shot, however, is less of a problem.
Solution
It would be better to cut to a medium close-up from a different camera angle, provided one was actually recorded by the production team.

FIGURE 8.9 Example 1 shows a cut-in or an axial punch-in. Example 2 shows a more traditional shot option for the cut. A new angle and focal length help to lessen the chance of a jump cut for the audience.
In Example 2 in Figure 8.9, Camera Position B has moved to the right, creating an angle on the subject that is more 3/4 frontal. If a shot from this position were available, the cut to the new angle would be more traditional and the risk of a jump cut would be reduced.
In the case where a shot from an alternative angle does not exist, then a cutaway could be used to separate the medium shot and the medium close-up of the same character on the same lens axis. This cutaway (of something appropriate to the scene) would allow the audience a visual break and the jump cut effect would not be experienced. This practice is more or less acceptable if you cut out to the medium shot from the medium close-up.
Exception
One exception to this practice is when cutting two shots together that are very dissimilar, such as when a great distance is covered between the two shots set up along the same lens axis. Of course, for creative reasons, you could edit a series of cut-ins along the same lens axis to achieve a quick punching-in effect – a zoom without the zoom, as it were.
16. Beware of Screen Placement Issues with an Object of Interest
Reason
Even when the human subjects are on the correct sides of the screen in the coverage shots, the audience will have an additional visual reference, sometimes called the object of interest or the point of interest.
For example, a two-shot of a man and a woman (Shot 1 in Figure 8.10) shows a painting that is framed center screen. Cutting to the man (Shot 2) will show the painting screen left. Cutting now to the woman (Shot 3), the object of interest (the painting) has jumped to screen right. Even though the edit is technically correct, the point of interest jumps, and this can be visually distracting.
Solution
Where an object of interest is evident, either keep it in the same area of the frame, or select the shots that either eliminate it altogether or minimize its on-screen presence (Shot 4).
Exception
An exception to this working practice is where the object of interest is so small as to be negligible, where it is far in the background, or where it is out of focus. You may also find that some other subject in the action of the scene obstructs the object of interest, either partially or totally.

FIGURE 8.10 Much like a person can jump sides of the frame in a three-person back-and-forth dialogue, objects of interest can do the same thing. Tighter shots may hide the object jumping left, then right, and back again.
17. Edit in a Wide Shot as Soon as Possible After a Series of Close-Up Shots in a Group Scene
Reason
It can be easy for the audience to forget the exact location of subjects in the film space, especially during a fast-moving production. After a series of medium shots, medium close-ups, and close-ups, particularly those with out-of-focus backgrounds, it becomes important to re-establish the scene’s and the subjects’ location. If you choose to introduce a series of characters, all in close-up, then you should show them all again grouped together in the wide shot.
Solution
Be careful about editing an entire sequence with only close-ups – unless there is a need to do so.
Even one quick cut to a long shot, showing the relationship of the subjects to each other and to their surroundings, gives a much better grounding to the scene for the viewing audience.

FIGURE 8.11 After a series of closer shots, it may be helpful to show a wide shot to re-establish the scene in the viewer’s mind.
Exception
The exception to this practice is where the location or scene is well known to the audience, such as the main set of a popular TV show.
18. Cut to a Close Shot of a New Subject Soon After He or She Enters a Scene
Reason
This may be the first appearance of this subject and the audience will want to know who he or she is. The audience should be shown the new information as soon as is practical.
A long shot will only show the new subject in relationship to other subjects and to the location, but someone new entering the wide scene needs to be shown in a closer shot to be more properly identified.
Solution
Edit in a closer shot of the subject at the earliest opportunity. This also applies if the character is not new but has not been seen by the audience for some time. Support the audience’s understanding of the story by reminding them of events and people through tighter shots that provide the necessary details.

FIGURE 8.12 Inform the audience by showing them a closer shot of a new character entering a scene.
Exception
The obvious exceptions are when the character is an extra or a “bit” player, needs a delayed introduction for comedic reasons, or needs to be kept secret for narrative purposes.
19. Use an Establishing Shot to Set Up a New Scene’s Location
Reason
The audience not only like to know what is happening in a new scene, but also where it is happening. They benefit from seeing some form of visual “geography” that establishes the relationship between the environment and the subjects in the scene that unfolds there.
Solution
Some form of wide shot – for example, a long shot, a very long shot, or an extreme long shot – will be helpful. This wide shot should serve a number of purposes, such as to give some geography of the scene, to show time of day or season of year, to establish the relationship of the character(s) to the surroundings, and/or to establish a general impression of the movement of the subjects.
In documentary or non-fiction motion media productions, these types of establishing shots should be among the B-roll footage. For any kind of project that lacks these shots in its original, visual material, consider using stock footage libraries or still photographs of locations – perhaps with a motion effect to provide some energy.
Exception
You may opt, for creative reasons, not to show an establishing shot but rather to cut right in to the scene, perhaps in a close-up shot of some element within the set. Then you could pull back and show a wider shot of the location of the scene. This method creates more of an anti-establishing shot. It stresses audio ambience over exterior imagery while you are grounding the viewer in the new location, and makes for a refreshing change. If the scene is shown in closer shots and seems to take place in an unknown location, the actual establishing wide shot could be shown last as a sort of reveal and a surprise for the audience – perhaps for shock, perhaps for comic intent, or perhaps purely as information.

FIGURE 8.13 Using a wider shot to open a new sequence of scenes at a new location can help to ground the audience and provide much-needed information with one image. This holds true for both exterior and interior locations within your story.
20. Use Close-Ups of Subjects in a Scene for the Greatest Emotional Effect
Reason
A close-up of anyone’s face is a very intimate shot. It carries with it a great deal of visual information and, depending on the expression of the face and the context within the story at that point, it can easily sway the audience emotionally. Using such a powerful shot too early in a scene’s development could dilute the efficacy of close-ups when they are used later to make an emotional point or underscore a certain counter-current in the storyline through a reaction shot.
Solution
Save the close-up shot of the character or characters for when the audience will benefit most from seeing the actors’ faces in such intimate detail. The close-up will yield a clearer assessment of a character’s emotional or mental state to the viewer. If the drama or tension of the scene is rising, cutting to closer shots toward the climax will provide the audience with more emotionally engaging visuals. This effect will be watered down if you go to the close-up shots too soon in a scene’s development – or, perhaps even worse, if you allow the energy to dissipate by cutting back out to the wide shot too frequently.

FIGURE 8.14 The close-up conveys much emotional detail. Use where appropriate, but often later in the scene is preferable for the greatest emotional effect on the audience.
Exception
Documentary and news talking-head interviews will be recorded mostly in medium shots and closer. You will have to use these shots right away in the sequence. Often, fictional narrative television and web programming will have significantly more coverage with close shots of individuals due to the smaller screen on which they get displayed. Cutting to such close-up shots sooner in each scene could be encouraged for television and internet programming. Additionally, if the lighting on a close-up of the character partially or entirely obscures the face for narrative purposes (to protect an identity, create mystery, etc.), then these shots should be edited in the sequence as required.
21. Cut Away from Subjects Soon After Their Look Rests upon Their Object of Interest
Reason
A shot depicting a subject looking at some object of interest off screen is the perfect set-up for a reveal to the audience. In general, you would cut to the shot of the object of interest next. The motivation for this edit arises out of the character’s look and initial facial reaction to the yet-to-be-seen object off screen. Once the physical movement of head and eyes has come to a rest, the audience will likewise wish to see what is now being focused upon – hence the cut to the shot of the object which reveals the new information (Figure 8.15).
Solution
The editor hopes that the actor was instructed during production to look off screen and react to some object. He or she further hopes that the actor achieves the look with a final solid head placement and eye-line to some object off screen. It is the solidity of the final look – the focusing of the eyes along a particular line – and a facial reaction of recognition that create the strongest cut point.
Exception
Clearly, if no take of the “looking” shot ends with a solid, strong gaze from the actor, then you cannot cut away at the moment of the eyes’ focus. You will have to find the most acceptable point of recognition on the actor’s face and then cut. Faster action sequences or scenes that involve multiple objects off screen do not necessarily call for a static head and focused eye-line from the actor.

FIGURE 8.15 Allowing the actor’s eyes to lock onto the off-screen object of interest generates a need within the viewer to also see this new object. This motivated cut to the object of interest is often called a reveal.
22. Use J-Cuts and L-Cuts to Smooth Over Transitions
Reason
Straight cuts on all picture and audio track edits can feel rather staccato – especially in dialogue scenes. It can really improve the flow of a scene if sometimes the incoming sound starts under the outgoing picture clip (a J-cut), or, conversely, the outgoing sound carries on under the incoming picture clip (an L-cut).
Solution
Sound bridges are useful both within scenes and between scenes or segments of a video. The idea behind the J-cut stems from real life where a person will hear a sound and then look to see what is making that sound – audio information leading to new visual information. The L-cut allows the audience to acclimate to new visual data while they are momentarily carried forward by the familiar audio that they have already been experiencing in the preceding clip. Rather than an abrupt changeover in both picture and sound information, this staggered approach can smooth over edit points and propel the audience forward with a little more finesse.

FIGURE 8.16 Simply by trimming the audio track cut point for Clip A and Clip B, you can turn a straight cut into an L-cut or a J-cut split edit or sound bridge.
Exception
Some moments of a video, depending on the genre, can actually benefit from the hard, simultaneous cut between picture and sound clips in the timeline. Abrupt changes in audio levels (usually from quiet to loud) can “wake up” the audience with a sudden burst of sound energy. This is often accompanied by a changeover in the brightness of the video clips or the amount of visual movement within the imagery at the same time.
23. Create Continuous Motion Action Edits by Matching Physical Movements
Reason
The audience typically expect continuous motion when they watch a scene from a story that was shot in the continuity style of filmmaking. The movements of subjects and objects would be constant and uninterrupted in reality, so they should appear to have the same fluidity in a movie of this style. The various shots, from different angles and with different framing, should be cut together to present this illusion of continuous motion. The “blink” of the actual edit is masked by the matching movements from one shot of the coverage of the action to another shot of the continuation of that same action. The cut goes unnoticed by the audience (Figure 8.17).
Solution
Perhaps this can be best demonstrated with an example. The simple scene involves a woman sitting at a patio table. As she enjoys the morning, she lifts a mug of coffee and drinks. Shot A is a medium shot of the woman at the table and she lifts her mug of coffee – CUT TO – Shot B, a close-up shot continuing the coffee mug lift and showing the actual sipping of the beverage.
As you near the end of Shot A (the medium clip), you would cut somewhere along the motion path of the woman’s arm rising – not before the arm begins to move and not after it has fully brought the mug up to her mouth. This new tail frame, cut during the motion, will inform you where to begin Shot B.
You may start by trying to match the mug’s position in the first frame of Shot B exactly to the frame at the end of Shot A. This may or may not work. It is often suggested to begin Shot B three to five frames prior to the “ideal” visual frame for “perfect” physical continuity. Those fractions of a second of action are lost on viewers as they acclimate their eyes and minds to the new information on the screen in the second shot. Remember to always back up toward the beginning of Shot A and watch the edit at normal playback speed (scrubbing across the cut will not give you the true timing of the actions even though the object placement may seem correct on the screen at the two frames around the cut point).

FIGURE 8.17 Cutting on the action of subject movement (about two-thirds completed) will most often make for a smoother transition across the action edit. Viewers ignore the matching action cut as they absorb the new information in the second shot.
If there is a jump of some kind (not smooth movement), then experiment with cutting action a little earlier or a little later, and judge for yourself. The Trim Tools in your video-editing application will make this editing process easier. Most continuous action will benefit from trimming just a few frames at either the tail or the head, or sometimes a bit from both.
Exception
Any project that calls for a special visual style, such as jump cuts, or playing with the space/time continuum of actions and reactions, etc., does not always need to follow this practice.
Additionally, if the performance of an actor’s dialogue delivery during this scene is particularly engaging and dynamic, then allowing minor gaps in motion continuity may be fine because the audience will most likely be so attentive to the character’s words that the glitch in motion may go unnoticed.
24. When Cutting a Rise as an Action Edit, Cut Before the Subject’s Eyes Leave the Frame
Reason
A “rise” is any movement of a subject from within the frame to up and out of the top of the frame and then across the edit point in continuous action. In these shots, the camera does not tilt up to properly follow the movements of the subject and the head gets cut off. For example, the subject sits on a park bench and then stands up, someone climbs the rungs of a ladder, or a subject walks up steps. The action edit point could occur anywhere within the actor’s total movement up until the eyes are about to break the top of the frame.
It would be advisable to keep the actor’s eyes on screen for as long as possible in the first shot. The subject’s eyes are the natural focal point of the viewer’s attention. When they leave the frame, the audience lose that connection with the subject. Additionally, with no tilt up to maintain proper framing, the subject’s head is cut off and this just looks odd to the viewer. This gets worse in close shots when the rise occurs very quickly due to the magnification of the head within the shot’s framing.
Solution
A woman is seated at a park bench (Figure 8.18). The edit point in Shot 1 will be when her eyes approach the top of the screen (Frame 1B), cutting to Frame 2B in Shot 2. This may seem only a short distance, but actually the subject leans forward before rising. This happens naturally.
If the subject’s head is off screen when the cut is made (Frame 1C), then the edit will appear to be “late.” If the editor cuts before movement (Frame 1A), so that all of the movement is seen on the medium long shot (Frame 2A), then the edit may be deemed an “early cut.”
In these examples, early cuts are not normally as disturbing as late cuts. Watching most of the action from the second (wider) shot is not so wrong, especially if the woman continues up and out of the frame. However, the late cut example of Shot 1C and Shot 2C presents the issue of what the audience get to look at during the last few moments of Shot 1. Granted this transition will occur relatively quickly, but once the entire head clears the top of the frame, the audience are seeking some new information. They want to see the character’s face again and watch the continuous action of the move.
Exception
One exception to this practice is when the first shot is closer than a medium close-up. It is rather difficult to cut smoothly away from a close-up or big close-up on a rise. An early cut is almost inevitable due to the size of the face within the frame and the lack of physical space for the upward movement.

FIGURE 8.18 Examples of cutting on the rise. Column A shows the medium close-up of the character rising off the bench. Column B shows the medium long shot of the same action. Best practice may be to leave the subject’s eyes on screen for as long as possible and then cut away from Shot 1B to Shot 2B.
25. When Cutting to a Close-Up of an Action, Select a Version of the Close-Up Where the Action Is Slower
Reason
If the action of the close-up happens at the same speed as that of the wider shot, then the speed of the action, as seen on the close-up, seems faster. This is due to the relative size of the object within the closer framing. It is now a large object so it has very little screen space to move within the close-up frame. Any quick or even “normal” movement would appear to happen too quickly because the object has less distance to travel around the screen before it breaks out through an edge. You hope that the production team understood this phenomenon and got some of the close-up takes at a slower speed of object movement.
For example, in Figure 8.19, the subject is picking up a book in the wide shot. The close-up shows the hand also picking up the book. The action on the long shot is at normal speed and the book never leaves the frame. But in the closer shot, the book moves out of the frame very quickly. So, if the close-up action is carried out at the same speed, it seems faster.

FIGURE 8.19 Be aware of speed of action in closer shots where the magnified object’s movement clears the frame very quickly. Shot 1 is a medium long shot of a woman picking up a book. Shot 2 is a close-up highlighting the book’s movement out of the frame.
Solution
You hope that the director has provided an additional close-up with a slightly slower action. The slower version will appear to move at a “normal” speed. If necessary, your video-editing software may have motion effects built in that can slow down a shot just enough to be effective. Be forewarned, however, because a keen audience may easily detect this slight slow-motion effect.
Exception
This practice does not apply to close shots of moving machinery.
26. Understand the Visual Differences Between a Dolly-In and a Zoom
Reason
Many consider a “zooming” image to be a very unnatural visual effect due to its uniform magnification of distant objects. The camera does not move and the lens optically enlarges all visual elements within the frame. It has no change in perspective. The horizon (or far distance) and the middle distance will come toward you at the same speed as any objects in the foreground. As our eyes do not zoom, the “movement” through film space can seem unnatural and stand out to a viewer.
Solution
Unlike a zoom shot, a dolly-in shot (sometimes called a truck-in or a push-in) is considered a more natural movement that will have a perspective change analogous to what our normal vision would produce. The camera lens, like our eyes, is moved closer to the subject, who appears to grow larger while the background remains “further away.”
The two sequences of shots in Figure 8.20 show the difference between the zoom and the dolly-in. Note the differences in size and apparent “nearness” of the doorway awning at the corner of the building in the background frame left.
It is also a common practice for filmmakers to combine lens and camera support movement within a complex shot. A shot containing a zoom may also be used if it contains another camera movement at the same time that helps to camouflage the zoom.
Examples of such shots include:
• a tilt with a zoom
• a pan with a zoom
• a crab dolly with a zoom
• a pedestal or boom elevation with a zoom, etc.
Exception
An example of a non-traditional zoom is when it “creeps,” i.e., when it is so slow that you actually do not realize it is a zoom. Slow zooms during long takes of slowly paced action or dialogue-driven shots will evolve the composition over a longer time and the subtle changes in framing happen so gradually that viewers will most likely not notice as they pay attention to the actors, etc. As an editor, you will find this type of shot relatively easy to cut into the program in its entirety, or to cut up with other reaction shots as necessary, because the zoom will be so slow that cutting on the lens movement will most likely not be noticed.
A zoom in TV news or other “reality”-type programming or sports coverage is another exception as it is more accepted within those genres. Obviously, a detail of the content or action is the motivation to make the zoom.
In addition, a zoom used in a shot without any discernible background, (e.g., a white wall, sky, or flat ocean) might possibly go unnoticed.

FIGURE 8.20 Zoom movements will alter perspectives on the film space, especially the background. The left column shows zoom movement and the right column shows dolly-in movement. Subjects receive similar magnification, but notice the differences in size and proximity of background elements, chiefly that triangular doorway awning seen in the background frame left.
27. Beware of Shots that Dolly Out without Motivation
Reason
A dolly track-out (sometimes called a truck-out or a pull-out) can often initiate a scene to show more of the location, or signal the end of a sequence or a scene. It may precede either a dissolve or a cut to another scene or even a fade-to-black. If no subject movement comes toward the camera initiating the track-out (backward, away from the established angle of view on the scene location), then the camera takes on a consciousness of its own. The audience may not be accustomed to the camera suddenly moving as if it were motivated by its own thoughts or desires (Figure 8.21).
Solution
The motivation for the dolly track-out will usually be included in the shot. In the case where no motivation is evident, or where motivation does not exist in the previous shot, see if the scene can still run without that tracking shot. Typically, dolly shots take a long time and can cost a production a lot of money, so it might not be an option to leave it out of the final edit.
Exception
If this is a visual treatment that has already been established in the motion picture (a free-moving camera with its own “motivations”), then it would be part of the style of the film and, therefore, appropriate to use. Another exception may be when a track-out precedes a narrative jump in time, location, or tempo, or where the dolly-out is the final shot of the production.
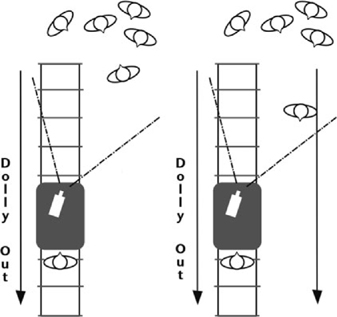
FIGURE 8.21 Understand when track-out dolly shots are motivated by subject movement and when they are not. A camera moving away from the location of a scene on its own appears to have a certain consciousness that may not be evident among the other scenes in the program.
28. Select the Best Version of a Pan or Crab Dolly Shot
Reason
Dolly moves and panning shots that follow talent movement are often rather tricky to record during production. Several variables and different crew members, plus the talent, are involved in their creation and it is easy for things to not quite flow as intended. When reviewing the takes of complex or developing shots like these, watch for the one with smooth camera movement, adequate lead room for the subject’s movement, proper focus, and good pacing. An audience watching a bumpy move, a bad composition, or a blurry moment in the shot may have their viewing experience compromised.
Solution
Again, an editor cannot change the quality of the shots that he or she is given, but must work with the material presented as best as possible. Seek out the best takes that are available that meet the criteria for such a shot. In some cases, you may use just the good portions of multiple takes and stitch them together with some cutaways. If there are a number of takes, a shot should be selected where the camera has “led the subject” (i.e., where there is more frame space before the subject than behind – as shown in Figure 8.22), has good focus throughout, and is smooth, with good pacing appropriate for the entire scene.
Exception
The exceptions to this practice may be found in fast-paced action shots, or even handheld cinéma vérité style shooting where the slightly jerky camera adds to a sense of immediacy, danger, or reality.

FIGURE 8.22 Select the crab dolly shots that provide stability, good focus, and ample lead room for talent movement.
29. Begin and End Each Pan, Tilt, or Dolly Shot on a Static Frame
Reason
Cutting into a shot that is already in motion can cause a jump cut effect within the mind of the viewer. Cutting away from a shot that is in motion to a static shot can also be jarring, but it may be more acceptable if the narrative calls for such a visual treatment.
Solution
The production team should provide pan, tilt, and dolly shots that begin with a static frame, move for the duration of action, and then end on a static frame. This is not always the case, but as an editor you would hope for this scenario (Figure 8.23).
If Shot 1 is a static, simple shot and you wish to cut to the complex moving shot (Shot 2), then you should keep those static frames at the head of Shot 2. This allows you to cut from static frames to static frames. The audience will treat this as an invisible edit because movement comes after the static transition.

FIGURE 8.23 The locked-off camera at the end of Shot 1 will help to create an invisible cut into the static start frames in dolly Shot 2.
At the end of Shot 2, after the tilt, pan, or dolly move, you would most likely wish to finish that shot on a static frame as well. You can then cut to Shot 3, the next static shot. This again provides an invisible edit for the audience: static to static.
Exception
If you decide to string several complex movement shots together, perhaps in an action sequence, then you can cut not static to static but moving to moving to keep the pace of the action going. One thing to watch out for in this scenario, however, is the speed of the camera movement and of the subject movement within the shots that you are cutting together. If the speeds are not matching or at least similar, this can cause visual interruptions to the flow of images and the audience may sense the shift in tempo.
30. Avoid Editing a Stationary Simple Shot After a Moving Complex Shot of the Same Subject
Reason
A cut from or into a camera movement may appear as a jump to the eye. A subject who is in motion in a dynamic Shot 1 but who is then shown as stationary in a static Shot 2 will appear to jump in time or space.
Solution
Take, for example, a subject who is moving across film space (right to left). The shot calls for her movement to be paralleled by a crab dolly (Figure 8.24). It is possible to cut to a static shot of the subject, but only when the subject has cleared the frame for a reasonable time prior to the cut. The end dolly of complex Shot 1 should be static prior to the cut to the simple static medium Shot 2 of the stationary subject.
There are two reasons for this. First, you may want to finish or clear the action in the shot before cutting out of the shot. Second, the pan or dolly is likely to be a complex shot. As such, like a developing shot, it should have a beginning (the initial static frame), a middle (the pan with another movement, tilt, or zoom), and an end (the final static frame).
The preferred place for the cut is on the static frame, where the camera is not moving even though the subject may be.
So, unless the camera stops, and/or the subject stops, and/or the subject is no longer in the frame, then it is better if the next shot does not show the same subject as stationary.
Exception
There are many scenarios where this guideline may be overruled. Depending on the material involved, the program type, the pacing of the footage, and the pacing of the scene being cut, you may choose to experiment with cutting into and out of action and stationary shots. Most likely, however, you will succeed in proving to yourself that it just does not look or feel right the majority of the time.

FIGURE 8.24 Allow the dolly action and subject movement to finish before cutting to a static shot of the same subject who appears stationary.
31. Avoid Cutting Pans and Tilts that Reverse Direction at the Cut Point
Reason
Screen direction and flow of motion have a continuity of their own. When object movement motivates a leading camera pan or tilt in Shot A and then Shot B reverses that object’s movement, a visual “crash” will occur at the cut point. Screen directions will have suddenly switched and the viewer will feel this reversal as a disorientation of visual flow.
Solution
You hope that the production team maintained screen direction and visual continuity while they were shooting the coverage for the scene. If you do not have a continuous direction in the footage between Shot A and Shot B, then you can either not use Shot B or insert some other shot between the two to distract viewers and re-orient their sense of movement so that when Shot B comes on the screen, they are not disturbed by the alteration in the pan or tilt’s direction of movement.
You can also employ a flip effect to switch left/right direction of movement (if no text or numbers appear on the screen during the flipped shot).
Exception
As a creative practice, it may be worthwhile, given the appropriate topic in a program, to attempt to marry reversing pan or tilt shots to cause the visual crash for effect. A story with strong conflicting themes, an experimental film, a non-fiction promotional video, or a music video may exhibit such crash cuts.
32. Avoid Crossing the Action Line or the Screen Direction Will Be Reversed
Reason
Refer to the section on screen direction in Chapter Four.
In Diagram 1 of Figure 8.25, a conveyor belt moves boxes from frame left to frame right as seen from Camera Position A. The shot itself is shown in Image 2. If the line is crossed – i.e., if the next shot is taken from Camera Position B (see Diagram 1) – then the belt appears to be moving the boxes from right to left (Image 3).
Solution
Select shots from one side of the line only, or use a neutral cutaway between the shots if the line must be crossed. A close-up of part of the machinery not showing the belt movement would be suitable. In documentary or reality programming, you could also use a wipe to get from one side of the belt to the other.

FIGURE 8.25 The moving machinery establishes an action line and a screen direction. Shooting from the opposite side of the initial 180-degree arc would reverse the flow and flip directions, so try to avoid editing such conflicting shots.
Obviously, if the camera were to move from one side of the belt to the other during the shot, a jump cut would not appear, but the direction of the belt would still be reversed.
Exception
Shots (especially B-roll for a non-fiction program) recorded from the opposite side of the action line could certainly be edited together in a fast-paced montage sequence.
33. Avoid Cutting an Action Edit from a Two-Shot to Another Two-Shot of the Same Subjects
Reason
An action edit requires closely matching continuity of placement, movement, and general performance. With two moving subjects involved in the shots, it becomes that much more difficult for the editor to match the movements of each (Figure 8.26).
Solution
When cutting out of the two-shot, cut to a closer shot of one of the two characters, cut to some form of reaction shot, or possibly cut to a very long shot if it exists among the footage. Trying to match the action for all concerned parties would be difficult if you went for another two-shot from a different angle.
Exception
A much wider shot of the entire environment, including the two subjects, is more likely to hide any incongruous body movements, etc. Any event shot with multiple cameras may also avoid this issue because action would match across a multi-camera edit. If the action concerned is frenetic enough (a fight scene, extreme sports, fast dancing, etc.), then cutting from two-shot to two-shot may be perfectly acceptable with that sort of energy, confusion, or movement, although it would still appear as a jump cut.

FIGURE 8.26 Cut from the first medium long shot to any other coverage shot except another medium long shot still showing all subjects. An unwelcome jump cut will result if you do not follow this guideline.
34. Allow a Subject to Exit the Frame Completely Prior to Showing Him or Her Entering the Next Shot
Reason
In the “classic” screen-direction continuity action edit, it is advisable to allow the subject to leave the frame entirely in Shot A – especially when Shot B shows that same character, but at a new location and at a later film time. It is customary to cut away once the actor’s eyes have cleared the edge of the frame, because the face and eyes of the actor are what the audience will be watching, but showing the whole body clear the frame allows for a cut to any new location with no need for matching continuous body placement. Screen direction may still be maintained, however. If an emotional note has just played out in the scene and the characters depart, then you may want to linger on the empty location in Shot A for a beat or two to allow the audience time to soak in that quiet moment.
Solution
As seen in Figure 8.27, Shot A ends with the body no longer visible just prior to the cut. Introducing Shot B, the viewer will find an empty frame of a new location, and possibly a new time, to analyze. Then the actor or object will enter the frame. This allows something of interest to the viewer to remain on the screen at all times.

FIGURE 8.27 If you wish to jump a subject in place and time at a cut point, allow him or her to clear the frame entirely and have the new or incoming shot start empty. The new empty frame of Shot B will provide new visual data (place and time) to the viewer before the character strides in from the edge of the frame.
Exception
Extremely fast-paced action sequences may allow for portions of the subject’s body to remain on screen at the end of Shot A and appear already on screen at the start of Shot B. The increased speed of subject movement covers the jumps in subject screen placement at the cut point. If the pacing is too slow, however, the portions of the subject visible at opposite ends of the screen might cause a jump cut.
35. Maintain Screen Direction Across an Action Edit
Reason
This is a very basic practice for any moving subject within the accepted film grammar. The continuity of screen direction, even across the transition, should be constant. It helps to establish the directions of left and right within the film space and keeps the audience properly oriented within this fictional landscape (Figure 8.28).
Solution
The appropriate coverage with proper screen direction should be provided to you for the edit. If you do not get footage with proper screen direction maintained, then you had better seek a diverting cutaway shot to place in between shots. You may also choose to establish this “inconsistency” as a visual motif for this character or for the overall project.
Exception
The exceptions to this practice are when:
• the direction is actually seen to change on screen;
• there is a suggested change of direction on screen followed by a cutaway;
• the change of direction is caused by the cutaway (e.g., in the haunted house, running in one direction, seeing the ghost, then running the opposite way).

FIGURE 8.28 Screen direction of moving subjects should be maintained across action edits. (Photo credits: Zach Benard)
36. Avoid Making an Action Edit from a Long Shot of a Subject to a Close-Up of the Same Subject
Reason
It is a jump cut to be avoided, unless a shock effect is required or unless the character is recognizable and identifiable in the long shot and there is not much action to physically match when the close-up shot cuts on screen.
Solution
In Example 1 of Figure 8.29, the overhead schematic shows a man walking up to a car in a wide shot. He stops beside the car door to unlock it with his key. In two shots, it may look as it does in the images in the example.
It will cut together, but it is too much of a jump to the eyes of the audience, and the visual reaction may be, “Who is this new man?” or “Where have the first man and the car gone?” Unless this character and vehicle are extremely well known to the viewing audience, this edit can break the visual flow and is therefore discouraged.
It would be better to use three shots, as shown in Example 2: (1) the wide shot to set the scene; (2) the medium long shot at a different angle to show more details; and (3) the close-up shot from the first angle. The result of having the extra shot between the wide shot and the close-up is to make the scene flow more smoothly. Now the audience know who the man is, where he is going, and what he is doing.
Exception
This practice may be overruled if the established editing style of the program calls for such a visual treatment of the material.

FIGURE 8.29 If the coverage has been provided, you may find it beneficial to cut three shots (long, medium, close) rather than just two (long, close) so that the audience follow along with this series of action edits. (Photo credits: Anthony Martel)
37. Beware of Editing a Cut-to-Black Followed by a Cut-to-Full-Picture
Reason
A straight cut-to-black is a very serious statement in narrative film production. Because it is an abrupt change-over from visible picture to full black, it carries with it a very dramatic weight, especially when you cut straight out of that black to a new, full image in the next shot. Reserve this bold treatment for an appropriate project whose visual style can absorb this dramatic editing practice.
Solution
Some possible combinations for the end of a sequence or scene and the start of another are:
• cutting to the next picture;
• dissolving to the next picture;
• fading to black and then fading up to the next picture (dipping to black);
• cutting to black and then fading up to the next picture;
• fading to black and then cutting to the next picture.

FIGURE 8.30 A hard cut from a full picture to a full screen of opaque black can be jarring for the audience. Treat this dramatic transition with respect and use it appropriately.
Exception
The cut-to-black and cut-to-picture are used to break two entire programs, two productions, or two complete items from each other, or for a very dramatic effect. Cuts-to-black are often used in editing feature film trailers because the shots that are joined together to advertise the movie were not meant to be joined together and cuts-to-black add to the drama and mystery of the story. Also, the cut-to-black may quickly lead into a title (typically white font over black, opaque background).
38. Take Advantage of the Transition Point that Natural Wipes Offer
Reason
Natural wipes occur any time that an object moves past the camera lens and momentarily blocks the composition of the frame before it clears out of the way. The movement (typically horizontal, but sometimes vertical) provides the perfect motivation to make a cut or a wipe to a new shot in the same scene, or to transition into a new scene.
Solution
Really thoughtful filmmakers will actually pre-plan the talent blocking of main characters, or more often “extras,” to create the natural wipe moment for the editor to use. Other times, a simple happenstance like a van driving through the foreground of the shot on a long-lens exterior set-up can provide the motivation and the physical “image blocker” for the editor to create the natural wipe on his or her own initiative.
Regardless of who constructs it, a natural wipe is “natural” because it occurs during the shot while it is recorded – the wiping of the image on screen is inherent to the footage. Sometimes, during a complex dolly shot, the camera may crab past columns or pillars in a hotel lobby or a parking garage structure. Even though the objects are solid and unmoving, the camera’s movement past them will create a natural (solid vertical) wipe across the recorded images. These may become convenient or clever transition points for the editor to use (Figure 8.31).
It may be helpful to have several of these natural wipes within one scene but certainly within the entire motion media piece, as only one may stand out as awkward or uncharacteristic of the established visual style of the program. Multiple natural wipes create a visual motif for the show.
Also be watchful for production footage that may allow for (or require, if scripted that way) a natural wipe that occurs on vertical camera movement. A camera may rise up in Shot 1 (via a tilt, a jib arm boom, a crane, etc.) and move past a solid horizontal object, such as a ceiling, the wall over a doorway, heavily leafed tree branches, or even a star-filled night sky. Shot 2 of this mini-sequence would typically also have matching upward vertical movement, such as up from behind a desk or counter, or even “through” the floor. Join these two shots together to make it seem as though the camera has gone “up” to a new place, in both space and time.
Exception
Just because a natural wipe occurs within the footage, it does not mean that you must avail yourself of it and cut or wipe at that point, especially if it does not add to the overall scene or story flow.

FIGURE 8.31 An editor can take advantage of a natural wipe within the footage and either cut or wipe to a new shot at that time.
39. Take Advantage of the Transition Point that Whip Pans Offer
Reason
Much like the natural wipe, the whip pan (or flash pan) offers a very convenient and visually interesting motivation to transition from one shot to another. If planned by the filmmaker ahead of time, the fast motion blur generated at the end of a shot as the camera quickly spins horizontally will match with a corresponding motion blur at the start of another shot that is supposed to follow. The editor will join the tail blur of Shot A to the head blur of Shot B and the illusion, when watching the transition play itself through, will be that the motion of the blurring whip hurtles the viewer into a new location, time, or entirely different scene.

FIGURE 8.32 An editor can take advantage of the whip pan contained within two clips that were planned to be joined in this way. If no such whip pan occurred in either clip, then most video-editing software allows you to add blur effects and an editor could create the transition from scratch.
Solution
These whip pans (and, much less frequently, whip tilts) are usually designed and shot on purpose by the filmmaker during production. Unless there is a great deal of handheld footage that whips quickly left or right, then there will be little opportunity for an editor to create his or her own whip pans, although editing software may provide a cheat with some transition blur effects. Highly stylized shows or those with frenetic space/time jumps (like children’s programming, travel shows, or home & garden DIY shows) often employ these constructed pan/blur shot transition effects in post-production.
Exception
Not all whip pan transitions will play correctly. The tail of Shot A and the head of Shot B must be whip panning in the same direction and roughly at the same speed for this transition trick to work.
40. Do Not Use Video Track Dissolves During a Dialogue Scene
Reason
Dissolves typically represent a passage of time between the two video clips that are joined by that transition effect. Dissolves are also associated with a slowing of story time or a blending together of related visual elements to create a more profound, romantic, or otherwise “emotional” moment in the story. Dialogue scenes, typically, happen at one moment in continuous story time and should not need a transition effect to join the coverage shots together.
Solution
Straight cuts will most often be your safest bet when it comes to editing together the coverage shots of a dialogue scene. The pacing of the conversation is set by the timing between the video/audio clips of each character saying his or her lines or reacting to the lines of the others present. Time is usually immediate and continuous. A dissolve would suggest to the viewing audience that a more significant passage of time has somehow elapsed between clips. Additionally, as dissolve effects also act like audio cross-fades, there is a risk of compromising the outgoing and incoming lines of dialogue on the associated audio tracks.

FIGURE 8.33 Stay clear of using dissolve transition effects between dialogue coverage shots within a single scene, as shown in the first five images above. Unless the dialogue happens across a very long span of time, just use straight cuts within the dialogue scene edit.
Exception
Using dissolves to join video clips within a dialogue scene may be appropriate if the dialogue scene actually happens across a longer period of time. Example: Two friends lounge around their apartment on a lazy Sunday afternoon – only speaking occasionally – and the dissolves cover up the gaps in time between their spoken words to one another. It may also be appropriate to use dissolves during a dialogue scene if the scene also contains a short montage sequence of the subjects involved in the conversation simultaneously doing things and speaking across a longer period of time. Otherwise, stick to straight cuts.
41. Use a “Soft Cut” or Mini-Dissolve to Mask a Cut in Interview Footage
Reason
It is inevitable that an editor will have to cut down or in some way condense or “clean up” the spoken-word responses of an interviewee. This extraction of unusable words and picture will often result in a jump cut for the image. If the editor is lucky enough, the person being interviewed moved very little while speaking on camera in his or her medium shot or MCU. A short dissolve effect can smooth over this minor visual discrepancy.
Solution
Rather than using B-roll or some other cutaway to layer over the very subtle jump cuts, the editor may use a two-to four-frame dissolve across the cut to quickly but gently morph the two almost exactly matching video images of the speaker. A dissolve of such a short duration will either go entirely unnoticed (if the talent remained very still) or appear as a “soft cut” or minor melding effect rather than a hard jump in picture alignment.
Exception
Obviously, if the interviewee changed his or her body positioning or facial expression too much at the cut point, the dissolve, no matter how brief or long, will not successfully morph the two video clips together. A B-roll clip over audio would be preferable, or perhaps a noddy of the interviewer, if that is how the show is constructed.
42. Use a Dissolve Between Simile Shots
Reason
As you may know, a simile is a comparison of two unrelated subjects using the words “like” or “as” (e.g., “She’s as tough as nails”). Two shots that may not have anything in common within the context of the present scene or story can behave like a simile. The dissolve will unite the two different shots and a new meaning is created in the mind of the audience. A straight cut would not unite the subjects of the two different shots as blatantly; therefore, the audience might not understand the filmmaker’s “literary” intentions. Although a very old and slightly heavy-handed method of visual storytelling, the dissolved simile shot is still effectively used today, particularly in comedies and animations.
Solution
Sometimes, a filmmaker wishes to make a visual simile with two distinctly different shots. In our example, we compare the young man with a dog. Although the dog is part of the narrative, a cut to him may not create the sought-after visual connection. A dissolve to the dog and back to the young man would unite them and allow the audience to understand the visual simile connection.

FIGURE 8.34 A dissolve across these two shots of the man and the dog will help to make a connection between them in the mind of a viewer. A simile is formed: the young man is like a watchful dog. (Photo credits: A – Anthony Martel; B, D & F – Zach Benard)
The composition of these two simile shots need not be matching (as in a form edit) but it can help to “meld” these disparate objects and generate a sort of intellectual form of simile edit.
Exception
This sort of visual simile treatment has its origins in silent cinema and, if used today, can often feel heavy-handed. Through the use of sound and other, less obvious, visual elements, you might be able to convey a similar connection.
43. Handle Continuity, Time, or Information “Gaps” with an Insert Shot
Reason
There will arise a moment in every editorial process where continuity of action, direction, or dialogue is not quite right across certain edits. There will also be a need for the editor to condense or expand time to help the pacing of a scene. Insert and cutaway shots will help with this (Figure 8.35). They divert the audience’s attention enough from the previous shot without breaking out of the content of the scene in which they appear. The momentary distraction usually serves as enough of a visual break to reset the attention of the audience on the next cut that continues the action or dialogue after the hidden glitch. If a particular person or object needs to be highlighted as “important” to the audience, it can be shown as an insert.
Solution
The editor will hope to have footage specifically shot for insert or cutaway use, or he or she will have marked certain shots that contain usable insert moments: a close-up of a dog, a clock, or a photograph; a reaction shot from another character in the scene, etc. Keeping these insert/cutaway clips available will help the editor to mask over the continuity issues or to lengthen a moment or condense a longer event by providing a momentary, narratively related, and believable distraction to the minds of the audience.

FIGURE 8.35 The insert shot of the dog close-up allows time to be condensed so that the rider can arrive at the cabin that much sooner.
Exception
Certain footage – for example, from long-winded talking-head interviews – that has no B-roll or other related visual material may not offer any opportunity for insert or cutaway shots. If the project does not have the footage and does not call for the use of full-frame graphics or titles, then you may be in an editorial quandary. Again, stock footage or still photographs may help here.
44. Cut to Reaction Shots During Phrases or Sentences Rather than at the End
Reason
Each consecutive shot should convey some new information to the viewing audience. During a dialogue scene, just because one person is speaking does not mean that he or she is always providing new visual information. To help to keep the audience engaged, it can be useful to cut to something new, such as the reaction shot of the other character listening. Breaking up a long line delivery with the reaction shots of the other character(s) involved in the scene can provide a certain rhythm and show new information about the response of those listening.
If you show only one person speaking, then cut to the other person’s reaction over silence, then cut back to the first person who starts speaking again, etc., it will become rather monotonous for the viewer – too much straight back and forth, like a tennis match.
Solution
Look at and listen very carefully to the footage to find a motivation, however small, to insert a cutaway of the listener reacting. The reaction shot of Character B is visible over the continuing dialogue of Character A. If the cutaway is close to the end of Character A’s words, then this clip may become the next shot where Character B will actually be seen to speak as well. This type of dialogue editing with lapping picture and character line delivery is more interesting to the audience because it shows communication between the subjects, with both actions and reactions.
Exception
There are times when a single character does the majority of the speaking in a scene. If the performance is powerful enough to “carry” the scene, then by all means leave the line delivery uncut for the stronger emotional effect on the audience. Also, there may be a monologue delivered by one individual. If that performance is powerful enough, let it ride. For comedic purposes, it might underscore the monotony of the conversation to keep it in the form of a “he says, she says” back and forth, and not lap the listening character’s reactions over the off-screen dialogue.
45. When Editing Dialogue, Avoid Automatically Removing a Performer’s Pauses
Reason
There are some things that can really disrupt a performance, and this is one of them. The performer will have rehearsed the script to achieve a certain emotional state in the scene. Actors rightly claim that the space between words is just as important as the words themselves. Most of the time, the pauses are used to create weight and significance, or to add a dramatic element to the words or the scene in general. To automatically edit out these spaces (or beats or pauses) in a monologue or dialogue can completely change the intended meaning of the scene.
Solution
Accept the pauses as a guide for your edits and, perhaps, use them as a motivation to incorporate a cutaway. Seeing some other subject, as in a reaction shot or noddy, will maintain visual interest while keeping true to the pace of the actor’s spoken performance. Accept the pauses as an important integrated element in the dialogue and not just as a moment when someone is not speaking.
Exception
The exceptions may have to do with the lack of time. In non-fiction programming like news, documentary, short-form commercial, and current affairs, where the maximum amount of visual and verbal information must fit into the minimum amount of time, the editor may choose to edit out unnecessary pauses.
It is very important to note that an editor may also remove, add, shorten, or lengthen pauses for the purposes of reconstructing the scene with a new rhythm and pacing of line delivery. Although the subject’s performance is highly valued, the editor has the responsibility of sculpting the best story and character representations in the scene and across the entire motion picture. Playing with time, word order, and word placement can be beneficial.
46. In Documentary Programming, Edit Out “Ums” and “Ahs” in Interviewee Speech
Reason
Often, your goal as an editor, especially in documentary and other non-fiction programming about real people, is to make them look and sound as good as possible on screen. A fourth grader, a diplomat, or a scientist may all have certain verbal pauses in their vocalized speech patterns. They may say “um” or “ah” to fill the space between their thoughts. While listening in person, these verbal pauses often go unnoticed unless they are extremely excessive. Watching a short answer filled with “ums” and “ahs” will be more noticeable and less appealing to the viewer, and it can waste valuable time to get to the point.

FIGURE 8.36 For reasons of clarity or program timing, it can be advantageous to edit out the “ums,” “ahs,” and “likes” from a speaker’s dialogue.
Solution
Edit out these verbal pauses in documentary or non-fiction material whenever possible. If the mouth does not move very much while the sound is made, lift the “um,” “ah,” or “gulp” and let the room tone or ambience track mask the hole. If the offense is more visually noticeable, then you may have to cutaway to a graphic or some B-roll, or to an interviewer noddy shot if such a thing exists. The B-roll cutaway is a staple of documentary monologue editing so that the verbal points of the person speaking sound clear, concise, and coherent. When the “ums” and “ahs” are removed from the clip, the picture track will look very choppy but the sound track will flow smoothly. B-roll and other cutaways will mask the jump cuts and also provide the audience with additional visual story information.
Exception
Occasionally, someone’s speech pattern and the verbal tics that he or she exhibits are inextricably tied to his or her persona. It will be best to keep these inherent pauses or sounds to provide the viewer with the full “flavor” of the individual’s true character.
47. Use a Character’s Cleanly Recorded Dialogue under His or Her Off-Screen or Over-the-Shoulder Line Delivery
Reason
During production, the sound recordist may not have the boom operator favor the off-screen actor or the over-the-shoulder’s “shoulder” talent, which means that this “hidden” actor’s dialogue will sound weak on the recording while the favored talent’s line delivery, given closer to the microphone, will sound stronger.
Solution
Traditional master scene shooting technique should provide multiple shots of the same dialogue delivery as covered from different camera angles. Any wide or two-shot should provide strong audio levels from both characters. Single shots (MS, MCU, CU, etc.) of each character should also yield strong audio recordings of line delivery. Whenever a character needs to say lines but is either not on screen or has the back of his or her head visible in an OTS shot, the editor should cut in clean, clear audio track lifted from some other source if the production track is not good for that “off-screen” character. The bad-sounding audio for the “off-screen” character is cut out and replaced with good versions of the same script lines. This way, the person whom the audience are watching gets clean dialogue and the “off-screen” character also gets clear, clean dialogue with proper levels, albeit from different takes and different audio sources of that performer.
Exception
There really should be no exceptions to this guideline. You should always strive to start with the cleanest, clearest, strongest audio signal when you are editing the sound elements for a program. If the sound needs to be modified (made worse) for a special effect within the story, then you should still start with clean sound and degrade it yourself in a controlled fashion using audio software effects, etc.
48. Do Not Be Too Bound by Dialogue When Looking for a Cut Point
Reason
In dialogue footage, there are two major motivations for cutting: vision and sounds. During a two-person dialogue, actions and reactions will take place. If you only cut when one character’s words are finished, then it can become predictable or boring. While one person is talking, the other will be listening and may show facial reactions, provided the production team shot such footage. These reactions are very important and can be used as the motivation for the back-and-forth editing for the scene.
Solution
In fictional narrative shooting, it is common to record the close shots of one character’s dialogue delivery with an off-screen performance of the lines for the unseen character. The audio for the off-screen character will most likely not be used, but the visuals of the on-camera talent will be useful. It will be during these non-speaking moments that an editor should be able to find the reaction shots for cutaways in the scene. Also, it may be possible to lift some frames out of the beginning of the shot before “Action” was called, or from the end after “Cut” was called, if the talent did not break character too early.
In documentary, news, and other talking-head programming, if no facial reaction is evident during the question and answer period, then the director or producer will hopefully have shot what some people call a reaction noddy of the listener as safety coverage. Noddies are additional, close shots of the listener simulating a reaction to what was said – usually a slow head nod. A noddy may show other movements of the head or eyebrows, a smile, etc. When noddies are cut into the dialogue with a motivation, they can look quite natural, but they do tip the scales of artifice in non-fiction editing.

FIGURE 8.37 If cut in at the right moment, a reaction shot may have greater significance to the audience than the dialogue that they are hearing coming from the other character. (Photo credits: A – Zach Benard; B – Anthony Martel)
Noddies are also useful to edit out parts of verbal information. For instance, they can be used to reduce the duration of an interviewee’s answer or cover for the numerous “ums” and “ahs” that inevitably need to be edited out of the replies. There is no written rule about the duration of a noddy, so it more or less depends on the circumstances. Adding a cutaway shot that is too short (maybe under two seconds) may seem jarring; adding one that is too long may leave the audience wondering why they are not watching the speaker again.
Exception
An exception could be when the primary shot is a monologue. There will be no other character or subject present in the scene to use as a cutaway. Also, for comic timing, a delay in the cut to other characters may build the tension/release dynamic of the “pregnant” pause.
49. Do Not Leave Any Holes in Your Audio Tracks
Reason
Non-linear digital video-editing software applications allow you to place video and audio clips wherever you wish on their respective tracks. Unless it is purposefully planned, no editor will want to have a blank black screen in his or her video. Care is usually taken to ensure that there is some sort of video clip on every frame from the start to the end of the sequence. The same goes for the audio tracks. A section of the sequence that contains no audio data whatsoever will play back as total silence – an audio hole that sounds really “dead” when encountered in an otherwise sound-filled timeline.
Solution
Make sure that you have some kind of sound clip in place on each frame of your sequence. If your program calls for silence, place an audio clip in your timeline that has some level of recorded “silence” – like the tone of a “completely silent” room. There will be some sound data present that will typically mix better with the other clips of actual sound (sync source tracks, NATS, SFX, music, etc.) in your sequence. This way, the quiet, in-between moments will sound like relative silence in comparison to the rest of the audio and not like total dead silence.

FIGURE 8.38 A hole in the audio track will play as absolute silence and will be rather conspicuous to the listener. Try to have an audio clip (even of “silence”), on some track, at every frame across the entire sequence.
Exception
There can be certain creative uses of total dead silence in almost any kind of program, but it will play as rather dramatic to the audience. Be cautious with this technique and be sure to handle the transitions into and out of this dead audio hole with care.
50. When Appropriate, Edit Video Tracks to the Beats of Music in Your Sequence
Reason
Most people respond well to music and the structure of much of the music from around the world has beats that count off particular intervals of time. When the audience hear the beats, they “get into the groove,” as it were, and become more susceptible to having the visuals of the picture track change over at these unique beat moments. The beats and cuts follow along together in time. Faster-tempo cutting may be more “fun” or “exciting” and slower-tempo cutting may feel more “peaceful” or “sad.”
Solution
If your music video, promotional video or commercial, montage sequence, or non-fiction programming contains a soundtrack (especially a pop music song), then it can be relatively easy (and effective) to make your straight cuts on the picture track(s) when the music beats occur. Most editing apps allow you to add virtual markers to clips. You can manually add markers to your song clip at each frame where the pronounced beat occurs. Aligning your timeline position indicator (playhead) with one of these markers, you can then edit in a video clip starting at the correct beat moment. Some software can also do audio clip analysis and pre-mark the beats for you.
Exception
Obviously, an editor would (most likely) not wish to edit an entire video directly on the same matching beat interval. This would become too predictable and, perhaps, repetitively boring for the audience. Perhaps save this technique for certain key moments in the song and in the visual material.

FIGURE 8.39 Most software will allow you to add markers to the sequence at the beats of your music clip. This allows you to edit short video clips IN to OUT precisely between the beats.
51. If Appropriate for Your Story, Make a Cut at a Loud Sound on the Audio Track
Reason
Loud sounds are known to cause many people to blink their eyes. It’s like a crash cut.
Solution
An editor may be able to find a point in a scene’s development where a loud sound occurs on the audio track. If the picture edit is made with discretion at this point, it is likely that the cut transition will be hidden during the blinking process of the audience members who are reacting to the loud sound. This is a bit of a cheat and a bit of a gamble, but it may be effective at the right moment.
Exception
You should not cut just any time that there is a loud sound on the audio tracks. This is a poor way to construct a good story flow. However, a music video could benefit from this editing pattern if a cut were to be made on the strong drumbeats, for example.
52. Hold Off on Adding Music to Dialogue Scenes
Reason
Dialogue should most often convey important information about the story, the characters, or the topics of discussion. Carefully performed and cleverly edited dialogue will have a rhythm or cadence all of its own that can feel like the flow found in music. Adding actual music under spoken-word audio tracks can sometimes be a distraction for the audience, especially if the song has lyrics.
Solution
As an editor trying to get a feel for a scene from a film or a segment from a documentary, etc., you should keep your own distractions to a minimum. As much as there is value in editing to music (to help you to find the pacing), it would be best to cut dialogue scenes without any music present. This way, you can judge the technical qualities of the actual sync sound production audio files, and you can construct your own rhythm for the material.
Exception
If a diegetic musical soundtrack needs to be present in the scene, then add and mix it appropriately after the picture lock stage. The same goes for an original musical score.
53. During the Audio Mix, Make Sure that Music Track Levels Do Not Overpower Dialogue
Reason
Music is a very powerful creative device. It can propel a scene forward, slow it down, make the audience feel sad, happy, tense, etc. Once you get your program to the point where your music bed is in place, it is important to regulate the sound levels so that the music does not compete with the dialogue or other audio elements in your sequence.

FIGURE 8.40 Your dialogue and music tracks will most often be separate and independently controllable clips in your timeline sequence. Make sure that you lower the volume of your music to appropriate levels whenever important lines of dialogue are being delivered.
Solution
Attend to the proper audio level mixing for all audio elements, especially the music. If the music is “source” or diegetic (generated within the film world by a radio, live band, .mp3 player, etc.), then be aware that it should play continuously under that scene until either the music or the scene ends. If dialogue is delivered on top of the music bed, then make sure that you lower the music level under the spoken words. The audience will accept the fact that the music level drops into the background sounds because they are usually more interested in what the characters have to say.
Exception
If the location sound is recorded during the documentation of a live event (concert, benefit gala, etc.), then it will be difficult or impossible to lower the captured music levels in the background. Also, if the fictional narrative story calls for the loud music to drown out the spoken word, then keep it hot in the mix for this special purpose.
54. Consider Using a Sound Element Before Active Picture at the Start of a Program
Reason
Some claim that a picture without sound is dead, but sound without a picture is not. The audience, upon hearing sound (possibly spoken words, music, or ambience), will begin to imagine what is happening even before they know anything about it. The imagination is triggered. As the pictures then come onto the screen, the multi-sensory experience begins. This harkens back to those old-time radio programs where the listening audience heard dialogue, sound effects, and music but found engagement and entertainment in the aural experience – much as with podcasts of today.
Solution
If the type of program warrants it, sound elements important to the narrative (such as ambience, SFX, or music) may begin underneath the opening credit sequence, which can incorporate a fair amount of black screen space. The location and mood of the story are set by this leading audio information. Obviously, this practice depends upon what the sounds are and what the opening imagery will be in the program.
Exception
The exceptions to this guideline are short-form (30 to 60 seconds) television advertisements, where the picture is obviously on screen as early as possible for time reasons. In general, those who produce television and streaming web programming do not like to incorporate full black screens for too long because the viewing audience could mistake this for an actual technical error at the broadcasting station, with the cable signal, with the display device or video stream, etc.
55. For the End of a Program, Use the End of the Music
Reason
Music, of whatever nature, usually is divided up into different phrases, verses, or movements and has a distinct structure. Part of this structure will be an ending, fade-out, or climax. This climax should be used to match the shots that end your video. It would be confusing to show the final pictures of a program with an opening musical passage that awkwardly fades down. They would probably not match well.
Solution
The music should be back timed to find its correct start point relative to the visuals of the sequence. If the timing is correct, the last bars of the musical piece should match the final shots of the sequence. This is especially true at the end of a program when the last bar of the music would be timed with the fade-to-black, either at the conclusion of the story action or at the end of the closing credit sequence. Those more skilled in music editing may cut out the middle of a song and mix together the start and the end to jive better with the end of the motion picture.
Exception
The main exception to this practice is where the music is faded gradually into or under other sound, dialogue, or music that is stronger in the mix.
56. Make Appropriate Font Choices for Your Titles
Reason
Whether you have access to fonts just from your computer’s operating system or you have downloaded a larger collection of font libraries, you should choose sans serif fonts for most titling purposes in your video-editing software. Serifs are those little extra flourishes extending off the major structures that form each letter in an alphabet and number sequence. Fonts with serifs, particularly when used within interlaced standard-definition video projects, do not look very good at lower resolutions or when compressed into media files for streaming or on small-screen playback. The thinness in the design of some of those serif attributes gets lost (Figure 8.41).
Solution
Select sans serif fonts. You may even wish to make your chosen font bold and of a point size appropriate to the purpose of the title. Too small and the titles may not be legible on screen, especially if viewers will be watching your video on tablets or smartphone screens. Spell-check your words and names also. Crazy colors, drop shadows, or strokes may complicate things visually. White fill color over black background may often be the simplest and best choice for full-screen, opaque titles.
Exception
You are free to use any fonts recognized by your video-editing software and its titling tool, but the look should fit the show and be technically correct (sans serif most often). If you are sharing projects with editing partners across computer systems, you should guarantee that the fonts that you have selected for your titles also live on the other editing systems. Most often, the font data of your titles originates on your local host computer and does not travel with your project.

FIGURE 8.41 The font in Title A has serifs and other thin attributes that may not play well on video screens. The font in Title B is sans serif and may look better when used in titles.
57. Be Aware of Proper On-Screen Durations for Inter-Title and Lower-Third Graphics
Reason
Just as a recorded shot of a person can stay on screen for too long, so can a title or other graphic element. The audience absorb visual information from the shots as a product of composition, lighting, character facial expressions, colors, etc., but they absorb information from inter-titles and identifying lower thirds by reading it. If a title is not on screen long enough, it cannot be read and understood. If a title is left on screen for too long, the audience may become vexed waiting for the next shot or the next bit of information to appear.
Solution
An inter-title that says, “Later that same day …” (only four words) may be on screen for as little as two seconds. An inter-title that consists of several short phrases may require five, ten, or more seconds, depending on how many words there are and how complex the visual presentation is. A general guideline for the editor is to leave a title on the screen for as long as it takes to read through the words three times in a row. This is dependent upon the length of the written words, of course, and may have to be averaged down or up depending on the importance of the title information within the motion media piece and the overall timing of the edited program. Inter-titles, which are traditionally white lettering over a solid black background, are often preceded by a fade-to-black and followed by a fade-from-black.
Lower thirds are superimposed identification titles, usually showing a person’s name, occupation, or location in news, documentary, and non-fiction programming. They appear in the bottom lower third of the screen shortly after a close shot of the person speaking is edited into the sequence. The title should stay on screen long enough for the information to be read and digested by the average person, and then it should go away. Often, lower-third identifying titles like this dissolve onto the screen, stay solid, and then dissolve off – a bit less harsh than a straight cut on and off. You may also have seen fancier lower-third treatments that slide onto, type onto, or otherwise animate onto the screen. It is also customary to use the lower-third identifying title on the first appearance of a person in a program. There often is little need to show the title again if the same person is shown again later in your sequence, although this may happen if you wish – especially if your program is broken down into sections and the audience will need a reminder of who is speaking on screen.

FIGURE 8.42 Titles and lower-third graphics require appropriate timing for each edited piece. Too short and the audience may miss out on information; too long and they may get impatient waiting for the next visual element to appear.
Generally, a title can live on screen at full opacity for as long as needed. The actual duration will be determined by watching the end of the preceding clip and seeing how the title comes onto the screen and for how long before it cuts out to the next shot.
Scrubbing through the title clip in your timeline will not give you the appropriate sense of time. You must back up your playhead prior to the title’s entrance, and then play through its duration in real time in order to feel how long is long enough. It would be advisable for you to get feedback from several other people who know the project so that you can gauge how they feel about the timing of the title elements and lower thirds. Often, half of a second longer or shorter will make a big difference in helping it to feel “right.”
Exception
There are no real exceptions to this general practice. As the editor of these created graphic elements, you have total control over how long you wish to leave them on screen. After you know the information has been conveyed, it becomes a question of beats to determine the appropriate duration.
During the construction of your sequence, you can become enamored of a particular portion of a song that is playing on the audio track under the title or graphic. Timing out a visual element (like the inter-title or lower third) to a musical phrase can be a good way to engage an audience with multiple senses, but be aware that if the sound element is too short or too long, the title will be adversely affected also.
58. Use Still Digital Photographs Whose Image Resolution Is as Large as or Larger than the Project Format’s Pixel Resolution
Reason
Digital images that have a pixel resolution smaller than that of the project settings for the sequence being edited will need to be scaled larger to fit the full frame of video and will, therefore, degrade in quality.
Solution
Acquire still digital image files that match or exceed your sequence’s dimensions of pixel rows and columns. Example: An image that is 250 3 250 pixels will have to be scaled up quite a bit to fit nearer the edges of a full HD video frame that is 1920 3 1080 pixels in size. Scaling this small web image up to full HD pixel resolution will cause it to look blocky, chunky, blurry, and all-around bad. Images that have much larger pixel dimensions will easily scale down, retain much of their image data, and look good. Example: An image that is 3543 3 2365 pixels will reduce down to fit within the full HD video frame size.

FIGURE 8.43 Imported digital photographs that are too small for the HD or larger video format may need a special treatment such as this to retain image quality.
Exception
If a client must use a lower-resolution image, then design a layout that can highlight the smaller image within the larger frame and do not attempt to scale it up. A common and quick trick is to stretch the smaller image to fit into the larger sequence frame and then soften it with a frame-wide blur effect. On top of this blurred and stretched image, you can place the best version of the imported smaller picture at its original size to maintain full quality (Figure 8.43).
59. If Working for a Client, Complete Rudimentary Color Correction Before Showing a Rough Cut
Reason
Not everyone understands that video sometimes has less than desirable color characteristics. Overall brightness, contrast, and color casts can be quickly corrected with your software tools so that your sequence plays back and looks “normal” to the untrained eyes of your client.
Solution
Although the complete color grading will not be done until the finishing phase of post-production, there can be value in correcting any major luminance and chrominance video signal issues earlier, at the rough cut stage. Individuals who are not accustomed to how video editing and finishing work may have great difficulty seeing beyond the compromised imagery and may be less able to provide proper feedback on the actual edit in progress. With a quick pass on color correction, you are not staring at unsightly video clips all day long and the client will not freak out.
Exception
Some clients trust in the process and will not need to see corrected video early on. Time may not be on your side and even quick drag-and-drop auto-correction effects may be too time consuming for your due date. If you are editing your own personal projects, then follow the more traditional steps and save the real color grading for the finishing stage.
60. When Color Grading, Work Through Shots, Then Scenes, Then Overall Look
Reason
Scenes are made up of individual shots and the entire motion media piece is made up of scenes or segments. If you start small and build to larger chunks of the overall piece, then you’ll get the base levels set, match the adjoining scene clips, and be able to tweak an overall look for the entire project – in that order.
Solution
A solid approach to color grading a sequence during the finishing phase of post-production is to start with the shots that need the least help first and move on from there to the more difficult fixes. You should grade an individual shot and then apply that fix to all other clips from the same master clip that also live in the timeline. Next, grade the other shots in that scene so that shots that are supposed to be taking place at the same location and at the same moment of film time have a uniform appearance. Lastly, once all of the video clips have been corrected and graded to look as good as the project needs, then create the final, overall look for the entire show based on the already tweaked base layer.
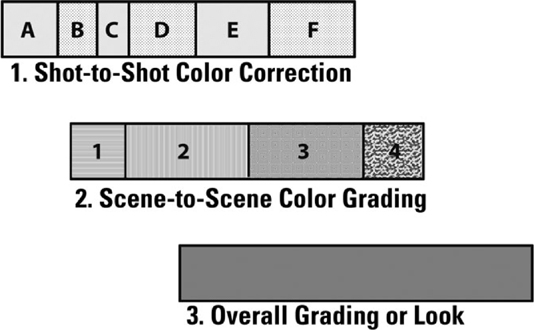
FIGURE 8.44 Color grading should progress from individual shots to shots within scenes or segments of a show and finally end with the creation of an overall look or color treatment for the entire program.
Exception
There really should not be much deviation from this order, because video-editing software applications process the video signal in certain orders. Ensure all of the clips have good contrast, brightness, and color values (across the entire sequence) before you attempt an overall, final look for the show or for segments of the show. Also, even the silliest or quickest of video sequences can benefit from the color correction and grading process, so it is best not to skip this phase of the editing process.
Chapter Eight – Review
1.Pay careful attention to media and project organization.
2.Learn and use the keyboard shortcuts for your video-editing applications and operating systems.
3.Organize your timeline tracks and maintain consistency across projects.
4.Keep your rough cut long; do not be tempted to do a finely tuned edit early in the process.
5.Review each edit or series of edits as you make them.
6.Duplicate your sequence before making major changes.
7.Show your edited motion picture to someone else and get feedback.
8.Put aside your edited sequence for a short time and watch it again with fresh eyes.
9.Use shots with matching headroom when cutting shot–reverse–shot in a dialogue scene.
10.Avoid shots where distracting objects appear to be too close to the subject’s head.
11.Avoid shots where the side edges of the frame cut off the heads or bodies of people.
12.Cut matched shots rather than unmatched shots in a back-and-forth dialogue scene.
13.When editing a telephone conversation, the subjects should appear to be looking across the screen at one another.
14.In a three-person dialogue, beware of cutting from a two-shot to another two-shot.
15.With a single subject, try to avoid cutting to the same camera angle.
16.Beware of screen placement issues with an object of interest.
17.Edit in a wide shot as soon as possible after a series of close-up shots in a group scene.
18.Cut to a close shot of a new subject soon after he or she enters a scene.
19.When editing a new scene with new backgrounds, show an establishing shot at the earliest opportunity.
20.Use close-ups of subjects in a scene for the greatest emotional effect.
21.Cut away from subjects soon after their look rests upon their object of interest.
22.Use J-cuts and L-cuts to smooth over transitions.
23.Create a continuous motion action edit by cutting during the physical movement in the two matching clips.
24.When cutting a rise as an action edit, cut before the subject’s eyes leave the frame.
25.When cutting to a close-up of an action, select a version of the close-up where the action is slower.
26.Understand the visual differences between a dolly-in and a zoom.
27.Beware of shots that dolly out without motivation.
28.When editing in a pan or a crab dolly move, use the best version that is smooth, timed well, and leads the subject’s movement.
29.Begin and end each pan, tilt, or dolly shot on a static frame.
30.If a subject is moving within a pan, crab dolly, or tracking shot, avoid cutting to a static image of the same subject if he or she is then stationary.
31.Avoid cutting pans and tilts that reverse direction at the cut point.
32.Objects, like people, moving in a direction have an action line. Avoid crossing it or the screen direction will be reversed.
33.Avoid cutting an action edit from a two-shot to another two-shot of the same people.
34.Allow a subject to completely exit the frame prior to cutting to that same subject in a new film space and time.
35.For any action edit, if a subject exits frame left, then the same subject should enter the next shot frame right.
36.Avoid making an action edit from a long shot of a subject to a close-up of the same subject.
37.Beware of editing a cut-to-black followed by a cut-to-full-picture.
38.Take advantage of the transition point that natural wipes offer when they occur in the footage.
39.Take advantage of the transition point that whip pans offer when they occur in the footage.
40.Do not use video track dissolves during a dialogue scene.
41.Use a “soft cut” or mini-dissolve to mask a cut in interview footage.
42.Use a dissolve between simile shots.
43.Use insert shots to cover gaps in continuity, condense or expand time, or reveal important story information.
44.A reaction shot seems more natural during a spoken phrase or sentence than at the end.
45.When editing fiction dialogue, avoid automatically removing a performer’s pauses.
46.In non-fiction programming, edit out “ums” and “ahs” in interviewee speech.
47.Use a character’s cleanly recorded dialogue under his or her off-screen or over-the-shoulder line delivery.
48.Do not be too bound by dialogue when looking for a cut point.
49.Do not leave any holes in your audio tracks.
50.When appropriate, edit video tracks to the beats of music in your sequence.
51.If appropriate for your story, make a cut at a loud sound on the audio track.
52.Hold off on adding music to dialogue scenes.
53.During the audio mix, make sure that music track levels do not overpower dialogue.
54.At the start of a program, the sound track can lead the visual track.
55.For the end of a program, use the end of the music.
56.Make appropriate font choices for your titles.
57.Be aware of proper on-screen durations for inter-title and lower-third graphics.
58.Use still digital photographs whose image resolution is as large as or larger than the project’s pixel resolution format.
59.If working for a client, complete rudimentary color correction before showing a rough cut.
60.When color grading, work through shots, then scenes, then overall look.
Chapter Eight – Exercises
1. Conduct a test of the most usable fonts. With your video-editing application of choice, type the following sentence into the title tool: “The quick brown fox jumps over the lazy dog.” Run through a series of fonts, colors, point sizes, borders, and drop/depth shadows. See which ones work best over an opaque background and which ones work best keyed over a video background.
2. Record a quick video interview with a friend, family member, or co-worker. Watch the footage and listen for any particular speech patterns, verbal tics, or padding with extraneous sounds or words. Edit out the time-consuming “ums,” “ahs,” and extra “likes.” Does it make the interviewee’s responses sound smoother, tighter, and more to the point? How did you choose to cover over the picture jump cuts?
3. Practice editing a piece of music to see if you can cleanly cut it down and seamlessly mix the pieces together. Try it with rock, pop, jazz, hip-hop, and classical to see which genres, if any, are easier to handle. (Hint: Instrumental pieces may work best.)
4. Based on the script found in Appendix C, record two people performing that scene, then edit it together. Try to incorporate as many of the applicable guidelines that have been presented here in Chapter Eight. If you need to, refer to the shot types discussed in Chapter Two before you record the video.
Chapter Eight – Quiz Yourself
1.What is a traditional “reaction shot” and when and why might you want to edit it into a scene?
2.Why might an axial edit (or punch-in) cause a jump cut with those two shots recorded from the same angle on action? When might this be a good thing to do?
3.What are “simile shots” and what might be the best way to join them together?
4.Why might you want to allow a subject to completely exit the frame before cutting to a new time and location where that same subject then enters?
5.If a car exits frame right in Shot A, then how should it enter the frame of the next shot (if you are following the traditional approach to handling screen direction of action)?
6.What is a “natural wipe” and how might you, as an editor, go about constructing one?
7.What is an “insert shot” and how, when, and where can you use it in your edited sequence?
8.How can B-roll be used to help to cover up the visual jump cuts caused when you edit out the “ums” and “ahs” of an interview subject in non-fiction or documentary programming? If B-roll for the subject of discussion does not exist in the source footage, what might an editor be able to use in its place?
9.Why might an action that is shown in a tight close-up shot appear to happen very quickly on the big screen?
10.Why might it be advantageous to make a picture track edit when a loud sound is heard on the audio tracks?