
Chapter Four
Assessing the Footage: Selecting the Best Shots for the Job
• Criteria for Shot Assessment
• Selecting the Best Shots
You should feel comfortable now identifying the various types of shots and sounds that may be used to create a motion media production. With these committed to memory, it will be that much easier to organize them when you acquire and review the material to be edited. Be forewarned, however, that not every shot type may be used to generate coverage for a particular scene. For example, it may not make much sense to look for an XLS in footage from a dialogue scene shot in an airplane cockpit – unless the production team provide you with an establishing shot of the plane in the sky or a POV shot from the cockpit down to the ground level.
Once you have the material organized, it will be helpful to review each shot for its technical and aesthetic qualities. Certain criteria work for some motion picture genres, but not all movies, shows, commercials, or music videos can be held up to one master checklist of good or bad visual and auditory aspects. What might never be allowed as acceptable in one program type may be entirely encouraged in another. So, as an editor, you will have to make your own judgment calls depending on the type of project you are editing and what the end goals of that project are set to be.
Criteria for Shot Assessment
Beyond judging whether your shots fall into the categories of simple, complex, and developing, you should be assessing them for their quality. The listing that follows, although certainly not exhaustive, should provide plenty of criteria upon which you might base an analysis of the material you will be editing. Again, the type of video you are editing will often come with its own style, traditions, and sense of what is acceptable and what is not, but you should at least be aware of these potential “gotchas.”
• Focus |
• Matching Angles |
• Framing and Composition |
• Matching Eye-Line |
• Exposure and Color Balance |
• Continuity of Action |
• Screen Direction |
• Performance |
• The 180-Degree Rule/Axis of Action |
• Continuity of Dialogue/Spoken Words |
• The 30-Degree Rule |
• Audio Quality |
Focus
One of the chief issues that you may encounter as an editor is incorrect focus during a shot. Nothing can ruin a good performance like bad focus. It is the camera department’s job to ensure good focus on shots, and, for the most part, they will. However, it only takes one false move or late start with the focus pull to turn a potentially good take into a bad one. With scripted fictional narrative filmmaking, the production team will often shoot multiple takes of a line reading or an action to ensure that they have the focus correct, so you should not have to worry too much with that kind of material. Unscripted projects, such as documentaries, corporate interview videos, or live news, often only allow one chance at good focus while the action happens in front of the camera. A soft-focus talking-head interview could render that entire interview unusable.
Why is soft-focus or blurry imagery so bad? It is the one technical factor in film or video that cannot be corrected during post-production. Unlike exposure, color balance, or even minor compositional framing changes, there is no fix for soft-focus footage. It becomes a problem because the viewing audience are intolerant of blurry images. As humans, our visual system is set to always see things in sharp focus (unless, of course, you require glasses or other corrective lenses to properly focus the light in your eyes). When we watch a moving image that has soft focus, we become distracted and uncomfortable as our eyes try to focus on the image that cannot resolve. It is unnatural for us to see things as being blurry.
When a filmmaker purposefully causes things to go blurry in a shot, it should have a thematic meaning or direct narrative connection. There usually is a subjective motivation for the blur (the POV of a drugged or injured character, for instance). If this does happen, placing some object within the frame in good focus should quickly follow the blurry moments or the editor should cut to a different in-focus shot within a reasonable time. So, unless a music video project is knowingly experimenting with radical focus shifts, you should avoid using blurry takes when you edit. If there are some well-focused moments in an otherwise blurry clip, mark those regions and salvage them for possible later use.

FIGURE 4.1 Audiences may forgive many things about an image, but they do not tolerate blurry pictures. Use the shots that have the best focus.
Framing and Composition
Living at the cusp between a technical issue and an aesthetic issue is the framing of a shot. It can be considered technical in the sense that sometimes the format of the recording device (film or video camera) may be a different size than the frame of the final deliverable product. This is especially true today if a documentary project will contain older MiniDV or 16mm film archival footage, which have a traditional aspect ratio of 4:3 for standard definition (SD). Finishing the mixed-aspect-ratio video for widescreen 16:9 high definition (HD or even UHD) may call for some framing adjustments in post-production.
As an editor, you may be called upon to reformat the video frame (scale it, “letterbox” it, cut it down to a smaller size as a picture-in-picture (PIP) or split-screen element, etc.). These days, with Cinema4K or UHDTV, you may have to perform what is called a pan and scan, where you take a large-resolution camera original format and extract a smaller frame size (like traditional HD) from it while simultaneously panning left and right to maintain some semblance of good composition in the new, smaller image. If you are mixing much older SD material into an HD project, you may choose to “pillar-box” the 4:3 picture inside the 16:9 frame size (Figure 4.2). No substantial frame aspect ratio changes are needed if working between traditional HD and UHD as they are both 16:9 in shape.
Aesthetic criteria for framing and composition have fewer immediate fixes. You will have to watch complex and developing shots for good focus, but also for good framing and proper composition. If an elaborate camera move bumps, jumps, sways, or in some way misses its mark while covering the talent or action, then you should not consider using that particular take, or at least not that particular portion of that take. Again, normally during production, there are quality controls for reviewing each shot, and if the filmmakers do not get it right, they usually perform the shot again, so you should have at least one good choice for your edit, but not always. That is where creative cutting comes into play.

FIGURE 4.2 A–B – an example of an HDTV 16:9 extraction from a UHDTV 16:9 hi-res image; C–D – an example of a 4:3 “pillar box” inside a 16:9 frame; E – an example of a frame with good headroom, look room, and a visible horizon line; F–G – high and low angles on a subject; H–I – examples of subjective and objective shooting styles. (Photo credits: A, B, F, G – Anthony Martel)
Of course, you will also wish to gauge the qualitative attributes of a shot. Is there appropriate headroom? Is there appropriate look room? Is the horizon line parallel to the top and bottom edges of the frame (if it should be)? Do you think the eye-line works? Is the vertical camera angle too high or too low? Is the horizontal camera angle too subjective or too objective? Does it work with the type of project you are editing? Very few of these other aesthetic qualities of the shots can be fixed by the editor (short of using some software effects to resize or rotate an image) so it might be best to place them aside and use any other better takes if you have them.
Exposure and Color Balance
With the availability of powerful yet relatively inexpensive video-editing software, issues with the exposure and color balance of the images are no longer that difficult to fix. Of course, you would prefer that all shots were originally recorded with good exposure and had the proper “look” for the color palette of the project’s visual design. If these shots exist in the master footage, then you really should start by selecting those first. But, if good performances or other visual material are present on shots that have exposure issues (the overall image is too bright or too dark) or color temperature shifts (the image looks overly blue or overly orange, etc.), then keep those shots for use and have yourself or a video colorist attend to their corrections with the software tools available. Even the most rudimentary video-editing software has some controls for altering image quality for luminance (brightness and contrast) and chrominance (hue and saturation).

FIGURE 4.3 Select the well-exposed shots. If you have to edit using dark, light, or color-challenged shots, most video-editing software comes with some built-in exposure-and color-correcting tools to help.
Audiences do not like it if someone has green skin when there is no reason in the story for that character to have green skin. Additionally, consider your own editing needs. How would it look to cut back and forth from a dark shot to a very bright shot if these separately recorded images are a part of the same scene, the same physical film space? Our eyes and our brains could be missing valuable information as we try to adjust between and rationalize the extremes of dark and light. For everyone’s sake, either correct the exposure and color issues or do not use the footage in the final project, if at all possible.
Screen Direction
This is mostly an issue with scripted fictional narrative media, but it comes up in other genres as well. Subject movement out of the frame of one shot and into the frame of the next shot must maintain consistent screen direction. To clarify, frame left is screen left and frame right is screen right when watching the images. The diegetic film space itself, the world in which the characters live and move, must be considered as real space; therefore it must comply to the same rules of left, right, up, down, near, far, etc.
If Shot A shows a character exiting frame left, then, when you cut to Shot B, the same character should be entering from frame right. The character’s direction of movement within the film space should be consistent: right to left and right to left again (Figure 4.4). Done incorrectly, this could cause a momentary confusion in the viewer. As an example, if you show a character exiting frame left in Shot A, then show the same character entering from frame left in Shot B, it will appear as though the character has simply turned around and is magically re-entering a different location. This can also appear as a jump cut. Some schools of thought say “anything goes” in today’s motion media world of movies, television, and web videos. They are counting on the viewing public’s sophistication in understanding cinematic language. This may be, but you can never go wrong with maintaining proper screen direction – allowing for deviations if the genre calls for it.

FIGURE 4.4 Maintaining screen direction of subject movement between shots helps to orient the action and reinforces the viewer’s understanding of the film space.
The 180-Degree Rule/Axis of Action
Continuing the logic of our screen direction discussion, you must also analyze the footage to make sure that the production team respected the axis of action or the imaginary line while they were recording coverage for the various scenes. As you may know, the 180-degree rule is established from the first camera set-up covering the action of a scene. This framing is usually a wide shot showing the subjects and their environment. An imaginary line, following the direction of the subject’s sight line, cuts across the set or location and defines what is frame left and what is frame right. Each successive medium or close-up shot of the talent within the scene should be set up with the camera on the same side of this line of action. If this axis of action has not been respected, then, to the viewing audience, the spatial relationships of the talent will be flipped left to right or right to left. Traditionally, screen direction is maintained by shooting all of the coverage from the one, initial, side of this line.
If you consider one of the alternative names for this practice, the 180-degree rule, it might help to clarify what is going on. When the camera crew record the wide shot for a two-person dialogue scene, they have established the physical locations of each subject and the direction of their lines of attention or sight lines. The imaginary line, established by talent sight lines, bisects an imaginary circle around the talent and makes a 180-degree arc within which the camera should move for recording more set-ups. If the camera were to move across this line to shoot an individual’s close-up, that character, once edited into the scene, will appear to be turning and facing the opposite direction. This will look incorrect to the audience because the shot will break from the established screen direction for this scene. As a result, you really should be careful if you are looking to edit in a shot that has crossed the line (Figure 4.5).

FIGURE 4.5 Coverage shots that cross the line may not be usable because they break the established screen direction for the scene. The two characters end up looking off screen in the same direction rather than looking back and forth at one another across the open film space between them.
Many filmmakers today are rather relaxed with this “rule.” A free-form approach to talent and camera movement, plus the sophistication of the viewing audience, allow for some switches within the scene coverage. Although you can never go wrong in using the traditional action line guide, use the shots that fit the editing style of the scene or program and go for the strongest performances.
The 30-Degree Rule
Based around the concept of the 180-degree rule, the 30-degree rule calls for the camera crew to move the camera around the 180-degree arc by at least 30 degrees before they set up for a new coverage shot of the talent. The reason is simple. If two images of one person (a medium long shot and a medium shot) are shot from two locations around the 180-degree arc and the physical distance between camera set-ups is less than 30 degrees, then the two shots, when cut together by the editor, will look too similar on the screen and cause a “jump” in the mind of the viewer (Figure 4.6).
This is one example of how a jump cut can occur. Without sufficient movement around the shooting arc, the viewpoint that the camera offers is too similar to the previous one and the subject will occupy nearly the same frame space. If you have to edit these two similar shots together, the imagery will appear to suffer an immediate jump in space and possibly in time. The angles of coverage and the shot type must be different enough to allow a believable alteration in viewpoints across the cut.

FIGURE 4.6 It is best to edit coverage shots whose individual angles on action are greater than 30 degrees apart along the 180-degree arc. If the camera angles covering the action are too similar, as in this example, the audience will perceive the edit as a type of jump cut. Images also containing very different subject sizes on screen would work best at the edit point.
As the editor, you cannot control where the camera was placed for the close-up coverage, but you do have control over what two shots you juxtapose together at a cut point (provided there are more than two angles of coverage). Make sure that the two shots are sufficiently different enough in their horizontal angle on action so they do not appear to jump while viewing them across the edit. It would be best if the two shots at the cut point also had different focal lengths or obviously different subject sizes within their frames – further reducing the likelihood of a jump cut.
Matching Angles
When shooting dialogue scenes, the production team will most often shoot what are called matching angles: coverage of each character in each shot type where the angle on the person, her or his size in the frame, the lighting scheme, and the focus on the faces are all consistent with one another. One person’s close-up will look very similar to the other person’s close-up, but they will be on opposite sides of the frame. The compositions of the matching shots mirror one another.
Traditional master scene filmmaking technique has historically called for an “outside-in” construction of a scene’s progression from beginning to end. Although not adhered to as much these days, it is a tried-and-true technique that will work for almost any motion picture. As an editor, you might assemble a traditional scene something like this:
• establishing shot – a very wide shot showing the location where the scene is to take place; may be an exterior even if the scene takes place on an interior set;
• wide shot – showing the characters and their placement in the film space;
• closer two-shot – bringing the two characters together in a tighter framing;
• over-the-shoulder (OTS) shot of the first character;
• answering OTS shot of the other character;
• medium close-up of the first character;
• answering medium close-up of the second character.
Cutting back and forth between matching coverage shots (OTS, MS, CU, etc.) will be easily accepted by the viewing audience because the images, although of two different people on opposite sides of the screen, “answer” one another and look like they belong together – mirroring one another. In other words, the visual aspects of these images match, but in reverse.

FIGURE 4.7 Use matching angles of shot types when editing coverage for a scene involving more than one person. When cutting back and forth between these close-ups, the audience sense the balance and the equality within the scene.
Matching Eye-Line
Eye-line (sight line) is an imaginary line that connects a subject’s eyes to whatever object holds his or her attention within the film world. If two people are speaking with one another, the other person’s face or eyes are often the object of interest, so the eye-line would trace from Character A’s eyes to Character B’s face/eyes. It could be a person looking at a clock, or a dog, or a work of art, etc. Getting the audience to trace the eye-line from a character in a close framing to an object of interest not in the same frame can be tricky.
When you cut away from the shot of the person looking off screen to the shot of his or her object of interest, the eye-line must match (Figure 4.8). The audience must be able to trace the imaginary line from the subject’s eyes, across the cut point, and to the object contained within the new shot. If this line does not flow correctly, then the audience will feel like something is just not right. As an editor, you cannot really fix eye-line mistakes; you will just have to find some other way to cut around the issue (see the sections on the use of inserts and cutaway shots later in the book).

FIGURE 4.8 The eye-line or imaginary lines of attention should match across the cut point between two shots.
Continuity of Action
We discuss this in detail throughout the book, but it is a topic that frustrates many editors. The action performed by or around the talent in one shot should match, relatively exactly, the same performed action as seen in a different framing, angle and/or focal length within the same scene’s coverage. This is called an action edit or continuity edit. Humans are very good at determining fluidity of motion. When things do not flow – when supposedly continuous actions do not match across a cut point – it is easily noticed (Figure 4.9).
Your job will be to finesse these action cuts as best as possible. Unless there is an obvious glitch in one entire shot, you may not be able to tell that actions will not match until after the footage review stage. Save all of the good takes and see which ones eventually cut best with one another. Trimming just a frame or two from the tail of one shot or from the head of the next might be enough to smooth over minor errors in continuity of action, but anything major will need to be addressed by other, more creative editing options – perhaps a simple cutaway or a customized effect – that fit the style of the project.
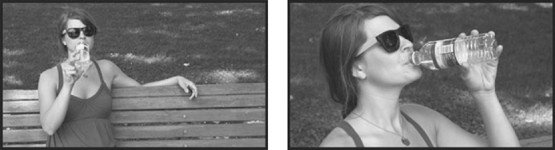
FIGURE 4.9 Watch out for continuity of action issues within the shots you are considering for the edit. Here, the water bottle jumps hands across the cut point.
Performance
The performance that an actor delivers on the film set is certainly an issue that the editor has absolutely no control over; it is decided between the actor and the director during production. You cannot fix bad acting or bad direction of good actors during post-production. You can, however, hide it or mask it through creative editing. As the editor, you set the pacing of the scene and the order and timing of line delivery, and, through the juxtaposition of clips of varying performances, you can alter the tone, mood, or perceived behavior of a character. You decide which performance works best in the edited story.
Sometimes, there simply is nothing else to cut to and there are no “better” takes to use. Cut in what you think works best for the overall scene, grin and bear it, and move on. If the talent’s performance is actually very strong but his or her ability to match his or her business (holding a glass or cigar, brushing his or her hair, etc.) is what makes a certain take less appealing, be ready to cut in the best performance and let the discontinuity of the little business stand as it is. You will find that strong performances do what they are supposed to do: engross the audience and involve them more deeply in the story. A minor continuity glitch will most likely not even be noticed when actors are delivering a great performance to the engaged audience.
Continuity of Dialogue/Spoken Words
Be aware of actor line delivery when reviewing the footage. Does the talent say different words from take to take and shot to shot? Is there a different timbre in the voice or a modified rate of delivery? Directors will often encourage actors to try different emotions, tactics, and approaches to what and how the character is speaking and behaving. These variations can be a goldmine if they all work together in the scene. If they cannot be joined together, then the editor will be faced with some challenges. Laying in different audio from alternative takes may alleviate some of these issues, but sometimes things just will not match. As with most audio issues, there may be a way around them for a fix, so keep the footage for later use. Ultimately, you and the director may decide that going with the best performance is better than sticking with action or dialogue continuity within a scene.
Be aware that similar issues may be uncovered while editing documentary or other non-fiction motion media products as well. A person being interviewed may alter his or her speaking style in pace, volume, or intonation, etc. while answering just one question or addressing one aspect of the topic being discussed. An editor often has to condense an individual’s response for time or clarity of message, and if the pace, volume, or tone do not match between and among words, then the audio portion of the edit will be compromised or unable to be achieved as desired. Similar issues may be found in the monologue or narration of “hosts” who do a lot of direct-to-camera addressing in their performances – likewise with stand-up news journalists in the field.
| “What do you want?” | “What do you want from me?” |
FIGURE 4.10 Lines of dialogue that stray from the script may come from inspired performances and even create a better story. Inconsistencies in speech from an interviewee may cause an editorial headache on a documentary show. (Photo credit: Zach Benard)
Audio Quality
Any sound sources, whether from a digital recorder, computer media files, or even HD videotape, must be of good quality in order to be used in the final audio mix. This holds especially true for any of the synchronous sound recordings from the production footage.
Some obvious issues to listen for:
• Levels – The volume should be adequate: not too quiet and not too loud (over-modulated) (Figure 4.11). Although the industry has a suggested range (mixing between –10db and –20db), each project will call for individual treatments – based on what is loud and what is soft for that particular content, the purpose of the video, and the intended means of exhibition.
Pretty much all software has a means for increasing or lowering the audio levels of master clips, clip segments, and overall sequences. These are sometimes referred to as “gain control.” Keep in mind that if you are given very quiet production/sync audio files, boosting their levels will not only raise the volume of the important spoken words you want to hear, but all other background sounds, including “white noise,” that you do not want to hear.
• Presence – Does the audio recording match the image size? If it is a CU of a human subject talking, do the words sound like they are up close to the camera or far away? If it is a long shot with the talent further away from the camera, does the audio represent the correct distance perspective? Microphone placement during a scene may or may not have been done ideally for the images recorded. Equalization effects might be able to help in situations like this.

FIGURE 4.11 Choose material with the best audio first. Example 1 shows an audio clip that was recorded with very low levels. The sound energy waveform is a thin strip and the playback is quiet. Example 2 shows an audio clip with very high energy levels. The overall sound levels are loud. There may be ways to do simple fixes with audio-”sweetening” software to even out these two clips to proper levels.
• Hiss – Is there any background (electronic) “hiss” or buzzing, etc., in the audio signal? Audio filters or effects in your software may be able to “dial out” this particular issue.
• Overlap – Do the actors speak over each other’s lines of dialogue? You cannot isolate an individual’s line delivery if many subjects are speaking all at once. In the ideal scenario, each take of character dialogue recorded during production was done clean with no overlap so you, as the editor, may purposefully construct an overlapping moment of dialogue in post-production.
• Ambience pollution – This is unwanted sounds from the recording environment such as jet engines overhead, air conditioner motors, traffic, radios or music, footsteps, nearby conversations, etc.
• Room tone – Did the production sound recordist provide the editor with at least 30 seconds of room tone for each location/set that appears in the project? As you should recall, room tone is a special “ambience” or “wild” recording (typically meaning that no image was captured at the same time as the sound was recorded) that simply documents the sound of the physical space where all of the action for that particular scene took place. Editors use it to smooth out the audio bed, especially around dialogue cutting or ADR use.
• Does audio exist? – Some technical issues (batteries, cabling, switches not switched, etc.) can result in no audio being recorded while the picture is recorded. You may find that the corresponding audio for a picture track you have was simply never recorded. If the production team were particularly lax with performing proper head slates at the beginnings of each shot, then you might have a purposeful MOS shot or it might be a technical glitch. Have fun figuring it out!
• Rights – It is easy to grab a portion of your favorite pop song and lay it in under your picture tracks, but if you do not own the rights (which is doubtful) or you do not acquire the right of use (which can be rather difficult and expensive), then you most likely cannot use that piece of music in your video.
Creative artists, producers, music publishing companies, etc. are very strict about rights of use, so be careful what you select and edit into your sequence. Fair use for educational or artistic repurposing rights walk a blurry line, so it might be best to seek out friends with bands or local groups who may be open to granting you the rights of use of their songs. Explaining this to clients might be challenging, but they will thank you for it in the end. “Rights-free” music tracks are also available for download from many sources on the internet. The adventurous among you might actually try to compose your own – which is doable with many free apps and relatively inexpensive music creation software titles.
Unlike bad focus, there are some tricks that can be done to improve the sound quality of the audio. Video-and audio-editing software applications usually have simple controls for managing the easy stuff like levels and panning. Special audio filters or effects also exist to handle the more challenging audio signal manipulations (e.g., pitch shifting, time compression, reverb, equalization, hum removal, etc.). If the audio is really bad and cannot be salvaged by tweaking with the audio software, then you still have the option of replacing it entirely with new, cleanly recorded dialogue audio files that will match the picture exactly. Some refer to this as looping or automated dialogue replacement (ADR). An audio engineer is more likely to do this re-recording work with the acting talent, but the editor would most likely edit the ADR audio tracks into the timeline. Of course, on small projects you would have to do all of this yourself. So if the pictures are good, but the audio is bad, the media may still be usable – depending on the project, time, and availability of the talent – for post-production dubbing.
Be Familiar with All of the Footage
Reviewing and assessing the footage for quality issues and gauging usability at the very beginning of the editing process actually serve a two-fold purpose. Obviously, this will help you to “pull the selects” or set aside your best shots for use in the assembly edit. It also forces you to become familiar with all of the footage shot for the project. This is exceedingly important because it will be your job to know what options you have during the cutting process. Although not as popular today, capturing from a tape source into your computer allows you to experience the tapes in real time and to get your first familiarity with the material. If you are working with digital media files copied from a camera’s hard drive or memory card, you will still have to watch all of the footage to assess quality and usability once it is available on your editing system. Plan for this extra time.
For scripted fictional narrative stories, the script initially guides your approach and the footage may match up for the most part. Use the best material you have when you follow the script’s framework. As the editor, though, you are often given the ability to rework scene order and restructure the story a bit differently than what the script called for originally. You are paid for your storytelling abilities, not just as an assembly monkey. If you are working with documentary, news, or even reality TV footage, you will have to be rather familiar with everything that is shown (the coverage of events or the B-roll) and with everything that is said (interviews, narration tracks, etc.). Adding comments to your clips, embedding markers with script lines, or having a timecode transcript of interviews can all be helpful. The extreme importance of solid project and media file organization cannot be stressed enough here. You never know which piece of footage will turn a good edit into a great edit. As you begin to frame the story during the edit, the footage itself helps to give it form, direction, influence, etc. An editor familiar with all of his or her building blocks can construct a better project.
Chapter Four – Final Thoughts: So How Does All of This Help You?
The job of the editor goes well beyond just slapping together a few pictures and sounds with a song and a title or two. The editor is the person at the end of the creativity chain who takes all of the available material (all of the production footage, graphics, music, etc.) and puts it together in such a way that it makes sense, tells a story, gives information, and/ or entertains a particular audience. An editor is a storyteller who also has to possess technical knowledge, not just of the editing tools he or she uses to conduct the edit, but also of film language: the grammar of the shots and the quality of the sounds.
This chapter has presented you with a review of the simple criteria upon which you can base your judgments of “good” or “no good” where the footage is concerned. Knowing what not to use in your edited piece is almost as important as knowing what to put in it. Understanding film language and having the ability to scan picture and sound clips for compromising quality issues are important first steps in becoming a good editor.
Related Material Found in Chapter Eight – Working Practices
#10, 11, 12, 13, 15, 16, 23, 25, 27, 28, 29, 31, 32, 35, 58, 60
Chapter Four – Review
1. An editor should, ideally, watch and listen to all of the master source clips for a project so that she or he may determine which ones are qualitatively, technically, and aesthetically appropriate for use in the given program being made.
2. Soft-focus shots are pretty much unusable unless the inherent blurriness is part of a subjective POV shot or is quickly racked to some object in focus.
3. It can be helpful to an editor if the production footage exhibits solid composition and framing, and appropriate headroom and look room.
4. Shots that contain appropriate exposure and color balance will require less grading during the finishing stage of post-production and will therefore have a greater chance of maintaining good image quality throughout the process.
5. Shots that respect the screen direction of subject and object movement across and out of the frame will keep the imaginary physical space of the film world geographically true for the audience.
6. The action line on any given film set establishes the 180-degree arc in which a camera may traditionally be set up to cover the angles on action.
7. Jumping the line causes a reversal in a character’s eye-line and flips the film world’s references for left and right.
8. Shots coming from the same scene’s coverage should be at least 30 degrees divergent from one another in their angles on action and have a different focal length or image magnification in order to edit together without a jump cut.
9. Audiences have come to expect matching angles from images that cover traditional dialogue scenes. The back-and-forth dialogue of Character A and Character B is seen from similarly framed, angled, lighted, and focused shots.
10. When the production team create a shot of a character looking out of the frame at some object of interest, the reveal shot of that object should be framed and angled such that it appears to be viewed by the character doing the looking, although not typically a literal POV. The eye-line of attention must match across the edit.
11. Continuity of action should exist between the two coverage shots that the editor chooses to juxtapose in the sequence. The cut on action will appear smoother to the viewer if movements, speed, direction, etc. are very similar if not the same.
12. Continuity of performance helps an editor to join two shots that cover a single character speaking, emoting, or reacting during dialogue. Differences in the tone, rate of delivery, or “business” may compromise the edit.
13. Audio sources may have numerous issues, so careful attention must be given them for volume, perspective/proximity, background noises, clicks/pops/scratches, etc. A private edit suite with good audio monitors (speakers) or a pair of good-quality, noise-canceling headphones will help to pick up on the anomalies.
Chapter Four – Exercises
1. Carefully watch and listen to your favorite show and see how many (if any) issues pop up that relate to the criteria discussed in this chapter. Even the most polished programs will suffer, in some ways, from a compromised edit or an audio glitch that will most likely go unnoticed by the average viewer. Practice sharpening your observational skills by purposefully looking for mismatched angles, weak compositions, action line jumps, jump cuts, poor audio dubbing, etc.
2. Record your own or acquire from a friend a short dialogue scene, assess the master clip footage, and edit it together as best as you can. Which problems that you detected in the master clip footage also appear to be problems in the edited piece? Which problems have been “fixed” by your clever editing and how did you do it?
3. Take the scene from Exercise 2 and strip away the dialogue tracks. Gain access to the same actors (if possible) and use your own version of automated dialogue replacement to record new versions of the scene’s lines of dialogue. Edit these new audio tracks into your timeline and see how closely you can hand sync the mouth movement and the new dialogue audio clips.
Chapter Four – Quiz Yourself
1. When might it be a good thing to use a blurry shot in a story?
2. You are presented with footage for half of an entire scene that is accidentally amber-toned. The performances are strong but the color does not match the footage from the other half of this scene. Is it totally unusable or might there be something you can do to it or with it in your sequence? If so, what?
3. True or false: trimming just a few frames from the tail or head of clips at a continuous action edit may smooth out the illusion of movement across the cut, provided the subject performed the actions in a very similar fashion in each shot.
4. How might you handle adding historic 4:3 SD archive footage into a widescreen 16:9 HD documentary project?
5. Taking a traditional approach to covering a dialogue scene, why is it important to keep the camera within the initially established 180-degree arc of the action line’s imaginary circle?
6. How might overlapping dialogue from multiple characters in coverage shots cause issues for an editor’s choices while assembling the scene?
7. What does “ADR” stand for and how is it used to fix audio problems for a motion media project?
8. When might you have to reformat visual sources (change their shape or aspect ratio) during your editing of a project involving historical or archival media footage?
9. You have been asked to sync video and audio source master clips. You encounter a video-only clip whose head slate shows the fingers of the “clapper” (2nd Assistant Camera) between the clapsticks preventing them from closing and the letters “MOS” are written clearly on the slate as well. What does all of this mean to you, the editor, and how will it help you to find the matching sync audio file for that video-only master clip?
10. In the world of video editing, to what do the terms “luminance” and “chrominance” refer?