
In this section we will see all the configuration steps required to deploy a working Lync environment. The additional configuration required for external user access will be explained in Chapter 3, Deploying Lync Mobility and External Users Access.
The final result will be like the one shown in the following diagram:

We have the base information in the following table:

As we can see, we have used two different domains (this is a "typical" situation):
The four steps of this phase (preparing the Active Directory, modifying the DNS, configuring Internal CA, and deploying the SQL database) can be executed in any order because no one is a prerequisite to the other.
We need to extend the Active Directory schema with classes and attributes that are required by Lync Server.
For the previously mentioned operation, our forest and domain have to be at least Windows Server 2003 native level (that is why all domain controllers must have at least the Windows Server 2003 operating system).
Note
A list of supported Active Directory topologies is available here at Active Directory Support (http://technet.microsoft.com/en-us/library/gg425756.aspx).
There are three different ways to extend the schema:
- Using the Lync Server Deployment Wizard
- Using the Lync Server Management Shell
- Using
ldifde.exe
In text we will follow the most common approach. To streamline the installation process, we will use the deployment wizard on the first Front End Server that we are going to deploy. If we want to use a different method, we can start by referring to Preparing Active Directory Domain Services at http://technet.microsoft.com/en-us/library/gg398607.aspx.
The second part of setting up the infrastructure requires you to manually add Lync records to the internal DNS.
The recent application of a change to the Baseline Requirements for the Issuance and Management of Publicly-Trusted Certificates (http://www.digicert.com/internal-names.htm) implies that it will not be possible in a few years to use internal names in our certificates, so a split-brain DNS configuration (with the public zone published on the internal DNS and the public FQDN related to internal addresses) or pinpointing DNS are the suggested solutions.
Usually, we will deploy two kinds of certificates:
- Certificates from our Internal CA for the internal services and connections
- Third-party certificates for the Internet-facing server, such as a reverse proxy and Edge
The first set of records that we need to add is the one related to the Lync Enterprise Front End pool.
As we said before, the pool can be balanced using DNS load balancing or a hardware load balancer.
The previous choice is not available for Lync's web services; therefore, if we also need to have web services in HA, we have to select a dedicated solution, such as a hardware load balancer paired with the DNS load balancing.
What we just said implies that there are different possible scenarios from a name-resolving point of view. A good part of them is addressed in the document DNS Requirements for Front End Pools at http://technet.microsoft.com/en-us/library/gg412910.aspx.
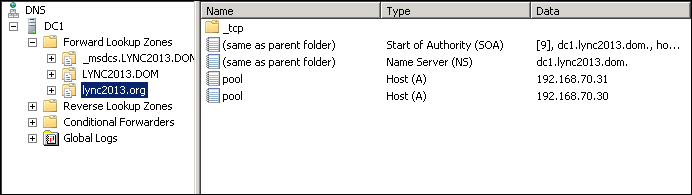
In our example, we will only have DNS load balancing with a couple of Lync Front End Servers, Lync1 (192.168.70.30) and Lync2 (192.168.70.31). The name of the pool will be Pool. The public domain will be Lync2013.Org.
Our DNS configuration will use the commonly used approach, "split-brain" DNS or "split" DNS, where we create an internal copy of the public DNS zone, replacing the IP addresses for Lync with the internal DNS records.
A drawback of the previously mentioned solution is that we will have to manage two "public" zones, the split-brain one and the zone published to the Internet.
An alternative could be to use a "pinpoint" DNS zone (refer to Determine DNS Requirements at http://technet.microsoft.com/en-us/library/gg398758.aspx), where we need to insert just the DNS records that will be different from the external zone, and point them to the internal network addresses. The rest of the DNS zone remain unchanged, and is referenced from the external, real master.
We need to perform the following steps to create a split-brain DNS:
- Create a new zone in our internal DNS (the same where the domain zone is hosted, as shown in our example):
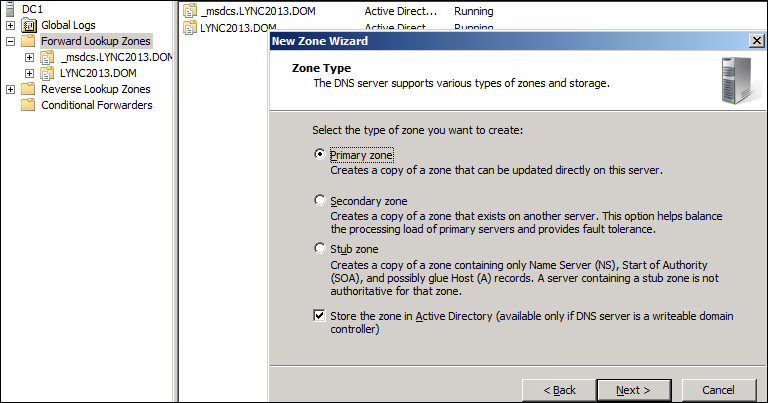
- Name the zone as our public SIP domain
lync2013.org(so that we have the "split-brain"), as shown in the following screenshot. - Add the A records for the Enterprise pool pointing to the IPs of each of the Front End Server units.
Now, we have to address another aspect: the DNS records for the web services.
Before we insert the information in the zone, we have to take an important decision regarding the URLs that we will expose to the external users.
Web services of Lync are tied to three different URLs: "meet", "dial-in", and "admin".
- Meet is the base URL for the meeting invitations we send, for example, to people outside our company or to someone who has no Lync client installed on his/her machine (and will participate using the Web App).
A URI for a Lync meeting is similar to
https://meet.lync2013.org/fabrizio.volpe/Y6JTZ98S.Launching it, a user with a Lync client installed locally will see the meeting start in the client, while a user without a client will have to access the meeting via the web interface of Lync.
- Dial-in is a record used to give users who will take part in a meeting using a telephone (for example, a traditional PSTN line), an interface where they can manage parameters such as a personal PIN and so on.
- Admin is used to publish the administrative console of Lync.
The only record really needed in Lync is meet, while dial-in is interesting only if we will use Enterprise Voice with dial-in conferencing and admin is something that we have to evaluate for every different deployment.
As we read in the document Planning for Simple URLs at http://technet.microsoft.com/en-us/library/gg398287.aspx, there are various options available.
I prefer to use a common "root" in the URI, because acting this way, we may need a single name in the certificate (let's say meet).
In our test deployment, we will have meet as the common path, and so we will need only two additional A records pointing meet to the Front End Servers that are added, as we can see in the following screenshot:
Note
As we said before, the web services have high availability only if paired with a hardware load balancer. So, the configuration we have seen right now will use round robin to work (that is, in case of a failure, 50 percent of users trying to launch a Lync meeting from the internal network will experience failure).
Depending on the version we are using (Lync 2013, Lync 2010, or Store app), the client will query the DNS for a list of specific records, and as soon as one of them is resolved, the client will use it for authentication.
The following schema should make things clear:
|
Client |
Queried SRV records' order |
|---|---|
|
| |
|
Lync 2010 |
|
|
Store app and client for mobile devices |
|
So, we have to add lyncdiscoverinternal, _sipinternaltls._tcp, and sip.
Note
Cumulative updates to desktop clients change the DNS location process from Lync Server 2010 (http://technet.microsoft.com/en-us/library/gg398758.aspx)
The SIP record will be pointed to the public IP of the Lync Edge server. This is because the configuration, using which we are going to test Lync Edge, will use the internal DNS as its primary DNS (an alternative is to use the hosts file on the server).
While lyncdiscoverinternal requires two A records with the IPs of the two Front End Servers and SIP via a simple A record to create the SRV record for sipinternaltls._tcp, we need to operate it as shown in the following screenshot, launching Other New Records from the DNS manager, and then selecting Service Location SRV (as depicted in Required DNS Records for Automatic Client Sign-In at http://technet.microsoft.com/en-us/library/bb663700(v=office.12).aspx).

The final situation of the DNS zone that we have to create will look like the following screenshot:

The configuration of the certification authority infrastructure is mandatory if our deployment will be based on certificates issued from an Enterprise CA.
The previously mentioned decision implies the limits for our Lync services when we will proceed to allow access to external users. Only clients and servers that accept our Internal CA as a trusted authority will be able to access our services, and that means our typical user will probably be one of our company workers or someone from a trusted partner network. The impact of the "internal" certificate is reduced if all the clients are part of our domain (because they will accept our Internal CA by default).
The other option (using a well-known public certification authority) is for sure easier to manage, but requires money because what we need for Lync is a costly Unified Communication (UC) certificate with multiple Subject Alternative Names (SANs).
Note
There is no "easy way" or shortcut to bypass the need for certificates. Wildcard certificates (less costly) are not supported for the Edge services (they are usable only for the reverse proxy external interface). Also, using no certificate is not an option, because Lync has a high level of integrated security, and the server services (on the Edge or Front End) will simply not start with a wrong / not accepted certificate.
A detailed description of the deployment of an Enterprise CA is not included here, although a good starting point to understand it is the Active Directory Certificate Services Step-by-Step Guide article at http://technet.microsoft.com/en-us/library/cc772393(v=ws.10).aspx.
Now, talking about setting up the database, Lync Back End is a SQL deployment (more or less complex) without any Lync component or feature installed, but dedicated to host the Lync Central Management store.
The SQL Server deployment must be completed before creating and publishing the Lync topology by using Topology Builder.
The supported databases (only the 64-bit edition) are: SQL Server 2008 R2 Enterprise, SQL Server 2008 R2 Standard, SQL Server 2012 Enterprise, and SQL Server 2012 Standard.
Some suggestions related to the installation of SQL for Lync are as follows:
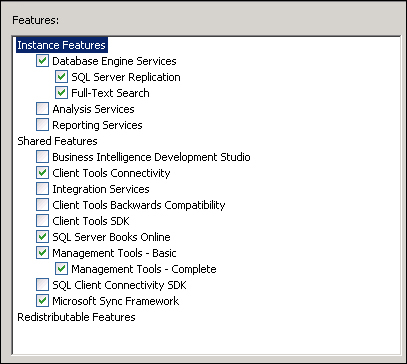
- The features I will use in the example deployment are the ones we can see in the following screenshot:
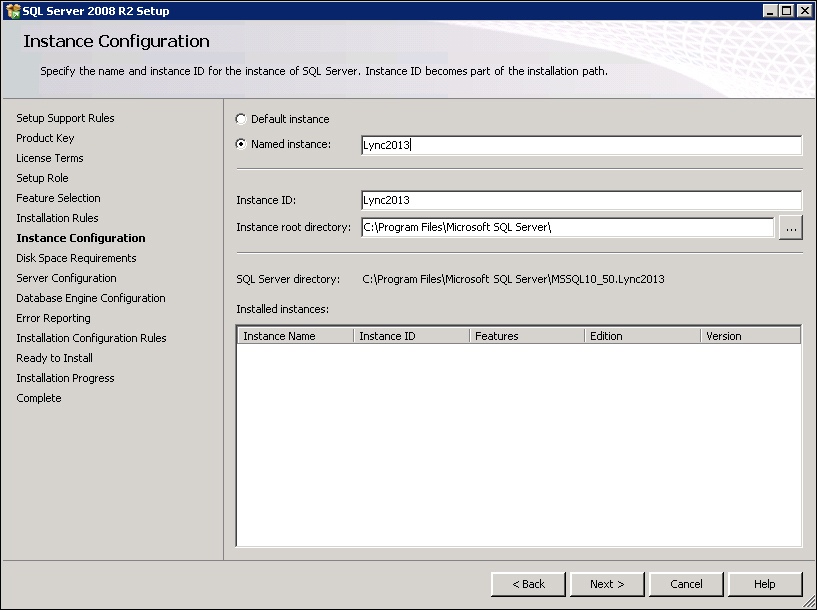
- Create a named instance for every Lync feature that requires a database to work (Archiving, Monitoring, and so on).
- Database mirroring is the best high availability feature you have for the Back End Servers of Lync. The first server (principle) will send the active transaction log record to the second (mirrored) server. The mirrored server applies the transaction log record one by one in sequence.
- Databases that work in mirroring need to be in "Full Recovery" mode, so watch out for the growth of the database logs.
- Mirroring requires two SQL servers and an optional third one (which can also be Express Edition) to act as a Witness that is required, so that the failover/failback of the principal database is automated.
Later, the Lync Topology Builder will require a file share during the process of creating mirror databases. We can create the share right now, giving the permissions to the accounts of the SQL servers (for the deployment of SQL1, SQL2, and Witness) as stated in Tim Harrington's blog post Adding a SQL Mirror to an Existing Lync Server 2013 Back-End (http://howdouc.blogspot.it/2012/08/adding-sql-mirror-to-existing-lync.html).
If we are launching Topology Builder, it implies that we have completed the following checklist:
- Selected the kind of deployment we will use for our internal Lync servers (Front End pool or Standard Edition Servers)
- Selected the kind of certificates we will use
- Selected the features we will deploy
- Selected the geographical aspect of our Lync infrastructure (see Lync sites in Chapter 2, Understanding Front End Pool Pairing)
- Selected the number of additional servers we need considering the following list:
- Edge
- Reverse proxy
- Mediation
- Director
Often, it is the starting point that every company customizes with its parameters (especially from a naming and addressing point of view).
The preceding list is only to say that launching Topology Builder is the closing act of the design part.
After that, all we need to do is simply install Lync on the required servers, and make the whole mechanism work.
Note
Of course, changes to an existing topology are possible, and in some cases are not difficult to make. However, some modifications (changing server or pool names, changing the deployment from Standard Edition to Enterprise Edition and the opposite way, and so on) are painful (requiring new certificates from an external authority) or impossible.
In the text, I suggest a staged approach to learn the meaning of the different steps. So we will deploy the internal servers, test them in depth, and then add the Edge and the other Internet-connected features (and test them too, obviously).
In the following paragraphs, we will see a step-by-step installation of a Lync 2013 Enterprise Edition Front End with a SQL Back End enabled to mirroring. An Office Web Apps server will also be deployed (we will not look at the details related to this setup).
Note
The Edge server and the reverse proxy will be added in Chapter 3, Deploying Lync Mobility and External Users Access.
To understand the installation process in text, we will have it divided into three phases:
A complete list of the required features and software to install Lync 2013 on Windows 2012 named System Requirements for Servers Running Lync Server 2013 can be found at
http://technet.microsoft.com/en-us/library/gg398588.aspx. A faster and lesser error-prone way to add the requirements is to use a PowerShell script. I have used a good one from Pat Richard's blog (http://www.ehloworld.com/1697).
We can add Silverlight right now, or it will be automatically installed the first time we launch the Lync Server Control Panel.
After the preparation (including the infrastructure steps and the system requirements installation), we are able to install Lync on the first Front End Server using the following steps:
- Launch
Setup.exefromLync Installation Support"Setupamd64. This will be required for the installation of C++ 2012. - The setup process will require an installation path for Lync 2013.
- The usual License Agreement request will appear, which will require you to select the I accept the terms in the license agreement checkbox.
The installation of the core components will go on.
The Lync Server 2013 Deployment Wizard will appear on the screen as follows:

- At this point, even the Lync Server Management Shell is installed on the server.

As a requirement to install Lync on our organization, we have to perform the following steps:
- Preparing the schema
- Preparing the forest
- Preparing the domain
The previously mentioned steps require accounts that have the rights to modify the Active Directory schema, forest, and domain, as stated in the Preparing Active Directory Domain Services article at http://technet.microsoft.com/en-us/library/gg398607.aspx.
From the deployment wizard, we will launch Prepare Active Directory and a menu with seven steps will be available:

The first step will be Prepare Schema, the third will be Prepare Current Forest, and the fifth will be Prepare Current Domain.
All the other actions are dedicated to check the operation's result, and (in the last step) the addition of users in the group of Lync administrators, CSAdministrator.
The Prepare Schema screen will warn the user that the preparation of the schema is a "run once" operation. The operation will run, giving us "onscreen" updates on the various passages. When the step is completed, we can examine the log to check for (eventual) errors.
Prepare Current Forest and Prepare Current Domain are really similar to the schema preparation step.
Now, before going on with Topology Builder, we should have our SQL servers installed, a clear idea of our network from the connectivity point of view, and a plan for the names of the internal services too.
A reliable file share is also required (and usually it is suggested to use a file server cluster). The share will contain information that is accessed from all the servers and are store in three folders. The Lync File Share is used to house a bunch of Lync Shared Resources between servers. Once up and running, the server generates three subfolders: 1-ApplicationServer-1, 1-CentralMgmt-1, and 1-Webservices-1.
In our deployment, the share will be hosted on the Witness server of the SQL mirroring.
During the design of the topology, we will be required to also insert the name of the Office Web Apps server. The installation of this server can be done before we launch Topology Builder or after (in the second scenario we will create a "pointer" to the server).
The steps to complete the Web Apps server installation are the ones you can read, for example, in Doug Deitterick's blog (http://blogs.technet.com/b/dodeitte/archive/2012/09/10/office-web-apps-server-amp-lync-server-2013.aspx).
Use the following steps to prepare and publish the Lync topology:
- To make Topology Builder available, we have to launch the deployment wizard and select Install Administrative Tools.
- At the end of the process, the builder will be available in the Start menu of the server.

- We have to select New Topology in the first screen and then configure the SIP domain as we can see in the following screenshot:

- We will select no additional SIP domain and move to the Define The First Site menu. The information on sites we will insert in the wizard, especially if we have a single site, are not critical.
- At the end of the previous procedure, we will have a wizard to deploy the Lync Front End as we can see in the following screenshot:

- As foresighted, we will deploy an Enterprise Front End pool. The name of the pool will be
pool.lync2013.org, and we will use the public FQDN and a split-brain / pinpoint DNS to resolve the name from the internal network, as explained earlier in the chapter:
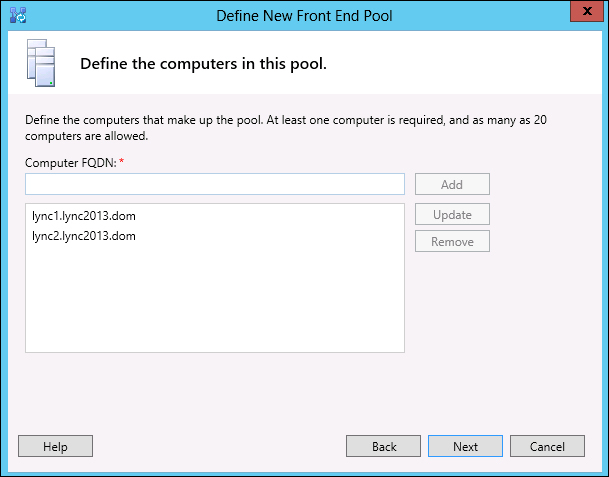
- We will add the two Front End Servers to the pool using their Active Directory / internal domain FQDN as shown in the following screenshot:
- Now, we will add the Conferencing feature as we can see in the forthcoming screenshot:

Note
Enterprise Voice and Call Admission Control will be explained in Chapter 3, Deploying Lync Mobility and External Users Access and Chapter 4, Introducing the Lync Mediation Server. Dial-in conferencing is used to enable users with a telephonic connection to take part in a Lync conference (if we have Enterprise Voice already deployed). Archiving and Monitoring have been described earlier.
- We will not collocate a Mediation server or add the Edge server (for the moment). So we will go on simply selecting Next.
- The configuration of the SQL Back End with mirroring will require some additional information (simply adding the three SQL servers we have planned as primary, mirror, and Witness, with the
Newbutton):
- The path to the network share (FQDN
witness.lync2013.dom, the file share,LyncShare) will be required: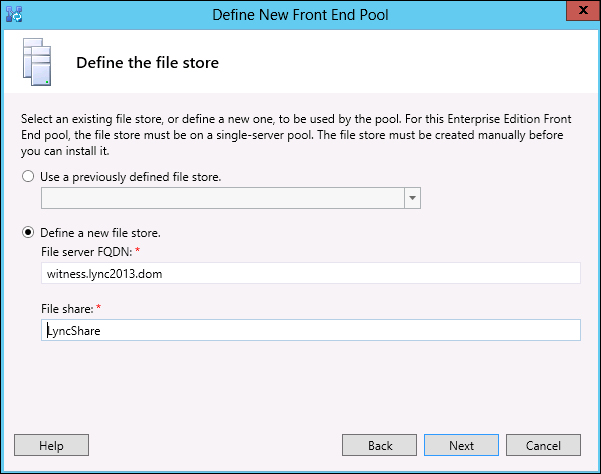
- Enabling conferencing means that we will be asked for an Office Web Apps server (
webapps.lync2013.dom), as we can see in the following screenshot:
The screen will now show the association with the server we have defined at step 12.
- Now, to make it easier to access the web services (and to spare some SAN names in the certificates), We will modify the "simple URLs" of Lync. That's an operation to run on the "root" of the topology by launching Edit Properties:

- We have edited the URLs so that they have a common base name (
https://meet.lync2013.org) and each service with its own path (/dialin,/meet, and/admin), as we can see in the following screenshot:
- Now, it is time to publish the topology (the operation is launched from the Lync Server root in the topology view), as in the following screenshot:

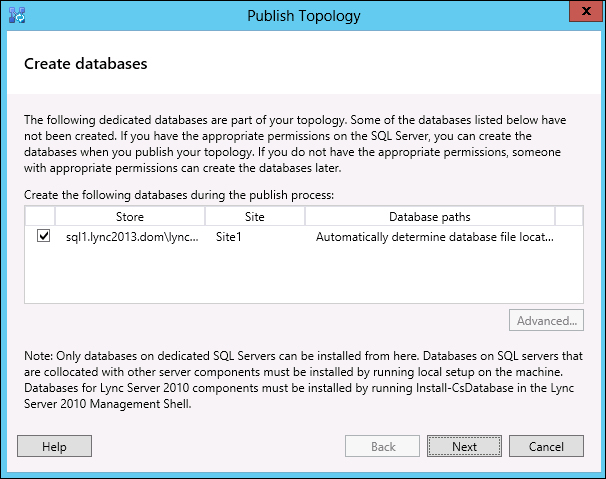
- After the first screen, we will be asked for the location of the Central Management server (in our example, it will be the pool itself). Usually, we would prefer to click on Advanced… and select Use SQL Server instance defaults (the modification is shown in the following two screenshots):

We are able to modify the path where database files and logs will be placed. If we have no special requirements, the default selection is a good solution.

- Next is the creation of the database (again, I suggest that you click on the Advanced… menu to select Use SQL Server instance defaults).
- To create the mirrored database, we will be asked for a share. We will use the share previously created on the Witness server, as shown in the following screenshot. We could prefer to create a new share to split the Lync and database traffic.

- At the end of the process, we should see a screen containing a summary of the operations result, the access to the log, and a checklist of steps still waiting to be completed.
- SQL primary and mirror should be in a synchronized/restoring state (we can verify that from SQL Server Management Studio), and the share should be populated with folders and data (we are able to check this by opening the folder).
The following steps will now help you to install the components associated with Lync Server:
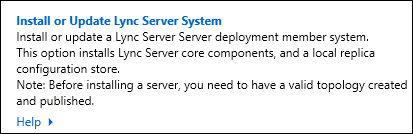
- Now, going back to the Lync Server deployment wizard, we can launch Install or Update Lync Server System.
- The first option, Step 1: Install Local Configuration Store, is required only once for every Lync Server.
- The Step 2: Setup Or Remove Lync Server Components option will be required every time we add or remove a component or role from the server deployment (as shown in the following screenshot):

- For these steps, we simply need to hit the Run button and accept the default settings. When we set up or remove a component, the server will check its FQDN. If it matches the topology, the configuration will go on.
- As usual, the result of the step will be shown in the ending screen with an available access to the logs for details.
Now, we will have a look at the following steps to install and assign certificates:
- Step 3: Request, Install or Assign Certificates allows us to create certificate requests, obtain the certificate directly (if we use an Enterprise CA), and apply them to Lync.
- We can go with the Request button to forward our certificate's request to our enterprise CA:

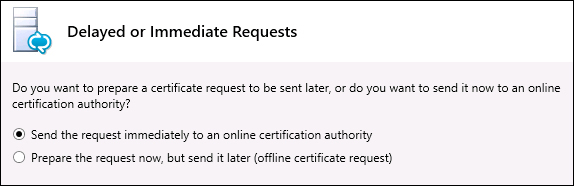
- After a starting screen that simply requires Next, we are able to select and send the request immediately (that's our situation) or prepare only the request (typically choose Send the request immediately to an online certification authority):
- We have to select our CA and then Next:

- If we do not need to add alternate credentials or specify an alternate template, we can simply hit Next in the two screenshots that follow.
The screen that you will see in the following screenshot is important, not because we can select a friendly name for the certificate, but because we have to specify that the private key must be exportable (selecting the flag button).
A certificate with a private key that is not exportable is not good for our needs (in our example, we will export it from this server to the other Front End and this does not work without this option enabled):

- Organization information (shown in the following two screenshots) is critical only if we are going to communicate with an external CA that may require a verification of our company data. The following screenshot shows the screen that displays a list of names that will be in the certificate:
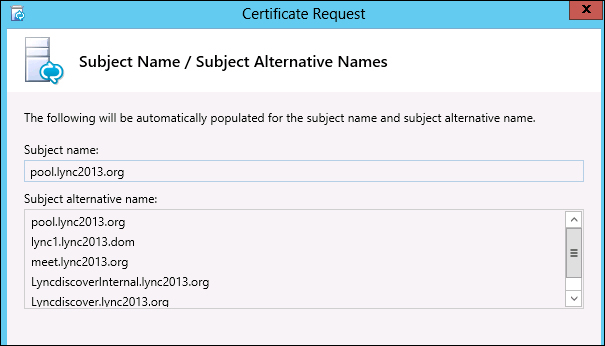
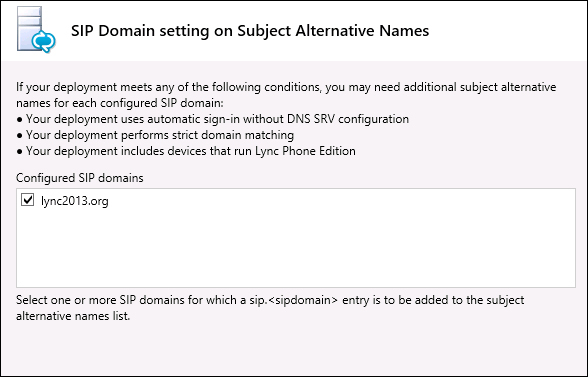
- We have to select the flag related to our SIP domain to add the names required for automatic sign-in and other features:
- In Configure Additional Subject Alternative Names, we can add the name of the second Front End (
Lync2.lync2013.dom), so that we can use the same certificate on both nodes (this is not mandatory, of course).The request process will run and contact our Enterprise CA. - When the certificate is ready, we can assign it automatically, leaving the flag selected:

Note
Lync 2013 requires an OAuth certificate for server-to-server authentication that is required to talk with Exchange 2013 and SharePoint 2013 (this is really important if we want to integrate with Exchange UM). There are a lot of good blogs on this topic, such as this one at http://social.technet.microsoft.com/wiki/contents/articles/13168.integrating-exchange-2013-owa-and-lync-server-2013.aspx from Fernando Lugão Veltem. We can assign the certificate with the Assign button from the same screen where we create the requests.
- If everything is well configured, using Step 4: Start Services we can check the server to see if Lync-related services are starting as expected.
- Now we can verify server logs, the Windows event logs, and test Lync Server 2013 from a client. It is also a good point to install the latest updates and patches for our Lync Server.
Note
Sometimes, we could have the Lync services hung in the starting phase for a long time. A good starting point to troubleshoot the cause of this error could be at this site http://www.bullspit.co.uk/2013/01/05/lync-2013-front-end-server-starting/.
The deployment steps are to be repeated on the second Front End (Lync2.lync2013.dom).
In Chapter 3, Deploying Lync Mobility and External Users Access, we will acquire SSL certificates from a third-party CA for our Edge and reverse proxy. We will have to apply the aforementioned certificate on the Front End servers as well (at least for the web services dedicated to the external users).
We can work on it using the same administrative interface we have seen in step 3 in the previous section.
If we have required public certificates that also include the FQDN related to our internal domain, we can simply replace the certificate released from our internal CA. However, this solution that includes the FQDN that is not reachable from the Internet in a third-party certificate will not be available after November 1, 2015.
What we can do then is use the capability of Lync to use different certificates on the web services dedicated to the internal and to the external users (as you can see in the following screenshot).

So, we are able to apply the certificate from the internal CA on the internal web services interface and the certificate from the third-party CA (containing only the FQDN of our public domain) on the external web services interface.