
10
Testing Your Frontend
In this chapter, we’ll implement tests to verify the task manager’s frontend features we implemented in the previous chapters. We’ll start with an overview of what you need to test JavaScript frontend applications. Then, we’ll learn how to implement tests for your React components and verify that our frontend routing solution and its configuration work as expected. Next, we’ll implement tests that focus on verifying the application’s features as experienced by its users and learn how to run the test suite from the command line.
By the end of this chapter, you should be able to implement unit and integration tests for your JavaScript frontend applications based on React, React Router, and Redux Toolkit. Providing tests for your applications will help you build solid and reliable software and minimize its maintenance effort in the future.
We will be covering the following topics in this chapter:
- Testing frontend applications overview
- Testing React components
- Testing the router
- Testing the application’s features
- Running the tests from the command line
Technical requirements
You will need the latest Node.js LTS version (16.15 at the time of writing).
You can download the full source code for this chapter at https://github.com/PacktPublishing/Full-Stack-Quarkus-and-React/tree/main/chapter-10.
Testing frontend applications overview
The main requirement when testing frontend applications based on JavaScript is having an engine that runs the tests for you. There are plenty of test runner alternatives to choose from – Mocha, Ava, and Jazmine, just to name a few. However, in Chapter 7, Bootstrapping the React Project, we created our frontend project by leveraging Create React App, which uses Jest as its test runner, and this is the one we’ll be using for our project. Jest is one of the most popular and widely adopted JavaScript testing frameworks. It’s not only a test runner, but a full-featured framework with features and tooling for mocking, assertion, verification, and so on.
One of the crucial parts of frontend testing is verifying that the page elements render correctly in the browser. This is especially critical with React since this library is all about components and managing their state. Enzyme was one of the main tools to test the React components’ output and rendering until a few years ago. However, this tool is no longer actively maintained and lacks built-in support for the latest React versions, so it should be avoided. Create React App automatically includes a dependency to React Testing Library in our project; this is the de facto tool nowadays and the one we’ll be using.
React Testing Library was initially released in 2018 as an alternative to Enzyme. It’s built on top of the DOM Testing Library, which allows you to query the resulting Document Object Model (DOM) when rendering your components to interact with them and verify their properties. Verifying individual DOM object behavior as compared to verifying complete snapshots of the page makes your tests more maintainable, robust, and less coupled with the implementation details of your components. Enzyme-based tests are usually focused on React component implementation details, such as their properties or internal state, which makes them brittle and often fail when the tested components are refactored. The main advantage of React Testing Library’s approach is that your tests won’t break each time you do minor changes to your component or its implementation while still verifying its correct behavior as expected by the end users.
As you can see, most of the required dependencies to test your components were already included by Create React App when we bootstrapped our application. Nonetheless, there are some parts of the code base that would benefit from additional dependencies to reduce the boilerplate when implementing their tests.
In the Adding state management section in Chapter 7, Bootstrapping the React Project, we introduced Redux Toolkit in our project. We could implement tests for the Redux store with the included tools, however, these tests would require cumbersome mocking and would be hard to maintain. Let us now add some test dependencies to our project that will help us with these tasks and allow us to write simpler and more maintainable tests for our application.
Adding the required dependencies
The usage of Redux Toolkit has allowed us to implement a global application state management system that interacts with the backend’s HTTP API with very little effort. The easiest way to implement tests that verify the behavior of our application and components that rely on Redux Toolkit Query is by leveraging an HTTP API mocking library. In our case, we’ll be using Mock Service Worker (MSW).
Mock Service Worker
MSW is a JavaScript testing library that is used to intercept HTTP requests on the network level and define mock HTTP responses. Since the interception is performed at the network level, it’s very easy to integrate into any application testing setup and requires no extra configuration.
To add the MSW dependency, we’ll navigate to our frontend application directory (src/main/frontend) and execute the following command:
npm install --save-dev --save-exact [email protected]The command should complete successfully, and the following lines should be visible in the dependencies section of our package.json file:
"devDependencies": {
  "msw": "0.43.1"
}
Since this dependency is only required for testing purposes, we’ll install it as a development dependency in our project. This is achieved by passing the --save-dev flag. Notice the usage of the --save-exact flag, too. This forces npm to make the package.json reference use an exact version rather than a Semver range expression. The resulting reference by default would be “^0.43.1” if no argument was passed. Note that the version includes a caret; this would usually imply that whenever the user runs npm install on this project, either the 0.43.1 version or any new minor version would be installed. Nonetheless, since this dependency has a 0 major version, npm has a special behavior and installs the latest patch version instead. However, by using an exact version, we make sure that 0.43.1 is always installed, regardless of the newer versions available.
Note
In Chapter 7, Bootstrapping the React Project, we initialized the application in the src/main/frontend directory. All of the directories and files referenced in the rest of this chapter related to the frontend application modules will be relative to this folder unless stated otherwise.
We’ve learned that frontend JavaScript testing requires a test runner and that verifying that the page elements render and behave as expected is one of the main purposes of these tests. We’ve gone over the required dependencies and configured our project with the missing ones. Let us now continue by implementing the tests for our application. There are several kinds of tests we can implement depending on their scope, and we’ll start by testing individual React components.
Testing React components
Depending on the complexity of your components and their purpose, it might be advisable that you implement specific unit tests for them. This ensures the component behaves according to specification for every defined scenario and property.
Unit testing
Unit testing is a software development technique by which developers write automatic tests that verify that the smallest testable units of an application (called units) behave according to its design requirements.
Let us see a practical example by implementing a test for the CompleteChip component. In the Implementing a Task Edit dialog section in Chapter 9, Creating the Main Application, we created this custom component that renders the completion date of the provided task, or nothing if the provided task is not completed. To implement the test for this component, we’ll start by creating a new CompleteChip.test.js file in the src/tasks directory.
Test file naming
By default, Jest, with the configuration provided by Create React App, searches for tests in files with the .js extension under any __tests__ directory, or files with a .test.js extension. For our tests, we’ll be using the latter approach, so that we can keep the test files close to the production code they verify.
You can find the complete source code for this file at https://github.com/PacktPublishing/Full-Stack-Quarkus-and-React/blob/main/chapter-10/src/main/frontend/src/tasks/CompleteChip.js. Let us analyze the following most relevant parts:
describe('CompleteChip component test', () => {
  //…
});
The test implementation starts by declaring a Jest describe block. These blocks are used to group test cases that are related to each other. It’s not required, but it helps keep things organized and also allows the inclusion of setup and teardown code blocks that are common for these groups of tests. In this case, we’re declaring the CompleteChip component test suite, which includes tests to verify how the component renders when there’s no provided task, the provided task is incomplete, and the provided test is completed. The first argument for the describe function is the name of the test group, and the second contains a function where you should declare the nested tests and preparation code blocks.
The following code snippet contains the test to verify that Chip won’t be rendered in case the component is configured with an undefined task attribute:
test('no task, not visible', () => {
  // When
  const {container} = render(<CompleteChip />);
  // Then
  expect(container).toBeEmptyDOMElement();
});
The code for the test starts with a Jest test block (you can use its alias, it, alternatively). Each test case should be implemented within these blocks where the first argument is the name of the test, and the second contains a function with the test execution code and expectations.
Given-When-Then (GWT) / Arrange-Act-Assert (AAA)
We tend to organize our tests using a GWT or an AAA structure. The first part, Given/Arrange, sets the test context by preparing the original state or environment for the tested scenario. The When/Act phase contains the action that is being tested, and it should contain a single statement in most cases. The final part, Then/Assert, contains the test expectations and assertions that verify the tested action behaves accordingly.
The When section of the test renders a <CompleteChip /> component with no task attribute. For this purpose, we use React Testing Library’s render function that renders the component into an HTML div container, which is appended to the DOM’s document body. The function returns a container variable with a reference to the div DOM node that contains the rendered HTML component.
The last part of the test contains a Jest toBeEmptyDOMElement expectation to verify that the container is empty just like the component specification requires. This expectation is part of React Testing Library’s jest-dom Jest extension package. You can find the complete list of expectations at https://github.com/testing-library/jest-dom.
The following snippet contains the code to verify that Chip is rendered when CompleteChip is configured with a completed task:
test('complete task, shows date', () => {
  // When
  const {container} = render(<CompleteChip task={{complete:
    '2015-10-21T04:29:00.000Z'}}/>);
  // Then
  expect(container).not.toBeEmptyDOMElement();
  expect(screen.getByText(/2015/)).toBeInTheDocument();
  expect(screen.getByTestId('complete-chip')).
    toHaveClass('MuiChip-colorSuccess');
});
The test action renders a CompleteChip component with a task with a valid completion date initializing the HTML DOM container variable. The assertion section verifies that the container is not empty. This is the opposite of what was asserted in the previous test case; notice how this is achieved just by prepending .not to the .toBeEmptyDOMElement() expression.
The next part uses React Testing Library’s screen functions to query HTML nodes from the entire document.body to verify that the React component is rendered accordingly. Let us see these functions in more detail as follows:
- screen.getByText
This function tries to find a component containing the provided text literal or regular expression, throwing an exception if none is found. In our case, we’re testing the document to find a component with a text containing 2015. We’re using a regular expression, which implies that the component might contain other text and characters too.
- screen.getByTestId
A function that tries to find an HTML node with a data-testid attribute with the provided ID as the value, failing with an exception if none is found. Test IDs are a convenient way to identify unique components for tests, however, they require changes in production code to work. In our case, we need to edit the src/tasks/CompleteChip.js file and make the following changes:
<Chip
  icon={<CheckIcon />}
  color='success'
  label={new Date(task.complete).toLocaleDateString()}
    variant='outlined'
  data-testid='complete-chip'
/>
In the expectation section, we’re verifying that the Chip component is rendered with the success color variant by checking that it has the MuiChip-colorSuccess class, using jest-dom’s toHaveClass matcher.
We have now implemented enough tests to verify that the CompleteChip component behaves according to its specifications. Let us now see how to execute these tests in IntelliJ.
Running the tests on IntelliJ
To run the CompleteChip.test.js test suite in IntelliJ, we need to click on the play button near the describe block and click on the Run ‘CompleteChip component test’ menu entry.

Figure 10.1 – A screenshot of IntelliJ’s Run ‘CompleteChip component test’ menu entry
The tests should execute and pass, and we should be able to see the results in the Run tool window.

Figure 10.2 – A screenshot of IntelliJ’s ‘CompleteChip component test’ test execution results
Now that we know how to run the tests from the IntelliJ IDE, let us continue implementing the tests for the application’s routes.
Testing the router
In the Adding routing section in Chapter 7, Bootstrapping the React Project, we included React Router in our project to provide a routing solution for our application. Then, in the Adding the task pages to the application router section in Chapter 9, Creating the Main Application, we configured the definitive routes for the task manager. Just like any of the application’s features, these routes should be tested to make sure they follow the specifications and that they don’t break in the future.
To be able to properly test the application routes, we’ll need to be able to render complete application pages that require a Redux store configuration and an MUI theme provider. Let us create some utilities that will allow us to provide these settings in our tests.
Testing helpers
To host the testing helper files in our project, we’ll create a new src/__tests__ directory that will allow us to clearly distinguish this code from the production code. Next, we’ll create a new react-redux.js file under this directory. You can find the complete source code for this file in the GitHub repository, but let us analyze the most relevant parts as follows:
import {render as testRender} from '@testing-library/
  react';
export const render = (ui, options = {}) => {
  const Wrapper = ({children}) =>
    <Provider store={store}><ThemeProvider theme=
      {theme}>{children}</ThemeProvider></Provider>;
  return testRender(ui, {wrapper: Wrapper, ...options});
};
The main purpose of this file is to expose a render function with the same signature as the React Testing Library’s render function but wrapping the provided component (the ui parameter) with a Wrapper component. This wrapper provides a Redux store and MUI theme configuration that some components may require to render. Let us now see this function in action by implementing the tests for the task manager frontend application’s routes.
Testing the application’s routes and navigation system
The routes for the application are defined in the src/App.js file. Let us edit its corresponding test file, App.test.js, and replace its now outdated content with the router test suite. You can find the complete source code for this file at https://github.com/PacktPublishing/Full-Stack-Quarkus-and-React/blob/main/chapter-10/src/main/frontend/src/App.js.
The following code snippet contains the code that will set up and tear down the MSW server:
  let server;
  beforeAll(() => {
    server = setupServer();
    server.listen();
  });
afterAll(() => {
  server.close();
});
The beforeAll block contains a function that Jest will execute a single time before any of the tests in the surrounding describe block is executed. We’ll use this kind of setup whenever we want to configure an initial context or state that is common to every test and won’t be altered by any of them. The first statement, setupServer, configures the MSW server. We could optionally pass a set of initial MSW mock handlers as the first argument of the function. The second statement, server.listen(), starts the MSW server, which will now be able to accept requests.
The afterAll block contains a function that Jest will execute a single time after all of the executed tests in the surrounding describe block have finalized their execution. The arrow function contains a single statement that closes the MSW server, which will no longer accept connections.
The following snippet contains the preparation code required for each of the tests:
beforeEach(() => {
  window.sessionStorage.clear();
  server.resetHandlers();
  server.use(rest.all('/api/*', (req, res, ctx) => res
    (ctx.status(404))));
});
The snippet contains a beforeEach statement with a function that Jest will run each time before any of the tests in the surrounding describe block are executed. What we do here is prepare the context for each of the tests by cleaning up any residue that previous tests might have left. We start by clearing sessionStorage, which will effectively remove any JWT that might have been persisted by one of the other tests. Then, we remove any configured mocks from the MSW server by running the server’s resetHandlers() function.
In the last statement, server.use(), we prepare an MSW request handler that will catch any HTTP request to a path that starts with /api/ and respond with a 404 Not Found HTTP status code. This is used as a generic catch-all handler that will take care of any request we have not specifically prepared for a test case and that is not relevant to the tested scenario. Let us now see how to verify the router behavior for both users who have an active session and users who don’t.
Testing redirection for logged-out users
The following test verifies that whenever the users navigate to the protected /tasks application path without an active or valid session, they are redirected to the /login path and the login form is presented to them:
test('logged out user visiting /tasks, redirects to /login', () => {
  // Given
  window.history.pushState({}, '', '/tasks');
  // When
  render(<App />);
  // Then
  expect(window.location.pathname).toEqual('/login');
  expect(screen.getByText(/Sign in/, {selector: 'h1'}))
    .toBeInTheDocument();
});
In the Given phase, we use the web browser’s History API pushState function to programmatically navigate to the /tasks URL. In the When phase, we invoke our customized render function to render the router component (App) into document.body. In the assertions phase, we verify that the current browser location has changed to the /login path; this asserts that our Redux store effectively handled the missing session and redirected the user to the login page route.
The last expectation uses the screen.getByText function to verify that the Sign in text is visible on the page. This time, we pass additional options in the function’s second parameter to further refine the query and make sure that the Sign in text is visible within an h1 element. From the business logic perspective, this assertion is making sure that the router renders the Login page whenever a user navigates or is redirected to the /login path. Let us now implement the same test but for logged-in users instead.
Testing redirection for logged-in users
The test in the following code snippet verifies that whenever the users navigate to the protected /tasks application path with a valid session, they are not redirected and the Tasks page is presented to them:
test('logged in user visiting /tasks, displays /tasks', async () => {
  // Given
  server.use(rest.post('/api/v1/auth/login', (req, res,
    ctx) =>
    res(ctx.status(200), ctx.text('a-jwt'))));
  await store.dispatch(login({name: 'user', password:
    'password'}));
  window.history.pushState({}, '', '/tasks');
  // When
  render(<App />);
  // Then
  expect(window.location.pathname).toEqual('/tasks');
  expect(screen.getByText(/Task manager/, {selector:
    '.MuiTypography-h6'}))
    .toBeInTheDocument();
});
The tested scenario contains asynchronous logic that needs to be waited for; a session needs to be loaded into the application’s store, which requires backend queries to be completed. Notice how the nested test function is defined using the async keyword, which converts the function body into a promise. Jest infers the asynchronous nature of the function and will configure the test executor to wait for the promise to complete.
In the test arranging phase, we start by mocking the response to any HTTP POST requests performed to the /api/v1/auth/login path to return a fake JWT. Then, we directly dispatch a login action to the application’s store using the await operator to wait for the asynchronous action to complete. This action is processed by the auth API Redux slice we implemented in the Managing the frontend session section in Chapter 8, Creating the Login Page, which internally performs the HTTP request we just mocked. At this point, when the test is executed, the context is set so that the application contains a valid user session.
Next, we programmatically navigate to the /tasks path and render the application router, just like we did for the logged-out user version of the test. However, since the user is now logged-in, the Then phase of the test contains different expectations. We first verify that the user has not been redirected elsewhere by asserting that the current browser path is /tasks. Then, we check that the Tasks page has been rendered by verifying the title displayed in the application’s top bar, which should only be visible for authenticated users.
The App.test.js file contains additional tests for route-specific behavior, which follow a similar pattern; please make sure to check those out too on the GitHub repository. Let us execute them by clicking on the play button near the describe block and clicking on the Run ‘Router tests’ menu entry.

Figure 10.3 – A screenshot of IntelliJ’s ‘Router tests’ test execution results
The tests should pass, assuring us that the application router is working as expected for the provided scenarios. These tests are exclusively focused on the routing layer by treating the router as the testing unit; however, each of the application routes can also be treated as part of the organic application’s features. Let us now see how to write tests by treating each of the defined application features as the testing unit.
Testing the application’s features
When implementing an application, especially if you’re following a test-driven development (TDD) approach, it might be more interesting to write tests that verify the behavior of an actual application feature from the user’s perspective rather than specific units of code from a component’s technical perspective. The resulting tests will provide value from a business point of view and ensure, in an automated and sustainable way, that the application as a whole behaves according to what was requested in its specification. For this purpose, we’ll create the following files:
- src/auth/auth.test.js
- src/projects/projects.test.js
- src/tasks/tasks.test.js
- src/users/users.test.js
Each of these files will contain tests that verify the application’s features related to its containing module work as expected. For example, the users.test.js file contains tests that verify the task manager’s user-related features, such as the ones in the following list, behave according to specification:
- logged-in users can see their information
- logged-in users can change their password
- admins can navigate to the users page and see a list of users
Notice how the names, rather than explaining the technical properties specific to a component (for example, CompleteChip, with no task, is not visible), reflect a feature of the application that adds value to the end users. Let us now analyze examples in more detail by focusing on the tests for the features related to the task manager’s user authentication and authorization.
Testing the auth-related features
In Chapter 8, Creating the Login Page, we created the Login page to allow users to log into the application and implemented the auth API Redux slice to manage the user’s session. In the auth.test.js file, we’ll implement tests to verify that all of these features work according to what we specified. You can find the complete source code for this file at https://github.com/PacktPublishing/Full-Stack-Quarkus-and-React/blob/main/chapter-10/src/main/frontend/src/auth/auth.test.js. Let us analyze the most relevant parts and go over the concepts we haven’t seen yet.
In the beforeEach code block, we can find the following statement:
server.use(rest.post('/api/v1/auth/login', (req, res, ctx)
  =>
      req.body.name === 'admin' && req.body.password ===
        'password' ?
        res(ctx.status(200), ctx.text('a-jwt')) :
          res(ctx.status(401))));
Since we are going to test the login form, most of the tests will perform an HTTP POST request to the /api/v1/auth/login endpoint. In this statement, we set an MSW handler to respond to these requests. If the request body contains the required fields, then the response will be successful and include a fake JWT. If the request doesn’t contain valid credentials, a response with a 401 Unauthorized HTTP status code is emitted.
This test suite contains a nested describe block to group the tests related to the login feature as follows:
  describe('login', () => {
    beforeEach(() => {
      window.history.pushState({}, '', '/login');
    });
Since every test in this group starts by loading the login page, we’ll add this step to a common beforeEach Jest function.
The following test verifies the login feature’s happy path, where a user logs into the application and is redirected to the pending tasks page, works as expected:
test('with valid credentials, user logs in', async () => {
  // Given
  render(<App />);
  // When
  userEvent.type(screen.getByLabelText(/Username/),
    'admin');
  userEvent.type(screen.getByLabelText(/Password/),
    'password');
  userEvent.click(screen.getByText(/Sign In/));
  // Then
  await waitFor(() => expect(window.location.pathname).
    toEqual('/tasks/pending'));
  expect(await screen.findByText(/Todo/, {selector:'h2'})).
    toBeInTheDocument();
});
In the When section, we’re emulating a user typing some valid credentials in the applicable form fields and clicking on the sign in button. For this purpose, we use the following userEvent Testing Library functions to simulate user interactions with the provided DOM elements:
- userEvent.type
This function fires the required DOM events to emulate what happens when the user types. The first parameter should target HTML input or textarea elements, and the second should contain the string representation of what the user is typing. In our case, we are using it to type the valid credentials to the username and password text fields. To retrieve the DOM nodes for these fields, we use the screen.getByLabelText function, which finds form elements with labels that match the provided regular expression in document.body.
- userEvent.click
This function simulates a user clicking on the provided DOM element. In this case, we’re simulating a user clicking on the Sign In button that should be visible in the login form.
In the Then section of the test, we wait for and assert that the user gets redirected to the /tasks/pending URL. We also make sure that the Tasks page is the one being rendered by checking that the page title (Todo) is present in the document. The screen function that we use in this case is findByText, instead of getByText, which does the same thing as getByText but waits asynchronously for queried elements to be on the page.
Notice how this test also verifies that the application router is working as expected. In the end, you need to balance whether there are corner cases that require specific tests for the router, such as those we provided in the Testing the router section, or whether some of these tests are no longer needed because their specification is covered by the feature test.
This file also contains tests to verify what happens when there are errors during the user’s login workflow and the action doesn’t complete. For example, the login, with invalid credentials, user gets credentials error test verifies that when users provide wrong credentials, they receive a Snackbar message informing them of the situation as follows:
expect(within(await screen.findByRole('alert')).getByText(/Invalid credentials/)).toBeInTheDocument();Let us now execute the tests on IntelliJ to make sure everything is working as expected. Just as we did before, we press the play button near the topmost describe block and click on the Run ‘auth module tests’ menu entry.

Figure 10.4 – A screenshot of IntelliJ’s ‘auth module tests’ test execution results
We’ve now implemented enough tests to verify the auth features of the task manager. Let us continue by analyzing the tests that verify the task management-related features, which are the core of our application.
Testing the task management-related features
In Chapter 9, Creating the Main Application, we wrote the implementation for all of the features related to task management. In the tasks.test.js file, we’ll implement tests to verify that all of these features work according to what we specified. You can find the complete source code for this file at https://github.com/PacktPublishing/Full-Stack-Quarkus-and-React/blob/main/chapter-10/src/main/frontend/src/tasks/Tasks.js. Let us analyze the most relevant parts and go over the concepts we haven’t covered yet.
Dealing with tasks in the real application requires being able to choose from projects, having the logged-in user information, and so on. For this purpose, the global beforeEach block of this suite contains mocked responses for all of the HTTP resources, as you can see in the following snippet:
server.use(rest.get('/api/v1/tasks', (req, res, ctx) =>
  res(ctx.status(200), ctx.json([
    {id: 1, title: 'Pending task 1', description: 'A
      description', priority: 1, project: {id: 0, name:
        'Work stuff'}},
    {id: 2, title: 'Pending task 2', project: {id: 1, name:
      'Home stuff'}},
    {id: 3, title: 'Completed task 3', complete:
      '2015-10-21', project: {id: 1, name: 'Home stuff'}},
  ]))
));
server.use(rest.get('/api/v1/projects', (req, res, ctx) =>
  res(ctx.status(200), ctx.json([{id: 0, name: 'Work
    stuff'}, {id: 1, name: 'Home stuff'}]))));
server.use(rest.get('/api/v1/users/self', (req, res, ctx)
  =>
  res(ctx.status(200), ctx.json({id: 0, name: 'user',
    roles: ['user', 'admin']}))));
In this case, we’re faking an initial list of tasks with different properties that will allow us to test the client-side filtering capabilities. In addition, we’re mocking the list of projects from which the user will be able to choose and the information about the currently logged-in user. Since these are the only required endpoints, it’s no longer needed for us to provide a generic catch-all handler as we did in the Testing the application’s routes and navigation system section.
The test suite is organized into three different sections using Jest describe blocks as follows:
- users can create tasks
This group of tests verifies the features related to new task creation. They are intended to ensure that the user can access the New Task dialog through the provided buttons in TopBar and on the Task lister page. They also ensure that the user can fill in the form data for the tasks and that this information is persisted when saved.
- users can list tasks
These tests verify that the user can access the different task pages by clicking on their main drawer menu entry or directly navigating to the exposed route and that only the appropriate tasks are listed.
- users can edit tasks
These tests verify that a user can click on a listed task to open the edit task dialog and that the edited tasks data is persisted in the backend when saved.
The test implementations are straightforward, readable, and self-explanatory. Let us execute them by clicking on the play button near the first describe block and clicking on the Run ‘tasks module tests’ menu entry.

Figure 10.5 – A screenshot of IntelliJ’s ‘tasks module tests’ test execution results
The feature tests for the rest of the modules, projects, and users follow the same patterns we described for the auth and task tests so we won’t analyze them. Please check their implementation on the GitHub repository.
We’ve seen how to execute the tests from IntelliJ. Let us now learn how to run them from the command line.
Running the tests from the command line
So far, we’ve been running the tests from IntelliJ, which provides a convenient way to run a single test or a complete test suite. However, you might not be using IntelliJ, or even if you do, it’s always important to know how to execute the tests using the command line. This is also the way you’d configure the test execution in a CI pipeline.
Our application was bootstrapped using Create React App, and one of its main features is the provision of scripts for your application that you don’t need to maintain. This is the case for the test scripts too, which are linked in the package.json file as we can see in the following screenshot:

Figure 10.6 – A screenshot of the beginning of the scripts section in package.json
In the Testing helpers section, we added some testing helper files to a directory named __tests__. Unfortunately, Jest treats these files as tests too by default. We’ll need to modify Jest’s configuration so that the involved helper files are ignored. For this purpose, we’ll add the following to the last part of the package.json file:
  "jest": {
    "testMatch": ["**/?(*.)+(spec|test).[jt]s?(x)"]
  }
With this testMatch property, we instruct Jest to search for tests that match the provided glob pattern, which will match all of our test files since they all have the .test.js suffix.
To run the tests from the command line, we just need to execute the following command from the frontend project root:
npm testThe default Create React App configuration will launch the tests in its interactive watch mode. This mode will run the tests that have changed since the last repository commit and also watch for changes to re-run those that are modified while the script is running. When running Jest in watch mode, your command should show the following messages:

Figure 10.7 – A screenshot of the execution result of the npm test command
This mode can be useful in development mode and might improve your workflow performance. However, you might also want to run the complete test suite, not just those tests that have changed, in a non-interactive mode. You can accomplish this by executing the following command:
npm test -- --watchAll=falseThe first -- is used to indicate that the subsequent arguments should be passed to the underlying react-scripts test command. The --watchAll=false flag is the Jest CLI configuration flag to disable watch mode. Once executed, you should see a test execution summary like the following:

Figure 10.8 – A screenshot of the execution result of the npm test -- --watchAll=false command
You might also be interested in finding the test coverage for the project. With the Create React App test script and Jest, it’s as easy as specifying the --coverage argument, which can be used both in the watch and in the non-interactive modes. The following command will execute the tests and gather the coverage information with the watch mode disabled:
npm test -- --watchAll=false --coverageThe command should complete successfully and you should see a test execution summary like in Figure 10.8 and a table with the detailed coverage results.
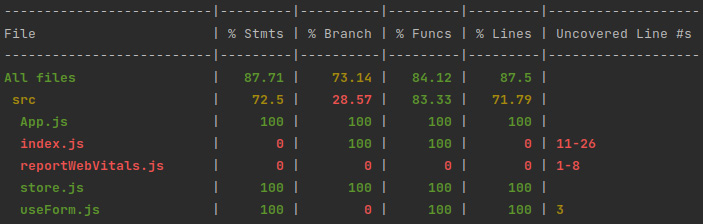
Figure 10.9 – A screenshot of the execution result of the npm test -- --watchAll=false --coverage command
We have now completed the implementation of the required tests to ensure that the frontend side of the task manager behaves as expected. Our application is now much more reliable, and we should feel safe when we need to refactor or make changes to the project in the future.
Summary
In this chapter, we learned how to write tests for our JavaScript frontend application based on React, React Router, and Redux. We also provided complete test coverage for the task manager’s features by implementing a complete portfolio of unit and integration tests. We started by learning about the required and recommended dependencies to implement our tests and added the missing ones. Then, we developed tests for our React components and our React Router configuration. We also wrote tests to verify the application’s features from a user perspective and learned how to run them from the command line.
You should now be able to implement tests for your JavaScript frontend applications based on React, React Router, and Redux Toolkit using Jest, MSW, and React Testing Library. In the following chapter, we’ll integrate the frontend and backend projects and create an API gateway in Quarkus so that the frontend application can be served from the backend.
Questions
- What’s the purpose of Jest’s describe function?
- How many times will the beforeAll function execute when running a complete test suite?
- Can you run asynchronous tests in Jest?
- What function would you use to emulate a user typing into a text field?
- How can you calculate the code coverage of your tests?