6. Editing
It seems like all we’ve been doing so far is getting ready. That’s important, to be sure, but it’s nothing to write home about. Now the fun part starts...editing. Editing is the process of deciding how to combine all the different media at your disposal to tell a compelling story. And story is the key word here. Never lose sight of the reason you are editing—you are telling a story. Ideally, it’s a story someone else wants to watch.
Here’s the key point: In the initial edit, edit your clips as quickly as you can into the Timeline. Don’t worry about perfection—that’s why it’s called a rough cut. It isn’t until you see what you actually have to work with that you can start making meaningful decisions about how to best tell your story.
Final Cut Pro X introduces new concepts, and new technology, that makes telling your stories faster, easier, and more flexible than ever.
The Editing Process
As you’ve seen, you need to understand some new concepts as you make the transition into Final Cut Pro X. In Chapter 3, you learned about Events and Projects. In Chapter 5, you learned about keywords. Now, when it comes to editing, you need to understand storylines. And in Final Cut Pro X there are two types of storylines: primary storylines and connected storylines.
The simplest definition is that a storyline is a collection of clips contained on the Timeline. These clips can consist of video, audio, or still images. The primary storyline is the main collection of clips inside your project. There is only one primary storyline per project. (In Final Cut Pro 7 terms, the primary storyline is similar to tracks V1, A1, and A2—except that Final Cut Pro X doesn’t use tracks.) However, you can have an unlimited number of connected storylines.
Connected storylines, which are also just called storylines, connect to the primary storyline. These additional storylines are used for B-roll (images that illustrate what the person on camera is talking about), sound effects, still images, titles, background plates, and so on. Generally, though not always, a connected storyline contains multiple clips.
Note: On Connected
I keep using the word connected. That’s because whenever you edit a clip into the Timeline, it has to be connected to something. It is either part of the primary storyline or connected to it.
There are also connected clips, which are just single clips connected to the primary storyline. You first met a connected clip in your simple edit in Chapter 2.
The benefits to this connection, as you’ll see in future chapters, is that whenever you move a clip in the primary storyline, all clips connected to that clip will move with it. This vastly reduces the risk of getting clips or Projects out of sync by moving some clips but not all of them.
In Chapter 2, you learned how to do a simple edit. In this chapter, you’ll learn how to use all the editing power that Final Cut Pro X provides.
The Editing and Playback Preferences
Before you start editing, though, you need to tweak two preference panes. The first time you went to preferences, in Chapter 3, you set your import settings. Now, you need to adjust how FCP X handles editing and playback.
Editing Preferences
Choose Final Cut Pro > Preferences (or press Command+[comma]) to open the preferences window (Figure 6.1).
Figure 6.1 This is the Editing preferences window. The settings displayed are how I have my Editing preferences set.
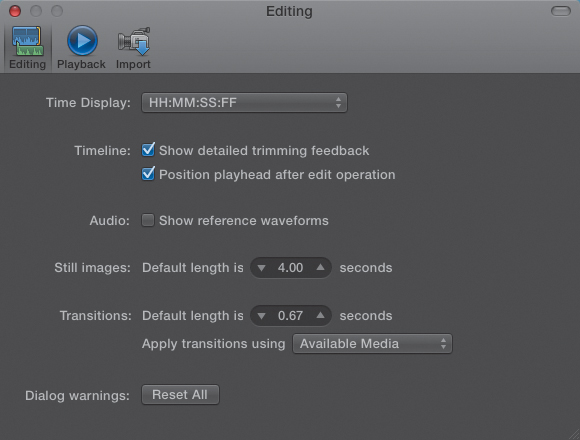
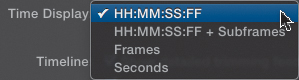
Time Display allows you to set the time format displayed in the Dashboard in the center of the toolbar as you move the skimmer or the playhead (Figure 6.2). You can set it to the following:
• Timecode, which is best for video editing.
• Timecode, plus subframes, which is best for audio editing. A subframe is 1/80th of a video frame.
• Frames, which is best for animation and some film.
• Seconds, which is best for short projects of less than a minute.
Figure 6.2 There are four different timecode display options.
Show detailed trimming feedback makes trimming clips a lot easier by displaying the clips you are trimming in the Viewer. The default is off; I recommend turning this on and will demonstrate it in Chapter 8.
Position playhead after edit operation moves the playhead from wherever it is to the end of a clip when you edit that clip into the Timeline.
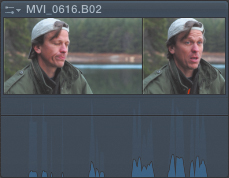
Show reference waveforms displays a “ghost image” in your audio waveforms that shows the waveform volume as if it were normalized (Figure 6.3). If you are always dealing with very soft clips, this can make viewing your audio waveforms much easier, because it accentuates the level changes. If your audio is already loud, turning this on won’t make any difference. This is a display-only function and does not affect the audio levels themselves.
Figure 6.3 Reference waveforms allow you to see audio levels as though the audio were normalized. This is display-only and doesn’t affect editing.
Still images determines the default duration of an imported still image. In Final Cut Pro 7 and Express, the default duration was ten seconds. In FCP X, it has been shortened to four. You can make this any length you want, measured to the hundredth of a second.
Transitions determines the duration of the default transition—a cross dissolve. In FCP X, Apple decided to display all time values as seconds and hundredths of a second, rather than frames. Given all the different frame rates currently in HD—something like eight and growing—this makes sense. However, I miss entering my frame values. (By the way, a 20-frame dissolve, which is my favorite duration for 30 fps video, is 0.67 seconds—just in case you want to know.)
Apply transitions using has two choices: Full Overlap and Available Media. To apply a transition to an edit point, you need extra media (called handles) before the Start and after the End. The reason is that during a dissolve, for example, you need to see both the outgoing and incoming clips. You need video from both clips for the duration of the dissolve. (Chapter 10 covers this in more detail.)
Well, what happens if you don’t have the video handles for the transition?
• Full Overlap means that Final Cut Pro will pull up (move left) the downstream clip (the incoming clip) to create enough overlap for the transition to be applied. The good news is that this works great at making sure your transitions all work. The bad news is that this will shorten your downstream clip by the duration of the transition, which may, or may not, cause problems with your content.
• Available Media is the traditional behavior of clips you saw in Final Cut Pro 7. To apply a transition, FCP needs at least four frames of overlapping video. If there are not four frames of handles, FCP won’t apply the transition. If there are more than four frames but fewer than the duration you want to apply, FCP will adjust the duration of the transition to match the number of handles available.
This setting applies only to transitions, and the default setting is Available Media.
Playback Preferences
The final preference pane you need to visit controls playback (Figure 6.4). Most of the default settings are fine.
Figure 6.4 This is the third of three preference windows: Playback.
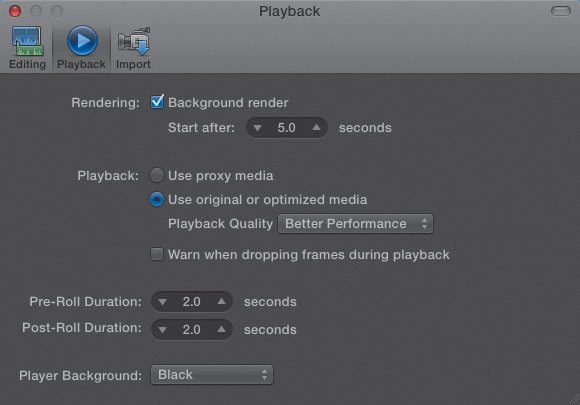
Rendering allows you to turn on, or off, background rendering when the system is idle and to determine how long FCP waits before starting a background render. Most of the time I have background rendering turned on. The only time I turn it off is when I am doing a live streaming event—like a webinar—using Final Cut Pro. Because background rendering is so processor-intensive, I turn off background processing for my event to make sure I have enough CPU power to make the live event flow smoothly. The rest of the time, I leave this on.
Playback allows you to switch between displaying proxy clips, optimized clips, and original clips. This is a toggle switch—you can select proxies, optimized clips, or originals. You can change the Timeline display at any time; however, you can display only one format at a time.
Warn when dropping frames during playback tells you when you are dropping frames, and I always want to know when I am dropping frames. Dropping frames is a good indicator that your hard disk is not fast enough to keep up with playback. The best way to fix this error is to get a faster hard disk or connect it using a faster protocol. This is one of those errors that can screw up your project. If you are laying off to tape, turning this on is essential. If you are exporting your media, turning this on is helpful.
Pre-Roll Duration and Post-Roll Duration determine the amount of time to play before and after a selection when looping playback or auditioning clips.
Player Background determines the color of the Viewer when previewing effects but does not affect output. The Viewer background is always black when outputting.
Now that your preferences are set, it’s time, finally, to start editing.
Editing Techniques
Thanks to John Putch and his Route 30, Too! film. I’ll use some real scenes to illustrate how to edit dramatic footage.
Append Edit
Let’s start by looking at the basic building block of editing in FCP X: the append edit. An append edit takes the selected clip, or range within a clip, and edits it to the end of the Timeline, regardless of the position of the playhead or the skimmer.
So that you can see clips better in the Event Browser, click the Switch in the lower-right corner and adjust the size of the clips to your satisfaction. If you want to see more of the clip, grab the slider just to the left of the Switch and drag it (Figure 6.5).
Figure 6.5 Click the Switch to set clip height and display waveforms in the Event Browser.
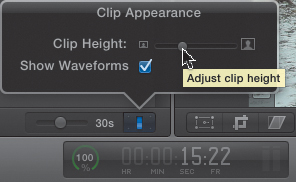
Also, be sure Show Waveforms is turned on so that you can see the audio associated with each clip. Notice that waveforms are embedded at the bottom of the video clip. This makes it easy to quickly see both the audio and the video for a clip.
The All option means that you are seeing the entire clip as a single thumbnail. As you drag the slider more to the left, the thumbnails expand to show more of the clip; say a thumbnail every minute, or one every ten seconds. To keep my screenshots small, I generally set this to All.
Also, I’ve found it very useful to turn snapping on for editing and then turn it off for trimming (Figure 6.6). In this case, since you are editing, I’ll turn snapping on. To do this, do one of the following:
• Click the Snapping button in the top-right corner of the Timeline.
• Press N (for “snnnnnnnnnapping”). This is a toggle that turns snapping either off or on. Me? I almost always use the keyboard shortcut.
Figure 6.6 My favorite keyboard shortcut is also a button—which toggles “snapping.”
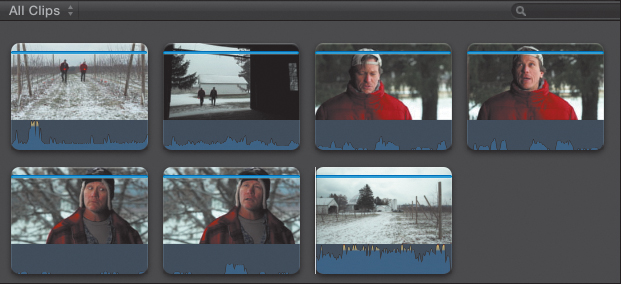
This scene contains seven clips: Two men walk from the field to the doorway of a barn, where a conversation takes place. The shots are displayed in clip name order, not shot order. If you were to number the clips in this image in shot order, it would be: 1, 3, 4a, 4b, 5a, 5b, 2 (Figure 6.7).
Figure 6.7 These are the clips we’ll be working with for this short scene.
So, let’s set the Start and End for the first clip. In Chapter 2, you learned that you can drag the selection boundaries for a clip to set the Start and End. While this works, it often is not accurate or fast enough.
Here are other ways to set the Start, also called the In, of a clip:
• If the skimmer is active, move the skimmer where you want the shot to start, and press I.
• If the skimmer is not active, move the playhead where you want the shot to start, and press I.
• Drag the left side of the selected clip boundary.
• Select the clip in the Event Browser; then, click the Dashboard to switch it to “timecode jump” mode, and enter the starting timecode of your shot. You don’t need to enter punctuation—for example, to move the playhead to 51:20, simply enter 5120 and press the Enter key.
• Using the J-K-L keys, play the playhead and press I where you want the shot to start. This allows you to set the Start in real time during playback.
• Play the clip and press I where you want the shot to start.
Just as there are multiple ways to set the Start, there are also multiple ways to set the End:
• With the skimmer active, move the skimmer where you want the shot to end, and press O.
• With the skimmer inactive, move the playhead where you want the shot to end, and press O.
• Drag the right side of the selected clip boundary.
• With the clip selected and a Start set, choose Modify > Change Duration (or press Control+D) and change the duration of the clip.
• Select the Dashboard, enter the timecode you want for the Out, press the Enter key, and then press O.
• Using the J-K-L keys, play the playhead and press O where you want the shot to end. This allows you to set the End in real time during playback.
• Play the clip and press O where you want the shot to end.
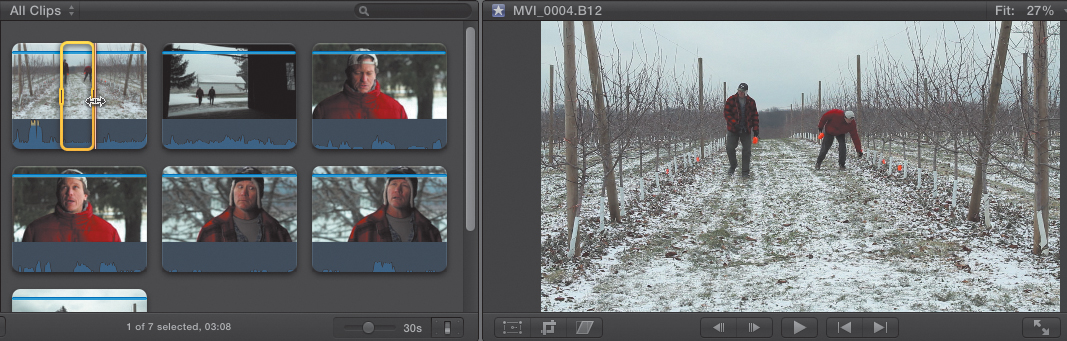
However you decide to do it, set an In and an Out for your first clip. Figure 6.8, for example, shows the selected clip with the Start and End marked and the clip visible in the Viewer.
Figure 6.8 This is the first clip in the Viewer and what it looks like in the Event Browser.
Tip: Psst... Wanna Play a Clip from Start to End?
Piece of cake. Press /.
Just as there are several ways to mark a clip, there are several ways to perform an append edit:
• Click the append edit button in the toolbar (Figure 6.9).
Figure 6.9 Click this button to make an append edit. Shortly, you’ll be using the keyboard shortcut: E.
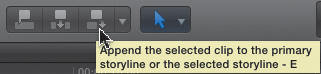
• Press E.
• Choose Edit > Append to Storyline.
• Drag the clip from the Event Browser to the Timeline.
The clip is automatically edited from the Event Browser to the end of the Timeline, regardless of the position of the playhead or the skimmer.
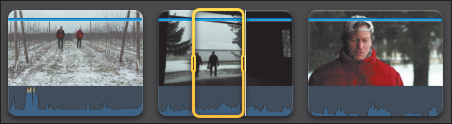
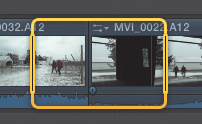
Let’s do this again. Using one of the techniques outlined earlier, set the Start and the End for a second clip (Figure 6.10). Then, press E, or use another method, to append the clip from the Event Browser to the Timeline.
Figure 6.10 The yellow border indicates the selected range of the next clip to be edited to the Timeline.
Note: Hey! What About Those Storylines?
By default, an append edit is applied to the primary storyline. However, if you want to append a clip to a connected storyline, click the dark gray bar above the connected storyline to select it before clicking the append edit button or pressing E.
This technique does not work with connected clips. I’ll explain how to create and edit to connected storylines later in this chapter.
To preview the edit point, use the up and down arrow keys to jump the playhead between two clips. Note that this always lands the playhead on the starting frame of the clip to the right (the incoming clip). Then, press Shift+?.
This is a very cool shortcut, where the playhead backs up a few seconds before the edit point, plays through the edit point, and then, after a few seconds of playing past the edit point, resets itself to its original position in the Timeline.
Hmmm...you go from a shot of the two men in the field to them walking up to the barn. This feels awkward; what you need is a transition shot between these two shots. And doing that requires an Insert edit.
Insert Edit
An insert edit places a clip between two clips at the position of the playhead. If the playhead is between two shots, the new clip is inserted between those two shots. If the playhead is in the middle of a clip, an insert edit breaks the clip into two pieces and inserts the clip between those two pieces. An insert edit always changes the duration of a Project.
In Figure 6.11, for instance, you have a transition shot of the men walking out of the field and heading toward the barn. This will smooth the transition nicely between the field shots and the barn shots.
Figure 6.11 You need this transition shot to get the men from the field to the barn. Notice the In and Out are already selected.
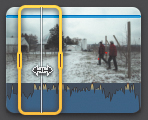
Notice, also, that the clip is already marked—the Start and the End are set. Since I discussed marking a clip as part of the previous edit, you don’t need to repeat the process here. However you decide to mark your clip, do so now.
When the clip is marked and the playhead is where you want the new shot to go, there are three ways to insert the new shot (Figure 6.12):
• Click the Insert button.
• Press W.
• Choose Edit > Insert.
Figure 6.12 Click this button to perform an Insert edit, or press W.

The new shot is inserted into the Timeline at the position of the playhead.
With all edits, but especially for inserts, you have another option to consider: What part of the media do you want to edit to the Timeline? You can edit the audio and video, the video only, or the audio only.
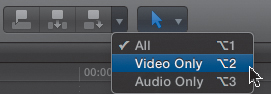
There are three ways to control what media from a clip edits to the Timeline (Figure 6.13):
• Choose Edit > Source Media, and then pick one of the three options.
• Click the small downward-pointing arrow just to the right of the append edit button and select one of the three options.
• Use one of the three keyboard shortcuts:
• Option+1: Edit video and audio
• Option+2: Edit video-only
• Option+3: Edit audio-only
Figure 6.13 To make a video-only edit, select that option from the small arrow to the right of the edit buttons.
Whether you choose from the menu or use the keyboard shortcuts, the option you choose remains in effect until you change it.
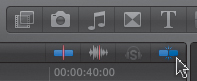
There’s a visual indicator that shows special edit settings are in effect. Take a look at the different color icons in Figure 6.14):
• White boxes: Audio and video is being edited.
• Blue icon: Video only is being edited.
• Green icon: Audio only is being edited.
Figure 6.14 Different icons mean different functions: audio and video (top), video only (middle), and audio only (bottom).

Now that you have the three action shots edited, it’s time to cut to a dialog shot (Figure 6.15). The process is the same: preview the clip, set the Start, set the End, and edit the shot to the Timeline. Since this is the last shot in the short piece, you can use an append edit and press E. You have now created a four-shot project.
Figure 6.15 Here’s the last shot in the sequence.
Special Case: Insert into a Range
There’s a special case of the insert edit where you can insert a clip into a range in the Timeline. The range can be contained entirely in one clip or span more than one clip. Here’s how this works.
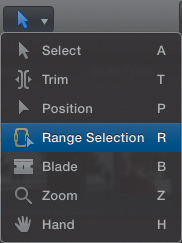
1. From the Tool palette, select the Range tool (or press R) (Figure 6.16).
Figure 6.16 The Range tool allows you to select a portion of a clip.
2. In the Timeline, drag the Range tool to select the area you want to replace with a new shot (Figure 6.17). In this example, I’m selecting the end of the second shot and the beginning of the third shot; ranges can be within a single shot or span between clips.
Figure 6.17 In the Timeline, select the range within a clip, or between clips, that you want to replace with a new shot.
3. In the Event Browser, mark the clip (this means to select the clip and set the Start and End) you want to edit into this range. In this example, I’m picking a very yellow clip so you’ll be able to see the new clip in the Timeline very clearly.
4. Click the Insert button, or press W.
Note: Hey! What About Those Storylines (Um, Again)?
By default, an insert edit is applied to the primary storyline. However, if you want to insert a clip to a connected storyline, click the dark-gray bar above the connected storyline to select it, and then position the skimmer (or the playhead) where you want the clip inserted before clicking the Insert button or pressing W. This technique does not work with connected clips.
The new clip is edited into the selected range of the Timeline (Figure 6.18). But, and this is very important, notice that it inserted the clip into the range. The second half of the second clip was pushed down to the right, as were all the downstream clips. No media is lost with an Insert edit.
Figure 6.18 Here’s the new shot inserted into the Timeline. Notice that no media was lost creating this Insert edit.

Overwrite Edit
While it is helpful that you can insert into a range in the Timeline, you rarely want to preserve what’s in the range. More often than not, you want to replace it.
Note: Can I Lock the Playhead in Place?
Yes. If you want to prevent the playhead from moving when you click the skimmer, just press the Option key when clicking the skimmer, and the playhead won’t move. This is very useful when marking clips or when working with effects.
The append edit is new with Final Cut Pro X; however, FCP 7 editors may be wondering whether their favorite edit, the overwrite edit, made the transition, because that would be perfect for this task. Fortunately, while the overwrite edit didn’t get its own button, it did make the trip and has its own menu choice and keyboard shortcut.
Unlike an insert edit, which places a new clip into the Timeline by moving all the downstream clips to the right, an overwrite edit replaces whatever is on the Timeline with the new clip. This means that an overwrite edit, unlike an insert edit, will never change the duration of your Project, unless you edit the clip to the end of your Project.
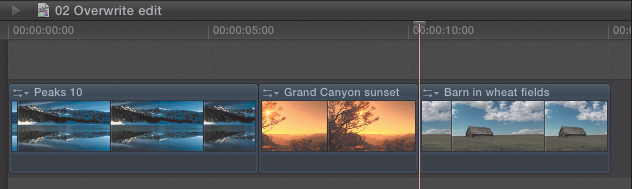
Let me use some different footage to illustrate this. Figure 6.19 shows a Project of two clips. The Project runs exactly 15:00.
Figure 6.19 Here’s the Project you are about to do an overwrite edit into.
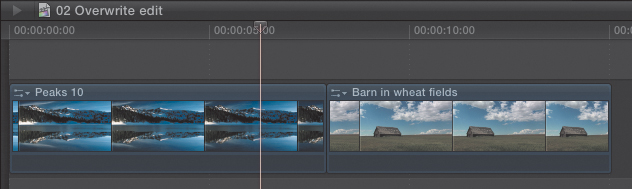
In the Event Browser, I have selected and marked a new clip. To overwrite edit this new clip into the Project, either select Edit > Overwrite or press D (Figure 6.19).
Ta-da! The new clip was edited into the Project at the position of the playhead, replacing what was in the Timeline for the duration of the new clip and without changing the duration of the Project (Figure 6.20). (The Project still runs exactly 15:00.)
Figure 6.20 The new clip replaced what it landed on and did not change the duration of the sequence.
Overwrite Editing into a Range: A Three-Point Edit
Just as you can insert edit into a range, you can also overwrite edit into a range. The procedure is similar.
1. Select the Range tool (press R).
2. Select a range in the Timeline. For the example in Figure 6.21, the range spans two clips and runs exactly 3:00. The entire Project runs 15:00.
Figure 6.21 After the edit, the Timeline duration remains unchanged, and the inserted clip is exactly 3:00 in duration.

3. Mark a clip in the Event Browser. In this example, the duration of the Event clip is exactly 7:00; clearly this is longer than the range in the Timeline.
4. Press D to perform an overwrite edit (or choose Edit > Overwrite). The duration of the Project does not change, and the new clip edits into the selected range (Figure 6.21) as the Timeline duration supersedes the Event duration.
Note: What About Storylines?
Yup, you guessed it! By default, an overwrite edit is applied to the primary storyline. However, if you want to overwrite a clip to a connected storyline, click the dark-gray bar above the connected storyline to select it, and then position the skimmer (or the playhead) where you want the clip inserted before pressing D. This technique does not work with connected clips, but you probably guessed that by now.
After the edit, the Timeline duration remains 15:00. This process of overwrite editing into a range is often called a three-point edit, because you need three points—the Start and End in the Timeline and the Start in the Event Browser—in order to perform the edit.
Backtime Edit
Sometimes, and sports comes instantly to mind, you care more about where a clip ends in the edit than where it starts. (Think of a runner crossing the finish line in a highlights reel—the end is much more important than the start.)
This type of edit is called a backtime edit, and you can do it in Final Cut Pro X as well. Here’s how.
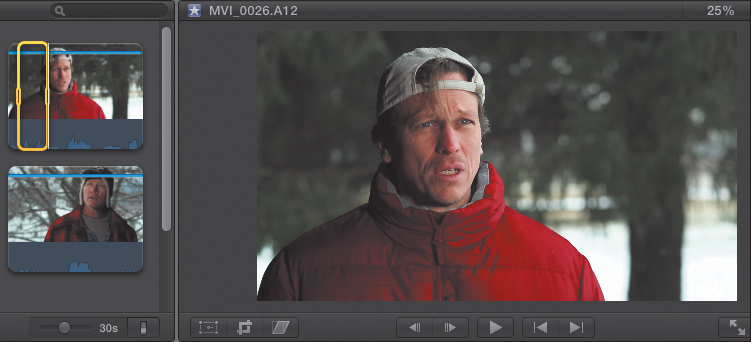
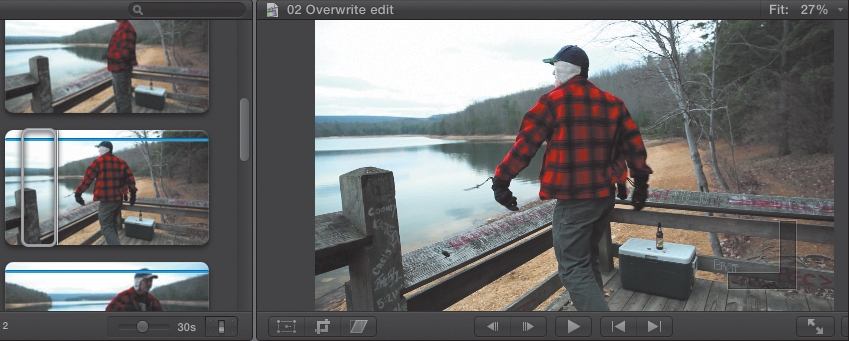
1. Select the clip in the Event Browser that you want to edit into the Timeline. Notice that in the last frame of the shot the tip of his hand is almost touching the wooden rail (Figure 6.22). (He’s been throwing stones in the lake.)
Figure 6.22 Here’s the next clip; you want to edit the clip based upon the End of the shot.

2. Deactivate the skimmer—I find the skimmer doesn’t give me the accuracy I prefer, though using the skimmer is faster than moving the playhead. Both work.
3. Place the playhead in the Timeline where you want the last frame of the selected clip to end.
4. Press Shift+D. (There is no button for this, nor is there a menu option.)
The Event Browser clip is edited to the Timeline such that the last frame of the Browser clip matches the position of the playhead in the Timeline. You can see this in Figure 6.23. The small image on the left is the Browser clip; his hand is just touching the rail. The big image on the right is the Timeline clip, where his hand is just touching the rail. Perfect match!
Figure 6.23 Just double-checking that the ending of both clips match.
In addition to a backtime overwrite edit (which is what this is), you can also do a backtime insert edit (press Shift+W) and a backtime connected edit (press Shift+Q). I’ll get into connected edits after this next section on replace edits.
Replace Edit
A replace edit replaces the contents of one clip, or a selected range, with another clip. A replace edit can be done to any clip in the Timeline. You can replace from the start of a clip or the end of a clip. This is a big change for Final Cut Pro 7 editors, where you could also replace from the position of the playhead, which you can’t do in FCP X.
You can also use replace edits to add clips to Auditions, which I’ll talk about later in this chapter.
Replace edits don’t exist on any menu. Here’s how you do it:
1. Select and mark a clip in the Event Browser that you want to use to replace a clip in the Timeline.
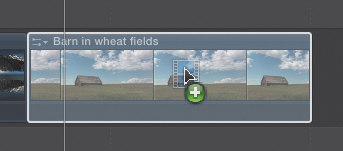
2. Drag the clip from the Browser directly on top of the clip you want to replace in the Timeline. The Timeline clip turns white (Figure 6.24).
Figure 6.24 Dragging a clip on top of another clip turns the bottom clip white—this is the indicator for a replace edit.
3. Let go of the mouse.
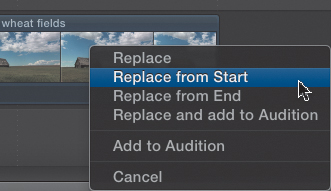
4. Make your selection from the pop-up menu that appears (Figure 6.25):
• Replace: The Timeline clip is replaced by the Browser clip. If the durations of the two clips are different, the Timeline is altered to match the duration of the Browser clip. The start of the newly replaced Timeline clip matches the start of the Browser clip.
• Replace from Start: The Timeline clip is replaced by the Browser clip, starting at the beginning of the Browser clip. The duration of the Timeline clip does not change.
• Replace from End: The Timeline clip is replaced by the Browser clip, starting from the end of the Browser clip. The duration of the Timeline clip does not change. (Think of this as a backtime replace edit.)
Figure 6.25 There are three options for a replace edit, plus the ability to create an Audition.
Note: Can You Replace Edit Into a Selected Range?
No, but there’s a workaround.
The replace edit works only with whole clips. However, you can use the Razor Blade tool (press B) to slice the Timeline clip into the sections you need and then replace the section. Chapter 7 discusses the tools in the Tool menu in more detail.
The two Audition selections (Replace and add to Audition and Add to Audition) will be discussed in Auditions, in just a few pages.
There are two keyboard shortcuts for these replace options:
• Shift+R: Replaces a clip based on the duration of the Browser clip
• Option+R: Replaces a clip from the Start, based on the duration of the Timeline clip
Connected Edit
Connections are new with Final Cut Pro X. They are essential for B-roll, sound effects, music, and many effects. What connections allow is to stack clips vertically, which allows you to have more than one image or sound playing at the same time.
Tip: Connecting to the Storyline
All clips outside the primary storyline must be connected to the primary storyline—either as a connected clip or as a connected storyline.
Connections also allow keeping connected clips in sync with clips in the primary storyline. Connections are always placed into the primary storyline. You can’t connect a clip to another connected clip or connected storyline.
A connected clip is a single clip connected to the primary storyline. A connected storyline is one or more clips grouped into a single entity that is connected to the primary storyline. The principle reasons for using connected storylines are for trimming and transitions. (See Chapters 8 and 10.)
To edit a connected clip to the Timeline, place the skimmer or playhead where you want the clip to connect, and select and mark the clip in the Browser (you should be getting good at this by now). Then do one of the following:
• Click the connected edit button (Figure 6.26).
Figure 6.26 The first button on the left allows you to create a connected edit.
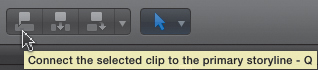
• Choose Edit > Connect to Primary Storyline.
• Press Q.
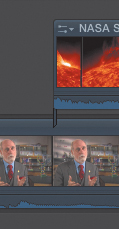
The selected clip is placed above the primary storyline if the clip contains video (Figure 6.27). If the clip is audio-only, it is placed below the primary storyline. Clips can be moved above or below the primary storyline by dragging them.
Figure 6.27 This is a connected B-roll clip, attached to the primary storyline.

Connections are indicated by small vertical lines connecting the primary storyline with the connected clip or storyline (Figure 6.28). If too many connections makes viewing the Timeline difficult, turn them off using the Switch in the lower-right corner of the Timeline. Click the Switch and uncheck Show Connections. The hooks disappear. You can turn them on by clicking the checkbox again.
Figure 6.28 This is a close-up of the hook, or connection, connecting the top clip with the primary storyline.
The main reason for turning this display off is when you have so many connected clips that the lines between clips get to be distracting. You are not deleting the connections, just making them invisible.
Special Case: Editing a Connected Clip to or from the Primary Storyline
Sometimes, you may want to move a connected clip to the primary storyline or move a clip from the primary storyline to become a connected clip. If you just drag it, it will ripple changes throughout the entire Project.
Instead, there are two options:
• To move a selected clip, or clips, from the primary storyline, choose Edit > Lift From Primary Storyline, or press Option+Command+Up arrow. The clip moves up, and the space in the primary storyline is replaced with a gap.
• To move a selected connected clip down to the Primary Storyline, choose Edit > Overwrite to Primary Storyline, or press Option+Command+Down arrow.
Several notes about this: First, this works only with clips, not with storylines. Second, you can’t move a connected audio-only clip to the primary storyline. And, third, if you don’t want to use the keyboard shortcuts, you can achieve the same results using the Position tool, which I cover in Chapter 8.
Connected Storylines
As mentioned, there is a second kind of connected clip, called a connected storyline. This is one or more clips grouped together and connected to the primary storyline. Connected storylines have a variety of benefits compared to connected clips. Some include more trimming options (Chapter 8) and transitions (Chapter 10). For this reason, I won’t spend a lot of time with them here.
To create a connected storyline, select a connected clip and do one of the following:
• Press Command+G.
• Choose Clip > Create Storyline.
You can tell a connected storyline from a connected clip by looking for the dark-gray bar above the clip, which is the symbol of a connected storyline (Figure 6.29).
Figure 6.29 Connected storylines have a dark-gray bar across the top. Connected clips don’t.
Just as you can edit clips into the primary storyline, you can edit clips into a connected storyline. The procedure is nearly the same. The key difference is that you need to select the connected storyline first and then edit into it.
Specifically, you can do the following:
• Append edit
• Insert edit
• Insert into a range
• Overwrite edit
• Overwrite into a range
• Backtime edit
• Replace edit
All the standard edits that you just learned in the primary storyline work the same in a connected storyline.
You can also drag a clip into a connected storyline or remove a clip from the storyline by dragging it out. A clip that is dragged out of a connected storyline becomes a connected clip, unless you drag it out and into the primary storyline.
You can disassemble a connected storyline into its component clips, by either selecting Clip > Break Apart Clip or pressing Shift+Command+G.
Dragging Clips from the Finder
You can even drag clips into your Project directly from the Finder. When you do, a few special rules apply:
• You can drag clips from the Finder directly into the Timeline or on top of the name of the Event in the Event Library.
• Finder clips are analyzed according to current preference settings.
• Finder clips that you drag into the Timeline are linked to the source Event that you selected when the Project was first created.
• Finder clips that are dragged into an Event are linked to that Event.
Dragging Finder clips allows you to do one of four edits:
• Append edit: Drag clip to the end of the storyline you want the clip added to.
• Insert edit: Drag the clip between two other clips.
• Replace edit: Drag the clip on top of the clip you want it to replace.
• Connected edit: Drag the clip above the clip on the primary storyline where you want the clip to connect.
To drag a clip from the Finder into FCP X, you need to see both the clip in the Finder and FCP X.
Creating Auditions
Just as connections are new with FCP X, so are Auditions. An Audition is a group of clips that act as a single clip in the Timeline. Auditions are not like multiclips, as in Final Cut Pro 7, where you can see multiple images at the same time. Instead, think of an Audition as a very fast way to do a replace edit—switching from one clip to the next until you find the shot that works best.
For example, you could use Auditions to determine the best take in a performance, choose the best B-roll clip to use to illustrate a point, or compare different endings to find which works the best.
You can create Auditions in the Event Browser or the Timeline. Because an Audition keeps all the clips in it “live,” it is a good idea to finalize an Audition in the Timeline when you’ve picked the version you want to use.
Caution: Auditions Use Whole Clips
Because you cannot set a Start and an End on more than one clip in the Event Browser, when you build an Audition, the entire clip is included. This means you will need to trim the final Audition clip in the Timeline after you decide which version to use.
However, there is a workaround. You can select the region you want to use in each clip and mark it as a Favorite. Then, in the All Clips menu, display only Favorites. You can build an Audition from just those Favorite selections.
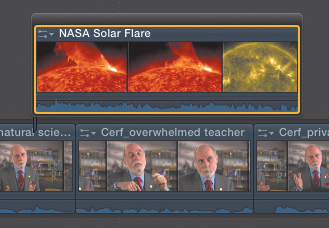
Let’s illustrate this with an example. I have an interview with Dr. Vint Cerf in which he discusses the interplanetary Internet (a conversation, by the way, that I found flat-out mind-bending). I want to use an Audition to pick the best NASA video clip to illustrate what Dr. Cerf is talking about.
In the Event Browser I selected three of the NASA video clips.
1. Once your clips are selected, create an Audition by doing one of the following (Figure 6.30):
Figure 6.30 Auditions are easiest to create in the Event Browser. Select the clips you want to combine into an Audition, and then create the Audition from the pop-up menu.

• Right-clicking one of the selected clips and selecting Create Audition
• Pressing Command+Y
• Choosing Clips > Audition > Create Audition
2. The Audition clip appears in the Browser with the Audition icon in the top-left corner. Each of the clips inside it can be easily accessed using either a keyboard shortcut (Control+[left/right arrow]) or a menu choice. Audition clips are indicated by a small “spotlight” icon near the top-left corner. Edit the Audition into the Timeline—generally, as a connected clip.
Caution: Spaces Interferes with Auditions
Spaces, the ability to extend your desktop using multiple workspaces, uses the same keyboard shortcut as Audition. You can change the Spaces keyboard shortcut in the Finder by choosing[Apple logo] > System Preferences > Keyboard > Keyboard Layouts.
3. To see the contents of an Audition, select it and press Y (or choose Clip > Audition > Open Audition (Figure 6.31).
Figure 6.31 To view the contents of an Audition, press Y.
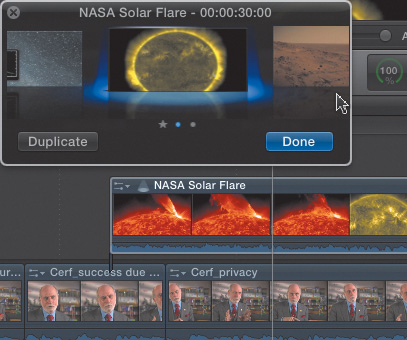
This opens a small window where you can see all the different clips in the Audition. The clip that is currently displayed in the Audition is called the pick.
4. With the Audition window active, switch between clips by either clicking near the left or right edges of the Audition window or using the keyboard shortcut right arrow to go to the next clip in the Audition or left arrow to go to the previous clip.
If the Audition clips were different durations, the duration of the Audition would change as different clips were selected as the pick. This duration change would shift all the downstream clips so that sync would be maintained.
5. When you have found the clip you want to use, click Done.
6. You can add a clip to an Audition, or replace an existing clip, by dragging a clip from the Event Browser directly on top of the Audition until the Audition turns white. Then, let go of the mouse (Figure 6.32).
Figure 6.32 Not only can you replace individual clips, you can also add to, or replace, clips in an Audition.
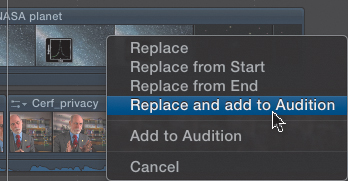
Replace and add to Audition: FCP will replace the currently displayed clip with the new one.
Add to Audition: The new clip will be added to the Audition without affecting any of the other clips.
If you select one of the top three replace options, the Audition will be replaced by the clip you dragged down from the Browser.
7. To remove a clip from an Audition, open the Audition (press Y), display the clip you want to delete in the small window, and press the Delete key.
8. To finalize an Audition, which removes all the clips you don’t want, display the clip you want to use in the final version, and then do one of the following:
• Right-click the Audition and choose > Audition > Finalize Audition.
• Press Shift+Option+Y.
• Select Clip > Audition > Finalize Audition.
All the clips you don’t want disappear, leaving just the clip you do want.
Note: Can You Apply Effects or Transitions to Auditions?
Yes. You treat an Audition as though it is a stand-alone clip. Apply transitions and effects with no problem. As you switch between clips, the transitions and effects switch with the clip. The only potential problem is that if the Audition clip does not have sufficient handles for the transition, the transition is either shortened or removed.
I think Auditions have a lot of potential, but they have two limitations you need to be careful of:
• Because the Event Browser does not remember the Start and End of more than one clip, creating Auditions requires using whole clips. A workaround to this is to view only favorites or clip ranges in a keyword collection before creating Auditions.
• You can’t set a duration for an Audition. The duration of the Audition changes as the pick clip changes. While you can trim the duration for each individual clip, if you add a new clip to the Audition, the Audition duration changes to match the new clip. This means that changing between three different Audition clips creates wildly different durations in the Timeline.
If precise clip duration is important, it might be faster to simply use replace edits—which do respect the duration of the clip in the Timeline.
Auditions provide an alternative way of previewing clips in context, and the ability to switch quickly between them can help you find the right shot faster.
Summary
Editing is central to why you use Final Cut Pro X. Editing is also central to good storytelling. Editing video has two principle goals, one creative and the other business. Our creative goal is to craft a compelling visual story that other people want to watch. Our business goal is to create this story as efficiently as possible, while still maintaining the highest possible quality.
The tools covered in this chapter help you meet both these goals. The more software helps you achieve both these goals, the more likely you are to sleep better—and longer—at night.
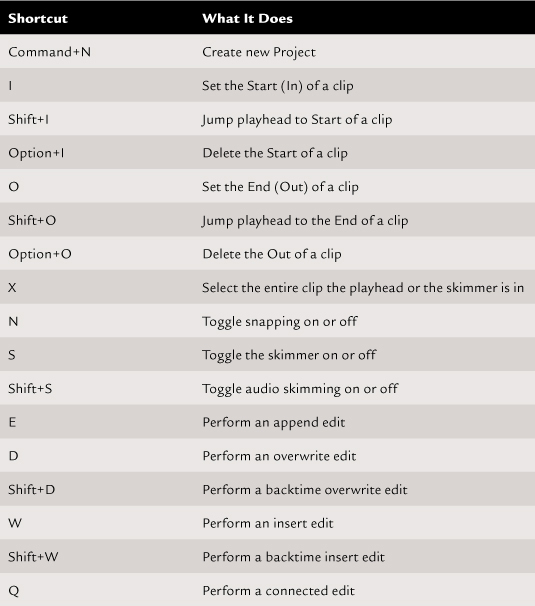
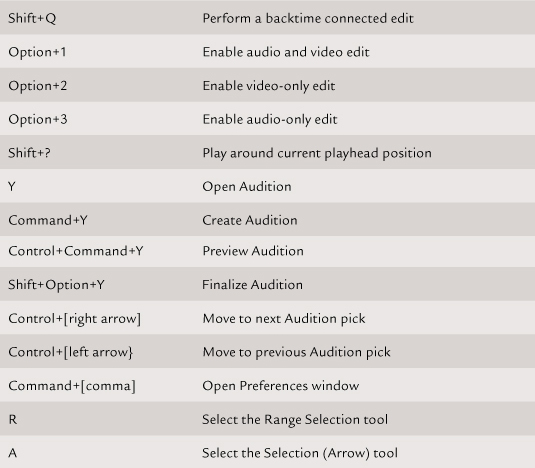
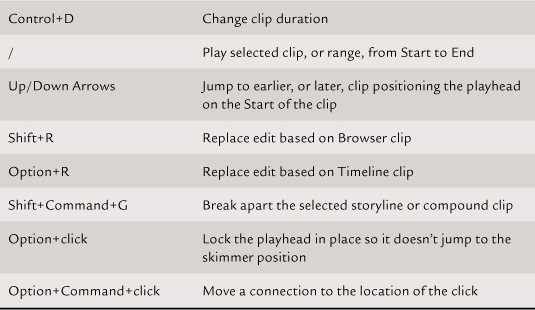
Keyboard Shortcuts