5. Organizing Clips: Ratings, Keywords, and Extended Metadata
Metadata bores most people to tears. That’s a shame, because if you think of metadata as labels, it becomes a whole lot more interesting. This chapter looks at all the different ways you can label your clips so you can find them again in the future—ratings, keywords, and extended metadata.
Ratings are the easiest—fast, simple, but limited in scope. Keywords provide a great balance between depth of features and ease of use. Metadata allows you to label and track just about any conceivable data element associated with your clips, with one problem: You can search only a little bit of it.
Displaying Events and Clips
Before you look at applying labels to your clips, I want to show you a couple secrets buried at the left of the toolbar. For example, these buttons control how Events and clips are displayed in the Event Library and Event Browser (Figure 5.1).
Figure 5.1 The three buttons to the right control how media is sorted and displayed in the Event Library and Event Browser.
From the left, they are as follows:
• Toggle display of Event Library (Shift+Command+1)
• Control display of Events in Event Library (the Gear icon)
• Display clips in Event Browser as thumbnails (the Blue button in Figure 5.1)
• Display clips in Event Browser as a list
It is these right three buttons that I want to focus on for a page or two.
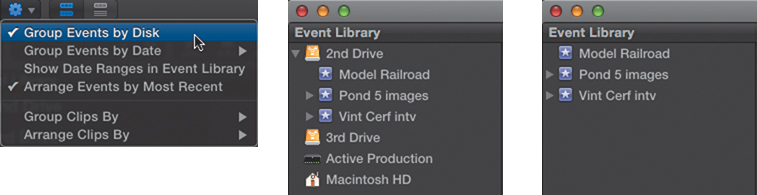
Click the gear icon to change how Events are displayed in the Event Library. For example, when Group Events by Disk is checked, the hard drives attached to your computer are displayed, along with the Events stored in them (Figure 5.2). When this option is unchecked, only the Event names are displayed.
Figure 5.2 Checking Group Events by Disk (left) displays hard disk names (center); unchecking it does not (right).
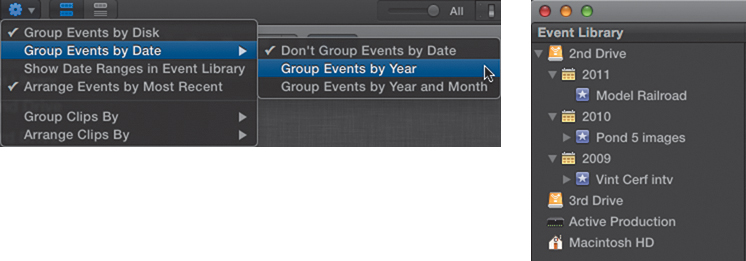
Within Group Events by Date, you can also select to display the year the Event was shot (Figure 5.3). If Group Events by Year and Month is checked, FCP displays both the year and the month of the Event.
Figure 5.3 Check Group Events by Year (left) to display the year the media for that Event was shot (right).
When Show Date Ranges in Event Library is checked, the range of dates represented by the clips in that Event are displayed below the Event name (Figure 5.4).
Figure 5.4 When Show Date Ranges in Event Library is checked (left), the image on the right is the result.

Note: Not All Dates Are Real
When using date display with videotape, the date is the date the video was captured, not the date it was shot. For existing QuickTime movies, there may not be a date at all. This date option is most useful when working with tapeless media that was imported directly from the card or camera by Final Cut Pro.
When Arrange Events by Most Recent is checked, Events are displayed with the most recent event sorted to the top. When this is unchecked and the date display is turned on, Events are displayed in chronological order. If the date display is turned off, Events are displayed in alphabetical order, regardless of how this choice is set.
The bottom two menu choices affect the Event Browser; the top four affect the Event Library:
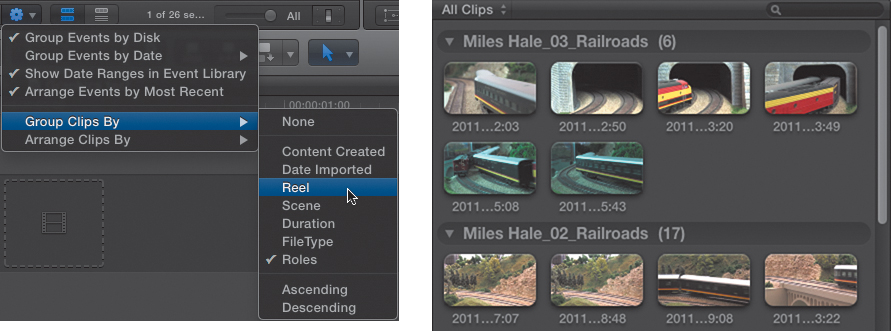
• Group Clips By: This controls how clips are displayed in the Event Browser (to the right of the Event Library). For example, in Figure 5.5, the clips are grouped by Reel (or card). New with version 10.0.1, you can also group clips by Role. (See Chapter 7.)
Figure 5.5 When Group Clips By and Reel is checked (left), images are categorized by reel name in the Event Browser (right).
• Arrange clips By: This determines the sort order of clips in the Event Browser. Options include sorting by filename, take number, duration, or creation date.
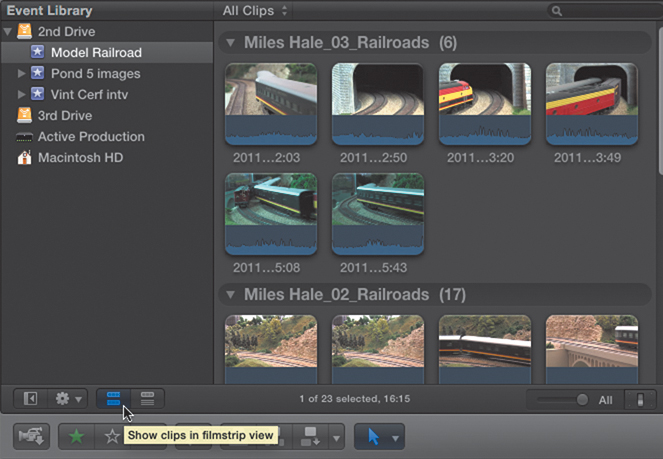
Immediately to the right of the gear icon are two buttons that further determine how clips are displayed in the Event Browser. Click the left button to display clips in Filmstrip view (Figure 5.6). On the next page, I’ll show you how to change the size of those filmstrips.
Figure 5.6 Clicking the Filmstrip button (it’s blue because it is currently active) displays Event Browser clips as filmstrips.
Note: Can You Hide the Clip Names?
Yes. The names of clips displayed in the Event Browser can be hidden easily. Choose Clip > Hide Clip Names (or press Option+Shift+N). Hiding clip names is useful when the names are not meaningful or you want to reduce on-screen clutter. To bring the names back, press Option+Shift+N again, or choose Clip > Show Clip Names.
Click the right button, and clips are displayed in List view. Only one thumbnail is displayed—the clip that’s selected in the list (Figure 5.7).
Figure 5.7 List view (the blue icon) displays key information about each clip. Only one clip thumbnail is displayed at a time.

Like the Browser in FCP 7 or Final Cut Express, this list gives you access to essential information about each clip:
• Filename
• Starting timecode for the entire clip (this does not change when you set an In)
• Ending timecode for the entire clip (this does not change when you set an Out)
• Clip duration of the entire clip (this does not change if you set an In or Out)
• The date the clip was created
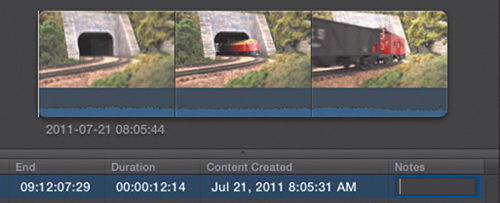
• A searchable note you can add to the clip (double-click the Notes field to make an entry) (Figure 5.8). Notes can also be added in the Timeline Index and the Info tab of the Inspector.
Figure 5.8 Notes are useful places to comment about a clip. Notes can be added in List view, the Inspector, or the Timeline Index.
Note: Skimmer Trick
As long as we are talking about hidden features, here’s a cool trick with the skimmer. Hover the skimmer over any clip in the Event Browser and press Control+Y. (You can press Control+Y any time; this is just more dramatic!)
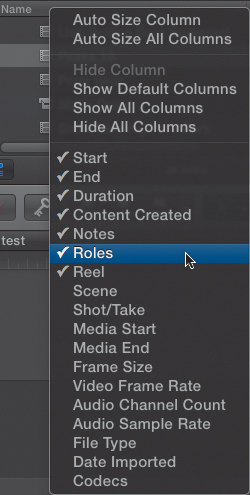
By the way, the thumbnail above the list shows the highlighted clip using three images: the starting frame, the middle frame, and the ending frame. Also like Final Cut Pro 7 and Final Cut Express, if you right-click any of the column headers, a list with additional clip information is displayed. To show a particular column, check it. To hide a column, uncheck it (Figure 5.9).
Figure 5.9 Right-click any list column header to reveal additional columns of information.
Immediately above whatever clip the skimmer is hovering over, a small text display appears with the name of the clip and the timecode of the current position of the skimmer (Figure 5.10). This is especially useful when the clips are very small and you can’t read filenames. (As you skim, timecode is also displayed in the Dashboard in the center of the toolbar.)
Figure 5.10 To display, or disable, additional skimmer info, press Control+Y.
One more thing and I’ll wrap up this section. In the lower-right corner of the Event Browser, when the Event Browser is in Thumbnail view, is...the Switch (Figure 5.11).
Figure 5.11 The Switch, in the lower-right corner of the Event Browser, determines clip height and whether audio waveforms are displayed.
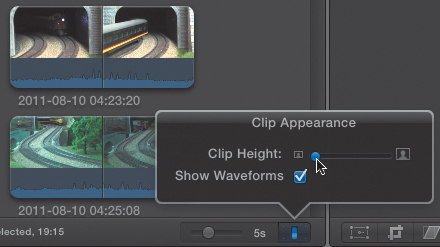
Figure 5.12 Timecode is essential to all editing and is displayed in the Dashboard.
• Hours (using either a 12-hour or 24-hour clock)
• Minutes
• Seconds
• Frames
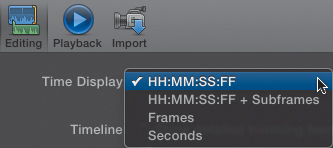
• HH:MM:SS:FF: Hours/minutes/seconds/frames is the default timecode setting.
• HH:MM:SS:FF + subframes: This allows much more accuracy in audio editing.
• Frames: This is often used in animation and heavy effects work.
• Seconds: This displays the total seconds and hundredths of a second, of your project.
Figure 5.13 Timecode preferences are set in the Editing tab.
Click the Switch (Figure 5.11), and use the top slider to control the size of the thumbnails. Click Show Waveforms, and you can see the audio waveforms attached to each clip. (A waveform is the visual representation of the volume of the sound associated with a clip.)
Just to the left of the Switch is a horizontal slider. Move this to determine how many thumbnails to display for each clip. Slide it all the way to the right—to All—and you display one thumbnail per clip. This shows the most clips in the least amount of space. Slide it left, and you see more thumbnails per clip. In this example, 5s means that it is displaying a thumbnail for every five seconds of a clip.
When you zoom into a clip, notice that the side edges of the clip appear torn. This means there is more of the clip displayed on the thumbnail above (torn on the left) or below (torn on the right). You don’t need to display the Switch in order to adjust the duration between thumbnails.
Working the Ratings
Ratings are a fast and easy way to apply some basic selection criteria (um, labels) to a portion of a clip, an entire clip, or a group of clips. There are, essentially, three ratings:
• Favorite rating (green star)
• No ratings (clear star)
• Rejected rating (red “X”)
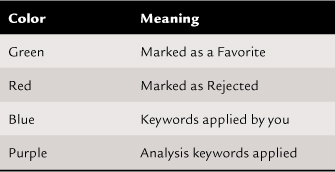
To apply a Favorite rating, select a clip, a group of clips, or a portion of a single clip and click the green star (or press F). The selected portion of each clip is marked with a green line across the top (Figure 5.14).
Figure 5.14 Select a clip, click the green Favorite star, and a green bar appears at the top of all selected clips, or ranges. Rejected clips display a red bar.

To apply a Rejected rating, select a clip, a group of clips, or a portion of a single clip, and click the red X (or press Delete). A red bar appears across the top of the rejected clip, or the portion of the clip, that was selected. Rejected, however, is a relative term. You aren’t actually doing anything with the clip except applying this label. You can edit rejected clips as easily as you would any other clip. However, the benefit to this label will become more obvious in a second.
To remove either a Favorite or Rejected rating, select the clip, or clips, containing the rating you want to remove and click the white star (or press U). All ratings associated with those clips are removed. (Removing ratings, by the way, does not remove any analysis or keywords that are applied to any of these clips.)
The real benefit to using ratings comes in when you want to find clips. For instance, in Figure 5.15, notice the three clips across the top. The first clip has a Favorite bar across the entire clip, the second has a Favorite bar across only a portion of the clip, while the third clip has a red rejection bar.
Figure 5.15 Ratings have color codes: green for favorites and red for rejected.
Notice, also, the All Clips text at the top. This is the hidden button to the Filters pop-up menu. When you click All Clips, a pop-up menu appears. By default, this Filters menu, as Apple calls it, displays all the clips in that Event (Figure 5.16).
Figure 5.16 All Clips allows fast filtering of clips to display all Favorites or hide all Rejected.
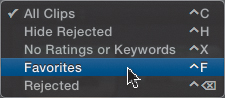
Note the keyboard shortcuts next to each Find option. For example, you can hide all the rejected clips in this display by choosing Hide Rejected (or pressing Control+H). The benefit to using this filter is that the clips are still there, unlike a clip that you delete. To reveal all the rejected clips, select All Clips.
This same filtering process works for Favorites. Choose the Favorites filter (press Control+F), and all the Favorite clips from that Event, or all selected Events, are displayed in the Browser.
Or, find just the Rejected clips by selecting Rejected.
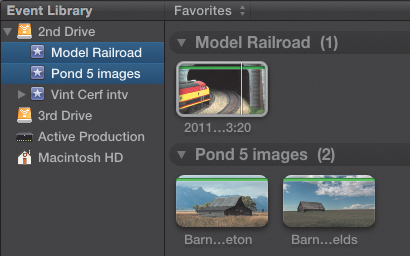
Another cool thing about ratings is that you can use them to find Favorites in multiple Events (Figure 5.17).
Figure 5.17 You can even filter for ratings across multiple selected Events.
You find all clips that don’t have a rating or a keyword applied by selecting No Ratings or Keywords, or by pressing Control+X.
In the Event Library, select all the Events you want to search. Then, in the Filters pop-up menu, select Favorites (or Rejected or No Ratings...you get the idea). All the Favorite clips, or clip regions, from all the selected Events are displayed in the Event Browser, sorted by Event. Cool!
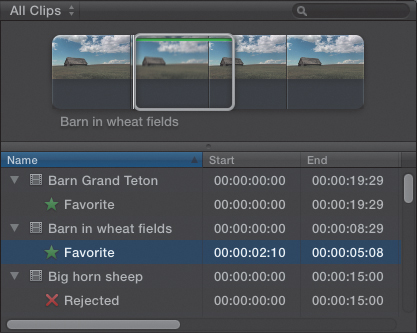
There’s also a hidden feature to using List view with ratings in the Event Browser. (The List View button is just above the red X—see Figure 5.7.) Click the List View icon to display clips in the Event Browser as a list.
Those clips that have a small, right-pointing arrow next to the name have either a rating or a keyword applied to them. Click the arrow to display the rating or keyword. In this case, two clips have Favorite ratings, and one clip has a Rejected rating. Even more useful, click the name of the rating, in other words, Favorite, to select the portion of the clip that has the rating applied to it (Figure 5.18).
Figure 5.18 Twirl-down arrows to the left of clip names indicate clips with either ratings or keywords.
The thing I like most about ratings is that they are fast and simple to use. However, they don’t deal with complexity at all. To label and find clips based upon multiple criteria, you need keywords. We’ll look at those next.
Keying in on Keywords
Keywords, like keyframes, have an intimidating air about them. But, really, the concepts behind both are very simple, though their power is profound. A keyword is simply a label that you apply to a portion of a clip, an entire clip, or a range of clips that allows you to categorize it and search for it.
Note: Where Is All This Stuff Stored?
Ratings and keywords are stored in the Event database. Metadata elements are placed in the media file during import. However, metadata that is added after import, or custom metadata fields, are not stored in the media file but in the Event database.
Keywords allow you to label clips with a variety of categories and find clips based on any or all of these categories. Now, you can quickly zero in on exactly the clips you want from a pool of potentially thousands of clips. In FCP X, Apple has simplified the process of assigning, modifying, and finding keywords.
There are two types of keywords within Final Cut: automatic keywords and manual keywords:
• Automatic keywords: These are applied during import or analysis. For example, keywords are applied indicating the video format, or image size, or when you analyze a clip for excessive shake or to determine how many people are in the shot.
Note: So, What’s a Keyframe?
A keyframe is a point of change during playback. It is the basic building block of animation—which you will get to in the second half of this book. (By the way, you always use keyframes in pairs, just in case you were curious.)
• Manual keywords: These are applied by you and can represent anything. For example, typical keywords might be the scene number, an actor’s name, the location, the costumes, whether it’s a good or bad take—in other words, manual keywords generally relate to the visual or audio content of a shot that can’t be figured out automatically by the computer.
Adding and Deleting Keywords with the Keyword Editor
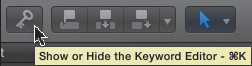
To add a keyword, go to the Event Browser and select the portion of a clip, a clip, or a group of clips, where you want to add keywords. Then, click the Key icon in the middle of the interface (Figure 5.19).
Figure 5.19 Click the Key icon to display the Keyword editor.
This opens the Keyword editor. This window is where you add and remove keywords from clips. It also allows you to assign keyboard shortcuts to keywords (Figure 5.20).
Figure 5.20 This is an empty Keyword editor, where keywords can be added to clips.
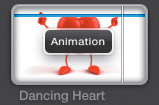
To add a keyword to a selected clip (and in this section, using the word clip also means “portion of a clip or group of clips”—I just get tired of writing the same phrase over and over), type the keyword in the top data entry box.
In this case, I entered Animation for a clip that features a dancing heart.
When you finish typing the word, all the selected clips animate, showing the keyword being placed inside them (Figure 5.21). Also, as soon as a keyword is applied to a clip, a blue bar appears near the top of the selected portion of the image. This is the visual indicator that at least one keyword has been applied to a clip.
Figure 5.21 A keyword, Animation, being added to a clip. Note the blue bar added at the top.
To remove a single keyword, select the clip (or portion of a clip...you get the idea) in the Event Browser; then, in the Keyword editor, delete the word from the top line of the Editor (Figure 5.22).
Figure 5.22 To remove a keyword, select a clip(s), delete the word in the Keyword editor (left), and watch the explosion (right).

In this example, with four keywords to this clip, I highlighted Animation and deleted it. The deleted animation explodes inside the dancing heart clip.
Note: Can You Apply Keywords to an Entire Event?
No...and yes. You can’t select an Event in the Event Library and apply a keyword to the entire Event. However, you can select all the clips in the Event Browser and then apply a keyword to the selected clips. Also, analysis keywords and the folder that contains the media files can be applied as keywords during import.
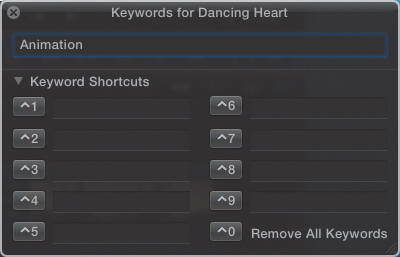
If you want to remove all the keywords in a clip, click the ^0 button just to the left of Remove All Keywords at the bottom of this window, or, even easier, press Control+0.
The Keyword editor makes it easy to automate the process of adding keywords. Here, for example, I have four keywords added in the window which were filled in as I entered keywords.
• To add a new keyword, without applying it to a clip, type it directly in the text box next to a number.
• To delete a keyword, without removing it from a clip, highlight the text next to a number and press Delete.
• To change a keyword, without changing it in the clip, select the text next to a number and type over it.
• To apply any of these keywords to a selected clip, either click the button to the left of the text or type the keyboard shortcut. (The thingy that looks like a roof is the symbol for the Control key.)
The Keyword editor does not have to be open for the keyboard shortcuts next to the text to work. The shortcuts are always available.
Viewing Keywords
There are many different places to view the keywords associated with a clip:
• In the Event Browser, you can use the skimmer to display keywords. Press Control+Y to turn on skimmer info. Keywords are displayed in the Info window.
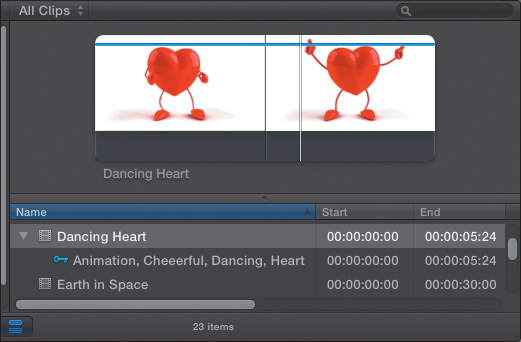
• Also in the Event Browser, display clips in List view and twirl down the arrow to display all ratings and keywords associated with a clip. (To display clips as a list, click the blue button displayed in the lower-left corner of Figure 5.23.)
Figure 5.23 The List view in the Event Browser displays all the keywords applied to each clip.
• Keywords are also displayed in the Event Library either as a Keyword Collection or as a Smart Collection (Figure 5.25). A Keyword Collection is a list of all the clips containing that keyword. (A Smart Collection is a saved dynamic search, which I will discuss shortly.) To see the clips that contain a specific keyword, click the keyword in the Event Library.
Figure 5.25 All keywords contained in an Event are displayed under each Event as a Keyword Collection.

To see all the clips that contain more than one keyword, use the Command key to select all the keywords you want to review, and all the clips that contain at least one of the selected keywords will be displayed. (Folks who understand logic call this an “Or” search—a clip will be displayed if it contains “either this keyword or that keyword.”)
Find Clips Using Keywords
Clicking the name of a Keyword Collection is a fast way to find clips using keywords. But there is far more you can do with keywords to find what you need.
Tip: The Reset Button
By the way, if you want to cancel a search or clear the Search box, click the small, gray X in a circle on the right side of the Search box. (Apple calls this the Reset button.)
First, you can find clips using the Event Library and Keyword Collections. You can also use the Search box in the top-right corner of the Event Browser. Type in the text you are searching for, and all relevant clips will be selected (Figure 5.26).
Figure 5.26 Use the Search box in the top-right corner of the Event Browser to locate clips by filename.

Note: Can You Find Keywords in the Timeline?
Yes, using the Timeline Index (press Shift+Command+2), you can search and display all keywords associated with clips in the Timeline. I’ll talk more about this in Chapter 7.
By default, this text box looks for filenames. In this example, entering the word Sunset displays all clips that contain the word Sunset in the filename. However, you can refine this further by selecting a Keyword Collection (or, as you’ll see a bit later, a Smart Collection) in the Event Library and then entering a word in the Search box. For example, click the Keyword Collection Environment and display all clips that contain the word Sunset in their filename and contain the Environment keyword.
Creating, Modifying, and Deleting Smart Collections
The real power of keywords appears when you use them in combination, which leads me into talking about Smart Collections. Look at Figure 5.26 again. See that small magnifying glass on the left side of the Search box? That little icon opens a whole new world of search possibilities: the Filter window. When you enter text into the Search box, what you are really doing is entering a search into the default setting of the Filter window (Figure 5.27).
Figure 5.27 Click the magnifying glass to reveal the Filter window, which provides much more extensive search capabilities.

The Filter window allows you to create searches based on a wide variety of criteria: Text in a filename, Ratings, Media type, Image stabilization, Keywords, People, Format info, Date, and Roles.
First, the Filter window allows you to combine as many of these different search types into one search as you want, which is why it is more powerful than just a single Keyword Collection. Second, the Filter window allows you to save this search as a Smart Collection so that as new clips get added to the Event that match the criteria of the search, the clips automatically show up as part of the collection, without having to formally add them to the collection or change the search to include them.
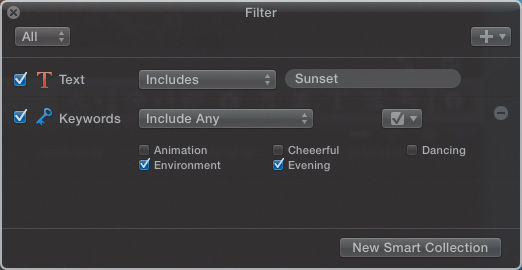
Click the plus button (it’s called the Add Rule pop-up menu) and add Keywords. A second set of criteria is displayed, showing all the available keywords. Uncheck the keywords you don’t want to search for. In this example, you are just searching for clips that contain the keywords Environment and Evening (Figure 5.28).
Figure 5.28 A typical search would be for clips containing specific keywords.
The search is updated dynamically. As soon as you change a setting, all the clips that meet the revised search criteria are displayed. You don’t need to approve the search or even exit the Filter window. This allows you to instantly see whether you are finding the clips you need.
You can even search across multiple Events and multiple hard disks. For instance, in Figure 5.29, I selected the 2nd Drive, which means I am searching across all Events contained on this drive. (Select more than one hard drive if you want to search across multiple drives.)
Figure 5.29 As media libraries get bigger, searching on multiple criteria becomes even more useful.
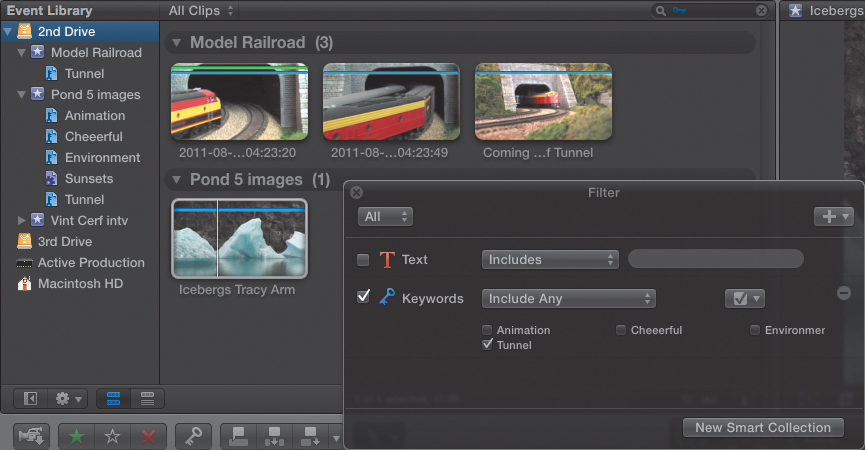
I turned off the Text search—notice the Activate checkbox on the left is unchecked. This is important, because if Text is turned on and blank, you’ll get weird search results.
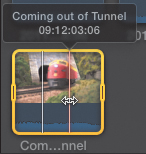
I checked just the keyword I wanted to search on, Tunnel. (You can search on multiple keywords; just check the ones you want to search on.)
Instantly, the four clips that have the keyword Tunnel applied to them appear in the Event Browser. (Also, if you have eagle eyes, a small blue key appears in the Search box at the top—yes, it is virtually impossible to see—which indicates a keyword search is in place.)
To cancel the search so you can see all your clips again, click the small X in a circle at the right side of the Search text window.
By default, Final Cut Pro displays only the clips that match all the selection criteria in the Filter window. This is called an “And” result. If you want to search for all the clips that meet any single one of these search criteria, change And to Any in the Filter window (Figure 5.30). Now, any clip that meets at least one of these criteria will be displayed.
Figure 5.30 To further refine a search, Boolean “and” and “or” can be added.

“And” is more exclusive, displaying fewer clips. “Any” is broader, displaying more clips. If you want to delete a search you’ve entered, click the red minus (-) in a circle. (Apple calls this the Remove button.) It’s to the right of any added search criteria.
Note: Help! I Can’t Find My Clips!
If all, or most, of your clips have disappeared when you were not expecting them to disappear, it’s probably because you have a search in place that you forgot about. Click the Reset button in the Search box to cancel any searches to get your clips back.
Let’s take a look at some of the different search criteria you can enter in the Filter window:
• Media types allows you to display files that contain specific media, such as audio or video.
• Ratings shows clips that have ratings, Favorite or Rejected, assigned to them.
• People displays those shots that Final Cut Pro has identified as containing people, for example, a close-up, two-shot, or wide shot. Note that, like keyframes, all the selection options for people are represented by checkboxes.
• Stabilization shows clips that FCP has flagged as containing excessive shake. (This option does not include clips flagged as having rolling shutter problems.)
• Format allows you to search for clips using a wide variety of technical criteria (Figure 5.31).
Figure 5.31 Formats allows you search on a wide variety of technical criteria.

• Date shows clips based upon a range of dates compared to when they were either created or imported.
• Roles shows clips based upon the Roles (a new feature in 10.0.1) assigned to each clip.
Tip: Keywords Are Not Text
Remember, text searches look at the text associated with a clip—specifically, the filename, plus any notes or markers attached to the clip. Keywords are separate from text and won’t appear in a simple text search.
Many searches are simple; others get quite complex. However, whether a search is simple or detailed, it can speed finding clips by saving the search so you can easily reuse it.
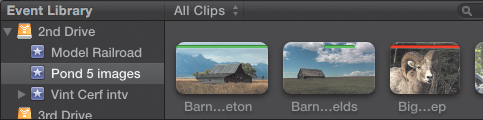
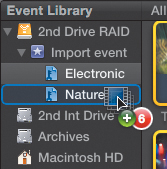
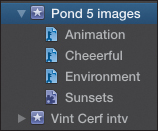
Saved searches are called Smart Collections. To convert a search to a Smart Collection, click the New Smart Collection button at the bottom of the Filter window. The Smart Collection is immediately saved and displayed under the selected Event. Figure 5.32 illustrates the three different icons in the Event Library:
• Event. This is the icon next to Vint Cert intv or Pond 5 images.
• Keyword Collection. This is the icon next to Animation or Cheerful.
• Smart Collection. This is the icon next to Sunsets.
Figure 5.32 The three icons of the Event Library: Event, Smart Collection, and Keyword Collection.
Note: This Won’t Work
You can’t add a clip to a Smart Collection by dragging it on top of the Smart Collection in the Event Library. This works for Keyword Collections but not Smart Collections.
As you start adding more and more keywords, keeping them organized becomes a real challenge. Just as you use folders in the Finder to organize your files, you can use folders in the Event Library to organize both Keyword and Smart Collections.
To create a new folder, do one of the following:
• Select File > New folder.
• Press Shift+Command+N.
• Right-click an Event name and select New Folder.
Moving Collections into a folder is easy—just drag them in.
Note: What Can a Folder Store?
Unlike Final Cut Pro 7 or Final Cut Express, folders in the Event Library of FCP X store keywords. You can’t use folders to hold Events or clips.
Managing Metadata
In addition to Ratings and Keywords, there is a whole new section of extended metadata that’s included but hidden in Final Cut Pro X. There are hundreds of metadata fields just two mouse clicks away.
However, I’m just going to touch on this extended metadata here because, unlike Ratings or Keywords, most of the metadata inside Final Cut is not easily searched. While you can enter data in some of these fields, modify data, and even add custom data fields and views, most of the information contained in the metadata files can’t be searched or exported. In the short term, this metadata is principally of interest to developers, which is why XML import and export is so important.
The Info Inspector
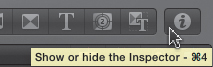
To see this extended metadata that Final Cut Pro is storing, select a clip in the Event Browser and then click the Inspector icon, or press Command+4 (Figure 5.33). You can also select clips in the Timeline and view them in the Inspector. The Inspector is a part of the interface you’ll learn more about in Chapter 9. For now, just know it is central to all FCP’s effects.
Figure 5.33 Click the Inspector icon (Command+4) to view metadata.
In earlier versions of Final Cut (both Pro and Express), you made changes to clips and effects in the Timeline or in the various tabs of the Viewer. In FCP X, all those changes are centralized in the Inspector. Starting with Chapter 9, working with the Inspector will be an essential part of the editing process. For now, though, I just want to introduce this part of the interface as it regards metadata.
When you click the Inspector icon, the Inspector window opens. Depending upon what you have selected, a variety of text tabs appear at the top of the Inspector. In this example, there are three: Video, Audio, and Info.
Click the Info tab at the top, and the metadata window opens (Figure 5.34).
Figure 5.34 The Basic view of metadata, accessed using the Info tab.
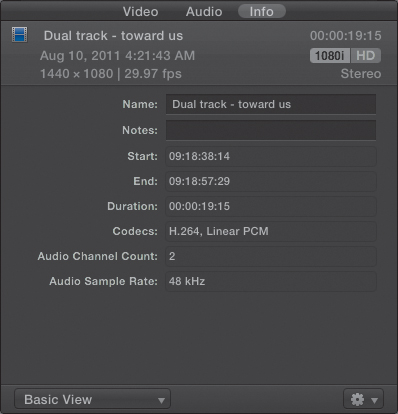
This is the Basic view of the metadata associated with the clip. It includes things like clip title, the Notes field from the List view in the Event Browser, the clip start and end timecode, and the general codec and audio info.
In the lower-left corner is a hidden button. Click Basic View, and a new menu choice appears. These view options allow you to see more and more of the metadata that is actually being tracked for this clip. For instance, watch what happens when you select General View (Figure 5.35).
Figure 5.35 Click Basic View in the lower-left corner of the Info tab to reveal more view options, and then click General View.
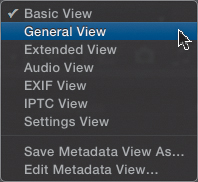
The amount of information displayed expands significantly! In fact, there’s so much of it, you need to scroll down to see all of it. As you’ll discover, each time you choose a new view, more, and more, and more(!) metadata is revealed. You can add new metadata fields, create new views of your metadata, and save custom metadata views.
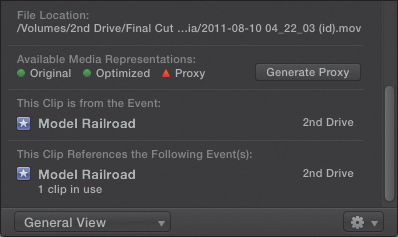
In the lower-right corner is a gear menu, which Apple calls the Action menu. Click it, and an interesting option appears: Show File Status (Figure 5.36).
Figure 5.36 The gear menu allows reviewing file status.

The File Status window adds a very interesting collection of data to the bottom of whatever metadata view you are looking at (Figure 5.37). This new data shows where the source file is stored on your hard disk, which Events are storing the clip, which Projects the clip is used in, and whether the file has been optimized or converted to a proxy file. This also allows you to reestablish links between Projects and Events.
Figure 5.37 File Status shows where clips are used or stored, and whether optimized or proxy files exist.
Just as XML was the underlying framework that made Final Cut Pro 7 such an industrial workhorse, the extensive metadata that is modified, tracked, and, ultimately, imported and exported with Final Cut Pro X will unlock new applications and utilities that will provide capabilities that you can only begin to imagine now.
Summary
In the past, you would track your clips by filename, by the folder they were stored in, or if you were feeling really creative, by a color label. However, in FCP X, you have a lot more tools to label, track, and find exactly the clip you need when you need it. This ability to search for clips, especially between multiple Events and multiple hard disks, makes working with very large projects, with truly large collections of clips, much more manageable.
Keywords will become critical to managing large libraries of tapeless media.
Keyboard Shortcuts