14. Keying
Keying is the process of making one element in an image—a shade of gray or a particular color—transparent, so that you can put one image on top of another image.
You began exploring this, though not using this name, when you were looking at titles in Chapter 11. The process of inserting text on top of another clip is one form of a key. However, this chapter focuses on the most popular types of keying: luma key and chroma key.
Keying is used every day in productions big and small. This chapter shows you how to use this technique successfully.
Planning a Key
The reason keying became necessary is that many times, due to cost or physical impossibility, a script calls for putting an actor someplace where they can’t go—for instance, standing on the soil of a distant planet, or inside the human body, or in front of an animated weather map.
Keying also saves time and money. Rather than fly an actor to a distant locale, you can use a local film crew to take pictures of that location, shoot the actor locally in front of a green screen, then composite (combine) the two images together in postproduction.
Sounds simple, doesn’t it? The problem is that when green-screen work is not thought through properly, a visual train wreck ensues. Planning—especially before you start shooting—is essential to good keys. You should have a really good idea of what your background images look like before shooting. That way, you can answer aesthetic questions like these:
• Where should the actor stand in the frame?
• Where should the actor be looking?
• Where should the green-screen camera be positioned so it matches the position of the imaginary camera that is shooting the background?
• Where are light sources coming from and do they need to match?
• How much room does the actor have to move?
• Are there physical objects the actor needs to move around or be hidden behind?
You get the idea. Unless you know what the background looks like, it is really hard to make the foreground (the part of the image that contains the actor) look right.
Then there are technical issues you need to consider:
• Make the background as smooth as possible. Painting the background is always better than using a crumpled cloth.
• Light the background evenly.
• Foreground lighting does not need to match the background lighting. Light the foreground for drama. Light the background for evenness. Ultimately, you will make the entire background and its lighting disappear.
• Keep your actors at least 10 feet in front of the background. This avoids having the light wrap around their bodies, which makes creating a clean key really difficult. (The phrases “pulling a key” and “creating a key” are synonymous.)
• When in doubt, shoot your actors toward the middle of the frame, so you keep their entire body in the shot. You can always reposition later. (This way you avoid the problem of repositioning someone shot at the edge of the frame, only to discover that when you move the image, half of his or her body is missing.)
• Avoid thin, fly-away hair. Caps, shawls, braids, bonnets, hats, hoods, and hairspray all help to keep hair under control. The hardest thing to key is loose, wildly moving hair.
None of these questions can be solved in postproduction. Once the images are recorded, all you can do is work with them. The goal is to prevent problems by thinking about these issues before you start shooting.
Creating a Luma Key
Luma keys are special effects that remove a black or white background to superimpose the rest of the image on a second clip. Luma keys were invented before chroma keys because black-and-white images predated color.
Note: Stacking Order
When it comes to stacking clips, the foreground clip is always on a higher layer than the background. The stacking order determines what is foreground (top), midground (middle), and background (bottom).
Luma keys can make the black background of an image transparent, while retaining the white portion as opaque. Or, conversely, you can remove the white portion while retaining the black—a luma key works both ways. In the “really old days” this technique was used for live talent. Today, you’ll only need it when you are trying to key a JPEG graphic downloaded from the web.
Here’s how a luma key works:
1. First, you need a JPEG file. This is Bob (Figure 14.1). He’s an incredibly complex JPEG file that I could have downloaded from the Internet, except that I created this in Photoshop. (Bob is the reason people don’t hire me as a graphics designer. Also, Bob could have been a variety of colors, instead of solid white. As long as the background is black, this effect would still work.)
Figure 14.1 This is Bob. He’s a blob. But he really wants to go places.

2. In the Timeline, I edited a background clip into the primary storyline, then stacked Bob above it as a connected clip. (Remember, if you want to see two images at the same time, they need to be stacked above each other.) You could also put Bob in the primary storyline and connect the background clip below it.
3. In Chapter 12 you met the built-in effects. These are effects settings that are inherent in every clip. The Effects Browser has the rest of the effects you’ll be using: clip effects—more than 100 effects that can be added to each clip. To display the Effects Browser, either click the Effects Browser button or press Command+5 (Figure 14.2).
Figure 14.2 Click the Effects Browser button, or press Command+5, to open the Browser.

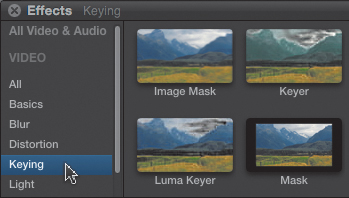
As usual, effects in this Browser are sorted by categories, and you can search for effects using the Search text at the bottom (Figure 14.3). For this chapter, I want to concentrate on the effects in just one category: Keying. There are four options for keying: Luma Keyer, Keyer, Mask, and Image Mask (Figure 14.4). I’m going to use the Luma Keyer filter.
Figure 14.3 This is the Effects Browser—the home for hundreds of effects.
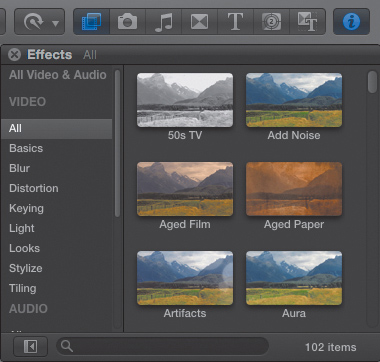
Figure 14.4 The Keying category has four effects.
Note: “Clip Effect” or “Filter”
This is a holdover from Final Cut Pro 7, where effects that could be applied to each clip were called “filters.” I will try to call these “effects,” but if I slip and call it a “filter,” just substitute “clip effect.” They mean the same thing.
4. To apply the Luma Keyer filter, either select the foreground clip (Bob) and double-click the Luma Keyer, or just drag the filter on top of Bob. Since clips on higher layers always block clips on lower layers, you always apply clip effects, and effects in general, to the clip on the highest layer.
Poof! Bob is instantly placed over the background (Figure 14.5).
Figure 14.5 Bob is instantly transported to a new background!

With the foreground clip (Bob) selected, look at the effects settings in the Inspector (Figure 14.6). Though I will examine most of these in detail in the next section, I want to point out a few things:
• Effects are always placed at the top of the Inspector, above the built-in effects.
• The Invert checkbox lets you toggle between removing the black or removing the white. Click it and you’ll see what I mean.
• If the edges of the key are fuzzy and not sharp, slowly drag the black or white Luma settings to adjust the key settings. Most of the time, these will be fine; when you need to adjust them, make small adjustments.
Figure 14.6 The Inspector shows the settings that got Bob where he is today.

The benefit of knowing how to create a Luma key is that it allows you to work with graphics that are downloaded from the web. However, most of the time you’ll spend your time working with green-screen keys, or chroma keys. I cover that next.
Creating a Chroma Key
Chroma keys, green-screen keys, blue-screen keys—they all mean the same thing: making a background color transparent so you can put the rest of the shot on top of a different background. The reason you need to use this technique is that no video format shot by a camera contains an alpha channel.
Alpha Channel Defined
Every pixel (“picture element”—the smallest part of an image) contains four values when an image is displayed in Final Cut Pro X: red, green, blue, and alpha. The red, green, and blue values are pretty obvious—they are what give each pixel its specific color. The alpha value determines how transparent, or opaque, each pixel is.
However, when you shoot video with a camera, the camera doesn’t record any alpha channel data. Every pixel is fully opaque. Green-screen techniques were invented to solve this problem—how to remove the background from an image. So when you bring the clip into FCP and apply the right effect, you convert all those opaque green background pixels into transparent pixels and store that information in the alpha channel—the part of a clip that remembers how transparent each pixel is.
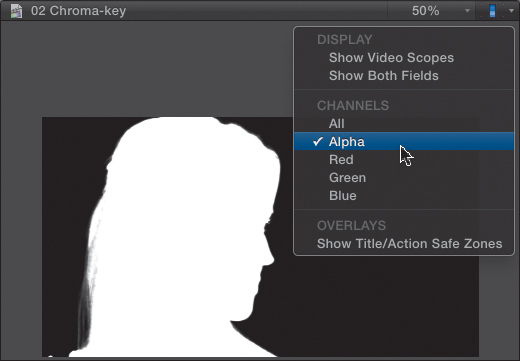
You can view the alpha channel by clicking the switch at the top right corner of the Viewer and choosing Alpha (Figure 14.7). White is opaque, black is transparent, and gray is translucent. In this case, the actor’s head is white (opaque), and the background is black (transparent). This is what you would see when adjusting a chroma key. With “normal” video, the entire screen is white, meaning every pixel is opaque.
Figure 14.7 The alpha channel can be displayed using the Switch pop-up menu. White is opaque, black is transparent, and gray is translucent.
To be truthful, there are two video formats that do support alpha channels: Animation and ProRes 4444. (Avid’s DNX format also supports alpha channels, but it isn’t natively available in Final Cut Pro X.) The problem is that these formats are used only in postproduction to move files between applications while retaining all the transparency information. No camera uses either of these formats, and if one in the future did, the camera would still not record any transparency data, because it would have the challenging task of figuring out what is foreground and what is background. So, green screens will be with us for a long time to come.
Create a Simple Chroma Key
One of the really nice things about Final Cut X is that Apple has totally rewritten the Chroma-key effect. It is much simpler than in earlier versions and delivers much better results.
The steps to create a key are easy:
1. Place the green-screen shot above the background.
2. Apply the Keyer effect.
3. Adjust the effect for best results.
4. Repeat steps 1–3 for each green-screen clip.
In the source clip, notice how smooth and flat the background lighting is (Figure 14.8). Flat (smooth) lighting with no wrinkles in the green is so essential to creating great-looking keys.
Figure 14.8 This is the source clip for our first key.

You can either place the green screen clip in the primary storyline with the background clip connected below it or you can place the background clip in the primary storyline and the green screen clip connected above it. Which option you choose depends upon how you are transitioning into the effect.
In this example, I placed the background clip in the primary storyline. Then, immediately above it, I placed the green-screen clip. The markers are there to mark where I want to take screen shots for this book; they are not necessary to create the key (Figure 14.9).
Figure 14.9 This is one way to position clips in the Timeline: with the background on the bottom and green-screen on top as a connected clip.

Select the top (green-screen) clip and apply the Keyer filter by either double-clicking it or dragging it on top of the green-screen clip. This key uses the default settings for the Keyer effect. The hair keys without a bit of green spill—and even the loose hair is retained (Figure 14.10). Apple has done a great job with this effect. As long as the background is properly lit, pulling a clean key could not be easier!
Figure 14.10 Poof! One great-looking key.
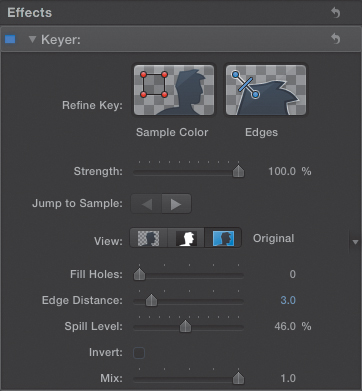
When you open the Inspector, as you saw with the Luma key, the chroma-key effect is at the top, with the built-in effects below it (Figure 14.11). As you’ll discover, you can move clip effects around and delete them. However, for now you only need one effect—the Keyer—and it is in exactly the right spot, at the top of the Inspector.
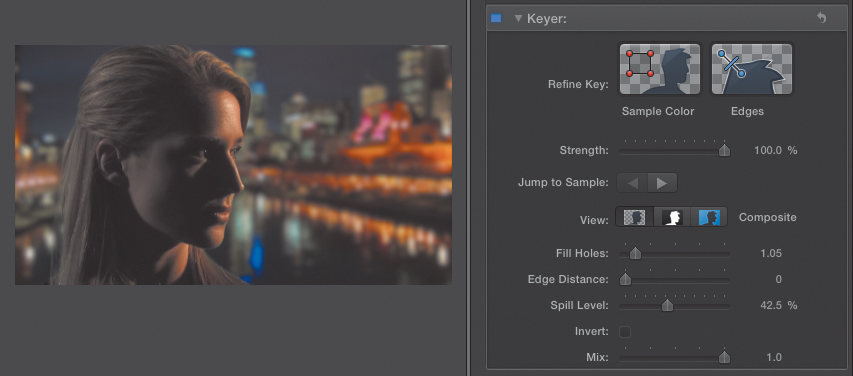
Figure 14.11 These are the Inspector settings for this key.
Sometimes you’ll get lucky and the key will look perfect as soon as you apply the filter. But the worse your lighting, or uneven the background, the more likely you’ll need to tweak the shot.
Note: Stacking Order Matters
In Final Cut Pro 7, the order in which filters were stacked in the Filters tab made a difference in the final effect. This is also true in FCP X. You can change the order of effects (filters) in FCP X by dragging the name of the effect up or down. However, you cannot drag an effect into the built-in effects. Clip effects always process before built-in effects. Most of the time this is fine, but every so often it causes problems. For keying, this won’t be an issue.
Refining the Sample Color
The best way to start cleaning up a shot is refining the sample color. The sample color is the color of the background that you want to remove.
1. Click the Sample Color drawing in the Inspector; you’ll find it near the top of the effect.
2. Draw a rectangle near, but not next to, the actor’s face (Figure 14.12). When it comes to keys, the most important element is getting the transition right between the face and the background. That’s why hair is an important consideration. If our actors were wearing shag boots, it wouldn’t really matter, because the audience is looking at their face. But because hair is right next to the eyes, any errors in keying hair are blindingly obvious.
Figure 14.12 Draw a rectangle for a sample color near the face, but away from any loose hair or clothing.

For this reason, I make it a habit to always sample the background color nearest the eyes without getting any skin, hair, or costume in the sample. This is critically important; if any other color gets sampled, it will totally hose the key.
Generally, the only adjustment you need to make to improve a key is to refine the sample color.

Create a More Complex Key
Let’s try creating a more complex key that illustrates what can be done with lighting and repositioning an image.
1. Place the green screen clip in the primary storyline (Figure 14.14).
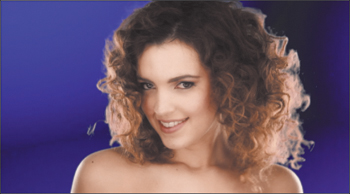
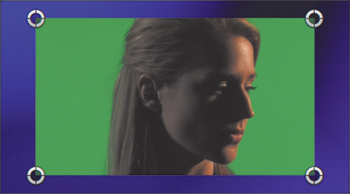
Figure 14.14 This is Lisa. It’s also a dramatic moment in my script for a very suspenseful movie about the dark, seamy, underbelly of river life. So far, I have exactly this one shot for my movie, but, um, when I shoot the rest, “It’s gonna be great!”

In my example, notice how evenly lit the background is, but how dark and “contrasty” the foreground is. This is perfectly OK. As long as the background is evenly lit, you can light the foreground anyway you want that’s in keeping with the story you are telling.
2. Select the foreground (top) clip and apply the Keyer effect.
3. Refer to Figure 14.11 for the full settings of this filter. Just below the Jump to Sample button is this three-way switch. This provides three views of the key (Figure 14.15):
• Composite (or finished results) on the left
• Matte in the center
• Source Image on the right
Figure 14.15 In the middle of the filter is the View button, which displays (from left to right) the final composite, matte, and source image.
4. Click the blue Source Image button on the right. This allows you to sample the color of the foreground without seeing any of the background.
You have a pretty nice key, but it still needs some adjustment.
5. Sample the background color near the face, being careful not to get any skin, hair, or costume in the sample. This becomes especially important when dealing with wrinkled or badly lit backgrounds (Figure 14.16).
Figure 14.16 Again, to be sure of getting the best key, sample the background color close to the face. Press the Shift key and drag new rectangles, to create more than one sample of the background.

6. Click the middle Matte button (Figure 14.17).
Figure 14.17 When you click the Matte button, the foreground goes white (opaque), and the background goes black (transparent). The goal is to eliminate all shades of gray.

Removing Gray Shades
Your goal is to have the background be solid black and the foreground solid white. You want as few shades of gray as possible—none, in fact, especially in the middle of your actors. Shades of gray cause a weird twinkling effect, the hallmark of a bad key.
The problem is more pronounced with a wrinkled background that has many shades of green. To solve this problem, follow these next steps.
1. Switch back to the Source button and use the Sample Color tool to draw rectangles around the different wrinkles until the background matte is clean—solid black. Hold down the Shift key to create more than one sample on the same clip.
2. Switch back to the Matte button to evaluate the background.
3. Repeat steps 1 and 2 until the all shades of gray in the background are gone. If the interior of the foreground still has gray shades, adjust the Fill Holes slider to make the foreground solid white.
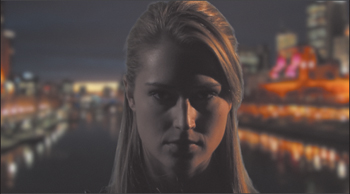
Click the left button to see the final composite (Figure 14.18). Very dramatic! I added some blur to the background to improve the perception of depth.
Figure 14.18 Here’s the final composite.
Refining the Key
This key would look better if I moved Lisa to the left to make a more dynamic shot against the lights of the shore. (And thinking of lights, look at how the colors in her hair and cheek reflect the color of lights in the background. We, ah, planned that.)
1. Turn on the Transform on-screen controls and, while holding the Shift key, drag the center circle to the left (Figure 14.19). This constrains movement to just horizontal or vertical movement.
Figure 14.19 Use the Transform settings to move the actress horizontally so she looks more into the frame at the lights on shore.
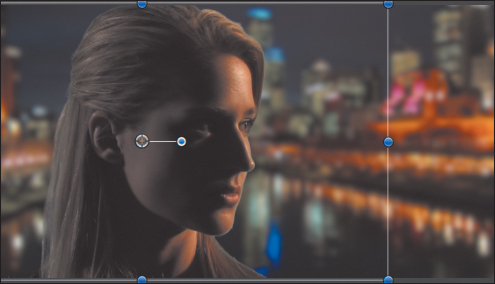
2. Keep dragging the circle until her image positions in the frame better. When you are happy with the position, click the Done button; or press A to return to the Select Tool. This is important because you can’t change effects settings if any of the on-screen controls are active.
Now you have a little “tearing,” or edge softness, around her mouth. You can fix this by following these steps:
1. Return to the Inspector and click the Edges button.
2. Drag from just inside the foreground that’s tearing across the boundary between foreground and background and slightly into the background (Figure 14.20). The goal is to help FCP figure out where the edges are.
Figure 14.20 The Edges button lets you fine-tune the edges between the foreground and the green screen.

3. Drag the vertical slider in the middle of the line you just drew and slide it right to the edge between foreground and background—in this case, her lips.
4. To get rid of some green spill on her shoulder, adjust the Spill Level slider until you get the look you want.
Here’s the final effect and the settings it took to get there (Figure 14.21).
Figure 14.21 This is the final effect and the settings for it.
Important Note: Interlaced Footage
If your key uses interlaced footage for either the foreground or background, it is important that you match the interlacing between the two clips. If you don’t, the foreground clip will go out of focus. You have two options to prevent this problem: Don’t ever reposition the clips, or make sure the interlacing matches. Since you’ll do repositioning all the time, here’s how to match interlacing:
In the Transform setting, be sure the Y value (vertical position) ends in an even whole number. It can be positive or negative, but no decimals. It needs to end with 0, 2, 4, 6, or 8.
Note this rule does not apply to progressive footage.
Adding a Mask
Quite often you’ll be given chroma-key footage that has problems—the green-screen background doesn’t properly fill the frame, or there are light stands in the shot, or some other garbage has crept in that you need to get rid of. While you can use trimming for this (I talked about this in Chapter 12), many times it is easier to use a mask.
Note: Is There a Difference Between a Matte and a Mask?
Yes. But no one except a few curmudgeons can remember the difference. For all intents and purposes, when using software, the two terms mean the same thing.
The benefit of using a mask is that you can draw irregular shapes within the frame and feather the edges to soften the effect. That image inside the mask is from the green-screen clip. That image outside the mask is from the background clip. The mask in FCP X is a four-corner affair, which means it creates shapes with four sides. Always apply the mask after you’ve pulled your key. I’ve found this to be more reliable.
Tip: Help! My Mask Won’t Move!
Yeah, I had that problem, too. Masks don’t work correctly for some types of clips, especially those in the primary storyline. If you run into this problem, try using trim instead.
Follow these steps to create a mask:
1. Select your green-screen clip and, from within the Keying category of the Effects Browser, double-click the Mask effect.
2. This is the default setting of the mask (Figure 14.22). I turned off the key so the results of using the mask are easier to see. To change the settings, grab one of the white circles and drag.
Figure 14.22 The mask filter applied with its default settings.
3. If you want to feather the edges, drag the Feather slider—the feather can be either inside or outside the mask, depending on which way you drag the slider.
4. If you want to round the edges, drag the Roundness slider.
You can keyframe Feathering and Roundness, but not the placement of the four mask points. I hope Apple will add that feature in the future. Fortunately, there are already a few third-party solutions for moving masks available for free online.
Here’s a final result, with an asymmetric, feathered shape (Figure 14.23). Remember, when setting the mask, give your actors room to move. Masks are designed to hide garbage around the edges of the frame, not precise rotoscoping around the actor.
Figure 14.23 This is the result of moving the mask points and adding feathering.

Summary
Keys are an essential part of today’s postproduction effects. The new Keyer in Final Cut Pro X makes keying a whole lot easier than ever before.
Remember, the key to a great key is to spend time in production creating a smooth background, then lighting it evenly. Oh! And it would also help if your actors didn’t wear green in their costumes.
Keyboard Shortcuts
