
Chapter 1
Building Visibility for Your Page
In This Chapter
![]() Letting everyone know where to find you on Facebook
Letting everyone know where to find you on Facebook
![]() Sharing and suggesting your Page with your existing customers and connections
Sharing and suggesting your Page with your existing customers and connections
![]() Sharing photos to attract people to your Page
Sharing photos to attract people to your Page
In Books II and III, we explain how to design a functional Facebook Page. In this minibook, you find some practical ways to increase the visibility for your Page by letting people know where you’re located on Facebook and learning how to share and suggest your Page to Friends.
Imagine that you open a new storefront. You want to send out notifications to everyone on your lists, both existing and potential customers, so they can find you. You need to do the same for your Facebook Page.
Some of your existing customers and connections are already on Facebook, but some (depending on your customer demographics) are not. At the ready are Facebook’s built-in systems for attracting people to your Page and some time-tested offline strategies to bring people not on Facebook to your Page.
 A Facebook business Page is completely public, which means that anyone can view it regardless of whether he has a Profile on Facebook. People without Profiles won’t be able to like, comment on, or share anything on your Page, but they can view all your posts and photos.
When you open the doors to your new Facebook location, you’ll be stepping into a new type of marketing — one based on conversation, content, value, and sharing. The next few pages contain ideas you can use right away to add Facebook to your existing company materials and website, as well as some basic techniques using the Facebook Photo Album that are sure to attract people to your Page.
Inviting Your Existing Customers and Connections to Your Page
Think of your Facebook Page as a new bricks-and-mortar space. It has an address and is open 24/7. You just moved in, and it’s time to let people know about it. The point is to build a bit of a buzz about your new place so people will like the Page and share it with their Friends.
Some businesses create a Page launch day to make a big splash with their entry on Facebook. Others go slowly and build their presence on Facebook over time. Pick the way that suits you and your business, but make sure you do all the following (that apply) to invite your existing customers and connections.
You might be able to get your vanity URL right after you create your new business Page, or you might need to have at least 25 people like your Page to be eligible for a vanity URL. Plan ahead, and if you need to, get your 25 people right away so you can use a more elegant Facebook address (such as www.facebook.com/SociallyCongruent) on your hard-copy materials. See Book II, Chapter 1 for how to secure a vanity URL.
A vanity URL doesn’t contain numbers like this:
http://www.facebook.com/Pages/manage/?act=40641063#!/Pages/Socially-Congruent/147368801953769?ref=ts
Changing your hold message
If your business has a phone on-hold system, update it and add your Facebook address. Here are several great (made-up) examples:
- Thank you for calling. We’re so sorry you have to wait. Waiting makes me cranky, but if you are at your computer, why don’t you go to facebook.com/johnhaydon.digitalmarketing and check out all the latest tips on using Facebook for your business.
- Thank you for calling. If you are listening to this hold message, maybe we are out brewing some tea! If you’re like many of our customers — you have Facebook up and running — find Planetary Teas and see what’s steeping there.
- While you’re holding, you might as well go over to my Facebook Page. Yes, I’m on Facebook. In fact, you might find a discount or two over there that might come in handy when I pick up your call! Go to facebook.com/johnhaydon.digitalmarketing.
Adding your Page address to your e-mail signature
Most businesses want to add their Page name to their e-mail signature right away. You don’t have to have your vanity URL yet to do this because you can hyperlink a long URL to simple text. In case you don’t have a signature yet, we show you how to fix that, too.
Follow the instructions for the e-mail client you use to create an e-mail signature that promotes your Page.
Microsoft Outlook 2007
If you use Microsoft Outlook 2007, follow these instructions. Other versions of Outlook will be similar, but it’s always good to check Outlook’s tutorials on how to modify your e-mail signature.
- Open Outlook and sign in to your account.
- Choose Tools⇒Options.
- On the Options dialog box that appears, click the Mail Format tab.
- Click the Signatures button.
Doing so pulls up the Signatures and Stationery dialog box. Make sure that you’re on the E-mail Signature tab, as shown in Figure 1-1.
- Either select an existing signature to edit or click New to create a new signature, as shown in Figure 1-1.

Figure 1-1: Edit an existing signature or create a new one.
- Editing an existing signature: Select the existing signature, enter your new text, select it, and click the Hyperlink icon, as noted in Figure 1-1. This pulls up the Insert Hyperlink dialog box. Type your Facebook Page URL in the address field and then click OK.
- Adding a new signature: Click the New button, and a dialog box opens where you can give this new signature a name. Name it and click OK. Then design your signature in the editing box. Again, to add a hyperlink to your Facebook Page name, type the name of the Page, select it, click the Hyperlink icon, and add the URL in the Address field.
- Click OK.
When you create a new e-mail message, your existing signature autopopulates in the new e-mail. To change the e-mail signature from within the message, click the Insert tab in the new e-mail window, select Signatures from the Ribbon, and click the name of the new signature. Outlook replaces the signature in the new e-mail message with the one you choose.
Gmail
If you use Gmail, you design your signature a little differently than you do in Yahoo! and Outlook. The good news is that you can add an image to your signature; however, you can’t upload it from your computer. You need to host images “in the cloud,” which means using a service such as Flickr, or even Facebook, to store the images online.
- Open Gmail and sign in to your account.
- Click the Options icon (it looks like a gear) in the top-right corner of the page.
Note: The Gmail Options link may look different, depending on which browser, and which version of that browser, you’re using. The link may be labeled Settings.
The Settings page appears and defaults to the General tab.
- Find the Signature section (about halfway down the page), and select the e-mail address to which you want to add the Facebook address.
If you have only one Gmail address, you won’t see a drop-down menu.
 You can have as many signatures as you have Gmail addresses.
 - Design your signature with your name and contact info.
- Enter the name of your Facebook Page, select it, and click the Hyperlink icon.
- Type or paste your Facebook Page URL in the Web Address field.
If you type the URL in your signature (for example, https://www.facebook.com/GrandmaMaryShow instead of Grandma Mary Show), the URL information is autopopulated when you click the hyperlink icon.
- Click OK.
- (Optional) Add an image (a photo or logo image) to your signature:
- Click the Image icon (the one with the land-and-sky image).
- In the Add an Image dialog box that opens, enter the image’s URL.
This is what makes Gmail’s signature program different from the others. You can’t just upload an image from your computer. The image has to exist somewhere online. Gmail will connect to that address online and pull it into the signature each time you send an e-mail.
If the image you want to use exists only on your computer’s hard drive, you can upload it to your Facebook album or to an image site such as Flickr. After you upload it, right-click it (Control-click on a Mac) and then choose Copy Image URL (or Copy Link Address or Copy Image Location) from the menu that appears.
- Paste the URL in the Add an Image dialog box, shown in Figure 1-2.
A preview of the image is there for you to check.
- Click OK.

Figure 1-2: Add the image URL, and it loads automatically in each e-mail you send.
All images online have an address or URL. You can use any image on your website, or any image hosted on Facebook or photo-hosting sites (such as Flickr). Using other people’s images could be an infringement of copyright. Use only those images for which you have permission to use.
 - Click Save Changes at the bottom of the page.
Figure 1-3 shows a full signature example, including an image, created with Gmail.

Figure 1-3: Signatures with added links and an image.
You can add some simple text to your signature with the link spelled out (not hyperlinked), as follows:
- You might Like Us on Facebook, too.
- http://facebook.com/yourcompanyname
- Do you hang out on Facebook? Come say hi at
- http://facebook.com/yourcompanyname
You can also use an Internet browser extension or application to create a signature that contains a Facebook icon linked to your Page. The best one we’ve found that works in all major browser-based e-mail is WiseStamp. When you go to www.wisestamp.com, the site figures out which browser you’re using and shows you the correct download link. Then just follow the instructions provided. When your e-mail recipients click the Facebook icon, they go straight to your Facebook Page.
Including your new Facebook address on hard copy mailings
Some businesses dedicate a hard copy mailing to their customers to tell them about their new Facebook Page. You can include the announcement in a regular mailing or create a special one, but if your customers read what you send them in the mail (postcards, brochures, newsletters), you need to make the announcement in that medium, too.
Many companies are now including in all their hard copy mailings a small social connection area that shows their online connections, including their website address, YouTube channel, Twitter username, LinkedIn company page address, and more.
Updating your letterhead and stationery
You need to have your vanity URL before you update your letterhead. As we discuss earlier in this chapter, you may need 25 people to like your Page to be eligible to get one. Then you can add an elegant URL, like www.facebook.com/SociallyCongruent, to your stationery, as shown in Figure 1-4.

Figure 1-4: A Facebook address can be added to any letterhead design.
Including a Facebook icon on your web page
Web pages now commonly feature a Facebook icon. In fact, a website without one seems to be missing something. You eventually want to integrate everything Facebook has to offer with your website. See Book VII (on advanced marketing) for everything Facebook offers. For now, a simple first step is to connect your website to Facebook.
Putting a linked Facebook icon on your website or blog is very easy. All you need are your Facebook Page URL address and an image of the icon you want to use. You can even do this before you secure your vanity URL. You can have a graphic designer create an icon image for you or use an existing one, as shown in Figure 1-5.

Figure 1-5: Standard Facebook icon images you can use.
A great source of Facebook icon images is Iconfinder (www.iconfinder.com). Enter Facebook in the search bar and then select the icon you prefer. The drop-down menu gives you three options: No License Filtering, For Commercial Use, and No Link Back. We suggest opting for No Link Back because it’s the simplest to use.
After you select the appropriate category, find an icon that blends well with your website. Select it and then select the size you need. If you don’t know what size you need, download all the sizes and save them to your computer. Then you need to send these images to your webmaster to place on your website or do the job yourself.
If you’re using a WordPress, Joomla!, or Drupal template for your website, you may find that Facebook icons are built into the template offerings, and all you need to do is add your Facebook Page address to activate the icon on your website. Many plug-ins for those systems allow you to add a Facebook icon and link it to your Page. You need to explore your website-creation system and see whether this feature is available.
If you’re using an HTML system to create your website, you can create your own linked image and then upload the new HTML page with the new icon (with the link code) to your server. If that last sentence made no sense to you, you need to talk to your webmaster or website designer.
Linking to your Page from your Profile
If your Page is a service that you offer, go back to your Facebook Profile and add a little bit to your About tab about your new Page’s location. If your business is something that you want to keep completely separate from your Profile on Facebook, you can skip these steps. Book II, Chapter 2 covers how to edit your About tab.
To link to your business Page from your Profile, follow these steps:
- Click your name in the top-right corner of any page on Facebook.
This step takes you to your Timeline.
- Find the About link below your picture, and click it.
You go to an interface where you can edit all the bits and pieces of your personal account.
- Click the Edit button to the right of the Work and Education heading.
You can use the Work and Education section to add your new Page address.
- Type the name of your new business Page.
- When you see the Page come up in the suggestions, click it to add it to your Work section.
Fill in your position and any other important information (address and so on).
- Click the Add Job button.
- Click the Done Editing button.
Figure 1-6 shows how the editing space looks on the Timeline.

Figure 1-6: This screen is where you add your business Page location on your personal Timeline.
Make sure that the viewing option is set to Public so that people will be able to see your Page linked and be able to click through to it. You can change the icon by clicking the drop-down arrow while you’re in Editing view and selecting the world icon (Public).
Another creative idea is to put your business Page URL on your Profile’s Cover photo. You have to do a little photo editing, but the result will help move people over to your Page. Or you can put your website address on the image, as in Figure 1-7.
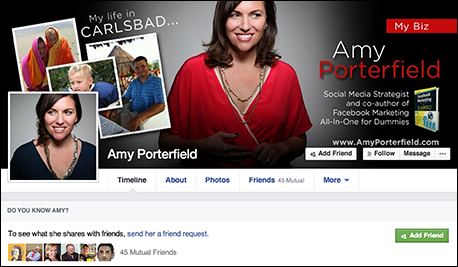
Figure 1-7: Modify your personal Cover image to show people where you want them to find you.
Inviting your other social networks to visit your Page
Maybe you’ve been active on Twitter or various niche social media sites, and now you want to invite the people you’ve met there to visit your Page. You can get people to click the link to check you out, but you want them to like you, too.
A good way to develop a flow to your Page — so that people are asking questions or commenting on your posts — is to invite your most engaged members of your other social networks to join you on Facebook.
Here are some examples of how you can connect your Facebook Page with other social media:
- Twitter: Add your Facebook Page link to any Direct Messages you already have going out to new followers.
- LinkedIn: Add your Facebook link to any message you send, and make sure that it’s listed on your Profile.
- YouTube: Add your link to any YouTube channel in the info section and to the first line of each video’s description section. You can also use the LinkedTube service (www.linkedtube.com) to create a clickable link right on the video itself.
Every social media system has a place to add links; be sure to go to each one you already use and add your new Facebook Page address.
After you add the link to your Page on your other networks, you can start to invite people to your Page through your regular posts and updates. One of the attractive things about a Facebook Page is that you can have a longer conversation than the 140-character limit in Twitter, so your Twitter followers might enjoy a longer conversation with you on Facebook.
On a regular basis, create a post that links back to your Page on all your other social networks. You can also post the direct links to any photo or album you’ve created. See the upcoming section, “Sharing your albums and photos.” This is a nice way to invite people to see your Page and (ideally) stick around and like it.
Growing your Page manually or buying automatic fans
The debate between growing your Page manually and buying automatic fans is a controversial subject. As much as we’d like to take the middle ground on this, we recommend that you grow your Page organically. It’s always better to have people on your Page who are real, engaged fans of your product or service rather than to pay companies for any “Get fans fast!” services you hear about or see online.
Think creatively about contests, games, applications, and other forms of Page building rather than buying your way into Facebook fame. See Books V–VIII for those strategies.
Sharing Your Page with Your Friends on Facebook
You have several ways to invite your Friends to like your Page:
- As a Page administrator, you can use the Invite Friends link in your Admin panel.
- As an admin, you can invite your e-mail contacts to like your Page.
- You and everyone else can share the Page. Sharing a Page puts the invitation in the sharee’s Notifications.
If you don’t want any of your Friends to be invited to be connected to this Page, you can skip inviting and sharing.
Still, you may want to go through the steps to share your Page because these steps are the same ones you’ll want your supporters to duplicate to show your Page to their Friends. Understanding how sharing works allows you to craft the best message to solicit your Friends’ help in expanding your reach.
There are countless other ways to bring people other than your Facebook Friends to your Page, but these ways are built into Facebook’s own system and can be used effectively to create momentum toward an engaged community for your business. After you have a few friendly faces who have liked your Page, you can start to use some of the advanced marketing ideas in Books V through VIII.
Inviting Facebook Friends to your Page
Only the Page admins can use the Invite Friends feature. Everyone else needs to use the Share feature.
As an admin, to invite your personal Facebook Friends to your business Page, follow these steps:
- Go to your Page, and look above the Admin panel.
- Choose Build Audience⇒Invite Friends, as shown in Figure 1-8.
A dialog box appears.

Figure 1-8: The Build Audience drop-down menu.
- Search for and select your Friends.
You have several ways to do this:
- From the Search All Friends drop-down menu, choose Recent Interactions, a geographic location, membership in a shared group, or members of your Friends lists (see Figure 1-9).
- Type a person’s name.
- Click a person’s Profile image to select that person.
- After you select everyone you want to invite, click Submit.
The invitation will be sent.
If a person has already been invited to like the Page, it will say “invited” with a check mark to the right of their name.

Figure 1-9: Find people you want to invite to like your Page.
You know your Friends. Don’t overdo inviting because getting an invitation week after week for the same Page, either through Suggesting or Sharing or posting, can be really irritating. To find other ways to attract your Friends to your Page, keep reading this book!
Friends lists are created in your Profile. You can’t create any business Page lists. One time when a Friends list is important for your Page is when you’re asking your Friends to like your Page by using the Share or Invite link.
As of this writing, you don’t get a chance to add a personal message to a Friends invitation. Your Friends can ignore the message, click the link that takes them to your Page and click the Like button there, or click the Like link in the notification.
Sharing your Page
The other main way to invite your Friends to your new Page is this:
- Choose Build Audience⇒Share Page, as shown in Figure 1-10.
A dialog box opens.
A window is automatically fills with some of the information from your Page’s Info section. The items included are defined by the type of business category you choose, as we discuss in Book II, Chapter 1. If you filled in your Info fields fully, you see a description of your business, including your Page’s Profile image, all ready to send.
- (Optional) Add a comment in the status box above the invitation.
Anyone sending a Share invitation can edit the title and the information by clicking in those fields and typing something new.
- Choose where to post it: your Timeline, on a Friend’s Timeline, in a group, on your business Page, or in a private message.
If you’re posting to your own Timeline, you can also change who can see the Share post by opening the Post Privacy Setting drop-down menu (see Figure 1-11) and deciding whether everyone, just Friends, or others can see it. You have several choices, and you can also select Custom and then set who can and who can’t see this invitation.
You should post an invitation to your Friends in many ways — on and off Facebook — to have them connect to your new Page.

Figure 1-10: Invite Friends to like your Page.

Figure 1-11: Set who gets to see your Share Page message.
The next few figures show examples of what the Share invitation will look like, depending on which business category you chose for your Page.
Figure 1-12 shows someone who chose Product/Service. It populates the invitation only with the Company Overview text from the Basic Information page. Look how much information can be sent!

Figure 1-12: Only the Company Overview is used in the invitation from a Product/Service type of Page.
In Figure 1-13, the category is Public Figure, which populates the invitation only with the Personal Information from the Basic Information page.
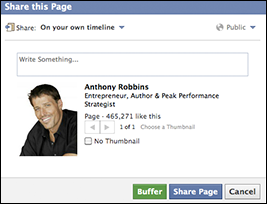
Figure 1-13: The Personal Information field is used in the invitation for Public Figures.
Figure 1-14 shows what is pulled up for a Page with the category Musician/Band. It populates the invitation only with the Biography part of the Basic Information page. If you don’t put anything in the Biography field, the invitation pulls information from the Members field.
You may need to experiment with where you place text on your Basic Information page so that your Share Page invitation contains the text you want other people to see.

Figure 1-14: The Biography section might be used for a musician.
Figure 1-15 highlights a TV show. The invitation populates only with the Plot Outline text of the Info link, as shown in.

Figure 1-15: The Plot Outline information is used in the invitation if the Page type is TV show.
The people who end up sharing your Page this way usually don’t know that they can edit the Title and Information fields. They don’t know they have control of the information that populates the invitation, so you can see why it’s important to have the right category and to fill in the Basic Information section fully.
Sending requests to promote your Page
It’s perfectly okay to privately message some of your closest Friends and business partners to ask them to share your Page with their Friends on Facebook. You can call them on the phone (imagine that!), e-mail your new Facebook address link to them, give them a handwritten invitation over drinks (it’s been done), or use the built-in instant messaging (chat) system that Facebook offers. If your Friends like using the chat system, you can have a nice little conversation with them about your new Page.
You can see which Friends are online by clicking the Chat menu in the bottom-right corner of any Facebook Page. A green dot appears next to a Friend who is online and available to chat, and a phone icon appears next to a Friend who has her phone connected to her Facebook account.
If you click someone with the phone icon, the regular chat message box opens up, but the message is delivered to the phone. On Profiles and anywhere else on the site, clicking a chat icon starts a conversation with that person.
To send a chat message, simply type your message and then press Enter/Return.
Finding and thanking your key enthusiasts
Acknowledging the people who spread the word about your Page is always a good idea. You can offer an incentive or reward for their efforts.
The trick is figuring out who is helping you out! Currently, the only way is to ask. So take the bull by the horns, pop the question in the form of a Page update, (such as “Who has shared this Page today?”), and offer discount coupons or codes as rewards.
We’ve seen many creative ways of thanking enthusiastic supporters. The folks behind one Page we know offer free, live training to anyone that evening if they can get their like count above a certain number. If they can add 50 new likers to their Page by 5 p.m., everyone is invited to free training to create a custom video tab (see Book V, Chapter 2 on creating custom tabs)! This strategy has been very effective for this business.
Adding Photos to Attract People to Your Page
No matter whether you have a physical product or are in a service industry, photos sell and attract. You have many ways to use photos to invite people to your Page and to keep them actively engaged.
Collect many high-quality photos of your product, or shots of your service, or anything that relates to your Page’s focus. Continue to collect these photos, and make sure to post them on a regular basis.
Read the information in this section to develop a marketing strategy using photos in Facebook.
Creating a marketing strategy with your Cover photo
The Timeline format features a large Cover photo, which we talk about in Book II, Chapter 2. Here, you need to think about how to really use this large image to your business advantage.
As we discuss further in Book II, Chapter 2, Facebook is very clear about not having this image turn into an ad or a billboard. Facebook wants to keep it kind of an artistic experience, which can be a challenge for some businesses. Here are some ideas to jump-start your creativity:
- Highlight your fans. Mari Smith does an excellent job of executing this marketing idea. You can see her images through time where she highlights a single fan or all her fans. You can go directly to her Cover photo album here: http://on.fb.me/MariCoverPhotos.
- Show happy customers. If you have images that convey satisfaction with your product or service, there’s no better way to use the Cover photo space. A nice example is www.facebook.com/CrustPizzeria. If the happy faces are not currently Crust Pizzeria’s Cover photo, click Photos and then click Cover Photos to see the Cover photos that show the happy customers.
- Issue a call to action. This strategy is a fine line to tread, but it can be done. Take a look at Amy’s Cover photos for a few good examples here: http://on.fb.me/AmyCoverPhotos. You can’t use the words “Click Here” or “Go to This Website,” but you can put the title and date of an upcoming webinar on the image, as Amy has done.
Creating a marketing strategy with photo albums
Consider your business before you click the photo-upload link. Think about what would be interesting to people who already know you and what would be interesting to those who have never heard of you. Use the photo system in Facebook to its fullest, keeping in mind best practices for your niche or industry.
Take a moment to think of some really interesting Photo Album names that would promote your business. You always have the Album called Profile Pictures and Cover Photos, which will always contain all the photos you use for your Profile image and Cover images, but you can name every other album that you create.
If you’re selling a physical product, for example, create an album called Happy Customers, and upload shots of happy customers using your product. Create an album called Found in Chicago for photos of your product on the shelves of a store in Chicago. You could use this idea in a contest; see more in Book VI on making Facebook come alive with events and contests.
If you’re selling a service, create an album called Here I Am, Doing It (replace Doing It with your service), and upload photos of your staff doing their work, or showing you providing a session of your service. How about creating an album called Award-Winning for photos of your awards and achievements?
Your business might use humor to attract a strong group of fans: that is, likers. If you think that putting up a picture of your dog and labeling him the Acting CEO works for your customer base, go ahead and have fun with it! The people who really like your Page will most likely share these photos, so make them relevant to your business. They can be funny — and goodness knows, we all could use a laugh.
Uploading photos to your Facebook Page
Uploading photos to your Facebook Page involves the same process as uploading to your Profile except that you start from your Page.
Uploading photos to Facebook is a snap. Here’s how:
- Log in to your personal Facebook account and go to your Page.
- Click the Photos app box below your Cover photo.
- On the new page that appears, click the +Add Photos button on the top-right side of the page.
Yet another new page appears.
- In the dialog box that appears, browse your computer for and select the photos you want to upload.
You can select multiple images by Ctrl-clicking on a PC or
 -clicking on a Mac.
 - While your photos upload, fill in a name for your album (use the strategies described in the preceding section), the location, and the quality.
- Add a description.
This step is very important because this text stays with the photo no matter where it’s viewed. Try to incorporate your full website address or full Facebook Page address. These addresses will be hyperlinked and clickable.
Include the http:// part of your URL, your product name, or contact info in the caption field to make the link clickable, like the one shown in Figure 1-16. - When the photos are loaded, click the Post Photos button.
The album of photos appears on your Page’s Timeline.

Figure 1-16: Adding an http:// link is a vital marketing step.
You also want to designate a photo to be the album cover, which you do by following these steps:
- On your Page, click the Photo app and select the album you want to work with.
You can set the cover only for albums you’ve created. You can’t set a Cover photo for the Cover photos album or Profile pictures.
- Click Edit.
All the images in the album are in view.
- Hover over the image you want to designate as the Cover.
- When a small drop-down arrow appears in the top-right corner of the image, click it and choose Make Album Cover.
- Click Done.
Use Adobe Photoshop or other photo-editing software to create beautifully designed photos that will become your album covers. Upload these photos and select them as the Cover, and you create something very clear and easy to select when viewing and sharing.
If you already have a photo album created and want to add more to that particular album, follow these steps:
- Log in to your Profile and click your Page’s name in the left sidebar.
You’re taken to your business Page.
- Click the Photos app box below your Cover photo.
- On the new page that appears, click the album to which you want to add photos.
The album’s thumbnail images appear.
- Click the Add Photos button in the top-right corner of the Page.
- In the dialog box that appears, browse your computer for the photos you want to upload.
- Follow Steps 5–8 in the steps list at the beginning of the “Uploading photos to your Facebook Page” section.
- Follow the steps in the preceding list to designate a Cover photo.
Sharing your albums and photos
The marketing strategy behind sharing your albums and photos is something that you need to sit down and design. Maybe every Friday you send out a new album or every Tuesday, you post an image of your products that you found around town or in another city.
You can also share this album or individual pictures again, after publishing, from two places:
- Your business Page Timeline: If you see your album or photo on the Page Timeline, you can click the Share link below the photo, as shown in Figure 1-17.
You can put a call to action in the Message field when you share, asking people to share the album with their Friends.
- The album itself: The second way is to go through the album, which we show you in the next set of steps.

Figure 1-17: You can click the Share link below the photo album posted on your Timeline.
To share an album (or individual pictures) after publishing, follow these steps:
- Go to your Page and select the Photos app box.
- Select the album you want to share.
- Click the Share link below the images.
- Choose where to share the album by clicking the drop-down arrow shown in Figure 1-18:
- On Your Own (personal) Timeline
- On a Friend’s Timeline
- In a Group
- On Your Page
- In a Private Message
If you share in a private message, the link to the photo or album will go to the recipient’s Messages section. You can also send the album to folks outside the Facebook platform by using an e-mail address, but they will need to join Facebook to see the picture(s). See the following section for more details.
- Select a viewing option: Public, Friends, Friends Except Acquaintances, Only Me, or any of your personal lists.
- Click the Share Album button.

Figure 1-18: You can share your photo album in several ways.
Sharing with people other than your personal Friends on Facebook
You can send any photo or album directly to anyone other than your personal Facebook Friends by following the steps in the preceding section — except this time, instead of selecting to send it to your own Timeline, choose In a Private Message from the drop-down menu and type an e-mail address rather than a Facebook name. Facebook sends an e-mail with a link to the photo. Note: If the person you send it to is on Facebook, he’ll be able to view it. If he doesn’t have a Facebook account, the link will take him to a Page with the message that he can’t view the photo unless he joins Facebook.
You also have a direct URL to each album that you can send to anyone, and those people will be able to view it. Or you can post anywhere online. To find this direct URL, follow these steps:
- Go to your Page and select the Photos app box.
- Select the photo that you want to share.
- Make sure that you’re viewing the photo (it will be in a lightbox setting).
- Copy the URL of the image from the browser bar.
- Paste the URL in an e-mail message.
- Send the e-mail.
If the person to whom you sent the URL to doesn’t have a Facebook account, she can view the photo anyway as long as you have viewing set to Public. An invitation to join Facebook will be there, too.